
IN THIS CHAPTER
Most of us save our email so we can refer to it at a later date. How long you save messages varies (I have some messages that are about 5 years old), but it is common enough to find several hundred emails in a folder.
Then one day someone refers to an old email, or you remember something in a message and want the details. Opening and reading hundreds of emails is not practical, but using the power of Thunderbird enables you to do these tasks easily.
In this chapter you cover message management. We’ll discuss how you store, filter, sort, and perform other tasks involving your email messages.
Your email folders in Thunderbird are similar to folders you have on your disk drive. The mail folders are located in your profile, with Local Folders being located in a subfolder called mail. This would look like this: profilesxxxxxxxx.defaultmail, where xxxxxxxx.default is your profile.
Under Local Folders, Thunderbird creates some more folders:
Inbox—. The default location in which Thunderbird places your newly received email messages. You can set an option to send incoming emails to a folder specifically for the account or another account’s folders.
Drafts—. Folder where you save messages without sending them. At a later time, these messages can be reopened, edited, and saved or sent.
Templates—. Patterns used to create email messages. The template can have formatting, text, and header information included.
Sent—. Folder where a copy of each email you send is saved. This way, you can later review any messages you have sent.
Trash—. The location where deleted messages are placed. The Trash folder can be emptied explicitly, or Thunderbird can empty the trash when closing.
New folders can be created by right-clicking an existing folder and selecting New Folder in the context menu.
Looking at Figure 11.1, you see Thunderbird, as of the end of the last chapter. You see News & Blogs, Local Folders, a set of folders for one of the two email accounts ([email protected]), and a set of folders for the other email account ([email protected]).

Messages have one label—the subject (this is almost always true because the sender might occasionally forget to enter one). You can, however, add other labeling to your messages in Thunderbird.
Thunderbird allows you to label messages with an attribute, such as the following:
0—None, where there is no special label on the message. This is the default value. Messages with a none label are listed in black text, bold for unread, and normal for read messages.1—Important, for messages you feel are important, or at least more important than others. Important messages are listed in red, so they stand out.2—Work, for messages that are work related. Your work messages are listed in orange.3—Personal, which marks your personal messages to differentiate them from nonpersonal messages. A personal message is listed in green.4—To Do, indicating that you need to do something, such as research and reply, or some other deferred action. A to-do message is listed in blue text.5—Later, which lets you mark a message as being one you will take action on at a later time. Messages marked for later are listed in magenta.
All the label colors can be reset in the Options dialog box (see Figure 11.2). Select Tools, Options in the menu; then click the Display button on the left side of the Options window. Label colors are located near the bottom of the Options window.

Using labels creates visual clues as to the message and what each message’s current state is. If you want to change the descriptive text for the file labels, edit the label’s text. In the figure, I changed the label Important to read Important to Me.
Change the text to whatever text you want to use. Labels can be used to allow you to quickly see messages in a label group by selecting View, Messages in the menu.
To keep things simple, I want to organize my life as much as possible. For example, I teach at the college level and have a folder (named FPC) for messages from the college (students mostly, but occasionally other faculty and staff). That way, I can easily find college-related messages and they don’t get lost in my Inbox.
I can drag and drop messages I want to have moved into the FPC folder, but a better solution is to have Thunderbird do this automatically. The tool for automatically processing a message is called a filter. Most email programs support filters, and Thunderbird is no exception.
A filter starts by looking at the message’s header and body fields. The filter tests the values found with your test value. For example, I would check the Sender field to see whether it contains the text fpc.edu. If the text is found, it is a message from someone at the college and I can move it to the FPC folder. The header fields that Thunderbird checks are
Subject—. The message’s subject field
Sender—. The name and email address of the sender
Body—. The actual message body text (this is significant only if you are fetching both headers and body text)
Date—. The message’s date stamp
Priority—. The message priority, which can be set by the sender
Status—. The message status (junk or not junk)
To—. The specified recipient of the message (which might not be you)
CC—. The courtesy copy list
To or CC—. The To and CC fields, which are both tested
Age in Days—. Messages that are older than the specified number of days
Thunderbird’s filters enable you to do more than just move a message to another folder, however. Filters support the following actions:
Move to folder—. Tells Thunderbird to move the message to the specified folder. Messages can be moved between different accounts. When a message is moved, it is removed from the Inbox and placed in the destination folder.Copy to folder—. Enables you to create a copy of the message and move that copy to another folder. The original message is unaltered and remains in the Inbox.Label the message—. Used with the message labels, described previously in the section “Labeling Messages.”Change the priority to—. Sets the message’s priority to one of the five priority values:Highest,High,Normal,Low, andLowest.Set Junk Status to—. Flags the message as eitherJunkorNot Junk.Mark the message as read—. Sets the message’s status to read (even though you might not have read the message). If the sender has asked for a read receipt, this request is processed as part of this action.Flag the message—. Sets the message flag.Delete the message—. Deletes the message, sending it to the trash folder.Delete from POP server—. If you have left the message on the POP server, delete it there. This does not affect the local copy of the message, if one exists.Fetch body from POP server—. Tells Thunderbird to get the message’s body from the email server. This option is significant only if you have set Thunderbird to retrieve headers and not message bodies.Forward Message to—. With this option Thunderbird forwards any messages that match the filter’s criteria. You specify the email address to which to forward the messages. The only problem with this feature is that you cannot add any body text to the message.Reply with Template—. Most users utilize this as an out-of-office message. However, sometime you might want a standard response sent to the sender of the message.Ignore thread—. Tells Thunderbird to ignore the entire newsgroup message thread; threads are defined as the thread’s initial message and all replies to the message.Watch thread—. Tells Thunderbird that this newsgroup thread is important and that it should track the thread.
With filters, the actions are not exclusive. You can choose one or more actions (such as Move to folder, Mark the message as read, and Change the priority).
To create a message filter, do the following:
In Thunderbird’s Tools menu, select Message Filters.
In the Message Filters dialog box, click the New button.
In Filter Rules, name and create your filter.
Click OK to close Filter Rules, and then click OK again to close Message Filters.
Creating a filter is probably easier done than said, and after you create your first filter, the next one will be easier.
Tip
When using filters, you should check to see that the filter is doing what you expect—at least for the first few times the filter is used.
For my email, I use about 15 filters. These filters look at subjects, senders, who the message is being sent to, and other information. Then most messages are moved to folders based on the results of these tests. Some messages are deleted, although that is an action that must be used carefully so as not to lose any important messages. (I usually delete messages that contain sexual terms; drug names; or words such as mortgage, loan, free, opt-out, and a few other words or phrases I have found to be common in spam.)
Each filter is applied in order, so a message processed with an earlier filter might not necessarily be processed with a later filter—for example, when the earlier filter deletes the message.
After you have filtered your messages, you can organize them, too. Sorting and grouping are valuable tools.
Message sorting is an often-ignored but very powerful tool. The easiest sort is to click the various message list headers, such as subject, sender, date, and so on. Click one time to sort in ascending order and a second time to toggle the ascending/descending order.
Most Thunderbird users have only a few columns displayed, and using the click-to-sort technique is useful only if the column to be sorted is displayed. Sometimes you sort on fields other than those you can see; to do this, you use a more advanced sort technique.
In Thunderbird’s View menu, you can select Sort by (see Figure 11.3). Under Sort by is a list of fields: Ascending, Descending, Threaded, Unthreaded, and Grouped By Sort.

The fields are mutually exclusive, as are Ascending/Descending and Threaded/Unthreaded/Grouped By Sort. Thunderbird allows sorting on only one field at a time.
The three mutually exclusive options (Threaded, Unthreaded, and Grouped) let you organize messages either by topic (threaded) or into groups.
For example, you can sort by date and then group based on that sort. This could result in groups for old mail, last week, yesterday, and today. Grouping by sender would create groups for each sender. Any field that can be sorted can also be grouped.
Tip
You can add fields (columns) in the view by clicking the button at the far right of the view’s header bar. This button is to the right of the Date column in Figure 11.3.
Thunderbird supports two searches. The first enables you to search for specific messages. The second searches addresses in any of your address locations.
Both searches are useful, but I find I search messages much more frequently than I search the addresses.
The Search Messages dialog box is displayed when you select Edit, Find, Search Messages in Thunderbird’s menu (see Figure 11.4). In this figure I searched for either eBay or PayPal and got seven matches (all phishing emails, too). The Search Messages dialog box is divided into two halves: The top is where you enter your search criteria, and the lower half is where the results of the search are displayed.
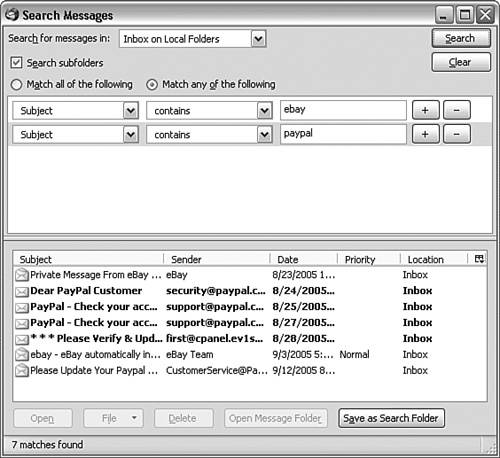
In the top half, you choose which folder (and subfolders, if desired) you will be searching for. Then you select a field (these are the same fields you filter and sort on), the search condition (Contains, Doesn’t Contain, Is, Isn’t, Begins with, or Ends with), and the text to search for. A search can look for multiple items in multiple fields; however, these search criteria must either match all (an AND search) or match any (an OR search).
After the search has successfully found messages, in the bottom half of Search Messages you can select a message(s) and open, file, delete, or save them as a search folder. If you select only one message in the list of results, you can also choose to open the message’s folder.
In addition, a quick search is located at the right end of the view bar. If you are doing a simple search, this tool might be faster than the more complex Search Messages dialog box.
Search folders are folders that contain the results of a search. The contents of a search folder are not actual messages, but are virtual copies of the messages. If you delete a search folder, the messages listed in it are not deleted. However, if you delete a specific message (or messages), the original message is deleted as well, so be careful. The same is true about other message modifications; these affect the original message, as well.
A search folder is dynamically updated. This means that new messages are searched as they arrive and, if the search is successful, they go into the search folder. You do not have to manually update the search because Thunderbird does this automatically for you.
When you are through with the search folder, you can right-click it and select Delete Folder from the context menu. This is a permanent deletion; the search folder is lost and cannot be recovered from the Trash folder.
The Advanced Address Book Search dialog box is displayed when you select Edit, Find, Search Addresses in Thunderbird’s menu (see Figure 11.5). This dialog box is divided into two halves just as Search Messages is. The top is where you enter your search criteria, and the lower half is where the results of the search are displayed.

Figure 11.5. This search was for all names that have either a 1 or a 2 as part of the email address.
In the top half, you choose which address book (the Personal Address Book, all imported address books, or collected addresses) you will be searching. Then you select a field (these are the same fields you see in your address books, such as Name, Display Name, Email Addresses, and so on), the search condition (Contains, Doesn’t Contain, Is, Isn’t, Begins with, Ends with, or Sounds Like), and the text to search for. A search can look for multiple items in multiple fields, but these search criteria must either match all (an AND search) or match any (an OR search).
When the search has successfully found address book entries, in the bottom half of Advanced Address Book Search you can select an address (or addresses) and select Write to compose an email (see Figure 11.5). If you select only one message in the list of results, you can also choose to view that entry’s properties.
Searching addresses is also possible while composing a message. If you type the first few characters of an address into the Compose window, a drop-down appears listing all the address book names that match those few characters (see Figure 11.6). Then simply click the name to be used (or press Tab) to select the default (first entry).

Figure 11.6. I typed Pe. Thunderbird then displayed all the names that begin with these two characters and made the first one the default.
Of course, to search for addresses there must be something to search—the Thunderbird Address Books.
Thunderbird has two default address books: your Personal Address Book (abook.mab) and the Collected Addresses address book (history.mab). Additionally, there might be other address books, with various names, created when address books from other applications are imported. All address book database files have an extension of .mab (Mozilla Address Book).
You can move or copy an address book from one Thunderbird profile to another by simply copying the abook.mab and history.mab files to the new profile. (You should do this before using the other profile’s address books because the originals would be lost.)
The other, imported, address books can not be copied from one profile to another. This is due to the fact that the linkages to tell Thunderbird about these additional address books are located in prefs.js. Rather than attempt to modify prefs.js, it is usually easier to export the address book (to an LDIF file) from the first profile and then reimport it into the second profile.
Another issue is backups of the address books. Each address book can be backed up by exporting the address book to an LDIF file and then backing up the LDIF file to a disk, CD-R, or other external media.
To export an address book, do the following:
Open the Address Book window by selecting Tools, Address Books in the Thunderbird menu.
Click the address book to export.
Click Tools in the Address Book window (not the Thunderbird window), and select Export.
Provide a unique name for the exported address book.
Repeat this process for all the address books you have, including the Personal Address Book and the Collected Addresses address book.
Reimporting an exported address book is similar. Just follow these steps:
Open the Address Book window by selecting Tools, Address Books in the Thunderbird menu.
Click Tools in the Address Book window (not the Thunderbird window), and select Import. The address book information will be imported into a new address book named the same name as the import file.
Following the import, you can either rename the newly created address book or copy the entries into one of your other address books.
Repeat this process for all the address books you want to import.
If you find that you don’t have a good backup of your custom and imported address books but the profile will no longer load, there is a procedure to try to recover these lost address books. One suggested technique is to follow the instructions at http://kb.mozillazine.org/Moving_address_books_between_profiles. Another suggestion is to do this:
Create a new, blank profile.
Exit Thunderbird.
In the profile, rename the
abook.mabfile to a temporary name—for example,temp-abook.mab(see step 10).Copy your custom or imported address book from the old, nonworking profile to the new profile and rename this file
abook.mab.Open Thunderbird and open the Address Book window. Check the Personal Address Book and see whether your original addresses are in the file. If they are, follow the next steps (and if not, try the hyperlink noted previously).
Create a new address book. In the Address Book window’s menu, select File, New, Address Book. Give this new address book the name of your old address book (or any other name you want to use).
Copy all the names from the Personal Address Book to your newly created address book.
Exit Thunderbird.
Rename the
abook.mabfile to a different name. This file will not be used except as an emergency backup.Finally, rename the address book file you renamed in step 3 (
temp-abook.mab) toabook.mab.
With just a tiny bit of luck, you should have recovered your custom or imported address book.
Thunderbird’s address book features are powerful, flexible, and easy to use.
Here are a few ideas from the experts:
Thunderbird enables you to have multiple sets of folders. Each email account can have its own inbox, and sets of folders or accounts can share folders.
You can label a message in Thunderbird to indicate which type of message it is, including personal, work-related, important, or a task you want to do at a later time.
By filtering messages, you can automatically process messages, file them into folders, and perform other actions on your incoming email.
With message sorting and grouping, you can order your messages and group them into logical groupings.
Thunderbird has a powerful and flexible search feature. This search lets you quickly find information in emails.
With Thunderbird’s search folders, you have a way to save a search and reuse it at a later time. Search folders are dynamically updated as new email arrives.
You can delete a message’s attachment leaving the message body intact. This keeps your mail box size in check, while allowing you to keep a historical copy of the message.
Your Thunderbird address books enable you to organize your addresses and other useful information such as telephone numbers and even some custom information.