
IN THIS CHAPTER
Firefox uses extensions to enhance its functionality. An extension is a package consisting of chrome modifications and executable content (usually in JavaScript). Extensions are installed using the Extensions Manager, found on the Tools menu.
Extensions provide varied functionality enhancements, variety, and versatility. There are navigation extensions, humor extensions, searching extensions, and so on—in all, there are about 20 categories of extensions for Firefox. The actual number of possible extensions is impossible to estimate. The Mozilla website has perhaps 500 extensions for all its products, with many more posted on its developer’s website.
In this chapter we will cover tools and extensions for extension development. We’ll also discuss the Extensible User Interface Language (XUL), JavaScript, and resources for extension developers.
First, the suggestions in this section are not absolute. You can install and configure Firefox differently and still be a successful extension developer. However, my experience has taught me that these steps are very useful in starting extension development.
I recommend a new, clean installation of Firefox. If Firefox is already installed, I recommend uninstalling it and checking to make sure the Firefox program folder has been deleted.
Next, delete your profiles! Back them up if you want, so you can later reinstall them, but for now, you will want a clean profile.
After you have uninstalled Firefox and cleared all your profiles, reinstall Firefox.
Now, your Firefox installation will have all components from the same installation source, thereby avoiding corrupt installation files. As well, because the profiles will be clean, you will be starting out clean.
After you have installed Firefox, launch it. Firefox will go to the default home page. In the Location bar, type about:config to go to the preferences configuration page. You will change several preferences to values that improve your development environment.
Tip
Generally, the only extensions you want installed in Firefox when developing are those that are specifically intended to assist you in creating your extension. Delete any other extensions.
In the about:config window, check the following preferences. Set them as indicated, and then restart Firefox. (Restarting ensures that your changes have taken effect.)
If you determine any preferences are missing during the Firefox installation, add them using about:config. Check the following preferences:
nglayout.debug.disable_xul_cache = true—Setting this preference totrueturns off the XUL cache. Any XUL changes made will not require that you restart Firefox.browser.dom.window.dump.enabled = true—Setting this preference totruecauses thedump()statement to print to the JavaScript Console. You must restart Firefox with the–consoleoption to use this preference. Try creating a shortcut icon on your desktop with the–consoleoption added to the command line (see Figure 16.1).javascript.options.showInConsole = true—This preference enables the JavaScript Console to log chrome errors.javascript.options.strict = true—With this preference, warnings are also sent to the JavaScript Console. This can generate more messages because warnings for all the extensions are sent to the JavaScript Console, not just those generated by your extension.
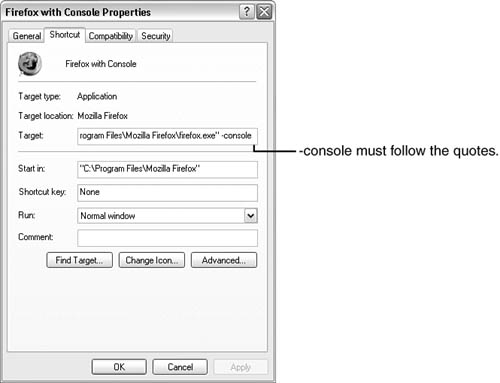
The two JavaScript preferences require that you run Firefox with the console for them to be useful. To start Firefox with the console active, modify your desktop shortcut to Firefox as shown in Figure 16.1. Add –console after the final quotation mark in the Target string. If you add it before the final quotation mark, it will not work.
Caution
Of all these settings, nglayout.debug.disable_xul_cache is the most vital. Failing to disable the XUL cache can result in some very strange behavior when modifying your extension.
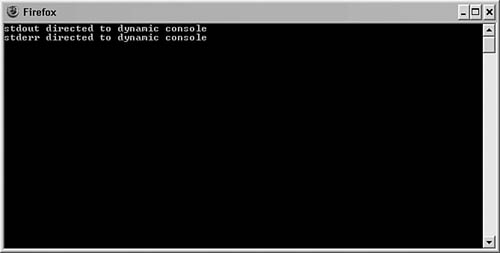
Now, start Firefox one final time. Check about:config to be sure your four development preferences are correctly set. Switch to the console and see what it looks like. Figure 16.2 shows the Firefox console during a run of Firefox.
There are several useful development tools, most of which are implemented as Firefox extensions.
Prior to starting development, go to Mozilla’s Firefox extensions page and see which developer extensions are currently available. Check this page frequently because the list changes often.
The following section contains information on the Extension Developer extension. This particular extension, designed for extension developers, can save you a great deal of time if used properly.
One of the most useful tools for extension development is the Extension Developer. This tool was written by Ted Mielczarek and can be downloaded at http://ted.mielczarek.org/code/mozilla/extensiondev/.
Extension Developer installs a new pop-up menu under Firefox’s Tools menu selection. The eight choices in this menu are
Extension Builder
Toggle Debugging Prefs
JavaScript Shell
JavaScript Environment
JavaScript Injector
HTML Editor
XUL Editor
Reload All Chrome
You can quickly try each of these options, as described in the following.
The Extension Builder is the most powerful and useful feature of Extension Developer. Shown in Figure 16.3 is the dialog box that appears when this feature is selected.
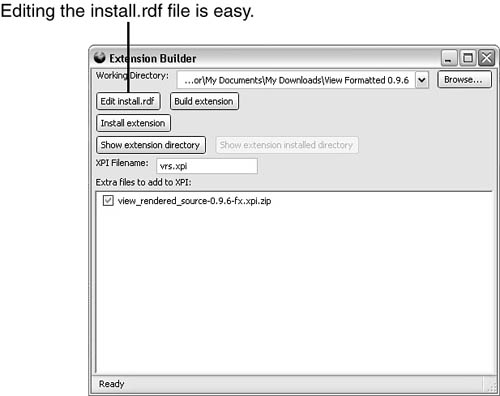
Figure 16.3. One useful part of Extension Builder is its capability to edit the install.rdf file automatically.
Other features of the Extension Builder include the capability to build the extension, install it, determine its folder location, and show its installed folder.
The install.rdf editor is able to read the extension’s install.rdf file. All extensions must have an install.rdf file (this file tells Firefox all about the extension).
In the previous section, “Preferences for Extension Developers,” you set some preferences when developing extensions. The Extension Developer’s menu item Toggle Debugging Prefs toggles three of the four recommended extension building preferences:
nglayout.debug.disable_xul_cachebrowser.dom.window.dump.enabledjavascript.options.showInConsole
Being able to toggle these preferences is important because, when they are set, Firefox performance can be seriously compromised.
The one preference that is not toggled is javascript.options.strict. If your extension uses JavaScript and you are encountering problems, manually enable javascript.options.strict preference, as earlier described.
Sometimes the JavaScript Console’s one-line JavaScript evaluator is not sufficient for testing pieces of JavaScript code. The JavaScript Shell interface can be very useful in such cases.
In Figure 16.4, the JavaScript Shell was started. The first six lines in the window are welcome text, complete with some links (including Math, help, and enumerate Windows()).
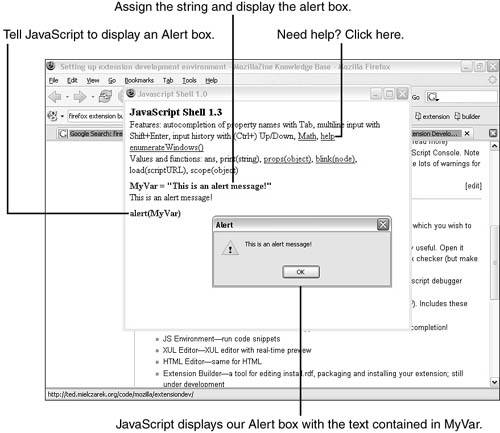
Figure 16.4. The variable MyVar is assigned a string; then MyVar's contents are displayed in an Alert box.
The steps to display the Alert box shown in Figure 16.4 are shown here:
On the seventh line,
MyVar = "This is an alert message!"is the first line typed into JavaScript Shell’s window.The JavaScript Shell responds by printing the new value of
MyVar, in the eight line.In the final line,
alert(MyVar)is typed and Enter is pressed. The Alert box is displayed, using the text you saved inMyVar.
If you click the help link (end of the third line), a short but useful help page is displayed. After using this small window for a while, you might find that it is indispensable when developing simple JavaScript code.
The JavaScript Environment is similar in concept to the JavaScript Shell. The most important difference is that the JavaScript Environment allows you to develop more complex JavaScript code.
The JavaScript Environment window is shown in Figure 16.5. In this example, I’ve written a simple JavaScript program that prints the squares of numbers between zero and five. (When you start the JavaScript Environment, you will see the inspiration for this program.) To make this example a bit more than trivial, I’ve created a function to do the square function.
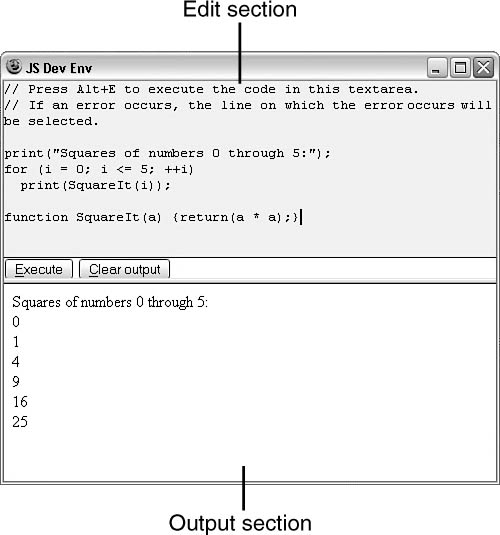
Figure 16.5. In the JavaScript Development Environment window, the top half is the window where you enter your code.
Here's my sample code:
print("Squares of numbers 0 through 5:");
for (i = 0; i <= 5; ++i)
  print(SquareIt(i));

function SquareIt(a) {return(a * a);}
This small JavaScript program created the results shown in Figure 16.6.
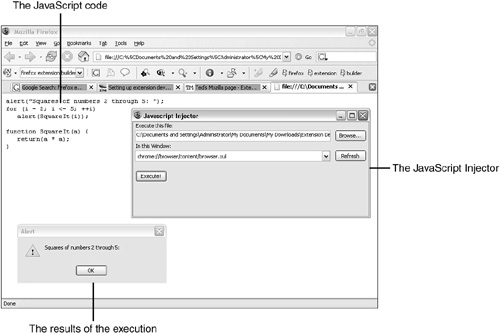
The JavaScript Injector enables the user to execute JavaScript that has been saved in a file. This allows easy testing of complete JavaScript files without having to cut and paste.
Shown in Figure 16.6 is Firefox with a small sample JavaScript program. This program is similar to the one in the previous example; however, the previous example’s print() statements have been replaced with alert() statements. This was done because the JavaScript Injector runs the JavaScript program in a true JavaScript environment, whereas the other two examples have a text output area available.
In the end, all three of these JavaScript tools are very useful.
Much like the JavaScript Shell, the HTML Editor has a window with two sections. In the upper section you enter your HTML code, and in the bottom, as you are working, you will see the rendered results of the HTML.
This small tool supports clipboard copy and paste, letting you easily move HTML code into and out of the HTML Editor. (This is important because there is no file Open, Save, or Close command.)
Figure 16.7 shows the HTML Editor with a small piece of HTML that was lifted from my cooking web page.
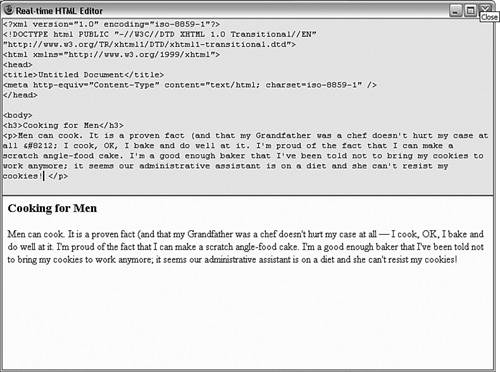
Figure 16.7. This HTML was created completely in the Real-time HTML Editor. If you are a guy and think you can’t cook, think again.
The Real-time HTML Editor gives you immediate feedback by showing what the HTML code will look like in a browser window.
When you find that JavaScript won’t do everything you want (and JavaScript is limited, intentionally), the next avenue to greater functionality is XUL. XUL allows for easy development of platform-independent user interfaces, although Java and JavaScript must still be relied on for much of the underlying functionality.
In Firefox, click Edit in the menu for an example of a menu using XUL. It is not a part of Windows. Firefox doesn’t use the Windows GUI interface except for client output. Everything you see in the Firefox window—the menu, the toolbar(s), the status bar, and so on—is a creation of Firefox. Most Windows applications use Windows to display titles, menus, toolbars, and the like. That is fine for those applications, but Firefox was designed to be platform independent.
Someday most applications will use XUL—a victory for developers who don’t want to be tied down to a specific operating system. The XUL Editor is shown in Figure 16.8. This code example is a bit more complex than our previous JavaScript examples, but it does more. Though not obvious, our XUL example uses JavaScript.
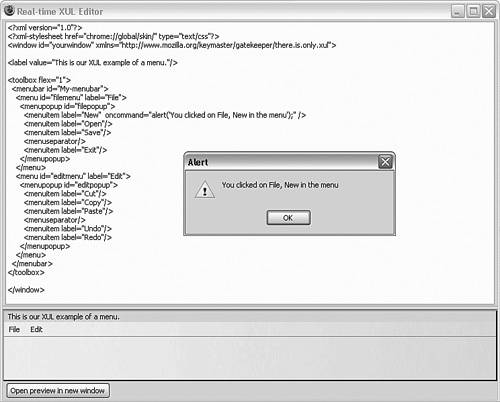
Figure 16.8. XUL frees you from the operating system, just like the operating system frees you from the hardware.
To be more readable, this simple bit of XUL code is shown in Listing 16.1. In this code, several items are highlighted in bold; these are areas that deserve closer inspection.
Example 16.1. The Sample XUL Code from Figure 16.8
<?xml version="1.0"?>
<?xml-stylesheet href="chrome://global/skin/" type="text/css"?>
<window id="yourwindow" xmlns="http://www.mozilla.org/keymaster/gatekeeper/there.is.only.xul">

<label value="This is our XUL example of a menu."/>

<toolbox flex="1">
  <menubar id="My-menubar">
    <menu id="filemenu" label="File">
      <menupopup id="filepopup">
        <menuitem label="New" oncommand="alert('You clicked on File, New in the menu')," />
        <menuitem label="Open"/>
        <menuitem label="Save"/>
        <menuseparator/>
        <menuitem label="Exit"/>
      </menupopup>
    </menu>
    <menu id="editmenu" label="Edit">
      <menupopup id="editpopup">
        <menuitem label="Cut"/>
        <menuitem label="Copy"/>
        <menuitem label="Paste"/>
        <menuseparator/>
        <menuitem label="Undo"/>
        <menuitem label="Redo"/>
      </menupopup>
    </menu>
  </menubar>
</toolbox>

</window>
In Listing 16.1, we have added code to the file menu’s New command. Added is an oncommand attribute. The data assigned to the oncommand attribute is what will happen when the user selects (clicks) this item. In this example, "alert('You clicked on File, New in the menu')," is JavaScript code. I enclosed the entire item in double quotation marks. Usually, a text literal passed to the JavaScript alert() function is enclosed in double quotation marks, but because this entire item is in double quotation marks, I instead used single quotation marks for the alert()’s parameter.
After you get used to using XUL, you will find it easy to create user interface functionality using a combination of XUL and JavaScript.
Chrome is the look and feel of an application’s user interface. Colors, button shapes, fonts, sizes, and so on are all specified as parts of chrome. Chrome is always affected by themes and, to a lesser extent, by extensions. This lesser extent is typically parts of chrome that are directly part of the extension’s functionality (such as added dialog boxes, menu items, and so forth).
When Firefox loads, it loads the chrome. From then until Firefox closes, Firefox does not change the chrome. When a new theme is selected, Firefox implements the theme when it restarts. The same is true in regard to extensions—extensions are loaded and configured at startup, not during the normal operation of Firefox.
The Extension Developer extension forces Firefox to reload the chrome without a restart. The concept is that this makes developing extensions (and themes) much faster. At least that is the idea.
My experience has been that developing extensions can be a risky process. Not only can you load the extension you are developing and have Firefox crash, but you also can damage the profile. In fact, it is too painfully easy to corrupt a profile when developing extensions.
If you are willing to take the risk that a reloading of the chrome might not resolve some problems your extension has caused but that you might not realize have occurred), you should try the Reload All Chrome option.
Two consoles are available to extension developers. The first console is the Firefox Console, which receives messages relating to errors in Firefox. The second console, the JavaScript Console, specifically displays errors relating to JavaScript. Both are vital to creating extensions.
The Firefox Console is a separate window started when the Firefox command contains the switch –console.
The Firefox Console displays the streams stdout and stderr in a simple, display-only window (refer to Figure 16.2). Both stdout (which is short for standard output) and stderr (which is short for standard error) are terms that are inherited from the C and Unix days.
Note
Both stdout and stderr are from pre-Windows days. Back when we used command prompts, characters, terminals, and graphics were what we put on the wall and called art. Ah, the good old command prompt days….
It was common to redirect either (or both) to files, but in today’s Windows GUI environments, we don’t have a console or any way to easily grab this valuable information. The Firefox Console solves this problem in a crude but usable way.
stdout is the nonerror output from a number of I/O statements. stderr is error output, either specifically written to stderr by the program or from runtime functionality’s error trapping routines.
The JavaScript Console serves a function very similar to that of the Firefox Console. The JavaScript Console receives error message information from JavaScript about errors and other problems that occur in JavaScript code.
Unlike the Firefox Console, though, the JavaScript Console has some management tools. There are controls to restrict how much information is displayed (All, Errors, and Warnings and Messages) and a Clear button. Plus, the JavaScript Console allows copying information about an error to the Windows clipboard so it can be pasted into other applications if necessary.
The JavaScript Console can be displayed in a Firefox sidebar (see http://www.digitalmediaminute.com/article/1348/updated-open-firefox-javascript-console-in-a-sidebar), as a separate window (select JavaScript Console in the Tools menu), or in a tab (by creating a new tab and entering the following URI in the Location bar):
chrome://global/content/console.xul
Figure 16.9 shows the JavaScript Console displayed as a separate window (go to the Tools menu and click JavaScript Console).
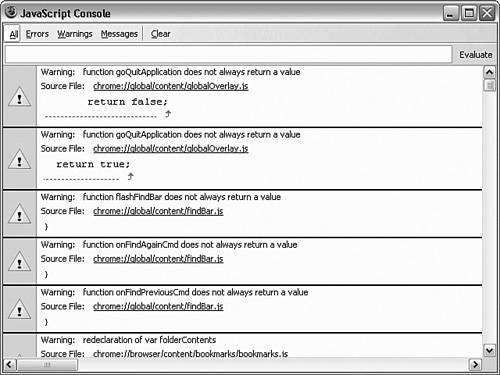
At the top of the screen are the buttons that limit the display to either a severity level or all messages and a Clear button to clear the console’s display. Below these buttons is a small text area in which you can type a JavaScript statement and have it evaluated by either clicking the Evaluate button or pressing the Enter key.
Another powerful advantage of the JavaScript Console is that it provides information about errors in a consistent format. Each error has a severity level symbol (Error, Warning, or Message), an error description, an error source (usually a file), along with optional error-specific information.
The filename for the error is a link to that file. Click the filename, and the file is opened in a browser window.
Tip
Programmers love to indent their code using tab characters. (Indenting is vital to creating readable code.) I’m going to suggest that you not put tabs in any files you use when creating your extensions. Instead, use spaces to indent.
Many of the error-reporting tools display a pointer to the exact place in the file where the error occurred. This pointer might not reflect the correct position if there are tabs in the source line.
When developing extensions and themes, it can be useful to have several copies of Firefox running at the same time.
However, if you attempt to run a second copy of Firefox, all that typically happens is that you are switched to the currently running copy—not what you want in this situation.
Mozilla has taken care of this problem. There is a way to force Firefox to open a second independent copy of itself on demand. And, this small feat of magic is easy to do.
Multiple instances of Firefox are allowed when the environment variable MOZ_NO_REMOTE exists and is set to a value of 1. You can do this in one of two ways. One way is to create a batch script file with the following two lines:
Set MOZ_NO_REMOTE=1
Firefox %1 %2 %3 %4 %5
Save this file as firefox2.bat (or any other name you find suitable, as long as you use .bat for the extension).
Next, run this batch file in a command prompt window (go to the Start menu and select All Programs, Accessories, Command Prompt). Or, from the Windows run command box (go to the Start menu and select Run), you can enter the following command:
Firefox2 –p my_second_profile
where my_second_profile is the name of a profile different from the profile the other copy of Firefox is running. If you fail to specify a profile that is not in use, Firefox might prompt for one.
Note
You can’t run two copies of Firefox using the same profile. Plan ahead and create a clone of your profile, so you won’t have to reinstall extensions and themes when using these techniques.
The second method is to set a permanent user environment variable, as the following steps show:
Open the Windows Control panel.
Double-click System.
Click the Environment Variables button at the bottom (just above the OK button).
In the top section, labeled User Variables for, click New (see Figure 16.10).
In the Variable Name box, type
MOZ_NO_REMOTE.In the Variable Value box, type
1.Click OK to save this variable; then click OK to close the Environment Variables window.
Click OK to close the System window, and close the Windows Control panel.

After you finish adding the new environment variable, all that is necessary to start another copy of Firefox is to click the Firefox icon!
Firefox makes extensive use of XUL. In the previous section, “Extension Developer,” the effect of a simple XUL fragment was shown. Of course, that example is not a full application, but it does show what XUL can do.
XML User Interface Language (XUL), which is based on XML, has a syntax that at first glance seems similar to HTML. This syntax is made up of events, widgets, tags, and data. There are some rules that are global and must be followed. Four basic rules are
Events and attributes must be in lowercase only. No mixed case, except for quoted strings, is allowed.
Strings must be double quoted.
Widgets must have close tags. Valid close tags are
<tag>,</tag>, and<tag/>.Attributes, when specified, must be assigned a value.
Earlier in “XUL Editor,” you created a simple window with a menu. The code was shown previously in Listing 16.1. Now let’s take a closer look at this code, on a line-by-line basis:
<?xml version="1.0"?>
This is an application directive specifying the XML version.
<?xml-stylesheet href="chrome://global/skin/" type="text/css"?>
This is another application directive specifying the stylesheet used.
<window id="yourwindow" xmlns="http://www.mozilla.org/keymaster/gatekeeper/there.is.only.xul">
This creates the window and gives it the ID "yourwindow". The XML name space (xmlns) is also specified.
<label value="This is our XUL example of a menu."/>
This creates a label at the top of the window. We specify the text in double quotation marks.
<toolbox flex="1">
Next, we create a toolbox that holds one or more toolbar widgets. The flex="1" part describes how unused space is divided between children.
<menubar id="My-menubar">
This creates a container that will hold menu items.
<menu id="filemenu" label="File">
This line creates a top-level menu item labeled File.
<menupopup id="filepopup">
Next, we create a pop-up menu (one that drops down, actually) that is displayed whenever the user clicks the top-level menu item, Files.
<menuitem label="New" oncommand="alert('You clicked on File, New in the menu')," />
Our first pop-up menu item is labeled New and has an action that takes place when the user clicks it. The action is a JavaScript alert() box displaying the text specified.
<menuitem label="Open"/>
<menuitem label="Save"/>
These are the two additional pop-up menu items. Neither has an action that will take place when it is clicked. Eventually, however, it will be necessary to write the handlers.
<menuseparator/>
A menu separator draws a line between pop-up menu items.
<menuitem label="Exit"/>
This is the last pop-up menu item.
</menupopup>
This line closes the pop-up menu.
</menu>
And this line closes the File menu.
<menu id="editmenu" label="Edit">
Next, we create a second top-level menu item named Edit.
<menupopup id="editpopup">
  <menuitem label="Cut"/>
  <menuitem label="Copy"/>
  <menuitem label="Paste"/>
  <menuseparator/>
  <menuitem label="Undo"/>
  <menuitem label="Redo"/>
</menupopup>
This adds a pop-up menu to our Edit menu. None of these items have any actions written for them yet.
</menu>
This ends the Edit menu.
</menubar>
And this ends the menu bar.
</toolbox>
Now we end the toolbox.
</window>
And finally we end the window definition. (A copy of this script is available on the book’s website at http://www.quepublishing.com/title/0789734583.)
The best source of reference information for XUL is http://www.xulplanet.com.
Java or JavaScript? And, what’s the difference?
Java is a programming language developed and controlled by Sun Microsystems. It is proprietary, licensed, and readily available on a number of platforms.
JavaScript was developed by Netscape as a scripting language for its browsers.
The difference between Java and JavaScript is roughly the same as the difference between C/C++ and Java (or C/C++ and JavaScript). There are similar syntax requirements, and some of the names are the same (or sufficiently similar that it is easy to figure out what’s what). For many years, C and C++ have been the programming languages of choice for many applications and systems. Unix, Linux, and Windows contain extensive C and C++ code. Even Firefox has thousands of C and C++ source files.
I’m including a simple JavaScript reference here. For a more complete reference, try http://wp.netscape.com/eng/mozilla/3.0/handbook/javascript/, which contains tutorial and reference sections. JavaScript supports operations (assignments, math, and so on), conditionals (if, loop, and so forth), objects, and functions. JavaScript statements are
break—This immediately ends awhileorforloop.comment—This inserts a comment into the JavaScript code.continue—This ends the current iteration of a loop and begins a new iteration. Essentially, it skips following statements.for—This is a basic looping structure in which the start, condition, and increment can be specified.for...in—This iterates the variable for all properties in an object.function—This creates a function that can be called from multiple locations. Optionally, it returns a value.if...else—This is the basic conditional test block.new—This creates a new array, Boolean, date, functions, math, number, or string object.return—This returns from a function, optionally passing back a return value.this—This is a reference to the current object.var—This declares and initializes a variable. It is not an error to initialize a variable, but it is bad programming practice.while—This creates a conditional loop structure that is executed as long as the condition is true.with—This allows you to specify a default object for a collection of statements.
The Firefox window object is used to create all windows in Firefox. They can be manipulated as a whole (such as applying a theme) or individually (adding a menu item or button to one window), as the developer desires.
Take a look at Firefox’s main window. It has a title bar, a menu bar, toolbars, scrollbars, status bars, and other features. When a window is created, its feature can be specified. Features are classified into three broad categories:
Position and size—. Enable the specification of a window’s size and position.
Toolbars and chrome—. Control which features (as mentioned previously) the window will have.
Window functionalities—. Used to describe how the window will behave. These include resizing, scrollbars, and other similar functions.
A good reference on the windows object is at http://www.mozilla.org/docs/dom/domref/dom_window_ref.html.
Each extension is ultimately identified by a complex number called a globally unique identifier (GUID). Any extension you write will need its own GUID, and it is best to not make one up. The reasons to have GUIDs are found in the history of software development and how components such as software interact with each other and the operating system.
As computers have become more complex, the use of names to describe unique content, features, and functionalities has become problematic. Names created by independent parties who were developing these features often were identical to names from other developers. Usually, this similarity was unintended, but the results were that Windows (and applications) often got confused as to which object was being referred to because two items had the same name.
As a solution, Microsoft created a methodology to ensure that every component had a unique name that would never be duplicated under normal circumstances. These identifiers were first used with Object Linking and Embedding (OLE) to allow objects to be embedded into documents. Each object needed a global identifier that never changed for that object (even between two computers) and was unique. Enter the GUID, a system that was initially set up by Microsoft and adopted by many others along the way.
A GUID is a 16-byte (128-bit) number. In reality, a GUID is divided into groups of 8 hexadecimal digits, 4 hexadecimal digits, 4 hexadecimal digits, 4 hexadecimal digits, and 12 hexadecimal digits. Neither the value nor the position of any part of the GUID is significant—nor is there any meaning for the groupings.
A GUID is generated, under optimal conditions, by taking the generating computer’s Ethernet or Token Ring hardware address (the NIC MAC address, a value that in itself is unique to this one computer), the current time, and a pseudorandom number. All three are mixed together with a bit of programming magic to create a GUID. We are guaranteed that no two computers will have the same NIC MAC address. Even if there were to be two identical MAC addresses, it is very unlikely that both would try to generate a GUID at the same time or that the pseudo number portion would be the same. This makes GUIDs sufficiently unique so that we will never have duplicate GUIDs. There are GUID generators that do not use the NIC’s MAC address; therefore, these GUIDs cannot be guaranteed to be unique. However, the likelihood of duplication is remote at best.
For example, Firefox’s GUID is {ec8030f7-c20a-464f-9b0e-13a3a9e97384}. Usually an application does not change GUIDs unless it changes sufficiently that compatibility issues would result from it being confused with earlier versions of the same application.
GUID generators are available online. The website at http://www.hoskinson.net/webservices/guidgeneratorclient.aspx creates all the GUIDs you might ever want. However, should you not trust an outside source to generate your GUIDs, you can get your own GUID generator from Microsoft (GUIDGEN.EXE is part of Visual Basic 6’s tools pack).
For the sample extension, GUIDGEN.EXE is used. Figure 16.11 shows the results of generating the GUID.
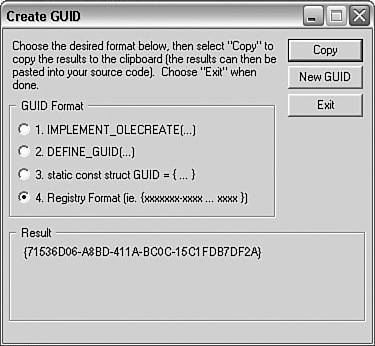
The GUID shown is the one used in this chapter’s example.
Firefox offers a few command-line options. Some are useful for developers, and having shortcuts for these options can make the process of developing an extension much easier.
The following table lists Firefox startup options.
Option | Description |
|---|---|
| Runs Firefox using the debugging console. The console provides error message output. |
| Forces the locale to be the one specified in |
| Creates a profile named |
| Displays a list of Firefox command options. |
| Makes Firefox’s window height equal to |
| Tells Firefox to install the extension pointed to by |
| Tells Firefox to install the theme pointed to by |
| Starts Firefox with the specified profile. |
| Starts Firefox with the profile pointed to by |
| Starts Firefox with the Profile Manager. |
| Starts Firefox with the Profile Wizard. |
| Starts Firefox with all extensions disabled. This is used to recover from an extension that keeps Firefox from starting. |
Starts Firefox, first displaying the Profile Select dialog box. | |
| Forces the Firefox user interface to be the one for the specified locale. |
| Starts Firefox and displays the URL provided. This option does not use a dash prefix. |
| Prints the Firefox version. |
| Makes Firefox’s window width equal to |
With the introduction of Firefox version 1.5, extension development has been made a bit easier. The contents.rdf files are gone, replaced by an easier-to-understand chrome.manifest file.
In the following paragraphs, you will build a simple extension that works with most versions of Firefox below version 1.5 and a second extension for Firefox version 1.5 and later. The basic functions of these two extensions are identical: You add a menu item and a call to a relatively trivial JavaScript piece of code. These examples have been kept as simple as possible, with the intention that they be easy to learn and implement. After you gain more experience, you can either add to these examples or create your own from scratch.
First, we will describe items that are common to all versions of Firefox. Following this, we will discuss the version-specific bits and pieces.
You will need a few helper batch files. One batch file will package your extension, creating your JavaScript Archive (JAR) contents file and the extension’s XPI installation file. This batch file will then call another batch file that will clear Firefox’s profile, restoring it to a known starting point. For extensions, the best starting point is with no extensions or themes installed.
First, start Firefox with the -profilemanager command-line option. This starts the Profile Manager. In the Profile Manager, create a new profile, naming it Testing Profile.
Next, set your development preferences as described previously in the section “Preferences for Extension Developers.” If you want to set a home page, do so now. After your preferences (and home page, if desired) are set, exit Firefox. Some developers might want to also load the Extension Developer extension; if you do, do this before exiting Firefox. Restart Firefox and ensure that your setup is what you want and that any necessary extensions are loaded (and functional). Then exit Firefox again.
Now you will create a backup copy of your profile.
The easiest way to back up your profile is to open a Windows Explorer window and navigate to Firefox’s profiles folder (for example, in Windows XP, it’s Documents and Settingsuser-idApplication DataMozillaFirefoxProfiles). Right-click the profile you created—there should be only one profile at this point if you have started with a clean Firefox installation and deleted any preexisting profiles. Next, drop it in the same folder and select Copy Here from the pop-up context menu Windows Explorer displays. You will then have a second copy of the profile with an additional extension of .bak added to the profile’s name. Make a note of this backup copy’s name. Now repeat the copy again and save the third copy with the extension .backup. This third copy is your emergency recovery copy.
Next, you need to configure a development folder.
You must create a folder to hold your new extension. Although you probably will develop your extension by using an existing extension as a foundation to build upon, let’s take a look at what the folder structure for this sample extension looks like.
Your new extension needs a name. I’ve picked the name MyExtension as the name for the extension. After you have a name for the extension picked out, the extension will need a home. The name for this top-level folder is not critical. Other subfolder names will be significant, but the topmost level folder can have any convenient name, usually the same name as your extension.
Note
There is nothing to say that your extension can not have more folders than those described here. However, most extensions have these two subfolders as a minimum. As well, none of the folder names are absolute—you can use other names if you want. The names given here are simply those used by many developers of Firefox extensions.
In My Documents, I created my MyExtension folder. In this folder we need two subfolders. The first is named content, and the second is called chrome. We now have these folders:
MyExtensionMyExtensioncontentMyExtensionchrome
Contained in the root folder will be two or three project files: the install.rdf file, the extension’s .xpi file, and (for Firefox 1.5 and later) the chrome.manifest file.
Caution
Windows programmers are used to having filenames and folder names that are not case specific. So, for a Windows programmer, MyExtension is the same as myExtension and myextension.
However, Firefox might not always be so forgiving. A good rule of thumb is to be case conscious when working with Firefox extensions.
The content folder is where you will put your working copies of the extension’s files.
In MyExtension the three files in the contents folder are
contents.rdf(for versions of Firefox before 1.5)myextension-Overlay.xulmyextensionOverlay.js
More complex extensions will have more files in the contents folder.
With the folders created, next you need a few files. Your extension is rather simple, so you only have a few files that must be created for it.
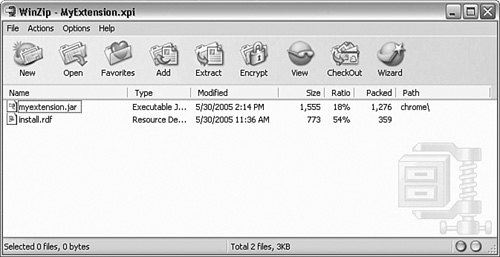
All extensions are distributed using XPI files. The definition of an XPI file is that it is a Mozilla extension distribution file, although that tells little of what it really is.
XPI files are, for all intents and purposes, simply renamed Zip files. You can create them in several ways. My method uses the WinZip command-line interface driven by a batch file. (I will go more into depth regarding this batch file later in this chapter.)
Contained in the XPI file will be a minimum of two files:
The
install.rdffile that describes to Firefox the extensionThe extension’s JAR (JavaScript Archive) file
For versions of Firefox from 1.5 onward, the
chrome.manifestfile
More complex extensions might have other files that are used as part of the installation process. An example is the Google Bar extension that also has install.js and googlebar.js.
All the root files in the XPI file are used for the extension’s installation. The extension’s actual functionality is always contained within the JAR file.
The following paragraphs cover the contents of the XPI file for this chapter’s extension project (see Figure 16.12).
Contained within the extension’s JAR file are all the files that make up the extension. Some of the files often found in a JAR file include XUL, RDF, JavaScript, and various image files.
The files contained in this extension’s JAR file are shown in Figure 16.13.
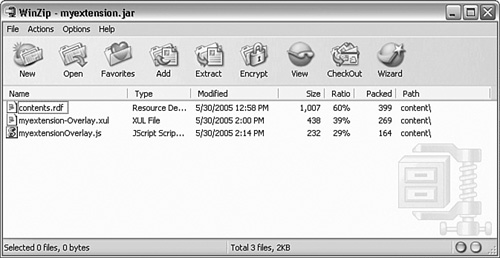
There will be two or three files in the JAR:
contents.rdf—This file contains information about the extension. This file is required, with this name. Contained in thecontents.rdffile is an extension description and the extension’s internal name. This file also contains information regarding the extension’s XUL file. This file should be found only in extensions for Firefox versions 1.0.x and earlier.myextension-Overlay.xul—Contained in themyextension-Overlay.xulfile are instructions telling Firefox what functionality the extension will modify or enhance. This file’s name must match the name specified in thecontents.rdffile.myextensionOverlay.js—In this chapter’s extension, there is a simple JavaScript file. This file’s name is specified in the extension’s XUL file and might not be found in every extension.
A few other files can be used to streamline the extension packaging process. If you want to use it, the Extension Developer extension also provides this functionality.
The first supporting file is named makexpi.bat (see Listing 16.2). This is a command batch file that calls the command-line version of WinZip to create both the JAR file and the XPI file. Optionally, this batch file can do other cleanup tasks as well. Comments have been added to this file to make its function clearer.
Note
The makexpi.bat file depends on WinZip and the command-line interface. Both are available at the WinZip website (http://www.winzip.com). By default, WinZip and the command-line interface, wzzip.exe, are installed in C:program fileswinzip. If you want to use another Zip-type program, such as TUGZip, makexpi.bat must be modified accordingly.
Example 16.2. The makexpi.bat File
@echo off If X%1 == Xhelp ( Echo makexpi [firefox] Echo where specifying firefox builds for Firefox 1.1.x and later. Echo if no parameter is specified this will build Echo a Firefox version 1.0.x and earlier Echo extension. goto end ) REM the debug.txt file holds the output from all the commands. REM This keeps execution cleaner. time /T >debug.txt REM - Create the JAR file first. WinZip will add or create as necessary. echo Refreshing the JAR file! >>debug.txt REM This line is for versions of Firefox 1.0.x and earlier. If X%1 == Xfirefox ( "%programfiles%WinZipwzzip" -a -r -P chromemyextension.jar contentmyextensionOverlay.js contentmyextension-Overlay.xul >>debug.txt ) else ( "%programfiles%WinZipwzzip" -a -r -P chromemyextension.jar content >>debug.txt ) REM - Build the XPI file echo Refreshing the XPI file! >>debug.txt If X%1 == Xfirefox ( "%programfiles%WinZipwzzip" -a -r -P MyExtension.xpi chromemyextension.jar chrome
In Listing 16.3, you must change the parts in bold to whatever filenames you want for your extension.
Example 16.3. The clearprofile.bat File
@echo off Rem you *must* fix the profile name below (in bold) to match your profile name! RD /s /q "%appdata%MozillaFirefoxProfilesjvaofcos.Testing Profile" MD ""%appdata%MozillaFirefoxProfilesjvaofcos.Testing Profile" xcopy /s /y ""%appdata%MozillaFirefoxProfilesjvaofcos.Testing Profile.bak" "%appdata%
In Listing 16.3, you must change jvaofcos.Testing Profile to reflect the name of the Firefox profile you created for testing and debugging purposes.
Firefox 1.0.x represents versions of Firefox before 1.5. Some users have not switched to Firefox 1.5 due to concerns that their favorite extensions and themes will not be compatible with the newer version.
Firefox 1.0.x does not support the chrome.manifest format (we’ll talk about chrome.manifest later). Thus, any extension for these platforms require the more complex contents.rdf file. This makes these extensions slightly more complex.
First, for your extension, you will create some folders. The first folder will be the extension’s root folder. In the extension root folder, you will create two additional folders, chrome and content.
In this example, you have to create or modify four files: install.rdf, contents.rdf, myextension-Overlay.xul, and myextensionOverlay.js. I’ve listed each of these files in the following sections, showing the parts that are relatively generic and those areas that you’d rewrite or enhance for your extension.
The install.rdf file is the file Firefox uses to install the extension (see Listing 16.4). This file describes the extension and provides Firefox with the name and location for the extension’s JAR file.
Example 16.4. install.rdf
<?xml version="1.0"?>

<RDF xmlns="http://www.w3.org/1999/02/22-rdf-syntax-ns#"
     xmlns:em="http://www.mozilla.org/2004/em-rdf#">

   <Description about="urn:mozilla:install-manifest">
     <em:id>{71536D06-A8BD-411a-BC0C-15C1FDB7DF2A}</em:id>
     <em:version>0.1.05</em:version>
     <em:targetApplication>
       <Description>
         <em:id>{ec8030f7-c20a-464f-9b0e-13a3a9e97384}</em:id>
         <em:minVersion>0.9</em:minVersion>
         <em:maxVersion>1.0</em:maxVersion>
       </Description>
     </em:targetApplication>
     <em:name>My Extension</em:name>
     <em:file>
       <Description about="urn:mozilla:extension:file:myextension.jar">
         <em:package>content/</em:package>
       </Description>
     </em:file>
   </Description>
</RDF>
In the install.rdf file, you must provide a new GUID for your extension. My GUID was 71536D06-A8BD-411a-BC0C-15C1FDB7DF2A, and it is in bold in the listing. Please don’t just change a few numbers trying to make your own GUID; use a generator as described previously to make a new GUID.
The minVersion and maxVersion need to be changed to reflect for which versions of Firefox your extension is designed. The defaults in Listing 16.4 are what you should use for versions of Firefox before 1.5.
The name My Extension should be changed to the name of your extension. Spaces are acceptable, and no quotation marks are needed.
The JAR filename, myextension, must be the same as the JAR file created by makexpi.bat.
The contents.rdf file needs some modifications, as shown in Listing 16.5.
Example 16.5. contents.rdf
<?xml version="1.0"?>
<RDF:RDF xmlns:RDF="http://www.w3.org/1999/02/22-rdf-syntax-ns#"
      xmlns:chrome="http://www.mozilla.org/rdf/chrome#">

  <RDF:Seq about="urn:mozilla:package:root">
    <RDF:li resource="urn:mozilla:package:myextension"/>

 </RDF:Seq>

 <RDF:Description about="urn:mozilla:package:myextension"
   chrome:displayName="My Extension"
   chrome:author="Peter D. Hipson"
   chrome:authorURL="http://www.hipson.net"
   chrome:name="myextension"
   chrome:extension="true"
   chrome:settingsURL="chrome://myextension/content/settings/settings.xul"
   chrome:description="Add a menu item to Files in Firefox.">
 </RDF:Description>

 <RDF:Seq about="urn:mozilla:overlays">
   <RDF:li resource="chrome://browser/content/browser.xul"/>
 </RDF:Seq>

 <!-- overlay information for Mozilla Firebird-->
 <RDF:Seq about="chrome://browser/content/browser.xul">
   <RDF:li>chrome://myextension/content/myextension-Overlay.xul</RDF:li>
 </RDF:Seq>
</RDF:RDF>
In Listing 16.5, the lines starting with chrome: should be changed as appropriate. The chrome:name value should match the name in chrome:settingsURL and in the chrome://myextension line.
The myextension-Overlay name should match the name of your extension’s XUL file. Mozilla conventions say that overlay should be part of the name.
You need to modify the myextension-Overlay.xul file as shown in Listing 16.6. This filename needs to match the name in the contents.rdf file (refer to Listing 16.5). This file is identical for all versions of Firefox.
Example 16.6. myextension-Overlay.xul
<?xml version="1.0"?>

<overlay id="MyExtensionOverlay"

xmlns="http://www.mozilla.org/keymaster/gatekeeper/there.is.only.xul">

// Include the Javascript

  <script type="application/x-javascript"
  src="chrome://myextension/content/myextensionOverlay.js">
  </script>

  <menupopup id="menu_FilePopup">
    <menuitem label="My Extension" position="1" oncommand= "myextensionmessage();" />
  </menupopup>
</overlay>
In the myextension-Overlay.xul file, you must give the overlay a name. Change MyExtensionOverlay to a name that suits your extension’s name.
In the chrome: line, the myextension should be changed to match the chrome:name in the contents.rdf file.
The menuitem line needs to reflect whatever chrome changes your extension is doing. I’m adding a menu item, but you might be doing something different. The myextensionmessage() call to JavaScript must match your JavaScript functions, if you use JavaScript, or whatever way you choose to add functionality to the menu item.
The myextension.js file contains the JavaScript code to give my extension its functionality (see Listing 16.7). In the listing, you would rename it to match the name in the myextension.xul file. This extension is trivial—it just displays a message box using the JavaScript alert() function call. This file is the same for all versions of myextension.
Example 16.7. myextension.js
// An example of some JavaScript functionality.
// You could code virtually any functionalty that
// JavaScript supports here:

function myextensionmessage() {

    alert("         ...and, it worked!         ");
}
If you decide to use JavaScript in your extension, you could use this file to hold your JavaScript functionality. As extensions grow more complex, additional JavaScript source files might need to be added.
Firefox 1.5 and later versions are compatible with extensions written for earlier versions of Firefox. However, it is best to adhere to the new extension conventions as described here.
In this sample extension, both myextension.js and myextension-Overlay.xul won’t change based on versions of Firefox. For the contents of these two files, refer to the previous section.
In addition to these two files, two other files exist in the Firefox 1.5 version of this sample extension. One file (install.rdf) will be modified, whereas the other (chrome.manifest) will be added to your extension. The file contents.rdf is no longer used. If Firefox finds a contents.rdf file and does not find chrome.manifest (for example, an old extension written for earlier versions of Firefox), a chrome.manifest file is created from the contents.rdf file.
Because some of the changes to install.rdf will be new even to experienced extension writers, let’s cover them in detail. First, Listing 16.8 shows the new install.rdf file.
Most of the changes in install.rdf involve the addition of lines and some minor rearranging of content.
Example 16.8. install.rdf
<?xml version="1.0"?>

<RDF xmlns="http://www.w3.org/1999/02/22-rdf-syntax-ns#"
     xmlns:em="http://www.mozilla.org/2004/em-rdf#">

  <Description about="urn:mozilla:install-manifest">
    <em:id>{71536D06-A8BD-411a-BC0C-15C1FDB7DF2A}</em:id>
    <em:version>0.1.05</em:version>
    <em:targetApplication>
      <Description>
        <em:id>{ec8030f7-c20a-464f-9b0e-13a3a9e97384}</em:id>
        <em:minVersion>1.0</em:minVersion>
        <em:maxVersion>1.5+</em:maxVersion>
      </Description>
    </em:targetApplication>

    <!-- Front End MetaData -->
    <em:name>My Extension</em:name>
    <em:creator>Peter D. Hipson</em:creator>
    <em:description>Add a menu item to Files in Firefox. </em:description>
    <em:homepageURL>http://www.hipson.net</em:homepageURL>
    <em:updateURL>http://www.hipson.net</em:updateURL>

    <em:file>
      <Description about="urn:mozilla:extension:file:myextension.jar">
        <em:package>content/</em:package>
      </Description>
    </em:file>
  </Description>
</RDF>
In addition to the name and GUID changes outlined in Listing 16.8, in versions of Firefox earlier than 1.5, you need to make the following changes to your install.rdf file.
You should create a new section, preceded by the following comment line:
<!-- Front End MetaData -->
This comment indicates that data for your extension follows. Next, add four lines that take data that was in your contents.rdf file and place them in install.rdf. The format of the lines will change—we are only interested in the extension-specific data that has been highlighted in the listing.
The <em:name>My Extension</em:name> remains the same as the previous example:
<em:creator>Peter D. Hipson</em:creator>
The em:creator line takes the data that was in the contents.rdf file’s chrome:author line. No quotes are needed for this field:
<em:description>Add a menu item to Files in Firefox. </em:description>
The em:description line takes the description that was in the chrome:description line in the contents.rdf file:
<em:homepageURL> http://www.hipson.net</em:homepageURL>
The data in em:homepageURL is the chrome:authorURL data from contents.rdf:
<em:updateURL>http://www.hipson.net</em:updateURL>
The em:updateURL data was not present in the sample contents.rdf file and simply specifies where to look for updates to this extension.
The chrome.manifest file is new to Firefox 1.5 (see Listing 16.9). It is intended to replace the complex and often problematic contents.rdf file with something that’s easier to work with.
This file, in this example, has just two lines, making it considerably shorter than contents.rdf. The file is a simple text format, created with Notepad or your favorite text editor.
Example 16.9. chrome.manifest
overlay chrome://browser/content/browser.xul chrome://myextension/content
A chrome.manifest file has, at a minimum, the lines shown in Listing 16.9. Some additional lines might be present in a more complex extension’s chrome.manifest file.
These potential lines are listed in the following, along with a description. Compare these specification lines with the lines in Listing 16.9 to see how the parameters would change. Items in bold would change to match your extension.
The content package line describes the extension (packagename) and the location of the extension’s JAR (or other content) file:
content packagename path/to/files
In the chrome.manifest file, the path/to/files was jar:chrome/myextension.jar!/content/. The exclamation point after the JAR file’s extension is required, so don’t forget it.
The locale package line specifies the locale name and the path to that locale’s files. This line is required in chrome.manifest:
locale packagename localename path/to/files
An example of this line is locale myextension en-US jar:en-US.jar!/locale/en-US/myextension. In this example, en-US is the locale identifier for English in the United States. The en-US.jar file is the JAR file containing elements specific to the locale and the location in that JAR file of the necessary content. This file is optional in chrome.manifest.
The skin package line specifies the extension’s skin (think theme) location. Again, it includes the package name and a path to files that would be similar to that in the previous examples:
skin packagename skinname path/to/files
The XUL overlay package line specifies the extension’s XUL overlay’s location. There is a path to the chrome for this extension:
overlay chrome://file-to-overlay chrome://overlay-file
An example of this line from chrome.manifest is
overlay chrome://browser/content/browser.xul chrome://myextension/content
This code gives the information provided in the contents.rdf file’s overlay section.
Many extensions modify the Cascading Style Sheets (CSS) used by Firefox. The style overlay line provides this information in a format similar to the previous overlay line:
style chrome://file-to-style chrome://stylesheet-file
Firefox is a multiplatform product, meaning it will run on Windows, Linux, and Mac OS/X. If your extension is specific to one of these platforms, add the keyword platform at the end of the content lines.
More complex extensions have multiple occurrences of these lines in chrome.manifest. If you want to learn more about chrome.manifest, go to http://www.mozilla.org/xpfe/ConfigChromeSpec.html.
Here are a few ideas from the experts:
To prepare for extension developing, it is important to set up the development environment. A clean (new) installation of Firefox, with a clean (never used) profile, can make debugging much easier.
Some preferences make extension development much easier. These, used in conjunction with Firefox command-line options, make testing easier.
A number of extensions have been created just to help others create their extensions. One notable extension is the Extension Developer extension.
Firefox has a debugging console that is displayed when Firefox is started with the
-consoleoption.Developers can set an environment variable to allow multiple instances of Firefox to run. Normally, Firefox runs only one instance (copy) at a time.
Programs and objects are uniquely identified using a GUID. There are programs to create GUIDs and websites that will create GUIDs online.
Understanding Firefox command options is important for developers. Having shortcut icons on the desktop preconfigured for these options lets you easily launch Firefox with an option.
Extensions have a basic arrangement and names for the extension’s folders. Following these conventions makes an extension’s development easier.
The
chrome.manifestfile is new to Firefox 1.5. This file is designed to replace thecontents.rdffile with a file that is easier to work with.