
Now that we understand the general developer flow a bit more, let's take a deeper dive into using some of the tools and approaches that you can use.
In this case, we will be using the following tools to populate and manage the content of our chosen Source Control repository, in this case, Git. To provide an easy means to explore the benefits of a more distributed solution, we will use GitHub as a hosted instance of Git (others are available, including broader developer flow features):
- GitHub: Ensure that you have a GitHub account. Public accounts are free, but you can also use a private account for the purposes of this chapter. Download the excellent GitHub GUI from either https://desktop.github.com/. This chapter will use the Mac edition, though not to the level that it will not be possible find and perform equivalent operations in the Windows edition; both clients are really easy to use!
- Apache Ant v1.9 or greater: To determine if you have this already installed; type in
ant -versionat the terminal prompt to confirm. If not, you can download it from http://ant.apache.org/. - Force.com Migration Toolkit: This can be downloaded from https://developer.salesforce.com/page/Tools. The instructions in the read me file recommend that you copy the
ant-salesforce.jarfile into your Apache Ant installation folder. I do not recommend this and instead prefer to capture build tools like this in a/libfolder located within the source code. This makes it easier to upgrade for all developers in a seamless way, without having to perform the download each time. - Force.com IDE: The Force.com IDE is an open source project run by Salesforce. It gets regular updates and improvements, such as support for developing Lightning Components and the only interactive Apex Debugger (talk to your Salesforce contact for access). For more information and download instructions visit https://developer.salesforce.com/page/Force.com_IDE.
A key decision when populating your Source Control repository is the folder structure.
The following table shows one structure that you might want to consider:
If you want to follow through the steps in this chapter, follow on from the source code as contained within the chapter-12 branch. If you would rather review the end result, skip to the chapter-13 branch in the sample code repository to review the build.xml and package.xml files.
Perform the following steps to create the new repository and clone it, in order to create a local repository on your computer to populate with initial content:
- Log in to your GitHub account from your web browser and select the option from the dropdown next to your user to create a new repository. Also select the option to create a default
READMEfile.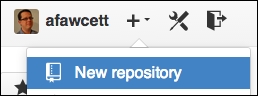
- From the web browser project page for the new repository, locate the Clone or download button on the right-hand side bar towards the bottom of the page. Click the Open in Desktop button on it to open the GitHub desktop client and begin cloning the repository, or open the GitHub desktop client manually and select the Clone to Computer option.
- The preceding clone process should have prompted you for a location on your hard drive in which the local repository is to be stored. Make a note of this location, as we will be populating this location in the following steps.
- Create a
/libfolder in the root of the repository folder. - Copy the following files from the
/libsample code folder from this chapter into the new/libfolder created in the previous step:- Copy the
ant-salesforce.jarfile - Copy the
ant-salesforce.xmlfile - Copy the
ant-contrib-1.0b3.jarfile
- Copy the
- Create a
/srcfolder in the root of the repository folder. - Copy the
build.xmlfile that you have been using from the previous chapters into the root of the repository folder.
In this chapter, we will update the Ant build.xml script file to allow it to deploy the application source code into new Developer Edition orgs as needed. Before this, we will use the Ant sf:retrieve task provided by the salesforce-ant.jar file to retrieve the latest content of our FormulaForce package, which you have been developing so far, in the form of component source files, which we will migrate to Source Control.
Note
Note that we are performing this step due to the approach we have taken in this book, which is starting with development in the packaging org. If you are not starting from this point, you can create a /src folder and the package.xml file as described manually. That being said, you might want to make some initial inroads within the packaging org to establish a package and namespace with some initial objects.
The following build.xml target retrieves the content of the package defined in the packaging org and populates the /src folder. Make sure that your Package name is called FormulaForce. If not, update the packageNames attribute as follows:
  <target name="retrieve.package">
     <sf:retrieve
        username="${sf.username}"
        password="${sf.password}"
        retrieveTarget="${basedir}/src"
        packageNames="FormulaForce"/>
</target>Perform the following command (all on one command line) with your own username, password, and token to execute the retrieve target. Ensure that you have changed the location to the root folder of your local repository first:
ant retrieve.package
   -Dsf.username=yourusername
   -Dsf.password=yourpasswordyourtoken
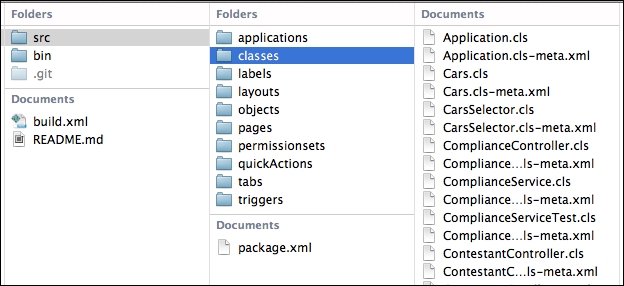
You should see something like the following in your local repository folder:
Note
You might find references to the package namespace present in the code and metadata files retrieved. These should be removed, otherwise the files might not deploy or execute within an unmanaged developer org. You can use file search utilities to find such references. For example, open the /layouts/Contestant__c-Contestant Layout.layout file and search for QuickActionName, then remove the namespace reference.
Before we are ready to commit this to your local repository (required before you can upload or push to the GitHub remote repository), open the package.xml file created by the retrieve operation and convert it to a more generic form. The one created by the preceding process contains explicit lists of each of the components in the package.
This means that if developers add new component files within the subfolders such as /classes, /pages, and /objects for example, they will not be subsequently deployed automatically without first having to update the package.xml file.
To avoid the developer from having to remember to do this, the package.xml file can be updated to use wildcards instead. For example, open the package.xml file and replace explicit references with wildcard characters, as shown in the following examples:
    <types>
        <members>*</members>
        <name>ApexClass</name>
    </types>
    <types>
        <members>*</members>
        <name>ApexPage</name>
    </types>
    <types>
        <members>*</members>
        <name>ApexTrigger</name>
    </types>
Also remove the fullName, apiAccessLevel and namespacePrefix tags from the package.xml file. Repeat the preceding approach for most of the component types in the package.xml file, not just the ones shown earlier as examples, with the exception of those that are known as child components.
If you compare the preceding example with the package.xml file created previously, you will note that some of the components in the original package.xml file are child components of the CustomObject component, such as FieldSet, WebLink, CustomField and ListView. Also multiple entries for CustomLabel are not needed. Thus, they don't need wildcard entries at all as they will be deployed through their parent file, for example, via the CustomObject component's .object file, which contains fields.
Note that the actual list of components contained within the FormulaForce package still resides in the packaging org. The role and purpose of the package.xml file within Source Control is different and is more optimized for developer org deployments.
Finally, commit and sync the preceding changes to your local repository using the GitHub UI tool and upload or push (to use the correct Git term). If you run the tool, you should see that it is already reporting that new files have been detected in the repository folder on your hard disk, as shown in the following screenshot of the Mac version of the tool. Simply enter a summary and description and click on Commit & Sync.
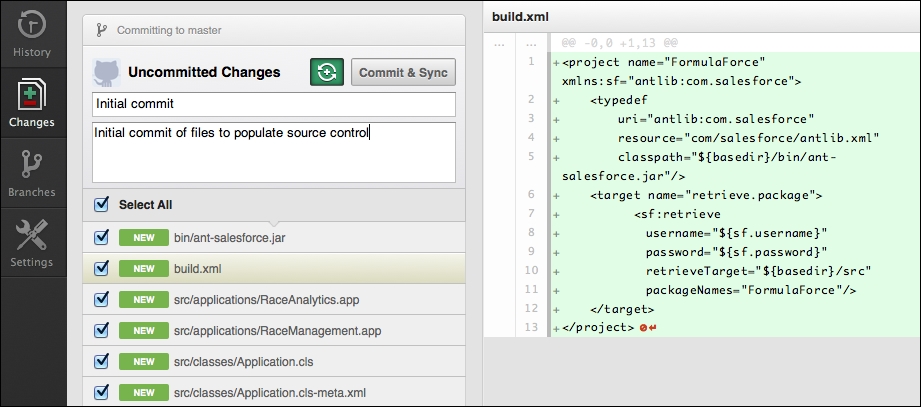
Note that this will both commit to the local repository and be pushed to the remote repository in one operation. Typically, developers would work on a set of changes and commit locally in increments, before deciding to push all changes as one operation to the remote repository.
Note
If you're not familiar with Git, this might seem a bit confusing, as you have already physically copied or updated files in the repository folder. However, in order to push to the remote Git repository stored on the GitHub servers, you must first update a local copy of the state of the repository held in the .git folder, which is a hidden folder in the root of your repository folder. You should never edit or view this folder as it is entirely managed by Git.
Now that we have our initial Source Control content for the application created, let's deploy it to a developer org. Before we do this, we will update the build.xml file to clean the org (in case it has been used to develop an earlier build of the application).
Salesforce does not provide an Ant task to completely clean a developer org of any previously deployed or created components. However, it does provide a means via its Force.com Migration Toolkit to deploy what is known as a destructivePackage.xml file, which has a list of components to delete. Unfortunately, this needs a little help when there are component dependencies present in the org. FinancialForce.com has provided an open source solution to this via an undeploy.xml Ant script, which wraps this process and resolves the dependency shortcomings.
Download the following files from the /lib folder of the FinancialForce.com repository (https://github.com/financialforcedev/df12-deployment-tools), and place them in the /lib folder created earlier, along with the ant-salesforce.jar file:
exec_anon.xmlundeploy.xmlxmltask.jarml-ant-http-1.1.3.jarant-contrib-1.0b3.jar
Next, the Ant script is updated to default by executing the existing deploy target (used to deploy the sample source code from previous chapters). Then, by importing the preceding tasks into the build file, the undeploy target becomes available as a dependent target to the deploy target, which means that it will be called before that target is executed. The following sample build script highlights these changes:
<project name="FormulaForce"
   xmlns:sf="antlib:com.salesforce" default="deploy">
  <property name="sf.server"
    value="https://login.salesforce.com"/>
  <import file="${basedir}/lib/exec_anon.xml"/>
  <import file="${basedir}/lib/undeploy.xml"/>

  <target name="deploy" depends="undeploy">
    <sf:deploy
        username="${sf.username}"
        password="${sf.password}"
        serverurl="${sf.server}"
        runAllTests="true"
        deployRoot="${basedir}/src"/>
  </target>

</project>
Execute the following command (all on one command line) to run the preceding script (make sure that you use your developer org username, password, and token):
ant
	-Dsf.username=yourdevusername
	-Dsf.password=yourdevpasswordyourdevtoken
Note
It appears to output quite a lot of messages to the console due to the complexity of the undeploy target being executed. After a few moments, it will begin executing the deploy target. Once you receive confirmation that the entire script is successfully complete, you can confirm that the application has been deployed by logging into the org.
Once you're happy that the build.xml file is working fine, go back to the GitHub UI application and, as before, use the Commit and Sync button to commit your changes and push to the GitHub server's remote repository.
Congratulations! You have now left home (the packaging org) and moved out into your own brand new developer org. This also means that you can now allow other developers to start work independently on your code base by following the same developer flow using their own developer orgs.
Note
Salesforce does not automatically grant access to applications, tabs, pages, objects, and fields deployed using the Migration Tool. So, you will find that before you can see these components, you need to assign your Permission Sets to your developer org user. Doing this is a good way to ensure that these are kept up to date with new components and are valid. In general, testing as a system administrator is not a reliable confirmation of your application working in an end-user scenario. This is why Salesforce has adopted this policy—to make the developer think about which permissions need to be applied, even in a developer org.
Now that you have moved out of the packaging org and into a developer org, you will no longer be developing or executing code within the associated namespace context that it provides. If you recall back to the chapter around execution contexts, remember that the debug logs from Apex code executed in the packaging org had two namespaces referenced: the packaging org one and the default one. While everything runs in this namespace implicitly in the packaging org, nothing would ever run in the default namespace.
As you will have noticed, when writing the Apex code in the packaging org, you don't have to prefix Custom Objects or fields with that namespace the way you would have to in a subscriber org where your package was installed. Instead, in the packaging org, this is done implicitly on the whole, which made it easier to export into Source Control, as the target developer org environments do not have the namespace assigned to them (because it can only be assigned once).
When developing and executing code in a developer org, everything runs in the default namespace. Keep in mind the following differences when developing in a developer org:
- Apex features that can help implement Application Apex APIs such as the
@deprecatedannotation and theVersionclass that are not supported outside of the packaging org and results in compilation failures in the developer org. The main downside here is the lack of ability to use the@deprecatedattribute as you want to retire old Apex APIs. Behavior versioning using theVersionclass is not something I would recommend for the reasons outlined in Chapter 9, Providing Integration and Extensibility. - Apex tests that utilize Dynamic Apex to create and populate SObject instances and fields will need to dynamically apply the namespace prefix by autosensing, whether the Apex test is running in a namespace context or not. The following code snippet is a good way to determine whether the code is running in a namespace context or not. You can place this in a test utility class:
DescribeSObjectResult seasonDescribe = Season__c.SObjectType.getDescribe();
String namespace = seasonDescribe.getName().removeEnd(seasonDescribe.getLocalName()).removeEnd('__'),
- Apex tests that utilize
Type.forNameto create instances of Apex classes (for example, a test written for an application plugin feature) will also need to dynamically apply the namespace prefix to the class name given to the plugin configuration (such as the custom metadata type featured in Chapter 9, Providing Integration and Extensibility).
Later in this chapter, we will discuss Continuous Integration. This process will automatically perform a test deployment and execution of Apex tests in the packaging org and thus continue to ensure that your tests run successfully in the namespace context.
The Migration Toolkit actually wraps the Metadata API with some handy Ant tasks that we have been using in the preceding Ant scripts. The toolkit itself is written in Java and complies with the necessary interfaces and base classes that the Ant framework requires, to allow XML elements representing the tasks to be injected into the build scripts such as the sf:retrieve and sf:deploy tasks.
While you can apply the same approach as Salesforce to develop your own Ant tasks for more custom tasks relating to your application and/or automation of common tasks during setup or deployment, you will need to be a Java programmer to do so. As an alternative and with the addition of a few supporting Ant tasks (those copied into your /lib folder), you can actually call these APIs directly from the Ant scripting language.
In a previous chapter, we saw how Ant macros can be written to call the Metadata API's package install and uninstall capabilities, this was achieved without Java code. This capability from Ant can be quite useful if you are developing an application that extends another package, as you can easily automate installation/upgrade of the package(s) ahead of the deployment by extending the deploy script we ran earlier.
The open source exec_anon.xml file from FinancialForce.com imported earlier into the build.xml file actually contains within it an Ant macro that leverages the Tooling API's ability to call the Apex code anonymously, much like the Force.com IDE and developer console tools offer.
In previous chapters, we leveraged the SeasonService.createTestSeason method to create test record data in the application's Custom Objects. Using the Ant executeApex task, this can now be called from the Ant script in order to autocreate some useful data in a developer org. This approach will help developers, testers, or business analysts to easily try out or demonstrate the new features from the latest builds with the manual data setup as follows:
<target name="deploy" depends="undeploy">

  <sf:deploy
      username="${sf.username}"
      password="${sf.password}"
      serverurl="${sf.server}"
      deployRoot="${basedir}/src"/>

   <executeApex
       username="${sf.username}"
       password="${sf.password}">
     SeasonService.createTestSeason();
   </executeApex>

</target>Once the application is deployed to a developer org, you have a number of options and tools to choose from as you then proceed in developing on Force.com. Your choices impact the way in which your changes find their way back into your Source Control repository. Making sure that everyone in the development team is crystal clear on this aspect of the development workflow is not only important to their efficiency, but also helps prevent work being lost or rogue files finding their way into Source Control.
Browser-based tools such as the Setup menu and Schema Builder provide an easier way of editing Custom Objects, Fields, Layouts, and Permission Sets than their XML-based formats. However, for other aspects of development the browser-based developer console is not to everyone's liking when it comes to editing Apex and Visualforce code. I personally prefer a desktop tool such as Force.com IDE to edit these types of files.
You can either the browser- or desktop-based approaches exclusively or in combination. It is important to keep in mind which approach is automatically keeping your local repository files in sync with the org and which is not.
- Browser-based development: Any changes that you make via the browser-based tools (including developer console) will remain in the developer org and will not automatically find their way to your local repository folder, thus, they are not visible to the Git tools for you to commit to Source Control.
- Desktop-based development: If you're using a desktop tool such as Force.com IDE, mapped to your repository local folder location, edits you make here will automatically sync between your local repository folder and your developer org by such tools.
- Browser and desktop-based development: This option allows the developer to make the best use of the tools at their disposal, albeit at the cost of some complexity and additional consideration when it comes to gathering all the changes to commit to Source Control.
To download the changes that you have made using the browser-based development tools to your local repository folder, an Ant script and the Migration Toolkit can once again be used by applying a similar approach to that used when initially downloading the contents of the package from the packaging org using the sf:retrieve Ant task earlier.
The following Ant script will refresh the contents of the /src folder based on the component types listed in the package.xml file (again you might need to add new component types to this file from time to time as you make use of new platform features):
<target name="retrieve">
  <sf:retrieve
      username="${sf.username}"
      password="${sf.password}"
      serverurl="${sf.server}"
      retrieveTarget="${basedir}/src"
      unpackaged="${basedir}/src/package.xml"/>
</target>
To run the preceding target, use the following command (all on one command line):
ant retrieve
-Dsf.username=yourdevusername
-Dsf.password=yourdevpasswordyourdevtoken
Once this command completes, you can use the Git tools to review changed files, accepting, ignoring, or discarding (reverting back to the last committed version) accordingly. These are some use cases you might encounter with this approach and ways to handle them:
- Additional files downloaded: Wildcards are used in the
package.xmlfile, as described earlier, to make it easier to add and remove files. The downside is that for some components such as application and layout, you might find that some of the standard files for these get created in your repository folders as well. One solution is to drop using wildcards for these metadata types and the other is to leverage the.gitingorefile to prevent these files from being candidates for commits. With the GitHub UI tool, you can right-click on these files and select Ignore. This will create a.gitignorefile if one does not already exist and add the appropriate file to it. As this file is also committed into the repository, you only have to do this once. - Differences in file content order or additional elements: Sometimes file changes are flagged up by the Git tools when you have not directly made modifications to the corresponding component in the browser tools. This can be the case after a platform upgrade when new features arise or an org-wide configuration change is made (such as switching on the Multi-Currency support), or on occasions when the order of the XML elements have changed, but the overall effect on the object is the same. If you experience these changes often and they result in a change that you're happy to accept, it can be tempting to initially accept them, such that less false differences appear in the future. However, don't let such browser-based development differences go unexplained, the root cause could be quite important! Use of different org types or org templates between developers can also result in this type of issue. Ensure that all developers are sourcing their developer orgs from the same sign-up page and are of the same org type.
The key benefit with desktop-based tools and Source Control is that they allow you to edit Force.com source files while synchronizing with both Source Control and an attached Salesforce Developer Edition org. In Force.com IDE the default is to not to automatically upload to the attached developer org each time a file is saved, right click the project node in the Package Explorer and under the Force.com sub menu, select Work Online. So long as these tools are editing files from the local repository folder location, file edits are automatically seen by the Source Control system, which in our case is Git.
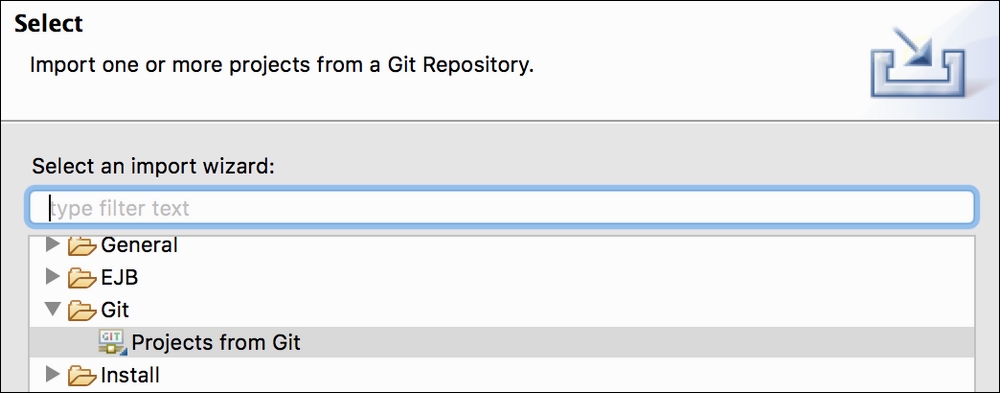
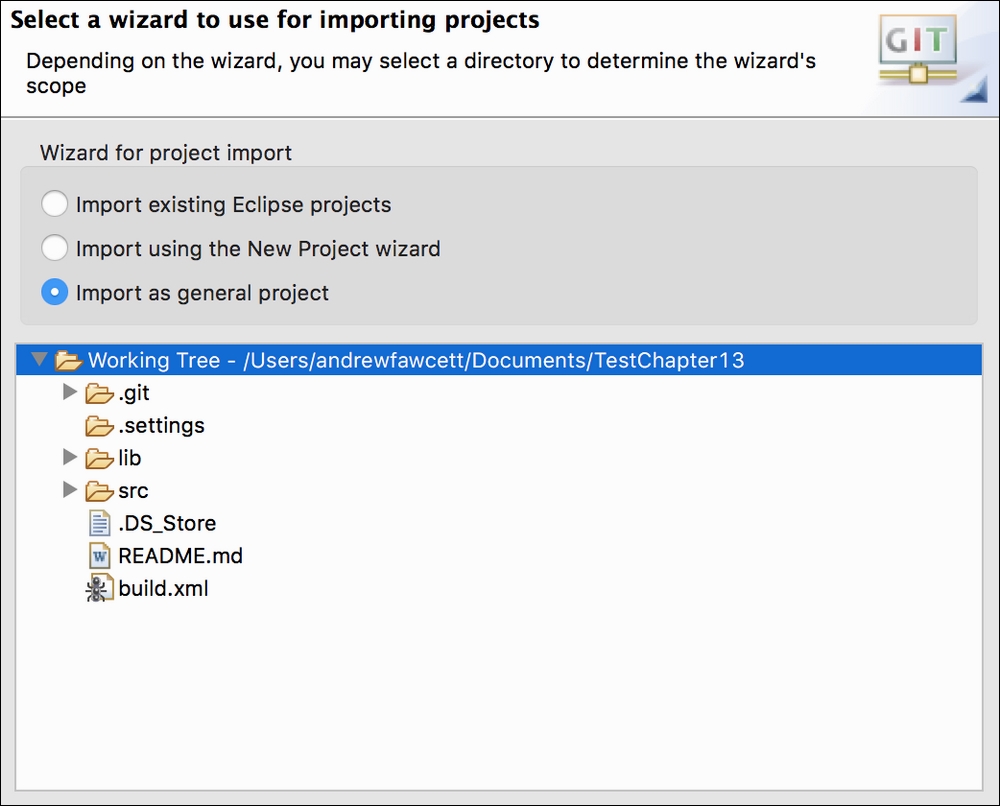
Select Existing local repository, if your repository is not shown, click Add and navigate to the folder used previously to download the GitHub repository. Finally click Import using the New project wizard and click Finish:
Give your project a suitable name and click Finish. This project is now connected to your local Git repository. The Eclipse IDE has built-in support for Git if you have eGIT plugin installed, so you can choose to either use the GitHub desktop tool or continue within Eclipse.
In order to connect the project with Salesforce you need to add the Force.com IDE features to the project. Right-click on the project in the Package Explorer, then from under the Force.com sub-menu, select the Add Force.com Nature option. You will see a prompt to remind you that need to provide connection details to complete the connection:

Once again right-click on the project in the Package Explorer, then from under the Force.com sub menu, select the Project Properties option. Complete the login details using the developer edition org you deployed to earlier in this chapter then click Apply.
Tip
Once you click Apply you may be asked whether you want to re-fetch and overwrite the projects all Force.com components in the project. Select No. This is because the project folder already has source code contained within it and the org your using was populated from the same folder contents, there is no need for the wizard to download.
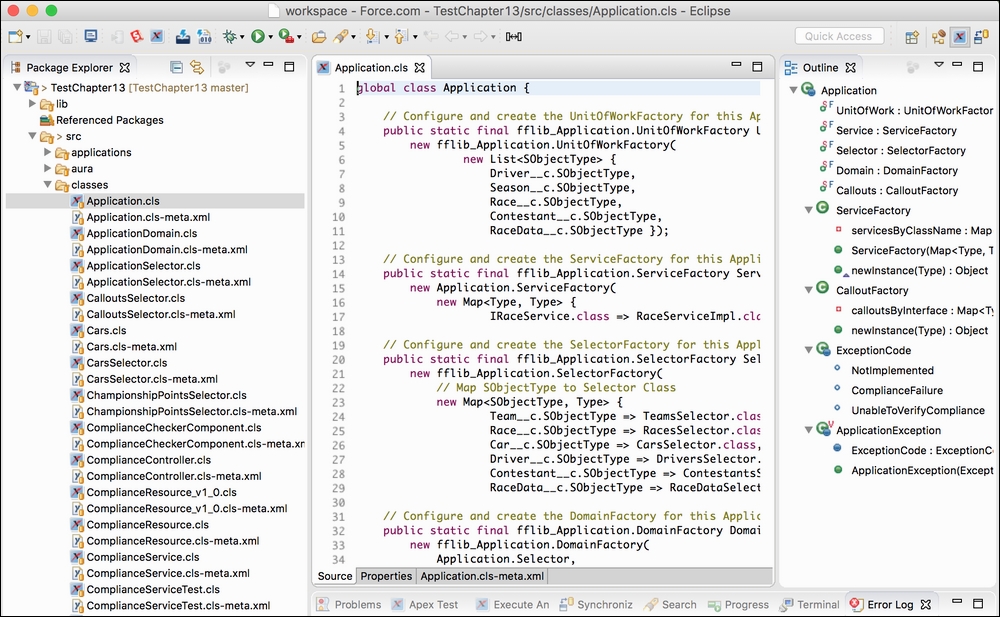
The Force.com IDE project wizard creates a /.settings folder, /Referenced Packages and .project and salesforce.schema files in the repository's root folder. You can use the .gitignore facility to omit these from Source Control visibility unless everyone in your team is using Force.com IDE. This screenshot shows how the project looks after creation, allowing you to begin editing your Apex code immediately:
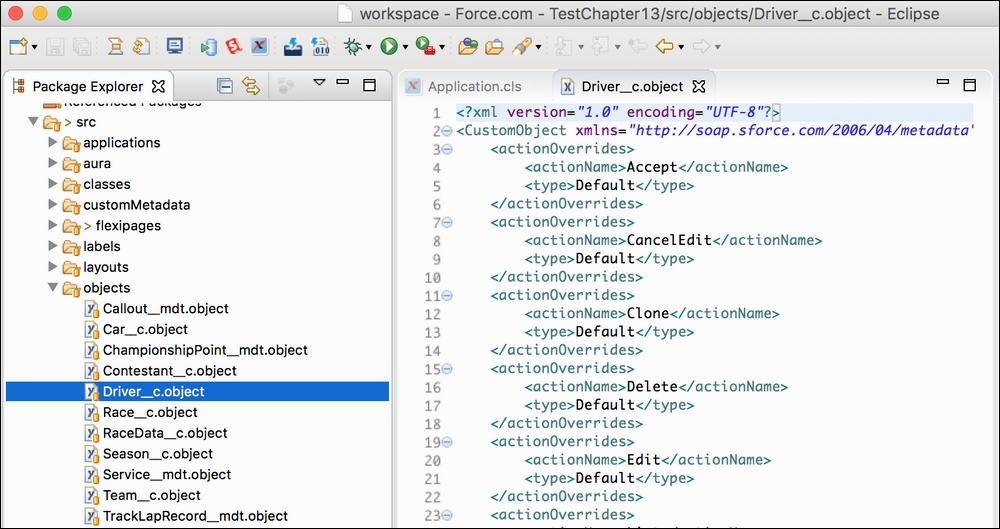
You are also able to edit files that represent Custom Objects and fields:
If you choose to combine this development approach with the browser-based approach, the Force.com IDE offers a way to refresh the files from within the desktop tool. Simply right-click on the folder and select the appropriate option. This facility effectively performs a retrieve operation similar to that described in the earlier section via the Ant build.xml script. As such, watch out for similar side-effects in terms of additional files or file changes.