
Chapter 17. Pagination and Printing

The exercises in this chapter will explore pagination in Adobe InDesign. You’ll review the Actions panel (see Chapter 16, Automation) to prepare your files for printing before setting up the InDesign print space. The final result will be a folded, saddle-stitched flipbook.
In Chapter 6, Color Models, you learned that the RGB color space is used largely for screen distribution, and that the CMYK color space is used mainly for printing. Since this chapter emphasizes printing, assume that you’ll be preparing a document for print. Remember that you should always check with your printer to determine what color space you should use.
Colors, Resolution, and Calibration
If you’re printing at home, you’ll most likely be working with an inkjet printer, which is typically configured for RGB color. However, many commercial printers utilize the CMYK color space. The CMYK printer will run plates with the four colors—cyan, magenta, yellow, and black—across a page that, when combined, will generate a close approximation of any color in your file. You may also choose a specific color from the Pantone color set. These are dyes that printers can use to match exactly the color in your document to the desired color on the printed page. Corporations hire designers to create brand guidelines (specification documents) that include how the logo should appear in various contexts and which Pantone colors should be used for corporate identity materials.
Reminder
RGB stands for red, green, and blue. CMYK is an acronym for cyan, magenta, yellow, and black.
If you’re working with a printer, you’ll also want to know what resolution to use (300 DPI is usually fine for inkjet printers) and what file formats are acceptable. Many printers will request a PDF, and some will specify which version of PDF to choose during the saving process.
Link
Modern Postcard offers templates and lists prepress settings on its website, www.modernpostcard.com/templates.
Finally, many commercial printers calibrate their systems and share a color setting file that you can install on your computer. You can follow your computer’s wizard to calibrate your monitor.
Monitor calibration will vary from computer to computer. On my Mac-Book Pro, I can calibrate the monitor from the Displays applet in the Mac OS X System Preferences panel.
Pagination and Binding
InDesign settings let you set up your document with single pages or facing pages. Use single pages if you want to create, for instance, a PDF document with a series of screen-sized pages, or facing pages if you want to design a publication with pages on the left and right sides. You created single pages in Chapter 11, The Grid. In this chapter’s exercises, you’ll explore facing pages.
When facing pages are in use, the Pages panel displays icons of each page side by side. The first page is always a single page. (You can ignore this page entirely or use it as you see fit.) After this page, the rest of the document shows two pages side by side. This is where things get a little tricky. When you’re designing for facing pages, you have to consider how the pages will print on paper. If you’re folding your paper in half to print “two pages” (or one page layout on each half of the paper), then you’re not exactly printing two pages—you’re printing one layout on one half of the paper and one layout on the other half. To make matters even more confusing, you’ll probably be printing on both sides of the paper. For this reason, when you’re using facing pages (and assuming you’re printing on paper that will be folded in half after printing is complete on both sides of the sheet), you’ll count your “pages” in fours. Fold a piece of paper in half and then look at how many “pages” are created—four (FIGURE 17.1).

FIGURE 17.1 Label the front and back of a sheet of paper twice, equidistant from the center. Fold the page in half. Then label each folded half page with the numbers 1-4. (Number 1 is placed on what would be considered to be the cover of the pamphlet.) To demonstrate this, I unfolded my sample and scanned each side of the page.
Are you with me so far? Because now you’re going to see something even more difficult to explain (but clear as day when you print). When you set up a document, you have to take this folding process into consideration. If you’re printing and folding at home, remember that in the Pages panel, the pagination will go something like this: Skip the first page. On the first set of facing pages, the left page is the front cover, and the right page is the back cover. Remember—you’re counting by fours, as each piece of paper includes four pages, so this is either pages 1 and 4, 1 and 8, or 1 and 12, and so on. The next set of facing pages will be the back cover minus one on the left, and the front cover plus one on the right. For instance, in a 12-page pamphlet, the second set of facing pages will be 11 and 2. The third set of pages will be front cover plus two and back cover minus two, or in our example, pages 3 and 10. This crisscross pattern extends until you reach the last set of facing pages, which is always the center spread of the publication (FIGURE 17.2). Keep this in mind because InDesign will simply label the pages sequentially—1, 2, 3, 4, and so on—without awareness of the pagination that you may be using for your project. I recommend placing an easy-to-read number somewhere on the artboard next to each page to remind you which page you’re truly working on. When it’s time to print, you can export the “true” (to how they’re labeled in InDesign) pages 2 through the final page, ignoring page 1 as a PDF. This will place just the facing pages in the exported PDF.

FIGURE 17.2 When 3 sheets of paper are folded and numbered consecutively, you can unfold the paper and see the pagination pattern for 12 pages (3 sheets of paper * 4 sides to each sheet) that you would assign to the pages as you work on them in InDesign.
Facing pages typically result in a folded publication in which the individual sheets of paper are bound together using a saddle stitch on the fold. This can be done with a stapler or waxed thread and a needle. The folded part is called the gutter, and you’ll want to allow plenty of room between the gutter and the area where you position foreground, essential elements of your composition (for instance, type that should be legible or images that should be easy to see). It’s common to allow background images, colors, or decorative graphic elements to fill the entire composition—all the way to the gutter.
Link
Learn to sew your saddle stitch with SeaLemonDIY’s tutorial at youtu.be/aWHkY5jOoqM.
If all of this seems too complicated, instead of working with facing pages, you can continue to lay out your publication on single pages. You can bind the single sheets of paper at the spine with glue—this is called perfect binding—or with a giant clip.
Link
Learn to glue a perfect bind with Charmaine Martinez’s tutorial at youtu.be/pH283zNUGhY.
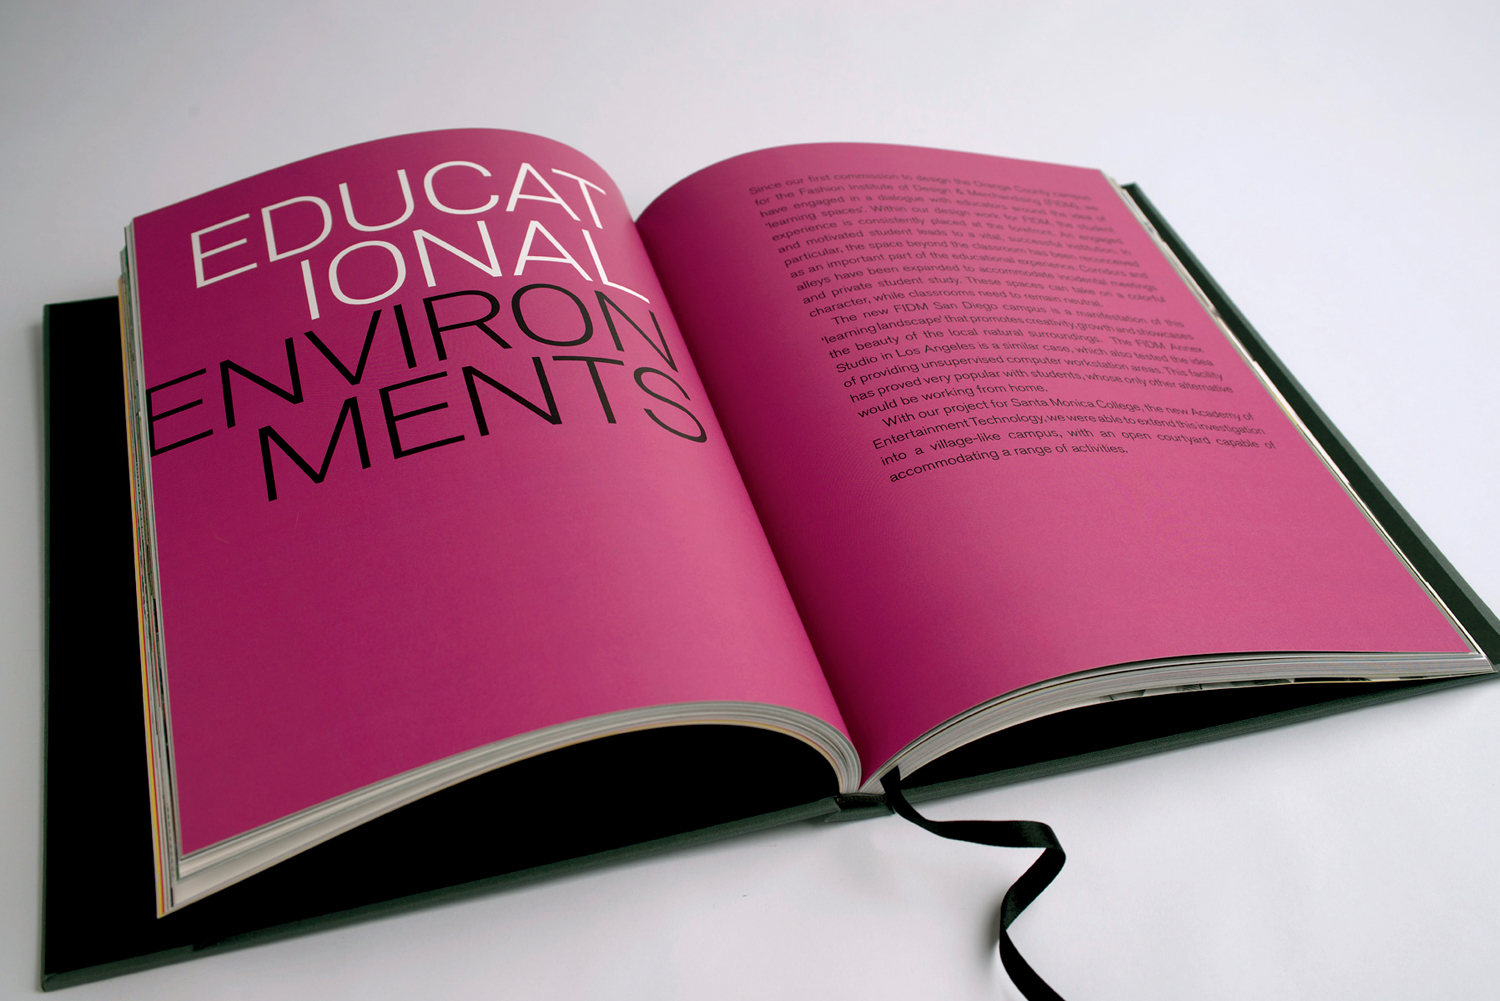
FIGURE 17.3 Crystal Adams for Designful Studio, Promotional Portfolio Book, Client: Clive Wilkinson Architects, 2012. The book was designed to showcase the firm’s winning submission to the Smithsonian Cooper-Hewitt National Design Award. Here a two-page spread is unified by a single background color, the sans serif class of typography, and the alignment of the type on the pages.
![]() The chapter16-results folder from the Chapter 17 downloads area on the companion website. It includes the 10 Adobe Photoshop files created using the Actions panel in Chapter 16, Automation.
The chapter16-results folder from the Chapter 17 downloads area on the companion website. It includes the 10 Adobe Photoshop files created using the Actions panel in Chapter 16, Automation.
![]() You’ll also need to create prints, as well as supplies for trimming and binding.
You’ll also need to create prints, as well as supplies for trimming and binding.
What You’ll Make

FIGURE 17.4 In these exercises, you’ll decide to create a flipbook bound with clips (such as the book on the left) or with a saddle stitch (the book on the right).
Exercise 1. Revisit the Actions Panel
To begin, you’ll create an action that converts the Photoshop files in the Chapter16-results folder into print-ready TIFF files (saved with proper resolution and color space for your printer). You can create your own Actions by following these steps or simply load and play my actions (see the first sidebar). See Chapter 16 to review the Actions panel.
Workspace > Essentials
Open Photoshop and set the workspace to Essentials using the pull-down list in the Application bar or by choosing the Window menu > Workspace > Essentials.
1. Copy the chapter16-results folder on your Desktop and rename it chapter17.
2. Open any one of the 10 Photoshop files (01.psd through 10.psd) in Photoshop. Display the Actions panel by choosing the Window menu > Actions.
3. Create a new action named Print that completes some or all of the following commands (FIGURE 17.5). I saved mine in the Flipbook set of actions—you can do the same or leave it in the Default Actions set. Alternatively, you can load and play the actions that I’ve saved in the chapter17-results folder on the companion website.
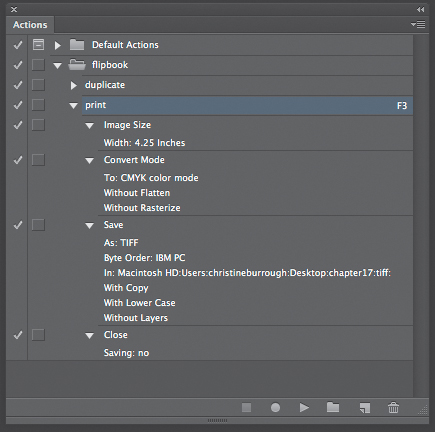
A. Change the image size to 4.25 by 4.25 inches with Resample Image unchecked. (This will drop the DPI to a little under 300, but that works out fine on my inkjet printer.)
B. Change the color mode to CMYK or leave it as RGB, depending on your printer. I changed mine to CMYK as an example by choosing the Image menu > Mode > CMYK. Click OK in the dialog asking to flatten layers if you do modify the color mode.
C. Save the file in TIFF format (use the Format pull-down menu in the Save As dialog) and watch out for three essential activities: create a new folder named tiff where you’ll save these images; do not change the file name; and click the Save as a Copy button beneath the Format pull-down menu. This will save a copy of the file in TIFF format in a new folder named tiff inside your chapter17 folder.
D. Close the original file and don’t save it. You don’t want to save these steps over the original file!
Exercise 2. Apply a Batch Action From Bridge
You can apply an action to a single open file or on a folder of files in what’s called a batch. In this exercise, you’ll batch-process your files using Bridge.
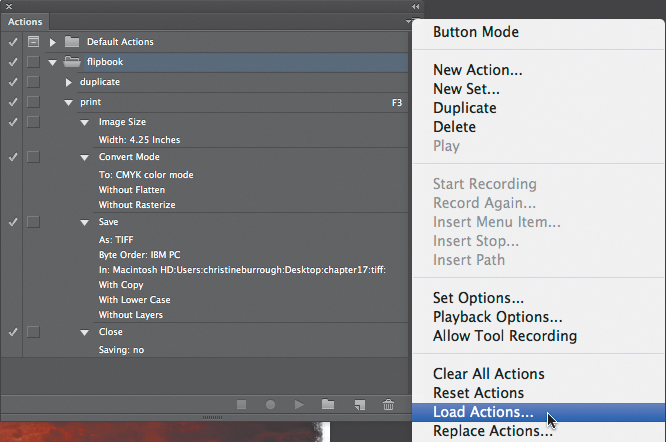
Loading Saved Actions
1. Open Adobe Bridge and locate your tiff folder. (It’s likely in the chapter17. folder.)
Workspace > Essentials
Open Bridge and set the workspace to Essentials using the button in the Application bar or by choosing the Window menu > Workspace > Essentials.
2. Select all of the numbered files, 01.psd through 10.psd.
3. Choose the Tools menu > Photoshop > Batch.
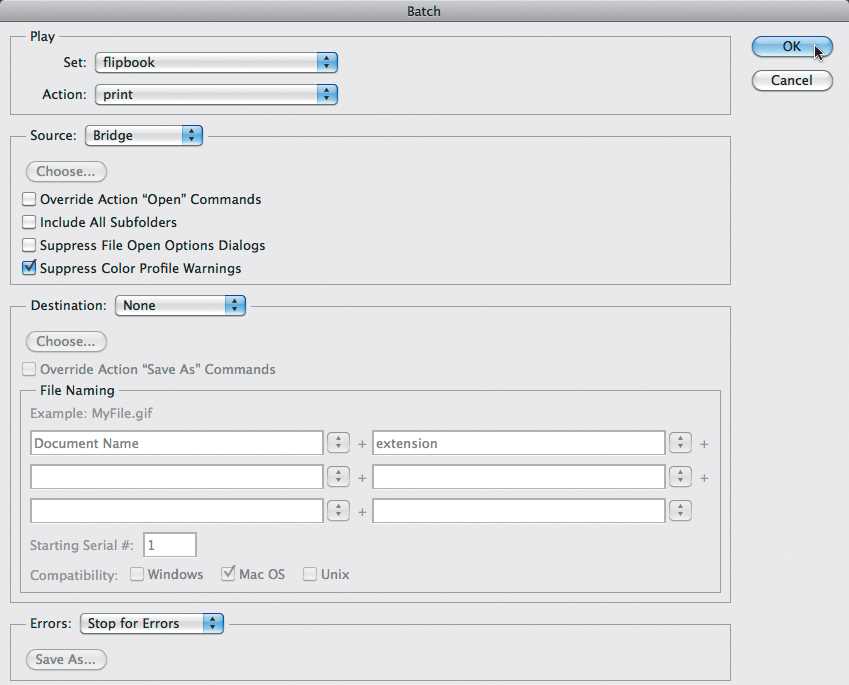
4. In the Batch dialog box, you’ll see four areas: Play, Source, Destination, and Errors. Match your settings to mine as follows (FIGURE 17.7).
Remember, you can drag and drop the tiff folder on the Bridge icon in the Dock if you’re using a Mac to force this folder to open when Bridge is launched.
A. In Play, select the Flipbook set and the Print action.
B. The Source is Bridge. In this area, click the Suppress Color Profile Warnings button to eliminate having to click OK through any warnings that might appear.
C. Set the Destination to None because you’ve already provided a destination for saving within your action.
D. Set Errors to Stop for Errors.
5. Ready? Press OK! Have fun watching Photoshop complete these steps for you on all your files while you look on in wonder.
6. Your flipbook will seem more complete if you start and end with the same image. In this case, you should save an image of the background without the balloon to use as the first and final image. Open any of the 10 PSD files from the chapter17. folder in Photoshop. Click on the Eyeball icon to hide the balloon-original. layer (FIGURE 17.8). Save the file as start.psd in the chapter17 folder. Then play the Print action on the file.

7. Return to Bridge. Notice that the files are saved in the tiff folder and that their names include a space and the word copy. You’ll rename the files to eliminate these naming issues. Before doing that, create a duplicate of the start copy.tiff file to use as the final page in the flipbook. Click once on start copy.tiff and choose the Edit menu > Duplicate.
8. Organize the images by clicking and dragging one of the two start copy.tiff (or start copy copy.tiff) files to the beginning of the set of images. Now the set of 10 images is bookended by the same file, which doesn’t display a balloon. Select all 12 files and rename them by choosing the Tools menu > Batch Rename. Create settings that will eliminate the space and the word copy, save the files in the same folder, and rename them using two-digit sequence numbers (FIGURE 17.9).

FIGURE 17.9 Rename the files. The left part of this screenshot includes two copies of the start file; the right part shows all images named with sequential numbers.
Reminder
Review Chapter 4, Creating and Organizing Digital Photographs, for a refresher on renaming files with the Batch Rename command.
Exercise 3. Two Options for Printing and Binding
In this exercise, you’ll prepare your booklet for printing and binding in InDesign. You can choose whether you’d like to create a simple, single page document that can be bound with a giant clip or be perfect bound with glue, or you can create facing pages for a saddle-stitched publication.
Workspace > Essentials
For Exercises 3A and 3B, open InDesign and set the workspace to Essentials using the button in the Application bar or by choosing the Window menu > Workspace > Essentials.
Exercise 3A. Option A: Single Pages and Easy Binding
This exercise is similar to the exercises in Chapter 12, Continuity. You’ll use a set of single pages in the Pages panel to lay out a multipage document that you can print from InDesign or an exported PDF.
1. Open InDesign and choose the File menu > New Document.
2. Match your settings to those in FIGURE 17.10. Set the Intent pull-down menu to Print. I included 14 pages (an extra page for the front and back covers) and used a width and height of six inches. You can type “6 in” into the fields, and InDesign will convert the units of measurement to picas. I unlocked the margins using the lock icon next to the Top and Bottom fields, and I increased the left margin to 1 inch as this is where the binding will take place (FIGURE 17.10).

3. Set a guide on the A-Master page to help you align the images in the book. To determine where the images should be placed, double-click A-Master in the Pages panel; then choose the File menu > Place and place one of the 12 TIFF images. You can use the left margin as an alignment aide on the left side, so you simply need a guide on the top or bottom of the image.
4. Change the units of measurement from picas to inches by right-clicking or Control-clicking on the ruler and selecting Inches.
Key Command
Press ![]() -R to show or hide rulers in any Adobe application.
-R to show or hide rulers in any Adobe application.
5. Set a top guide on A-Master at .75 inches. Then delete the photograph, leaving just the guide on the master page.
6. Leave the first page blank or add anything to it that you want as cover material. Double-click on page 2 in the Pages panel to activate it.
7. Choose the File menu > Place or press ![]() -D and select all 12 files from the tiff folder. Click OK.
-D and select all 12 files from the tiff folder. Click OK.
8. You’ll see a loaded cursor in InDesign. The cursor now holds all 12 image files. Place the cursor at the intersection of the top guide and left margin on page 2 and click once (FIGURE 17.11). The first image loads on the page, and the cursor still holds the remaining 11 images.

9. Double-click on page 3 and click the loaded cursor at the intersection of the guide and left margin to place the next image. Continue to activate the next page and place images, one at a time, through page 13.
10. Save the file as single-page-booklet.indd in your chapter17 folder. I tend to save my native files in an outside folder (or top-level directory) and any linked or placed files in a subfolder (in this case, the tiff folder).
11. Choose the File menu > Export and save a PDF (Print) of the 14-page booklet. In the PDF dialog, choose the Marks and Bleeds side menu and click the Crop Marks button (FIGURE 17.12). This will provide a guide when it’s time to trim your printed pages.

12. Print the PDF file and trim the pages using the trim marks as a guide and then bind the left side using clips or glue. For short books like this one, consider laminating the pages (an office supply store can typically do this for you), as it makes them easier to flip and provides the audible feedback of a flipping sound (FIGURE 17.13).

FIGURE 17.13 This flipbook consists of laminated pages and is bound with two clips purchased at an office supply store.
Exercise 3B. Option B: Paginating Facing Pages for a Saddle-Stitched Binding
This exercise is similar to Option A, but it accounts for the pagination of a booklet or pamphlet that incorporates a folded page with printing on both sides and a saddle-stitched binding. The steps that follow mimic those in Option B and the exercises in Chapter 12; however, you’ll use facing pages and carefully place images on the correct pages to achieve the printed document in your mock-up. You’ll use a set of facing pages in the Pages panel to lay out a multipage document that you can print from InDesign or an exported PDF.
It’s always a good idea to create a mock-up before you begin. Your document will have 32 pages, printed on 8 sheets of paper (8 x 4 is 32). You will create 16 spreads (16 x 2 is 32). Twelve spreads will include an image and blank facing page, and there will be additional room for front and back cover art. Stack 8 sheets of paper, fold them in half, and then label each page starting with the front cover and ending with the back cover so that when unfolded, your labeled mock-up will resemble the sample pattern in FIGURE 17.14.

FIGURE 17.14 When the 8 sheets of paper are unfolded and the pages are labeled correctly, you will notice a pattern in the way the numbers increase, starting with the front cover, and decrease, starting with the back cover, until you reach the centerfold.
1. Open InDesign and choose the File menu > New Document.
2. For this book, you’ll need 32 pages, as one side of each page will be blank (leaving you with 16 pages). Of course, you should also include the front and back covers in your tally. Match your settings to those in FIGURE 17.15. Set the Intent pull-down menu to Print. Be sure to click the Facing Pages button. I included 32 pages (remember that you need to work in multiples of four) and used a width of 5.5 inches and a height of 6 inches. You can type “5.5 in” and “6 in” into the fields, and InDesign will convert the units of measurement to picas (33p0 and 36p0). I left the margins at their default setting of 3 picas.

3. Inspect your new document. Note that the Pages panel will begin with a first page that has no facing page attached to it. Since you’ll ignore this page, you need to add an additional page to face the last one in the document. Click the Create New Page button at the bottom of the Pages panel (FIGURE 17.16). Now you have a single page at the top of the Panel that you’ll dismiss and a set of 32 facing pages (FIGURE 17.17).
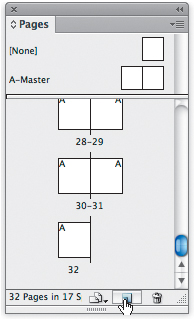
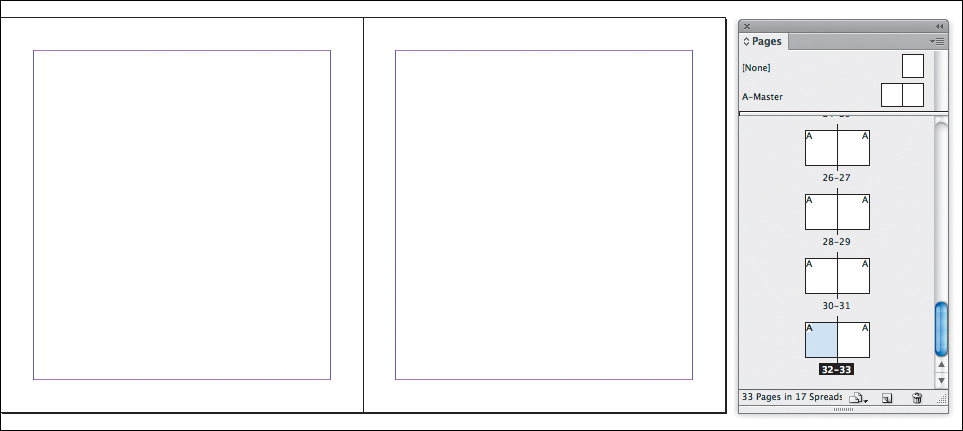
FIGURE 17.17 Pages 32 and 33 in the Pages panel show the last spread (which will end up being the centerfold).
Rulers and Units
Press ![]() -R to show or hide rulers in any Adobe application. Control-click or right-click on the ruler to change the unit of measurement to inches.
-R to show or hide rulers in any Adobe application. Control-click or right-click on the ruler to change the unit of measurement to inches.
4. Set guides on the left and right pages of A-Master to use as an alignment tool for all images in the book. To determine where you should place the images, double-click the left page of the A-Master page in the Pages panel; then choose the File menu > Place and choose one of the 12 TIFF images. Use the margin closest to the gutter, where the saddle stitch will bind the book, for horizontal alignment. This means you simply need a guide on the top or bottom of the image for vertical alignment. Position the image centered on the page and give it a little extra room on the bottom to create bottom weight on the page. When I did this, I noticed that I was close enough to .75 inches on the ruler, so I placed my horizontal guide at that position on both pages (FIGURE 17.18).

5. Delete the image from the master pages.
6. Leave the first page blank as it has no facing counterpart. Double-click on page 2 in the Pages panel to activate it.
7. Label your pages before you place any images. Type the words back cover on the artboard above page 2 and the word cover on the artboard above its facing page, page 3 in the Pages panel. Consult your physical mockup (see FIGURE 17.13) as you continue to label each page. Label page 4 in the Pages panel as inside front cover (2) and its facing page (page 5 in the Pages panel) as inside back cover (31) (FIGURE 17.19).

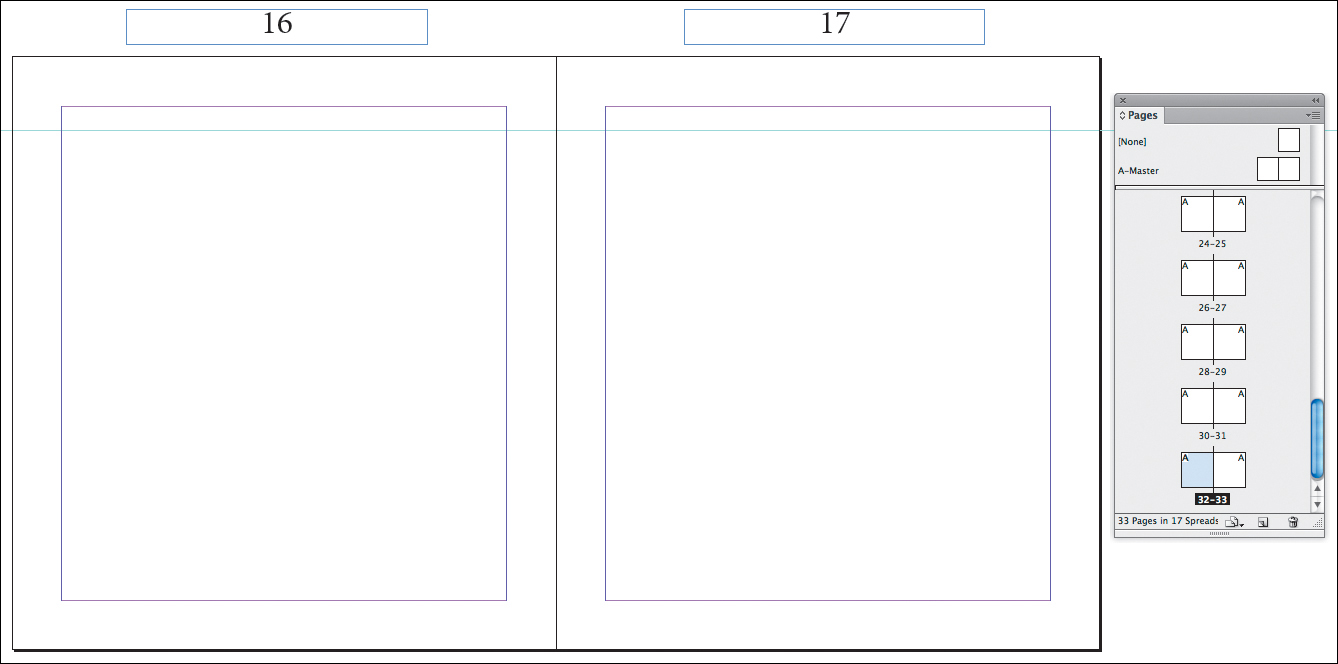
8. Continue to label each page. You’ll notice a pattern as you decrease the page numbers staggering from the left side of the Pages panel to the right and increase the numbers staggering from the right side of the Pages panel to the left as you crisscross your way down each set of facing pages (FIGURE 17.20). The last set of pages (pages 32 and 33 in the Pages panel) is the center spread, pages 16 and 17 in the booklet (FIGURE 17.21).

FIGURE 17.20 Notice the pattern as you label the pages with their printed sequence values: one set of diagonal numbers decreases and the other increases.
It’s normal to have an extra blank page at the beginning or end of a saddle-stitched book or pamphlet. This is a result of working in units of four. You may want to use those pages to hold small amounts of copy or images relating to a brand or series.
9. Consult your mock-up before placing the images! Place the images on the odd-numbered pages (according to your labels, not the Pages panel) starting on page 3 and ending on page 27. Choose the File menu > Place or press ![]() -D and select all 12 files from the tiff folder. Click OK.
-D and select all 12 files from the tiff folder. Click OK.
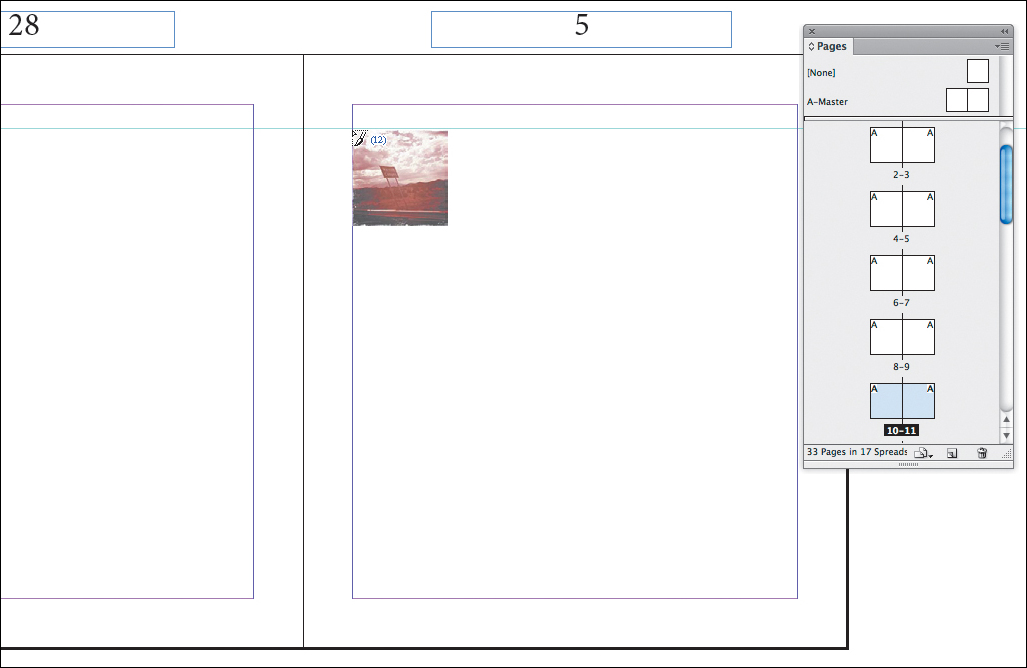
10. You’ll see a loaded cursor in InDesign. The cursor now holds all 12 image files. Place the cursor at the intersection of the top guide and left margin on the page you labeled as page 5 (page 11 in the Pages panel) and click once (FIGURE 17.22). The first image loads on the page, and the cursor still holds the remaining 11 images.
11. Scroll through your document or double-click page 15 in the Pages panel and click the loaded cursor at the intersection of the top guide and left margin to place the next image on the page you labeled as page 7. Continue to activate the next odd-numbered page and place images, one at a time, through the page labeled 27. Work in the order of the labeled pages so that you’ll place the images correctly. This means that you’ll place images down to the bottom of the InDesign document (at the spread on the page labeled 17), and then you’ll place images moving back up toward the top of the document to position images on odd-numbered pages after the spread.
12. Add art or type to the cover, or leave it blank, and draw the cover with a pen or pencil once the book is printed.
13. Save the file as saddle-stitch-booklet.indd in your chapter17 folder. I tend to save my native files in an outside folder (or top-level directory) and any linked or placed files in a subfolder (in this case, the tiff folder).
14. Choose the File menu > Export and save a PDF (Print) of the 32-page booklet. Match my settings in the PDF dialog: in the General menu, set the Pages Range to pages 2–33. Also press the Spreads radio button (FIGURE 17.23). In the Marks and Bleeds menu, click the Crop Marks button (FIGURE 17.24). This will provide you with a guide when it’s time to trim the printed pages.

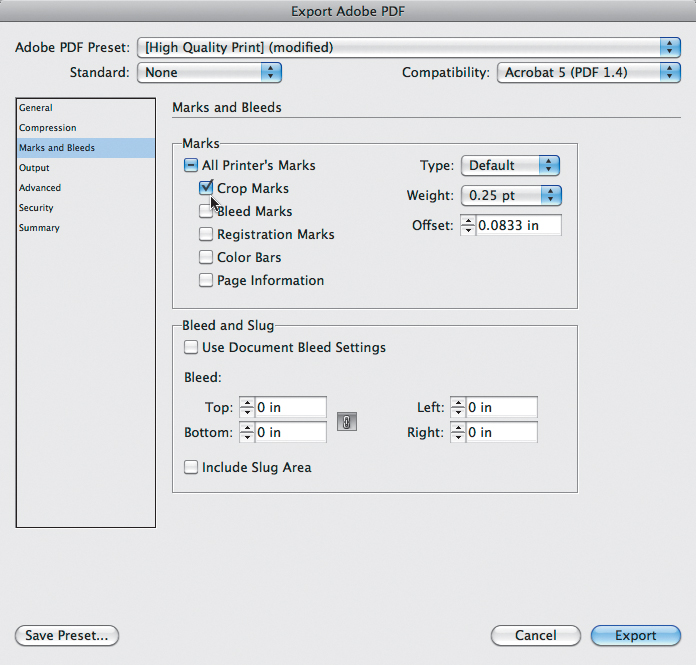
FIGURE 17.24 Add crop marks when saving the PDF to create a guide to use when trimming the printed paper.
15. Print the PDF file and trim (and fold) the pages using the crop marks as a guide. If you’re printing on letter-sized paper (8.5 by 11 inches), enable Shrink to Printable in the Print dialog to print the crop marks. Fold and bind the booklet in the gutter using a stapler that opens (do this on a carpeted floor or a cutting mat and then fold the staples over) or waxed thread and a needle (FIGURE 17.25).

FIGURE 17.25 The final saddle-stitch book has staples on the spine. You may want to trim the outer edges of the pages once the book is assembled.
 Lab Challenge
Develop your own pamphlet, booklet, or zine, and then explore methods of printing and binding.