
10
MICROSOFT OFFICE ACCESS 2003
Chapter Outline
10.2 Starting Microsoft Office Access 2003
10.3 Working with Access Database
10.1 INTRODUCTION
Microsoft Access is a database management system that allows the user to create a relational database and then access, retrieve, and use the data in it. Access facilitates creation of database in several ways, manage database structures, import and export databases from/to various data sources and file formats, backup, restore, and perform other operations in easy-to-use graphical user interface.
Access is a part of Microsoft Office suite of applications, and of all the Office applications, only Access has the facility to be used as a relational database. One can store all kinds of information in an Access database, use queries to analyse the data, and create professional reports. Access also integrates well with other Office packages, and data transfer between Access and the other Office components is relatively easy. In addition, against the other desktop databases Access is both rich in features and powerful. Lastly, Access can be used by almost any user. Beginners can learn to use the wizards and the easy-to-understand interface while developers can push it to its limits and do some extraordinary things with it. It is an application for everyone created with a mixed user-level in mind. This chapter discusses the basics of designing and creating an efficient and productive database using Access.
10.2 STARTING MICROSOFT OFFICE ACCESS 2003
To open Microsoft Access, perform any one of the given below steps.
- Double-click the Microsoft Access icon located on the desktop.
- Click start, point to All Programs, then point to Microsoft Office, and then select Microsoft Office Access 2003.

Figure 10.1 Starting Microsoft Access
10.3 WORKING WITH ACCESS DATABASE
Whenever you start Microsoft Office Access 2003, you will see the Getting Started task pane, which enables to access online help and content, open existing database and create a new database. To create a new database, click Create a new file on the Getting Started task pane. This displays the New File task pane which provides various options for creating a blank database, opening an existing database, or navigating to any database stored on your computer or on a network drive (see Figure 10.2). The New section in the New File task pane provides the following options:
- Blank database: To create a new database from scratch.
- Blank data access page: To create a new data access page.
- Project using existing data: To create database project using existing data.
- Project using new data: To create a database project using new data.
- From existing file: To select the most recently used database from the list of existing databases.
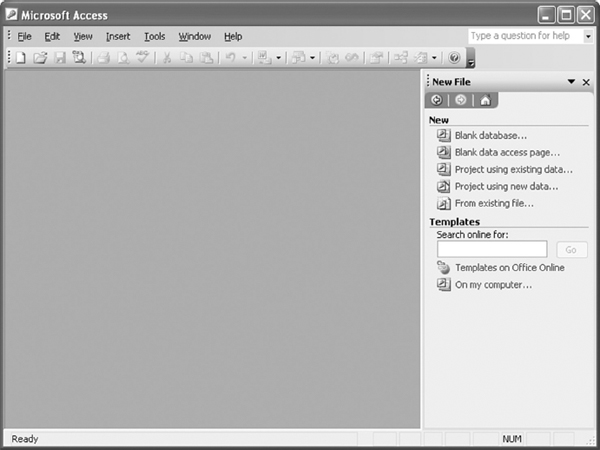
Figure 10.2 Access Opening Window
10.3.1 CREATING AND SAVING A DATABASE
To create a new database, follow the steps given below:
- Select Blank database from the New section in the New File task pane to display the File New Database dialog box (see Figure 10.3).
- Click the Save in list box to specify the location to save the new database. Enter the desired name of the new database in the File name text box (by default, Access names the database as db1.mdb). Click the Create button to create the new database.

Figure 10.3 File New Database Dialog Box
Note: Unlike other Microsoft Office applications, an Access database must be saved before one starts working on it.
10.3.2 OPENING A DATABASE
To open an existing database, follow the steps given below:
- Select Open from the File menu to display the Open dialog box (see Figure 10.4). You can also open an Access database by clicking the Open button (
 ) on the Database toolbar.
 - Specify the name of the desired file in the File name drop-down box. If the desired file is not in the current location, you can locate it by navigating through Look in list box. Select the desired file and click the Open button.

Figure 10.4 Open Dialog Box
Note: Access database can also be opened by double-clicking the Access file icon placed on the specified location.
10.3.3 CLOSING A DATABASE AND EXITING MICROSOFT ACCESS
After finishing all the work in Access database, you may want to close the database and exit Access. For this, perform any of the steps given below:
- Select Close from the File menu to close the database and select Exit from File menu to close the Access program.
- Click the Close button at the top-right corner of the Database window to close the current database. Note that when a database is opened in Access then there are two close buttons (see Figure 10.5). One is located at the right-most corner on the title bar of the Access application window, which closes the Access application while the second at the top-right corner of the Database window which closes the current file.

Figure 10.5 Closing a Database and Exiting Microsoft Access
Note: The extension of an Access database is.mdb. When you are working in Access, a temporary file is created with.ldb extension. This file can be ignored as it disappears as soon as the database is saved and closed. In addition, a user cannot proceed further if the selected database has not been saved.
10.4 MICROSOFT ACCESS ENVIRONMENT
When an Access database is created or opened, the main screen of the program appears (see Figure 10.6). This main window has many different parts, which are described in detail below.
Title Bar
The bar across the top of the application window is the title bar. It displays the name of the application. On the far right of the title bar are the Minimize, Maximize/Restore, and Close buttons; these buttons are used to change the size or close the application window.
Menu Bar
Below title bar is the menu bar, which contains different drop-down menus that allow the user to perform different functions in Access.
Toolbar
Generally, one or more toolbar appears just below the menu bar. The toolbar contains command buttons that provide single-click entry to carry out many commonly performed tasks. By default, Database toolbar is displayed in the Access environment. Additional toolbars like Query Design and Relationship toolbars can be added by right-clicking on the menu bar and selecting the Customize option from the pop-up menu.

Figure 10.6 Parts of an Access Window
Status Bar
The bar at the bottom of the Access window is the status bar which displays information specific to the task you are currently performing.
Database Window
In the middle of the Access desktop window is the Database window, the command centre of Access environment. The purpose of this window is to provide access to the objects in the database and allow the user to create new ones. At the top of the Database window is a bar which displays the name of the active database. The left side of the Database window has Objects and Groups section containing the list of objects that Access support. It provides direct access to every object in the database. The options under Objects section are used to create, edit, or view the seven main object types in the Access database such as tables, reports, queries and so on. Under Groups section, one can create shortcuts to the Objects in the database.
Database Objects
An Access database consists of a collection of tables, queries, forms, reports, pages, macros, and modules which are used to manage and present the data. These components are also called database objects.
- Tables: A table holds a collection of information stored in the form of fields and records. All the information necessary for the queries, forms, and reports in the database are based on the data in the table. One can sort and filter the information in many different ways. It is a place, which permits addition, deletion, or modification of records, fields, and field properties.
- Queries: A query facilitates retrieval of information from multiple tables, which can be put together for viewing and analysis purposes. Using queries, one can select fields or records from different tables, sort the results, summarise, and perform calculations with the data.
- Forms: Forms are used as the front-end for entering data. It is an object in Access, which allows the database users to edit and view information, one record at a time. All the information entered in a form will then be inserted into the corresponding table. Form may be customised to have all or only some of the fields in a table. Forms are optional, but they help in making the data entry easier, especially if several people are entering data into the database.
- Reports: A report provides total control of the presentation of the data. When information from the tables and queries are ready to be displayed, reports help in presenting this information in a formatted manner. One can add colours, put in summaries and calculations, add in appropriate titles, only show certain fields, and perform many other formatting details.
- Pages: Pages (also known as data access pages) are web pages that contain data from the database and are published on the Web. A data access page can be used to view, add, or edit data stored in the database.
- Macros: Macros are used to speed up the way a database works, for example, you could create a macro which automatically starts your database on a specific form.
- Modules: Modules performs the same function as macros. They allow you to write small programs which can run within Access to speed up your work.
10.5 WORKING WITH TABLES
A table is a collection of data and is the first object that is added to the database. It contains rows and columns. The data entered in a row is called a record. For example, in a table EMPLOYEES, there are multiple rows and each row has a specific record of an employee. In Access, a table stores the information. Before we input the information, we must first create tables. There are quite a few ways to create Access tables. However, tables can be mainly created in Design view or using the Table Wizard.
10.5.1 CREATING A TABLE IN DESIGN VIEW
Creating a table in Design view is very common because it offers several benefits. Design view allows you to define the fields in the table before adding any data to the datasheet. The table's Design view window is divided into two parts: a top pane for entering the field name, data type, and an optional description of the field, and a bottom pane for specifying field properties. To create a table in Design view, follow the steps given below:
- Select Tables from the list of Objects in the Database window to display various options for creating tables in the right side of the Database window.
- Double-click Create table in Design view to display the Table1: Table window showing the design view of the table.
- In the first row of the Field Name column, type-in the name of the field and press Tab or Enter to move to the next column. (Note that field names can contain letters, numbers, and/or spaces, and other characters, excluding periods, exclamation points, accents, and brackets).
Figure 10.7 Design View of a Table
- In the Data Type column, click the drop-down arrow to the right of the cell to display a drop-down list containing Access data types. Select an appropriate data type from the list and press Tab or Enter to move to the next column.
- The Description column, while optional, is good to use for documentation purposes as well as for giving directions to the person entering the data.
- Continue steps 3-5 until all the desired fields are created in the table.
- Once the table is created, to save the table, click the Save button (
 ) on the Table Design toolbar or select Save from the File menu to display the Save As dialog box (see Figure 10.9).
 - Enter the desired name of the table in the Table Name text box, and then click OK. Microsoft Office Access message box appears which prompts you to define a primary key for the table (see Figure 10.10). Click Yes to create the primary key, or click No if no primary key is required, or click Cancel to remain in the Design view.

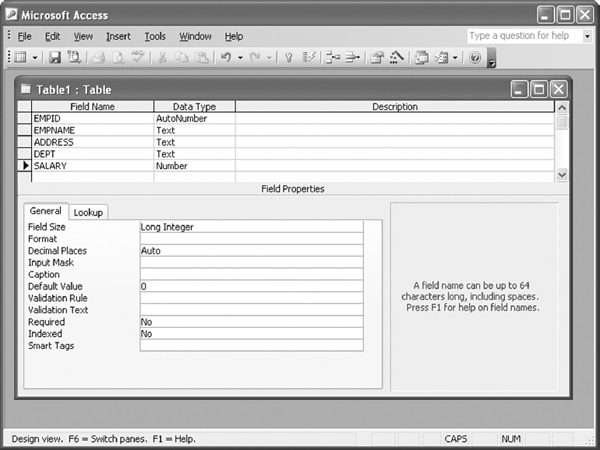
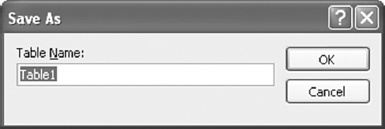
Figure 10.9 Save As Dialog Box

Figure 10.10 Microsoft Office Access Message Box
Setting Primary Key
A primary key is a field whose value uniquely identifies each record of the table. In other words, when a field is set as a primary key it ensures that no two records in a table can have the same value. While it is optional to set a primary key, it is a good practice to create one. For example, to set EMPID as the primary key of the above table, follow the steps given below:
- Open the table in Design view. (Note that to open a table in Design view, select the desired table from table list, and then click the Design button (
 ) on the Database window toolbar).
 - Place the cursor in the EMPID field row and right-click to display a pop-up menu (see Figure 10.11).
- Select the Primary Key option from the pop-up menu. This displays a key symbol (
 ) in the record selector area adjacent to the field name EMPID which confirms that EMPID has been set as the primary key for the table (see Figure 10.12).
 - Click the Close button (
 ) on the Table1: Table window, Microsoft Office Access message box to confirm the changes made to the table's design appears. Click Yes to save changes and close the table's design view. Access takes you to the Database window

Figure 10.11 Setting Primary Key
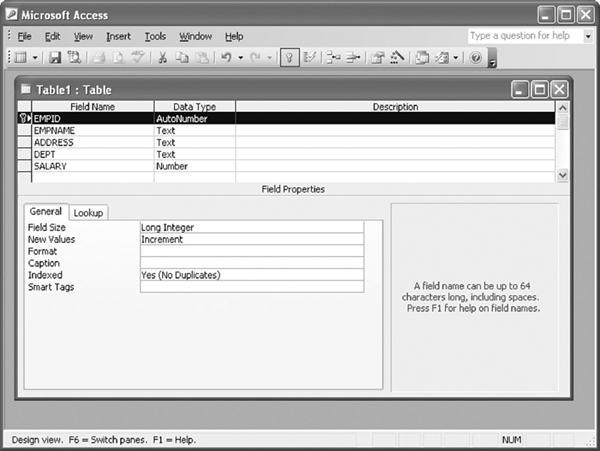
Figure 10.12 Design View after Setting EMPID as Primary Key
Access Data Types
While creating a table, one must assign a data type for each field. The data type determines the type of values one can enter for a field in a table. Table 10.1 describes the data types available with Access 2003.
10.5.2 CREATING A TABLE USING WIZARD
The Table Wizard helps the user to organise data by providing sample fields that one can include in a table and it assigns a primary key to each table. Later, if a change is required in the design of a table, one can modify it using the Design view. To create a table using the Table Wizard, follow the steps given below:
- Select Tables from the list of Objects in the Database window, and double-click Create table by using wizard to display the Table Wizard dialog box.
- The wizard has sample tables, which are categorized as, Business or Personal (see Figure 10.13). The Business category contains tables like Customers, Products, Students, Employees, and so on. The Personal category contains tables like Household Inventory, Recipes, Photographs, and so on. Select an appropriate category to display the sample tables related to that category.
- Select the appropriate table from the Sample Tables list box. The sample fields related to the selected sample table appears in Sample Fields list box.
- Now, select the desired fields that you require in your table from the Sample Fields list box. To select the required field, either double-click the field, or simply select the field and click the (
 ) button. To select all the fields listed, click the (
 ) button. You can click the (
 ) button to remove a field from the list, or (
 ) button to remove all the fields. The Fields in my new table list box displays the selected field(s) (see Figure 10.14).
Figure 10.13 Selecting a Category
- To change the name of a field, select the desired field in the Fields in my new table list box and click the Rename Field button to display the Rename field dialog box. Type the new name in the Rename field text box and click OK. Once the fields for the new table are selected, click Next to proceed.
- Enter the desired name for the table in What do you want to name your table? text box (see Figure 10.16). In addition, this dialog box can also set a primary key for the table. Select Yes, set a primary key for me to create the primary key by Access, or select No, I'll set the primary key for manual assignment of the primary key and click Next.
- Note that when you select No, I'll set the primary key, a drop-down box containing the fields (that are selected by you for the table) appears (see Figure 10.17). From the drop-down box, select the field to be set as the primary key, and click Next.
- The last dialog box of the Table Wizard provides options to modify the newly created table in Datasheet view, or enter data manually, or via a form (see Figure 10.18). Select Enter data directly into the table, and then click Finish. Access creates and saves the table and then opens it in Datasheet view.
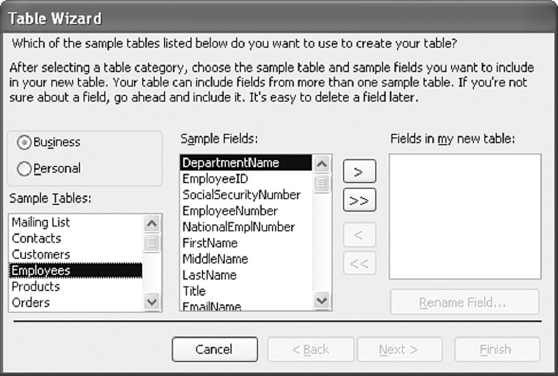

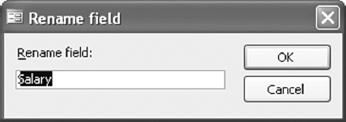
Figure 10.15 Rename field Dialog Box
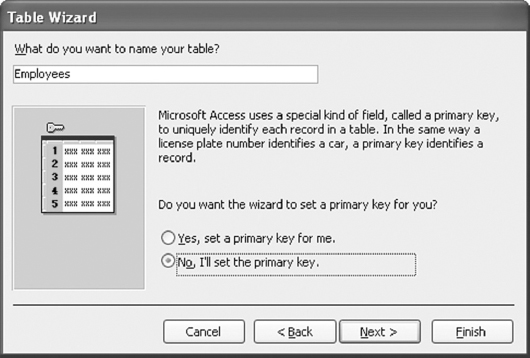
Figure 10.16 Entering Name and Selecting an Option for Setting the Primary Key
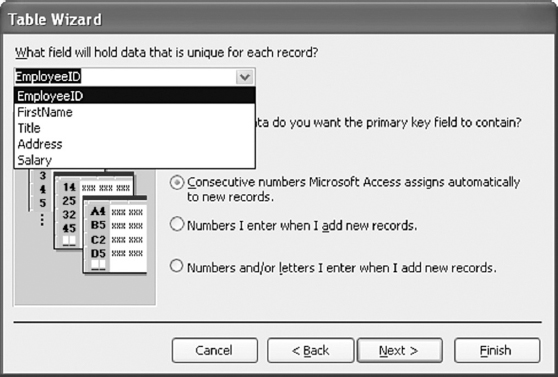
Figure 10.17 Setting Primary Key Manually
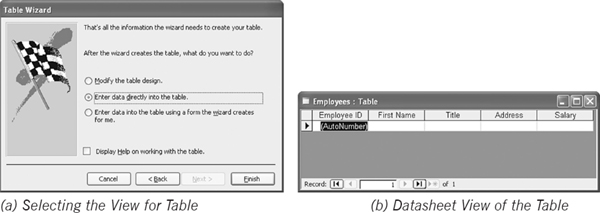
Figure 10.18 Displaying Table in Datasheet View
10.5.3 ADDING, MODIFYING, AND DELETING RECORDS
Once the table is created, you may want to add some records to it. To add (or modify or delete) records, you need to open the table. To open a table double-click the table name or select the table from table list and then click the Open button (![]() ) on the Database window. Note that by default a table opens in Datasheet view.
) on the Database window. Note that by default a table opens in Datasheet view.
Adding and Modifying Records
Records can be added to the table in Datasheet view by typing in the record beside the asterisk (![]() ) that marks the new record. To enter data in a table, follow the steps given below:
) that marks the new record. To enter data in a table, follow the steps given below:
- Open the table in the Datasheet view.
- Enter the necessary information to the first field, and press Tab key to move to the next field. Similarly, add data to all the fields. Once the data for all the fields in a row is entered. Press Enter to move to the next record. Note that Access automatically saves the new record. Figure 10.19 shows the Datasheet view of a table after inserting some records.
- To modify data in a record, place the cursor in appropriate field in the record and make the necessary changes.
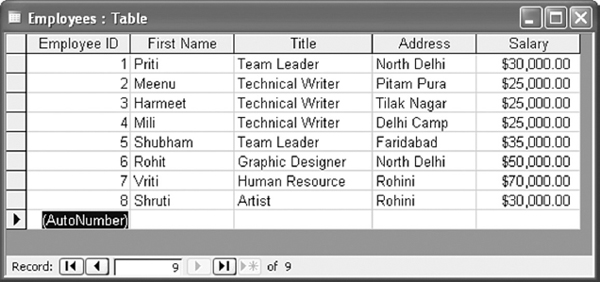
Figure 10.19 Datasheet View of the Table after Inserting the Records
Deleting Records
To delete record(s) from a table, follow the steps given below:
- Open the table in the Datasheet view.
- Select the record(s) by clicking the record selector area to the left of the record. To select multiple records click and drag within the record selector area.
- Press the Delete key or select Delete Record from the Edit menu or click the Delete Record button (
 ) on the Table Datasheet toolbar. An Access message box confirming the deletion appears.
 - Click Yes to delete the record(s) or No to cancel the deletion.
10.5.4 NAVIGATING A TABLE
When you open an access database, you see a list of tables contained in that database. In previous section, you learnt how to add, modify or delete records in tables. This section explains how you can move around in a table (in Datasheet view).

Figure 10.20 Moving around in a Table
Use the right arrow key (![]() ) or press Tab or Enter to move between the fields in the table. To move back a field at a time, press the left arrow key (
) or press Tab or Enter to move between the fields in the table. To move back a field at a time, press the left arrow key (![]() ) or press the Shift and Tab keys at the same time. The up (
) or press the Shift and Tab keys at the same time. The up (![]() ) and down arrow (
) and down arrow (![]() ) keys can be used to move between records. The record where the cursor is placed display a triangle in the grey shaded bar at the far left indicating the active row. An asterisk (
) keys can be used to move between records. The record where the cursor is placed display a triangle in the grey shaded bar at the far left indicating the active row. An asterisk (![]() ) appears at the row where the next record will be entered. The vertical scroll bar can be used to move up and down the records, and the horizontal scroll bar is used to move left and right around the fields.
) appears at the row where the next record will be entered. The vertical scroll bar can be used to move up and down the records, and the horizontal scroll bar is used to move left and right around the fields.
Navigation Buttons
At the bottom of the Datasheet window are the Navigation buttons (see Figure 10.20). These buttons are used to move to the first, last, next, previous, or any specific record in the table.
Note: The Datasheet view can also be used to reformat the table by changing the size and order of the field columns.
10.6 QUERIES
The query is the basic tool that Access provides for retrieving information from the database. Without queries, data would be useless, because they allow the distillation of a large quantity of data into easy to understand statements. Queries select records from one or more tables in a database so that they can be viewed, analysed, and sorted on a common datasheet. A datasheet is a temporary table, which the Access creates, to answer queries. It contains a subset of the data in the table serving as the source of the query. This resulting collection of records is known as dynaset (dynamic subset). It is saved as a database object and can, therefore, be easily used in the future. Note that whenever the original table is updated Access automatically updates the query.
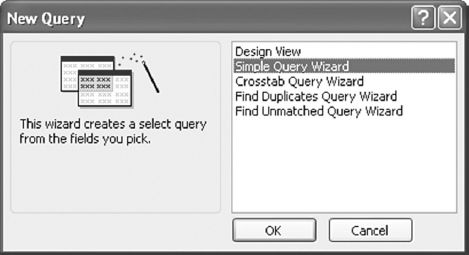
Figure 10.21 New Query Dialog Box
10.6.1 CREATING A SIMPLE QUERY USING WIZARD
To create a query that displays only a selected set of fields in a table, follow the steps given below:
- Select Queries from the list of Objects in the Database window, and click the New button (
 ) on Database window to display the New Query dialog box (see Figure 10.21).
 - Select Simple Query Wizard and click OK to display the Simple Query Wizard dialog box.
- Select a table from the Tables/Queries drop-down box. The fields related to the selected table appear in Available Fields list box (see Figure 10.22).
- Select the desired fields for the query from the Available Fields list box and click Next (see Figure 10.23).
- Based on the fields selected, the next dialog box may give you the option of choosing between a detail or a summary query (see Figure 10.24). Choosing Detail shows every field of every record. If you select the Summary option, you have additional options for how you would like the data summarised. For example, the wizard creates summary fields that do a count or calculate an average on the numeric field(s).
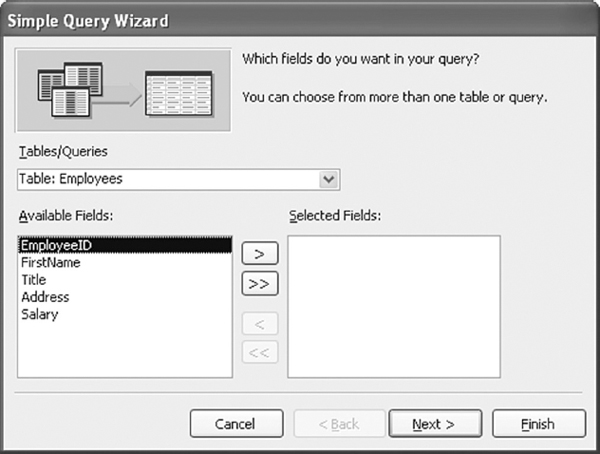
Figure 10.22 Selecting Table for the Query

Figure 10.23 Selecting Fields for the Query
- 6. The last step of the Simple Query Wizard prompts for the query name (see Figure 10.25). Enter a name for the query, and then click Finish. Access creates and saves the query and then opens it in Datasheet view.

Figure 10.24 Choosing Detail or Summary Query

Figure 10.25 Specifying Name for the Query
10.6.2 RUNNING A QUERY
Once a query is created, you can run the query to view the query result. To run a query, follow the steps given below:
- Select Queries from the list of Objects in the Database window to display the list of available queries.
- Double-click the query you want to run. Access 2003 runs the query and displays the result in Datasheet view (see Figure 10.26).
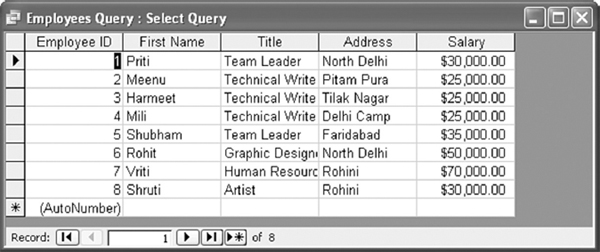
Figure 10.26 Query Result in Datasheet View
10.6.3 SORTING QUERY RESULTS
Microsoft Access allows the sorting of data retrieved by a query so that it may be displayed in a logical manner, that is, either in ascending or descending order of given field(s). To sort a query result, follow the steps given below:
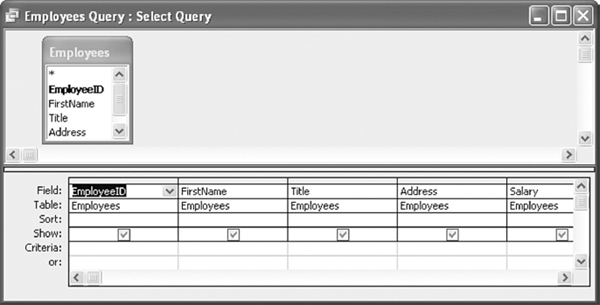
Figure 10.27 Design View of Query
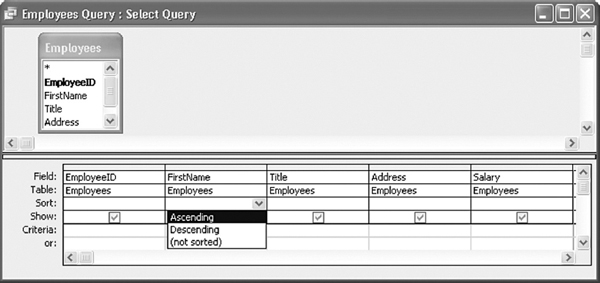
Figure 10.28 Drop-down List Showing Options for Performing the Sort
- Select Queries from the list of Objects in the Database window and click the desired query name in the query list to select it.
- Click the Design button (
 ) on Database window to open the query in Design view (see Figure 10.27).
 - Click in the Sort row of the field that you want to use for performing the sort and click the drop-down arrow to display the choices for sort order (see Figure 10.28).
- Select the desired sort order, for example, select Ascending to sort data in ascending order or select Descending to sort data in descending order.
- Click the Save button (
 ) on the Query Design toolbar to save the query, and then click the Run button (
 ) to view the result of the query in the Datasheet view with desired sort order (see Figure 10.29).
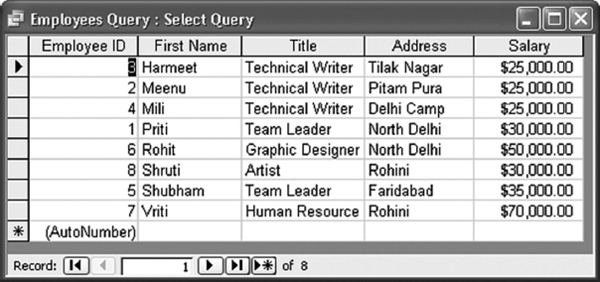
Figure 10.29 Query Result with Desired Sort Order
10.6.4 USING SQL IN MICROSOFT ACCESS
Apart from generating queries using Wizards or Query Designer, Access also facilitates generation of queries using Structured Query Language (SQL). SQL is a language often used in querying, updating, and managing relational databases. Each query created in Microsoft Access (created using a wizard or designed in Design view) has an associated SQL statement that defines the actions of that query.

Figure 10.30 Design View of the Employees Query
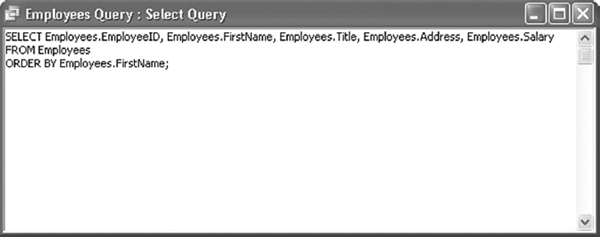
Figure 10.31 Employees Query in Select Query Window
Viewing and Modifying Existing Queries
To view or modify an existing query in SQL View, follow the steps given below:
- Select the desired query name in the query list and click the Design button on the Database window to open the query in Design view Figure 10.30 shows the Employees, query in Design View.
- Select SQL View from the View menu to display the query in Select Query window. This window displays SQL statement that is equivalent to query that you created in Design view Figure 10.31 shows the Employees, query in select Query window.
- If you want to modify or change the query, Access allows you to make the required changes to the SQL statement.
- Select Design View from the View menu to return to the Design view.
Creating SQL Queries
To create an SQL query, follow the steps given below:
- Double-click Create query in Design view in the Database window to display the Show Table dialog box with Tables as the active tab (see Figure 10.32).
- Select the table(s) on which you want to base the SQL query from the table list.
- Click the Add button to add the table(s) in the Design view.
- Click the Close button to close the Show Table dialog box.
- Select SQL View from the View menu to display the query in Select Query window (see Figure 10.33).
- Create the desired query (see Figure 10.34) and click the Save button (
 ) on the Query Design toolbar to display the Save As dialog box.
 - Enter the desired name for the query in the Query Name text box (see Figure 10.35), and then click OK to create the query.
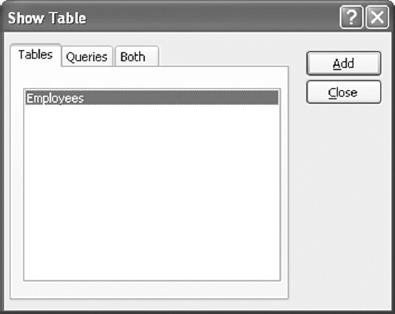
Figure 10.32 Show Table Dialog Box
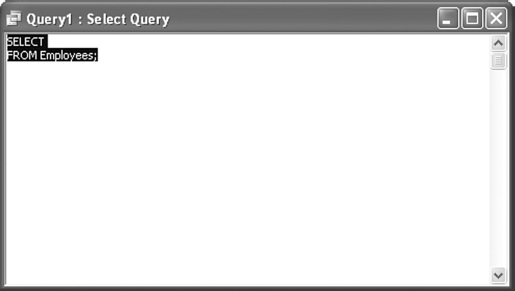
Figure 10.33 Query in Select Query Window
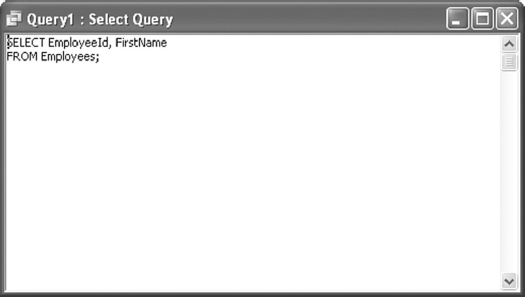
Figure 10.34 Creating the Query in Select Query Window
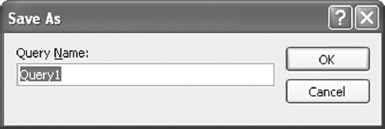
Figure 10.35 Specifying Name for the Query
10.7 FORMS
A form is nothing more than a graphical representation of a table. One can add, update, and delete records in the table by using a form. A form is more useful when the table contains numerous fields. This way the user of the form can view all the fields in one screen. If the same situation was to be handled using the Datasheet view, the user would have to keep scrolling to get the desired field.
10.7.1 CREATING A FORM USING WIZARD
The easiest way to build a form is by using the Form Wizard. To create a form using the Form Wizard, follow the steps given below:
- Select Forms from the list of Objects in the Database window, and double-click Create form by using wizard to display the Form Wizard dialog box.
- Select the table or query from the Tables/Queries drop-down list. The fields related to the selected table (or query) appear in the Available Fields list box. (see Figure 10.36)
- Select the desired fields for the form from the Available Fields list box and click Next. (Note that this displays the fields selected for the form in the Selected Fields list box) (see Figure 10.37).
- Select a layout for the form from the available layouts (see Figure 10.38). Various available layouts are listed below:
- Columnar: A single record is displayed at one time with labels and form fields listed side-by-side in columns.
- Tabular: Multiple records are listed on the page at a time with fields in columns and records in rows.
- Datasheet: Multiple records are displayed in Datasheet view.
- Justified: A single record is displayed with labels and form fields are listed across the screen.
- PivotTable: Multiple records are displayed as an ‘interactive table’ that allows to summarise a large amount of data quickly.
- PivotChart: The graphical representation of PivotTable is a PivotChart.
After selecting desired layout click Next to proceed.
- Select a style for the form from the various pre-defined set of styles provided by Access (see Figure 10.39). and click Next.
- In the last dialog box (see Figure 10.40[a]), enter a name for the form. Select Open the form to view or enter information to open the form in Form view or Modify the form's design to open it in Design view. Click Finish to create the form. Figure 10.40[b] displays the from crcated using From wizard..

Figure 10.36 Selecting Table or Query

Figure 10.37 Selecting Fields for the Form

Figure 10.38 Selecting the Form's Layout
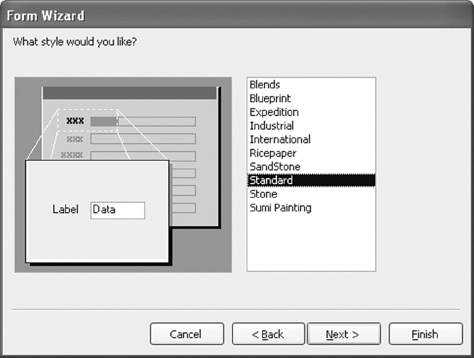
Figure 10.39 Selecting the Form's Visual Style
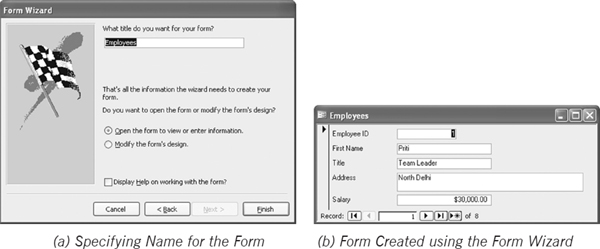
Figure 10.40 Displaying the Form
10.8 REPORTS
Although tables, queries, and forms can be printed, they may not look very professional, as they are not designed for printing purposes. Reports, however, are designed to take the data from a table, or selected by a query, and printed in a professional-looking layout. Reports allow you to group, sort, and manipulate the data to present them in a friendly manner for those who will be reviewing it. Reports can be made by combining data, images, charts, and even audio/video elements. You can add headers, footers, and page numbers, group the information, and change the background colours, among other things.
10.8.1 CREATING A REPORT USING WIZARD
When you design your first report, use the Report Wizard. This is the quickest way of creating a report. The Report Wizard asks you a series of questions to help you design the data exactly as you want. After you have created the report, you can open it in Design view to modify its structure. To create a report using the Report Wizard, follow the steps given below:
- Select Reports from the list of Objects in the Database window, and double-click Create report by using wizard to display the Report Wizard dialog box.
- Select a table or query from the Tables/Queries drop-down list. The fields related to the selected table (or query) appear in the Available Fields list box (see Figure 10.41).
- Select the desired fields to be included in the report (see Figure 10.42) and click Next.
- Based on the fields selected, the next dialog box (see Figure 10.43) may give option to add grouping levels for the report. Select fields from the list to group by fields, and click the Priority button (
 ) to change the order of the grouped fields (if more than one field is selected) and click Next.
 - The records in the report can be viewed in a sorted order. In the next dialog box (see Figure 10.44), specify the fields on which you want to base the sorting and select the desired sort order and click Next.
Figure 10.41 Selecting Table or Query
Figure 10.42 Selecting Fields for the Report
Figure 10.43 Grouping Data for the Report
- Select a Layout and an Orientation for the report (see Figure 10.45) and click Next.
- Select a graphics style for the report (see Figure 10.46) and click Next.
- Enter a name for the report in What title do you want for your report? text box (see Figure 10.47[a]). In addition, you can also select to open the report in either print preview or design view mode. Click the Finish button to create the report. Figure 10.47 [b] shows a preview of the report created.
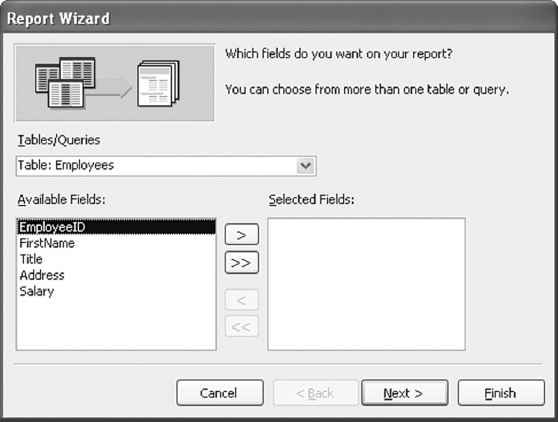

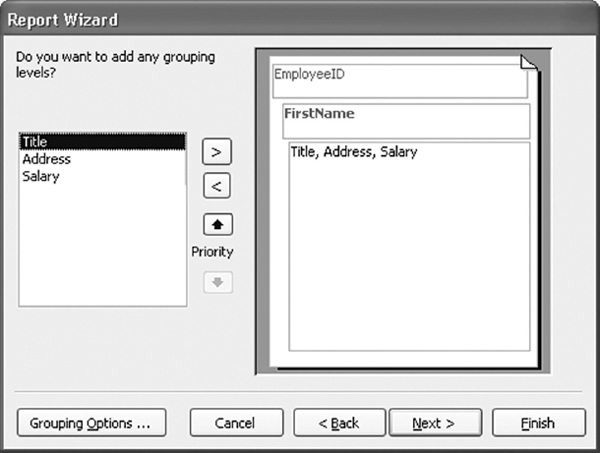
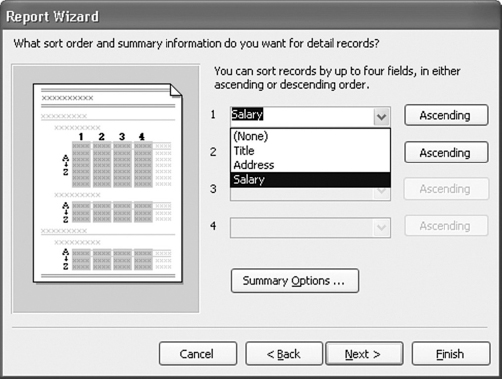
Figure 10.44 Specifying Sort Order

Figure 10.45 Selecting Report's Layout and Orientation
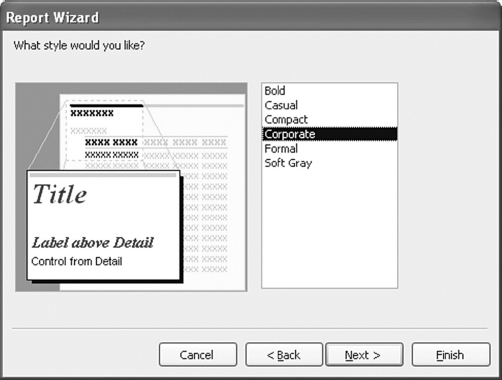
Figure 10.46 Selecting a Style for Report

Figure 10.47 Displaying the Report
LET US SUMMARISE
- Microsoft Access is a database management system that allows the user to create a relational database and then access, retrieve, and use the data in it.
- An Access database consists of a collection of tables, queries, forms, and reports that are used to manage and present data. These components are also called database objects.
- Table in Access holds a collection of information stored in the form of fields and records. All the information necessary for the queries, forms, and reports in the database are based on the data in the table.
- Query facilitates retrieval of information from multiple tables, which can be put together for viewing and analysis purposes. One can select records from different tables, sort the results, summarise, and perform calculations using query.
- Access allows for the sorting of data retrieved by a query so that it may be displayed in ascending or descending order of the given field(s).
- Access facilitates generation of queries using Structured Query Language (SQL) apart from generating queries using Wizards or Query Designer.
- Forms are the front-end side of an Access database that allows entering of data. It is an object in Access, which allows the database users to edit and view information, one record at a time.
- Reports are the polished form data representation. When information from the tables and queries are ready to be displayed, reports help in presenting this information in a formatted manner.
EXERCISES
Fill in the Blanks
- Access provides the feature called _______ that helps in generating the tables, queries, and reports automatically.
- Access is a part of Office suite of applications and is developed by _______.
- _______ data type is used to automatically insert numeric values in a field of a table.
- The extension of an Access database is _______.
- _______ present at the bottom of a table are used to navigate from one record to another.
- Specific information can be retrieved from a database using _______.
- Queries can be generated by Query Wizard, Design View, and through _______.
- Forms are _______ representation of data.
- Reports look very professional, as they are designed for _______ purposes.
- The Form Wizard allows _______ types of layouts.
Multiple Choice Questions
- Which one of the following is not an object of Access?
- (a) Tables
- (b) Queries
- (c) Layouts
- (d) Reports
- Which of the following statement(s) is true about Access tables?
- (a) A database may contain more than one table.
- (b) There can be more than one primary key in an Access table.
- (c) A database contains only one table.
- (d) Access table cannot store images.
- Which of the following data types can hold up to 65,536 characters?
- (a) Text
- (b) Currency
- (c) Number
- (d) Memo
- In Form Wizard, which of the following is the default layout of a form?
- (a) Datasheet
- (b) Columnar
- (c) Tabular
- (d) Justified
- Reports can contain:
- (a) Charts
- (b) Audio
- (c) Images
- (d) All of these
- A report may be based on:
- (a) Table but not query
- (b) Neither a table nor a query
- (c) Query but not table
- (d) Both table and query
- The Show Table dialog box that appears while creating queries in Design view shows:
- (a) Tables
- (b) Queries
- (c) Both (a) and (b)
- (d) None of these
- Which of the following operations can be performed in a form?
- (a) Adding a record
- (b) Modifying a record
- (c) Deleting a record
- (d) All of these
- Choose the odd one out:
- (a) Datasheet View
- (b) Slide View
- (c) Design View
- (d) None of these
- Which of the following is used to answer a question about a database?
- (a) Query
- (b) Table
- (c) Report
- (d) Form
State True or False
- There are no in-built databases in Access.
- For creating a query, at a time only one table can be used.
- It is essential for a user to set the field properties while designing a table.
- While designing query, the Sort row is used to sort the fields in ascending or descending order.
- A user can create queries using SQL commands.
- While creating a table using the wizard, the user cannot rename a field.
- It is essential to define a primary key in a table.
- You can add priority to the fields in a report.
- In Access, macros and modules are not the objects like tables and queries.
- A table can be displayed in either Design view or in a Datasheet view.
Descriptive Questions
- Write a brief note on various Microsoft Access 2003 objects.
- Create a query using the Query Wizard. Now write down the steps that must be followed to sort the records based on a key in descending order.
- Create a report named “Books” that show the books issued according to date and serial number of the Book ID.
- Design and create a database for storing a Birthday List of your family and friends. Include fields such as name, birthday, favourite colour, and Hobby. Insert at least six records in the database.
ANSWERS
Fill in the Blanks
- Wizards
- Microsoft
- AutoNumber
- .mdb
- Navigation buttons
- Queries
- Structured Query Language (SQL)
- Graphical
- Printing
- Six
Multiple Choice Questions
- (c)
- (a)
- (d)
- (b)
- (d)
- (d)
- (c)
- (d)
- (b)
- (a)
State True or False
- False
- False
- False
- True
- True
- False
- False
- True
- False
- True