
This chapter covers
Overview of JSNI
Passing Java objects to JavaScript
Calling Java code from JavaScript
Loading external JavaScript libraries
Wrapping JavaScript code as Java classes
GWT’s key benefit is the ability to abstract away from JavaScript, which frees the developer (you!) from concerns over browser differences and developing in an untyped programming language. But just as normal application code occasionally uses assembly-language segments for special needs, so client-side GWT applications can interact directly with JavaScript. In a normal application, you may use assembly code to get speed advantage or access hardware in the only way it can; for GWT applications, in our experience, there are four possible situations when it may be sensible to use JSNI (you may think of more):
To enable communication between a main application and component applications using a JavaScript variable (although only when they can’t be in the same variable scope)
To access browser functionality that hasn’t been included directly with GWT
To expose an API of your GWT application to other applications on your web page that can execute JavaScript (useful if you’re replacing legacy applications in an existing site)
To access useful JavaScript libraries that you don’t have either the patience or the ability to translate into GWT (you may, for example, be restricted by a license associated with the library)
For the Dashboard application, you’ll enable communication between the main application and the component applications by using a JavaScript variable, which can be set by the menu system and read by the component applications when they’re being deleted. The original version of the slider we discussed in chapter 7 used the JavaScript Native Interface (JSNI) to find the scroll position of the browser window to ensure that the thumbnail was moved to the correct location, regardless of how far the window had been scrolled; this functionality wasn’t available directly in GWT until version 1.4.
In this chapter, we’ll look at the general syntax of JSNI and how you can use JSNI to communicate to the browser and other GWT applications. We’ll round off the chapter by showing you how to load and access third-party JavaScript libraries, in particular some JavaScript search libraries from Google, which allow you to produce Dashboard applications such as those shown in figure 8.1.

Figure 8.1. The Dashboard showing the Google Video Search application on the left and the Google Ajax Search application on the right. Both applications are JavaScript libraries wrapped as GWT widgets using JSNI.
There is a strong caveat with all this talk about JSNI: Ask yourself if you really need to use JSNI. A lot of the time, the capability you’re after may exist in the standard GWT. One key thing to remember about JSNI is that it can only be included in client-side code—so no JSNI can appear in code destined for, or on, the server. This makes sense if you step back and remember that JSNI is JavaScript code, which needs to execute in a web browser!
Before you’re in the position of being able to build the two widgets for this chapter, we need to introduce and explore some of the attributes of JSNI—the basic syntax and operation.
JSNI is GWT’s mechanism to allow you as a programmer to embed JavaScript in the Java code. We can’t overemphasize the point that JSNI is almost a last-resort approach. Many issues that look like they need JSNI can be solved at the GWT Java level if you spend time looking. It’s possible to view the relationship between GWT Java and JSNI as you do the relationship between a high-level programming language and assembly code: Yes, you can do it, but it’s sensible only if there is a clear need to do so.
It’s possible to carry this analogy further, because JSNI, just like assembly language, is less portable across systems. If you write something in JSNI that works in one browser, there is a risk that it may not work at all, or perhaps may work in a different way, in other browsers. As an example, you can count the number of children for a DOM element using the simple Java GWT DOM.countChildren() method. If you were to write that method in JavaScript, you would have to, as GWT does for you, write several versions to cope with DOM differences between Internet Explorer and the other browsers (check out the DOMImplStandard and DOMImplIE6 classes in the GWT gwt-user.jar file to see the GWT definitions for this method in the different browsers). In JSNI, you can write only one of these methods, or you would have to add the own browser detection JavaScript as well. This isn’t in the spirit of GWT, which advocates writing once and running in many different browsers. There is also the risk that writing your own JSNI code could introduce memory leaks, unless you’re an expert at those matters.
Note
JSNI is applicable only to client-side aspects of your application, because JavaScript doesn’t run on the server side. It’s therefore not possible to use JSNI code in any server-side code or to pass an object over remote procedure calling (RPC) to the server and expect to be able to execute any included JSNI code server-side.
However, let’s be a little more positive about JSNI. In the cases where you do have to use it, it can be powerful. JSNI lets you interface between Java and JavaScript in a type-safe way; you can use JavaScript objects in the Java code and rely on Java’s strong typing to protect you against various programming errors. But again, the more functionality you include in a single JSNI block, the less you can rely on Java’s strong typing to minimize errors.
JSNI also provides a seamless way of moving between Java and JavaScript, allowing you to pass objects and exceptions across the boundary in both directions. Through JSNI, you manage JavaScript objects from Java, and you can call back to the Java code from the JavaScript code you write. As we mentioned in the chapter introduction, one use is to wrap a third-party JavaScript library, where you create JavaScript objects from the library and pass them around the GWT Java code before perhaps sending them back to the JavaScript library.
One word of warning about JSNI: It’s potentially a moving target during the early stages of GWT adoption. The existing model works well in most cases, as you’ll see later in this chapter, but already several requests for reviews have been published about changing functionality of certain aspects. A guiding principle of JSNI coding is to spend as little time as possible in “the dark side”; each JSNI method should be at an atomic level (perform one clear function) so that you isolate issues and keep as much control as possible in the strongly-types Java realm.
Let’s move on and assume that you’re in a situation where JSNI is the approach you need. The first thing you need to understand is how to use the syntax.
If you’re familiar with writing native methods in Java for other languages, then JSNI will seem relatively familiar. If you’ve never written native methods before, don’t worry; their syntax is a little strange but not frightening. Java Native Interface (JNI) is the Java approach that allows Java code to interface with components written in other languages, for example C or C++ or assembly. JSNI is the GWT Java equivalent for interfacing with JavaScript components, and it follows a syntax similar to that of JNI.
In the next few sections, we’ll look at the syntax used to cross the boundary both ways between Java and JavaScript and how the objects you pass over that boundary are treated. Here’s a simple JSNI method call:
public static native void method_name(ObjectTyp someData)
/*-{
   [email protected]::data1 == "GWT In Action"
}-*/;
We hope that doesn’t look too scary, even with the @ and :: symbols sprinkled in. To start to understand why these are there, we’ll first look at how you call JavaScript functionality from a GWT Java program.
To include JavaScript code in a GWT application, you must write it in a specific way so that both the syntax checkers of Java and the GWT Java compiler can recognize it and deal with it appropriately. For syntax checkers, that means ignoring the code because it isn’t Java; and for the GWT compiler, it means merging it in a structured way into the JavaScript output of compilation.
A basic JSNI method is defined as shown here:

In the template, you define the method in a normal Java way, but you must include the keyword native as one of the modifiers ![]() ; this identifies the code to the Java compiler as JNI code and to the GWT compiler as JSNI code. To help any syntax checkers know that they should avoid parsing the JavaScript code, you wrap it as a comment by using a modified standard comment, which starts with the characters
; this identifies the code to the Java compiler as JNI code and to the GWT compiler as JSNI code. To help any syntax checkers know that they should avoid parsing the JavaScript code, you wrap it as a comment by using a modified standard comment, which starts with the characters /*- (a forward slash, an asterisk, and a dash) and ends with -*/ (a dash, an asterisk, and a forward slash) ![]() . It’s also important not to forget the trailing semicolon at the end of the definition; otherwise your code won’t compile!
. It’s also important not to forget the trailing semicolon at the end of the definition; otherwise your code won’t compile!
Crossing the boundary from Java to JavaScript can come in two forms: writing JavaScript code in the Java application that performs some dedicated functionality, or writing JavaScript in the Java application that calls functionality in a JavaScript library already loaded into the web browser. Both methods follow the same syntax of extending the previous template to provide parameters, a return type if necessary (otherwise the return type must be defined as void), and the native code. You can consider this crossing of the boundary diagrammatically as shown in figure 8.2.
Figure 8.2. The interaction between Java and JavaScript code when crossing the Java-to-JavaScript boundary in a JSNI call from a GWT application
Here is some typical code required to cross the boundary from Java to JavaScript:

Overall, the definition is the same as a normal Java method; you provide a list of parameters that can be passed in and a possible return object type. If you provide a return type, rather than just a void, then the JavaScript must return an object of the correct type. (Be aware that JSNI code can’t create new Java objects; it can manipulate ones passed in or create new JavaScript objects, but not new Java objects.)
Remember
It isn’t possible to create new Java objects in a JSNI code block. Return types must either be primitive types, manipulated Java objects that have been passed in as input parameters, or references to newly created JavaScript objects (a JavaScriptObject type).
It’s important to understand how the objects you provide as parameters are handled across the Java-to-JavaScript boundary, as you’ll see in the next section.
We have mentioned before that one of the benefits of using Java to develop the Ajax/rich Internet applications is the strong typing provided by the Java language, which isn’t present in JavaScript. This missing typing model could cause problems as you start crossing the boundary from Java to JavaScript.
Unfortunately, there isn’t much you can do about the typing capabilities of JavaScript. Once the objects have passed into the realm of JavaScript, they’re sadly on their own. This brings us back to the point we mentioned earlier—the shorter amount of time you can spend in this potentially lawless world of JavaScript, the better. If you have to spend a long time there, it’s preferable that you do so only to interact with stable third-party JavaScript libraries. What you can do, though, is ensure that a clearly defined and repeatable mapping exists between Java typed objects and JavaScript untyped objects, which is what GWT provides.
Primitive Java numeric types, such as byte, short, char, int, long, float, or double, become simple objects in JavaScript whose value is that of the original object. For example, if you have a Java char, char keyPress = 'a', then it will become the JavaScript variable var k = 'a'. Similarly, the Java int, int val = 10, becomes the JavaScript variable var v = 10.
A Java String is translated across into JavaScript as a simple variable to which the original text is assigned. Therefore the Java object String name = "GWT In Action" becomes the JavaScript variable var s = "GWT In Action". Finally the simple Java boolean, becomes another simple JavaScript variable; the Java boolean b = true becomes the JavaScript variable var b = true.
Moving on to more complicated Java objects that can be passed across the boundary, you have the Java array, a Java object, and a new object to GWT called the JavaScriptObject. We’ll discuss the last object more in the next section; for now, you should think of it as just a reference to a JavaScript object created somewhere else that can be passed around the Java code and on to other JavaScript methods—but you can’t look into its contents from the GWT Java code. This may sound strange, but we’ll explain in more detail later in the section on this object.
Passing an array across the Java-to-JavaScript boundary is treated in a similar opaque way; you know you have an array object, but you can’t look into its contents. This means that if the JavaScript code needs to use values in the array, then you should move them out of the array before you cross the boundary: either into separate parameters or into another type of user-defined Java object. You can manage Java objects in JavaScript through the JSNI interface, as we’ll discuss next.
You can also pass your own defined Java objects across the Java-to-JavaScript boundary; GWT provides a special syntax allowing you to access the fields and methods of that Java object. This will take a little bit of explaining, so please, stick with us.
Let’s say you have an object of type Data, which is defined by the class shown in listing 8.1 to contain a simple string and an integer.
Example 8.1. Example class that will be accessed through the Java-to-JavaScript boundary
package org.gwtbook.client;
public class Data{
   String data1 = "GWT In Action";
   int version = 1;
}
You use an instance of this type in a new class defined in listing 8.2, called DataManip.
Example 8.2. Example class demonstrating accessing Java objects through the Java-to-JavaScript boundary
In the DataManip class, you have a couple of additional class variables: one called correct ![]() and then other a static variable called
and then other a static variable called checked ![]() (it doesn’t matter what they stand for in this example). You also define a JSNI method
(it doesn’t matter what they stand for in this example). You also define a JSNI method ![]() called
called doSomething(), which takes as a parameter an instance of the Data class but returns nothing (we’ll cover going across the JavaScript-to-Java boundary in a short while). When doSomething() is called, you want it to look at the DataManip class’ correct value ![]() ; if that is
; if that is false, then you want to check the static field checked ![]() . If that too is
. If that too is false, then you confirm whether the Data instance passed in as a parameter has its data1 field set to “GWT In Action” and the version value set to 1 ![]() ; if they are, then you do something else in the code.
; if they are, then you do something else in the code.
To perform this functionality, you need to access an instance field, a static field, and a field in a Java object passed in as a parameter, in that order. In each case, you need to use the JSNI-specific syntax for accessing Java objects, the template for which is shown in figure 8.3.
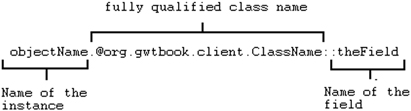
Figure 8.3. Explanation of the JSNI method to access a field in a Java object. The first part comprises the name of the instance (an object name, the keyword this, or blank for a static field). Next are the fully qualified class name and the field name.
When you access the instance field ![]() , the name of the instance is
, the name of the instance is this, the class name of this instance is org.gwtbook.client.DataManip, and the field you’re after is called correct. Accessing this field is, therefore, performed by writing the following in the JSNI code:
[email protected]::correct
Accessing the static field ![]() requires you to access a field where there is no defined
requires you to access a field where there is no defined objectName (because the field is static across all instances). In JSNI, you write
@org.gwtbook.client.DataManip::checked
(Notice that the period is missing and only the @ symbol is still required if there is no object name to reference.)
Finally, when you want to reference the data1 field in the parameter that you’ve passed in, then the parameter name, someData, is the objectName, and you write
[email protected]::data1
You can also access the methods from the Java object passed across the boundary in a similar way. We’ll discuss how that works once you’ve seen how you return objects back across the boundary to the Java code.
When you’ve completed the functionality you need in JSNI, it’s common to pass an object back in return. As with all Java methods, you need to define the return type of the JSNI method, which will either be a Java primitive, a Java object, a GWT JavaScriptObject, or void. Diagrammatically, you’re performing the action shown in figure 8.4; once complete, program control is back in the hands of the GWT Java code.
Figure 8.4. Examining the interaction between Java and JavaScript code when returning values across the JavaScript-to-Java boundary in a JSNI call from a GWT application
Just as there was a defined mapping between Java and JavaScript objects for the parameters, such a mapping exists when going from JavaScript to Java for the return values.
To get a Java primitive numeric coming out of the method call, the value returned from the JavaScript must be a numeric value. You need to be careful with returning primitive numerics because GWT doesn’t determine whether the type is correct. If you define the Java method to return a Java int, and the JavaScript returns the value 1.5, then the result passed out of that surrounding Java method will be unpredictable.
Returning Strings and booleans is much simpler because they translate directly to their Java equivalents. Java objects can also be returned from the JavaScript; however, you can’t just create Java objects in the JavaScript. If you want to return a Java object, then it must have been passed in as one of the parameters.
Take care if you’re returning null objects, because the JavaScript undefined value isn’t treated by JSNI as null; if it’s used, unpredictable results can occur (you must always use the null value). You may even want to ensure that any JavaScript variable you pass back is checked to be sure it isn’t the undefined value before it’s returned.
We mentioned briefly when passing in parameters that GWT provides a special object called the JavaScriptObject. This type of object can be returned by the JSNI method if a new JavaScript object is created as part of the call. You’ll see this in use often later in this chapter when you use JSNI methods to create new JavaScript objects from a third-party library. You need a reference to these third-party objects in the Java code because you’ll later be calling methods on them, and they’re therefore passed back as subclasses to the JavaScriptObject. This JavaScriptObject is opaque to the Java code—you can’t use Java code to call the methods in it or even to see its fields; you need to pass them back into new JSNI methods to do that. But you’ll see this in action a little later. First we need to finish our journey through the JSNI syntax by looking at how you can call Java methods from JavaScript.
As well as being able to access fields on Java objects from JavaScript, you can execute methods defined in those objects in a similar manner, as shown in figure 8.5. To refer to a method, you use a syntax similar to that you used to refer to fields. There are, however, some slight differences. This time, the generic template for calls to methods is shown in figure 8.6.

Figure 8.5. Examining the interaction between JavaScript and a Java object when crossing the JavaScript to Java boundary in JSNI

Figure 8.6. Explanation of the JSNI method to access a method in a Java object. First is the instance name, followed by the fully qualified class name. The method name is followed by the parameter signature and then the arguments.
The first part of this should be familiar from when you were accessing fields, with the same discussion about there being no objectName if you’re accessing a static method, using this if you accessing a method in the current instance, and using the parameter name if you’re accessing a passed-in object to a method. The difference occurs in the second half of the template, where you see the values param-signature and arguments. The arguments part is a list of the various arguments whose types match the parameter signature. JSNI uses the internal Java method signature to define the parameter signature, but it doesn’t require a definition of the return type to be included. Parameter type signatures are defined in table 8.1.
Let’s look at a simple example, shown in listing 8.3.

In ![]() , you call the
, you call the m1() method in this class, which takes a Java String as its parameter; so, you must define the parameter signature as Ljava/lang/String;. Then, you call the m2() method ![]() , which expects an
, which expects an integer, so the method signature is I. (In your code, these definitions should all be on one line—it’s sometimes difficult to get all of them on one line in the book!)
The final type of objects that can come out of the JSNI call are exceptions.
It’s strongly recommended that JavaScript exceptions be handled in the JavaScript segments of the JSNI method and that Java methods be handled in Java code. The reason is that when a JavaScript exception creeps over the JavaScript boundary into the Java, it becomes, and can only become, an object of type JavaScriptException.
You don’t necessarily lose information about the JavaScript exception, because you can use the getName() and getDescription() methods to return String values about the original JavaScript exception. But relying on these methods leads to messy code requiring the use of String comparison to handle the exceptions, whereas they can be handled more gracefully in the JavaScript code.
The only exception to this rule is where an exception is raised in Java code called by a JSNI method, which is then handed back to more Java code. In this case, the original Java exception typing is preserved through the boundaries.
With all these basics in place, let’s look at the occasions when we said you may need to use JSNI, starting with how you perform different types of communication between components (browser, GWT applications, and legacy code).
You can use JSNI to allow the applications to talk to the browser, to allow GWT applications to message each other (on the client side), and to allow legacy applications to talk to the GWT application. This chapter looks at each of these types of communication in turn.
Due to the process GWT uses to load GWT applications, which we’ll look at in chapter 17, you have to subtly alter the way in which you access the standard JavaScript variables window and document. The way that GWT loads the applications means you don’t have direct visibility of these JavaScript variables; however, GWT fixes that in one of two ways—you can talk to the browser either using a method in the Window Java class or through the newly provided JavaScript variables $wnd and $doc. The Window class, that we’ll look at next, keeps you in the realm of Java.
If you’re thinking of using functionality normally associated with the JavaScript window variable, you should first double-check that the GWT Window class (which can be found in the com.google.gwt.user.client package in gwt-user.jar) doesn’t provide the access you’re looking for. It provides access to a number of functions normally accessed through the JavaScript window variable (such as raising alert and confirmation windows, opening new browser windows, setting the browser title, and enabling/disabling scrolling). You’ll use this class in the Dashboard to display the confirmation message when a user deletes a component, as you can see in figure 8.7.
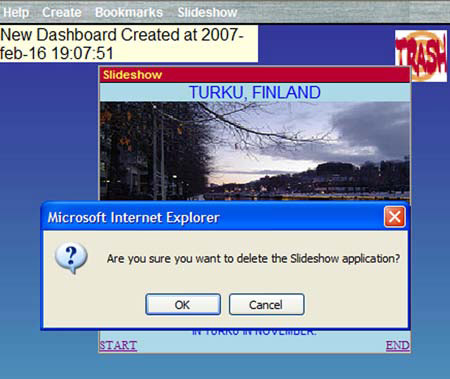
Figure 8.7. Dropping the Slideshow widget on the trash icon pops up a JavaScript confirm message. Rather than using JavaScript to get the message, you use the GWT Window class’s confirm() method.
When the user attempts to delete an application, you create a confirmation box using the code shown in listing 8.4. (If you wanted purely an alert window, then you could use the Window.alert() method.)
Example 8.4. Using the confirm() method in the Window class to present a confirmation window
Window.confirm(
  messages.ConfirmDeleteMessage(
    this.parkComponent.getName()));
While we’re thinking of the Window class, we should point out that in the Dashboard, you prevent the browser window from scrolling by using the Window.enableScrolling() method; passing false to this method lets you to stop component applications from moving completely out of the browser area. The majority of the communication with the browser should be performed through the provided GWT classes. But on occasions where GWT hasn’t provided a mechanism as yet, you’ll have to dig down to the native JavaScript to do that.
On rare occasions, the methods provided by the GWT Java classes for communicating with the browser won’t provide the functionality you need. In these cases, you need to use JavaScript (through JSNI); but because of the way the GWT loading mechanism works, you can’t use the normal JavaScript window and document variables (see chapter 17 for more on the loading mechanism). Instead, GWT provides the variables $wnd and $doc, respectively.
Prior to GWT 1.4, the Slider class you built in chapter 7 had an example of using these variables. When a user clicks the slider’s background, you want the thumbnail to move to the appropriate location. This works fine using the standard methods, until someone scrolls the screen. Once that happens, the x and y positions the onMouseDown event provides you with no longer correlate with the locations on the slider’s background. You need a way to obtain the scroll-off sets and then use those in the positioning calculations. The Slider class originally included some JSNI code that was responsible for getting those values. From GWT 1.4 on, GWT provides its own method in the Window class to do the same task. The code you would have used to implement that functionality is shown in listing 8.5.
You use both the $wnd and $doc variables to access y offset properties of the browser. At ![]() , you retrieve the
, you retrieve the pageYOffset value for non-IE browsers, and at ![]() you need to use the
you need to use the $doc variable to retrieve the body.scrollTop variable for IE. Whichever value you eventually retrieve is the one returned to the caller of the method.
This is also a great example to point out the limitation of JSNI we spoke of earlier—managing browser differences. The code tries to identify browser differences using a number of conditional statements, checking for the existence of particular variables to understand what type of browser it’s dealing with. Not exactly elegant, and it could be solved using class replacement based on the browser property technique we discuss in chapter 15, but that would make it harder to explain the point of this example!
If you’re confident that there are no browser differences, then you can proceed in the manner shown in this section. Through these $doc and $wnd variables, all the usual window and document browser functions are possible. Note that the Slider class now uses the GWT 1.4–provided methods Window.getScrollleft() and Window.getSrollTop() instead of your JSNI method.
Another place in the Dashboard where you use these variables is to give the Dashboard user the ability to change locale through the menu system. When the user clicks a locale in the menu system, you call the function shown in listing 8.6 with the appropriate locale parameter. (The GWT Command that is called when the menu is clicked first removes the onWindowCloseListener(), which you added in chapter 6, so the user isn’t bombarded with warning messages; then, this code is called by that Command.)
You’ll use the $wnd variable often when interfacing between GWT applications and any JavaScript library that may have been loaded by the application, as well as when exposing an API into the GWT application.
GWT applications come in many shapes and sizes. Some, like the Dashboard, take up all of the browser’s space; many others fit in a small segment of a web site. As you saw in chapter 1, there will be times when the GWT application may replace an existing application. In all these cases, you may need to talk to the application from an external entity—which may be another GWT application or some legacy code. In order to do this while preserving the standard GWT loading mechanism, you need to expose the GWT application through a JavaScript API, something that GWT can easily manage with a bit of JSNI magic.
To expose an API, you need to expose JavaScript methods outside of the application that have the following features:
Can call parts of the application’s code
Have names that don’t get obfuscated by the compiler so you can reference them
You can achieve the first part of this through using JSNI to call back to static methods in the code. The second part is achieved by carefully constructing new methods in the browser by using JavaScript definitions. You can access the main browser page through the $wnd object. To create new JavaScript methods at that level, you create definitions along the following lines:
$wnd.newMethodName = function(parameters){
   // Some code
}
If you make the internal part of this definition a JSNI call back to static methods in the GWT application, then you’ve exposed an API to external applications. Let’s look at how you do this for the Dashboard application.
There isn’t much of an API that you can expose for the Dashboard you’re building, but for the sake of an example, you’ll expose two methods for setting and getting the Dashboard’s name (which is usually changed by the user clicking it and typing in a new name). In the application download, we provide another HTML file than the one you’ve been using so far; it’s called Dashboard_APITest.html. That file provides two new buttons, Get and Set (at the top of the web browser page), which aren’t part of the GWT application but call the API methods. Figure 8.8 shows that clicking the Get button displays an alert window with the current name of the Dashboard as its contents.
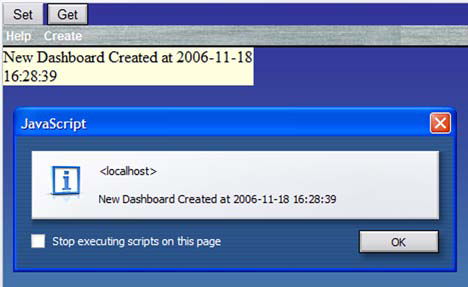
Figure 8.8. Clicking the Get button on the web page to activate the Dashboard’s API getDashboardName() method
When you click the Set button, the JavaScript in the HTML page calls the Dashboard’s __setDashboardName() API method, which calls back through the defined API into the Dashboard application and changes the name, as shown in figure 8.9.
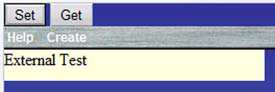
Figure 8.9. The result of clicking the Set button on the web page, which activates the Dashboard’s API setDashboardName() method
In the Dashboard.java file, you’ll find the segment of code that accomplishes this (see listing 8.7).
The first two methods (![]() and
and ![]() ) provide the functionality for setting and getting the Dashboard’s name in normal Java code, which is held on the
) provide the functionality for setting and getting the Dashboard’s name in normal Java code, which is held on the EditableLabel widget called dashboardName.
The third method ![]() is the JSNI method that sets up the external methods for the API. In this method, you can see the creation of two new JavaScript methods: one for setting the Dashboard name
is the JSNI method that sets up the external methods for the API. In this method, you can see the creation of two new JavaScript methods: one for setting the Dashboard name ![]() and the other for getting the name
and the other for getting the name ![]() .
.
It works by adding two new methods to the browser’s window object, which then means those methods are available to anyone else who can see the browser’s window object. In the new method definitions, you use JSNI to refer to the static methods (![]() and
and ![]() ) in the Java class. If an external entity calls the
) in the Java class. If an external entity calls the __getDashboardName() JavaScript method accessible from the browser’s window object, then the GWT Java getDashboardName() ![]() method is invoked.
method is invoked.
To test the API, add two new buttons to the Dashboard_APITest.html file, which call the set and get methods as follows:
<button onClick="javascript:__setDashboardName('External Test'),">
   Set
</button>
<button onClick="javascript:alert(__getDashboardName());">
   Get
</button>
Each button calls the appropriate JavaScript method.
You can use this API approach to provide access to whatever functions you require in the GWT applications by adding the necessary code. As we mentioned at the start of this section, this approach can be useful if you’re migrating an existing web site component by component, because you can still allow legacy JavaScript code to access new GWT applications in the way they accessed the old JavaScript code the application has replaced.
Using an API is a way of calling into the GWT applications, and you could use the same approach to communicate between two separate GWT applications on a web page. Another way to do this inter-application communication is to use a variable stored in the browser page and pass values through that variable.
When you drag a Dashboard component application over the trash icon, you want it to be removed from the screen. Before it’s removed, though, you need to check whether the user should be asked for confirmation about whether it should be deleted. The mechanism you’ll use is for the component application to check a JavaScript boolean variable, which is set by the main Dashboard application. This is a useful approach when you need to pass data between two distinct GWT applications, but it should be limited to that situation.
The normal way of passing information between components in your application is to ensure that both components are in the same variable scope in your GWT code, as shown on the left in figure 8.10.

Figure 8.10. On the left, the variable is in the scope of both components and can be manipulated directly in the code. On the right, the variable is out of the scope of both components, so another mechanism is needed to alter the variable’s value. For the Dashboard, you manipulate the variable using JSNI code.
To understand this idea of the scope of a variable, check out the code shown in listing 8.8. The variable confirmDelete is visible to both objects.
Example 8.8. How a variable can have scope over a couple of objects
public class Test{
   boolean confirmDelete = true;

    public class Obj1{
       public Obj1(){
         confirmDelete = false;
       }
    }

    public class Obj2{
       public Obj2(){
         confirmDelete = true;
       }
    }
}
Most of the time, you can make sure the variables needed are in scope of all components by having a classwide variable as shown in listing 8.8, by having setters and getters in the subclasses, or by using a static variable. Typically, components that need to share variables are in the same panel, or composite widget, or application. However, on rare occasions, you can’t keep a variable in scope.
In the Dashboard application, you have a variable called confirmDelete that needs to be shared with the menu system and all the DashboardPanels. If the variable is set to true and the panel is dragged over the trash icon, then the panel confirms with the user whether they want to delete it. Although you can keep this in scope of the component applications by using a static variable in the Dashboard class, you’ll break the rules slightly and implement it as a JavaScript variable outside the scope of the GWT to allow us to explain the concept shown on the right in figure 8.10.
In a model such as that shown in figure 8.10, you make a JavaScript variable in the HTML page and then use JSNI code in the Java GWT applications to access it. The code in the Dashboard.java file to “get” and “set” this JavaScript value is shown in listing 8.9.
Example 8.9. Code used from the GWT Java code to set and get a JavaScript value set in the Dashboard.HTML file
private native void setConfirmDelete(boolean confirmDelete)/*-{
   $wnd.confirmDelete = confirmDelete;
}-*/;

private native boolean getConfirmDelete()/*-{
   return $wnd.confirmDelete;
}-*/;
At their basic level, the getConfirmDelete() method returns the value of the JavaScript variable confirmDelete, and the setConfirmDelete() method sets it. Similar code for getting the value can be found in the implementation of the DashboardPanel in chapter 5, which completes the link between the main Dashboard application and the component applications.
As well as interacting with your own GWT components using JSNI, you can also use it to interact with existing JavaScript libraries.
To use an existing JavaScript library, such as the Google Video Search capability, you need to load the necessary JavaScript code into the application. In the case of the Google Video Search, this means loading in two separate JavaScript libraries, both of them downloaded from Google at runtime. The first is the Google Ajax Search library (which is common across both the Search and Video Search applications), and the second is the specific JavaScript library for the video searching. Because two different libraries are needed, we’ll explore each of the two different GWT ways of loading libraries: using the HTML file, and using the module XML file. For the Google Ajax Search library, you’ll use HTML.
The first of the two ways we’ll look at for loading a JavaScript library is through the HTML file the application lives in. You do so by using the normal way of linking JavaScript files to a web page, using the <script> tag. In the head section of the Dashboard.html file, you place the following text:
<script src="
http://www.google.com/uds/api?file=uds.js&v=1.0&key=X"
type="text/javascript">
</script>You need to replace the X with a Google Ajax Search API key, which you can obtained from http://code.google.com/apis/ajaxsearch/ (when using the API in hosted mode, you should get a key that is linked to the http://localhost:8888domain; if and when you deploy your code to your server, you’ll need to change this key to one reflecting your URL at that point).
That’s it for loading a JavaScript library via the HTML. As you can see, it’s nothing different from the way you would normally load a JavaScript file for an HTML page. If you don’t have access to the main HTML page, or you want to be more modular, add the JavaScript through the module XML file. For the video-searching JavaScript library, you’ll use this module XML file method.
In chapter 9, we’ll talk about using the ability to load JavaScript libraries for applications through the module XML file. This is a useful approach if you want to modularize the applications and ensure that everything required by the application is kept with the application. It made sense for you to load the Google Ajax search JavaScript library in the HTML page, as you just saw, because it’s used by more than one application.
The Google Video Search JavaScript library, on the other hand, is only used by Google Video Search Dashboard application, so you’ll load this code through that application’s module XML file. In the GoogleVideoSearch.gwt.xml file, you define the following to load the gsvideobar JavaScript file:
<script src="
       http://www.google.com/uds/solutions/videobar/gsvideobar.js">
</script>
Pre–GWT 1.4, it was necessary to include some JavaScript inside a CDATA tag that returned true to indicate that the script had loaded. That isn’t necessary beginning with GWT 1.4, because the bootstrapping process now guarantees that the JavaScript is loaded (assuming of course it can be found).
With the JavaScript library loaded, it’s time to start using it. There are probably many different patterns of code you could use to achieve this, but we’ll look next at the one we, as authors, have become comfortable with.
One powerful aspect of GWT is the ability to wrap any existing JavaScript library (your own or from a third party) as a GWT widget that can then be used as normal code in the GWT applications. You’ll need to do this if you can’t translate the library into Java, either because it’s too much effort or because you don’t have the ability (perhaps due to licensing or visibility of code).
JavaScript libraries exist for Google Maps and the Google Ajax Search capabilities, all provided by Google, and all falling into the category of JavaScript code that you don’t have the ability to write yourself as Java code. There already exists a useful GWT widget that wraps the Google Maps functionality (http://sourceforge.net/projects/gwt/), so we’ll focus on Google’s Video and Ajax search libraries.
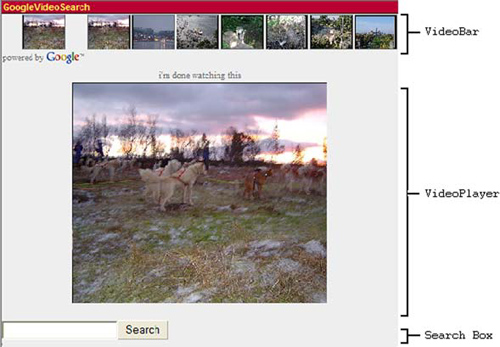
Google’s Video Search capability (http://www.google.com/uds/solutions/videobar/index.html) provides a nice video-searching application, as shown in figure 8.11.
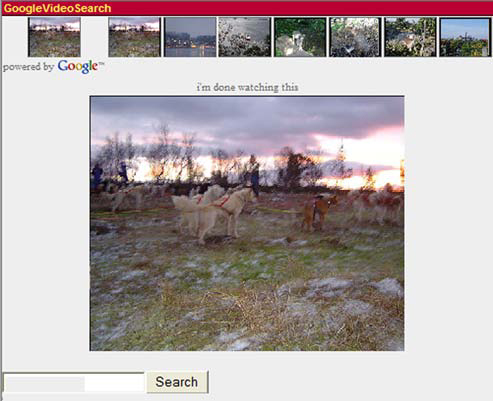
Figure 8.11. The Google Video Search application running in a browser. The whole coding for this is a JavaScript library provided by Google, which is then wrapped in JSNI for use in GWT.
The wrapping of this is relatively simple and a little limited, because you wrap one JavaScript object and expose only two functions: create() and execute(). But it gives us a good opportunity to examine the concepts in detail and give you an understanding of how the flow works between the objects you need to create. To take you further into JSNI, you’ll wrap the Google Ajax Search functionality (http://code.google.com/apis/ajaxsearch/); at the time of writing this book, it provides five different searchers in one search control, three of which are shown in action in figure 8.12.
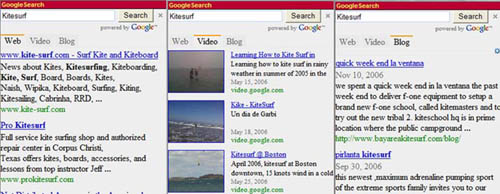
Figure 8.12. Three views of the Google Search Dashboard application, showing the Web, Video, and Blog Search capabilities on the phrase “Kitesurf”
The key to implementing both of these Dashboard component applications is, of course, JSNI and the use of all the techniques we’ve discussed so far in this chapter. In the general case, you perform the following steps:
Load the JavaScript library.
Access the loaded JavaScript library, and create instances of the necessary objects.
Use the objects.
Step 1, loading the JavaScript library, allows you to use a particular capability you need for the application (for example, to use the Google Video Search capability, you need to load two JavaScript libraries into the application). You’ve already seen how you can load libraries, so let’s take the next step and begin to look at how you access the library.
The journey to create and use objects in the newly loaded JavaScript library follows the hierarchy shown in figure 8.13.

Figure 8.13. The object hierarchy involved with implementing a GWT widget that wraps a JavaScript library
First, you’ll create a simple Java class that contains the JSNI code needed to interact with the JavaScript library; this is the GWT Impl Class. Next, you’ll create a Java class that extends the basic GWT JavaScriptObject class. This class is an opaque object that wraps the JavaScript object obtained by creating a new JavaScript object from the JavaScript library. It also contains an instance of the Impl class to enable you to call the JavaScript objects methods. Finally, you’ll use the JavaScriptObject class inside the GWT widget class to provide a widget. Let’s take these three steps in a little more detail, beginning with the GWT Impl class.
This is the first class you build when wrapping JavaScript libraries, and it contains all the JSNI code required for interfacing with the particular JavaScript object you’ll be wrapping. It’s useful to look at JavaScript examples provided by the library’s documentation to see how you should create the implementation class and then identify the methods you want to expose from that. For the Google Video Search, Google provides the code repeated in listing 8.10 as an example.
In this Google example, an options object is created ![]() followed by a new
followed by a new GSvideoBar JavaScript object with two DOM elements representing where the two components will be displayed as well as the previously created options object as parameters ![]() . Finally, the code executes a search
. Finally, the code executes a search ![]() on the newly created
on the newly created GSvideoBar.
The GWT Java implementation class will have to emulate all this, but you want to break out the functionality into different methods to make it more modular. This allows you to include the methods in the GWT approach to create new widgets, such as that in figure 8.14.
For the GWT Google Video Search functionality, you define the implementation class shown in listing 8.11, which closely follows the original GWT example.
Example 8.11. Implementing the Java class that encapsulates JSNI calls to an underlying loaded JavaScript library
In the GWT approach, you provide a create() method ![]() that creates the
that creates the GSvideoBar JavaScript object you’re after. This method is written in JSNI and demonstrates nicely how you cross the Java-JavaScript boundary. The method takes two GWT Element objects that represent the browser elements where the search-bar and video player will be displayed. These parameters, along with some options ![]() , are used directly in the JavaScript call
, are used directly in the JavaScript call ![]() where the GWT compiler makes sure the Java objects have become valid JavaScript objects. Notice as well that the JavaScript object is created by accessing it through the
where the GWT compiler makes sure the Java objects have become valid JavaScript objects. Notice as well that the JavaScript object is created by accessing it through the $wnd object.
After creating the new JavaScript GSvideoBar object in the JavaScript code, you return it as the result of the method call ![]() . In this case, you now have a JavaScript object, so you must return an object whose type is a GWT Java
. In this case, you now have a JavaScript object, so you must return an object whose type is a GWT Java JavaScriptObject object (you’ll see how to handle that in the next section—the GSvideoBar Java object is a subclass of the JavaScriptObject).
The second method defined in the implementation class is the execute() method ![]() , which performs the main work in the class by executing a search on the Google video library. You pass in as the first parameter the
, which performs the main work in the class by executing a search on the Google video library. You pass in as the first parameter the GSvideoBar object, created previously. As it crosses the boundary back into JavaScript through the JSNI interface, the opaque object turns back into a fully visible JavaScript object whose methods you can call in JavaScript—which in this case is the execute() method ![]() .
.
Let’s look at this mysterious GSvideoBar object, which in the JavaScript code is the true GSVideoBar JavaScript object but in the Java code becomes an instance of the JSObject class.
You will normally create JavaScript objects using the JavaScript library on which you subsequently call methods to provide the functionality you’re after. In the GWT approach, you want to keep as much of the code in Java as possible and make use of the strong typing of the language and benefits of the compiler. As you saw in the last section, you try to make the GWT access to the JavaScript library as modular as possible, which results in your having to manage the initially created JavaScript object as a Java object. To do this, you use the GWT JavaScriptObject class.
When you pass a JavaScript object out of a JSNI segment of code and into the Java, then the GWT compiler automatically treats it as an object defined by the Java method’s return type. If you define that return type to be a JavaScriptObject or a subclass of it, then you receive an instance of an opaque Java object. It’s called opaque because you can’t look into or execute methods on it while in the Java code. The real use of the standard JavaScriptObject is to act as a handle to a JavaScript object as you pass it around in the Java code.
What you do with the JavaScriptObject class is to extend it, hold a reference to the implementation class, and contain methods that match those you want to execute in the implementation. You can see this in action if you look at the Java GSvideoBar class shown in listing 8.12, which extends the GWT JavaScriptObject class and represents the GSvideoBar JavaScript object.
Example 8.12. Implementing the Java class that embodies a JavaScript object treated as an opaque object
You start the class definition by defining that you’ll extend the JavaScriptObject class. Beginning with GWT 1.4, you shouldn’t provide a constructor method for JavaScriptObjects or your code won’t compile. (If you pick up some legacy code, it may not have been updated to reflect this change, so you may see some errors.) At ![]() , you create a static instance of the implementation class that you’ll use to create the new JavaScript object. There is a bit of a circular action going on here; you call the static
, you create a static instance of the implementation class that you’ll use to create the new JavaScript object. There is a bit of a circular action going on here; you call the static create() method ![]() , which in turn calls the implementation class’s
, which in turn calls the implementation class’s create() method, which returns a new GSvideoBar object.
Overriding the standard JavaScriptObject class offers two key benefits. First, you get to provide a name that is more meaningful (this is necessary when you start wrapping more complicated JavaScript libraries that require you to manage more than one JavaScript object). Second, you can add the JavaScript object’s methods into the new class to make it act more like the opaque JavaScript object it represents.
An example of this second point is the execute() method ![]() . In this class, you create a definition that requires the user to pass in the search string as a parameter. Inside the method, you call the implementation class’s
. In this class, you create a definition that requires the user to pass in the search string as a parameter. Inside the method, you call the implementation class’s execute() method, passing in this JavaScriptObject as the first parameter followed by the search string. This means you’re always addressing the correct instance of the JavaScript object.
The final step to take is to create the class that will present itself to the GWT application as the widget.
Creating the widget class is an easy task; see listing 8.13.
You need to create two GWT DOM elements where the video bar and player will reside (you use some simple labels (![]() and
and ![]() )) and then add them to a vertical panel to provide some structure. With the visual structure in place, you call the create method in the
)) and then add them to a vertical panel to provide some structure. With the visual structure in place, you call the create method in the GSvideoBar class using the DOM elements representing the labels ![]() . You can’t directly pass the labels, because the code expects DOM Elements, but a call to
. You can’t directly pass the labels, because the code expects DOM Elements, but a call to Label’s getElement() method resolves that.
Once completed, the create method returns a JavaScriptObject, which you store in the class field gsvideoBar. You complete the widget by defining a widget-level method for each of the methods defined in the JavaScriptObject class. In this case, this means creating an execute() method ![]() . This method calls the
. This method calls the JavaScriptObject’s execute() method, which in turn calls the implementation class using itself as a parameter to perform the video search.
That’s all you need to do to perform the simple wrapping of a JavaScript library with one JavaScript object—the widget is now ready to use.
All this work has created a brand-new GWT widget that you use in exactly the same manner as any other GWT widget. You can see this in the Google Video Search Dashboard application code, shown in listing 8.14.
In the Dashboard’s video search application, you create a new GVSWidget and place it in a new composite that also provides the user with the ability to type in a search phrase and click a search button. When a phrase is entered and the button is clicked, you call the widget’s execute() method, and you’re presented with a number of videos to select from.
In the next section, we’ll look at how you can take this wrapping strategy a little further with libraries where there are multiple objects, and we’ll discuss why it isn’t always efficient to wrap every single JavaScript object.
The previous section wrapped a simple JavaScript library where there was only one JavaScript object. As you saw, this is a real-life example, but nowadays it’s often the case that the JavaScript libraries you may want to wrap contain more than one object that you need to manage.
Let’s look at the Google Ajax Search API, which you’ll use to present the user with a Dashboard search component similar to that shown in figure 8.15.

Figure 8.15. Google Ajax API Search in the Dashboard’s Google Search application (showing four of the five available searchers)
We won’t go into as much detail about the wrapping in this section, because we did that in the last section. What we’ll look at here are the main differences between this component and the previous Video Search. First, let’s consider the classes that need to be created.
This component has a number of different JavaScript objects that could be wrapped, as shown in figure 8.16 (which is taken direct from the API documentation at http://code.google.com/apis/ajaxsearch/documentation/reference.html).

Figure 8.16. Google Ajax Search API JavaScript objects, the majority of which you need to manage in Java code, making this a complex library to wrap
For the widget, you’ll wrap the GSearchControl and all the searchers, and you’ll do so using the same pattern you saw in the previous section. For example, the GnewsSearch class becomes the code in listing 8.15.
Example 8.15. The GnewsSearch class, which is part of the Google Ajax Search implementation
public class GnewsSearch extends GSearch{

   private static GnewsSearchImpl impl = new GnewsSearchImpl();

   public static GnewsSearch create(){
      return impl.create();
   }
}
The only difference between this and the previous widget is that in the GSearchControl, you have more complicated methods such as adding new searchers to the control. Because you’re working at a Java level, you have simple methods such as
public void addSearcher(GwebSearch theWebSearcher) {
   impl.addSearcher(this, theWebSearcher);
}
Here you add a JavaScriptObject to another JavaScriptObject. As we mentioned before, these are opaque objects, so you’re just playing with objects; it isn’t until you get to the implementation class that the real work of addition occurs. At this point, you cross the Java-to-JavaScript boundary and call the JavaScript library’s addSearcher() method on the GSearchControl JavaScript object to add the GwebSearch JavaScript object:
public native void addSearcher(GSearchControl searchControl,
                               GwebSearch theWebSearcher) /*-{
   searchControl.addSearcher(theWebSearcher);
}-*/;
We made a conscious choice not to wrap the GsearcherOptions and GdrawOptions JavaScript objects. Next, you’ll see why and what the impact is of keeping them as Java objects.
When you start dealing with more than one object to wrap, you face a decision: Do you try to wrap every single object that is available, or do you take a more relaxed strategy and wrap only those for which it’s necessary? Sometimes you don’t want to go through the process of creating full Java classes for all JavaScript objects, due to time constraints or for other common-sense reasons. In the Google Search functionality, two objects perform no function except to hold values of options.
Although you could create all the implementation and JavaScriptObject classes for the GdrawOptions and GsearcherOptions JavaScript objects, you would end up writing vast amounts of code for little benefit. It’s easier to keep these objects as simple Java classes and then convert them only when necessary, which, in this example case, is when you draw the control or add searchers.
When you draw the search control, you call the draw() method in the SearchControlImpl, which takes as parameters a JavaScriptObject (the search control), a DOM element (where the control will be drawn), and a Java object representing the options. Unfortunately, GWT won’t translate the options object from Java to the required JavaScript object, so you must do that; but it’s relatively simple to achieve, as shown in listing 8.16.
You create a new JavaScript object of the GdrawOptions by writing the code at ![]() (remember that you need to get the new object through the
(remember that you need to get the new object through the $wnd object). Once you have the JavaScript GdrawOptions object, you walk through the fields in the Java object, checking for values and then setting up the appropriate equivalent in the JavaScript object (for example, at ![]() , you check if an alternative input area is provided; if so, you set it up in the JavaScript
, you check if an alternative input area is provided; if so, you set it up in the JavaScript theOptions object ![]() ). Finally, you call the Java
). Finally, you call the Java SearchControl object’s draw() method with the new JavaScript theOptions object as a parameter ![]() .
.
The Google Search control also provides the functionality for the user to save search results through a call-back mechanism. Let’s check out how you can implement and support such functionality.
It isn’t unusual for a third-party JavaScript library to provide the ability to call some user-defined JavaScript code if an event happens in the library. In the case of the Google Search Library, you can tell it to display a label after each search result, which, if clicked, performs a user-defined action (typically, the result of the search is stored). Figure 8.17 shows this in action in the Dashboard.
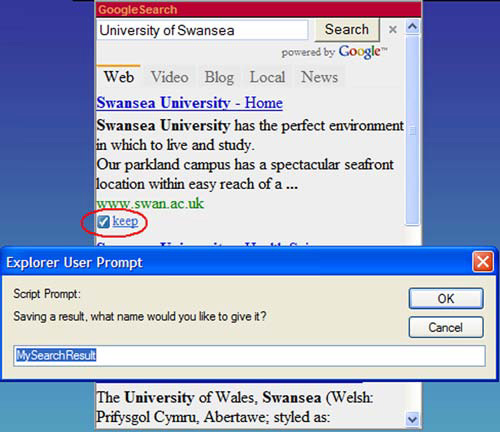
Figure 8.17. Implementing the feedback mechanism of Google Search to display an alert when the Keep label is clicked
Because this is GWT, you’ll implement this in a GWT style. The first step is to try to emulate the GWT event-handling mechanisms you saw in chapter 6. You’ll create a new KeepListener interface, which requires a simple onKeep() method to be implemented that is executed when the user clicks the label in the widget. The listener is defined as the interface shown in listing 8.17.
You use this listener as shown in listing 8.18 by adding it as an anonymous class to a search control and implementing the onKeep() method.
Example 8.18. Using the KeepListener class
searchWidget = new GSearchWidget();
GSearchControl sc = searchWidget.getGSearch();
sc.addOnKeepListener(new KeepListener(){
   public void onKeep() {
      Window.prompt("Saving a result, what name would you
                     like to give it?", "MySearchResult");
   }
});
For our keep listener in listing 8.18 we simply pop up a prompt (using the GWT 1.4 Window.prompt() method) to ask for the user to provide a name to save the result as. In the implementation of GSearchControl, you place the code that ties the listener to the call-back functionality of the library. The way this is performed usually depends on the library; in the case of the Google Search, you need to call the setOnKeepCallback() method. Google define this method as follows:
“For instance, if this method is called as .setOnKeepCallback(foo, MyObject.prototype.myKeephandler), when a user clicks on the keep label, a call to foo.myKeephandler() is called.”
This isn’t so easy for you to implement in GWT! However, you can use the trick that you employed when creating an API again and implement the callback as shown in listing 8.19.

At ![]() , you register a new JavaScript method that calls the
, you register a new JavaScript method that calls the onKeep() method of the listener passed in as the parameter. To tie this together, you then register the new method with the search control ![]() to be the method called if the user clicks the Keep label after a search result.
to be the method called if the user clicks the Keep label after a search result.
The final step in completing the generation of the Google Search widget is to create the widget.
When used in the Dashboard application, you add the widget as a single component in a DashboardComposite, resulting in the application shown in figure 8.18 (where we searched for one of the best contributions Finland has given the world for a cold winter’s night—the sauna).
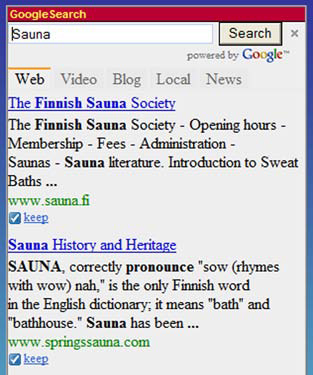
Creating a widget from a third-party JavaScript library means that you must adhere to any rules the underlying JavaScript library may place on you. In the case of the Google Search Library, tasks must be performed in a specific order, as provided in the documentation:
Create the search control.
Add the searchers.
Create any options.
Draw the control.
Listing 8.20 shows how you achieve this to create the widget shown in figure 8.18.
First, you create a new instance of the search widget ![]() . Then, you use the
. Then, you use the getGSearch() method on the widget to create the JavaScript instance from the library ![]() . Next, you add a few searchers to the widget: a web searcher
. Next, you add a few searchers to the widget: a web searcher ![]() , along with video, news, blog, and local searchers
, along with video, news, blog, and local searchers ![]() . With the searchers added according to the Google Ajax Search specification, you create a new set of drawing options to tell the widget it should draw itself in tabbed mode
. With the searchers added according to the Google Ajax Search specification, you create a new set of drawing options to tell the widget it should draw itself in tabbed mode ![]() . Finally, you draw the search control in
. Finally, you draw the search control in ![]() .
.
JSNI is an extremely powerful way of interfacing with existing JavaScript libraries and filling in the gaps where GWT may not yet have the functionality you need. It allows you to apply some of the good control and typing aspects of Java to the JavaScript interfaces; however, you should keep your use of JavaScript to a minimum. View using JSNI as you would writing assembly-language code segments in a high-level language project—it’s for specialized tasks, not for everyday use. The main reason for restricting the use of JavaScript is cross-browser issues, just as assembly-language coding restricts your ability to move projects to other machines.
If you’re going to use JSNI, remember that it’s valid only in your client-side components, and you’ll need to use the $wnd and $doc variables instead of the standard JavaScript window and document variables because of the way GWT loads your application. Also remember that when you’re executing JavaScript code, you don’t have the protection of GWT when it comes to browser differences (for example, the JavaScript getElementById() method isn’t as robust as the GWT’s cross-browser DOM.getElementByID() method). Finally, GWT and JSNI don’t allow you to get around any normal restrictions of JavaScript coding; for example, you still can’t subvert the security mechanisms that browsers employ.
We’ve reached the end of our journey through the more client-side related aspects of GWT, and it’s time to consider the flexibility that GWT provides when building a real-sized application—using GWT’s modularization aspects.