
JUnit testing of GWT applications
Testing asynchronous code
Deploying GWT applications
Installing GWT-RPC servlets
At some point, you’ll make the leap from evaluating GWT to deploying it on production systems. This chapter shows you how to write tests for your application, making long-term maintenance easier, and also shows you how to migrate applications from hosted-mode development to a server.
In this chapter, we won’t assume that you’re a JUnit wizard or that you know your Java application server backward and forward. Although we provide useful information for experts, we also give you step-by-step information if this is your first time working with these tools.
We’ll get to setting up your production environment shortly. First, let’s examine testing, starting with an overview of JUnit.
Many developers (and entire organizations) have taken up the notion of test-driven development, or at least recognize the importance of writing tests. The return on investment when creating tests comes in the form of time saved as the application gets larger and also during the maintenance phase of the software lifecycle. Almost in contradiction to the notion of writing automated tests as being a good thing, we find that writing those tests for JavaScript applications can be difficult and time consuming.
In Java-land, we’ve had powerful testing tools available for many years. At the top of the testing framework heap is JUnit, which is so popular that it has been ported to many other languages. It has remained popular because it’s easy to use and has been integrated with IDEs and build tools like Eclipse and Ant.
In the land of JavaScript, we haven’t seen the success of any single testing framework, and none can match the usability and ease of use of JUnit. The lack of a good testing framework for JavaScript may be because writing complex JavaScript applications is a relatively new idea, or perhaps it’s because it isn’t easy to test code that is meant to be run by the browser. Whatever the reason, testing JavaScript is hard, but GWT provides a solution.
When it came time to add testing capabilities to GWT, the GWT development team turned their attention to the de facto standard: JUnit. But instead of creating something similar to JUnit, they harnessed the power of JUnit itself. What this means for you as a developer is that you get to use a time-tested framework for testing, and all the tools that go along with it.
In this section, we’ll look at how to use JUnit to test your GWT code, and we’ll point out areas where the support isn’t perfect. Before we get started, we need to have a quick review of JUnit.
If you haven’t seen or heard of JUnit, the best place to start is the JUnit project site at www.junit.org. The site contains links to dozens of articles about the framework, dating back to 1999. Our overview in no way replaces the thousands of pages written on the subject, but it provides enough detail to allow you to write some simple tests even if this is your first experience with JUnit.
Unless you already have JUnit ready to go, you need to visit the JUnit site to download the latest release of the 3.8.x branch. When you visit the JUnit site, you may notice that a 4.x version available, but this version isn’t compatible with GWT. JUnit 4.x takes advantage of new functionality that was added in Java 5; but as we explained in chapter 1, GWT doesn’t yet support the Java 5 syntax.
Let’s begin by opening an IDE or a text editor and writing a simple test case.
In JUnit, a test case is a class that may contain one or more tests. The purpose of the test case is to group a set of tests together, typically based on their function. For example, you may want to place all tests for a calendar widget in the same class, potentially allowing you to write private methods that can be shared among the tests.
In the example, you’ll write a test case that tests basic math functionality, giving you a feel for how to use JUnit. You begin by creating a new class named MathTestCase and having it extend JUnit’s TestCase class, as shown in listing 16.1.
The next step is to add some tests to the class. For each test you add, you need to create a method. The method name must begin with the name test. JUnit works by interrogating the methods in the class; any method that begins with the word test is taken to be a unit test. In listing 16.1, you create four methods, each of which tests a different mathematical function.

The JUnit TestCase class includes dozens of methods that can be used to test for a valid value; listing 16.1 provides several examples. In the test testAdd()![]() , you use the method
, you use the method assertEquals() from the parent TestCase class to test the equality of two int values. You pass two values to the assertion method: the expected result (110) and your tested value. In this case, you’re testing that the variables x plus y are equal to 110. The TestCase class includes similar variations of the assertEquals() method for testing each of the primitive types, as well as String and Object values.
In testSubtract() ![]() , you use another of the
, you use another of the TestCase methods to test the truth of the statement x – y == 90. If this statement returns a false value, the test fails. Other similar methods in the TestCase class include assertNull(), assertNotNull(), and assertFalse(), each of which behave as the name implies.
In testMultiply() ![]() , you see a variation on the
, you see a variation on the assertEquals() method that includes an error message as the first argument. You may have as many assertions in a single test as you like, which can cause confusion if you can’t tell which assertion in the test failed. If you add a message to the assertion and the test fails, the message is displayed in the test results, making it easy to determine what part of the test failed.
The last variation in the example is used in testDivide() ![]() . Here you test the value, and if the result isn’t correct, you call the
. Here you test the value, and if the result isn’t correct, you call the fail() method. The fail() method does as you may expect: It fails the test. The fail() method takes an optional message parameter that can be used to provide additional information about the failure.
These are the TestCase assertions that you’ll use most often, but there are a few more. You can use the assertSame() method to test that two object references point to the same object. failSame() does the opposite, failing if the two references point to the same object. There is also a variation of the assertEquals() method for float and double values that allows the addition of a delta argument. The delta is used to specify a maximum difference between the values being tested. For example, the following assertion is true because 99.5 is within 0.6 of 100.0:
assertEquals(100.0, 99.5, 0.6);
When you add up all the variations of assertions with and without messages and deltas, you have three dozen different assertion methods to choose from.
Now that you have your test-case written, you need to have JUnit run your tests.
JUnit provides two tools for executing unit tests, called test runners. One runs your tests at the command line, and the second presents you with a GUI tool for point-and-click testing. Unfortunately, the GUI version of the testing tool doesn’t behave as expected when running your tests against a GWT application, so we’ll only explain how to use the command-line version.
To run your tests at the command line, you need to execute the class junit.textui.TestRunner that is bundled in with the JUnit JAR file. It takes a single parameter: the class name of your test case class. You also need to include the path to the JUnit JAR file and the path to your compiled test-case class file. If you don’t typically run Java applications at the command line, you would execute something like the following command:
java -cp junit.jar;./classes"
  junit.textui.TestRunner
  org.gwtbook.test.SampleTestCase
....
Time: 0

OK (4 tests)
Note that in this example you use a backslash at the end of the line to denote that the command continues onto the next line. This is supported only in UNIX and UNIX-like shells; in Windows, don’t include the backslash in the command.
As the tests execute, JUnit prints dots to indicate the progress of the testing. Once completed, it displays the total time it took to run the tests along with the results of the testing. In this case, JUnit displays that all four tests ran successfully.
It’s nice to see that all the tests passed—but if this was always the case, you wouldn’t need to write tests to begin with. Let’s introduce some failures into the code. You can do this by altering the value of the y variable in the test-case class, changing it from 10 to 11:
private int y = 11;
After making this change, you need to recompile the test-case code. Then, run the tests again, and you’ll see the following output:
.F.F.F.F
Time: 0.016
There were 4 failures:
...
FAILURES!!!
Tests run: 4,  Failures: 4,  Errors: 0
In the output, we used ellipses (...) to denote the additional messages that appear in the output. When you run this yourself, you’ll see a message and a partial stack trace indicating the reason for the failure. For example, the following message is displayed at the command line for the failure report on the testAdd() method:
1) testAdd(org.gwtbook.test.SampleTestCase)
 junit.framework.AssertionFailedError:
 expected:<110> but was:<111>
Notice that JUnit tries to provide a helpful message by displaying not only the expected value but also the result. This may help you in debugging the problem without the need to add logging to your test case.
At the bottom of the output, JUnit tells you that failures occurred and provides a count of the tests run, the number of failures, and the number of errors. The difference between these last two may seem confusing at first, but a failure isn’t an error.
When JUnit reports an error, it means that a runtime exception was thrown and the test didn’t properly account for it. This is different from a failure, which indicates that an assertion failed. To illustrate this point, let’s use the following test example:
public void testDataProvider()
{
  List data = DataProvider.getData();
  String value = (String)data.get(0);
  assertEquals("Testing", value);
}
This test may seem correct, but a lot of runtime errors could potentially occur, which means that JUnit wouldn’t be able to properly report on them. First, you don’t test that getData() returns a value, which could cause a null pointer exception. You also don’t check that there is a value in the List, so grabbing the first element could result in an index out of bounds exception. Last, you cast the value to a String, but if it isn’t a String value, a class cast exception will be thrown. If any of these runtime exceptions occurred, they would be reported by JUnit as errors, not failures.
A better way to write the test is as follows:
public void testDataProvider()
{
  List data = DataProvider.getData();
  assertNotNull("data is null", data);
  assertTrue("data is empty", data.size() > 0);

  Object value = data.get(0);
  assertTrue("value is not a String", value instanceof String);
  assertEquals("value is incorrect", "Testing", (String)value);
}
You now test for each of the possible error conditions using assertion methods and provide a message for each assertion that adds value to your test report if the test fails. Also notice that you don’t need to use conditional blocks in your test to prevent any of the runtime errors from occurring. Specifically, after you call assertNotNull() to test for a valid return value from the DataProvider class, you don’t need to provide code to prevent the next line from executing if it fails, which would result in a null pointer exception. This isn’t necessary because JUnit ends the execution of a test as soon as any assertion fails.
This means that any cleanup in the test that follows a failed assertion won’t be executed, so it’s important to not use tests for cleanup. This can be problematic, because on some occasions you may need to free up some resources used by the test to properly handle errors.
Because you’ll often need to perform some setup prior to a test and cleanup after, JUnit provides two methods for this purpose. The setUp() method is called before executing each test in the TestCase class, and tearDown() is called after each test.
Listing 16.2 is an example of using the setUp() method to create a connection pool using the Jakarta commons-dbcp library before each test and shutting it down after the test has completed.
Example 16.2. An example of overriding the TestCase setUp() method
BasicDataSource dataSource;

protected void setUp() throws Exception
{
  dataSource = new BasicDataSource();
  dataSource.setDriverClassName("oracle.jdbc.driver.OracleDriver");
  dataSource.setUsername("scott");
  dataSource.setPassword("tiger");
  dataSource.setUrl(connectURI);
}

protected void tearDown() throws Exception
{
  dataSource.close();
}
Although managing a connection pool is more relevant to testing server-side code than it is to GWT code, it’s a concept that most developers can understand. You initialize or reset the services needed by the test in the setUp() method, and you shut down or release the services in tearDown(). Although you may not use these methods often, it’s good to know that JUnit makes it easy to do.
At this point, you know everything you need to get started writing tests. In the next section, we’ll discuss the specifics of using JUnit to test your GWT projects.
Back in chapter 2, we briefly discussed the junitCreator tool that ships with GWT. In this section, we’ll provide additional details and point out some important points that can help you avoid pitfalls.
The first question is, what does the junitCreator tool do? The short answer is that it creates a single TestCase class, two shell scripts you can use to execute that single test, and optionally two launch files for Eclipse. The first shell script or launch file is for executing your test case in hosted mode, and the second executes the test case in web mode. Let’s take a closer look at the options for junitCreator and the files it creates.
The command-line options for the junitCreator tool are similar to those for other tools. Following is the command-line syntax:
junitCreator -junit pathToJUnitJar -module moduleName
 [-eclipse projectName] [-out dir] [-overwrite] [-ignore] className
Here’s a description of the available options:
-junit—. Path to the JUnit libraries. This option is required, and it must point to the location of the JUnit JAR file. Again, note that it must point to JUnit version 3.8.x, because 4.x isn’t yet supported. This path is used in generating the scripts, where the path to JUnit is added to the classpath.-eclipse—. Name of the Eclipse project (optional). If included, this option generates the Eclipse launch files that can be used to execute the test case.-module—. GWT module of the application you wish to test. This option is also required and is the name of the module that contains the code that you want to test. The module name is added to the generated Java source code. We’ll look at what the generated code looks like shortly.-out—. Directory to write output files into (defaults to current).-overwrite—. Overwrites any existing files (optional).-ignore—. Ignores any existing files; doesn’t overwrite (optional).
When you’re running junitCreator, you’ll want the output to be directed to the same directory as your project. The scripts and launch files are placed in the root of the directory, and the test-case source is placed under a new source directory called test. For example, if you had an existing project called ExampleProject, the structure would look something like the left side of figure 16.1.

Figure 16.1. A sample project directory structure before and after adding a test case with junitCreator
When you add a test case using junitCreator, you might use the following command from inside the ExampleProject directory:
junitCreator.cmd -eclipse ExampleProject -junit <pathToJunit>
  -module org.gwtbook.ExampleProject org.gwtbook.client.ExampleTest
After running this command, the project would look like the right side of figure 16.1. It creates the two scripts for executing the tests and two Eclipse launch files, and it creates the test case class ExampleTest under a new test source tree.
When you’re running junitCreator, the test case you’re creating must reside in the same client package used by the project. In the case of figure 16.1, the project has a client package org.gwtbook.client. The test case must reside in this package or a subpackage under it.
Now, let’s take a closer look at the generated code for the test case and explain the slight differences between a GWT test case and a standard JUnit test case.
The full source for the generated test case, minus comments, is shown in listing 16.3.
The code shows a basic JUnit test case with a single sample test named testSimple(), which will succeed. What is different is that the test case extends the class GWTTestCase instead of the normal TestCase class from the JUnit library.
The second difference is the addition of the setModuleName() method. This method tells the testing system the name of the GWT module that contains this test case. Because this test case is essentially a GWT entry point, the module needs to point to the source of this test case. When you create the test case, you specify the module name as the same as the main project, which means you don’t need to create a separate one just for the test case.
From here, you can create tests just as you did at the beginning of this chapter when we examined the basics of JUnit. The rules for writing individual tests are the same as when you’re writing a GWT application. You may only reference core Java classes when they exist in the JRE Emulation library, and you may include JavaScript Native Interface (JSNI) methods in the test case.
This covers the basics, but GWT also provides an additional feature that makes testing RPC-driven GWT applications a little easier.
When we looked at the various flavors of RPC in chapters 10 through 13, one thing in common was that they’re all asynchronous. That makes it difficult to test because your tests may potentially end before the server returns a response. To allow for this, the GWTTestCase provides a mechanism you can use to tell the test to delay ending for some period of time, allowing your server code to return a response to the client. In this section, we’ll look at how you can use this mechanism to test your server-side functions.
For the purpose of discussion, you’ll use the RequestBuilder class for performing your RPC. We chose this method because it’s the simplest of the available mechanisms, but you could use any of the available RPC mechanisms.
To delay the ending of a test, GWTTestCase provides the method delayTestFinish(), which takes a number of milliseconds to delay before ending the test. Calling this method puts the test into asynchronous mode, and with that come some important semantics. In asynchronous mode, you must call finishTest() before the delay expires, or the test will fail—the idea being that if finishTest() was never called, it’s likely that your RPC call never returned. Listing 16.4 shows a sample test so you can see how this might work.
In this example, you’re testing your login service. You first set a five-second delay so the server code has time to complete execution and return a result ![]() . This delay starts only after the test has ended normally, so it can be set anywhere in the test and doesn’t need to be set before the RPC call.
. This delay starts only after the test has ended normally, so it can be set anywhere in the test and doesn’t need to be set before the RPC call.
Next, you make an asynchronous call to your login service, which could be a servlet or any other server-side service that is accessed via login.rpc. In order to handle the response, you pass in a RequestCallback that has an onResponseReceived() method to receive the server response. The onResponseReceived() method contains an assertEquals() method to test the server response: both the HTTP status code and the text result passed back from the server ![]() . You then call
. You then call finishTest() to signal a successful test completion ![]() . If the remote call throws an exception or fails, you call the JUnit
. If the remote call throws an exception or fails, you call the JUnit fail() method to indicate failure ![]() ,
, ![]() . The end result is a clean, simple test case for testing remote calls.
. The end result is a clean, simple test case for testing remote calls.
Due to the asynchronous nature of the RPC call, the order in which the code is executed differs from its order in the method. Figure 16.2 shows the real order, with the onCompletion() handler being called after the normal execution of the test has ended.
Figure 16.2. A diagram showing the flow of execution of your sample unit test, where the test performs an asynchronous call
During the delay period, three events will end the delay and complete the test:
If
finishTest()is called, the delay ends, and the test completes successfully.If an exception is thrown, including one caused by one of the assert methods, the delay ends, and the test shows an error.
If the delay ends normally, without
finishTest()being called, the test shows a failure due to a timeout.
As you can see, the GWTTestCase extension to JUnit allows you to test client-side code the same way you test server-side code. This allows Java developers already familiar with JUnit to leverage their existing knowledge without needing to learn yet another testing framework.
Once you’ve tested your application and feel confident that everything is working properly, you need to deploy the application.
It’s fairly typical to spend most if not all of your development time using just your IDE and the hosted-mode browser. The hosted-mode browser—and web mode as well—make it easy to write and test your application without ever deploying it to the server. When it comes time to deploy your application to a server, it would be nice if you could just toss it up on the server, and it would start working. Unfortunately, this isn’t the common case; deployment is often a source of pain. This section means to help alleviate that pain by providing tips to making the move to your server an easy one.
Throughout this section, we’ll discuss general deployment issues as well as those relating to RPC. When we discuss RPC, we do so with an eye toward the Apache Tomcat application server, which is freely available and widely used. You may be using a different server, such as Resin or JBoss, but the discussion still generally applies. We also assume that you know a little about your application server—at the least how to stop and start it.
At the time of this writing, we find ourselves between releases of GWT. GWT 1.4, which is still in development at the time of this writing, alters the way applications are loaded by the browser. Throughout this section, we’ll point out differences that exist between 1.4 and prior versions.
We’ll begin by looking at a simple GWT application that uses no RPC and examining how you can better organize the files in the project.
The files generated by GWT aren’t organized. If this is the first application you’re deploying, this may not seem like a big deal; but as you add modules, images, CSS, and other supporting files to the server, it can quickly become a mess. In this section, we’ll examine the compiled output of a project and the options available for organization.
As an example project, you’ll write an application that prints “Hello World” to the browser window. The entire application contains two lines of code along with the usual imports and class declaration. The application is shown in listing 16.5. It’s far from earth-shattering, but it suits our need for a simple application.
Example 16.5. Sample application that displays “Hello World” in the browser
package org.sample.client;

import com.google.gwt.core.client.EntryPoint;
import com.google.gwt.user.client.ui.Label;
import com.google.gwt.user.client.ui.RootPanel;

public class HelloWorld implements EntryPoint
{
  public void onModuleLoad() {
    Label output = new Label("Hello World");
    RootPanel.get().add(output);
  }
}
This application generates quite a few files when it’s compiled. It may come as no surprise that you don’t need most of them, especially given the simple nature of the project. Figure 16.3 shows the list of compiled files when you use GWT 1.3 to compile the project. If you’re using GWT 1.4, the list of files includes all of these plus additional ones.
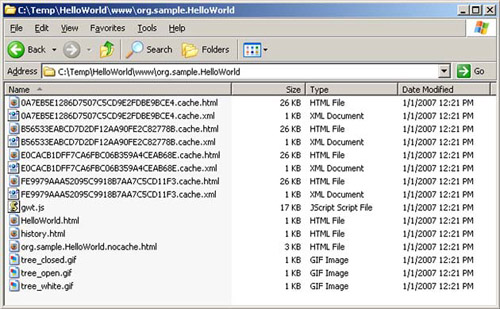
Before we go any further, let’s remove the files you don’t need, starting with the rebind decision files.
The rebind decision files are all of those files that end with cache.xml, found in both GWT versions 1.3 and 1.4. These files provide information about the choices the compiler made when generating the JavaScript for the project. As we discussed in chapter 9, the GWT compiler generates a different JavaScript file for each target browser based on the <replace-with> tags found in the module configuration files used by the project. These files specify the choices the compiler made for each version of the JavaScript file. For example, if the compiler was compiling the IE version of the JavaScript code, you would see this line in this file, indicating that it used the IE6 implementation of the DOM class:
<rebind-decision
  in="com.google.gwt.user.client.impl.DOMImpl"
  out="com.google.gwt.user.client.impl.DOMImplIE6"/>
Although this information may be useful for debugging, it isn’t used by the deployed application.
Next, we’ll look at the three tree images in the directory and explain what you can do to clean them up.
The next set of files to prune are the three image files: tree_closed,gif, tree_open.gif, and tree_white.gif. These images are used by the TreeItem widget that comes with GWT. If you aren’t using the Tree widget, as in this sample project, you should remove these three images. On the other hand, if you’re using a tree in your application, it’s unfortunate, because it isn’t the best idea to have images intermingled with your HTML files. Fortunately, the GWT Tree widget allows you to move them someplace more appropriate.
Let’s begin by looking at some sample tree code, shown in listing 16.6. This is a simple tree of fictitious beasts that have been reportedly seen in the wild, but for which no proof exists.
Example 16.6. Example code that produces a small tree listing several fictitious beasts
Tree tree = new Tree();

TreeItem myths = new TreeItem("Mythical Beasts");
myths.addItem("Loch Ness Monster");
myths.addItem("Big Foot");
myths.addItem("An under-budget software project");
tree.addItem(myths);

RootPanel.get().add(tree);
This code produces the small tree shown in figure 16.4. The figure shows both the open and closed state of the tree, including the small plus (+) and minus (-) images used to indicate the open or closed state of the tree branch. This accounts for the tree_open.gif and tree_closed.gif images. The third image, tree_white.gif, is used as a spacer for leaf items that don’t have children.
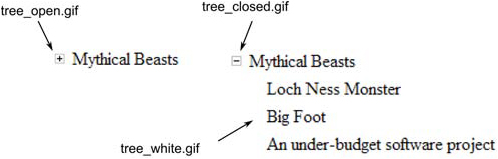
Figure 16.4. A Tree widget with sample data, showing the images used by the widget for the different tree states
To change the location of these images, the Tree widget provides a method setImageBase() that can be used to set a path that is added to the beginning of image name. If you wanted the images to be pulled from the images directory, you could use the following code when constructing your tree:
Tree tree = new Tree();
tree.setImageBase("images/");
The trailing slash is important because the code for Tree won’t automatically add it. With it, the code uses the paths images/tree_open.gif, images/tree_closed.gif, and images/tree_white.gif. After adding this to your code, you need to manually create the images directory and move those three images into it. Until you move the images, they appear as broken images.
Going back to the original code sample, you still need to do some more cleaning. We’ll continue by looking at the history.html file.
Additional Images Gwt 1.4
GWT 1.4 introduces two new images: disclosure.png and clear.cache.gif. The disclosure.png image (which may be renamed disclosure.gif prior to release) is used by the new DisclosurePanel. The second image, clear.cache.gif, is a clear spacer image used by the new ClippedImage and perhaps other widgets. If you aren’t using either of these widgets, you can remove the files; otherwise, you should keep them in the same directory as the nocache.js file for the project.
In the generated project files, you’ll find a history.html file. This is used by the history subsystem that we discussed in chapter 4. If you aren’t using the History class, as in the example, then you should remove this file along with the reference to it in the HTML page.
In the HTML page that is generated by the applicationCreator, you’ll see these lines in the body:
<!-- OPTIONAL: include this if you want history support -->
<iframe id="__gwt_historyFrame" style="width:0;height:0;border:0">
</iframe>
As the comment states, this is optional and is used only for the history system. If you aren’t going to use the history system, remove these two lines from the HTML file along with the history.html file.
With this file removed, your project space is looking quite a bit cleaner—but it isn’t organized, because all the files are still lumped into a single directory. In the next section, you’ll organize your JavaScript files by placing them in subdirectories.
Because there are some significant differences between the generated files in GWT 1.3 and 1.4, we’ll discuss each version in its own section. We’ll begin by examining GWT 1.3 and then immediately follow with version 1.4.
If you’ve been following along and removing the unused files from the sample project, you’ll see that there aren’t many files left. Figure 16.5 shows the current file list for the project. Remaining are the project HTML file (HelloWorld.html), the gwt.js file, the one loader script ending in .nocache.html, and the four browser-specific script files ending in .cache.html.
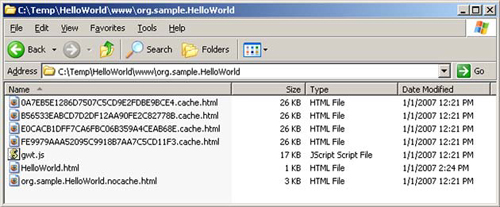
Figure 16.5. The current list of files in your GWT 1.3 project after pruning unused files like the rebind decision files, tree images, and the history file
You could deploy this lump of files as is without any further organization; but if you’re deploying a GWT project with other pages on your web site, you may want to keep the GWT project files separated from other site pages. In this section, we’ll assume that your Hello World application files need to be segregated from the rest of the pages on the site. This will involve creating a script directory and moving all the supporting files into that directory. You’ll also separate the files that are specific to the org.sample.HelloWorld module from other GWT projects while still sharing the common gwt.js file for all GWT applications on your site.
The first step is to create a new directory to hold the JavaScript code; name it scripts. Next, create a directory under scripts for the files specific to the module; name this directory the same as the module (org.sample.HelloWorld). Now, move the gwt.js file into the scripts directory and all the other script files into scripts/org.sample.HelloWorld. When you get done, your project should look like figure 16.6.
Figure 16.6. An example of a reorganized GWT application that uses a directory to hold scripts and modules
This structure makes it easy to deploy additional modules to the same server: You can add a new directory under scripts for the new module and place the files for the new module there. As for the gwt.js file, all the modules may share this file.
Note
If you’re using the GWT resource-injection mechanism to include external JavaScript files or CSS files from your module configuration, you’ll need to move the injected files into the same directory as the nocache.html file. This requirement also applies to any images referenced from injected CSS files that are using a relative path.
Now that your files are reorganized, you need to make some minor changes to the HelloWorld.html file to point to these new locations. In the HelloWorld.html file, you need to change two lines. The first is the script tag that points to the gwt.js file. Here, you need to update the src attribute to point to the gwt.js file in the scripts directory. When you get done, it should look like this:
<script language="javascript" src="scripts/gwt.js"></script>
The second change is to the metatag that specifies the name of the module to load. The following snippet shows the tag before you make your change:
<meta name='gwt:module' content='org.sample.HelloWorld'>
Without any additional path information, this tag will cause the GWT loader to look for the module JavaScript files in the same directory as this HTML file. Because you’ve moved these files into the scripts/org.sample.HelloWorld directory, you need to add this path information to the metatag. You do so by adding the path to the content attribute, followed by an equal sign (=) and then the module name. With this change in place, the updated metatag looks like this
<meta name='gwt:module'
  content='scripts/org.sample.HelloWorld=org.sample.HelloWorld'>
The equal sign separates the path from the module name. The GWT loader looks for the module at this alternate path instead of in the current directory.
With this last organizational change in place, you now have a tidy little application ready to be deployed to the server. Deploying the application from here is as simple as copying the files to any place on the server and optionally renaming HelloWorld.html to some other name, like index.html.
Now let’s take a look at how to clean up the JavaScript files when using GWT 1.4.
Although GWT 1.4 still hasn’t finalized, we want to examine what we see so far and explain how you’ll change the way you deploy your applications. The first noticeable difference is that the GWT compiler generates a lot of additional files. Figure 16.7 shows the files from the Hello World application; compare it to figure 16.5, the files generated by GWT 1.3, and you’ll see the difference.
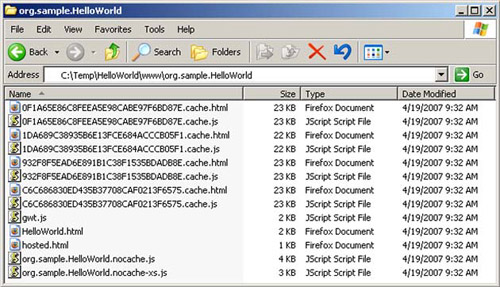
Figure 16.7. The current list of files in your GWT 1.4 project after pruning unused files like the rebind decision files, tree images, and the history file
The reason for all these files is to not only let you load a GWT application from your own server, but also allow others to load your GWT application from pages hosted on their server. Looking at 16.7, notice that for each *.cache.html, file there is a *.cache.js file. The HTML versions of these files are for use on pages originating from the same site that hosts your GWT code, and the JavaScript versions are for use on externally hosted sites. The difference between the two is that the HTML versions can be compressed by your server, whereas the JavaScript versions can’t be.
Along with the two sets of *.cache.* files are two bootstrap files: <module-name>.nocache.js and <module-name>.nocache-xs.js. The second version is the cross-site loader (ending with xs.js), and is for use on external sites. The first version is for use on the local server, the same server hosting your HTML pages. In most cases, you won’t need both sets of files, so you should remove either the local or cross-site versions. In figure 16.8, we make the assumption that you’ll be using the local loader for your application; the figure shows the cross-site files removed.
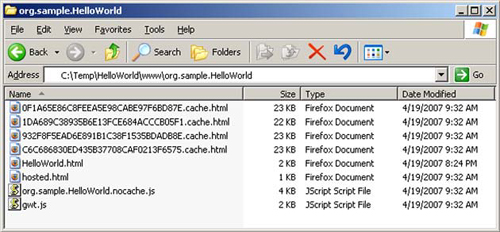
Figure 16.8. The current list of files in the GWT 1.4 project after pruning unused cross-site compatibility files
That leaves you with a lot fewer files than you started with, but you can still remove two more: hosted.html and gwt.js. The gwt.js file is used for compatibility with the GWT 1.3 loading style, so if you aren’t using the GWT 1.3 style of application loading with the meta tag, you can remove this file. The hosted.html file makes its debut in GWT 1.4 and is only needed for hosted-mode support. Removing these two files leaves you with only the necessary files to deploy your application.
From here, you could easily deploy the files you have left, but it’s common practice to relocate your JavaScript files into a scripts directory, making your file system more organized. When you relocated these files for GWT 1.3, you had to do some extra work to accomplish this; but with GWT 1.4 compiled files, all you need to do is relocate the *.nocache.js file along with the *.cache.html files into your scripts directory. Our recommended practice is to place these files in a directory named for the project; with the Hello World application, you place the JavaScript files under /scripts/org.sample.HelloWorld/. By placing the files in a directory named for the project, you can deploy additional GWT projects in the same manner, keeping the files for each application separate. The only change you need to make in the HTML page is to alter the script tag to point to the new location.
For more information about the GWT bootstrapping mechanism and all the files mentioned here, visit chapter 17, where we cover both topics in detail. Now that you’ve cleaned up the file system, let’s turn our attention to installing the servlets for the GWT-RPC services. In the next section, we’ll begin by providing a brief tutorial of setting up a servlet, in case you’ve never done so before.
If you need to install an RPC servlet, we need to assume that you already know how to write one and that you probably already have it running in hosted mode. In this section, we’ll show you how to deploy your servlet to a server that supports Java servlets, also known as a servlet container. For the purposes of exploration, we’ll keep it fairly light and generic when we talk about the server, which is all you need to deploy a servlet. This section won’t discuss connection pooling, caching, or other functions that are typically specific to the server software you’re running. We’ll cover the basics of the web.xml configuration file and how the organization choices from the previous section affect your application settings.
To begin, we’ll provide a high-level look at how a Java servlet container works and how it processes incoming servlet requests.
A servlet container is the part of a web server or application server that handles a network request and manages servlets throughout their lifecycle. Some servlet containers are also application servers, meaning they meet the requirements of the Java Enterprise Edition in addition to the servlet specification. JBoss is a freely available application server. Other servlet containers are only servlet containers, like the freely available and popular Apache Tomcat server.
If this is your first attempt at setting up a servlet container, we recommend Apache Tomcat, which can be found at http://tomcat.apache.org. It’s available for most popular operating systems, and it’s relatively easy to install and use. Throughout this section, any server-specific information that we provide is for Apache Tomcat. Rest assured that if you run a different software package, nearly all of the information in this section is relevant; we’ll keep it as generic as possible.
For developers new to servlets, the way they work can be a little confusing, especially if you’re familiar with how CGI scripts, ASP pages, or HTML pages are served. With these technologies, the URL in the browser matches the location of the file on the file system. For example, if a user requests /works/gwt_in_action.html, you expect that there is a file on the system named gwt_in_action.html in the directory works. Servlets don’t work like this. Instead, you use a configuration file to map a URL to a servlet class. This allows you to map any arbitrary URL or set of URLs to any servlet by using wildcards. The configuration file that is used to map URLs to servlets is named web.xml, and it always resides under the WEB-INF directory on your site.
When you’re developing a GWT application using the hosted-mode browser, you’re using Tomcat. Because this provides a good example of servlet configuration, it’s a good place to start the discussion about the web.xml file.
When you tested your RPC servlet in hosted mode, you may have noticed that a directory named tomcat was created. In that directory, under tomcat/webapps/ROOT/WEB-INF/, is a file named web.xml, which is known as a deployment descriptor. Unless you manually modified this file to integrate other services into your development environment, it looks like listing 16.7.
If you take a good look at listing 16.7, you’ll see that it isn’t complicated. It first defines a servlet by giving it an arbitrary name and specifying the full package and class name of the servlet. In this case, the servlet is GWTShellServlet. It’s important to note that you shouldn’t use this servlet on your server; it’s only meant for use only in the GWT development environment.
The second part of the configuration maps a URL to the servlet. It does so by specifying a URL pattern and the name of the servlet that handles requests to that URL—in this case, the URL is /*. The URL may include the wildcard * to match anything, so the pattern /* matches any request to the server. This isn’t typically what you want; but in this case, the GWTShellServlet servlet was written to read your project’s module file and dispatch the request to the right place. If you recall, the module configuration uses the <servlet> tag to define your GWT-RPC servlets. This information is used by the GWTShellServlet, but it isn’t used when you move your code to a production server.
Let’s apply these basics to how you configure your production environment.
The first step is to find the directory your server uses to deploy web applications. If you’re using Apache Tomcat, figure 16.9 shows this directory structure for the Tomcat installation. Figure 16.9 shows the directory structure on Windows, but it’s the same regardless of the platform.
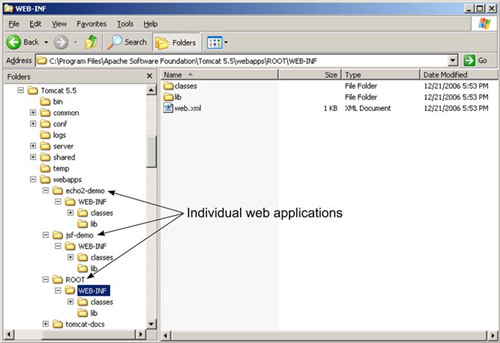
In figure 16.9, you see a bin directory to hold executables, conf for the overall server configuration, logs to store log files, and a few others. The directory that you need to be concerned with is webapps. This directory holds individual web applications running in Tomcat. Figure 16.9 shows a few applications we’ve placed there, like echo2-demo and jsf-demo. To access these applications in a browser, you use the URLs http://your-host-name/echo2-demo and http://your-host-name/jsf-demo. Each application directory in the webapps folder is accessible in your browser by using the same name as the application directory.
We’re pointing this out because the ROOT directory under webapps works a little differently. You can access the ROOT directory in the browser via http://your-host-name without specifying the application directory. This is important because you need to decide if you want your application to be accessed using just the host name in the URL or in an application directory. For example, if you want the Dashboard application to be accessible as http://your-host-name, then you place it under ROOT; otherwise, you create a new directory under webapps, perhaps called Dashboard, and the application is then accessible as http://your-host-name/Dashboard. For the purposes of the discussion that follows, it doesn’t matter what you choose because all applications, including the root application, have the same directory structure.
Inside, each application directory follows a specific structure. Figure 16.10 shows this structure, including the location of the web.xml file that is used to configure the application.

Figure 16.10. The directory structure inside a web application, including the location of the deployment descriptor
You place the HTML and JavaScript files generated by your project in the root of the application. In the WEB-INF/lib directory, you place any JAR files your project relies on. If you’re using GWT-RPC, this includes at least the gwt-servlet.jar file that is part of the GWT distribution. This JAR includes all the GWT classes required for the GWT-RPC mechanism. You should never deploy the gwt-user.jar and gwt-dev.jar files to your server, because they will probably interfere with your server; these JAR files contain their own Tomcat server code, which is used when you’re testing in hosted mode.
The WEB-INF/classes directory can be used for loose classes. You need to place any necessary compiled class files for your project under the WEB-INF/classes directory or package them as a JAR and place it in the WEB-INF/lib directory. The servlet container automatically includes all the classes and JAR files in these directories in the classpath for the application. Note that this only applies to code that needs to be run on the server. For example, if you’re using GWT-RPC, you must include the class files for your servlet and any Java interfaces it references. However, you don’t need to include any classes that are used only on the client side, such as widgets, because these aren’t executed on the server. Also note that it won’t hurt anything if you do deploy class files that are used only on the client, because they will never be called.
Once that is complete, the only step left is to create the web.xml file, known as the deployment descriptor, and reference your servlets.
When you’re creating the deployment descriptor, you need to map each individual GWT-RPC servlet to a URL. You can do this in the same manner as you saw previously when we looked at the deployment descriptor used by the GWT development environment.
The easiest way to explain this is to provide an example. Listing 16.8 provides the deployment descriptor file that could be used to deploy the Server Status project from chapter 10. In most cases, you can copy the example and alter it to match your servlet classes.
Just as you saw with the deployment descriptor used in hosted mode, you first define the servlet using the <servlet> tag, providing a name and class. You then provide a <servlet-mapping> tag that maps the servlet to a specific URL. The servlet you list in the deployment descriptor is your GWT-RPC class that extends the RemoteServiceServlet class. If you have multiple servlets, you’ll have multiple <servlet> blocks, one for each servlet you need to define.
The servlet-mapping is usually where it’s easy to run into problems. First, understand that the forward slash (/) at the beginning of the pattern refers to the root of this specific web application, not necessarily the root of the web site. This may seem confusing at first; but if you look back at figure 16.7, we showed you that each subdirectory in the Tomcat webapps directory is its own “application.” If you place the Server Status application in the webapps/status directory so that it’s accessible via the URL http://your-host-name/status, then the servlet-mapping/server-status refers to the URL http://your-host-name/status/server-status.
You also need to be concerned about the use of the method GWT.getModuleBaseURL() in your code, which typically references GWT-RPC and other server-side resources. Understand that this method returns the path to your project’s JavaScript file that ends with nocache.html. At the beginning of this chapter, we showed how you can relocate this file, as well as the other JavaScript files, to better organize your site. If you used getModuleBaseURL() to reference an RPC servlet, you need to account for this in the servlet-mapping.
As an example, if you look back at figure 16.6, you’ll see that we moved the generated JavaScript files for the module into the directory /scripts/org.sample.HelloWorld/. Let’s imagine that some code in this module referenced the following URL in an RPC call:
GWT.getModuleBaseURL() + "/hello-world-service"
In this case, you would use a servlet-mapping that looks like the following code. Notice how it takes into account the path to the generated JavaScript:
<servlet-mapping>
  <servlet-name>service</servlet-name>
  <url-pattern>
    /scripts/org.sample.HelloWorld/hello-world-service
  </url-pattern>
</servlet-mapping>
When you get done setting up your deployment descriptor, you should restart the servlet container to make sure the changes take effect. After you carefully write the deployment descriptor, if the RPC doesn’t seem to be working, then check the server logs. They will show you what URL the client browser is calling; you can compare this to web.xml and make any necessary changes.
In this chapter, we showed you how to use JUnit and how it can be used to test your GWT code. We showed you how you can use the included junitCreator tool to painlessly create new JUnit test cases for testing your client-side and RPC interactions, which isn’t typically available when building a non-GWT Ajax application.
We then turned our attention to deploying the GWT application to the server. We showed how you can better organize your project and what unused files can be safely deleted. In the end, we showed how you can keep your deployments organized, allowing you to deploy multiple GWT applications to the same server without having a mess of files.
After a good cleanup, we examined how a servlet container works and how it’s used to host GWT-RPC servlets. We looked at the deployment descriptor file in some detail, and we compared the hosted-mode deployment descriptor against what you would use in your production environment.
Now that the application is tested and deployed, the next chapter looks under the hood. There is a lot to GWT, and the more you know about how the magic works underneath, the better you’ll be able to maintain and debug your GWT application.