
Patterns for simplifying GWT-RPC code
Server polling techniques
Emulating server-push data communication
Custom GWT-RPC field serializers
In chapter 10, you began building a component called the Server Status component. The purpose of this example component is to present information about the Java Virtual Machine running on the server, including vitals such as memory and threads. During the course of that chapter, we took a deep look at how to use the GWT-RPC mechanism to solve the problem of sending data between the client and server.
When you finished that chapter, you had some code but not quite a finished component. It still needs polish. Some of the missing parts include structuring the presentation logic for your component, implementing a polling mechanism, and encapsulating the component so that it can be used over and over.
In this chapter, we’ll begin by jumping back into the project and finishing it, as we take a long look at architecting a reusable and maintainable client-side component—one that takes advantage of server-side resources.
So far in the Server Status project, which you started in chapter 10, you’ve unceremoniously plopped the RPC code into the entry-point class with little care about application architecture. In this chapter, you continue the Server Status project and polish it, allowing it to be easily extended and maintained. You do this by applying some software patterns to the RPC code; none of them are GWT specific, but you’ll apply them in a GWT-specific manner.
You’ll begin by encapsulating the entire Server Status component as an extension of the GWT Composite class, which you’ve seen in prior chapters, and adding some RPC-specific code. Following that, you’ll see how the Façade software pattern can be used to simplify RPC interaction. Finally, we’ll look at how you can use the Command software pattern to simplify the calling of remote methods.
Let’s begin with encapsulating the component.
The first step in building a component is to formulate the basic visual layout of the component and then decide which widget class should be extended. For the Server Status component, figure 11.1 shows the desired structure and the resulting styled HTML.
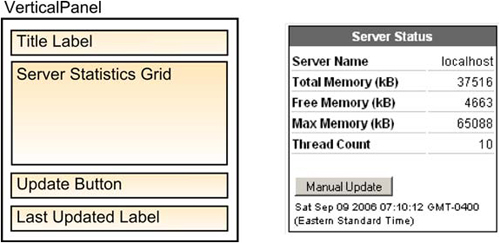
Figure 11.1. The structure of the Server Status component, and what the finished component looks like
The Server Status component is a VerticalPanel with four components. The first compartment inside of the component is the Server Status title bar. You’ll use a Label for this, and with a little CSS styling you can center it and make the title appear bold and white.
The second component you’ll employ is a Grid component to display the server statistics you’re retrieving via RPC. The grid is two cells wide and five cells tall to hold the five labels and five data values. These labels, like Server Name and Total Memory, are added to the grid as plain text. The values, on the other hand, are separate Label components so you’ll be able to update their values using the setText() method of the Label component. You could set the text directly in the grid for these, but by providing a named Label instance for each value in the code the code is somewhat self-documenting, making it easier to understand and maintain.
At the bottom of the Server Status component is an update Button component, used to manually update the statistics, and a Label to indicate the last time the values were updated. It’s our intention that this component will use some sort of polling mechanism to update itself periodically, but the manual update button can be used to force an early update. You’ll hook the Server Status component up to a polling mechanism when we discus polling techniques in the next section.
Once you’ve designed a general structure, the next step is to code this as a component.
In writing the shell for the component, you’ll deal with the layout of the component and not worry much about the inner workings yet. Once you complete the shell, you can move on to the next step and start having the component display data.
As we stated earlier, you need to decide which GWT user-interface component to extend. In figure 11.1, we showed that the outer shell of the component uses a VerticalPanel, but this isn’t a good choice for the basis of the component. The reason is that VerticalPanel exposes several methods that you don’t want the component to support. For example, the add() and remove() methods of VerticalPanel could be used to add or remove widgets from the finished component, changing the desired layout. For this reason, you want to extend com.google.gwt.user.client.ui.Composite. The Composite class provides several protected methods for use by an extending class and only publicly exposes a getElement() method.
In listing 11.1, you create the class ServerStatusComponent and place it in the org.gwtbook.client package with the rest of your client code. You define a private variable for each component that makes up the composite. This includes each of the components we discussed, including the five labels to hold the statistics you receive from the server.

Thus far, the only code you’ve included is the constructor for the ServerStatusComponent. The constructor calls the initWidget() method of the superclass, passing it a newly created VerticalPanel instance. This sets the user interface component that will be used as the outer shell for the component. To this, you add the title bar label, the statistics grid, the update button, and the last-updated label.
Next, you need to update the entry-point class to reflect that you’re now packaging the Server Status as a component. Notice that by encapsulating the ServerStatusComponent as a component, you’re able to instantiate it and add it to the RootPanel with only two lines of code (see listing 11.2).
Example 11.2. Instantiating the ServerStatusComponent
import com.google.gwt.core.client.*;
import com.google.gwt.user.client.rpc.*;
import com.google.gwt.user.client.ui.*;

public class ServerStatus implements EntryPoint
{
  public void onModuleLoad ()
  {
    ServerStatusComponent serverStatus =
        new ServerStatusComponent();
    RootPanel.get().add(serverStatus);
  }
}
You can now view the project in the hosted-mode browser; it should look like figure 11.2.
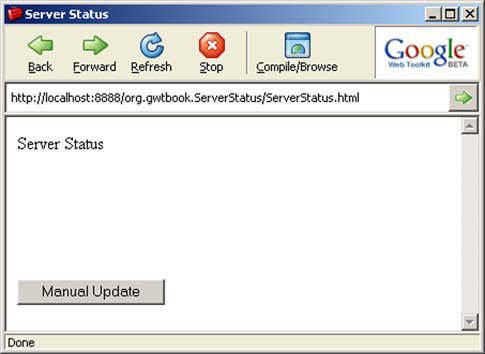
Figure 11.2. The incomplete shell of the Server Status component example running in the hosted-mode browser
The component looks a little sparse at this point, not only because you haven’t supplied any data, but also because you haven’t yet applied CSS styling.
As you saw in chapter 4, you can attach CSS class names to the individual parts of a component. You need to specify separate style class names for the title-bar, Grid component, update button, last-updated label, and the Composite as a whole. You also need to add labels to each row in the grid, to the left of where each data value will be displayed. See listing 11.3.

In listing 11.3, you reference two methods that you haven’t yet defined. The first is addRowToGrid(), which helps you populate the statistics grid; and the second is getStatusDataFromServer(), which is the method that triggers a call to the server.
For each row, addRowToGrid() sets the title of the value, which appears on the left side of the grid, and inserts the Label component to the right of it. For each title, you set the style class name to be stat-name, and for each value you set the style name to be stat-value. Creating methods like this that group repetitious code is extremely helpful, especially because GWT code can easily become verbose.
getStatusDataFromServer() will be used to trigger an RPC call to the server. We’ll describe this method and its purpose shortly, but for now you leave that method as an empty stub. Listing 11.4 shows the two methods you will add to the Server Status component.
Example 11.4. Adding the addRowToGrid() and getStatusDataFromServer( method
private void addRowToGrid (String name, Widget widget, int row)
{
  serverStats.setText(row, 0, name);
  serverStats.setWidget(row, 1, widget);
  serverStats.getCellFormatter().setStyleName(row, 0, "stat-name");
  serverStats.getCellFormatter().setStyleName(row, 1, "stat-value");
}

private void getStatusDataFromServer ()
{
}
If you run the application now, you see that it’s starting to come together. Figure 11.3 shows what the application should look like.
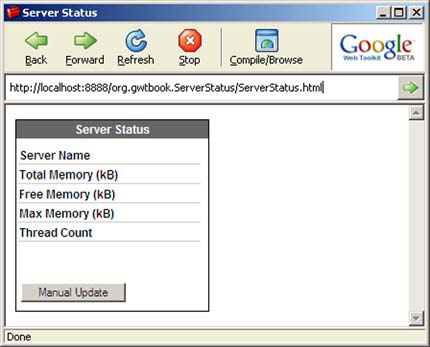
This assumes you’ve been following the example throughout the chapter and are using the CSS provided in section 10.1.
Now that you have the majority of the application’s moving parts, you need to fill in the getStatusDataFromServer() method, which calls the remote method. You’ll do this a little differently than you did in the prior section: This time, you’ll encapsulate the interface to the server as a façade.
The Façade pattern is one of the software patterns described in the famed book Design Patterns: Elements of Reusable Object-Oriented Software by Gamma, Helm, Johnson, and Vlissides. This book defines the Façade software pattern as a way of providing a higher-level interface to make a subsystem easier to use. In this case, you want to encapsulate all of the RPC logic into a class that provides a simple interface in an effort to achieve the following:
Reduce complexity by reducing the number of classes you need to interact with.
Promote weak coupling, allowing you to alter the underlying RPC mechanism without affecting the client.
We all like reduced complexity, because easier is almost always better, so it isn’t hard to understand the motivation for wanting the first point. You’ll realize this by creating a new class named ServerService with one method for each remote method plus a single getInstance() method (see listing 11.5).
Example 11.5. ServerService class
package org.gwtbook.client;

public class ServerService
{
  public static ServerService getInstance();
  public void getStatusData (AsyncCallback callback);
}
This class follows the Singleton software pattern, providing a single static method to retrieve an instance of the ServerService class. From this instance, you provide a getStatusData() method to call the remote service. It may be tempting to do away with the getInstance() method and make the remote method call static, but this isn’t a good idea. Doing so would reduce the flexibility of the class and make it more difficult to do things such as allowing multiple instances to be created. It’s one of those cases where you need to make the code a little more verbose to make future maintenance easier.
With the interface for the service class defined, you now need to implement the RPC service it will provide. In this case, your needs are simple: You have only a single endpoint (service URL) to call on the server, and you have only one method. The implementation is straightforward; see listing 11.6.
Example 11.6. The service façade
package org.gwtbook.client;

import com.google.gwt.core.client.GWT;
import com.google.gwt.user.client.rpc.AsyncCallback;
import com.google.gwt.user.client.rpc.ServiceDefTarget;

public class ServerService {

  private static ServerService instance;
  private ServerStatusServiceAsync proxy;

  private ServerService() {
    proxy = (ServerStatusServiceAsync)
      GWT.create(ServerStatusService.class);
    ((ServiceDefTarget) proxy).setServiceEntryPoint(
      GWT.getModuleBaseURL() + "server-status");
  }

  public static ServerService getInstance() {
    if (instance == null) {
      instance = new ServerService();
    }
    return instance;
  }

  public void getStatusData(AsyncCallback callback) {
    proxy.getStatusData(callback);
  }
}
In this implementation, you make the constructor private, allowing only the ServerService class to create an instance of itself. When getInstance() is called, it creates a new instance of the ServerService class only if one has not been created. This ensures that there will only ever be one instance of this class. When the ServerService class is instantiated, it creates the proxy instance that will be needed to call the server. When the getStatusData() method is finally called, the proxy object has already been created and can pass the callback object to the proxy.
You’ve effectively met your initial goals for using a façade. You’ve reduced the complexity of the ServerStatusComponent class because it no longer needs to deal with any of the underlying RPC code, including the creation of a proxy object and specifing an endpoint. You’ve also decoupled the calling class from the RPC implementation. You could potentially replace the GWT-RPC call with some other RPC mechanism such as XML-RPC, and you could do this without having to change any code in the Server Status component. You can do so only because you’ve completely delegated the RPC responsibility to the ServerService class.
Now that you have the façade class implemented, you can write the rest of the code for the Server Status component. You’ll do so by using the Command software pattern to provide future flexibility.
Early in our discussion of RPC, we addressed the fact that calls to the server are done in an asynchronous fashion, where the call to the server is as a separate thread of execution. We then examined how you can pass an anonymous instance of the AsyncCallback interface to receive the result from the server. Here’s the example we provided earlier:
AsyncCallback callback = new AsyncCallback() {
  public void onFailure (Throwable caught) {
    GWT.log("RPC error", caught);
  }

  public void onSuccess (Object result) {
    GWT.log("RPC success", null);
  }
};
This is a valid way of providing a callback object, but it has a couple of drawbacks. First, it locks you into using this specific functionality; if you wanted to change the functionality, you would need to rewrite the existing routine. Second, you can’t extend the functionality of the callback because it’s an anonymous class.
The solution to both of these issues is to use the Command pattern. The benefits you hope to achieve are as follows:
Create a new callback without having to rewrite or remove an existing callback.
Extend and reuse the callback.
Have the ability to create a callback that can execute other callbacks.
Applying the Command pattern is easy, especially given the way the existing callback mechanism works in GWT. All you need to do is create a named class for your callback; see listing 11.7.
Example 11.7. A callback command
private void getStatusDataFromServer ()
{
  ServerService.getInstance().getStatusData(
    new ServerStatsUpdater());
}

class ServerStatsUpdater implements AsyncCallback
{
  public void onFailure(Throwable caught) {
  }

  public void onSuccess(Object result) {
    ServerStatusData data = (ServerStatusData) result;
    labelServerName.setText(data.serverName);
    labelTotalMemory.setText(toKB(data.totalMemory));
    labelFreeMemory.setText(toKB(data.freeMemory));
    labelMaxMemory.setText(toKB(data.maxMemory));
    labelThreadCount.setText(Integer.toString(data.threadCount));
    labelLastUpdated.setText(new Date().toString());
  }
}
In the getStatusDataFromServer() method, you pass a new instance of ServerStatsUpdater, an inline class, instead of passing an anonymous callback routine. The ServerStatsUpdater class is the command object. In this case, you make the command an inline class due to the fact that it needs to update various Label objects inside the Server Status component. This, however, doesn’t take away from the fact that you’ve added flexibility with almost no additional coding time, and this code is easier to read than if you had used an anonymous AsyncCallback instance.
To provide an example of how this can add flexibility to your application, let’s add an additional requirement to the callback. Let’s require that you use the GWT logging mechanism on all callbacks to log the result of a callback. You could add this directly to the onFailure() and onSuccess() methods as in the following anonymous AsyncCallback, but there are some problems with this design:
AsyncCallback callback = new AsyncCallback() {
  public void onFailure(Throwable caught) {
    GWT.log("RPC Error", caught);
  }

  public void onSuccess(Object result) {
    GWT.log("RPC Success", null);
    ...
  }
};
In practice, you’ll likely have many different RPC commands, and you’d need to add this code to each callback. This in itself isn’t the problem; the problem occurs when you change your mind about how to log this information. For example, the previous code doesn’t let you know which RPC command was executed; it only lets you know whether it was successful. As developers, we aren’t fortune-tellers; a good design can prevent pain later when you need to update existing code. Using chains of callbacks is one solution you can apply to this problem.
If you go back to the Command pattern example, there are two ways in which you can provide shared logging functionality. The first is by chaining callbacks, and the second is to provide a superclass to the ServerStatsUpdater class, which includes logging capabilities. Let’s examine how to solve this problem by chaining callbacks. To do this, you need to create a new class called LoggingChainingCallback (see listing 11.8).
Example 11.8. LoggingChainingCallback class
package org.gwtbook.client;

import com.google.gwt.core.client.GWT;
import com.google.gwt.user.client.rpc.AsyncCallback;

public class LoggingChainingCallback implements AsyncCallback {

  private AsyncCallback callback;

  public LoggingChainingCallback(AsyncCallback callback) {
    this.callback = callback;
  }

  public void onFailure(Throwable caught) {
    GWT.log("RPC Failure ["
        + GWT.getTypeName(callback) + "]", caught);
    callback.onFailure(caught);
  }
  public void onSuccess(Object result) {
    GWT.log("RPC Success ["
        + GWT.getTypeName(callback) + "]", null);
    callback.onSuccess(result);
  }
}
The LoggingChainingCallback class implements the AsyncCallback interface and, as such, includes the onFailure() and onSuccess() methods. Notice that you add a constructor to this class. It takes an AsyncCallback as a constructor argument and stores the object in a private instance variable. You reference this instance in both the onFailure() and onSuccess() methods, using it to pass the result to that object after logging the event.
To use this class, all you need to do is alter the calling code slightly. You now pass the new ServerStatsUpdater callback to the constructor of the LoggingChainingCallback. The LoggingChainingCallback instance is then passed as an argument to the getStatusData() method:
private void getStatusDataFromServer ()
{
  ServerService.getInstance().getStatusData(
    new LoggingChainingCallback(new ServerStatsUpdater())
  );
}
If you’re confused about the chain of events, figure 11.4 will help. It shows the sequence of what happens when a successful result is returned from the server. The ServerService calls the onSuccess() method of the LoggingChainingCallback. This class logs the event and then passes the result on to the ServerStatsUpdater, which updates the fields.
Figure 11.4. Chaining actions, where one action performs its task and then passes control to the next
You’ve chained two callbacks together, where each performs its own function without overlap. In this design, you separate out the logging portion of the application so that it can be shared and modified independently of the callbacks to which it passes the request. With a little architecture, you’ve helped to future-proof the application, making it easier to alter logging functionality at a later date.
Besides chaining callbacks, we also mentioned that the Command software pattern allows you to subclass the command to enhance or replace the existing functionality.
As you’ve seen, you’ve applied the Command software pattern by creating a class that implements the AsyncCallback interface. One of the original reasons for doing this was so you could extend the command class, which is something you can’t do if you use an anonymous class for the callback. Again, the goal goes back to the need to separate out the logging for all RPC commands into a single class that can be reused and maintained in a single place.
You can achieve this two ways with a superclass. The first is by convention, and the second is to create a new type of callback interface. By convention, we mean that it’s up to the developer to follow the rules; if the rules are followed, the system works. In general, it’s a bad idea to allow a developer the ability to not follow the rules when functionality could break. But this approach is still useful when you can enforce the convention. For other times, there is a second approach. The goals you’ll attempt to achieve include the following:
Provide an abstract callback superclass that can be subclassed to add specific behaviors (such as logging).
Give the superclass the ability to handle the RPC result before the subclass.
To do this, you need to do a little design work. Figure 11.5 shows a high-level overview of what the new structure will look like.
Figure 11.5. Creating your own handler interface so you can add functionality, like logging, in a reusable manner
Figure 11.5 introduces a new interface called AsyncHandler that contains the two methods handleSuccess() and handleFailure(). You then create the class AbstractAsyncHandler that implements both the new interface and GWT’s AsyncCallback interface. You achieve the desired behavior by having this new abstract class intercept the RPC onSuccess() or onFailure() event and then forward it on to either the handleSuccess() or handleFailure() method.
The abstract handler in this sense is passing on the event to a method of a different name. You want to do this so the MyAsyncHandler will implement only the handleSuccess() and handleFailure() methods, and not the methods defined by the AsyncCallback interface. This allows you to extend the AbstractAsyncHandler with a handler with a specific function, like a logging handler, which only overrides the onSuccess() and onFailure() methods.
To build this, you’ll start at the top and work your way down. First, you create the AsyncHandler interface, which defines the two new methods:
package org.gwtbook.client;

public interface AsyncHandler {

  void handleSuccess(Object result);

  void handleFailure(Throwable caught);
}
The AsyncHandler interface mirrors the AsyncCallback interface in that it has two methods with the same parameters and return values; the only difference is the method names. Next, you need to create the AbstractAsyncHandler class (see listing 11.9).
Example 11.9. AbstractAsyncHandler class
package org.gwtbook.client;

import com.google.gwt.user.client.rpc.AsyncCallback;

public abstract class AbstractAsyncHandler
  implements AsyncCallback, AsyncHandler {

  public void onFailure(Throwable caught) {
    handleFailure(caught);
  }

  public void onSuccess(Object result) {
    handleSuccess(result);
  }
  public abstract void handleFailure(Throwable caught);

  public abstract void handleSuccess(Object result);
}
You declare the class as abstract, as well as the handleFailure() and handleSuccess() methods. This forces subclasses to either declare themselves as abstract or implement the two abstract interfaces. The next class in figure 11.5 is MyLoggingHandler class, but we’re going to skip this one for now because it’s just a placeholder for a handler class containing any type of needed functionality. Let’s skip to MyAsyncHandler, which is the specific handler you need to create for a specific RPC call.
In the Server Status component RPC call, you implemented ServerStatsUpdater as the callback handler. Let’s revisit that handler and alter it to use the new AbstractAsyncHandler as its parent class. The following code replaces the code you used earlier for both the call to the service class and the response handler:
private void getStatusDataFromServer ()
{
  ServerService.getInstance().getStatusData(
    new ServerStatsUpdater());
}

class ServerStatsUpdater extends AbstractAsyncHandler {

  public void handleFailure(Throwable caught) { }

  public void handleSuccess(Object result) {
    // success code
  }
}
This is essentially the same thing you started with, except the ServerStatsUpdater now extends the new AbstractAsyncHandler instead of implementing GWT’s AsyncCallback interface. With this change comes the fact that the handler method names are different, matching the abstract methods of the AbstractAsyncHandler class.
This new structure adds flexibility. As a reminder, these were the goals set forth for organizing the classes in this manner:
Provide an abstract callback superclass that can be subclassed to add specific behaviors (such as logging).
Give the superclass the ability to handle the RPC result before the subclass.
To demonstrate that you’ve achieved both of these goals, let’s go back to the logging example and create a subclass of the AbstractAsyncHandler that will automatically log RPC events. Name the class LoggingAsyncHandler to indicate that it provides automatic logging (see listing 11.10).
Example 11.10. LoggingAsyncHandler class
package org.gwtbook.client;

import com.google.gwt.core.client.GWT;

public abstract class LoggingAsyncHandler
    extends AbstractAsyncHandler {

  public final void onSuccess(Object result) {
    GWT.log("RPC Success [" + GWT.getTypeName(this) + "]", null);
    super.onSuccess(result);
  }

  public final void onFailure(Throwable caught) {
    GWT.log("RPC Failure [" + GWT.getTypeName(this) + "]", caught);
    super.onFailure(caught);
  }
}
Notice that you make the LoggingAsyncHandler class abstract, so it doesn’t need to implement the handleSuccess() and handleFailure() methods. You also override the onSuccess() and onFailure() methods and make them final. The purpose of making them final is so subclasses can’t alter the behavior of the class, which would most likely break it.
The onSuccess() and onFailure() methods are overridden to add the required logging capabilities and log the event prior to the handling of the event by its subclasses. This meets both requirements you set out to achieve.
Figure 11.6 summarizes the chain of events when a response is returned from the server. The LoggingAsyncHandler gets the first look at the response and passes the response up to its parent class, which then passes it down to the only class that implements the abstract handleSuccess() and handleFailure() methods.
Figure 11.6. The sequence of events for the new logging handler that has been inserted between the service and the response handler
It may seem as though you went the long way around to add a couple of simple logging statements, but as your GWT application gets larger, it becomes increasingly important to have a good design. The payback from this additional work comes from reuse of the logging handler and ease of maintenance.
Now that we’ve discussed a couple of patterns for maintainable client-side code, we can turn our attention back to the more general concept of polling.
Often, you may need to keep in constant contact with the server via RPC calls to keep the client updated. This is usually to inform the client browser of some event like the arrival of an email, a new chat message, a server being out of disk space, and so on. The solution is to poll the server. This can be done by contacting the server via RPC on a regular basis, such as every five minutes. Some applications require more frequent updates and may want to be as close to real-time as possible. In this section, we’ll explore GWT’s functionality for scheduling tasks and examine various polling techniques.
We’ll begin our examination by providing a high-level overview of polling terminology, including pull versus push. Then, we’ll look at the GWT Timer class and explain how it works. You’ll use the Timer class to enhance the Server Status component by making it update its contents on a regular basis. Following this, we’ll look at a technique called blocking to emulate a server-push mechanism.
Before we get into implementing polling, it’s useful to understand the different ways of delivering content and the consequences of each. Delivery techniques can be broken into two categories: server push and client pull. A push is when the server pushes content out to a client, and pull is when the client requests data from the server—the primary difference between these two being who initiates the request. Let’s look a little closer at these types: first push, then pull.
In theory, pushing data out to your clients is useful. You use it daily when you send an email or an instant message. For example, when you send an email, you’re sending it to a mail server, which in turn pushes the mail to another mail server. The same goes for instant messaging, where the message gets pushed to the intended recipient.
By pushing data out to clients, you can have any number of clients, perhaps many thousands, and no server or bandwidth resources are used until you have something to send. This scales well, and you can easily support any number of clients with this scheme with relative ease.
There is one hitch: Web browsers don’t have this capability. During the 1990s, quite a bit of work went into this area, but it never caught on. Part of the problem is that if you could push data to the browser, it would likely pose security issues, opening the user to a new breed of attack.
Although you can’t achieve true server-push, you’re often required to emulate it—for example, if you want to build a chat client that immediately broadcasts messages it receives. There are several techniques for doing this, like Comet, Pushlet, Pjax, and others. For the most part, these are difficult to implement in GWT, so we won’t discuss them here. Blocking server threads, on the other hand, is easy to implement in GWT; we’ll provide a full example of implementing this a little later.
The opposite of push is pull; we’ll examine pull technologies next.
Client-pull is another name for the standard request-response sequence used by the browser. When you go to a URL with your browser, you request a page from the server or, in other words, pull the page from the server. This technique is useful when a delay between the publication of an event and the receiving of an event is acceptable.
Client-pull has its own challenges. Because there can be a delay between sending and receiving the event, you often need to queue up data on the server, waiting for a client to check in. For example, if you write a chat application using client-pull, the server needs to store any unsent messages for a user until that user pulls the messages.
Between the two types of delivering data, pulling is the natural for web browsers. We’ll examine a client-pull implementation first by implementing a continuously updating component.
In this section, we’ll revisit the Server Status component and allow it to periodically update itself. To do this, you’ll add the ability to set the refresh rate for the data, as well as add the ability to change or stop the automatic updates. In doing so, we’ll need to look at the GWT Timer class, which allows you to trigger timed events.
If you’ve been following along with us, your Server Status component should be working and have a method that can be called to have it update its information from the server. If you haven’t been following with us, here is the basic shell for the Server Status component, which includes a getStatusDataFromServer() method that triggers an RPC call and updates the displayed data:
package org.gwtbook.client;

import java.util.Date;
import com.google.gwt.core.client.*;
import com.google.gwt.user.client.rpc.*;
import com.google.gwt.user.client.ui.*;

public class ServerStatusComponent extends Composite
{
  public ServerStatusComponent () {
     ...
  }

  private void getStatusDataFromServer () {
     ...
  }
}
In the full version of the Server Status component, the getStatusDataFromServer() method is called when the component is first initialized or when an update button is clicked. Next, you’ll add a timer to trigger an update as well.
The Timer class can be found in the com.google.gwt.user.client package. It provides a no-argument constructor and several methods. The method signatures are as follows:
public abstract class Timer {
  public abstract void run();
  public void schedule(int milliseconds);
  public void scheduleRepeating(int milliseconds);
  public void cancel();
}
The first thing to point out is that the Timer class is abstract, so you must subclass it to be able to use it. You can do this by creating an anonymous class or creating your own specialized timer class. When you implement your class, you need to implement the abstract method, run(), that is called when the timer is triggered. In this example, you create a timer that alerts the user with a “hello” message when a timer event is triggered:
Timer example = new Timer() {
  public void run () {
    Window.alert("hello");
  }
};
To trigger a timer event, you need to set either a one-time event with the schedule() method or a recurring event with the scheduleRepeating() method. In the case of schedule(), you specify the number of milliseconds to wait before executing the run() method. The scheduleRepeating() method also takes the number of milliseconds as a parameter, and it repeatedly executes the run() method. The first execution of run() begins in the number of milliseconds specified and then continuously recurs at that same interval.
The cancel() method, as apparent by its name, allows you to stop the timer. Once it’s stopped, you may start it again by calling either the schedule() or scheduleRepeating() method. The following example sets the timer for five seconds and then cancels it:
example.schedule(5000);
example.cancel(); // just kidding
The next step is to add additional methods to the Server Status component to provide the ability to set the update interval as well as the ability to stop the automatic updates. You’ll do this via a schedulable class.
There are many ways to implement a timer, but you’ll use an approach we think is highly reusable. The code not only can be used in the Server Status component, but also applies to any Composite component. It’s also possible, with some minor changes, to adapt it to other base classes.
You’ll accomplish this by creating a subclass of Composite called UpdateableComposite, shown in figure 11.7, that provides methods for setting and stopping the update timer. Before you start coding, look at the class diagram to see the relationships between the new class and the existing ServerStatusComponent class.
We’ll begin by introducing the new UpdateableComposite as a subclass of Composite. UpdateableComposite is an abstract class, meaning that it must be subclassed to use it, and it contains three methods. The startUpdateTimer() method starts the update timer. It allows you to specify the number of seconds between updates; you can use this same method to change the update interval. The update() method is an abstract method and must be implemented by the subclass.
Once you implement UpdateableComposite class, you alter the Server Status component to implement the update() method, and then set the timer (see listing 11.11).
Example 11.11. Abstract UpdateableComposite class
package org.gwtbook.client;

import com.google.gwt.user.client.Timer;
import com.google.gwt.user.client.ui.Composite;

public abstract class UpdateableComposite extends Composite
{
  private Timer timer = null;

  public abstract void update();

  public void startUpdateTimer(int seconds)
  {
    if (timer != null) {
      stopUpdateTimer();
    }

    timer = new Timer() {
      public void run() {
        update();
      }
    };

    timer.scheduleRepeating(seconds * 1000);
  }

  public void stopUpdateTimer()
  {
    if (timer == null)
      return;

    timer.cancel();
    timer = null;
  }
}
The implementation is straightforward but is worth some explanation. The class contains a single private field called timer, which holds the Timer object. You need to hold onto a reference to the Timer object so that you can cancel it when stopUpdateTimer() is called. Looking at the stopUpdateTimer() method, you can see that the method calls cancel() on the Timer object and then sets the timer field to null.
The startUpdateTimer() method first checks to see if the timer field is null. If it isn’t null, this is a sign that it has already been started. The method responds by calling stopUpdateTimer() to cancel the existing timer. This allows you to use startUpdateTimer() to change the interval period without having to worry about stopping the existing timer. The method then goes on to create a Timer instance. You’re creating the Timer as an anonymous class, which prevents external clients of this class from being able to control the timer directly. In the timer’s run() method, you call the abstract method update(). It will be left up to the subclasses of UpdateableComposite to determine what the update() method does.
With the UpdateableComposite complete, the only thing left to do is alter the Server Status component to take advantage of the scheduling capabilities:
public class ServerStatusComponent extends UpdateableComposite
{
  ...

  public void update() {
    getStatusDataFromServer();
  }
}
The only change is that you now extend UpdateableComposite instead of Composite directly, and you implement the update() method. The update() method, in turn, calls the private method getStatusDataFromServer(), which you created before triggering an RPC call to the server. In projects other than the Server Status component, you can include whatever code is required to update the component in the update() method.
With this mechanism in place, you can now easily create and schedule updates for the component. The code to do this for the Server Status component is here, but it will be essentially the same for any custom component that subclasses UpdateableComposite:
ServerStatusComponent serverStatus = new ServerStatusComponent();
serverStatus.startUpdateTimer(60);
In summary, using the GWT Timer class, it’s easy to schedule a piece of code to execute on a schedule. The concepts for doing this are the same no matter if you’re using a timer to schedule polling of the server or updating a display. In either case, it’s always a good idea to think through the design and use the tools that Java provides to create reusable code. The UpdateableComposite is just one example.
Now that we’ve explored timers and, in conjunction, the concept of polling, it’s time to look at how you can emulate server-push and push events to the client browser.
As we briefly mentioned earlier, no true server-push is available to browsers, meaning the server can’t send data to the browser without the browser requesting it. The reasons are security and lack of a standard. To accommodate for this lack of functionality, there are several schemes for emulating server-push. In this section, we’ll discuss and implement one such variation called blocking server threads.
From a high level, RPC involves a client browser requesting data from a server. The server then processes the request and returns a result. Not only is this how browser-based RPC works, but it’s also how web pages are served. With blocking server threads, you add one small alteration: You hold up the processing on the server until data is available to process. It’s similar to a company with poor customer service—you end up waiting on hold until there is someone to talk to you.
To help understand how this works, figure 11.8 provides a visual comparison between polling and blocking server threads.

In figure 11.8 you can see that when you use polling, the browser handles the orchestration by calling the server every 20 seconds. With blocking, the server becomes the conductor, placing the request on hold until it needs to process the request. Another important difference is that with blocking, you have an almost constant connection between the client and the server.
A web-based chat client is the classic example of the need for blocking server threads, and we’ll use this type of application as our example. You won’t build a complete component because doing so would require covering a lot of the same topics we’ve already discussed; but we’ll explain the few changes required to make it work. We’ll start with the code required on the client and then look at what changes are needed on the server.
When you implement the client side of blocking server threads, there is little that you need to do. The only requirement is that each time you get a response from the server, you need to initiate a new request. Take the following AsyncCallback implementation for example. We’ve removed the implementation details, but notice that it calls the method getDataFromServer() on both success and failure:
class ChatPanelUpdater implements AsyncCallback
{
  public void onFailure (Throwable caught) {
    ...
    getDataFromServer();
  }

  public void onSuccess (Object result) {
    ...
    getDataFromServer();
  }
}
You’d need to define getDataFromServer(); the only requirement is that this method triggers another RPC request. In the Server Status component, the method getStatusDataFromServer() serves the same purpose.
With this one minor change, we can turn our attention to the more interesting aspects of blocking server threads on the server.
Implementing the server portion of a blocking RPC server can be done the same way you block any Java thread: by issuing a sleep command. When you issue a sleep command to the JVM, it stops processing that specific thread of execution for some amount of time. Once the sleep time is finished, the thread wakes up and continues processing. Issuing a sleep command involves a single statement. The method Thread.sleep() takes a number of milliseconds to sleep; passing 1000 to the method causes the thread to sleep for one second:
Thread.sleep(1000);
For our purposes, you need to do more than just block the thread for some amount of time. You need to first determine whether you should process the request, which in the case of a chat application is when you have a message that you want to send the user. On the other hand, if you don’t have a message to send, you should put the thread to sleep for a short period of time. Once the thread wakes up, you check again whether you should process the request. To do so, you use a loop similar to this:
public List getMessages ()
{
  List result = new ArrayList();

  try {
    while (true) {
      if (canProcess()) {
        result = process();
        break;
      }

      Thread.sleep(1000);
    }
  } catch (InterruptedException ignore) {
  }

  return result;
}
You use the while(true) loop to create an endless loop, and at the end of the loop, you use Thread.sleep() to sleep for one second. Prior to sleeping, you check to see if you can process the request by calling canProcess(); if you can, you call process() to get the result of the RPC call and then break out of the while loop. The try statement catches an InterruptedException, which could result from the call to Thread.sleep()—for example, if the application server was being shut down.
This loop is fine, but what happens if the user closes their browser or navigates to a different web page? Unfortunately, you don’t have a good way to be notified of these events, so potentially a thread could loop forever even though the browser client is no longer present. To solve this problem, you need to introduce a timeout (see listing 11.12).
Example 11.12. Blocking threads example with the introduction of a timeout
public List getMessages ()
{
  List result = new ArrayList();
  long timeout = System.currentTimeMillis() + (30 * 1000);

  try {
    while (true) {
      if (canProcess()) {
        result = process();
        break;
      }

      if (System.currentTimeMillis() > timeout) {
        break;
      }

      Thread.sleep(1000);
    }
  } catch (InterruptedException ignore) {
  }

  return result;
}
To the original example, you added a timeout value: You set the value to the current time in milliseconds and add 30 seconds to that value. You also added a check, and, if the current time exceeds the timeout value, it breaks the loop. The timeout value you use depends on your specific project, but in most cases 30 seconds is sufficient to keep the number of requests down while removing stale connections quickly.
The exact implementation of canProcess() and process() depends a lot on the purpose of the method. For example, with the chat application, you’ll likely have a queue of messages for each user of the system, in which case canProcess() returns true if any messages are in the queue for that user. The process() method then returns the list of messages and clears out the queue, or marks the messages in the queue as being delivered.
Now that we’ve shown how you can easily implement polling, let’s turn our attention to a completely different, although equally important, topic: how to create custom serialization routines for your objects.
With GWT’s basic serialization system, you can create data objects that implement the IsSerializable interface, which can be passed between the client and server. When you implement this interface, GWT handles all the details of serialization and deserialization for you. This is usually sufficient for most work with GWT, but occasionally this mechanism isn’t sufficient for a given project. Three common reasons for needing to write a custom field serializer are as follows:
The default serialization causes performance issues for a complex object.
The class that needs to be serialized doesn’t implement
IsSerializable(orSerializableas of GWT 1.4).The class that needs to be serialized doesn’t have a zero-argument constructor.
Writing a custom field serializer is fairly easy. In this section, you’ll take the ServerStatusData class that you used as the data object for the ServerStatus component example, and you will write a custom serializer for it. To begin, let’s look at the original implementation of the ServerStatusData class, shown in listing 11.13.
Example 11.13. Original implementation of the ServerStatusData class
package org.gwtbook.client;

import com.google.gwt.user.client.rpc.IsSerializable;

public class ServerStatusData implements IsSerializable
{
  public String serverName;
  public long totalMemory;
  public long freeMemory;
  public long maxMemory;
  public int threadCount;
}
The data object is fairly simple, including only five fields; the custom field serializer will also be fairly simple, but it will highlight the important concepts. You’ll begin by creating a custom field serializer class, and we’ll look at implementing both serialization and deserialization. We’ll then discuss how to serialize objects that don’t have a zero-argument constructor.
To begin, you need to create a class for each custom field serializer, which must follow some rules:
The serializer class must reside in the same package as the class that it serializes.
The serializer class must have the same name as the class that it serializes plus
_CustomFieldSerializer.It must implement
serialize()anddeserialize()methods.It may optionally implement an
instantiate()method if the class requires custom creation.
These rules require the convention of adding the suffix “CustomFieldSerializer” to a class to specify that it’s a custom serialization class. Also, as you’ll see shortly, the three methods have signatures that depend on the class type being serialized. To help you understand how all this works, you’ll start by building the shell of the class; then, we’ll discuss each of the method signatures it contains. (See listing 11.14.)
Example 11.14. Beginnings of the ServerStatusData_CustomFieldSerializer class
package org.gwtbook.client;

import com.google.gwt.user.client.rpc.SerializationException;
import com.google.gwt.user.client.rpc.SerializationStreamReader;
import com.google.gwt.user.client.rpc.SerializationStreamWriter;

public class ServerStatusData_CustomFieldSerializer
{
  public static ServerStatusData instantiate(
    SerializationStreamReader reader)
      throws SerializationException
  {
  }

  public static void serialize(
    SerializationStreamWriter writer,
    ServerStatusData instance)
      throws SerializationException
  {
  }
  public static void deserialize(
    SerializationStreamReader reader,
    ServerStatusData instance)
      throws SerializationException
  {
  }
}
The first method, instantiate(), is a static method that takes a Serialization-StreamReader as an argument (which we’ll discuss shortly) and returns an object of the type this class was built to serialize, namely the ServerStatusData class. The instantiate() method is optional and is required only when the target class doesn’t have a zero-argument constructor. It must return the same type of object that you’ve built this class to serialize and deserialize—in this case, a ServerStatusData instance. The instantiate() method, like the other two methods, throws SerializationException.
The serialize() method is a static method that takes a writer object, used for adding data to the serialization stream, and an instance object, which is the object that is being serialized (in this case, a ServerStatusData object). This instance object is of the same type that you’re serializing, so if your custom field serializer was serializing an object of type Foo, then the instance parameter would be of type Foo.
The deserialize() method receives a reader object, which can read data from the serialized stream, and an instance object of the type of object that you’re deserializing (in this case, a ServerStatusData object). The instance object is the same object that was created by the instantiate() method, and the reader object is the same reader that was given as a parameter to instantiate(). The pattern for deserialization is that instantiate() is called first and is given an opportunity to read data from the serialized stream and use it in the creation of the object. The instance created by instantiate() is then passed to deserialize() along with the reader, allowing it to continue reading from the stream and setting any properties of the object.
Now that you have a basic shell, let’s discuss the usage of the serialization reader and writer classes by implementing the methods in the class.
Thus far, we’ve looked at the method signatures for the custom field serializer, but you haven’t yet implemented them. Let’s inspect each method individually and explain its purpose and how it should be implemented.
When GWT serializes or deserializes an object using your custom field serializer class, it calls instantiate(). The purpose of this method is to create a new instance of your object, including passing any values to the constructor required for its creation. This method has a default behavior, and you don’t need to implement the method unless you need to override the implementation. The default behavior as shown here, calls the zero-argument constructor of the data class and returns the instance:
public static ServerStatusData instantiate(
  SerializationStreamReader reader)
  throws SerializationException
{
  return new ServerStatusData();
}
In this implementation, you implemented a field serializer for the data class ServerStatusData. If you were writing a field serializer for a different class, the method signature would change to return an object of that type.
A SerializationStreamReader object is passed to this method and can be used to read values from the serialized stream and use those values in the construction of the object. For example, in the following example, the class FakeData’s constructor takes a String argument, which you pull from the reader:
public static FakeData instantiate(SerializationStreamReader reader)
  throws SerializationException
{
  String val = reader.readString();
  return new FakeData(val);
}
We’ll discuss using the SerializationStreamReader in more detail when we look at the deserialize() method (after the serialize() method).
The serialize() method of the custom field serializer is passed a writer object, which is used to write data to the serialized stream, and an existing object instance, which is the object you’ll serialize. Serialization works by reading some data from the object you’re serializing and then writing that data to the writer.
The writer is an instance of SerializationStreamWriter from the package com.google.gwt.user.client.rpc; it includes methods for writing different types of data to the serialized stream. Following is a list of available writer methods, all of which may throw a SerializationException:
The writer includes a method for each of the Java primitive types as well as the String and Object classes. Writing an object to the stream in turn calls the serializer for that type of object, which could be one of the serializers that comes with GWT or another custom field serializer.
You may write the fields to the stream in any order. The only restriction is that the deserialize() method reads the values from the stream in the same order you wrote them.
The deserialize() method is passed the object instance created by instantiate() and passed a reader so that it can continue reading from the serialized stream. The reader is an instance of SerializationStreamReader from the package com.google.gwt.user.client.rpc. It has a set of methods that allow you to read one value at a time from the serialized stream. The reader methods mirror the writer methods we looked at previously. It’s important that you read the values in the same order as you wrote them, or you’ll likely cause a SerializationException to be thrown—or, even worse, end up with a deserialized object with the wrong data in the wrong fields.
The reader object has the following methods, all of which throw SerializationException:
Just like the writer, there is one method for each of Java’s primitive types, plus String and Object. Calling readObject() in turn causes the deserialization of the value you’re reading.
Here is the deserialize() method for the ServerStatusData object:
public static void deserialize(
  SerializationStreamReader streamReader,
  ServerStatusData instance) throws SerializationException
{
  instance.serverName = streamReader.readString();
  instance.totalMemory = streamReader.readLong();
  instance.freeMemory = streamReader.readLong();
  instance.maxMemory = streamReader.readLong();
  instance.threadCount = streamReader.readInt();
}
The deserialize() method, like the serialize() method, is simple; you read each value from the stream in the proper order and set the appropriate field of the object.
In chapter 10, we introduced an example component, Server Status, which makes calls to the server and displays statistics on memory usage and the number of server threads. As we progressed through the chapter, we followed an entire build process for the component and presented something new at each step.
In chapter 11, we polished this working example by focusing our attention on the architecture and design of the application. You started by encapsulating your code as a reusable composite component. We looked at how the Façade software pattern can be used to hide the implementation details of the RPC call, providing the flexibility for changing this later without disturbing the entire application. We then focused our attention on the callback routine that receives the data from the server. You encapsulated this object as a Command object, and we discussed how this pattern allows you to easily add functionality like logging or chaining multiple commands together.
Once you had a stable and reusable component, we looked at polling techniques, starting with a comparison of server-push and client-pull. You created an abstract Composite class, which can be reused and will allow any component that subclasses it to pull data from the server on a scheduled basis. We followed this up with a discussion of how you can emulate server-push by blocking server threads.
Last, but not least, we discussed cases where the built-in serialization routines aren’t enough. You can write your own custom field serializer class to handle a data object that can’t follow the requirements of the IsSerializable interface.
We’ve covered quite a bit, but GWT offers even more with respect to RPC. In this chapter, we looked at GWT’s proprietary RPC mechanism, which is tailored to deliver Java objects between the client and server. But what if your server isn’t Java? In the next chapter, we’ll look at the rest of GWT’s RPC offering, including the ability to communicate with non-Java servers.