
Overview of GWT generators
Writing custom generators
Accessing input and context
Using introspection
Everything we’ve done so far has involved you, as a developer, writing GWT Java code for your application. But you can do more with GWT. Is your ideal development project one that includes sitting back with your feet up and letting a tool write the code for you? With GWT, your dreams are about to come true—almost. Using GWT generators, it’s possible, at compile time, to take an existing interface or class (a type) and automatically generate a brand-new type. This new type could implement the input interface or extend the input class, giving new functionality to your applications. The output type of a generator generally contains more implementation details than the input type.
Your task in this chapter is to create a generator that takes all of your Dashboard applications and automatically creates an About menu option in the application’s standard option menu bar. When the user clicks the About menu option, you’ll show them an alert box containing a list of all the fields and methods in the application’s class (if the application is in Internet mode, you’ll display only the public fields and methods). In practice, this means you must build and register a generator that takes all of the DashboardComposite classes in your application and creates a subclass that provides the About menu item and uses GWT introspection of the class to access the fields and registers.
Additionally, you’ll create a This App. Demonstrates menu item that displays the comment defined for the class to the user of the application. This task is also performed using the generator you’ll develop.
You’ve already used generators, albeit in the background, while developing the Dashboard application (although it’s understandable if you haven’t been aware of it). Remember when we talked about internationalization and how you provide an interface and a number of properties files? A generator takes that interface and generates a set of classes that bind methods defined in the interface to the values in the various language-specific properties files you also provided. These classes are then used in the deferred binding approach, where the appropriate locale class is selected in the compilation process.
GWT uses generators for more than internationalization. You also used them when you implemented the RPC technique (to talk to the server) in chapter 10. They took the proxies and interfaces and implemented all the code to plumb everything together. When you use JUnit to perform some testing in chapter 16, you’ll again use generators to take your test classes and produce the necessary classes in the format needed by JUnit. Table 14.1 indicates the class and packages where you can find the source code for these generators if you’re interested in seeing how GWT performs these tasks in detail.
Table 14.1. Package and class names of existing generators in GWT
Generator | Package | Class name |
|---|---|---|
JUnit |
|
|
Description Creates a JUnit-readable class from a user-provided GWT JUnit class. | ||
I18n |
|
|
Description Takes an interface that extends the | ||
RPC |
|
|
Description Creates all the plumbing code necessary to implement GWT RPC based on the interfaces you provide. | ||
Image Bundling |
|
|
Description Bundles together a number of user-provided images into a single image. | ||
Unfortunately, not much documentation is available for generators at present, but at least some people are at work decoding how these beasts work and looking at putting them to use (ourselves included!). This chapter represents our knowledge of how generators function, based on our investigation, and also shows you how to produce a practical implementation for the Dashboard.
The first point to note about generators is that most of the classes they use don’t reside in the JAR archives you’ve been comfortably using so far. Up to now, you’ve included the gwt-user.jar file into your projects, which includes all the standard GWT functionality required. For generators, you must venture into the gwt-dev-platform.jar archive (substitute your development environment for platform, such as gwt-dev-windows.jar). As always, to use these classes, you must add that archive to the classpath (for the commands that launch hosted mode and the compiler for web mode). Our classpath on our Windows development machine is included in the Dashboard-shell command script and looks like this:
@java -cp
        "%~dp0src;%~dp0in;C:/Program Files/gwt-win/gwt-user.jar;
         C:/Program Files/gwt-win/gwt-dev-windows.jar"
      com.google.gwt.dev.GWTShell
      -out "%~dp0www" %* org.gwtbook.Dashboard/Dashboard.html
With the classpath amended, there are three key steps to producing your own generator. First, you need to write the code that makes up your generator (we did say that automatic code generation was almost a case of the code writing itself). Next, you need to register the fact that you wish the generator to be used with the GWT system. Finally, you must use the deferred binding approach to create the objects that will be generated by a generator.
Writing a generator involves extending the com.google.gwt.core.ext.Generator class with the functionality you require. Registering the generator is performed through your application’s module XML file, where you indicate which type the generator should be executed on and what generator’s class name is—package_name.TypeToGenerateFor and package_name.GeneratorClassName in the following example:
<generate-with class="package_name.GeneratorClassName ">
   <when-type-assignable class="package_name.TypeToGenerateFor"/>
</generate-with>
By using the GWT.create(classLiteral) method to create your objects, you’re signaling to the compiler that it should use a deferred binding approach—meaning that at compile time (for web mode) or invocation time (for hosted mode), there is a little more work to do to get the appropriate class. In the case of deferred binding to a class created by a generator, you’re telling the GWT system that the appropriate class needs to be generated.
Be careful, though, because the classLiteral that you pass into the GWT.create() method should be the name of the type you’ve written, such as Clock.class, not the name of the type you expect the generator to produce. (The generator works by either implementing your interface or subclassing the class you provide as an input. The result can’t have the same name as the input, which is a standard Java rule.)
Note
You must use the deferred binding approach for creating instances of classes that will be generated. Otherwise, the compiler doesn’t know that it needs to invoke a generator.
The process of a generator’s action is shown in figure 14.1.

When the compiler comes across a deferred-binding instantiation for a class/type, it checks the module XML file (together with any included module XML files) to see if any direction is given to it. If the assignable type of the class/type under consideration matches the definition given in the module XML definition, then the generator is applied to it, creating a new type that is used in place of the existing type in the program. If no match is found, then the original class is used.
You know how to register a generator, and what happens at compile time. But what does a generator look like?
By convention, you place generator classes in a rebind package; for the Dashboard, this resides under the org.gwtbook package. Just as with server-side code, you should avoid placing a generator under the client package for two reasons: It doesn’t naturally fit in that package; and you can use Java 1.5 and other constructs that aren’t possible in the client-side code (if you place your generator in the client package, then the GWT compiler automatically tries to compile it and complains about any non-GWT compliant code).
Let’s look at the basic structure of any generator, shown in listing 14.1.
This generator doesn’t do much, but it does show that all generators need to extend the basic Generator class ![]() and implement the
and implement the generate() method ![]() . The inputs to the
. The inputs to the generate() method are all supplied by the compiler during the compilation process. These inputs include the context in which the generator executes; you can use that context to access classes, files, and properties. A TreeLogger is also supplied, which allows you to output your own logging information in the compilation logger. The final parameter is the name of the type that is being presented to the generator by the compiler.
At present, the result of the generate() method in listing 14.1 is the value null—which tells the compiler that the generator hasn’t created a new type and that it should use the original type passed in as the parameter. If you want to create a new type, then you need to provide the code to create that new type as well as return the name of this new type. You’ll do that now for the Dashboard example.
When you built the components for the Dashboard, you put in place a mechanism to let component applications display an option menu when they gain focus; but there is no requirement that a component application must have such a menu. By using a generator, you’ll now extend the Dashboard functionality by doing the following:
Setting the name of the
DashboardPanelthat theDashboardCompositesits in to be the name of theDashboardCompositeclass (this is then displayed on the application’s title bar and as the option menu name)Adding an About menu item to the option menu
Creating an About alert box, which describes the fields and methods of the
DashboardComposite(if the Dashboard is in Internet mode, then only the public fields and methods are listed)
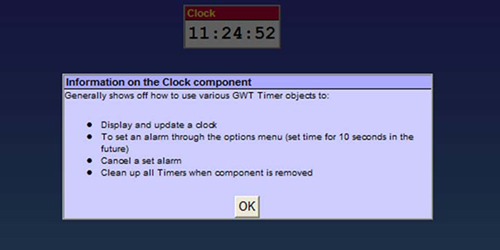
Once an application has gone through the generator, it will appear in the Dashboard. Clicking the About menu gives a result similar to that in figure 14.2, which shows the About dialog for the GoogleSearch component application in intranet mode.

Figure 14.2. The About dialog for the GoogleSearch Dashboard application, showing the methods and fields in the class. (The information was gathered by introspecting the class at compile time using a GWT generator.)
The generator that performs this follows this template:
Gets information about the input type and property values from the current context
Creates a new object that is used to create the new type (a
SourceWriterobject)Builds the new type, including introspecting the input type, extending that input type, and adding some new methods
Returns the new type’s name to the compiler
In the next few sections, we’ll look at each of these steps.
The generate() method takes as a String parameter the name of the input type. For the generator to be of any use, you need to access the type itself and not a reference to its name. Listing 14.2 shows how you do this.
GWT provides a TypeOracle class, an instance of which you can retrieve ![]() from the also-passed
from the also-passed generatorContext object, which allows you to access information about the type. Once you have the TypeOracle, you can get a reference to the class through the getType() method ![]() . In the example, you have no nested classes to find; but if you do, you need to use the source name (with periods) rather than the binary name (with
. In the example, you have no nested classes to find; but if you do, you need to use the source name (with periods) rather than the binary name (with $).
This use of TypeOracle is fairly simple: to get access to one named type. It can also be used to examine the whole set of types and packages in the context that is being compiled through various methods with the words package and type in their names.
The returned type from the getType() method is a JType, which is one of a number of GWT classes that represent Java constructs. There are also GWT Java classes for packages, classes, methods, parameters, fields, and so on; you can use these objects to perform introspection on classes, as you’ll see later in this chapter. For now, you use a couple of methods in the JType class to retrieve the package name of the input class as well as its simple source name ![]() . Both of these pieces of data are then used in creating the fully qualified name of the class you’ll generate
. Both of these pieces of data are then used in creating the fully qualified name of the class you’ll generate ![]() , which is the input class with the text
, which is the input class with the text Proxy appended to the class name. Any exceptions that are raised by your generator are handled at ![]() , where you output an error message to the current
, where you output an error message to the current TreeLogger object.
In certain circumstances, such as with internationalization, you’d like to know the values of the properties in this context so that the correct binding to constants/messages can be performed. Access to these values is through the PropertyOracle object.
When the GWT system creates the bindings required for internationalization, the generator needs to know which locale the current context is all about in order to select the appropriate properties file (this is why the files must be named in the particular manner they have been). Similarly, for the Dashboard, you wish to know if you’re generating for the Internet or intranet version. In chapter 15, we’ll introduce a user-defined property called externalvisibility that you can set as either intranet or internet. If the context you’re compiling for has the externalvisibility property set as internet, then you only show public fields and methods in the About dialog; you determine that by looking in the PropertyOracle (see listing 14.3).

You accessed information about types through the TypeOracle object, which you retrieved from the GeneratorContext object. Similarly, you access information about GWT properties through a PropertyOracle retrieved from the GeneratorContext object ![]() . Retrieving properties is slightly easier than class details because there is only one thing to look for. You use the
. Retrieving properties is slightly easier than class details because there is only one thing to look for. You use the getPropertyValue() method ![]() to get access to the value of the
to get access to the value of the externalvisibility property.
Unlike other points in GWT where we discuss properties, in the generator case you’re only concerned with the value of a property in the particular context being compiled at that point. For example, when you set up the locale property in chapter 3, you gave two values—an English one and a Swedish one. When the generator executes the locale, the property has only one value: that of the locale currently in context. In hosted mode, that means the locale currently being used; when compiling for web mode, the generator is called multiple times, once for each locale being managed.
If you can’t find the property you’re looking for, this is handled by the catch statement ![]() . You can also keep track of what’s going on in your generators by implementing logging.
. You can also keep track of what’s going on in your generators by implementing logging.
Logging in a generator is performed by writing log statements to the TreeLogger class that is passed to the generate() method. You can log either a message or an exception using the following template:
Logger.log(TreeLogger.LEVEL, message, exception)
Only one of the message or exception can be provided; the other should be left as the null object. Values of the LEVEL all come from the TreeLogger class and include the INFO and ERROR levels you’ve used in the Dashboard example as well as ALL, DEBUG, INFO, SPAM, NULL, TRACE, and WARN.
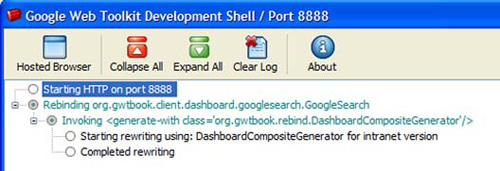
When you run the application in hosted mode, the generator is invoked whenever you create an instance of a DashboardComposite. The output in the hosted-mode window is shown in figure 14.3.
In web mode, all of the compilation is performed at once to generate the numerous permutations of JavaScript code (see chapter 17 for details). Figure 14.4 shows the output produced when we compiled the code.

Or, you can ask the compiler to use the TreeLogger by including the -treeLogger flag in the compile command (see chapter 2). Adding this flag means the output appears in hosted-mode style window, as shown in figure 14.5.

Figure 14.5. Output from the generator when preparing for web mode with the compile provided with the -treeLogger flag set
The log statements are added to your generator code, as shown in listing 14.4.
Example 14.4. Logging progress within a GWT generator
public String generate(TreeLogger logger,
                       GeneratorContext context,
                       String typeName)
       throws UnableToCompleteException {
   try{
      logger.log(TreeLogger.INFO, "Starting rewriting using:"+
                                   this.getClass().getSimpleName()+
                                    " for "+version+" version",
                                    null);
      // Other code
      logger.log(TreeLogger.INFO, "Completed rewriting", null);
      } catch ...
      }
}
You’re almost in a position to start writing your new functionality, but first you must get an object that represents the new type—the SourceWriter object.
You write your new type by printing lines of text to a SourceWriter object (which, unlike the other classes used in generators, can be found in the gwt-user.jar archive under the com.google.gwt.user.rebind package). The route to it is slightly convoluted and is shown in listing 14.5 as a separate method in the Dashboard Generator class.
First, you try to create a standard Java PrintWriter object from the current GeneratorContext through the tryCreate() method ![]() using the new fully qualified class name as a parameter. If you fail to get a
using the new fully qualified class name as a parameter. If you fail to get a PrintWriter, it’s because the class you’re trying to create already exists ![]() . This isn’t unusual, particularly because at compilation time the generator is called many times; you may have created the necessary new type in a previous permutation.
. This isn’t unusual, particularly because at compilation time the generator is called many times; you may have created the necessary new type in a previous permutation.
Note that if the generated type is to be an interface rather than the default of a class, then you additionally call the makeInterface() method on the composer factory.
Let’s assume you’re applying the generator to the Clock component application. If the PrintWriter has been successfully created, then ![]() creates your new type, which resembles the following:
creates your new type, which resembles the following:
package org.gwtbook.client.ui.clock

public class ClockProxy{
}
At ![]() , you tell the new class to have some imports. Because you’re going to add a
, you tell the new class to have some imports. Because you’re going to add a MenuItem and an associated Command, these are prime candidates to be included, as is the Window class, because you’re going to show an alert box with the Window.alert() method. Next, you tie the new type to the old type by setting its superclass ![]() . The class is now as follows:
. The class is now as follows:
import com.google.gwt.user.client.Command;
import com.google.gwt.user.client.Window;
import com.google.gwt.user.client.ui.MenuItem;
package org.gwtbook.client.ui.clock

public class ClockProxy extends Clock{
}
Finally, you create the SourceWriter from this ComposerFactory ![]() , which is subsequently used to create the methods in the new class.
, which is subsequently used to create the methods in the new class.
Assuming the result of getting the SourceWriter isn’t null, you need to take the last result and provide your new functionality. You do this by adding new methods, overriding methods in the superclass, or manipulating the input class. New methods and fields are written out to the SourceWriter object. We’ll look at creating two methods: one that overrides the DashboardComponent’s getName() method, and another that creates the About menu item.
To override an existing method, you write out the details to the SourceWriter, as shown in listing 14.6.

You first write out a JavaDoc comment for the new method. Then, you write the method definition you want using calls to the println() method. Although you generally won’t see the new method definition written down, here you use the indent() and outdent() methods to structure your code—it’s useful to structure the code in a sensible way for those occasions where you make errors. In these circumstances, the compiler will direct you to the error, and in our experience it’s often due to forgetting to put the semicolon in at the end of the command you’re constructing. Look at this line of code, which could be written instead of ![]() in listing 14.6:
in listing 14.6:
writer.println("return "" + className + """);The syntax checker in Java won’t complain about this, because it’s valid Java. But when you try to use your new class, you get the error message shown in figure 14.6.
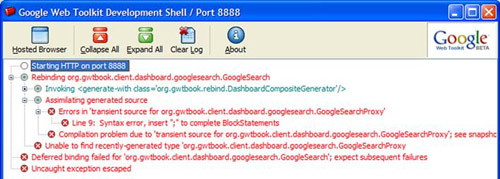
The error happens because you forgot to put a semicolon at the end of the code you’re generating, not because a semicolon is missing from the println() command. In this case, hosted mode tells you the error is in Line 9, and the next line in the error points you to the location of the temporary file containing Java code that has been generated, a segment of which is shown here:

The offending error line is marked ![]() , and you can see that a semicolon is indeed missing.
, and you can see that a semicolon is indeed missing.
You can see in figure 14.6 that the compiler tells you where to find the generated class, but remember from chapter 3 that you can direct the compiler where to place these generated classes by using the -gen directory flag.
This method was easy to write. More complicated ones are possible, including those that include an element of introspection on the input class, as you can see in the method that creates the About menu dialog.
When it comes to manipulating the input class, we briefly mentioned earlier that GWT provides a set of classes that allow you to introspect an existing Java class. These are depicted in figure 14.7.
Note
It’s only possible to introspect a Java class at compile time—and that introspection has to use the GWT classes in figure 14.7 rather than the normal Java way.
You use these classes when it comes to manipulating the input class. The starting point for introspection is the JClassType object, which you obtain from the OracleType at the start of the generator’s generate() method. Once you have this object, you can start asking for the class’s methods using the JClassType.get-Methods() method or its field using JClassType.getFields() method. You can find out the modifiers of the type, such as whether it’s public or private, what type it subclasses or implements, its metadata, and various other aspects.
Return objects from methods in the JClassType class generally come from those classes shown in figure 14.7. For example, if you wanted to list all the methods of the requestedClass object you retrieved from the TypeOracle, you would write the following:
JMethod[] methods = requestedClass.getMethods();
for(int loop=0;loop<methods.length;loop++){
   writer.println(methods[loop].toString()+"
);
}
You use these introspection approaches in the generator to create the About menu option we’ve previously discussed. Listing 14.7 shows the code.

At ![]() , you use GWT’s version of introspection to get the fields and methods of the class. Next, you make the method call the overridden parent’s
, you use GWT’s version of introspection to get the fields and methods of the class. Next, you make the method call the overridden parent’s createOptionsMenu() method ![]() so you ensure that the
so you ensure that the MenuItem you’re adding always gets added as the last item in the list. You create a String object to hold the alert message ![]() , and at
, and at ![]() you start looping around the fields in the input class. You check at
you start looping around the fields in the input class. You check at ![]() that you’re generating for the intranet version—or, if it’s the Internet version, whether the field is public. If either of those cases is true, then you add the details to the alert string.
that you’re generating for the intranet version—or, if it’s the Internet version, whether the field is public. If either of those cases is true, then you add the details to the alert string.
You can see the complete generator in the downloadable code, which includes all this code plus more logging. The result of the generator, so far, on the Clock Dashboard component application for the intranet version is shown in listing 14.8.
Example 14.8. The generated version of the Clock class (ClockProxy)
package org.gwtbook.client.ui.clock;

import com.google.gwt.user.client.Window;
import com.google.gwt.user.client.Command;
import com.google.gwt.user.client.ui.MenuItem;

public class ClockProxy extends org.gwtbook.client.ui.clock.Clock {

  /**
   * Overides DashboardComposite getName() method
   */
  public String getName(){
    return "Clock";
  }

  public void createOptionsMenu(){
    super.createOptionsMenu();
    optionsMenuBar.addStyleName("submenu");
    optionsMenuBar.addItem("About", new Command() {
      public void execute(){
        String aboutMessage = "About the Dashboard Clock Widget
                               (intranet version)
";
        aboutMessage +="Info Created by a GWT Generator

";
        aboutMessage +="Number Fields: 4
";
        aboutMessage+="org.gwtbook.client.ui.clock.Clock.AlarmTimer
                       alarm
";
        aboutMessage+="private com.google.gwt.user.client.ui.Label
                       clockLabel
";
        aboutMessage+="private boolean local
";
        aboutMessage+="org.gwtbook.client.ui.clock.Clock.ClockTimer
                       clock
";
        aboutMessage +="
Number Methods: 2
";
        aboutMessage+="public java.util.Date getTime()
";
        aboutMessage+="public void createOptionsMenu()
";
        Window.alert(aboutMessage);
       }
     });
  }
}
It’s not only methods that you can extend; you can also read and react to tags in the class’s comments or methods. You did this when you created an ImageBundle in chapter 4, where the path to the image was stored as a tag in the method’s comment. Let’s look at how you can use this mechanism to create the Dashboard components’ This App. Demonstrates menu item.
When you created an ImageBundle in chapter 4, you created an interface that included definitions such as this:
/**
* @gwt.resource org/gwtbook/public/ToolbarImages/ChangeEvents.png
*/
AbstractImagePrototype ChangeEvents();
The tag @gwt.resource defines the location of the image that should be included in the ImageBundle. GWT’s image bundle generator will ensure that this identified image is included in the bundle.
In the Dashboard, you use a similar approach to extract information in the class’s comment to display to the user when they click the This App. Demonstrates menu item. Listing 14.9 provides an overview of the Clock class.
Example 14.9. Clock class definition showing comment displayed as the This App. Demonstrates menu item

In the Dashboard generator, you extract the comment ![]() for the class
for the class ![]() and wrap it up to be displayed when the user clicks the This App. Demonstrates menu item, as shown in figure 14.8.
and wrap it up to be displayed when the user clicks the This App. Demonstrates menu item, as shown in figure 14.8.
You ensure that the text you want displayed from the comment starts with a specific tag—in this case, @dashboard.description. Then, in the generator, you write some code that extracts this text from the class’s metadata. For the Dashboard, this code is shown in listing 14.10.
First, you get a reference to the class’s metadata, which is tagged with the tag @dashboard.description ![]() . With the reference established, you either extract all the text related to the tag
. With the reference established, you either extract all the text related to the tag ![]() or create default text
or create default text ![]() . The next step is to wrap the
. The next step is to wrap the newAppDescription variable into some code that creates a display similar to figure 14.8.
There is one final step to take before you use your newly generated class: You have to return its name to the compiler.
The final task that the generator needs to perform is to return the name of the class the compiler should use. In listing 14.1, you saw that the compiler uses the input class if you return the null value. For the DashboardGenerator, you always return a class name, which is the name of the proxy class that either the generator just generated or was generated in the past.
To use the generated class in your code, you must use GWT’s deferred-binding approach to allow the compiler to generate the code for you. Fortunately, there isn’t much difference between normal Java object creation and GWT’s deferred-binding approach, except that you can’t pass parameters into the deferred approach. To create an object this way, write the following code:
DashboardComposite newObject =
    (DashboardComposite)GWT.create(Calculator.class);
Here you use the GWT.create() method, which is in the com.google.gwt.core.client package, to create a new object of the Calculator.class type. The parameter must be a class literal; and, frustratingly, you can’t use a variable in its place. This last fact explains why in the Dashboard.java code you’ll find the same code shown in listing 14.11 repeated for each Dashboard application.
Example 14.11. Creating an instance of the Server Status Dashboard application through deferred binding
If the panel hasn’t already been created ![]() , then you use the deferred binding approach to create a new instance of the appropriate
, then you use the deferred binding approach to create a new instance of the appropriate DashboardComposite ![]() ; place it in its own panel
; place it in its own panel ![]() , which is set to automatically display when created; and add it to your list of panels
, which is set to automatically display when created; and add it to your list of panels ![]() . In the case where the panel already exists, you make the old panel visible
. In the case where the panel already exists, you make the old panel visible ![]() . (This means only one instance of a Dashboard application is ever in the Dashboard at a time.)
. (This means only one instance of a Dashboard application is ever in the Dashboard at a time.)
With this generator in place and the Dashboard.gwt.xml file updated, you register the generator as follows:
<generate-with
      class="org.gwtbook.rebind.DashboardCompositeGenerator">
   <when-type-assignable
          class="org.gwtbook.client.ui.DashboardComposite"/>
</generate-with>
Then, every class you have that extends the DashboardComposite class will be passed to this generator and have a new About menu item stamped on it, as well as have its class name added as the title bar of the window it sits in. In our discussion, we briefly touched on some properties the generator can access—in this case, the externalvisibility property. GWT properties such as this are another way to alter what is displayed to the user.
We’ve covered client-side and client-server techniques and looked at how you can change an application by using generators or harnessing the power of GWT properties.
As you’ve seen, you can do a lot with these advanced techniques in GWT. The best way to get used to them is to use them and play with the Dashboard demo, adding a few more locales, including other domains on top of internet and intranet, or enhancing the DashboardCompositeGenerator.
For generators, the key things to remember is to make sure you return the correct name from the generate() method—if you don’t, then the results of the compiler won’t be correct! If you want the compiler to use the original class, return a null value to use the newly generated class return its new name. And don’t forget, if the result of the SourceWriter creation is null, the class already exists; return its new name and not null.
When you’re dealing with property-based coding, remember that the general pattern is to create a default class and then the variations, all of which extend the default class. Then, you can use replace-with tags in the module XML file to replace the default file when properties match values; or, if you’re using the i18n approach, the default class must implement Localizable, and all class names should follow the i18n naming structure.
In the next chapter, we’ll look at another advanced technique, which allows you to change your application based on the values given for a set of properties.