
Chapter 11
User Interfaces
Most games include UI elements such as a menu system and an in-game heads-up display (HUD). The menu system allows the player to perform actions such as starting and pausing the game. The HUD includes elements that give information to the player during gameplay. This can include elements such as an aiming reticule or a radar.
This chapter looks at core systems needed to implement user interfaces, including text rendering with a font, a system for UI screens, and localization for different languages. The chapter also explores implementations of certain HUD elements.
Font Rendering
In the TrueType font format, straight line segments and Bézier curves form the outlines of individual characters (or glyphs). The SDL TTF library provides support for loading and rendering TrueType fonts. After initializing the library, the basic process is to load fonts at specific point sizes. Then SDL TTF takes in a string and renders the string to a texture, using the glyphs from the font. Once this texture exists, the game can render the texture just like any other 2D sprite.
Much as in other systems, the Game class initializes SDL TTF in Game::Initialize. The TTF_Init function returns 0 if successful, and -1 in the event of an error. Similarly, Game::Shutdown calls TTF_Quit to shut down the library.
Next, you declare a Font class to encapsulate any font-specific functionality, as shown in Listing 11.1. The Load function loads in a font from the specified file, and Unload frees all font data. The RenderText function takes in the provided string, color, and point size and creates a texture that contains the text.
class Font
{
public:
Font();
~Font();
// Load/unload from a file
bool Load(const std::string& fileName);
void Unload();
// Given string and this font, draw to a texture
class Texture* RenderText(const std::string& text,
const Vector3& color = Color::White,
int pointSize = 30);
private:
// Map of point sizes to font data
std::unordered_map<int, TTF_Font*> mFontData;
};
The TTF_OpenFont function loads a font from a .ttf file at a specific point size and returns a pointer to the TTF_Font data corresponding to the font at that size. This means to support different-sized text in the game, you must call TTF_OpenFont multiple times. The Font::Load function, shown in Listing 11.2, first creates a vector of the desired point sizes, and then it loops over this vector, calling TTF_OpenFont once per size and adding each TTF_Font to the mFontData map.
Listing 11.2 Font::Load Implementation
bool Font::Load(const std::string& fileName)
{
// Support these font sizes
std::vector<int> fontSizes = {
8, 9, 10, 11, 12, 14, 16, 18, 20, 22, 24, 26, 28,
30, 32, 34, 36, 38, 40, 42, 44, 46, 48, 52, 56,
60, 64, 68, 72
};
// Call TTF_OpenFont once per every font size
for (auto& size : fontSizes)
{
TTF_Font* font = TTF_OpenFont(fileName.c_str(), size);
if (font == nullptr)
{
SDL_Log("Failed to load font %s in size %d", fileName.c_str(),
size);
return false;
}
mFontData.emplace(size, font);
}
return true;
}
As with other resources, you want to keep track of loaded fonts in a central place. In this case, the Game class adds a map where the key is the filename of the font, and the value is a Font pointer. You then add a corresponding GetFont function. As with GetTexture and similar functions, GetFont first tries to find the data in its map and, if it fails, it loads the font file and adds it to the map.
The Font::RenderText function, shown in Listing 11.3, creates a texture given a text string, using a font of the appropriate size. First, you convert the Vector3 color into an SDL_Color, where each component ranges from 0 to 255. Next, you look in the mFontData map to find the TTF_Font data corresponding to the font at the requested point size.
Next, you call the TTF_RenderText_Blended function, which takes in a TTF_Font*, the string of text to render, and a color. The Blended suffix means that the font will draw with alpha transparency around the glyphs. Unfortunately, TTF_RenderText_Blended returns a pointer to an SDL_Surface. OpenGL cannot directly draw an SDL_Surface.
Recall that in Chapter 5, “OpenGL,” you created the Texture class to encapsulate a texture loaded for OpenGL usage. You can add a Texture::CreateFromSurface function to convert an SDL_Surface into a Texture. (This chapter omits the implementation of CreateFromSurface, but check the source code for the gameproject.) Once the SDL_Surface is converted into a Texture object, you can free the surface.
Listing 11.3 Font::RenderText Implementation
Texture* Font::RenderText(const std::string& text,
const Vector3& color, int pointSize)
{
Texture* texture = nullptr;
// Convert to SDL_Color
SDL_Color sdlColor;
sdlColor.r = static_cast<Uint8>(color.x * 255);
sdlColor.g = static_cast<Uint8>(color.y * 255);
sdlColor.b = static_cast<Uint8>(color.z * 255);
sdlColor.a = 255;
// Find the font data for this point size
auto iter = mFontData.find(pointSize);
if (iter != mFontData.end())
{
TTF_Font* font = iter->second;
// Draw this to a surface (blended for alpha)
SDL_Surface* surf = TTF_RenderText_Blended(font, text.c_str(),
sdlColor);
if (surf != nullptr)
{
// Convert from surface to texture
texture = new Texture();
texture->CreateFromSurface(surf);
SDL_FreeSurface(surf);
}
}
else
{
SDL_Log("Point size %d is unsupported", pointSize);
}
return texture;
}
Because creating a texture is somewhat expensive, the UI code does not call RenderText every frame. Instead, it calls RenderText only when the text string changes and saves the resulting texture. Then on every frame, the UI code can draw the texture that contains the rendered text. For maximum efficiency, you could even render each letter in the alphabet to separate textures and then stich these letter textures together to form words.
UI Screens
Because a UI system might be used for many things, including the HUD and menus, flexibility is an important feature. Although there are data-driven systems that utilize tools such as Adobe Flash, this chapter instead focuses on a code-driven implementation. However, many of the ideas presented here can still apply to a more data-driven system.
It’s useful to think of the UI as containing different layers. For example, during gameplay, the heads-up display (HUD) shows information relevant to the player, such as health or a score. If the player pauses the game, the game might show a menu that lets the player choose between different options. While the game shows the pause menu, you may still want the HUD elements to be visible under the pause menu.
Now suppose that one of the options in the pause menu is to quit the game. When the player selects this option, you might want to have the game show a confirmation dialog box that asks whether the player truly wants to quit. The player might still see parts of both the HUD and pause menu onscreen under this dialog box.
During this sequence, the player can typically interact with only the topmost layer of the UI. This naturally leads to the idea of using a stack to represent the different layers of the UI. You can implement the idea of a single UI layer with the UIScreen class. Each type of UI screen, such as the pause menu or HUD, is a subclass of UIScreen. After drawing the game world, the game draws all UI screens on the stack in a bottom-up order. At any point in time, only the UIScreen on top of the UI stack might receive input events.
Listing 11.4 shows the first iteration of the base UIScreen class. Notice that it has several virtual functions that subclasses can override: Update for updating the UI screen’s state, Draw for drawing it, and the two input functions to handle different types of incoming input. You can also keep track of the state of a specific UI screen; in this case, you only need two states for whether the screen is active or closing.
The UI screen also might have a title, so the member data contains a pointer to the Font, a pointer to the Texture that contains the rendered title, and a position for the title onscreen. Subclasses can then call the SetTitle function, which uses Font::RenderText to set the mTitle member.
Finally, because a UIScreen is not an Actor, you cannot attach any types of components to it. Thus, the UIScreen class doesn’t use the drawing functionality from SpriteComponent. Instead, you need a new helper function called DrawTexture that draws a texture at the specified position onscreen. Every UI screen can then call DrawTexture as needed.
Listing 11.4 Initial UIScreen Declaration
class UIScreen
{
public:
UIScreen(class Game* game);
virtual ~UIScreen();
// UIScreen subclasses can override these
virtual void Update(float deltaTime);
virtual void Draw(class Shader* shader);
virtual void ProcessInput(const uint8_t* keys);
virtual void HandleKeyPress(int key);
// Tracks if the UI is active or closing
enum UIState { EActive, EClosing };
// Set state to closing
void Close();
// Get state of UI screen
UIState GetState() const { return mState; }
// Change the title text
void SetTitle(const std::string& text,
const Vector3& color = Color::White,
int pointSize = 40);
protected:
// Helper to draw a texture
void DrawTexture(class Shader* shader, class Texture* texture,
const Vector2& offset = Vector2::Zero,
float scale = 1.0f);
class Game* mGame;
// For the UI screen's title text
class Font* mFont;
class Texture* mTitle;
Vector2 mTitlePos;
// State
UIState mState;
};
The UI Screen Stack
Adding the UI screen stack to the game requires connections in several places. First, you add a std::vector of UIScreen pointers to the Game class for the UI stack. You don’t just use std::stack here because you need to iterate over the entire UI stack, which is not possible in std::stack. You also add functions to push a new UIScreen onto the stack (PushUI) and a function to get the entire stack by reference:
// UI stack for game
std::vector<class UIScreen*> mUIStack;
// Returns entire stack by reference
const std::vector<class UIScreen*>& GetUIStack();
// Push specified UIScreen onto stack
void PushUI(class UIScreen* screen);
Then the constructor of UIScreen calls PushUI and passes in its this pointer as the screen. This means that simply dynamically allocating a UIScreen (or subclass of UIScreen) automatically adds the UIScreen to the stack.
Updating the UI screens on the stack happens in UpdateGame, after updating all the actors in the world. This requires looping over the entire UI screen stack and calling Update on any active screens:
for (auto ui : mUIStack)
{
if (ui->GetState() == UIScreen::EActive)
{
ui->Update(deltaTime);
}
}
After updating all the UI screens, you also delete any screens whose state is EClosing.
Drawing the UI screens must happen in Renderer. Recall that Renderer::Draw first draws all the 3D mesh components by using the mesh shader and then draws all the sprite components by using the sprite shader. Because the UI comprises several textures, it’s natural to draw them by using the same shader that sprites use. So, after drawing all sprite components, the Renderer gets the UI stack from the Game object and calls Draw on each UIScreen:
for (auto ui : mGame->GetUIStack())
{
ui->Draw(mSpriteShader);
}
For testing purposes, you can create a subclass of UIScreen called HUD. You can create an instance of HUD in Game::LoadData and save it in an mHUD member variable:
mHUD = new HUD(this);
Because the constructor of HUD calls the constructor of UIScreen, this automatically adds the object to the game’s UI stack. For now, HUD doesn’t draw any elements to the screen or otherwise override any behavior of UIScreen. (Later in this chapter, you’ll learn about supporting different functionality in the HUD.)
Handling input for the UI stack is a bit trickier. In most cases, a specific input action such as clicking the mouse should affect the game or the UI—but not both simultaneously. Thus, you first need a way to decide whether to route the input to the game or to the UI.
To implement this, you first add the mGameState variable to Game that supports three different states: gameplay, paused, and quit. In the gameplay state, all input actions route to the game world, which means you pass the input to each actor. On the other hand, in the paused state, all input actions go to the UI screen at the top of the UI stack. This means that Game::ProcessInput must call ProcessInput on either each actor or the UI screen, depending on this state:
if (mGameState == EGameplay)
{
for (auto actor : mActors)
{
if (actor->GetState() == Actor::EActive)
{
actor->ProcessInput(state);
}
}
}
else if (!mUIStack.empty())
{
mUIStack.back()->ProcessInput(state);
}
You can also extend this behavior so that the UI screen on top of the stack can decide whether it wants to process the input. If the UI screen decides it doesn’t want to process the input, it can forward the input to the next topmost UI on the stack.
Similarly, when responding to SDL_KEYDOWN and SDL_MOUSEBUTTON events, you either send the event to the game world or to the UI screen at the top of the stack (via the HandleKeyPress function).
Because you added mGameState to track the state of the game, you also make changes to the game loop. The condition of the game loop changes to keep looping as long as the game is not in the EQuit state. You further update the game loop such that you call Update on all the actors in the world only if the game state is EGameplay. This way, the game doesn’t continue to update the objects in the game world while in the paused state.
The Pause Menu
Once the game has support for a paused state, you can add a pause menu. First, you declare PauseMenu as a subclass of UIScreen. The constructor of PauseMenu sets the game state to paused and sets the title text of the UI screen:
PauseMenu::PauseMenu(Game* game)
:UIScreen(game)
{
mGame->SetState(Game::EPaused);
SetTitle("PAUSED");
}
The destructor sets the game’s state back to gameplay:
PauseMenu::~PauseMenu()
{
mGame->SetState(Game::EGameplay);
}
Finally, the HandleKeyPress function closes the pause menu if the player presses the Escape key:
void PauseMenu::HandleKeyPress(int key)
{
UIScreen::HandleKeyPress(key);
if (key == SDLK_ESCAPE)
{
Close();
}
}
This leads to the game deleting the PauseMenu instance, which calls the PauseMenu destructor, which sets the game state back to gameplay.
To show the pause menu, you need to construct a new PauseMenu object because the constructor automatically adds the UIScreen to the stack. You create the pause menu in Game::HandleKeyPress to have it appear when the player presses the Escape key.
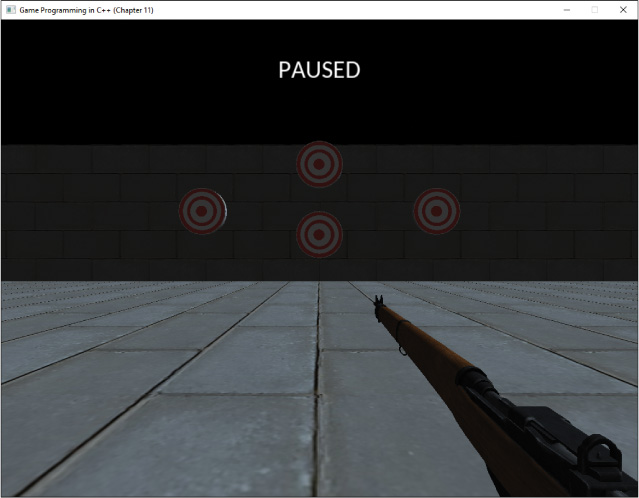
The overall flow is that while in the gameplay state, the player can press Escape to see the pause menu. Constructing the pause menu object causes the game to enter the pause state, which means actors don’t update. Then, if the player presses Escape when in the pause menu, you delete the pause menu and return to the gameplay state. Figure 11.1 shows the game paused with this simple version of the pause menu (which isn’t really a menu yet because it has no buttons).
Buttons
Most menus in games also have buttons that the player can interact with. For example, a pause menu might have buttons for resuming the game, quitting the game, configuring options, and so on. Because different UI screens may need buttons, it makes sense to add this support to the base UIScreen class.
To encapsulate buttons, you can declare a Button class, as shown in Listing 11.5. You can assume that every button has a text name, and so it also needs a pointer to the Font that renders this text. In addition, the button has a position onscreen as well as dimensions (width and height). Finally, when the player clicks the button, some action should occur, depending on the button clicked.
To customize a button’s action, Button uses the std::function class to encapsulate a callback function. This function can be a standalone function or, more likely, a lambda expression. When declaring a Button, the constructor takes in this function. Then, when the code detects a button click, you can call this function. This way, any arbitrary button you create for any arbitrary menu can call a corresponding arbitrary function.
Listing 11.5 Button Declaration
class Button
{
public:
// Constructor takes in a name, font,
// callback function, and position/dimensions of button
Button(const std::string& name, class Font* font,
std::function<void()> onClick,
const Vector2& pos, const Vector2& dims);
~Button();
// Set the name of the button, and generate name texture
void SetName(const std::string& name);
// Returns true if the point is within the button's bounds
bool ContainsPoint(const Vector2& pt) const;
// Called when button is clicked
void OnClick();
// Getters/setters
// ...
private:
std::function<void()> mOnClick;
std::string mName;
class Texture* mNameTex;
class Font* mFont;
Vector2 mPosition;
Vector2 mDimensions;
bool mHighlighted;
};
Button has a ContainsPoint function that, given a point, returns true if the point is within the 2D bounds of the button. This function uses the same approach as in Chapter 10, “Collision Detection”: You test for the four cases where the point is not within the bounds. If none of these four cases are true, then the button must contain the point:
bool Button::ContainsPoint(const Vector2& pt) const
{
bool no = pt.x < (mPosition.x - mDimensions.x / 2.0f) ||
pt.x > (mPosition.x + mDimensions.x / 2.0f) ||
pt.y < (mPosition.y - mDimensions.y / 2.0f) ||
pt.y > (mPosition.y + mDimensions.y / 2.0f);
return !no;
}
The Button::SetName function uses the previously discussed RenderText function to create the texture for the button’s name, stored in mNameTex. The OnClick function simply calls the mOnClick handler, if it exists:
void Button::OnClick()
{
if (mOnClick)
{
mOnClick();
}
}
You then add additional member variables to UIScreen to support buttons: a vector of Button pointers and two textures for the buttons. One texture is for unselected buttons, and the other is for selected buttons. Having different textures makes it easier for the player to differentiate between the selected and unselected buttons.
Next, you add a helper function to make it easy to create new buttons:
void UIScreen::AddButton(const std::string& name,
std::function<void()> onClick)
{
Vector2 dims(static_cast<float>(mButtonOn->GetWidth()),
static_cast<float>(mButtonOn->GetHeight()));
Button* b = new Button(name, mFont, onClick, mNextButtonPos, dims);
mButtons.emplace_back(b);
// Update position of next button
// Move down by height of button plus padding
mNextButtonPos.y -= mButtonOff->GetHeight() + 20.0f;
}
The mNextButtonPos variable allows the UIScreen to control where the buttons draw. You could certainly add more customization with more parameters, but using the provided code is a simple way to get a vertical list of buttons.
Next, you add code in UIScreen::DrawScreen to draw the buttons. For each button, you first draw the button texture (which is either mButtonOn or mButtonOff, depending on whether the button is selected). Next, you draw the text for the button:
for (auto b : mButtons)
{
// Draw background of button
Texture* tex = b->GetHighlighted() ? mButtonOn : mButtonOff;
DrawTexture(shader, tex, b->GetPosition());
// Draw text of button
DrawTexture(shader, b->GetNameTex(), b->GetPosition());
}
You also want the player to use the mouse to select and click on buttons. Recall that the game uses a relative mouse mode so that that mouse movement turns the camera. To allow the player to highlight and click on buttons, you need to disable this relative mouse mode. You can leave responsibility for this to the PauseMenu class; in the constructor, it disables relative mouse mode, and then it reenables it in the destructor. This way, when the player returns to gameplay, the mouse can once again rotate the camera.
The UIScreen::ProcessInput function, shown in Listing 11.6, handles highlighting buttons with the mouse. You first get the position of the mouse and convert it to the simple screen space coordinates where the center of the screen is (0, 0). You get the width and height of the screen from the renderer. You then loop over all the buttons in the mButtons vector and use the ContainsPoint function to determine whether the mouse cursor is within the bounds of the button. If the button contains the mouse cursor, its state is set to highlighted.
Listing 11.6 UIScreen::ProcessInput Implementation
void UIScreen::ProcessInput(const uint8_t* keys)
{
// Are there buttons?
if (!mButtons.empty())
{
// Get position of mouse
int x, y;
SDL_GetMouseState(&x, &y);
// Convert to (0,0) center coordinates (assume 1024x768)
Vector2 mousePos(static_cast<float>(x), static_cast<float>(y));
mousePos.x -= mGame->GetRenderer()->GetScreenWidth() * 0.5f;
mousePos.y = mGame->GetRenderer()->GetScreenHeight() * 0.5f
- mousePos.y;
// Highlight any buttons
for (auto b : mButtons)
{
if (b->ContainsPoint(mousePos))
{
b->SetHighlighted(true);
}
else
{
b->SetHighlighted(false);
}
}
}
}
The mouse clicks are routed through UIScreen::HandleKeyPress. Because ProcessInput already determines which buttons are highlighted by the mouse, HandleKeyPress just calls the OnClick function on any highlighted buttons.
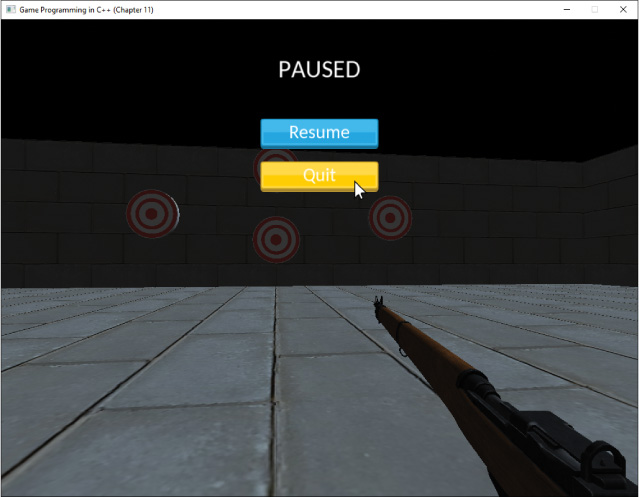
Using all this code, you can add buttons to PauseMenu. For now, you can add two buttons—one to resume the game and one to quit the game:
AddButton("Resume", [this]() {
Close();
});
AddButton("Quit", [this]() {
mGame->SetState(Game::EQuit);
});
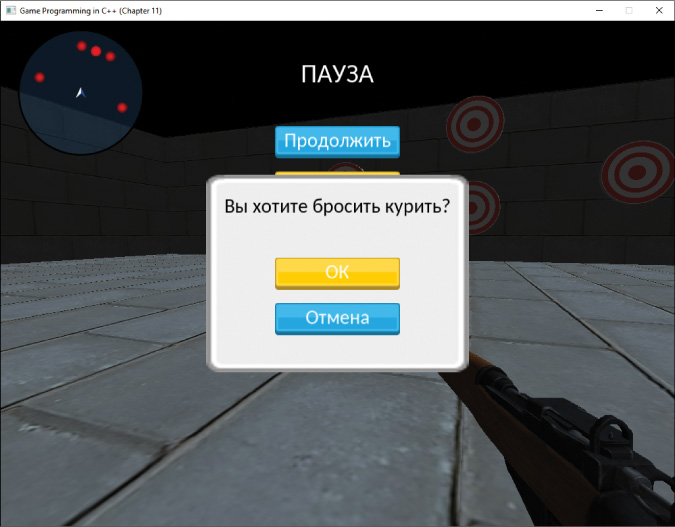
The lambda expressions passed to AddButton define what happens when the player clicks the button. When the player clicks Resume, the pause menu closes, and when the player clicks Quit, the game ends. Both lambda expressions capture the this pointer so that they can access members of PauseMenu. Figure 11.2 shows the pause menu with these buttons.
Dialog Boxes
For certain menu actions, such as quitting the game, it’s preferable to show the player a confirmation dialog box. This way, if the player clicks on the first button by mistake, he or she can still correct the mistake. Using a UI screen stack makes it easy to transfer control from one UI screen (such as the pause menu) to a dialog box. In fact, you can implement the dialog box with all the existing UIScreen functionality. To do this, you can make a new subclass of UIScreen called DialogBox.
The DialogBox constructor takes in a string for the text shown, as well as a function to execute when the user clicks OK:
DialogBox::DialogBox(Game* game, const std::string& text,
std::function<void()> onOK)
:UIScreen(game)
{
// Adjust positions for dialog box
mBGPos = Vector2(0.0f, 0.0f);
mTitlePos = Vector2(0.0f, 100.0f);
mNextButtonPos = Vector2(0.0f, 0.0f);
// Set background texture
mBackground = mGame->GetRenderer()->GetTexture("Assets/DialogBG.png");
SetTitle(text, Vector3::Zero, 30);
// Setup buttons
AddButton("OK", [onOK]() {
onOK();
});
AddButton("Cancel", [this]() {
Close();
});
}
The constructor first initializes some of the position member variables for both the title and buttons. Notice that you also use a new member of UIScreen, mBackground, which is a texture for a background that appears behind the UIScreen. In UIScreen::Draw, you draw the background (if it exists) prior to drawing anything else.
Finally, DialogBox sets up both OK and Cancel buttons. You could add additional parameters to DialogBox so that the user can configure the text of the buttons, as well as callbacks for both buttons. However, for now you can just use the OK and Cancel text and assume that the Cancel button simply closes the dialog box.
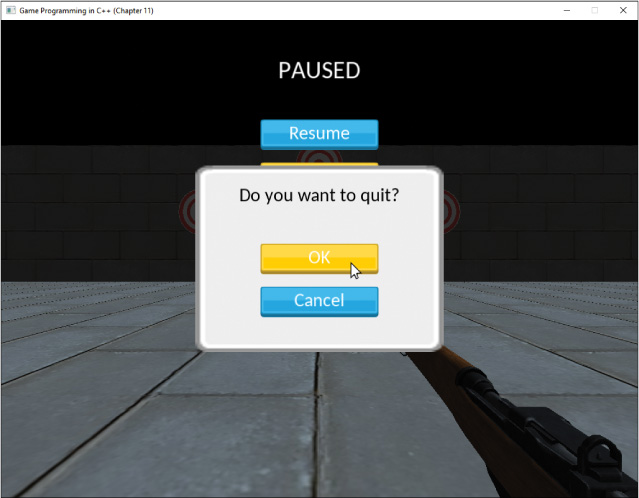
Because DialogBox is also a UIScreen, you can add it to the UI stack by dynamically allocating an instance of DialogBox. In the case of the pause menu, you change the Quit button so that it creates a dialog box to confirm that the user wants to quit:
AddButton("Quit", [this]() {
new DialogBox(mGame, "Do you want to quit?",
[this]() {
mGame->SetState(Game::EQuit);
});
});
Figure 11.3 shows this dialog box for quitting the game.
note
You could use the UI system as described to this point to also create a main menu screen. However, this also requires adding additional states to the Game class because the game can no longer spawn all the objects in the game world immediately; instead, you need to wait until the player progresses past the main menu.
HUD Elements
The types of elements in the HUD vary depending on the game. Such elements include showing hit points or ammo count, a score, or an arrow that points to the next objective. This section looks at two types of elements that are common for first-person games: a crosshair (or aiming reticule) and a radar that shows target positions.
Adding an Aiming Reticule
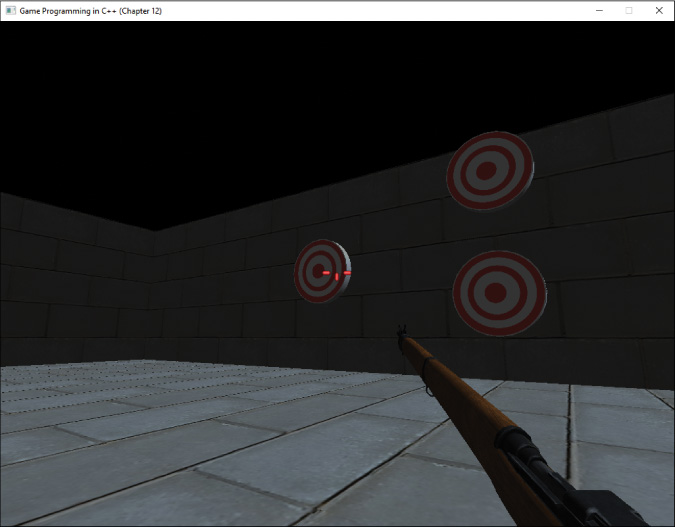
Most first-person games have some sort of aiming reticule (such as a crosshair) in the middle of the screen. As the player aims at different objects, the reticule might change appearance, with different textures. For example, if the player can pick up an object, the reticule might change to a hand. For games that allow the player to shoot, the reticule might change colors. If you implement the color change with a change of texture, then there isn’t a difference between these two behaviors.
In this case, you can implement a reticule that changes to red when the player aims at one of the target objects in the game. To do this, you need to add member variables to HUD for the different textures, as well as a Boolean for whether the player is aiming at an enemy:
// Textures for crosshair
class Texture* mCrosshair;
class Texture* mCrosshairEnemy;
// Whether crosshair targets an enemy
bool mTargetEnemy;
To track what the targets are, you create a new component called TargetComponent. Then, you create a vector of TargetComponent pointers as a member variable in HUD:
std::vector<class TargetComponent*> mTargetComps;
You then add AddTarget and RemoveTarget functions that can add and remove from mTargetComps. You call these functions in the TargetComponent constructor and destructor, respectively.
Next, you create an UpdateCrosshair function, as shown in Listing 11.7. This function gets called by HUD::Update. You first reset mTargetEnemy back to false. Next, you use the GetScreenDirection function first described in Chapter 9, “Cameras.” Recall that this function returns a normalized vector of the camera’s current facing in the world. You use this vector and a constant to construct a line segment, and you use the SegmentCast function from Chapter 10 to determine the first actor that intersects with the segment.
Next, you see if this actor has a TargetComponent. The way you can check this for now is to find if any TargetComponent in mTargetComps has an owner corresponding to the actor that you collide against. You can optimize this significantly after you implement a method to figure out which components an actor has; you will do this in Chapter 14, “Level Files and Binary Data.”
Listing 11.7 HUD::UpdateCrosshair Implementation
void HUD::UpdateCrosshair(float deltaTime)
{
// Reset to regular cursor
mTargetEnemy = false;
// Make a line segment
const float cAimDist = 5000.0f;
Vector3 start, dir;
mGame->GetRenderer()->GetScreenDirection(start, dir);
LineSegment l(start, start + dir * cAimDist);
// Segment cast
PhysWorld::CollisionInfo info;
if (mGame->GetPhysWorld()->SegmentCast(l, info))
{
// Check if this actor has a target component
for (auto tc : mTargetComps)
{
if (tc->GetOwner() == info.mActor)
{
mTargetEnemy = true;
break;
}
}
}
}
Drawing the crosshair texture is straightforward. In HUD::Draw, you simply check the value of mTargetEnemy and draw the corresponding texture in the center of the screen. You pass in 2.0f as the scale of the texture, as well:
Texture* cross = mTargetEnemy ? mCrosshairEnemy : mCrosshair;
DrawTexture(shader, cross, Vector2::Zero, 2.0f);
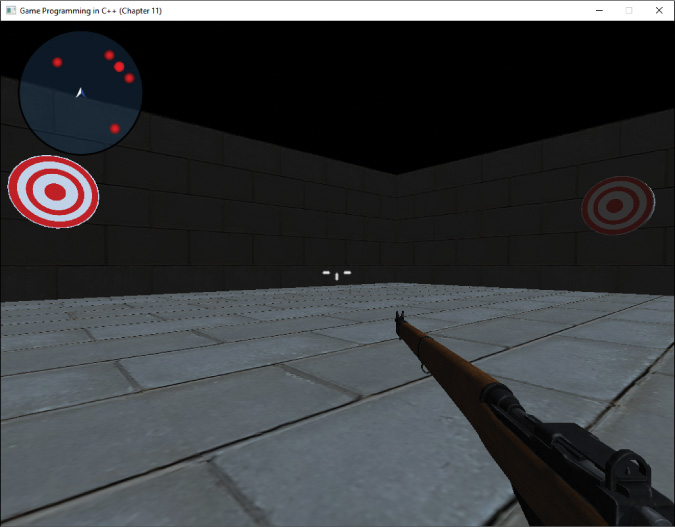
This way, as the player moves the aiming reticule to target an object, the reticule changes to the red crosshair texture, as shown in Figure 11.4.
Adding Radar
A game may have a radar that displays nearby enemies (or other objects) within a certain radius of the player. You can represent these enemies on the radar with blips (which look like dots or circles on the radar). This way, the player can get a sense of whether there are enemies around. Some games always show enemies on the radar, while others show enemies only under certain conditions (such as if the enemy recently fired a weapon). However, these conditions would only be an extension of a basic approach that shows all enemies.
There are two parts to implementing a working radar. First, you need to track the actors that should appear on the radar. Then, on every frame you must update the blips on the radar based on the position of the actors relative to the player. The most basic approach is to represent the blips with a Vector2 offset from the center of the radar, but you could also add other properties of blips, such as different textures.
You can leverage existing code and say that any actor that has a TargetComponent should also appear on the radar.
For this basic radar, you must add a few member variables to HUD:
// 2D offsets of blips relative to radar
std::vector<Vector2> mBlips;
// Adjust range of radar and radius
float mRadarRange;
float mRadarRadius;
The mBlips vector tracks the 2D offsets of the blips relative to the radar center. When updating the radar, you update mBlips. This way, drawing the radar simply means drawing the background and then the blip textures at the required offset.
Finally, the mRadarRange and mRadarRadius variables are parameters for the radar. The range is how far the radar sees in the world. For example, a range of 2000 means the radar has a range of 2000 units in world space. So, for every target that’s within mRadarRange of the player, you create a blip on the radar. The radius variable is the radius of the 2D radar drawn onscreen.
Suppose a game has a radar with a range of 50 units. Now imagine that there’s an object 25 units directly in front of the player. Because the object positions are in 3D, you need to convert both the position of the player and the object into 2D coordinates for the onscreen radar. In the case of a z-up world, this means the radar acts like a projection of the player and game objects on the x-y plane. This means your radar ignores the z components of both the player and the objects it tracks.
Because up on the radar usually denotes forward in world space, and your world is +x forward, just ignoring the z component is not enough. For both the player and any actors on the radar, you need to convert their (x, y, z) coordinates to the 2D vector (y, x) for the radar offsets.
Once both the player’s and the object’s positions are in 2D radar coordinates, you can construct a vector from the player to the object, which for clarity is the vector ![]() . The length of
. The length of ![]() determines whether the object is within the range of the radar. For the previous example with a range of 50 units and an object 25 units in front, the length of
determines whether the object is within the range of the radar. For the previous example with a range of 50 units and an object 25 units in front, the length of ![]() is less than the maximum range. This means the object should appear on the radar halfway between the center of the radar and the edge. You can convert
is less than the maximum range. This means the object should appear on the radar halfway between the center of the radar and the edge. You can convert ![]() to a scale relative to the radius of the radar by first dividing by the maximum range of the radar and then multiplying by the scale of the radar, saving the result in a new vector
to a scale relative to the radius of the radar by first dividing by the maximum range of the radar and then multiplying by the scale of the radar, saving the result in a new vector ![]() :
:
![]()
However, most radars rotate as the player rotates so that up on the radar always corresponds to forward in the game world. This means you can’t just directly use ![]() as the offset of the radar blip. Instead, you need to figure out the angle between the x-y projection of the player’s facing vector and the world forward (unit x). Because you want the angle on the x-y plane, you can compute this angle θ with the atan2 function and construct a 2D rotation matrix given θ. Recall that given row vectors, the 2D rotation matrix is as follows:
as the offset of the radar blip. Instead, you need to figure out the angle between the x-y projection of the player’s facing vector and the world forward (unit x). Because you want the angle on the x-y plane, you can compute this angle θ with the atan2 function and construct a 2D rotation matrix given θ. Recall that given row vectors, the 2D rotation matrix is as follows:

Once you have the rotation matrix, the final blip offset is simply ![]() rotated by this matrix:
rotated by this matrix:
![]()
Listing 11.8 shows the code that computes the positions of all the blips. You loop over all the target components and test whether the owning actor is in range of the radar. If so, you compute the blip offset by using the preceding equations.
Listing 11.8 HUD::UpdateRadar Implementation
void HUD::UpdateRadar(float deltaTime)
{
// Clear blip positions from last frame
mBlips.clear();
// Convert player position to radar coordinates (x forward, z up)
Vector3 playerPos = mGame->GetPlayer()->GetPosition();
Vector2 playerPos2D(playerPos.y, playerPos.x);
// Ditto for player forward
Vector3 playerForward = mGame->GetPlayer()->GetForward();
Vector2 playerForward2D(playerForward.x, playerForward.y);
// Use atan2 to get rotation of radar
float angle = Math::Atan2(playerForward2D.y, playerForward2D.x);
// Make a 2D rotation matrix
Matrix3 rotMat = Matrix3::CreateRotation(angle);
// Get positions of blips
for (auto tc : mTargetComps)
{
Vector3 targetPos = tc->GetOwner()->GetPosition();
Vector2 actorPos2D(targetPos.y, targetPos.x);
// Calculate vector between player and target
Vector2 playerToTarget = actorPos2D - playerPos2D;
// See if within range
if (playerToTarget.LengthSq() <= (mRadarRange * mRadarRange))
{
// Convert playerToTarget into an offset from
// the center of the on-screen radar
Vector2 blipPos = playerToTarget;
blipPos *= mRadarRadius/mRadarRange;
// Rotate blipPos
blipPos = Vector2::Transform(blipPos, rotMat);
mBlips.emplace_back(blipPos);
}
}
}
Drawing the radar is then just a matter of first drawing the background and then looping through each blip and drawing it as an offset of the center of the radar:
const Vector2 cRadarPos(-390.0f, 275.0f);
DrawTexture(shader, mRadar, cRadarPos, 1.0f);
// Blips
for (const Vector2& blip : mBlips)
{
DrawTexture(shader, mBlipTex, cRadarPos + blip, 1.0f);
}
Figure 11.5 shows this radar in a game. The dots on the radar each correspond to a target actor in the game world. The arrow in the middle of the radar is just an extra texture drawn to show where the player is, but this always just draws at the center of the radar.
Other extensions to the radar could include having different styles of blips depending on whether the enemy is above or below the player. Switching between such styles involves considering the z components of both the player and the object.
Localization
Localization is the process of converting a game from one region or locale to a different one. The most common items to localize include any voice-over dialogue as well as any text shown onscreen. For example, a game developer working in English may want to localize to Chinese if releasing the game in China. The biggest expense of localization is in the content: Someone must translate all the text and dialogue, and in the case of dialogue, different actors must speak the lines in different languages.
However, part of the responsibility of localization falls on the programmer. In the case of the UI, the game needs some system to easily show text from different locales onscreen. This means you can’t hard-code strings such as “Do you want to quit?” throughout the code. Instead, you minimally need a map to convert between a key like "QuitText" and the actual text shown onscreen.
Working with Unicode
One issue with localizing text is that each ASCII character only has 7 bits of information (though it’s stored internally as 1 byte). Only 7 bits of information means there is a total of 128 characters. Of these characters, 52 are letters (upper- and lowercase English), and the rest of the characters are numbers and other symbols. ASCII does not contain any glyphs from other languages.
To deal with this issue, a consortium of many different companies introduced the Unicode standard in the 1980s. At this writing, the current version of Unicode supports over 100,000 different glyphs, including glyphs in many different languages, as well as emojis.
Because a single byte can’t represent more than 256 distinct values, Unicode must use a different byte encoding. There are several different byte encodings, including ones where each character is 2 bytes or 4 bytes. However, arguably the most popular encoding is UTF-8, in which each character in a string has a variable length between 1 and 4 bytes. Within a string, some characters may be only 1 byte, others may be 2 bytes, others may be 3, and others may be 4.
Although this seems more complex to handle than a fixed number of bytes for each character, the beauty of UTF-8 is that it’s fully backward compatible with ASCII. This means that an ASCII sequence of bytes directly corresponds to the same UTF-8 sequence of bytes. Think of ASCII as a special case of UTF-8 in which each character in the UTF-8 string is 1 byte. The backward compatibility is likely the reason UTF-8 is the default encoding for the World Wide Web, as well as for file formats such as JSON.
Unfortunately, C++ does not have great built-in support for Unicode. For example, the std::string class is intended only for ASCII characters. However, you can use the std::string class to store a UTF-8 string. The catch is that if the string is UTF-8 encoded, the length member function no longer guarantees to specify the number of glyphs (or letters) in the string. Instead, the length is the number of bytes stored in the string object.
Luckily, both the RapidJSON library and SDL TTF support UTF-8 encoding. This, combined with storing the UTF-8 strings in std::string, means you can add support for UTF-8 strings without much additional code.
Adding a Text Map
In Game, you add a member variable called mTextMap that’s a std::unordered_map with key and value types of std::string. This map converts a key such as "QuitText" to the displayed text “Do You Want to Quit?”
You can define this map in a simple JSON file format, as shown in Listing 11.9. Every language has its own version of this JSON file, which makes it easy to switch between different languages.
Listing 11.9 English.gptext Text Map File
{
"TextMap":{
"PauseTitle": "PAUSED",
"ResumeButton": "Resume",
"QuitButton": "Quit",
"QuitText": "Do you want to quit?",
"OKButton": "OK",
"CancelButton": "Cancel"
}
}
You then add a LoadText function to Game that parses in a gptext file and populates the mTextMap. (This function calls various RapidJSON functions to parse in the file, but we omit its implementation here for the sake of brevity.)
You likewise implement a GetText function in a game and, given a key, it returns the associated text. This just performs a find operation on the mTextMap.
You then make two modifications to Font::RenderText. First, rather than directly rendering the text string it takes in as a parameter, you have that text string looked up in the text map:
const std::string& actualText = mGame->GetText(textKey);
Next, instead of calling TTF_RenderText_Blended, you call TTF_RenderUTF8_Blended, which has the same syntax but takes in a UTF-8 encoded string instead of an ASCII string:
SDL_Surface* surf = TTF_RenderUTF8_Blended(font,
actualText.c_str(), sdlColor);
Finally, any code that previously used a hard-coded text string instead uses the text key. For example, the title text for the pause menu is no longer "PAUSED" but "PauseTitle". This way, when you eventually call RenderText, the correct text loads from the map.
tip
If the game code has finalized English text, a quick hack to localize the text is to use the finalized English text as the text key. This way, you don’t have to track down every single non-localized string usage in the code. However, this can be dangerous if someone later changes the English strings in the code, thinking that this will change the text onscreen!
To demonstrate the functionality of this code, you can create a Russian.gptext file with a Russian translation of the strings in Listing 11.9. Figure 11.6 shows the Russian version of the pause menu with the Do You Want to Quit? dialog box.
Other Localization Concerns
The code presented in this section works only if the TrueType font file supports all needed glyphs. In practice, it’s common for a font file to include only a subset of glyphs. Some languages, such as Chinese, typically have a dedicated font file for the language. To solve this issue, you could add a font entry to the gptext file. When populating the mTextMap, you can also load the correct font. Then, the rest of the UI code needs to be sure to use this correct font.
Some issues with localization aren’t clear at first glance. For example, German text is typically 20% longer than the equivalent English text. This means that if a UI element barely fits the English text, it likely won’t fit the German text. Although this usually is a content issue, it may be an issue if the UI code assumes certain paddings or text sizes. One way to circumvent this is to always query the size of the rendered font texture and scale down the size of the text if it won’t fit within the needed extents.
Finally, in some instances, content beyond text or dialogue might need a localization process. For example, in Germany, it is illegal to sell a product containing symbols associated with the Third Reich. So, a game set in World War II may show swastikas or other symbols in the English version, but the German version must replace these symbols with alternatives such as the iron cross. As another example, some games also have content restrictions in China (such as not showing too much blood). However, this type of issue usually can be solved without additional help from a programmer, since the artists can simply create alternative content for these regions.
Supporting Multiple Resolutions
For PC and mobile games, it’s very common to have players with different screen resolutions. On a PC, common monitor resolutions include 1080p (1920×1080), 1440p (2560×1440), and 4K (3840×2160). On mobile platforms, there are a staggering number of different device resolutions. Although the Renderer class currently supports creating the window at different resolutions, the UI code in this chapter assumes a fixed resolution.
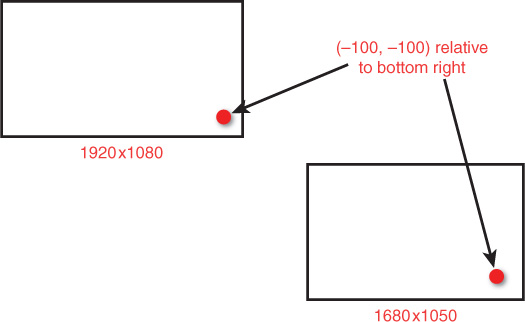
One way to support multiple resolutions is to avoid using specific pixel locations, or absolute coordinates, for UI elements. An example of using an absolute coordinate is placing a UI element precisely at the coordinate (1900, 1000) and assuming that this corresponds to the bottom-right corner.
Instead, you could use relative coordinates, where the coordinates are relative to a specific part of the screen, called an anchor. For example, in relative coordinates, you can say that you want to place an element at (–100,–100) relative to the bottom-right corner. This means the element would appear at (1820, 980) on a 1080p screen, while it would appear at (1580, 950) on a 1680×1050 screen (see Figure 11.7). You can express coordinates relative to key points on the screen (usually the corners or the center of the screen) or even relative to other UI elements. To implement this, you need to be able to specify the anchor points and relative coordinates for UI elements and then calculate the absolute coordinates dynamically at runtime.
Another refinement is to scale the size of UI elements depending on the resolution. This is useful because at very high resolutions, the UI might become too small and unusable. At higher resolutions, you could scale the size of the UI elements or even make the UI scale an option for the player.
Game Project
This chapter’s game project demonstrates all the features discussed in this chapter except for supporting multiple resolutions. The Game class has a UI stack, along with a UIScreen class, a PauseMenu class, and a DialogBox class. The HUD demonstrates both the aiming reticule and the radar. The code also implements text localization. The code is available in the book’s GitHub repository, in the Chapter11 directory. Open Chapter11-windows.sln in Windows and Chapter11-mac.xcodeproj on Mac.
In the game, use the standard first-person controls (WASD plus mouse look) to move around the world. Use the Escape key to enter the pause menu and the mouse controls to select and click on buttons in the menu. During gameplay, use the 1 and 2 key to switch between English (1) and Russian (2) text. Pressing these keys while the pause menu is showing doesn’t do anything because the UI screen absorbs the game input.
Summary
This chapter provides a high-level overview of the challenges involved in implementing the user interface in code. Using the SDL TTF library is a convenient way to render fonts, as it can load in TrueType fonts and then render the text to a texture. In the UI stack system, you represent each unique UI screen as an element on the UI stack. At any point in time, only the topmost screen on the UI might receive input from the player. You can extend this system to support buttons as well as dialog boxes.
The HUD might contain many different elements, depending on the game. An aiming reticule that changes based on aiming at an object requires use of collision detection to determine what object the player is aiming at. If the player aims at a target object, the HUD can draw a different texture. For a radar, you can project the player and any enemy objects onto the x/y plane and use these converted coordinates to determine where to draw a blip on the radar.
Finally, the UI needs code to handle text for different locales. A simple map can convert between text keys and values. Using UTF-8 encoding of these text values makes it relatively painless to use. The RapidJSON library can load in JSON files encoded in UTF-8, and SDL TTF supports rendering UTF-8 strings.
Additional Reading
Desi Quintans’ short article gives examples of good and bad game UI, from a design perspective. Luis Sempé, a UI programmer for games including Deus Ex: Human Revolution, has written the only book solely dedicated to programming UIs for games. (In the interest of full disclosure, I worked with the author many years ago.) Finally, Joel Spolsky’s book is for UI design in general, but it provides insight into how to create an effective UI.
Quintans, Desi. “Game UI by Example: A Crash Course in the Good and the Bad.” https://gamedevelopment.tutsplus.com/tutorials/
game-ui-by-example-a-crash-course-in-the-good-and-the-bad--gamedev-3943. Accessed September 10, 2017.
Sempé, Luis. User Interface Programming for Games. Self-published, 2014.
Spolsky, Joel. User Interface Design for Programmers. Berkeley: Apress, 2001.
Exercises
In this chapter’s exercises, you explore adding a main menu as well as making changes to the game’s HUD.
Exercise 11.1
Create a main menu. To support this, the game class needs a new state called EMainMenu. The game should first start in this state and display a UI screen with the menu options Start and Quit. If the player clicks Start, the game should switch to gameplay. If the player clicks Quit, the menu should show a dialog box confirming that the player wants to quit.
To add further functionality, consider spawning the actors only when first entering the gameplay state from the main menu. In addition, change the pause menu so that the Quit option deletes all actors and returns to the main menu rather than immediately quitting the game.
Exercise 11.2
Modify the radar so that it uses different blip textures, depending on whether the actor is above or below the player. Use the provided BlipUp.png and BlipDown.png textures to show these different states. Testing this feature may require changing the positions of some of the target actors in order to more clearly distinguish the height.
Exercise 11.3
Implement an onscreen 2D arrow that points to a specific actor. Create a new type of actor called ArrowTarget and place it somewhere in the game world. Then, in the HUD, compute the vector from the player to the ArrowTarget. Use the angle between this and the player’s forward on the x-y plane to determine the angle to rotate the onscreen 2D arrow. Finally, add code to UIScreen::DrawTexture to supporting rotating a texture (with a rotation matrix).