
Chapter 10
Collision Detection
You use collision detection to determine whether objects in the game world intersect with each other. While earlier chapters discuss some basic ways to check for collisions, this chapter takes a deeper look at the topic. This chapter first introduces the basic geometric types commonly used in games and then covers the calculation of intersection between these types. It concludes with a discussion of how to incorporate collisions into game behavior.
Geometric Types
Collision detection for games utilizes several different concepts from geometry and linear algebra. This section covers some fundamental geometric types commonly used in games, such as line segments, planes, and boxes. Each geometric type discussed here has a corresponding declaration in the Collision.h header file included in this chapter’s game project.
Line Segments
A line segment comprises start and end points:
struct LineSegment
{
Vector3 mStart;
Vector3 mEnd;
};
To calculate any arbitrary point on a line segment, you can use the following parametric equation, where Start and End are the start and end points, and t is the parameter:
For convenience, you can add a member function to LineSegment that returns a point on the line segment given a t value:
Vector3 LineSegment::PointOnSegment(float t) const
{
return mStart + (mEnd - mStart) * t;
}
The parametric representation of a line segment easily expands to define a ray or a line. A ray follows the above equation, but the bounds for t are as follows:
Similarly, a line has an unbounded t:
Line segments and rays are versatile primitives for many different types of collision detection in games. For example, firing a bullet in a straight line or testing for landing on a ground can use a line segment. You can also use line segments for aiming reticules (as in Chapter 11, “User Interfaces”), sound occlusion tests (as in Chapter 7, “Audio”), or mouse picking (as in Chapter 9, “Cameras”).
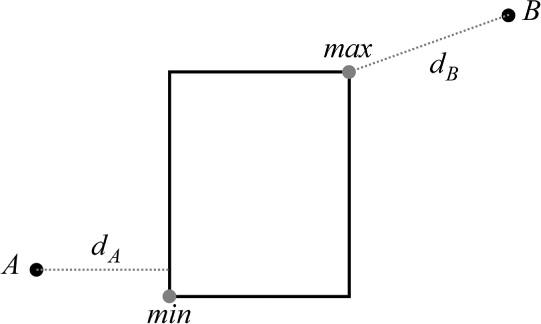
Another useful operation is finding the minimal distance between a line segment and an arbitrary point. Imagine that a line segment starts at point A and ends at point B. Given an arbitrary point C, you want to find the minimal distance between the segment and point C. There are three different cases to consider, shown in Figure 10.1.
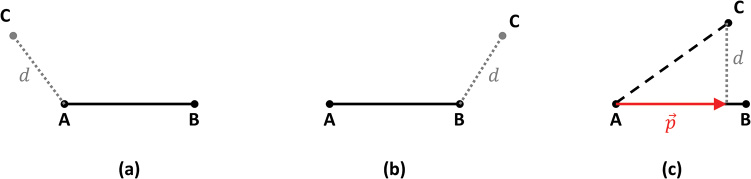
In the first case, shown in Figure 10.1(a), the angle between AB and AC is greater than 90°. You can test this by using the dot product because a negative dot product between two vectors means they form an obtuse angle. If this is true, the minimal distance between C and the line segment is the length of the vector AC.
In the second case, shown in Figure 10.1(b), the angle between BA and BC is greater than 90°. As in the first case, you can test this with a dot product. If this is true, the minimal distance is the length of BC.
In the final case, shown in Figure 10.1(c), you draw a new line segment from AB to C that’s perpendicular to AB. The distance of this new line segment is the minimal distance between C and AB. To figure out this line segment, you first need to compute the vector p.
You already know the direction of p, as it’s in the same direction as the normalized AB. To figure out the distance of p, you apply a property of the dot product called the scalar projection. Given a unit vector and a non-unit vector, extend (or contract) the unit vector such that a right triangle forms with the non-unit vector. The dot product then returns the length of this extended unit vector.
In this example, the length of p is the dot product between AC and a normalized AB:
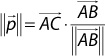
The vector p is then the scalar multiplication between the length of p and the normalized AB:

Using some algebraic manipulation—and remembering that the length squared of a vector is the same as a dot product with itself—you can simplify p as follows:
Finally, you construct the vector from p to AC, and the length of this vector is the minimum distance from AB to C:
Remember that because the distance must be positive in this case, you can square both sides of the equation to instead get the minimal distance squared from AB to C:
This way you avoid the expensive square root operation. For the most part, you will calculate the distance squared instead of distance throughout this chapter. Listing 10.1 gives the code for this MinDistSq function.
Listing 10.1 LineSegment::MinDistSq Implementation
float LineSegment::MinDistSq(const Vector3& point) const
{
// Construct vectors
Vector3 ab = mEnd - mStart;
Vector3 ba = -1.0f * ab;
Vector3 ac = point - mStart;
Vector3 bc = point - mEnd;
// Case 1: C projects prior to A
if (Vector3::Dot(ab, ac) < 0.0f)
{
return ac.LengthSq();
}
// Case 2: C projects after B
else if (Vector3::Dot(ba, bc) < 0.0f)
{
return bc.LengthSq();
}
// Case 3: C projects onto line
else
{
// Compute p
float scalar = Vector3::Dot(ac, ab)
/ Vector3::Dot(ab, ab);
Vector3 p = scalar * ab;
// Compute length squared of ac - p
return (ac - p).LengthSq();
}
}
Planes
A plane is a flat, two-dimensional surface that extends infinitely, much as a line is a one-dimensional object that extends infinitely. In a game, you may use a plane as an abstraction for the ground or walls. The equation of a plane is as follows:
where P an arbitrary point on the plane, n is the normal to the plane, and d is the signed minimal distance between the plane and the origin.
In code, a typical test is whether a point lies on the plane (and thus satisfies the plane equation). Because of this, the definition of the Plane struct only stores the normal and d:
struct Plane
{
Vector3 mNormal;
float mD;
};
By definition, a triangle lies on a single plane. So, given a triangle, you can derive the equation of that plane. You compute the normal to the triangle with the cross product, which corresponds to the normal of the plane. You already know an arbitrary point on the plane, as well, because all three of the vertices of the triangle are on the plane. Given this normal and point, you can then solve for d, as in Listing 10.2.
Listing 10.2 Constructing a Plane from Three Points
Plane::Plane(const Vector3& a, const Vector3& b, const Vector3& c)
{
// Compute vectors from a to b and a to c
Vector3 ab = b - a;
Vector3 ac = c - a;
// Cross product and normalize to get normal
mNormal = Vector3::Cross(ab, ac);
mNormal.Normalize();
// d = -P dot n
mD = -Vector3::Dot(a, mNormal);
}
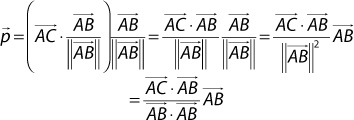
Finding the minimum distance between an arbitrary point C and the plane is simpler than for a line segment, though it also uses the scalar projection property of the dot product. Figure 10.2 illustrates the calculation, showing the plane from a side view.
You already know the normal of the plane n and the minimal distance d between the origin and the plane. You need to calculate the scalar projection of C onto the normal n, which is simply the dot product:
Then, the difference between d and this scalar projection yields a signed distance between C and the plane:
A negative value means C is below the plane (facing away from the normal), while a positive value means C is above. The signed distance calculation translates to the following code:
float Plane::SignedDist(const Vector3& point) const
{
return Vector3::Dot(point, mNormal) - mD;
}
Bounding Volumes
Modern 3D games have characters and objects drawn with thousands of triangles. When determining whether two objects collide, it’s not efficient to test all the triangles comprising the object. For this reason, games use simplified bounding volumes, such as boxes or spheres. When deciding whether two objects intersect, the game uses the simplified collision for calculations. This yields greatly improved efficiency.
Spheres
The simplest representation of the bounds of a 3D object is a sphere. The definition of a sphere only requires the position of the center of the sphere and a radius:
struct Sphere
{
Vector3 mCenter;
float mRadius;
};
As illustrated in Figure 10.3, bounding spheres fit around some objects better than others. For example, a sphere around a humanoid character has a lot of empty space between the character and the bounds of the sphere. Having loose bounds for an object increases the number of false positive collisions, meaning the bounding volumes for two objects intersect but the objects themselves do not. For instance, if a first-person shooter used bounding spheres for humanoids, players could shoot way to the left or right of a character, and the game would count that as a hit.
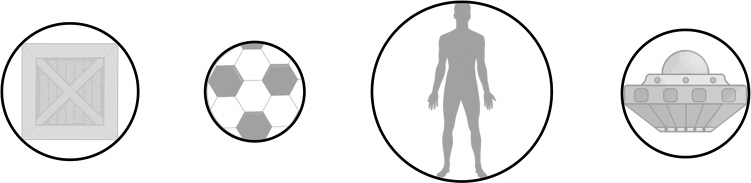
However, the advantage of using bounding spheres is that intersection calculations are extremely efficient. Furthermore, rotation has no effect on a sphere, so a bounding sphere works regardless of the rotation of the underlying 3D object. And for some objects, like balls, spheres perfectly express the bounds.
Axis-Aligned Bounding Boxes
In 2D, an axis-aligned bounding box (AABB) is a rectangle where the edges are parallel to either the x-axis or y-axis. Similarly, in 3D, an AABB is a rectangular prism where every face of the prism is parallel to one of the coordinate axis planes.
You can define an AABB by two points: a minimum point and a maximum point. In 2D, the minimum point corresponds to the bottom-left point, while the maximum corresponds to the top-right point. In other words, the minimum point has the minimal x and y values for the box, and the maximum point has the maximal x and y values for the box. This carries over directly to 3D, where the minimum point has the minimal x, y, and z values, and the maximum is likewise the maximal x, y, and z values. This translates to the following struct:
struct AABB
{
Vector3 mMin;
Vector3 mMax;
};
One useful operation with an AABB is constructing it from a series of points. For example, when loading in a model, you have a sequence of vertices, and you can use this sequence of vertices to define an AABB for the model. To do this, you can create a new function called UpdateMinMax that takes in a point and updates min and max, accounting for this point:
void AABB::UpdateMinMax(const Vector3& point)
{
// Update each component separately
mMin.x = Math::Min(mMin.x, point.x);
mMin.y = Math::Min(mMin.y, point.y);
mMin.z = Math::Min(mMin.z, point.z);
mMax.x = Math::Max(mMax.x, point.x);
mMax.y = Math::Max(mMax.y, point.y);
mMax.z = Math::Max(mMax.z, point.z);
}
Because you do not know where the new point is in relation to all the other points, you must test every component independently to decide which components of min and max should update.
Then, given a container of points, you first initialize min and max of the AABB to the first point in the container. For each remaining point, you simply call UpdateMinMax:
// Assume points is a std::vector<Vector3>
AABB box(points[0], points[0]);
for (size_t i = 1; i < points.size(); i++)
{
box.UpdateMinMax(points[i]);
}
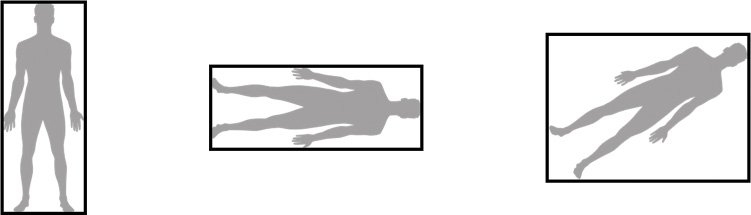
Because an AABB must keep its sides parallel to the coordinate planes, rotating an object does not rotate the AABB. Instead, it changes the dimensions of the AABB, as in Figure 10.4. In some cases, it may be desirable not to compute AABB rotations. For example, most humanoid characters in games only rotate about the up axis. If you make the AABB for the character wide enough, rotating the character does not change the AABB enough to warrant rotating the AABB (though watch out for animations that move the character too much). However, for other objects, it is necessary to compute a rotated AABB.
One way to compute an AABB after rotation is to first construct the eight points representing the corners of the AABB. These points are simply all possible permutations of the min and max x, y, and z components. Then you rotate each point individually and use the UpdateMinMax function to create a new AABB from these rotated points. Note that this process, shown in Listing 10.3, does not compute the minimal possible AABB of the underlying object after rotation. Thus, the game should save the original object space AABB to avoid error propagation after multiple rotations.
Listing 10.3 AABB::Rotate Implementation
void AABB::Rotate(const Quaternion& q)
{
// Construct the 8 points for the corners of the box
std::array<Vector3, 8> points;
// Min point is always a corner
points[0] = mMin;
// Permutations with 2 min and 1 max
points[1] = Vector3(mMax.x, mMin.y, mMin.z);
points[2] = Vector3(mMin.x, mMax.y, mMin.z);
points[3] = Vector3(mMin.x, mMin.y, mMax.z);
// Permutations with 2 max and 1 min
points[4] = Vector3(mMin.x, mMax.y, mMax.z);
points[5] = Vector3(mMax.x, mMin.y, mMax.z);
points[6] = Vector3(mMax.x, mMax.y, mMin.z);
// Max point corner
points[7] = Vector3(mMax);
// Rotate first point
Vector3 p = Vector3::Transform(points[0], q);
// Reset min/max to first point rotated
mMin = p;
mMax = p;
// Update min/max based on remaining points, rotated
for (size_t i = 1; i < points.size(); i++)
{
p = Vector3::Transform(points[i], q);
UpdateMinMax(p);
}
}
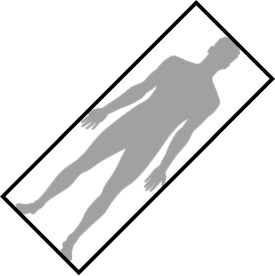
Oriented Bounding Boxes
An oriented bounding box (OBB) does not have the parallel restrictions of an AABB. This means that an OBB maintains the tightness of its bounds, regardless of the rotation of the underlying object, as in Figure 10.5. One way to represent an OBB is with a center point, a quaternion for the rotation, and the extents (width, height, and depth) of the box:
struct OBB
{
Vector3 mCenter;
Quaternion mRotation;
Vector3 mExtents;
};
Although it’s tempting to use OBBs, the downside is that collision computations are far more expensive with OBBs than with AABBs.
Capsules
A capsule is a line segment with a radius:
struct Capsule
{
LineSegment mSegment;
float mRadius;
};
Capsules are popularly used for representing humanoid characters in a game, as in Figure 10.6. A capsule can also represent a sphere moving over a set period because there’s a start point and an end point for the sphere’s movement, and the sphere of course has a radius.

Convex Polygons
Sometimes, a game may need bounds for an object that are more accurate than any of the basic shapes. For a 2D game, the object might have bounds represented as a convex polygon. Recall that a polygon is convex if all its interior angles are less than 180°.
You can represent a convex polygon as a collection of vertices:
struct ConvexPolygon
{
// Vertices have a clockwise ordering
std::vector<Vector2> mVertices;
};
These vertices should have a set ordering, such as clockwise or counterclockwise along the polygon’s edge. Without an ordering, intersections are more difficult to compute.
Note that this representation assumes that the developer correctly uses it, and it does no testing to make sure the polygon is convex and has vertices in a clockwise order.
Intersection Tests
Once the game is using geometric types to represent game objects, the next step is to test for intersections between these objects. This section looks at a series of useful tests. First, it explores whether an object contains a point. Then, it looks at intersections between different types of bounding volumes. Next, it looks at intersections between a line segment and other objects. Finally, this section covers how to handle dynamically moving objects.
Contains Point Tests
Testing whether a shape contains a point is useful by itself. For example, you might use this type of test for finding out whether a player is inside a region of the game world. In addition, some shape intersection algorithms rely on finding the point closest to an object and then figuring out if that point is inside the object. This section considers a point to be “contained” by a shape even if it’s technically on one of the edges of that shape.
Sphere Contains Point Tests
To figure out if a sphere contains a point, first find the distance between the point and the center of the sphere. If this distance is less than or equal to the radius, then the sphere contains the point.
Because the distance and radius are both positive values, you can optimize this comparison by squaring both sides of the inequality. This way, you avoid the expensive square root operation and add only one multiplication, making it far more efficient:
bool Sphere::Contains(const Vector3& point) const
{
// Get distance squared between center and point
float distSq = (mCenter - point).LengthSq();
return distSq <= (mRadius * mRadius);
}
AABB Contains Point Tests
Given a 2D axis-aligned box, a point is outside the box if any of the following cases are true: The point is to the left of the box, the point is to the right of the box, the point is above the box, or the point is below the box. If none of these cases are true, then the box must contain the point.
You can check for this by simply comparing components of the point to the min and max points of the box. For example, a point is to the left of the box if its x component is less than min.x.
This concept easily extends to a 3D AABB. However, instead of having four checks—one for each side of a 2D box—you have six checks because there are six faces for a 3D AABB:
bool AABB::Contains(const Vector3& point) const
{
bool outside = point.x < mMin.x ||
point.y < mMin.y ||
point.z < mMin.z ||
point.x > mMax.x ||
point.y > mMax.y ||
point.z > mMax.z;
// If none of these are true, the point is inside the box
return !outside;
}
Capsule Contains Point Tests
For testing whether a capsule contains a point, you first compute the minimum distance squared between the point and the line segment. To do so, you can use the existing LineSegment::MinDistSq function declared earlier. You know the capsule contains the point if that minimal distance squared is less than or equal to the radius squared:
bool Capsule::Contains(const Vector3& point) const
{
// Get minimal dist. sq. between point and line segment
float distSq = mSegment.MinDistSq(point);
return distSq <= (mRadius * mRadius);
}
Convex Polygon Contains Point (2D) Tests
There are multiple ways to test whether a 2D polygon contains a point. One of the simplest approaches is to construct vectors from the point to each pair of adjacent vertices. Then you can use the dot product and arccosine to find the angle formed by these vectors. If the sum of all these angles is close to 360°, then the point is inside the polygon. Otherwise, the point is outside the polygon. Figure 10.7 illustrates this concept.

The code for this type of test, shown in Listing 10.4, relies on the fact that two adjacent vertices are also at adjacent indices in the convex polygon’s vector.
Listing 10.4 ConvexPolygon::Contains Implementation
bool ConvexPolygon::Contains(const Vector2& point) const
{
float sum = 0.0f;
Vector2 a, b;
for (size_t i = 0; i < mVertices.size() - 1; i++)
{
// From point to first vertex
a = mVertices[i] - point;
a.Normalize();
// From point to second vertex
b = mVertices[i + 1] - point;
b.Normalize();
// Add angle to sum
sum += Math::Acos(Vector2::Dot(a, b));
}
// Compute angle for last vertex and first vertex
a = mVertices.back() - point;
a.Normalize();
b = mVertices.front() - point;
b.Normalize();
sum += Math::Acos(Vector2::Dot(a, b));
// Return true if approximately 2pi
return Math::NearZero(sum - Math::TwoPi);
}
Unfortunately, this angle summation approach is not terribly efficient because it requires several square roots and arccosine calculations. Other, more complex, methods are more efficient. One such method is to draw an infinite ray starting at the point and to then count the number of edges the ray intersects. If the ray intersects an odd number of edges, the point is inside the polygon; otherwise, it’s outside. This ray method works for both convex and concave polygons.
Bounding Volume Tests
It’s very common to compute intersection tests between different bounding volumes. For example, imagine that both the player and the wall use AABBs for collision. When the player tries to move forward, you can test if the player’s bounding volume intersects with the wall bounding volume. If they intersect, then you can fix the player’s position so that they no longer intersect. (You will see how to do this later in this chapter.) This section doesn’t cover all possible intersections between the different types of bounding volumes discussed earlier, but it touches on some important ones.
Sphere Versus Sphere Test
Two spheres intersect if the distance between their centers is less than or equal to the sum of their radii. As with the sphere contains point test, you can square both sides of the inequality for efficiency, using the following function:
bool Intersect(const Sphere& a, const Sphere& b)
{
float distSq = (a.mCenter - b.mCenter).LengthSq();
float sumRadii = a.mRadius + b.mRadius;
return distSq <= (sumRadii * sumRadii);
}
AABB Versus AABB Test
The logic for testing AABB intersection is like the logic for whether an AABB contains a point. You test for the cases where the two AABBs cannot intersect. If none of these tests are true, then the AABBs must intersect. For 2D AABBs, boxes A and B do not intersect if A is to the left of B, A is to the right of B, A is above B, or A is below B. You test this by leveraging the min and max points, as before. For example, A is to the left of B if the max.x of A is less than the min.x of B. Figure 10.8 illustrates these tests for 2D AABBs.
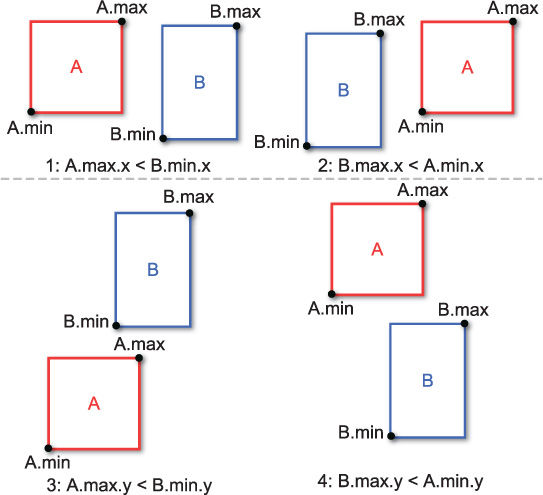
As before, when switching from 2D AABBs to 3D AABBs, you must add two more checks, for a total of six:
bool Intersect(const AABB& a, const AABB& b)
{
bool no = a.mMax.x < b.mMin.x ||
a.mMax.y < b.mMin.y ||
a.mMax.z < b.mMin.z ||
b.mMax.x < a.mMin.x ||
b.mMax.y < a.mMin.y ||
b.mMax.z < a.mMin.z;
// If none of these are true, they must intersect
return !no;
}
This form of AABB intersection is an application of the separating axis theorem, which states that if two convex objects A and B do not intersect, then there must exist an axis that separates A from B. In the AABB case, you’re testing the three coordinate axes to see if there is separation between the boxes on any of these axes. If the AABBs have separation on any coordinate axis, then, by the separating axis theorem, they cannot intersect. You can extend this approach to oriented bounding boxes, as discussed in Exercise 10.3 at the end of this chapter, and, in fact, to any set of convex objects.
Sphere Versus AABB Test
For sphere versus AABB intersection, you first need to calculate the minimum distance squared between the center of the sphere and the box. The algorithm for finding the minimum distance between a point and an AABB tests each component individually. For each component, there are three cases: The point’s component is less than min, the point’s component is between min and max, or the point’s component is greater than max. In the middle case, the distance between the point and box for that axis is zero. In the other two cases, the distance between the point and the box for the axis is the distance to the closest edge (either min or max). Figure 10.9 illustrates this for a 2D AABB.
You can express this with multiple Math::Max function calls. For example, the distance in the x direction is as follows:
float dx = Math::Max(mMin.x - point.x, 0.0f);
dx = Math::Max(dx, point.x - mMax.x);
This works because if point.x < min.x, then min.x - point.x is the largest of the three values and the delta for the x-axis. Otherwise, if min.x < point.x < max.x, then zero is the highest. Finally, if point.x > max.x, then point.x - max.x is the highest. Once you have the delta for all three axes, you then use the distance formula to compute the final distance squared between the point and the AABB:
float AABB::MinDistSq(const Vector3& point) const
{
// Compute differences for each axis
float dx = Math::Max(mMin.x - point.x, 0.0f);
dx = Math::Max(dx, point.x - mMax.x);
float dy = Math::Max(mMin.y - point.y, 0.0f);
dy = Math::Max(dy, point.y - mMax.y);
float dz = Math::Max(mMin.z - point.z, 0.0f);
dz = Math::Max(dy, point.z - mMax.z);
// Distance squared formula
return dx * dx + dy * dy + dz * dz;
}
Once you have the MinDistSq function, you can implement sphere versus AABB intersection. You find the minimal distance squared between the center of the sphere and the AABB. If it is less than or equal to the radius squared, then the sphere and AABB intersect:
bool Intersect(const Sphere& s, const AABB& box)
{
float distSq = box.MinDistSq(s.mCenter);
return distSq <= (s.mRadius * s.mRadius);
}
Capsule Versus Capsule Test
Intersecting two capsules is conceptually straightforward. Because both capsules are line segments with radii, you first find the minimal distance squared between these line segments. If the distance squared is less than or equal to the sum of radii squared, then the two capsules intersect:
bool Intersect(const Capsule& a, const Capsule& b)
{
float distSq = LineSegment::MinDistSq(a.mSegment,
b.mSegment);
float sumRadii = a.mRadius + b.mRadius;
return distSq <= (sumRadii * sumRadii);
}
Unfortunately, computing the minimal distance between two line segments is complex due to several edge cases. This chapter doesn’t go into those details, but its source code provides an implementation of MinDistSq for two line segments.
Line Segment Tests
As mentioned earlier, line segments are versatile in collision detection. This chapter’s game project uses line segment tests for testing whether the ball projectiles collide against objects. This section looks at a few key tests between line segments and other objects. For these tests, you want to know not only if the line segment intersects but the first such point of intersection.
This section relies heavily on the previously defined parametric equation of a line segment:
The approach for most line segment intersection tests is to first treat the segment as an infinite line—because if the infinite line does not intersect with the object, then there’s no way the line segment will. Once you solve for the infinite line intersection, you then verify that t is within the [0, 1] bounds for the line segment.
Line Segment Versus Plane Test
To find the point of intersection between a line segment and a plane, you want to find whether there exists a t such that L(t) is a point on the plane:
You can solve this with some algebraic manipulation. First substitute for L(t):
Because the dot product is distributive over addition, you can rewrite this as follows:
Finally, you solve for t:
Note that there’s a potential for division by zero if the dot product in the denominator evaluates to zero. This will happen only in the case where the line is perpendicular to the normal of the plane, meaning the line is parallel to the plane. In this case, the line and plane intersect only if the line is entirely on the plane.
After you calculate the value of t, you then test whether it’s within the bounds of the line segment, as in Listing 10.5. The Intersect function here returns the t value by reference, and the caller can use this to figure out the point of intersection if needed.
Listing 10.5 Line Segment Versus Plane Intersection
bool Intersect(const LineSegment& l, const Plane& p, float& outT)
{
// First test if there's a solution for t
float denom = Vector3::Dot(l.mEnd - l.mStart,
p.mNormal);
if (Math::NearZero(denom))
{
// The only way they intersect if start/end are
// points on the plane (P dot N) == d
if (Math::NearZero(Vector3::Dot(l.mStart, p.mNormal) - p.mD))
{
outT = 0.0f;
return true;
}
else
{ return false; }
}
else
{
float numer = -Vector3::Dot(l.mStart, p.mNormal) - p.mD;
outT = numer / denom;
// Validate t is within bounds of the line segment
if (outT >= 0.0f && outT <= 1.0f)
{
return true;
}
else
{
return false;
}
}
}
Line Segment Versus Sphere Test
To find the point of intersection between a line segment and a sphere, you find if there’s a t value such that the distance between the line and the center of the sphere C is equal to the radius of the sphere r:
To simplify this equation, you introduce substitutions:
To solve for t, you need some method to extract it from inside the length operation. To do this, you square both sides of the equation and replace the length squared operation with a dot product:
Because the dot product is distributive over vector addition, you can apply the FOIL (first, outside, inside, last) distribution rule:
You then rewrite this in the quadratic form:
Finally, you apply the quadratic equation to solve for t:
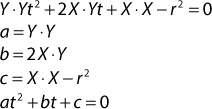
The discriminant of the quadratic equation (the value under the radical) tells you the number and types of solutions to the equation. A negative discriminant means the solutions are imaginary. For the purposes of a game, you can assume that none of the objects have imaginary positions. Thus, you know that a negative discriminant means the line does not intersect with the sphere. Otherwise, there can be one or two solutions to the quadratic equation. A discriminant of zero means there’s one solution because the line is tangential to the sphere. A discriminant greater than zero means the line has two points of intersection with the sphere. Figure 10.10 illustrates these three possibilities.
Once you have solutions for t, you then validate that t is within the range [0, 1]. Because there are two possible solutions, you give preference to the lower value of t, which represents the first intersection. But if the line segment begins inside the sphere and exits the sphere, the higher value of t represents the point of intersection. Listing 10.6 gives this code for line segment versus sphere intersection. Note that this function returns false if the sphere wholly contains the line segment.
Listing 10.6 Line Segment Versus Sphere Intersection
bool Intersect(const LineSegment& l, const Sphere& s, float& outT)
{
// Compute X, Y, a, b, c as per equations
Vector3 X = l.mStart - s.mCenter;
Vector3 Y = l.mEnd - l.mStart;
float a = Vector3::Dot(Y, Y);
float b = 2.0f * Vector3::Dot(X, Y);
float c = Vector3::Dot(X, X) - s.mRadius * s.mRadius;
// Compute discriminant
float disc = b * b - 4.0f * a * c;
if (disc < 0.0f)
{
return false;
}
else
{
disc = Math::Sqrt(disc);
// Compute min and max solutions of t
float tMin = (-b - disc) / (2.0f * a);
float tMax = (-b + disc) / (2.0f * a);
// Check whether either t is within bounds of segment
if (tMin >= 0.0f && tMin <= 1.0f)
{
outT = tMin;
return true;
}
else if (tMax >= 0.0f && tMax <= 1.0f)
{
outT = tMax;
return true;
}
else
{
return false;
}
}
}
Line Segment Versus AABB Test
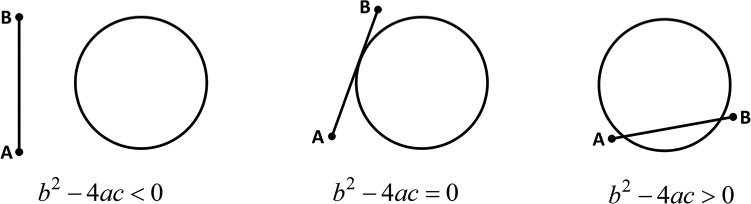
One approach for line segment versus AABB intersection is to construct planes for each edge of the box. In 2D, this yields four planes for the four different sides. Because the planes are infinite, simply intersecting with a side plane does not mean the segment intersects the box. In Figure 10.11(a), the line segment intersects the top plane at P1 and the left plane at P2. But because the box contains neither of these points, these points do not intersect the box. However, in Figure 10.11(b), the segment intersects the left plane at P3. Because the box contains P3, this is a point of intersection.
Figure 10.11 Intersection with the side planes but not the box (a), intersection with the box (b), and intersection with the box at two points (c)
Sometimes, the line segment may have multiple points of intersection, as in Figure 10.11(c). Both P4 and P5 intersect the box. In this case, the intersection should return the point closest to the start point, or the one at the lowest t value in the parametric formulation of the line segment.
For the segment tests versus each plane, recall that the equation for line segment versus plane intersection is as follows:
![]()
However, because each plane is parallel to a coordinate axis (or, in 3D, a coordinate plane), you can optimize this equation because the normal of each plane will always have zeros for two components and a one for the third component. Thus, two of the three dot product components will always evaluate to zero.
For example, the normal of the left side plane points directly to the left or right; the direction doesn’t matter for the purposes of the intersection test. In 2D, this is as follows:
![]()
Because the min point for the box is on its left plane, the d value is as follows:
![]()
Similarly, the dot products in the segment versus plane intersection equation also simplify to their x components. This means the final equation solving for intersection against the left plane is as follows:

The equations for the other side planes have similar derivations. For 3D, there are a total of six planes to test. Listing 10.7 shows a helper function that encapsulates the behavior of testing a single side plane. Note that if the segment intersects with the plane, the function adds the t value to a supplied std::vector. The intersection function uses this std::vector to test all possible t values in order, from earliest to latest planar intersection.
Listing 10.7 Line Segment Versus AABB Helper Function
bool TestSidePlane(float start, float end, float negd,
std::vector<float>& out)
{
float denom = end - start;
if (Math::NearZero(denom))
{
return false;
}
else
{
float numer = -start + negd;
float t = numer / denom;
// Test that t is within bounds
if (t >= 0.0f && t <= 1.0f)
{
out.emplace_back(t);
return true;
}
else
{
return false;
}
}
}
The Intersect function, shown in Listing 10.8, uses the TestSidePlane function to test the six different side planes of the AABB against the line segment. Each point of planar intersection has its t value stored in the tValues vector. Then, you sort this vector in ascending order and return the first intersection point contained by the AABB. If the AABB contains none of these points, the function returns false.
Listing 10.8 Line Segment Versus AABB Intersection
bool Intersect(const LineSegment& l, const AABB& b, float& outT)
{
// Vector to save all possible t values
std::vector<float> tValues;
// Test the x planes
TestSidePlane(l.mStart.x, l.mEnd.x, b.mMin.x, tValues);
TestSidePlane(l.mStart.x, l.mEnd.x, b.mMax.x, tValues);
// Test the y planes
TestSidePlane(l.mStart.y, l.mEnd.y, b.mMin.y, tValues);
TestSidePlane(l.mStart.y, l.mEnd.y, b.mMax.y, tValues);
// Test the z planes
TestSidePlane(l.mStart.z, l.mEnd.z, b.mMin.z, tValues);
TestSidePlane(l.mStart.z, l.mEnd.z, b.mMax.z, tValues);
// Sort the t values in ascending order
std::sort(tValues.begin(), tValues.end());
// Test if the box contains any of these points of intersection
Vector3 point;
for (float t : tValues)
{
point = l.PointOnSegment(t);
if (b.Contains(point))
{
outT = t;
return true;
}
}
//None of the intersections are within bounds of box
return false;
}
By testing each side of the box independently, you can modify the code to return which side intersects the line segment. This is useful if an object needs to bounce off the box (such as a ball bouncing as in this chapter’s game project). While not shown here, this requires associating each call to TestSidePlane with a side of the box. Then, you add that side (or normal to the side) as a reference parameter that Intersect can write to.
You can optimize the segment versus AABB intersection by instead using slabs, which are infinite areas bounded by two planes. However, grasping this approach requires additional mathematical backing. It’s one of the many topics discussed in Christer Ericson’s book, listed in the “Additional Reading” section at the end of this chapter.
Dynamic Objects
The intersection tests covered thus far are instantaneous tests. In a game, this means that you test whether two objects intersect on the current frame. Although this might be sufficient for simple games, in practice there are issues.
Consider the case where a character fires a bullet at piece of paper. Suppose you use a bounding sphere for the bullet and a box for the paper. On each frame, you test whether the bullet intersects with the paper. Because the bullet travels quickly, it’s unlikely that there’s one specific frame where the bullet exactly intersects with the paper. This means that instantaneous tests will miss the intersection, as in Figure 10.12.
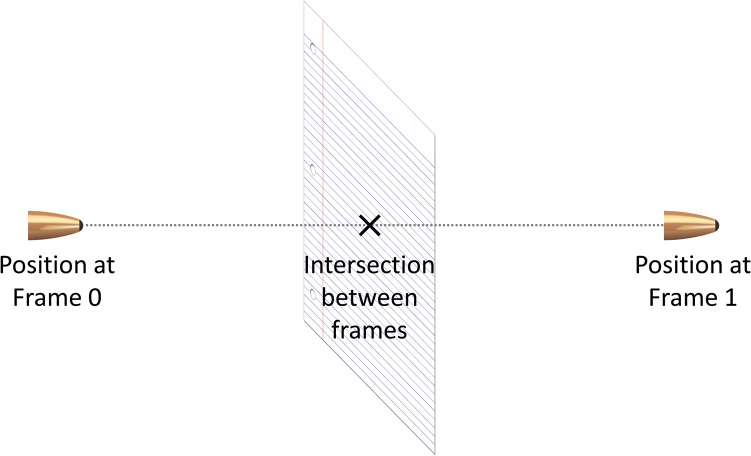
For the specific example of a bullet, you might solve this by representing the bullet as a line segment. The start point of the line segment is the position of the bullet in the last frame, and the end is the position of the bullet this frame. This way, you can detect whether the bullet intersects with the paper at any point between the last frame and this frame. However, this works only because the bullet is very small. You can’t represent larger objects with a line segment.
For some types of moving objects, such as two moving spheres, you can solve directly for the time of intersection. However, this doesn’t work well for cases such as boxes that rotate between two frames. For other types of moving objects, you might try to sample the intersection at multiple points between frames. The term continuous collision detection (CCD) can reference either directly solving the point of intersection or sampling the intersection.
To get a taste of how to solve directly for a time of intersection, consider the case of intersection between two moving spheres. This intersection, called swept-sphere intersection, also happens to commonly come up in video game companies’ interview questions.
For each sphere, you have the center positions during the last frame and during this frame. You can represent these positions using the same parametric equation as for line segments, where the position last frame is t = 0 and the position this frame is t = 1. For sphere P, P0 is the position last frame and P1 is the position this frame. Similarly, the sphere Q has the positions Q0 and Q1. So, these are the parametric equations for the positions of spheres P and Q:
![]()
You want to solve for the value of t where the distance between the two spheres is equal to the sum of their radii:
![]()
You now proceed in a manner similar to that used to test for line segment versus sphere intersection. You square both sides and replace the length squared with a dot product:

Then, you factor the terms and make substitutions:
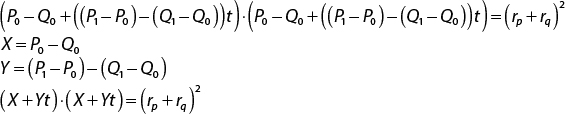
Finally, you distribute the dot product over addition, rewrite in the quadratic form, and solve the quadratic equation:
As with line segment versus sphere, you use the discriminant to determine whether any real solutions exist. However, for swept-sphere intersection you only care about the first point of intersection, which is the lower of the two t values. As before, you must validate that t is within the range [0, 1]. Listing 10.9 gives the code for swept-sphere intersection. The function returns t by reference, so the caller can use this to determine the position of the spheres at the time of intersection.
Listing 10.9 Swept-Sphere Intersection
bool SweptSphere(const Sphere& P0, const Sphere& P1,
const Sphere& Q0, const Sphere& Q1, float& outT)
{
// Compute X, Y, a, b, and c
Vector3 X = P0.mCenter - Q0.mCenter;
Vector3 Y = P1.mCenter - P0.mCenter -
(Q1.mCenter - Q0.mCenter);
float a = Vector3::Dot(Y, Y);
float b = 2.0f * Vector3::Dot(X, Y);
float sumRadii = P0.mRadius + Q0.mRadius;
float c = Vector3::Dot(X, X) - sumRadii * sumRadii;
// Solve discriminant
float disc = b * b - 4.0f * a * c;
if (disc < 0.0f)
{
return false;
}
else
{
disc = Math::Sqrt(disc);
// We only care about the smaller solution
outT = (-b - disc) / (2.0f * a);
if (outT >= 0.0f && outT <= 0.0f)
{
return true;
}
else
{
return false;
}
}
}
Adding Collisions to Game Code
The preceding sections discuss geometry objects used for collision and how to detect intersections between these objects. This section explores how to incorporate these techniques into game code. A new BoxComponent class adds AABBs for actors, and a PhysWorld class tracks boxes and detects intersections as needed. The character movement and new projectile firing code then leverage this new collision functionality.
The BoxComponent Class
The BoxComponent class declaration is much like the declaration of other components. However, instead of overriding the Update function, it overrides the OnUpdateWorldTransform function. Recall that the owning actor calls OnUpdateWorldTransform whenever it recomputes the world transform.
The member data of BoxComponent has two instances of the AABB struct: one AABB for the object space bounds, and one AABB for the world space bounds. The object space bounds shouldn’t change after initialization of the BoxComponent, but the world space bounds change whenever the owning actor’s world transform changes. Finally, BoxComponent has a Boolean for whether you want the BoxComponent to rotate based on the world rotation. This way, you can choose whether or not an actor’s BoxComponent rotates when the actor rotates. Listing 10.10 shows the declaration of BoxComponent.
Listing 10.10 BoxComponent Declaration
class BoxComponent : public Component
{
public:
BoxComponent(class Actor* owner);
~BoxComponent();
void OnUpdateWorldTransform() override;
void SetObjectBox(const AABB& model) { mObjectBox = model; }
const AABB& GetWorldBox() const { return mWorldBox; }
void SetShouldRotate(bool value) { mShouldRotate = value; }
private:
AABB mObjectBox;
AABB mWorldBox;
bool mShouldRotate;
};
To get the object space bounds of mesh files, the Mesh class also adds an AABB in its member data. Then, when loading in a gpmesh file, Mesh calls AABB::UpdateMinMax on each vertex, ultimately yielding an object space AABB. Then actors using a mesh can grab the mesh’s object space bounds and pass these bounds into the actor’s BoxComponent:
Mesh* mesh = GetGame()->GetRenderer()->GetMesh("Assets/Plane.gpmesh");
// Add collision box
BoxComponent* bc = new BoxComponent(this);
bc->SetObjectBox(mesh->GetBox());
To convert from object bounds to world bounds, you need to apply scale, rotation, and translation to the bounds. As when constructing the world transform matrix, the order is important because rotation is about the origin. Listing 10.11 gives the code for OnUpdateWorldTransform. To scale the box, you multiply min and max by the scale of the owning actor. To rotate the box, you use the previously discussed AABB::Rotate function, passing in the quaternion of the owning actor. You do this rotation only if mShouldRotate is true (which it is by default). To translate the box, you add the position of the owning actor to both min and max.
Listing 10.11 BoxComponent::OnUpdateWorldTransform Implementation
void BoxComponent::OnUpdateWorldTransform()
{
// Reset to object space box
mWorldBox = mObjectBox;
// Scale
mWorldBox.mMin *= mOwner->GetScale();
mWorldBox.mMax *= mOwner->GetScale();
// Rotate
if (mShouldRotate)
{
mWorldBox.Rotate(mOwner->GetRotation());
}
// Translate
mWorldBox.mMin += mOwner->GetPosition();
mWorldBox.mMax += mOwner->GetPosition();
}
The PhysWorld Class
Much as you have separate Renderer and AudioSystem classes, it’s sensible to create a PhysWorld class for the physics world. You add a PhysWorld pointer to Game and initialize it in Game::Initialize.
PhysWorld has a vector of BoxComponent pointers and corresponding public AddBox and RemoveBox functions, as shown in the skeleton declaration in Listing 10.12. Then the constructor and destructor for BoxComponent can call AddBox and RemoveBox, respectively. This way, PhysWorld will have a vector of all box components, much like how Renderer has a vector of all sprite components.
Listing 10.12 Skeleton PhysWorld Declaration
class PhysWorld
{
public:
PhysWorld(class Game* game);
// Add/remove box components from world
void AddBox(class BoxComponent* box);
void RemoveBox(class BoxComponent* box);
// Other functions as needed
// ...
private:
class Game* mGame;
std::vector<class BoxComponent*> mBoxes;
};
Now that PhysWorld tracks all the box components in the world, the next step is to add support for collision tests against these boxes. You define a function called SegmentCast that takes in a line segment and returns true if the segment intersects with a box. In addition, it returns by reference information about the first such collision:
bool SegmentCast(const LineSegment& l, CollisionInfo& outColl);
The CollisionInfo struct contains the position of intersection, the normal at the intersection, and pointers to both the BoxComponent and Actor of the collision:
struct CollisionInfo
{
// Point of collision
Vector3 mPoint;
// Normal at collision
Vector3 mNormal;
// Component collided with
class BoxComponent* mBox;
// Owning actor of component
class Actor* mActor;
};
Because the segment potentially intersects with multiple boxes, SegmentCast assumes that the closest intersection is the most important one. Because the vector of box components has no ordering, SegmentCast can’t simply return after the first intersection. Instead, the function needs to test against all boxes and return the intersection result with the lowest t value, as shown in Listing 10.13. This works because the lowest t value intersection is the one closest to the start of the line segment. SegmentCast uses the segment versus AABB intersection function discussed earlier but now modified to also return the normal of the side the line segment intersects with.
Listing 10.13 PhysWorld::SegmentCast Implementation
bool PhysWorld::SegmentCast(const LineSegment& l, CollisionInfo& outColl)
{
bool collided = false;
// Initialize closestT to infinity, so first
// intersection will always update closestT
float closestT = Math::Infinity;
Vector3 norm;
// Test against all boxes
for (auto box : mBoxes)
{
float t;
// Does the segment intersect with the box?
if (Intersect(l, box->GetWorldBox(), t, norm))
{
// Is this closer than previous intersection?
if (t < closestT)
{
outColl.mPoint = l.PointOnSegment(t);
outColl.mNormal = norm;
outColl.mBox = box;
outColl.mActor = box->GetOwner();
collided = true;
}
}
}
return collided;
}
Ball Collisions with SegmentCast
In the chapter game project, you use SegmentCast to determine whether the ball projectile the player fires hits something. If it does, you want the ball to bounce off the normal of the surface. This means that once the ball hits the surface, you must rotate it to face an arbitrary direction.
You first add a helper function to Actor that uses the dot product, cross product, and quaternions to adjust the actor’s rotation to face the desired direction. Listing 10.14 shows the implementation of this helper function, RotateToNewForward.
Listing 10.14 Actor::RotateToNewForward Implementation
void Actor::RotateToNewForward(const Vector3& forward)
{
// Figure out difference between original (unit x) and new
float dot = Vector3::Dot(Vector3::UnitX, forward);
float angle = Math::Acos(dot);
// Are we facing down X?
if (dot > 0.9999f)
{ SetRotation(Quaternion::Identity); }
// Are we facing down -X?
else if (dot < -0.9999f)
{ SetRotation(Quaternion(Vector3::UnitZ, Math::Pi)); }
else
{
// Rotate about axis from cross product
Vector3 axis = Vector3::Cross(Vector3::UnitX, forward);
axis.Normalize();
SetRotation(Quaternion(axis, angle));
}
}
Next, you create a BallActor class and attach to it a new MoveComponent subclass called BallMove, which implements the movement code specific to BallActor. The BallMove::Update function, shown in Listing 10.15, first constructs a line segment in the direction the ball is traveling. If this segment intersects with anything in the world, you want it to bounce off the surface. You reflect the movement direction off the surface with Vector3::Reflect and then use RoateToNewForward to tell the ball to rotate to face this new direction.
Listing 10.15 Using SegmentCast for Ball Movement
void BallMove::Update(float deltaTime)
{
// Construct segment in direction of travel
const float segmentLength = 30.0f;
Vector3 start = mOwner->GetPosition();
Vector3 dir = mOwner->GetForward();
Vector3 end = start + dir * segmentLength;
LineSegment ls(start, end);
// Test segment vs world
PhysWorld* phys = mOwner->GetGame()->GetPhysWorld();
PhysWorld::CollisionInfo info;
if (phys->SegmentCast(ls, info))
{
// If we collided, reflect the direction about the normal
dir = Vector3::Reflect(dir, info.mNormal);
mOwner->RotateToNewForward(dir);
}
// Base class update moves based on forward speed
MoveComponent::Update(deltaTime);
}
One thing to watch out for is what happens when you add a BoxComponent to the player, as you will do later in this section. You clearly don’t want the ball to collide against the player because the player fires the ball! Luckily, you can leverage the fact that the CollisionInfo from SegmentCast has a pointer to the actor owning the box component. Thus, if you save a pointer to the player somewhere, you can make sure a ball doesn’t collide against the player.
Testing Box Collisions in PhysWorld
Although not used in this chapter’s game project, some game features may require testing all the boxes in the physics world against each other. A naïve implementation is to perform pairwise intersection tests between all combinations of boxes in the world. This basic approach, shown in Listing 10.16, uses an O(n2) algorithm because it tests every box against every other box. The TestPairwise function takes in a user-supplied function, f, and calls f on every intersection between boxes.
Listing 10.16 PhysWorld::TestPairwise Implementation
void PhysWorld::TestPairwise(std::function<void(Actor*, Actor*)> f)
{
// Naive implementation O(n^2)
for (size_t i = 0; i < mBoxes.size(); i++)
{
// Don't need to test vs. itself and any previous i values
for (size_t j = i + 1; j < mBoxes.size(); j++)
{
BoxComponent* a = mBoxes[i];
BoxComponent* b = mBoxes[j];
if (Intersect(a->GetWorldBox(), b->GetWorldBox()))
{
// Call supplied function to handle intersection
f(a->GetOwner(), b->GetOwner());
}
}
}
}
Although TestPairwise is conceptually simple, it ends up making a lot of unnecessary calls to Intersect. It treats two boxes on opposite sides of the world the same as two boxes right next to each other. In the case of this chapter’s game project, there are 144 boxes. TestPairwise makes over 10,000 calls to the Intersect function given these 144 boxes.
You can optimize this by observing that two 2D axis-aligned boxes do not intersect unless they overlap on both coordinate axes. For example, the interval [min.x, max.x] from one box must overlap with the [min.x, max.x] interval from another box if the two boxes are to intersect. The sweep-and-prune method takes advantage of this observation to reduce the number of box intersection tests. The sweep-and-prune method involves selecting an axis and testing only boxes that have overlapping intervals along that axis.
Figure 10.13 illustrates a handful of AABBs and considers their intervals along the x-axis. Box A’s and Box B’s x intervals overlap, so they may potentially intersect. Similarly, Box B’s and Box C’s x intervals overlap, so they may intersect. However, Box A’s and Box C’s x intervals do not overlap, so they cannot intersect. Similarly, Box D’s x interval overlaps with none of the other boxes, so it can’t intersect with any of them. In this case, the sweep-and-prune algorithm calls Intersect only on the pairs (A, B) and (B, C) instead of on all six possible combinations.
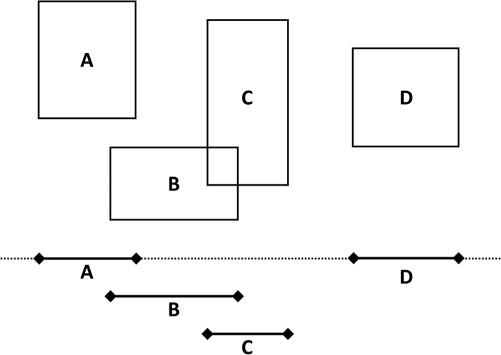
Listing 10.17 gives the code for the sweep-and-prune method along the x-axis. You first sort the vector of boxes by their minimum x-value. Then, for every box, you grab the maximum x value and save it in max. In the inner loop, you only consider boxes whose min.x is less than max. Once the inner loop hits the first box with a min.x greater than max, there are no other boxes that overlap along the x-axis with the outer loop box. This means there are no other possible intersections against the outer loop box, so you break to the next iteration of the outer loop.
Listing 10.17 PhysWorld::TestSweepAndPrune Implementation
void PhysWorld::TestSweepAndPrune(std::function<void(Actor*, Actor*)> f)
{
// Sort by min.x
std::sort(mBoxes.begin(), mBoxes.end(),
[](BoxComponent* a, BoxComponent* b) {
return a->GetWorldBox().mMin.x <
b->GetWorldBox().mMin.x;
});
for (size_t i = 0; i < mBoxes.size(); i++)
{
// Get max.x for box[i]
BoxComponent* a = mBoxes[i];
float max = a->GetWorldBox().mMax.x;
for (size_t j = i + 1; j < mBoxes.size(); j++)
{
BoxComponent* b = mBoxes[j];
// If box[j] min.x is past the max.x bounds of box[i],
// then there aren't any other possible intersections
// against box[i]
if (b->GetWorldBox().mMin.x > max)
{
break;
}
else if (Intersect(a->GetWorldBox(), b->GetWorldBox()))
{
f(a->GetOwner(), b->GetOwner());
}
}
}
}
In this chapter’s game project, TestSweepAndPrune cuts down the number of calls to Intersect roughly by half in comparison to TestPairwise. The complexity of this algorithm is on average O(n log n). Even though sweep-and-prune requires a sort, it is generally more efficient than the naïve pairwise test—unless there are very few boxes. Some implementations of the sweep-and-prune algorithm do the pruning along all three axes, as in Exercise 10.2. This requires maintaining multiple sorted vectors. The advantage of testing all three axes is that after you prune for all three axes, the remaining set of boxes must intersect with each other.
Sweep-and-prune is one of a category of techniques called broadphase techniques. The broadphase tries to eliminate as many collisions as possible before the narrowphase, which tests the individual pairs of collisions. Other techniques use grids, cells, or trees.
Player Collision Against the Walls
Recall that MoveComponent uses the mForwardSpeed variable to move the character forward or backward. However, the current implementation allows the player to move through walls. To fix this, you can add a BoxComponent to each wall (encapsulated by PlaneActor), as well as a BoxComponent to the player. Because you only want to test the player against every PlaneActor, you don’t use TestSweepAndPrune. Instead, you can just make a vector of PlaneActor pointers in Game and access this from the player’s code.
The basic idea is that every frame, you test the player’s collision against every PlaneActor. If the AABBs intersect, you adjust the player’s position so that it no longer collides with the wall. To understand this calculation, it helps to visualize the problem in 2D.
Figure 10.14 illustrates a player’s AABB colliding with a platform AABB. You calculate two differences per axis. For example, dx1 is the difference between the player’s max.x and the platform’s min.x. Conversely, dx2 is the difference between the player’s min.x and the platform’s max.x. Whichever of these differences has the lowest absolute value is the minimum overlap between the two AABBs. In Figure 10.14, the minimum overlap is dy1. If you then add dy1 to the player’s y position, the player stands exactly on top of the platform. Thus, to correctly fix the collision, you can just adjust the position in the axis of the minimum overlap.
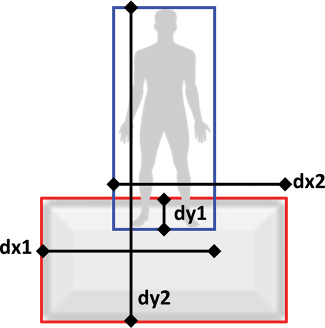
In 3D, the principle is the same, except there are now six difference values because there are three axes. The FPSActor::FixCollisions function as shown in Listing 10.18 implements this minimum overlap test. Importantly, because changing the position of the player changes the player’s BoxComponent, in between each intersect we must recompute the world bounds of the BoxComponent. You then call this function from UpdateActor, which means you call it after the MoveComponent updates the player’s position every frame.
Listing 10.18 FPSActor::FixCollisions Implementation
void FPSActor::FixCollisions()
{
// Need to recompute my world transform to update world box
ComputeWorldTransform();
const AABB& playerBox = mBoxComp->GetWorldBox();
Vector3 pos = GetPosition();
auto& planes = GetGame()->GetPlanes();
for (auto pa : planes)
{
// Do we collide with this PlaneActor?
const AABB& planeBox = pa->GetBox()->GetWorldBox();
if (Intersect(playerBox, planeBox))
{
// Calculate all our differences
float dx1 = planeBox.mMin.x - playerBox.mMax.x;
float dx2 = planeBox.mMax.x - playerBox.mMin.x;
float dy1 = planeBox.mMin.y - playerBox.mMax.y;
float dy2 = planeBox.mMax.y - playerBox.mMin.y;
float dz1 = planeBox.mMin.z - playerBox.mMax.z;
float dz2 = planeBox.mMax.z - playerBox.mMin.z;
// Set dx to whichever of dx1/dx2 have a lower abs
float dx = (Math::Abs(dx1) < Math::Abs(dx2)) ? dx1 : dx2;
// Ditto for dy
float dy = (Math::Abs(dy1) < Math::Abs(dy2)) ? dy1 : dy2;
// Ditto for dz
float dz = (Math::Abs(dz1) < Math::Abs(dz2)) ? dz1 : dz2;
// Whichever is closest, adjust x/y position
if (Math::Abs(dx) <= Math::Abs(dy) &&
Math::Abs(dx) <= Math::Abs(dz))
{
pos.x += dx;
}
else if (Math::Abs(dy) <= Math::Abs(dx) &&
Math::Abs(dy) <= Math::Abs(dz))
{
pos.y += dy;
}
else
{
pos.z += dz;
}
// Need to set position and update box component
SetPosition(pos);
mBoxComp->OnUpdateWorldTransform();
}
}
}
Because you also use PlaneActor instances for the ground beneath the player, you can also leverage this code, with modification, to test whether the player lands on the platforms. In Exercise 10.1, you’ll explore adding jumping to the player.
Game Project
This chapter’s game project implements all the different types of intersections discussed in this chapter, as well as BoxComponent and PhysWorld. It also uses SegmentCast for the ball projectile and implements fixing the player colliding against the walls. The result is a first-person shooting gallery, as shown in Figure 10.15. The code is available in the book’s GitHub repository, in the Chapter10 directory. Open Chapter10-windows.sln in Windows and Chapter10-mac.xcodeproj on Mac.

Figure 10.15 Chapter 10 game project
The controls for this game project use the FPS-style controls implemented in Chapter 9. Recall that W/S move forward and back, A/D strafe, and the mouse rotates the character. In addition, clicking the left mouse button now fires a ball projectile in the direction of the vector derived from an unprojection (also discussed in Chapter 9). The ball projectile uses SegmentCast to test whether it intersects with a wall or target. In either case, the ball reflects its facing direction based on the normal of the surface, causing it to bounce. If the ball hits a target, the game plays a ding sound.
Summary
This chapter provides an in-depth introduction to collision detection techniques in games. Games might use many different geometric types for collision detection. A line segment has a start point and an end point. The representation of a plane is its normal and distance to the origin. Spheres are simple bounding volumes but may cause many false negatives for characters of different shapes. Axis-aligned bounding boxes have sides aligned with the axes, while oriented bounding boxes do not have this restriction.
For intersection tests, this chapter covers many different types of intersections. Contains point tests can say whether a shape contains a point. You can also test whether two bounding volumes (such as two AABBs) intersect with each other. This chapter also covers tests for whether a line segment intersects with objects including planes, spheres, and other boxes. For moving objects, you may need to use a form of continuous collision detection to ensure that the game doesn’t miss collisions that occur between frames.
Finally, this chapter covers how to integrate collision detection into game code. The BoxComponent class has both object space bounds (derived from the mesh) and world space bounds that are updated based on the owning actor. PhysWorld keeps track of all box components in the world, and SegmentCast tests a line segment against all the boxes. For collisions between pairs of boxes, it’s more efficient to use the sweep-and-prune broadphase algorithm. Sweep-and-prune exploits the fact that two boxes cannot intersect if their intervals along a coordinate axis do not overlap. This chapter shows how to use both segment cast and box component collisions to implement some game-specific features, such as the ball bouncing off objects or the player colliding with the wall.
Additional Reading
Christer Ericson provides extremely detailed coverage of collision detection, covering both the mathematical bases of the algorithms and usable implementations. Ian Millington doesn’t have as much coverage of collision detection algorithms but explains how to incorporate collision in the context of physics engine movement, which is something this chapter does not discuss in detail.
Ericson, Christer. Real-time Collision Detection. San Francisco: Morgan Kaufmann, 2005.
Millington, Ian. Game Physics Engine Development, 2nd edition. Boca Raton: CRC Press, 2010.
Exercises
In this chapter’s first exercise, you add jumping to the chapter’s game project. In the second exercise, you improve upon the sweep-and-prune implementation covered in this chapter. In the last exercise you implement OBB versus OBB intersection between oriented bounding boxes.
Exercise 10.1
Add jumping to the player character. The ground objects already have corresponding axis-aligned bounding boxes. To implement jumping, select a key (such as the spacebar). When the player presses the jump key, set an additional velocity in the positive z direction. Similarly, add a negative z acceleration for gravity that slows down the jump velocity. After the player hits the apex of the jump, he or she starts falling. While they player is falling, you can detect in FixCollisions whether the player lands on top of a PlaneActor (because you know that the top is dz2). While the player is on the ground, disable gravity and set the z velocity back to zero.
To help keep the code modular, it’s recommended that you use a simple state machine to represent the different states of the character: on the ground, jumping, and falling. As an additional feature, experiment with transitioning from the “on ground” state to the “falling” state. While in the “on ground” state, keep making downward SegmentCasts to detect whether the player has walked off the platform. If that happens, switch from “on ground” to “falling.”
Exercise 10.2
Change the SweepAndPrune function to sweep and prune across all three coordinate axes. Have PhysWorld maintain three vectors of boxes and change it so that AddBox and RemoveBox touch all three vectors. Then sort each vector by its corresponding axis.
The sweep-and-prune code should then test along each axis independently and create a map of pairs of overlapping boxes along that axis. Once all three axes are complete, the code should compare the overlapping box vectors. The boxes that overlap along all three axes are the only boxes that intersect with each other.
Exercise 10.3
Implement OBB versus OBB intersection in a new Intersect function. As with AABBs, use the separating axis approach (that is, figure out whether they cannot intersect and then logically not the result). However, whereas there are 3 axes to test for AABBs, for OBBs there are a total of 15 different axes to test.
To implement this, first compute the 8 different corners of both OBBs. Each OBB has a total of 3 local axes corresponding to each side of the box. You can compute these by using vector subtraction between the correct set of points and normalizing the vectors. Because each box has three local axes, that yields the first 6 potential separating axes. The other 9 vectors are the combinations of cross products between the two OBBs’ local axes. For example, OBB A’s up vector crosses OBB B’s up, right, and forward vectors.
To determine the interval of the box along an axis, compute the dot product of each corner of that box versus the axis. The lowest dot product result is the minimum value of the interval and, similarly, the highest dot product result is the maximum value. Then determine whether the [min, max] intervals of both boxes separate along the axis. If any of the 15 axes separate, then the boxes cannot intersect. Otherwise, they must intersect.