
Chapter 3
Introducing Multitrack Recording with GarageBand
IN THIS CHAPTER
![]() Understanding the basics of digital multitrack recording
Understanding the basics of digital multitrack recording
![]() Recording tracks
Recording tracks
![]() Mixing tracks into a song
Mixing tracks into a song
![]() Mastering a song when it’s finished
Mastering a song when it’s finished
![]() Managing your song files
Managing your song files
There’s no getting around it: Making a song with GarageBand uses pretty much the same process that musicians and producers use to make hit records in multimillion-dollar recording studios. GarageBand is easier and a lot less expensive, but the process is much like the one the pros use.
And so, to use GarageBand well, you need to understand the multitrack recording process that lies beneath it. After you understand multitrack recording, you can plan and produce better recordings with GarageBand. If you’re ignorant of the process, you’re likely to flail about hopelessly, without ever composing anything good enough to listen to more than once. It’s that simple.
Even if you’re a grizzled old studio vet who has been overdubbing and sweetening tracks since I was in diapers (unlikely), you may want to read the chapter anyway. You may think you know the multitrack recording process, and you probably do, but I guarantee that you don’t know GarageBand like I do.
Have you ever been inside a multimillion-dollar recording studio or mixed audio on a 48-channel console? Recorded songs on a 24-track tape machine that costs more than many houses? Produced demo recordings for rock bands? Mixed audio for television and radio commercials? Well, I did all that and more before I gave up the advertising and audio engineering games to become a full-time Mac geek way back in 1985.
But I digress.
Here, I try to kill two birds with one chapter. This little chapter expands on the sneak peeks back in Chapter 1, but this time you stroll through the process of multitrack recording in GarageBand.
This chapter is a road map at 20,000 feet. As such, it foreshadows many techniques, terms, features, and other things that I cover in more detail throughout the rest of the book.
Understanding the Role of Stereo in Multitrack Recording
The way I see it, listening to music has had three major paradigm shifts over the ages:
- The Age Before Recorded Music: I won’t even attempt to put dates on it, but this was the time before the invention of recorded audio.
- The Age of Monaural Music: During this period, audio was recorded onto many types of media, using all kinds of strange devices (wire recorders, rotating drum recorders, and tape recorders, to name a few). During the Monaural Age, though, everything recorded had something in common: It played out of a single speaker. Or, to be a bit more technically correct, even if multiple speakers played back the sound, you heard a single track, or channel, of audio.
This era could have easily been known as The Age of One-Channel, but for reasons that will become apparent in just one second (or one sentence, whichever comes first), the monaural metaphor works better here.
- The Age of Stereo: One day, probably before I was born (my tech editor said it was 1933), the recording industry noticed that audio sounded dramatically better when it came out of two speakers, with each speaker playing a discrete track (or channel) of music.
Stereo caught on by the late 1950s and has been the way we listen to music ever since (although popular songs continued to be released as monaural recordings well into the 1960s).
Although the way we listen to music — stereo playback — has not changed much in over 50 years, the way we record that music has changed dramatically many times. Paradigm shifts happen, and in the world of audio recording, they've happened frequently. We made the leap from monaural to 2-track to 4-track to 8-track recording (all on tape); from ¼-inch tape to 1-inch tape to 2-inch tape (still tape); from tape to disk (no longer tape); and from million-dollar studios to hundred-dollar pocket-sized recorders to free software such as GarageBand.
If you have the chops, you can create music with GarageBand that sounds almost as good as (or even better than) music made in million-dollar studios 30 years ago. But regardless of how many tracks, channels, machines, tape decks, instruments, outboard gear, or microphones you have, your songs always end up mixed down to just two tracks, or channels (also known stereo mix). Figure 3-1 is worth at least a thousand words.
In Figure 3-1, the four tracks at the top represent three instrument tracks and a vocal track that will be mixed together to create the final two-track master. The two tracks at the bottom (L and R for left and right) represent the final mixed and mastered product — a two-track (stereo) mix.

FIGURE 3-1: In the simplest of terms, this is how multitrack recording works.
So now you know what that song in your head will look like after you record all the parts in GarageBand.
Strolling through the Recording Process, Quickly
After you’ve rehearsed (ha), the multitrack recording process begins. Here’s a quick overview of each step:
-
Get all the tracks down on tape (or disk in the case of GarageBand).
In studio-speak, this is called getting the tracks in the can. Be careful here; studio-speak can be confusing. In another chapter, I mention that can is studio-speak for headphones. Here, in the can means all the tracks you need for this song are finished. In this instance, the can is a metal or plastic container used to store tape (or film). The plural form (cans) still means headphones. I told you studio-speak can be confusing.
 Tracks are the basic building blocks of multitrack recording. You record tracks, enhance tracks, mix tracks, put tracks in the can, and so on.
 -
Adjust each track’s settings — level, pan, equalization, echo, reverb, effects, and so on — so that everything sounds just right to you.
This step is called mixing or postproduction.
-
Add effects to the song as a whole.
This step is called mastering — you add echo, reverb, equalization or other effects to the whole project, and add a fade-in, fade-out, or both.
- Export your mastered project as a two-channel (stereo) audio file.
I discuss tracks, mixing, and mastering in GarageBand in just a moment, but first, I want to be sure you’re ready to rock and roll.
Cutting the Tracks (“No Blood on ’em, Mr. Dylan”)
As you may remember from a page or two ago, the track is the basic building block of a song; each song is made up of one or more tracks.
 The maximum number of tracks is a function of the speed of your Mac’s processor, the amount of memory (RAM) it has, and the speed of your disk drive(s). If your Mac is old and its guts are slower, the number of tracks you can have in a project may be limited. On the other hand, most modern Macs are capable of handling heaven-only-knows-how-many tracks. You’ll usually see a warning dialog when your project exceeds your device’s capabilities. If that happens, you’ll need to reduce the number of tracks (or the number of effects on tracks) to proceed.
This section explains how to begin the multitrack recording process by laying down tracks in GarageBand. I explain how to record tracks and how you use a few of GarageBand’s features to make each track sound its best before you mix and master those tracks into a song.
In GarageBand, I usually record one track at a time. Although you could record your entire band playing a song live, or record yourself singing and playing the piano at the same time, unless you have a powerful Mac and a multichannel audio interface, you’ll be limited to recording one or two tracks at a time. Just remember to record each instrument or vocal on a separate track, so you can adjust the instrument or vocal track separately from the rest of the song’s tracks.
Recording tracks on a Mac
To record a track on your Mac, follow these steps:
-
Launch GarageBand.
If you don’t see its icon on the dock, look in your Applications folder; if you don’t see it in the Applications folder, search your Mac for GarageBand. If you don’t find it, open the Mac App Store (from the dock or the Applications folder), search for GarageBand, and download a copy.
The Choose a Project dialog appears.
-
Click New Project in the sidebar, as shown in Figure 3-2.
Note that if a project was open when you quit GarageBand, that project will reopen when you launch GarageBand. To close that project and start a new one, choose File ⇒ New.
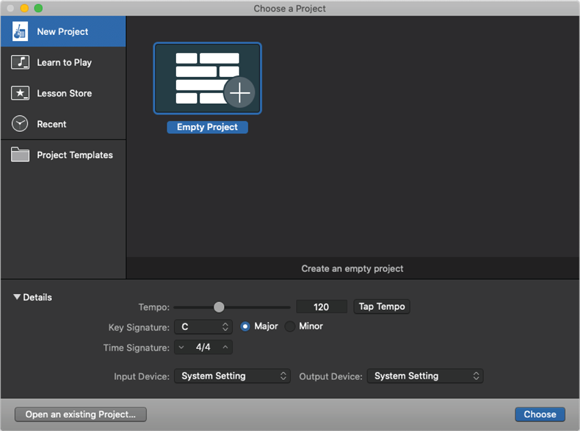
FIGURE 3-2: You see this dialog when you launch GarageBand on your Mac.
The settings in the Details section at the bottom of the dialog are the default for new projects. Accept them as they are, or adjust them to your liking as follows:
- Tempo: Use this slider to adjust the project’s tempo expressed in beats per minute (BPM). Or click the Tap Tempo button in time with your song to set the tempo manually.
- Key Signature: Use this pop-up menu to adjust the project’s key.
- Time Signature: Use this pop-up menu to adjust the project’s time signature.
- Input Device and Output Device: Use these pop-up menus to change your input and output devices.
Don’t fret (pun intended) too much about these options at this time. Just leave the Tempo, Key Signature, and Time Signature settings alone if you aren’t sure, at least for now. You can always change them later if you like.
-
Create a new project by clicking Empty Project and then clicking the Choose button.
The Choose a Track Type dialog shown in Figure 3-3 appears.
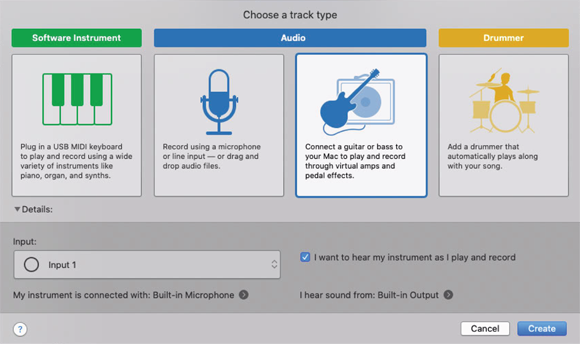
FIGURE 3-3: Specify the type of track to start with.
-
Select a track type for the first track in this project.
GarageBand offers four kinds of tracks for recording: software instrument, audio (mic), audio (guitar/bass), and drummer. Here’s how to choose the right type of track for the instrument or voice you want to record first:
- Software instrument track: Record using GarageBand’s built-in software instruments with either a MIDI keyboard connected to your Mac or one of GarageBand’s two onscreen keyboards.
-
Audio (microphone) track: Record using a mic connected to your Mac, a mic connected to an audio interface connected to your Mac, or your Mac’s built-in mic.
 Your Mac’s built-in mic sounds worse than almost any other microphone in the world. Use it only if no other options are available.
 - Audio (guitar/bass) track: Record an instrument connected to your Mac or an instrument connected to an audio interface connected to your Mac.
- Drummer track: Create a virtual drummer track for your song. Each virtual drummer includes a unique drum kit and playing style, both of which can be edited at will.
 Nice touch: After you record a track, the region you just recorded appears on that track in the timeline (which Apple calls the workspace) in its proper color — real instruments are blue and software instruments are green. Tracks even glow their proper color when you select them. Loops and real audio regions in the timeline are also colored this way.
GarageBand’s main window appears with a track of that type, as shown in Figure 3-4.
Congrats! You just started a new project and its first track.

FIGURE 3-4: GarageBand’s main window after choosing an Audio (guitar/bass) track for the first track.
GarageBand for the Mac doesn’t automatically save your work, so I recommend that you save your project with a descriptive name by choosing File ⇒ Save before you record. Furthermore, to avoid losing work if your Mac crashes or freezes, make a habit of saving your projects (File ⇒ Save or its keyboard shortcut ⌘ +S) every few minutes while you work.
Recording tracks on an iDevice
In this section, you create a new project with one track on your iDevice. Simply do the following:
-
Launch GarageBand.
Tap the + button to create a new song project. The screen shown in Figure 3-5 appears.
 Note that if a project was open when you quit GarageBand, that project will reopen when you launch GarageBand. To close that project and start a new one, tap the new project icon in the upper-left corner (and shown in the margin).
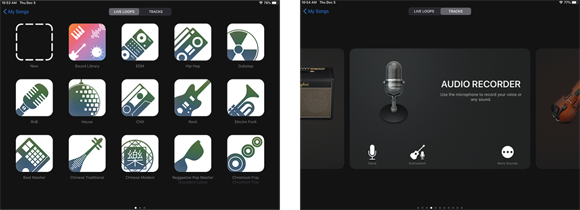
FIGURE 3-5: Create a new song using live loops (left) or tracks (right).
-
Tap Tracks at the top of the screen.
You're going to work in tracks mode for this exercise; you explore live loops mode in Chapter 13.
-
To choose a preset for the first track, swipe left or right and then tap the preset you want to use.
Your choices are Audio Recorder, Strings, Bass, Guitar, Amp, Keyboard, Drums, World, or Drummer. What you see next depends on which item you just tapped. Suffice it to say that your song appears and you’re ready to record.
Congrats! You just started a new project and created its first track.
Whether you like it or not, GarageBand for iOS autosaves your song when you close the app, when you open a different song, and when idle.
I recommend that you become familiar with your iDevice’s undo feature (shake the device and then tap the Undo button) and remember to use it if you don’t want GarageBand saving the song after you delete a region or track or make a change you’re not happy with.
Listening to tracks during recording and playback
Creating a multitrack recording is an iterative process. You record a track (or multiple tracks); when that’s done, you listen to make sure it’s okay before you move on. When you’re certain that track sounds okay, you record more tracks and listen to them. Then you listen to all the recorded tracks together. You record more tracks and then listen to all of them together as well as in different combinations.
Later, during mixing and mastering, you add effects to a track (or to the entire song) and listen again. Or you might change an instrument sound — and listen again.
And so it goes — you record a bit, you listen a bit, you adjust a bit, you listen a bit, you tweak this and that, and then you listen some more.
To play or record your project, you use GarageBand’s transport controls, which move the playhead much like the controls you’d find on a tape recorder, audio CD player, iPod, or DVD player. These controls can be seen in Figure 3-6 (Mac) and Figure 3-7 (iDevices).
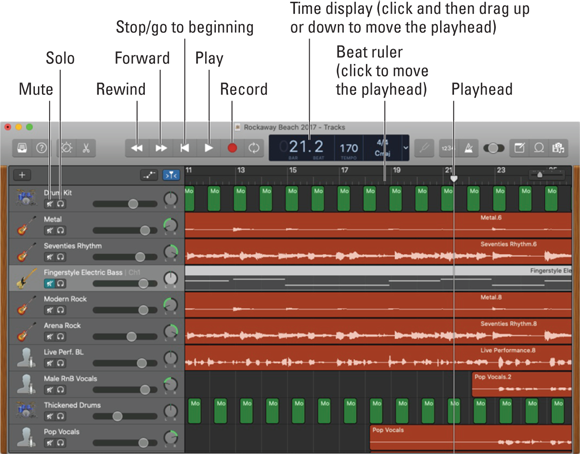
FIGURE 3-6: GarageBand’s transport controls on the Mac work like the controls on a CD player.
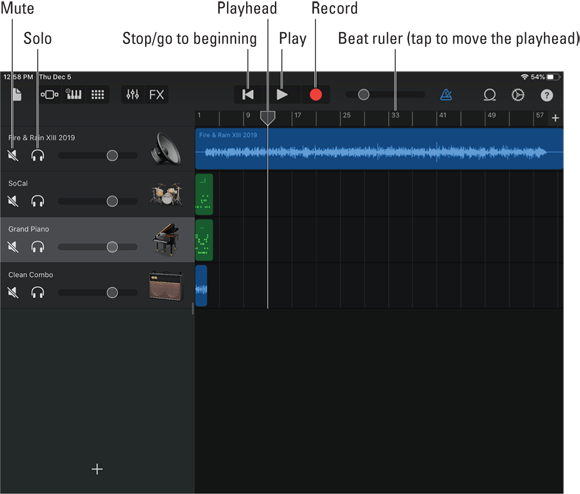
FIGURE 3-7: GarageBand offers fewer transport controls on iDevices, but they still work like the controls on a CD player.
With all that playing, recording, and listening, it would behoove you to memorize the myriad ways you can move the playhead hither and yon:
- Click or tap the play icon (or use the Mac keyboard shortcut, the spacebar) to play or stop the song.
- Click or tap and drag the playhead to a new position in the beat ruler.
- Click or tap anywhere in the beat ruler to move the playhead to that point.
- Click or tap the stop/go to beginning icon to move the playhead to the start of the song.
- (Mac only) Click the rewind icon (or use the keyboard shortcut, the ← key) to move the playhead backward one measure at a time.
- (Mac only) Click the forward icon (or use the keyboard shortcut, the → key) to move the playhead forward one measure at a time.
- (Mac only) Click the number in the time display and then drag up or down without releasing the mouse button to move the playhead to that point in the song. Or double-click the time display, type a new number, and then press Return.
Choosing which tracks you hear
The mute and solo icons are opposite sides of the same coin. You use them to determine which tracks you hear (or don’t hear) during recording and playback. The mute icon mutes (that is, silences) the track; the solo icon mutes all tracks but tracks with soloing enabled. So, for example, if you had four tracks numbered 1 through 4 but wanted to hear only tracks 1 and 3, you would either mute tracks 2 and 4 or solo tracks 1 and 3.
Having both the mute and solo options is convenient as you begin to have more and more tracks in your song.
The icons light up when enabled. For example, in Figure 3-6, the mute icon is enabled for the Fingerstyle Electric Bass track.
You may mute or solo as many or as few tracks as you like (or none or all) during playback or recording.
Deciding a track’s fate: Scrap bin, editing room, or mix?
After you play back a track, you may notice that it has some flaws. If you want to correct those flaws, you have several options:
- Punch in and re-record over the mistake. See Part 3 (Mac) or Part 5 (iDevice) for details on editing and tweaking.
-
Delete the region you just recorded and start over. Do this if you want to re-record the entire part you just recorded. To delete the part (which GarageBand calls a region):
- Mac: Click the region in the timeline and press Delete (Backspace on some keyboards).
- iOS: Double-tap the region in the timeline and then tap the Delete button that appears above it.
Now move the playhead to the appropriate spot in the song and re-record that part.
- Delete the entire track. If you decide the track just isn’t working and probably never will, you can delete it:
- Mac: Click its name and press ⌘ +Delete (⌘ +Backspace on some keyboards).
- iOS: Double-tap slowly on the track’s icon and then tap Delete. If you double-tap too quickly, the track’s Smart instrument controls will appear instead of the Delete button. If that happens, try again but tap more slowly.
Changing a track’s settings
You can change the settings of a track as follows:
- Mac: Double-click the track’s icon on the left, or select it (with the mouse or the arrow keys) and then click the Smart controls icon, as shown in Figure 3-8.
- iOS: Double-tapping its icon on the left or tapping the Track Controls button, as shown in Figure 3-9.

FIGURE 3-8: Track settings for the Male RnB Vocals track (Mac).
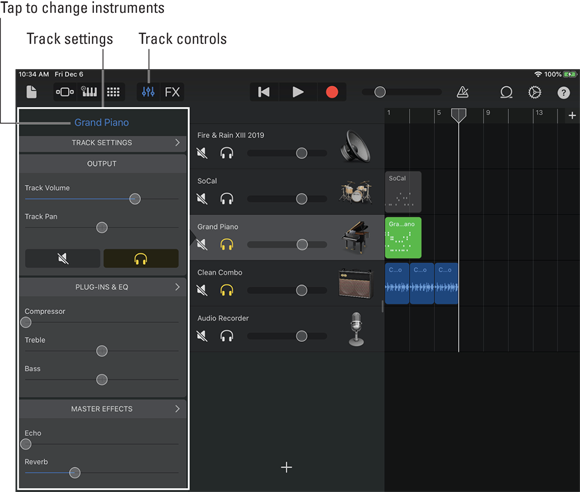
FIGURE 3-9: Track settings for the Grand Piano track (iOS).
Changing a track’s instrument
You can change a track's instrument any time you like. The only limitation is that you can’t change a real instrument track into a software instrument track, or vice versa. Other than that little hiccup, do the following to change the instrument on a track:
- Mac: Click the library icon and then select a different instrument.
- iOS: Tap the instrument’s name above the track settings on the left.
Checking levels during recording and playback
A simulated LED display shows the level of the track in real time as you play or record, as shown in Figure 3-10.
Level is audio-speak for the relative loudness of the track.
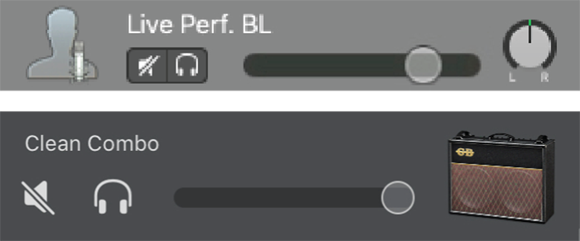
FIGURE 3-10: A quiet passage on the Mac (top) and iOS (bottom), with the track’s level display unlit.
So, when you play or record, the level display for each track tells you that track’s record or playback level at that precise point in your song. The playhead always shows that point on the timeline. Wherever the playhead is located, that’s where the song will resume playing or recording if you’ve stopped or paused.
Figure 3-10 was captured during the playback of a very quiet (almost silent) passage. As you can see, the level display is unlit. Now take a look at Figure 3-11, which was taken during a much louder passage.

FIGURE 3-11: A loud passage on the Mac (top) and iOS (bottom) with the level display fully lit (and red on the right).
The red LEDs on the right end of the level display are your enemies. You want to see as little of them as possible when you record a track. If you see too much red, the track is too “hot,” and will sound broken up and distorted when you play it back. An old studio saying goes like this: “If you see much red, your track is dead.” Believe it.
If you notice that this dot is lit after you record a track, listen to the track very carefully. The track may have been spoiled if you recorded it in the red — or hot — zone.
If a track is too hot when you’re rehearsing or recording, adjust its level so you see little or no red, and then record (or re-record). The following section provides further details on adjusting levels.
Adjusting levels
When you record, you mostly use the level faders to keep tracks from being recorded too hot, which can ruin the take. Later, during mixing and mastering, you use the level faders to mix all your tracks so each instrument and voice is heard clearly.
You can adjust the track level in two ways:
- Adjust the level of the entire track with the fader control. Fader is a pro audio term for a sliding control. The fader for each track is located under its name on the left side of the screen, as shown in Figure 3-12.

FIGURE 3-12: The level faders for Mac (left) and iOS (right).
- Adjust only part of a track with the track volume control. When you want to make part of a track louder or softer than the rest (or adjust its level in more sophisticated ways), you use a track volume control, which appears below the track when automation is enabled. No pro-audio term for the track volume control exists; it's strictly a computer innovation. If you’ve used iTunes or Final Cut Pro, you know how to use the track volume control; if not, you find out how a little later in this section.
You start with the faders, which you click and slide to the left to lower the level or slide to the right to raise it. For example, in Figure 3-12:
- The Grand Piano track is silent.
- The Male Rock Vocals track is set to a modest recording level.
- The Fingerstyle Bass track is set at 100 percent. (Don’t do that.)
So that’s about it for the level fader control, but you have a second way to adjust the level of a track that’s often better, and here’s why: The fader lets you choose only one level for the entire track. The method that I’m about to show you lets you change the level anywhere you like — and as many times as you like. For example, a track could start very quietly and build to a normal level (a fade-in), play at that level until a really loud passage occurs, drop the level for the loud part, bring the level back to normal again, and then fade-out.
To use the track volume control (officially known as the track volume automation control), follow these steps:
- Display the track volume control as follows:
- Mac: Choose Mix ⇒ Show/Hide Automation (or press the A key).
- iOS: Tap the track’s icon and then tap Automation.
-
Click the track volume control and drag the resulting dot up or down to raise or lower the level at that point in the song.
Figure 3-13 shows the track volume control for a Mac track (top) and iOS track (bottom).
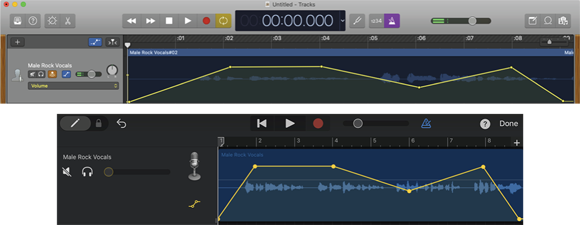
FIGURE 3-13: The track volume control tells this track, “Fade-in, play a few seconds, get softer, get louder, and fade-out” for the Mac (top) and iOS (bottom).
Here’s a blow-by-blow description of what happens to the level for the Male Rock Vocals track in Figure 3-13:
|
Time (Seconds) |
Action |
|
0 |
Silent |
|
0–2 |
Increase the level from 0% to 75% (fade-in) |
|
2–4 |
Remain at the 75% level |
|
4–6 |
Decrease the level from 75% to 50% |
|
6–8 |
Increase the level from 50% to 75% |
|
8–9 |
Decrease the level from 75% to 0% (fade-out) |
The track volume control method gives you more precise control than using the fader, so you’ll probably use the former on most of your tracks during mixing and mastering.
I recommend against using the track volume control when recording. It can be done, but it’s tricky and more likely to hurt your efforts and waste your time. Instead, I highly recommend that you use the level faders when you record and use the track volume control when you mix. I discuss mixing in great detail in Parts 3 (Mac) and 5 (iOS).
Polishing tracks
So you now know enough to lay down some tracks. After you have most or all of your tracks in the can, you can polish and embellish your song. You may want to redo a vocal part that isn’t as good as it could be, add the gentle strains of a string ensemble in your choruses, or insert some handclaps or the sound of a tambourine. You can trim noise at the beginning or end of a track, cut out and delete mistakes, and more, all of which comes under the heading of “editing” your tracks and is covered in Parts 3 (Mac) and 5 (iOS).
One of the greatest things about multitrack recording is that it’s not over until you say it’s over. If you decide that something doesn’t sound right, even months after mixing and mastering the song, you can go back to your original GarageBand file and change it to your heart’s content and then remix and remaster, and you’re off to the races with a new version of your song.
Two things that you can do to polish your songs are overdubbing (redoing) any part of a track that isn’t as good as it could be and sweetening, which is adding new tracks to fill out the sound of your song. I describe these terms briefly in the following sections and in more detail in Parts 3 (Mac) and 5 (iOS).
Overdubbing
Overdubbing is re-recording a part of a track to fix mistakes that were made in its performance or recording.
In the old days, you couldn’t overdub unless you had fairly sophisticated high-end tape machines that let you “punch in and punch out.” You would listen to playback, and right before the bad part of the track, the engineer would “punch” the Record button. As soon as you finished singing or playing the replacement part, he or she would punch the Record button again. What came before and after the replacement part remained intact, but the replacement track was grafted into the middle like magic.
Overdubbing doesn’t sound convincing if the replacement part sounds much different from the original part, so try to use the same setup that you used when you recorded the original track — the same microphones, room, instrument, audio interface, level and other settings, and so on — when you record overdubs on that track.
One last thing: If you flub an overdub take (or any take, for that matter), GarageBand is forgiving. Just undo the flubbed take by choosing Edit ⇒ Undo (or pressing ⌘ +Z), and try again.
You learn an even easier way to record multiple takes in Chapters 4 (Mac) and 12 (iOS), but for now, just get your head around the concept of recording a part more than once in your quest for the perfect take.
Sweetening
Another way that you can make your song sound more professional and finished is by sweetening it by adding tracks after your primary recording is completed. Sometimes, you listen to a semi-finished mix and realize that what this song needs is one or more embellishments, such as the following:
- Handclaps
- Bells
- Whistles
- Violins and cellos (a.k.a. a string pad)
- Tambourines or other percussion
You can sweeten a song anytime you want. If you’ve already mastered it, go back to the GarageBand file that you mastered from, add the new track or tracks, and remaster the song. Sweetening is covered in detail in Chapters 9 (Mac) and 18 (iOS).
Mix That Sucka
When you’ve finished recording tracks, and performed any overdubbing or sweetening your song needs, you’re ready to mix. When you mix a song, you’re doing two things:
- Adjusting the level for each track until all the tracks blend beautifully together, with none too loud and none too soft
- Setting the pan position for each track to place it on the sound stage — left, center, or right
Overview of mixing
Here’s an overview of how I work through the mixing process:
-
I usually start mixing by using the fader level controls until the relative level of each track is close to what I want to hear.
I call this a rough mix, but it's a fast and easy way to get this far.
- When I need better control over a track's level throughout the song, I use the track volume (automation) control.
- After I get the individual track levels set to my liking, I adjust the pan location of each track.
-
Finally, I turn on and adjust effects (if necessary) for each track and then check all my levels and pans again.
After I do all that, I’m ready to move on to the final step, mastering.
Setting the pan
For everything — turn, turn, turn — there is a season — turn, turn, turn. And, for every track, there is a pan knob — turn, turn, turn.
Turn the knob to the left to make more of that track come out of the left speaker; turn it to the right to do the reverse. Figure 3-14 (Mac) and Figure 3-15 (iOS) show a track with its pan set to hard left (top), dead center (middle), and hard right (bottom).
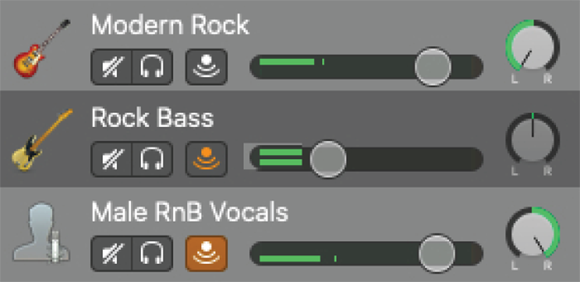
FIGURE 3-14: A Mac track panned hard left (top), dead center (middle), and hard right (bottom).
In the top version, the track is panned all the way to the left so that all the sound comes from the left speaker. In the middle version, the track is panned dead center, and you can hear equal parts of it from the left and right speakers. And the bottom version shows the track panned all the way to the right.
Note that the top and bottom versions in Figure 3-14 have only one of their two rows of LED level display lights lit, but the middle version has both rows lit. The level displays are showing you the stereo output for the track. The top row of simulated LEDs tells you the level of the left channel; the bottom row shows the level for the right channel.
So, to make a track sound like it’s coming from slightly to the left of center, you would turn the pan control slightly to the left of center. And so on.
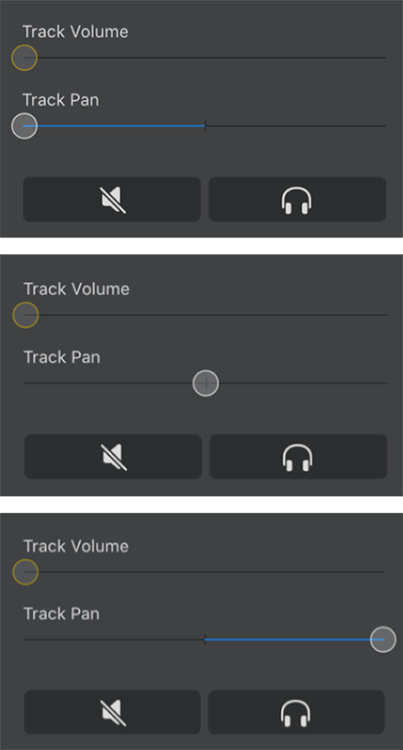
FIGURE 3-15: An iOS track panned hard left (top), dead center (middle), and hard right (bottom).
(Lord and) Mastering
After you’re satisfied with your mix, heave a big sigh of relief — the end is near. All that’s left is to master that puppy and be done with it.
Mastering is setting the song’s level and equalization and create a fade-in or fade-out. But mastering is useful also for emphasizing a quieter passage or deemphasizing a louder one.
All it takes is a few clicks…
… which makes it nothing like mastering a stereo recording in the real world. The art of changing a two-track mix into a fantastic-sounding Red Book Audio CD (the type of CD you buy at a music store) is just that — an art. Only a few hundred truly great mastering engineers exist in the world today, each an artist who can take a decent-sounding stereo mix and master it so that it sounds absolutely brilliant when you play the CD.
On the other hand, mastering your song with GarageBand on a Mac couldn’t be easier. (Sadly, the iOS version of GarageBand doesn't have a mastering step.)
Here are the steps to master a song on a Mac:
-
Enable (show) the master track by choosing Track ⇒ Show/Hide Master Track or pressing ⌘ +Shift+M.
If the master track is displayed, the ⌘ +Shift+M command hides it; if the master track is hidden, the command displays it. So, if you don’t see a master track at the bottom of your workspace, press ⌘ +Shift+M now. - You may have to scroll down to see the master track; it always appears as the last track on the list, as shown in Figure 3-16.
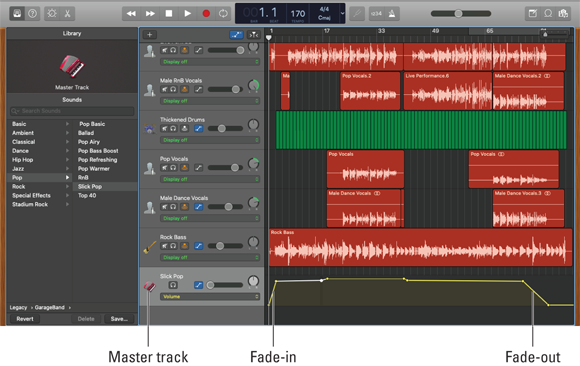
FIGURE 3-16: The Master Track is always at the bottom of the track list.
-
Choose Mix ⇒ Show Automation or press the A key to display the master track volume control so you can adjust the song’s level that way if you care to.
Using the volume control on the master track is the easiest way to create the fade-in or fade-out effect at the beginning or end of your song.In Figure 3-16, I’ve set up the volume control to fade-in quickly at the beginning of the song and fade-out slowly at the end. I’ve also made the first chorus a little louder than the rest of the song, because it had some quiet, delicate guitar work under the vocals. (Yeah, sure.)
- Click the library icon to display the mastering presets.
-
Click a preset.
I chose Slick Pop in Figure 3-16. Try a few presets and see how you like them — or maybe you did such a superb job mixing the song that it doesn’t need any master effects.
-
When you’re satisfied with the sound you’re hearing, choose Share ⇒ Song to Music (or Song to iTunes) to export the song to the Music (or iTunes) app.
In a few moments, you can open the Music or iTunes app and listen to your masterpiece.
And that’s that. You’ve now laid down the tracks, and then produced, mixed, and mastered your song.
If you want to get the best possible song, you still have a bit more work ahead of you:
-
Listen critically to the song.
Play the song on your favorite audio systems: in your car, your portable speakers, with headphones, and on a boom box.
- Take notes on what you hear, don’t hear, and think you'd like to hear.
- Remix and remaster according to your notes.
-
Repeat until you’re totally satisfied with the song.
Now the song really is done.
For details on tweaking the master volume, applying presets, and more, see Chapter 11 for Mac and Chapter 19 for iDevices, which cover mastering in loving detail.
Managing Song Files
Don’t delete your GarageBand project files after you finish (master) a song. You might decide to remix, sweeten, or remaster the song in the future, and you can’t do that if you don’t have the GarageBand file.
When and if you remix or remaster a song, add a number or a descriptive word or two to the new version. If you added some tambourine and handclaps to a song named Bliss, for example, name the revised version something like Bliss2 or BlissT&C. Then you'll have a better chance of finding the version that you want a few months from now.
When a song is absolutely perfect, you can add something like GoldenMaster (for example, BlissGoldenMaster). I've never finished a song that was even close to being absolutely perfect, but I’ll probably add GoldenMaster to its name if I do.