
Chapter 10. Talking to the internet with ARM: An Internet Connected “Fistbump”
As mentioned earlier, one of the wonderful things about these powerful ARM based Arduinos is the ability to handle complex networking protocols. In this chapter, we’ll show you how to make a simple internet connected project based on the MKR WiFi 1010. As the name suggests, this board has a build-in module that allows you to connect to a WiFi network, and from there to the internet. (It will also work on the Nano 33 BLE since it has built-in WiFi; you’ll just be missing the onboard battery connector that’s on the MKR.)
Inspiration for this project came from Michael Ang, who demonstrated this at a job interview, and assistance with the JavaScript and Glitch came from Jack B. Du.
An internet connected “fistbump”
Hopefully by the time you read this the COVID pandemic will be well under control, but at the time of writing, social distancing is very much still necessary and we have all gotten used to giving gentle “fistbumps” (if that) rather than hugs or shaking hands. This project will allow someone to send you a fistbump over the internet, from anywhere in the world, simply by clicking on a webpage.
At home, most of us have some sort of a modem which connects us to the internet, and a router which usually provides some wired Ethernet ports in addition to wireless Ethernet over WiFi. Even though there might be multiple device in your home connected to the internet, your home only has one IP address by which it is known to the outside world.
When you browse to a website or check your email, your router keeps track of which computer made that request, and when the website or email comes back, it is routed to the correct computer. This is how multiple computers on your internal network can independently access information on other computers on the internet.
However if someone outside of your internal network wants to contact a computer (or more likely a service) on your internal network, they are unable to do so because your router doesn’t know which computer to route the message to. (Obviously this is also good for the security of your computers). How then can someone send you a fistbump?
Introducing MQTT: the Message Queueing Telemetry Transfer protocol
Communicating on the internet utilizes a stack of protocols. The lowest level protocols interface directly with the hardware, while protocols higher up interface with those below them. This allows a variety of protocols to be developed without having to re-implement the lower levels. In terms of data, the lower level protocols handle individual bytes, slightly above these are protocols that group the bytes into packets, and higher yet are protocols that group the packets into various messages. At each layer multiple protocols with different features are available, the choice of which depends on what you are trying to accomplish. We will be using a protocol called MQTT, which is a great choice for exchanging short messages in near real-time between a number of devices.
An MQTT system consists of one or more clients and a broker which is responsible for relaying messages from one client to another. Clients can generate, consume, or both generate and consume messages. Each client (for instance, an Arduino) is assigned an ID, and a client that generates messages can do so on one or more topic (for instance, one topic for each attached sensor). Messages are identified with the client ID and the message topic.
Clients that consume messages will subscribe (via the broker) to one or more topic. When the broker receives a message, it forwards it each clients that has registered on the message topic.
The beauty of this scheme is that if a broker is on the global internet, e.g. not in your home, it can be accessed from anywhere on the internet, allowing clients that are on an internal network (your Arduino, someone’s browser) to send messages to each other.
MQTT is a protocol, not a product. You can write your own MQTT broker, you can install one of the many MQTT brokers available, or you can use a public broker already running on the internet. We will use a broker provided by the company Shiftr.io, which runs a public broker that is free to use with some restrictions. On the client side, we will create two clients: one on an Arduino MKR WiFi 1010, and one as a web page. We will host the web page on another free service provided by Glitch.com. Similar to Shiftr.io, Glitch.com provides a free web server with some restrictions.
This project is divided into four parts:
- Hardware circuit and physical construction
- A broker on Shiftr.io
- Arduino code
- A web page, including JavaScript code, on Glitch.com
Internet Connected Fistbump: The hardware
The circuit for this project is trivial, consisting only of a hobby servo motor. You will also need a solderless breadboard and some jumper wires1.
In Driving Bigger Loads (Motors, Lamps, and the Like) in Ch. 5, you learned how to control a simple DC motor. This type of motor is designed to turn continuously rather quickly, which is exactly what you want in a fan. However, if you need to move something a specific distance these motors are not very good. Hobby servo motors were created to move the control surfaces of model airplanes, and they are quite precise. They do this by incorporating feedback: inside the hobby servo motor is a sensor which detects the rotational position of the shaft, and a circuit which moves the motor in the appropriate direction to move it to the destination you have indicated. Hobby servo motors also include gears, reducing the high speed of the internal DC motor to a more useful speed, while at the same time increasing the torque proportionally. Hobby motors do not rotate continuously, but rather rotate only through 180 degrees. While this might seem strange, remember they were designed to move the control surfaces on model airplanes, for example the tail rudder. The rudder doesn’t rotate more than 180 degrees.
Hobby servo motors are incredibly useful even if you’re not building model airplanes. Imagine that you want to build an animatronic puppet, where the eyes might move left and right, eyelids might open and close, and the head might rotate towards the left and right. None of these motions require more than 180 degrees of rotation, and many animatronic puppets use hobby servo motors extensively.
Hobby servo motors are different from DC motors from an electrical point of view also: DC motors have two wires: when a suitable voltage is applied between those two wires, the motor turns. Hobby servo motors have three wires: a voltage of 5-6 volts is applied between two of them, and a control signal is sent on the third. The control signal is a pulse of a certain duration, where the pulse duration tells the servo motor what angle (between 0 and 180 degrees) to go to.
Hobby servo motors are usually terminated with a plastic connector housing the three terminals. The wires are color coded as follows:
| Wire Color | Arduino Connection |
| Black |
Ground |
| Red or Brown | 5V |
| White or Yellow | Control signal (any Arduino pin) |
To build the circuit, insert a wire or wire jumper into the connector and then connect to your Arduino. Ideally, us the same colors to avoid making mistakes later. Use a solderless breadboard to make the connections. For the servo control signal, you can use any pin number. I used pin 9 because it matches the built-in examples. Visit the Product page for Arduino MKR WiFi 1010 and click on the Documentation tab to see the pin names.
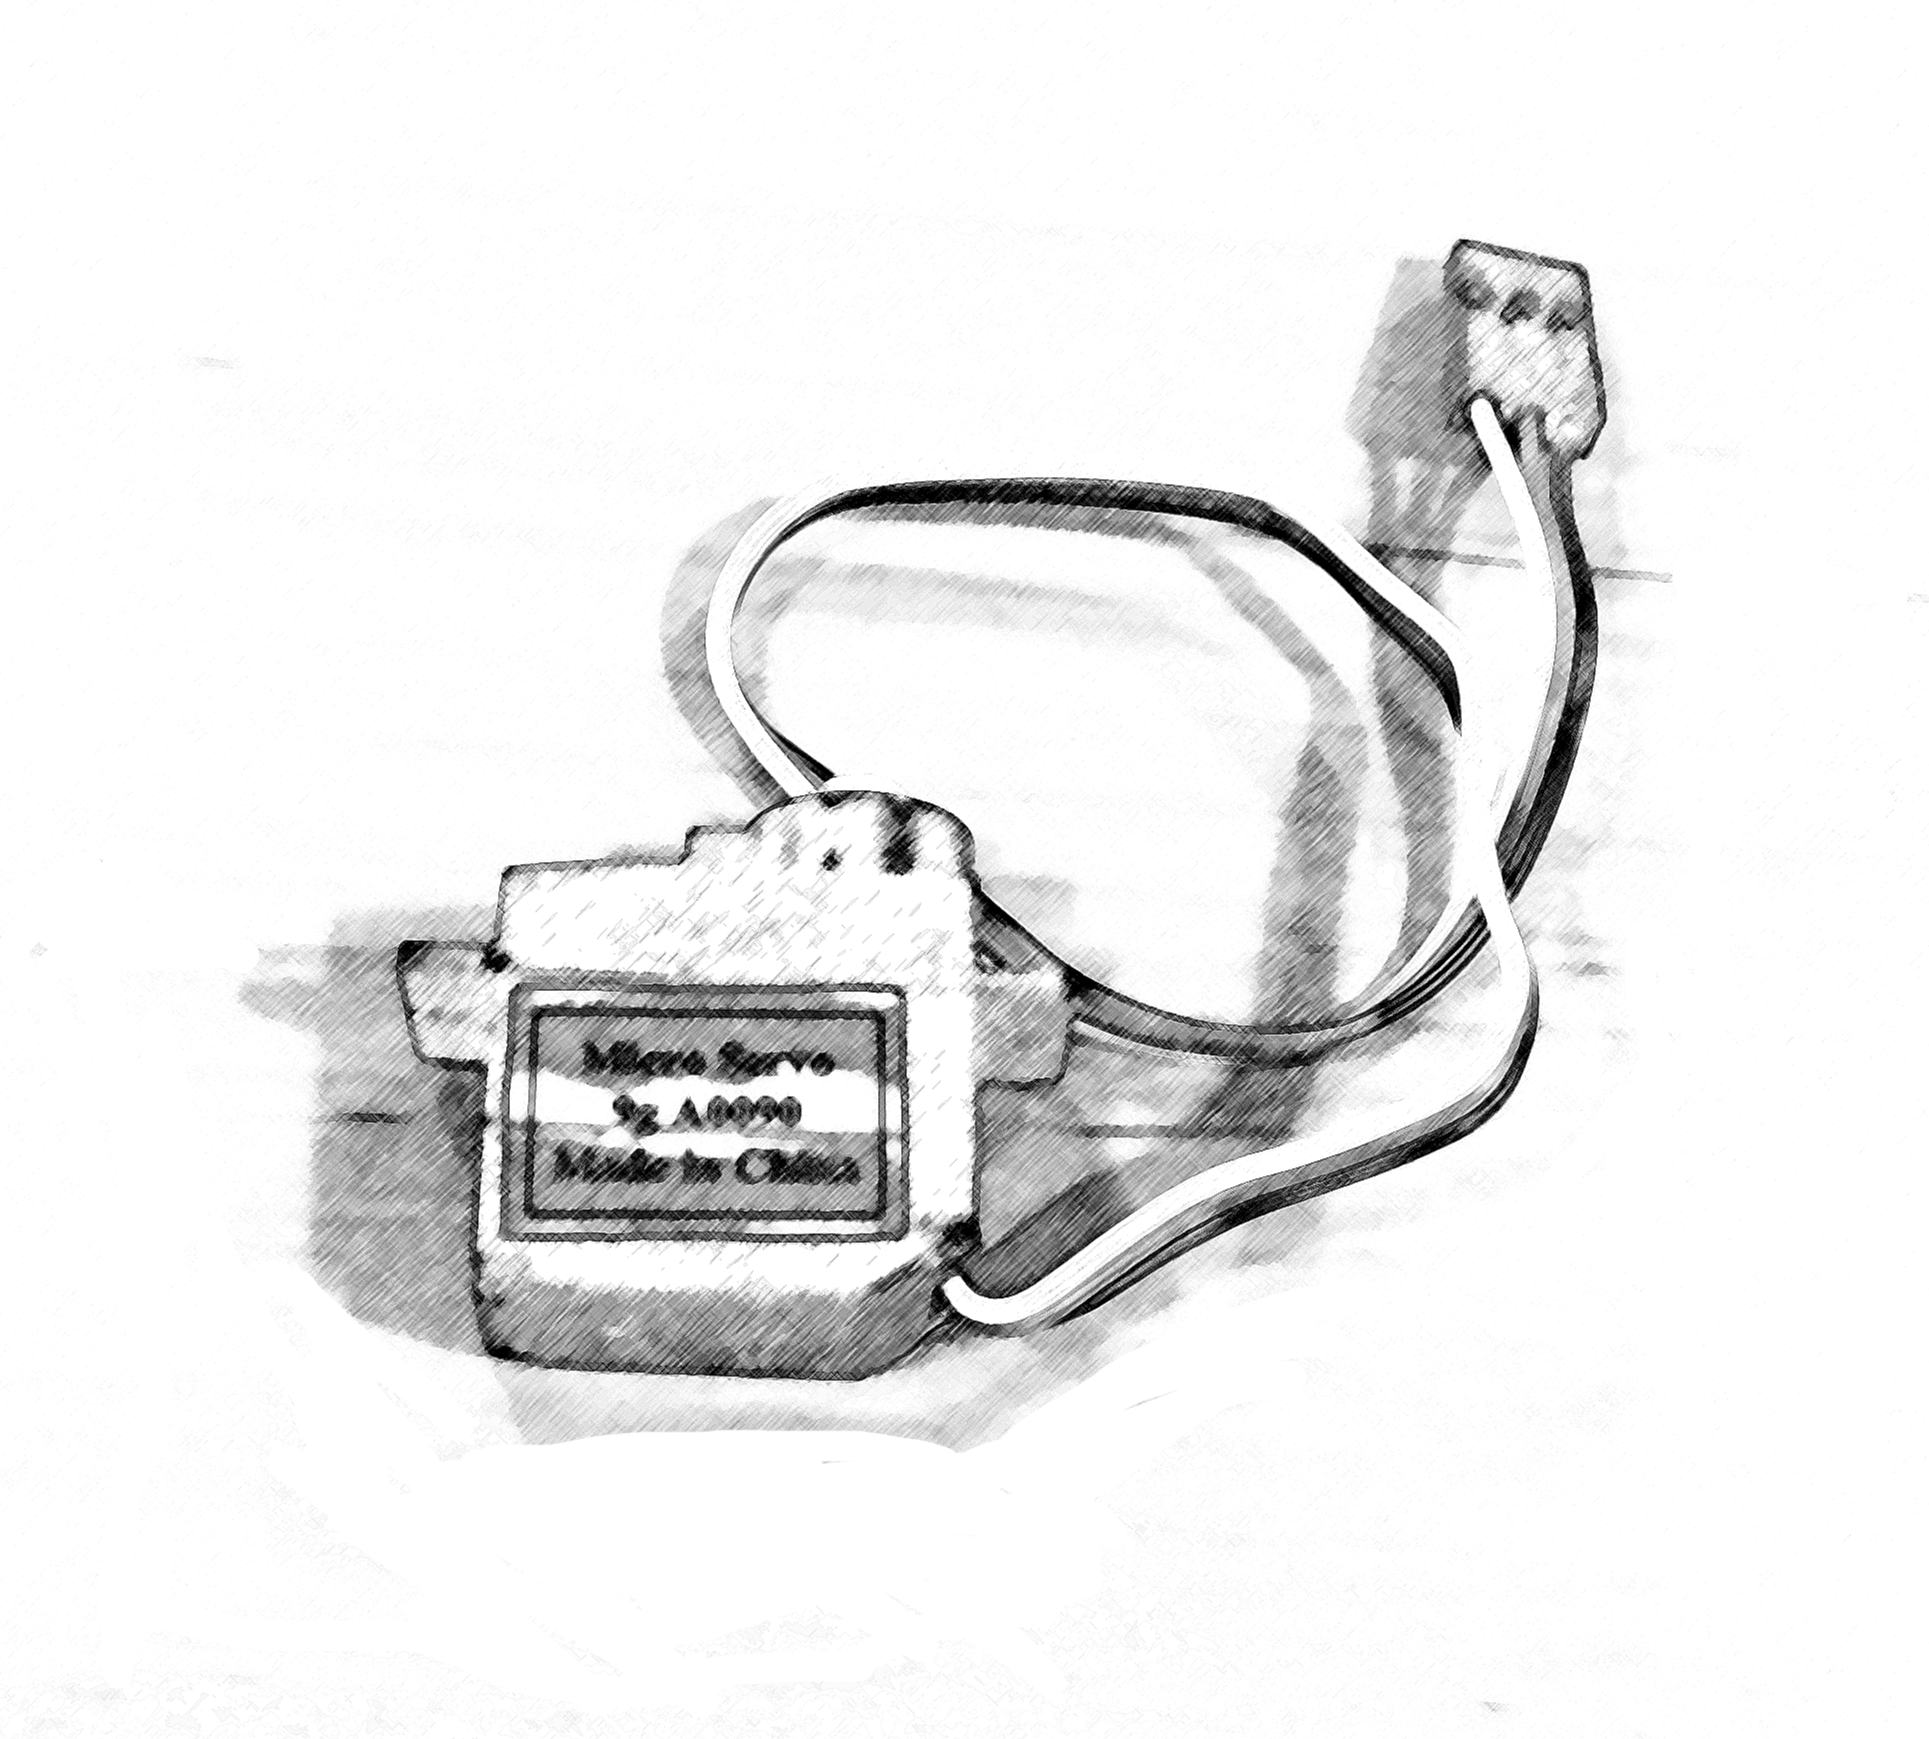
Figure 10-1. Servo Motor
Once you have the wires connected, test that the servo motor works properly with the “sweep” built-in example (File->Examples->Servo->Sweep). Once you load this program, the motor shaft should rotate from its zero position to 180 degrees and then back to zero continuously.
We will use the hobby servo motor to move a picture of a fist towards or away from you. You can draw a picture of a fist or print out the fist emoji. To make it easier to attach the emoji to the motor hub, use one of the horns included with your servo motor. I used a bit of hot glue to attach the fist to a cardboard “arm” and then to the servo horn:

Figure 10-2. cardboard arm with drawing of fist
Finally, make a cardboard stand to hold the servo motor. Before you attach the arm, use the following code to determine which angle will correspond to the fist being withdrawn, and which will correspond to the fist being “bumped”:
Example 10-1.
#include <Servo.h>

Servo myservo;

void setup() {
  myservo.attach(9);
  myservo.write(45); // move to position 45 degrees
}

void loop() {
}
Note the position of the motor shaft, then change the number 45 to 135 and see which direction the shaft moved. In my case 10 degrees was a good position for the fist being withdrawn and 170 degrees for “bumped”. You need to do this before attaching the arm to avoid damaging the arm by accidentally slamming it into the ground.
Change the number to move the arm back to the withdrawn position, and then attach the arm at the appropriate angle for the withdrawn position:
Figure 10-3. Cardboard arm with fist attached to servo motor
Now we are ready to get our project on the internet!
Internet Connected Fistbump: MQTT Broker on Shiftr.io
As mentioned earlier, Shiftr.io provides a free public broker which anyone can use. This broker is accessed at public.cloud.shiftr.io. Note that anyone else can potentially access your messages or even send you a message. If you want a private broker, you need to set up an account on Shiftr.io. To connect to the public broker we use the username “public” and the password “public”.
For client ID I have chosen “GSWA4E_ARM_Demo”, and for the topic I have chosen “fistbump”. You can change both of these to whatever you want. We will see how to use them in the code that follows.
Internet Connected Fistbump: Arduino code
The code below is commented fairly heavily, so I’ll only describe it here in general terms:
The setup() function does 4 things:
- Wait for the serial monitor to open
- Connect to the WiFi network
- Connect to the MQTT broker
- Attach the servo motor
The loop() does the following:
- If the connection to the MQTT broker has been dropped, reconnect
- If a message arrives, read the message, convert any numbers to an integer, and send that integer to the servo motor.
/*
   A simple MQTT client with a servo motor
   which connects to a broker and subscribes to a topic.
   When a message is received, the servo motor moves
   to the position in the message.
   Connect a picture of a fist to the servo motor arm
   and you can receive a "fistbump"
   from friends around the world

   This sketch uses https://shiftr.io/try as the MQTT broker.

   the circuit:
   - A servo motor attached to pin 9

   the secrets.h file:
   #define SECRET_SSID "sammydog"    // your WiFi network name
   #define SECRET_PASS "12345678"    // your WiFi network password
   #define SECRET_MQTT_USER "public" // Shiftr.io broker username
   #define SECRET_MQTT_PASS "public" // Shiftr.io broker password

   20 May 2021 - Created by Michael Shiloh
                 Based almost entirely on MqttClientButtonLed
                 example by Tom Igoe. See
                 https://tigoe.github.io/mqtt-examples/

*/

#include <WiFiNINA.h> // Library for WiFi functionality on the
                      // Nano 33 Iot. See
                      // https://www.arduino.cc/en/Reference/WiFiNINA
#include <ArduinoMqttClient.h> // Library for MQTT protocol. See
                      //
#include "arduino_secrets.h"   // Usernames and passwords

// initialize WiFi connection:
WiFiClient wifi; // WiFi client object
MqttClient mqttClient(wifi); // Create the MQTT client object
                             // and attach it to the WiFi object

// details for MQTT client:
char broker[] = "public.cloud.shiftr.io";
int port = 1883; // The Internet Protocol (IP) uses different port
                 // numbers to identify different services running
                 // on the same IP address. The MQTT protocol
                 // has been assigned the number 1883
char topic[] = "fistbump"; // You choose topic
char clientID[] = "GSWA4E_ARM_Demo_Arduino"; // You choose the client ID

#include <Servo.h>
Servo servo; // Each servo motor needs an object of class Servo
const int servoPin = 9;

void setup() {

  Serial.begin(9600);
  // wait for serial monitor to open.
  // This is necessary only if you want to catch all
  // messages. The Serial object will not exist until
  // you open the serial monitor, so effectively the
  // setup() function will loop here until you open
  // the serial monitor
  while (!Serial) // As long as there is no serial monitor ...
    ;             // ... do nothing

  // WiFi setup
  // initialize WiFi, if not connected:
  while (WiFi.status() != WL_CONNECTED) {
    Serial.print("Connecting to ");
    Serial.println(SECRET_SSID);
    WiFi.begin(SECRET_SSID, SECRET_PASS);
    delay(2000);
  } // Keep retrying until WiFi connection is established

  // print IP address once connected:
  Serial.print("Connected. My IP address: ");
  Serial.println(WiFi.localIP());

  // MQTT broker setup
  // set the credentials for the MQTT client:
  mqttClient.setId(clientID);
  mqttClient.setUsernamePassword(SECRET_MQTT_USER, SECRET_MQTT_PASS);

  // try to connect to the MQTT broker:
  while (!connectToBroker()) {
    Serial.println("attempting to connect to broker");
    delay(1000);
  } // Keep retrying until connection to Shiftr.io is established

  Serial.println("connected to broker");

  // Servo motor setup
  // The servo object is attached to the relevant pin
  servo.attach(servoPin);
}

void loop() {

  // Sometimes the connection to the Shiftr.io MQTT broker
  // is dropped. This is normal, as the MQTT protocol
  // does not require a permanent connection.
  // if not connected to the broker, try to connect:
  if (!mqttClient.connected()) {
    Serial.println("reconnecting");
    // Note that the return value from connectToBroker()
    // is not checked, so we may in fact not be connected.
    // That won't cause trouble, because in the next step we
    // won't have a message, so we will loop back here and
    // try again anyway.
    connectToBroker();
  }

  // if a message comes in, read it:
  if (mqttClient.parseMessage() > 0) {
    Serial.print("Got a message on topic: ");
    Serial.println(mqttClient.messageTopic());
    // read the message:
    while (mqttClient.available()) {
      // convert numeric string to an int:
      int message = mqttClient.parseInt();
      Serial.println(message);
      servo.write(message);
    }
  }
}

// Connect to the MQTT broker
// Returns: true if connection established
//          false otherwise
boolean connectToBroker() {
  // if the MQTT client is not connected:
  if (!mqttClient.connect(broker, port)) {
    // print out the error message:
    Serial.print("MOTT connection failed. Error no: ");
    Serial.println(mqttClient.connectError());
    // return that you're not connected:
    return false;
  }

  Serial.print("Connected to broker ");
  Serial.print( broker );
  Serial.print( " port " );
  Serial.print( port );
  Serial.print( " topic " );
  Serial.print( topic);
  Serial.println();

  // once connected, subscribe to the topic
  mqttClient.subscribe(topic);

  // return that you're connected:
  return true;
}
Note the first thing in setup() will cause the program to loop forever until the serial port is opened. This is to give you time to turn on the serial monitor, so that you don’t miss any messages. However this also means that if you don’t open the serial monitor, the program won’t progress any further. Once you know that everything is working properly, you can remove this if you want.
Internet Connected Fistbump: The Web Page
The web page consists of two files: index.html and sketch.js which contains the code which will detect a click and then send a message to the MQTT broker. The index.html file is quite trivial; it loads two libraries (p5.js and an MQTT library) and the sketch.js JavaScript code (which does all the work), enclosed by the appropriate html tags:
Example 10-3.
<html>
  <head>
    <script src="https://cdnjs.cloudflare.com/ajax/libs/p5.js/1.0.0/p5.min.js"></script>
    <script src="https://cdnjs.cloudflare.com/ajax/libs/paho-mqtt/1.0.1/mqttws31.min.js" type="text/javascript"></script>
    <script src="sketch.js"></script>
  </head>
  <body>
  </body>
</html>
The JavaScript code, which does all the work, is below. Again, the code is commented fairly heavily. p5.js is similar to the Arduino language in that there is a setup() function which runs once, and then a draw() function which runs continuously thereafter. The setup() function does the following:
- Create the MQTT object, which will be used to communicate with the MQTT library
- Set the callback functions, which will be called a connection to the MQTT broker is established or lost, and when a message arrives
- Creates elements on the web page for displaying different types of messages
- Set the background colour of the canvas
The draw() function does nothing, because everything happens in the callback functions
Most of the interesting work happens in the mousePressed() and mouseReleased() callback functions. These events are detected by the p5.js system, and when they occur these functions are called, if they exist:
- The
mousePressed()function sends a message (using the helper functionsendMqttMessage()) to move the fist forward to create the “fistbump”, and also changes the canvas color to provide some visual feedback that a mouse button has been clicked - The
mouseReleased()function sends a message to retract the fist, and returns the canvas to the original color.
The MQTT callback functions are detected and called by the MQTT library:
- The
onConnect()function subscribes to our topic - The
onConnectionLost()function only reports when a connection is lost - The
onMessageArrived()function prints out any messages that are received
/*
 * This web page is an example to be paired with a servo motor
 * and an MQTT client subscribed to the same topic. When this web
 * page is clicked, a message is sent via an MQTT broker. The subscribed
 * client, when it receives the message, will move the servo motor to the
 * position indicated in the message. The purpose is to deliver a remote
 * physical "fistbump" to an individual located elsewhere in the world
 * but on the internet.
 *
 * This sketch uses https://shiftr.io/ as the MQTT broker.
 *
 * This code uses the Eclipse Paho MQTT client library:
 * https://www.eclipse.org/paho/clients/js/
 *
 * 20 May 2021 - Created by Michael Shiloh
 *               Based almost entirely on MqttClientButtonLed by Tom Igoe
 *               See https://tigoe.github.io/mqtt-examples/
*/

/*
 * Although this is a comment, it tells Glitch that there are
 * globally available functions and objects. This prevents Glitch
 * from complaining about the MQTT and p5.js objects and functions
*/
/* global Vue, VueLocalStorage */

// MQTT client details:
let broker = {
  hostname: 'public.cloud.shiftr.io',
  port: 443
};

// MQTT client:
let client;
// client credentials:
// For shiftr.io, use public for both username and password
// unless you have an account on the site.
let creds = {
  clientID: 'GSWA4E_ARM_Demo_webPage',
  userName: 'public',
  password: 'public'
};
// topic to subscribe to when you connect
// For shiftr.io, use whatever word you want for the topic
// unless you have an account on the site.

let topic = 'fistbump';

// HTML divs for messages
let localDiv; // local messages
let remoteDiv; // remote messages
let statusDiv; // debugging info
let instructionsDiv; // instructions

function setup() {
  createCanvas(windowWidth, windowHeight);
  // Create an MQTT client:
  client = new Paho.MQTT.Client(broker.hostname, broker.port, creds.clientID);
  // set callback handlers for the client:
  client.onConnectionLost = onConnectionLost;
  client.onMessageArrived = onMessageArrived;
  // connect to the MQTT broker:
  client.connect(
    {
      onSuccess: onConnect,       // callback function for when you connect
      userName: creds.userName,   // username
      password: creds.password,   // password
      useSSL: true                // use SSL
    }
  );

  // create a div for the instructions
  instructionsDiv = createDiv('Click anywhere to send a fistbump');
  instructionsDiv.position(20, 20); // coordinates for the div

  // create a div for local messages:
  localDiv = createDiv('local messages will go here');
  localDiv.position(20, 50);

  // create a div for the response:
  remoteDiv = createDiv('waiting for messages');
  remoteDiv.position(20, 80);

  // create a div for status messages:
  statusDiv = createDiv('status messages will go here');
  statusDiv.position(20, 110);

  // Set the canvas color
  background(240); // very light grey
}

function draw() {
  // Nothing to do in draw() because all functionality is
  // event driven via callback functions
}

/*
 * Callback functions
 */

/* Callback functions for events that are detected by the
 * p5.js system
 */

// Clicking the mouse anywhere in the canvas will send the MQTT
// message '170', which causes the servo motor to move to position
// 170 degrees, and the canvas color changes to medium grey.
function mousePressed() {
  sendMqttMessage('170' );
  background(220); // medium grey
  localDiv.html('I sent a fistbump!');
}

// When a mouse button is released anywhere in the canvas send the MQTT
// message '10', which causes the servo motor to move to position
// 10 degrees, and the canvas returns to light grey.
function mouseReleased(){
  sendMqttMessage('10');
  background(240); // very light grey
  localDiv.html('I withdrew my fist');
}

/* Callback functions that were set in the MQTT object.
 * The MQTT library detects these events, and when they
 * occur, the user supplied callback function are called.
 */

// called when the client connects
function onConnect() {
  localDiv.html('client is connected');
  remoteDiv.html('topic is ' + topic);
  client.subscribe(topic);
}

// called when the client loses its connection
function onConnectionLost(response) {
  if (response.errorCode !== 0) {
    localDiv.html('onConnectionLost:' + response.errorMessage);
  }
}

// called when a message arrives
function onMessageArrived(message) {
  remoteDiv.html('I received a message:' + message.payloadString);
}

/*
 * End of callback functions
 */

// Helper function which is called in order to send a message:
function sendMqttMessage(msg) {
  // if the client is connected to the MQTT broker:
  if (client.isConnected()) {
    // start an MQTT message:
    message = new Paho.MQTT.Message(msg);
    // choose the destination topic:
    message.destinationName = topic;
    // send it:
    client.send(message);
    // print what you sent:
    // statusDiv.html('I sent: ' + message.payloadString);
  }
}
Now we need a place on the internet to serve this web page. There are many services for this, both paid and unpaid. We will use a service called glitch.com:
- Visit the website glitch.com
- Click on “Log In”
- Create an account, or sign in using one of the listed accounts you already may have.
- (Alternately, if you don’t want to create an account, you can click on “Email Magic Link”, enter your email address, and click on the link sent to your email address. This will give you an anonymous project.)
- You will be presented with the “Manage Your Projects” page and shown a variety of possible website types.
- Click on “Remix” button in the “Hello Webpage” box, which creates a new project with 4 default files: README.md, index.html, script.js, and style.css. We only need two of these, but the other two won’t bother us so you can leave them.
- Click on the “index.html” file and you will be presented with a simple editing screen. Delete everything there and paste in the contents shown above.
- Click on the “script.js” file and paste in the contents shown above for this file.
- Change the name of the file “script.js” to “sketch.js”, which is the convention for a p5 script file and is also the name we used in “index.html”
- Create a new file called “.eslintrc.json”. For the contents of this file just put in “{}”
- You may notice red dots on some lines (those containing calls to the MQTT and p5.js libraries). You can get rid of these by creating an empty file called “.eslintrc.json”, opening the terminal (available in the “tools” menu near the bottom left), typing “refresh” and pressing “enter”.
You can test the web page right there in the project. Near the top left corner you will see a pair of glasses and the word “Show”. Click on this and select one of the two options. I usually prefer “Next to The Code”. You will see our web page which consists of four lines, the first of which says “Click anywhere to send a fistbump”. If you click on this page you should see your servo motor move.
Once you have this all working properly, you can provide the URL to your friends around the world. To get this URL, click on the “Change URL” button above the window on the right, and copy the first line, which is the URL of your project. Glitch.com automatically assigns a new random URL to every project. Send this URL to your friends, and they can send you a fistbump!
1 All these components are included in the kit mentioned in the preface