Welcome to the Digital Darkroom
Pardon me, boy, is this the Transylvania Station?
Photography, as we know it, is going through its most profound changes since William Fox Talbot shocked the Daguerreotypists with his concept of “the negative.” Since its beginnings, photographers have continually worked with some kind of camera and darkroom. Over time, these tools have changed in form but not in function. Just as the format of the camera you use defines the kind of imagery you can produce, the kind of computer you decide on using can have a bearing on the kinds of digital images you are able to create.

This Taraxacum officinale (a.k.a. dandelion) was photographed with a Sony Cyber-shot DCS-W100 point-and-shoot camera in Macro mode. The built-in flash was used and the camera’s exposure compensation was set to minus one stop to darken the background, placing the focus on the foreground. © 2006 Joe Farace.
There’s an old photo lab saying that states: “speed, quality, and price—choose any two.” That may hold true for traditional photographic services but the way Moore’s law has been applied to digital imaging means you can have all three—when you choose the right computer! For the digital imaging computer buyer, speed, quality, and price have been replaced with price/performance, total cost of ownership, and return on investment. The computers that digital imagers prefer to use will, for the most part, parallel the kinds of cameras they are using now. In general, this boils down to three categories of computer-using photographers.
For amateur shooters who use digital point and shoot cameras, the most important factor in selecting a computer is price and performance. These computer users will be satisfied with computers that meet the minimum system requirements for the kind of entry-level image-editing software they may choose to run.
Photographers who prefer state-of-the-art digital SLRs will want state-of-the-art desktop computers for their digital imaging work and will want to consider the total cost of ownership. This includes both the time spent on learning the system and the cost of maintenance and upgrades.
Professionals and those photographers working in high-end digital SLRs or medium format digital cameras need workstations that can handle the large files produced by digital images created with such cameras, and will be looking for workstations that provide a return on their larger investments by speeding up the time it takes to process large images in large quantities.

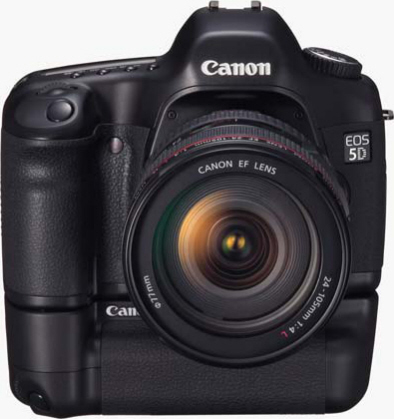
You can convert color digital images into black and white inside the digital darkroom, or capture them directly as monochrome files as I did with this photograph of Tia Stoneman using a Canon EOS 5D. Exposure was 1/160 second at f/6.3 in Program mode. ISO was set at 400. © 2005 Joe Farace.
|
The Origins of “Digital Darkroom” |
|
|
One of the first digital imaging programs available was called “Digital Darkroom” and was produced in 1989 by Silicon Beach Software. With this program, Silicon Beach programmers, Ed Bomke and Don Cone, introduced the world to the concept of graphics software plug-ins. When Aldus Corporation purchased Silicon Beach’s products, Digital Darkroom became a part of that company. When Adobe Systems acquired Aldus, Digital Darkroom was abandoned in favor of Photoshop. As time passed, |
MicroFrontier (www.microfrontier.com), producers of the photographic software Enhance and Color-It!, purchased the right to the name “Digital Darkroom” and now offer some pretty cool software for the Mac OS and Windows under that name. During its time between homes the words “digital darkroom”—now with lower-case “d’s”—came into widespread use, as a way to describe desktop imaging, and it is under those conditions that the term is used in this book. |
Back to the Future
If you buy a digital camera just to save money on film and processing you may be in for a surprise. While it’s true that someone who shoots lots of slide or negative film can quickly amortize even the purchase of a new $3000 Canon EOS 5D, there’s more to this equation than just the cost of the camera and a few memory cards.
The new EOS 5D fits into the same “good, better, and best” strategy that Canon used with their film-based SLRs. It’s plopped down right in the middle of their product line between the EOS 30D and Canon’s 1D alphabet soup models. Unlike the EOS 3 film camera that looks and feels more like an EOS 1, the 5D’s magnesium-alloy body reminds me more of a chunky EOS 30D; but where else are you gonna find an SLR with a full-sized chip for $3000?
One of the biggest differences between the worlds of film and digital photography is the start-up cost. After purchasing a film camera you can take the exposed film to any minilab in the country and they’ll gladly make prints from the exposed film for a modest charge, but when you purchase a digital camera you also buy into the concept of the digital darkroom. For some computer users this may just mean a few hardware or software upgrades along with a new peripheral or two, but if you’re starting from scratch, MacWorld magazine once estimated that, depending on your digital imaging goals, the cost of establishing a digital darkroom can go as high as $6500. But I don’t believe it has to cost that much. Here’s why . . .
A Shot in the Dark
A few years ago I sold all my traditional darkroom equipment, lock, stock, and tongs. After sitting untouched in my new home’s basement for several years, I decided it all had to go. I loaded enlarger, lenses, carriers, and trays into my car, and took them to a local photo show, selling them to practitioners of silver halide printing for below bargain prices. Why? Many years before my fire sale, I happily made the transition to the digital darkroom and now that all of these boxes upon boxes of traditional darkroom gear are gone, I haven’t looked back.
Assembling your own digital darkroom isn’t complicated or expensive and is much like putting together a camera system: you can tailor the equipment to meet your specific applications and budget. You can build a complete system for less than $1500 or spend more than the cost of a shiny new BMW 3-Series; it all depends on your budget and what you’re trying to accomplish.
Don’t Go Near the Water
Much like you can make photographs with a $3000 Canon EOS 5D or a $20 Holga (www.freestylephoto.biz/holga.php), virtually any new computer system can be the basis of a digital darkroom; but digital imaging, like the devil, is in the details, so here’s how to start assembling your new darkroom.
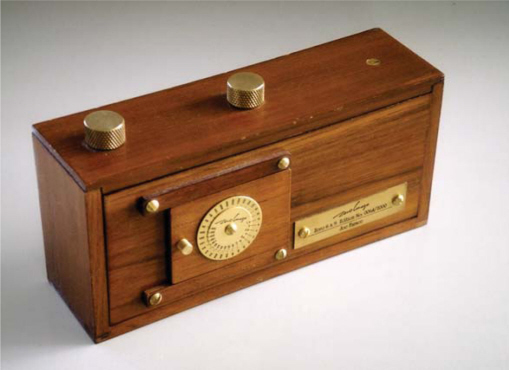
Any camera, and I mean any camera can be your entrance to the digital darkroom. This is the actual Zero Image (www.zeroimage.com) pinhole camera that I use to make photographs. The camera uses 120 films and has no shutter, no lens, no controls of any kind but it can make pictures! Don’t believe me? Look at this. © 2005 Joe Farace.
I am a big believer that photo ops are “right around the corner” and this photograph was made just a mile or so from my home at an old sugar factory. Camera used was a Zero Image pinhole camera along with Agfa color negative film. Exposure is by guesswork. Since the effective aperture is about f/225, I use the “hippopotamus” method of counting seconds for this 8-second exposure. One hippopotamus, two hippopotamus . . . The cool-looking edge effects were produced after the fact in the digital darkroom; I’ll show you how to do it later in this book. © 2003 Joe Farace.
Budget-minded digital imagers could start with the least expensive Mac Mini, iMac, or Microsoft Windows-based computer they can find. As I write this, you can purchase a new Mac Mini from the Apple Store (www.apple.com/store) for $600. This gets you a 1.5-GHz Intel Core Solo processor, 512-MB memory, a 60-GB hard drive, CD-RW/DVD-ROM drive, and built-in WiFi and Bluetooth. You’ll need a $100 monitor, a $20 keyboard, and a $20 mouse, or you can use these items from your old Windows machine. If you spent another $200, and got another copy of Windows, you’d actually be able to run both Windows and Mac OS on this one computer.
A Windows-based package from e-Machines (www.emachines.com), such as the W3107, costs $398.99 and features a 1.8-GHz AMD Sempron chip, 512-MB DDR random access memory (RAM), 10B hard drive, DVD RW, and an included 17-inch flat cathode ray tube (CRT) monitor. Since computer prices and specification change faster than even digital cameras, this will probably change based on when you’re reading this, but you get the picture.
As I write this, a new Apple MacBook with an Intel Core Duo processor costs less than $1100 and is an ideal entry-level computer for digital darkroom workers that want to work in the Mac OS. Torn between the Mac OS and Windows? We’ll get to that in just a bit. Product shot courtesy of Apple Computer; insert shot © 2005 Joe Farace. (Note: You’ll need a shot of a MacBook instead of an eMac, and the W3107 from e-Machines.)
When it comes to a computer’s processor, faster used to be better, but now computer makers have hit a speed wall. Instead, they’re adding processor cores to speed throughput. Intel’s Core Duo is just such a system, now appearing in both Macs and PCs. But you don’t need to worry much about it. Adobe’s Photoshop Elements 4 (www.adobe.com) requires only an Intel Pentium III or 4 or Intel Centrino (or compatible) 800-MHz processor. You’d be hard pressed to buy a new computer at those speeds. I’m currently running the Full Monte Photoshop CS2 on a 600-MHz G4 Power Macintosh with 768-MB RAM. Would I like more power? Yes, but I’d like to own a Chevrolet Corvette too.
|
For Windows: Pick a Chip, Any Chip at All |
|
|
What’s the difference between an Intel Celeron and a Pentium? (Die-hard techies can skip this part.) A Celeron is basically a Pentium chip with some stuff missing; specifically the cache. A cache is a hunk of fast memory that holds recently accessed data, so it’s ready when you need it and the CPU doesn’t need to go fetch it from RAM. This missing ingredient means a Celeron chip is slower than a Pentium, but it also means it costs less. Where does AMD’s (www.amd.com) Duron’s (who makes up these names anyway?) chip fit into this equation? All tests seem to indicate that the Duron will clean the Celeron’s clock, and |
if you need more power (and who doesn’t?) AMD’s flagship Athlon is generally considered to be a high-performance chip that rivals Intel’s Pentium. The hot new kid on the block is the Intel Core Duo, with not one, but two processors on a single chip, for a theoretical doubling of data throughput per clock cycle. You can expect more chips to go multiprocessor in the near future. If all of these issues are important to you, visit Tom’s Hardware Guide (www.tomshardware.com) for tests and comparisons on all of the different kinds of chips and advice on how to optimize the performance of your own Windows-based computer. |
Permanent and Temporary Storage
You can never have too much RAM, so get as much as you can afford. Even for the least expensive system, I urge beginning digital imagers to have a minimum of 512MB, but more is always better. If the computer you’re considering won’t allow you to increase the amount of memory, choose another one. Photoshop Elements 4, for example, requires only 256MB of RAM, but that doesn’t include the operating system and all the other stuff computers need to operate.
I hate to contradict Mies van der Roh, but when it comes to hard drives, more is more. The 80–100-GB hard disks included in our theoretical start-up systems are more than adequate, but more space is always useful. With 80-GB hard drives selling for under $65 at places such as www.dirtcheapdrives.com, it makes sense to upgrade or add to the puny drive that’s already installed in your computer. Two drives are better than one: I have two 120-GB drives inside my Power Macintosh G4. When there’s a problem starting from the main drive, I have another operating system installed on the second drive enabling me to start the computer and fix problems on the other drive. This is a trick I learned from Kevin Elliott (www.macmdcare.com) who also partitioned my main hard drive so that one boots from Mac OS 9, the other from OS X, giving me even more flexibility.
If you store all your digital images on the computer’s hard disk, you’ll quickly run out of space. That’s why your digital darkroom should include at least one form of recordable media. Most photographers currently use writable CD-R and DVD-R discs, and who can blame them? These discs hold lots of image files and cost a few pennies each. Re-writable CD drives are popular and many inexpensive computers include CD-RW drives as standard equipment. One of the optical storage technology’s biggest claims to fame is longevity. Good-quality CDs have an expected shelf life of 30 years, making them a good choice for anyone worried about long-term storage (be sure to buy quality name-brand discs) but format longevity is another question. As the prices of writable drives and media drop, DVD becomes a more attractive storage option. Instead of storing megabytes, DVD discs store gigabytes of image files, meaning you’ll have fewer discs to store and locate.
I have a 300-GB external (FireWire) drive, mostly to keep image files stored. Keep in mind the corollary to the “More” rule; backing up is harder to do. And you better back up. Every image file on that 300-GB drive is also backed up onto a CD or DVD disc.
You are going to need a way to capture images, but instead of connecting your digicam to your computer with the included cable to download images, purchase a card reader that reads all kinds of media. Even if your current camera only uses one media type, you never know what your next camera will use. Devices such as Belkin’s (www.belkin.com) Hi-Speed USB 2.0 8-in-1 Media Reader and Writer let you drag and drop images files to a computer, or even from one media card to another. Since it operates under the speedy USB 2.0 protocol, it’s fast. If your computer is still using the original, slower USB, don’t worry. The reader/writer is backward compatible. You should still strongly consider adding a USB 2 card if your older computer has an open slot. They are inexpensive and speed up your workflow more than you might imagine. (Note: There’s more on card readers in Chapter 2.)
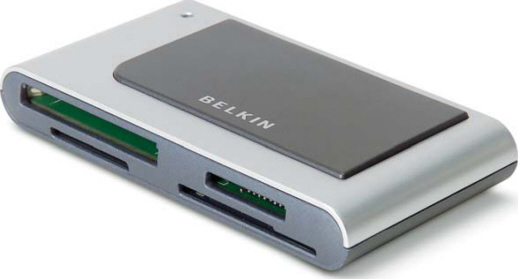
With slots dedicated to eight types of media, Belkin’s Hi-Speed USB 2.0 8-in-1 Media Reader has the ability to read and/or write CompactFlash I or II, SmartMedia, IBM Microdrive, Secure Digital, Multimedia Card, Memory Stick, and even Sony’s white MemoryGate Memory Stick. But not the xD-Picture Card used on Fuji, Olympus, and other cameras. Drawing power through the computer’s USB port, the 8-in-1 Media Reader doesn’t require additional power making it an ideal for hot swapping with other computers or devices.
|
PCI (Peripheral Component Interconnect) slots are the standard way to connect sound, video, and network cards to a motherboard, whether Mac or PC. As processors, video cards, sound cards, and networks have gotten faster and more powerful, PCI’s fixed width of 32 bits limited it to a maximum of five devices. PCI Express (PCIe) provides more bandwidth and is compatible with existing operating systems. It’s a high-speed serial connection that operates more like a switch controlling several serial connections |
leading to where the data needs to go. Every device has its own dedicated connection, so devices don’t have to share bandwidth, speeding up the entire process. What does this mean to you except some new buzzwords? A single PCIe lane can handle 200MB of traffic in each direction per second and move data at 6.4GB second in each direction to handle a Ethernet connection as well as audio, storage, and graphics adapters. And that’s a good thing. |
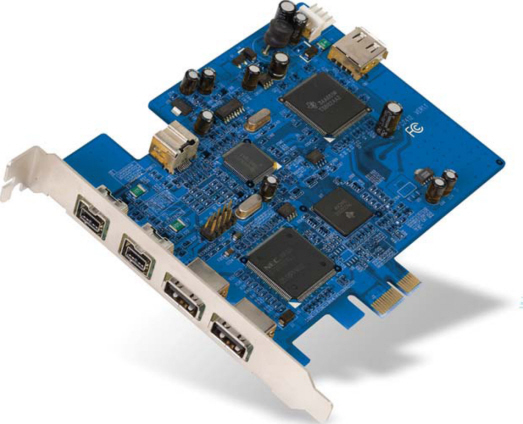
Belkin’s PCIe Cards increase the amount of available computing bandwidth to offer four-times-faster data transfer than standard PCI (see “PCI Meet Your Replacement”). PCIe Cards add expansion ports to your computer using the new PCIe technology and let you future-proof your computer to support new bandwidth-intensive applications. Cards available include: FireWire 800 and USB 2.0 PCIe Card ($149.99) SATA II RAID 2-Port (1 Internal/1 External) PCIe Card ($69.99); FireWire 3-Port PCIe Card ($79.99) SATA II RAID 2-Port PCIe Card ($59.99); and USB 2.0 5-Port PCIe Card ($69.99).
The Monitor and Merrimac
They’re big—and getting bigger—they takes up lots of desktop real estate, generate heat, a bit of radiation, and can give you headaches if you stare at them too long. CRT displays have been around a long time, and while some underlying hardware components have been improved during that time, notably in size, resolution, and even reduced radiation, the underlying technology is more than 60-year old.
One of my pet peeves is how expensive monitors have remained relative to overall system cost. If you’ve been shopping recently, you know that there are some bargain monitors out there and while some of that downward price pressure can be attributed to competition, the real reason is the growing popularity of liquid crystal display (LCD) flat-panel displays.
Bigger is better, and larger monitors have become more affordable. You should get the largest monitor your budget permits. Over time, I’ve migrated to LCD monitors for both my machines. Older LCD screens were not adequate for critical digital image manipulation, but after Apple introduced their Studio Display series, the ball game changed dramatically. I have a 22-inch Apple Studio Display on my Power Mac G4 and a 20-inch Apple Studio Display on my Compaq. Yes, I have an Apple monitor on my Windows computer!
The Apple Cinema Display features a 22-inch active-matrix LCD that delivers a wide-format design with 1600 by 1024 pixels and has a wide (160°) horizontal and vertical viewing angle for maximum visibility and color performance. It supports 16.7 million saturated colors, for use in all graphics-intensive applications. Photo courtesy of Apple Computer. Inset photo © 2005 Joe Farace.
After I upgraded my Power Mac G4 with a 22-inch Cinema Display, I decided to move my 20-inch Apple widescreen monitor to the Compaq, which proved easier than you might think. Older Cinema Displays used a propriety—big shock here—Apple Desktop Control (ADC) connection, so the first thing I needed was an adapter that would convert ADC to standard DVI (digital visual interface) as well as provide power. The solution was Apple’s $100 DVI to ADC Display Adapter, not to be confused with its $29 ADC to DVI connector cable. The second piece of the puzzle was installing a video card that’s equally at home inside a Mac OS or Windows computer. This turned out to be an ATI Radeon 9600 Pro and the quality of the image on the 20-inch Cinema Display is spectacular.
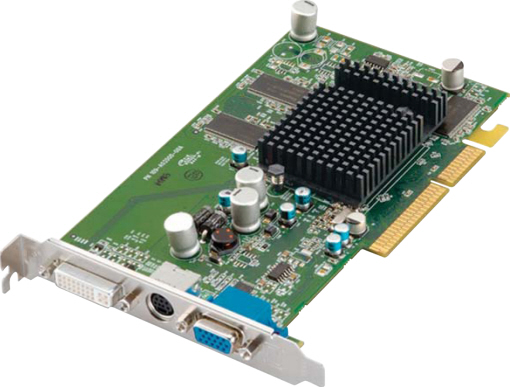
High rollers will be glad to know that the ATI Radeon 9600 Pro video card supports Apple’s 30-inch HD display. The board requires a computer with an AGP (Accelerated Graphics Port) slot, so before installing make sure yours has one.
Monitor Checklist
Before plunking down your hard-earned cash for a new monitor, there are many characteristics and features you should consider.
Color: Monochrome monitors have gone the way of the dodo bird and passenger pigeon. If you haven’t already noticed it, almost every monitor sold today features both color and high resolution. Gamers demand it, digital imagers require it, and software designers have turned even the most mundane office application into a desktop or Web publisher, which is why color viewing has become de rigueur.
Type: Where previously the major decision was between color and monochrome, the new choice is whether to purchase a CRT or an LCD flat-panel display. While some desktop monitors are CRTs, the space saving flat-panel monitors are beginning to take over; but the migration to the newer monitors has been slow, hampered by their high cost. Meanwhile, CRTs have become more affordable, and you can purchase a much larger glass monitor than a flat-panel display for the same money. Don’t be confused by monitors labeled “flat screen” and those labeled “flat panel.” A flat screen monitor is a classic glass-tubed CRT whose face is almost completely flat instead of the slightly rounded face found on most traditional monitors. Many others have emerged recently that have a standard curved tube with a flat-faced lens on the front that brings the image to a flat focus in front of you; not quite the same thing, and focus and distortion can be a problem. A “flat panel,” on the other hand, is always an LCD screen.

Planar Systems’ PE line of flat-panel monitors are designed for corporate users as well as home office users and students, but are great for budget-minded photographers too.
Besides higher cost, LCD screens are not without a few problems of their own. Dead pixels can occur in screens used in laptop or desktop computers. A standard LCD screen can have an occasional dead pixel that will display as black or green—no matter what’s displayed on the screen. On the other hand, LCD screens use less power. A typical 17-inch CRT uses 100W, while an equivalent-sized LCD screen needs less than 40. Whether you can measure these savings on your electric meter each month may be difficult, but you will conserve more energy with a flat-panel display.
Space: It’s not just the final frontier, it’s something too many monitor buyers overlook when shopping for a new display. Most LCD screens occupy a smaller footprint and take up one-third less desktop volume than a traditional monitor. CRT makers aren’t throwing in the towel. Some companies have introduced short-length monitors that take less space than traditional glass monitors with the same screen size. My view is that if monitor companies brought more compact CRT monitors at more aggressive prices to market earlier, nobody would be using flat panels except well-heeled early adopters.
Monitor size: When comparing CRT monitors, keep in mind that a monitor’s size refers to an approximate diagonal measurement of the monitor’s tube, not what you can actually see on the screen. In the past, manufacturers routinely overstated monitor screen sizes in much the same way that TV set builders have being doing for decades. A lawsuit challenging this long-standing industry practice and was settled by several companies and the terms of the settlement state that all monitors built after a certain date must be described by their actual viewable area. The settlement states that: “Defendants cannot refer to the computer display as 15 inches unless the viewable area is also disclosed.” One of the big differences between flat screens and glass CRTs is that LCD screens measure their actual size, and that’s why a flat-panel monitor will always provide more usable work area than a CRT of the same stated size.
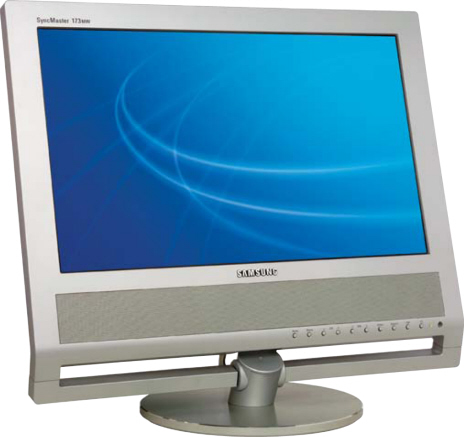
Samsung’s SyncMaster 173MW is an HDTV-ready computer monitor, stand-alone TV, and video display with digital and analog interfaces. Photo courtesy of Samsung.
Other than screen size and resolution, the next most important factors in evaluating your choice of monitors is dot pitch, refresh rate, and whether the monitor is multiscan or interlaced.
Resolution: This is a measure of the degree of sharpness of what you see on the screen and is measured by the number of pixels that are displayed across and down the screen. The ratio of horizontal to vertical resolution is typically 4:3, the same as TV sets, but that’s changing. Apple’s Cinema Displays use a wide-format design similar to that used by HDTV and have a resolution of 1600×1024 (at least mine does; newer models will differ). This format allows the Cinema Display to display two pages of graphics or wide screen movies without seeing a letterbox effect.
Shadow masks: All CRT monitors have a shadow mask, which is a thin screen that’s attached to the back of the screen preventing the outer edges of the electron beam from hitting the wrong phosphor dots. Any distortion caused by heat from the beams can disturb the beam’s accuracy that results in a loss of color purity. Some manufacturers produce this screen from a metal called Invar, which has an extremely low coefficient of thermal expansion and thus produces a better on-screen viewing experience.
Dot pitch: The classic definition of dot pitch is that it’s the diagonal distance between the red (center) dot of two adjoining pixel triads on a monitor as measured in millimeters. Most people acknowledge that it’s the distance between two pixels of the same color. Dot pitch can vary, but the smaller this number, the sharper the on-screen picture will be. Instead of dots, Sony’s Trinitron CRT tubes use vertical stripes, so their dot pitch ratings are similar, but not exactly the same as non-Trinitron tubes.
Refresh rate, a.k.a. vertical scanning frequency : This is a measure of the maximum number of frames that can be displayed on a monitor in a second as measured in Hertz (Hz). Hertz is a measure of electrical vibrations and 1-Hz equals one cycle per second. If the refresh rate is too slow, you get flicker. While many monitors measure refresh rates from 60 to 85Hz, with some even higher, most people won’t notice any difference at rates higher than 75Hz.
Multiscan or interlaced? MultiSync is a trademark of NEC, but many people use that term incorrectly when describing any multiscan monitor. On a typical monitor, a scanning beam starts at one corner and traces a single, pixel-wide horizontal line, then goes on to trace the next line. How fast the monitor makes both horizontal and vertical scans varies depending on the kind of graphics card used by the computer. A multiscan monitor automatically matches the signal sent by the graphics card and does all the work of making sure the graphics board and your monitor match.
Rocket’s Red Glare
One of the biggest problems facing computer users is glare from the monitor. While more and more CRTs have some kind of anti-reflective coating, this feature is far from universal, and even “non-glare” monitors experience some level of glare. In fact, one of the many advantages of flat-panel displays is that they produce much less glare than the shiny glass used on many CRTs.
Computer Vision Syndrome is caused by monitor glare that can create symptoms such as eyestrain, headaches, and fatigue. The best solution is to place your monitor where glare is not a problem, but this is not always possible. Glare can be solved with products such as Polaroid’s anti-glare filter, which also includes a conductive coating to eliminate static and dust problems, which can magnify the effect of glare. If you want more aggressive glare protection, consider a Circular Polarizer that eliminates 99% of the glare while enhancing contrast by 18 times. Polaroid’s filters include a built-in grounding strap to eliminate static electricity. When shopping for glare shields also look for the American Optometric Association Seal of Acceptance.
Where you sit in relation to your monitor is important too. Your screen should be between 18 and 31 inches from your eyes. When looking at the center of a screen, your head should be angled slightly downward. If you need to refer to another document as a point of reference, place that document at the same height and angle as the screen by using a document holder. If your monitor is too low, use a support to move it to a more comfortable height.
Don’t forget the very low-frequency and extra low-frequency radiation that emits from the sides and back of a monitor. These days most monitors adhere to Swedish Tjanstemannens Central Organisation (www.tco.se/index.htm) standards for radiation emissions, but you should check your monitor’s specifications to ensure they meet or exceed TCO standard.
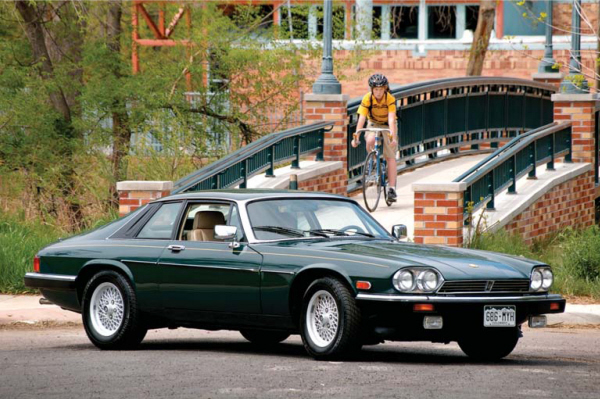
This photograph of a classic Jaguar XJ-S was made out “in the real world”: using a Pentax K100D and 70–150-mm lens. Exposure in Program mode was 1/350 second.
Out Here in the Real World, and I Don’t Mean MTV
What kind of computer should you buy? One answer is based on Farace’s immutable rules of the computing universe: No matter what kind of computer you buy, it will be replaced by a cheaper, faster version within 6 months. Don’t let that depress you. Start by purchasing the most powerful computer you can afford. The bad news is that even the most advanced personal computer will be technically obsolete in 18 months. Maybe you’ll be lucky and stretch it to 2 years, but most likely not. Nibbling away at this obsolescence is what I call the “mud flaps” factor. Over time, many computer users add software that makes their computer easier (or cooler) to use. Sooner or later, all of these bits and pieces take their toll, reducing the amount of available resources on the computer, creating conflicts and incompatibilities.
Building a digital darkroom, it turns out, is similar to building a traditional one. Based on your budgetary constraints, you assemble the tools that match the kinds of images you want to produce. I think its possible to assemble a digital darkroom containing all of the components that I have outlined, for less than the cost of a traditional wet darkroom, and you don’t have to soak your fingers—or tongs—in chemicals or work in the dark.
Asking about the kind of computer I use is as relevant as knowing the kind of camera I use. It doesn’t matter if I use a Hasselblad or Canon (I use both) and you already own 12 different Nikon lenses and several bodies. The same is true for operating systems. You can tailor the equipment to your specific applications and budget. You can build a system for less than $1000 or spend more than the cost of a shiny new Mini Cooper S; it all depends on your goals and budget.
Since 1984, I’ve been using both Mac OS and Windows operating systems, but today 90% of my imaging is done under Mac OS X, the rest under Windows XP until recently. I always advise people to purchase a computer that provides the best support. Not customer support; all computer companies provide universally bad—although some strive for intolerable—customer support, I mean the kind of help you can get from a friend; in my case, Mac MD’s Kevin Elliott.
|
Windows on a Mac? |
|
|
The big news for the future is that while digital imaging software may be available in both Microsoft Windows and Mac OS versions, both kinds of programs can be run on one kind of computer: An Intel-based Mac. Apple’s Boot Camp software allows Windows XP software to run on any Intel-based Mac OS computer. As I write this, Boot Camp is available as a public beta (www.apple.com/macosx/bootcamp), but is expected to be |
part of the release of the next update to the Mac OS, code-named Leopard. You’ll still need to install a copy of Windows because “Apple Computer does not sell or support Microsoft Windows,” but Boot Camp will burn a CD of all the required drivers for Windows so you don’t have to scrounge around the Internet looking for them. When it finally arrives, will Vista run under Boot Camp? I’ll be surprised if it doesn’t. |
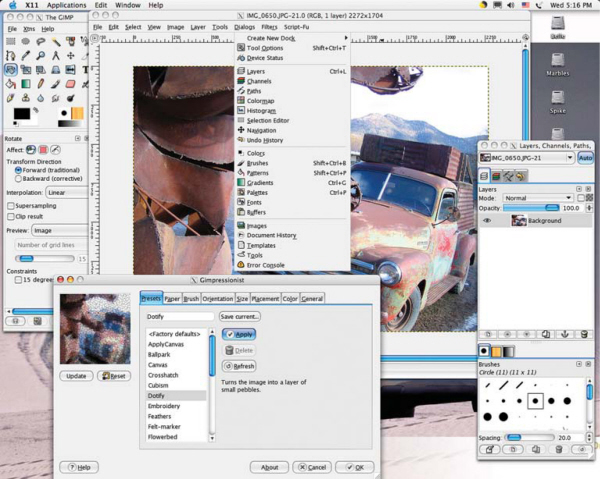
You would think that the choice of operating system boils down to the Mac OS or Windows, but it’s not that simple. The GIMP (GNU Image Manipulation Program) is a free open source photo retouching and image authoring program, and while some of its fans claim it’s just as good as Adobe Photoshop, it’s not. It is, however, hands-down the best free image-editing program available, and better than many programs that cost a hundred bucks or more. GIMP was originally a Linux-based product, but now is also available for Microsoft Windows and Mac OS X, which is built upon a UNIX framework.
Free image editing never looked this good. The GIMP was originally a Linux-based product, but now is also available for Microsoft Windows and Mac OS X, which is built upon a UNIX framework. © 2004 Joe Farace All Rights Reserved.
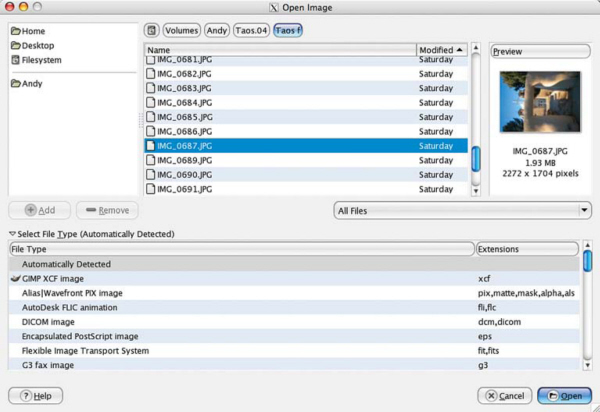
Before installing the GIMP, Windows users must first download and install the GTK run-time environment, and Mac OS X Panther users have to install X11. (It’s on Apple’s OS X CD.) The official website of the GIMP (www.gimp.org) contains all the information about downloading these files along with the scoop on installing and using the GIMP with these operating systems. This comprehensive site includes the source code, serves as a distribution point for the latest releases, and provides information about the GIMP community. If you are Mac OS user on a dial-up connection and the thought of downloading 40MB of data sounds unappealing, the MacGIMP Project (www.macgimp.org) sells a CD for less than 50 bucks. Windows users will need a broadband friend or a lot of patience.
On the Mac OS, you are still operating under the X11 environment, so some parts of the GIMP, such as the Open dialog, look similar but are different from the standard OS X dialog box. © 2004 Joe Farace All Rights Reserved.
|
Linux, Linus, but No Blankie |
|
|
Once upon a time, there was a brilliant findlandssvensk (Swedish speaking Finnish) student named Linus (pronounced Lee-nus) Torvalds who was born in Helsinki, Finland. He wrote the Linux kernel: the essential part of the operating system for Linux. Linux was his implementation of Unix, without proprietary code. It has been made available to the world, essentially free, as part of the “open source movement.” Open source is a method of licensing and distributing software that encourages people to copy and modify it freely. Today a Google search yielded a total number of 93,600,000 hits for Linux. Computers can run Linux or UNIX, but for most computer users, the choice of an operating system still be able to read Mac OS disks. Out of the box, most recent Macintosh computers already read Windows disks and discs, but you’ll need software such as DataViz’s (www.dataviz.com) MacOpener software to make it work in the other direction. You can think of it as the digital equivalent of being able to use Contax lenses on your Canon EOS camera. Going the other direction, DataViz’s MacLink Plus Deluxe is indispensable software for translating |
really boils down to a choice between the Mac OS and Microsoft Windows. All Apple Macintosh computers are currently shipped with OS X. Available in both Home and Professional versions, depending on your specific application, Windows XP—like Mac OS X—has been designed for ease of use, but has been controversial from its launch, with many formerly staunch supporters in the media highly critical of this version. Based on my personal experience with this operating system on my own desktop and at workshops, it has accomplished its goal of being more accessible, and is an image-friendly OS. No matter what kind of computer you choose, I think you should make it “friendly” with the other major platform. It’s a great idea for your Windows computer to Windows-based files for use with your Mac OS computer. While Adobe Photoshop-compatible plug-ins are platform specific, Photoshop Actions are not and having MacOpener on my Windows computer lets me copy Action files back and forth between my Power Macintosh G4 computer and my Windows XP computer-using Mac-formatted CD-R, Iomega Zip, or floppy disks. |
Riding the Resolution Carousel
It is inevitable that you will encounter more than one type of resolution. For example, device resolution refers to the number of dots per inch (dpi) that a device, such as a printer or monitor, can produce or display. Device resolution on computer monitor screens can vary from 60 to 120dpi. (Note: Don’t confuse this with screen resolution, which refers to the number of dpi in the line screen used to reproduce halftone images.) A 21-inch monitor displays more pixels than a 13-inch model, and some monitors can even display various pixels per inch (ppi). If you don’t change the magnification level, what you see at 64dpi is simply a closer look at the same image. Because the pixels are larger it appears to be lower resolution. Monitor screen resolution, to confuse things further, is also measured in lines per inch (lpi). This last one is left over from TV.
Image resolution really refers to the amount of information that is stored in an image file and is often expressed in ppi. The image resolution of any graphic image ultimately determines how large a file is. This means that the higher the resolution, the bigger the file, and size determines how long an image will take to move, manipulate, store, or print. All this goes back to how many bits, bytes, kilobytes, and megabytes an image file contains, and completes the circular discussion of resolution that began with bits.

What’s a pixel? If you look close enough you can see them. This is an extreme close up of that same picture of Brenda, but when printed even at 13×19 inches or viewed on a large monitor these little digital squares are impossible to detect—especially when the print is viewed at the “normal viewing distance.”The old rule of thumb for determining what’s normal is that a print should be viewed from a distance approximately equal to the diagonal measurement of the print.
The bottom line on resolution is that you have to match the resolution of the image acquisition device and software to the output. Requirements for World Wide Web applications, because they are based on monitor resolution, are different from working with four-color magazine-quality output. By understanding resolution and what it means, you will be in a better position to evaluate equipment purchases and make the right choices.
Good Resolutions
Computer graphic communication uses a pastiche of buzzwords borrowed from the printing, design, and photographic fields, blended with a sprinkling of computer jargon. If some of these buzzwords seem strange to you, they’re collected in a glossary that can be found at the end of this book.
In general usage, the word resolution refers to how sharp or (as some people put it) “clear” an image looks on a screen or when printed or output as film. Any discussion of resolution must first look at two items that ultimately refer to what most people will agree is resolution: bits and pixels.
A bit is the smallest unit of information a computer can process. Because computers represent all data (including graphics) by using numbers, or digits, they are digital devices. These digits are measured in bits. Each electronic signal becomes one bit, but to represent more complex numbers or images, computers combine these signals into 8-bit groups called bytes. When 1024 bytes are combined, you get a kilobyte, often referred to as “K.” When you lasso 1024 kilobytes, you have a megabyte.
Pixel is short for “picture element.” Visual quality—or resolution—can be measured by the width and height of an image as measured in pixels. A computer screen is made up of many thousands of these colored dots of light that, when combined, produce a graphic image. On the screen, combinations of pixels, called triads, produce all of the colors you see. A triad contains three dots, one each for red, blue, and green. In a CRT monitor three electronic “guns” fire three separate signals (one for each color) at the screen. If all the three guns hit a single location at equal intensity, it will appear white on the screen. If none hit a target pixel, it will be black.
The higher an image’s resolution—the more pixels it has—the better its visual quality will be. An image with a resolution of 2048×3072 pixels has higher resolution than the same image digitized at 128×192 pixels. At low resolutions, images have a coarse, grainy appearance making them difficult to evaluate. Higher resolution is not without some cost: as the resolution of a device increases, so does its cost. Bits are important to photo files because you often find a file or hardware device referred to as 24- or 30-bit devices. A 24-bit image has eight bits each for red, blue, and green. A 30-bit image has 10 bits for each color. More is always better.
Trading Places
As in all computer applications, the resolution of a particular graphic image involves trade-off. As a graphic file’s resolution increases, so does its file size. Larger file sizes mean your computer system requires more space per image. If you have been wondering why the “normal” hard disk size exploded from 100MB to 100GB, look to the megapixel race still ongoing in the digital camera marketplace.
You may have heard the graphics and image-manipulation programs are memory hogs. That’s partially true. In order to work on a photograph, programs such as Adobe Photoshop require memory that is three to five times the size of the original image. To handle a 18-MB image file, you need between 54 and 90MB of RAM. Fortunately, Photoshop has a built-in virtual memory scheme (called a “scratch disk”) that reduces RAM requirements by treating unused hard disk space as additional RAM. In this example, it means having at least 54MB of unused hard disk space available. The program’s Preferences menu lets you specify where the program should go to get this hard disk space, and you can have primary and secondary disks to use as scratch disks.
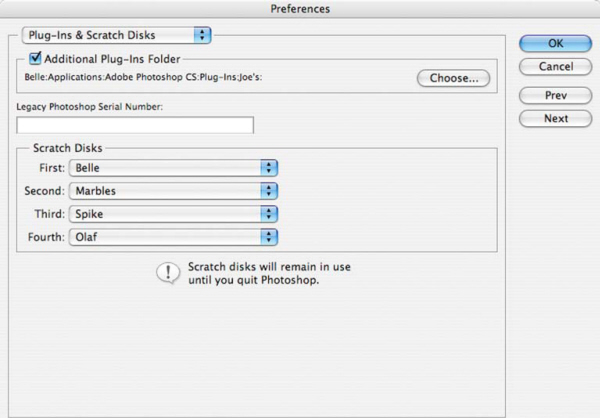
A scratch disk is any drive or drive partition with free memory. By default, use the hard drive where the operating system is installed as the primary scratch disk. By using Plug-ins and Scratch Disks preferences (Photoshop > Preferences > Plug-ins & Scratch Disks) you can change the primary scratch disk and designate a second, third, or fourth scratch disk to be used when the primary disk is full. Your primary scratch disk should be your fastest hard disk. For best performance, scratch disks should be on a different drive from any large files you are editing. Scratch disks should be conventional (non-removable) media and a local drive; they should not be accessed over a network. Drives that have scratch disks should also be defragmented regularly.
If you do not have enough memory or scratch disk space, Photoshop can give you a “Not Enough Memory to Complete that Operation” error message. Fortunately, there is an easy enough way to find out if you will have problems before you start work on an image. Photoshop displays information showing how much memory that particular image takes in the lower left-hand corner of any image window. By clicking on these numbers, you have the option of displaying File Sizes or Scratch Sizes. While File Size information is interesting, I recommend you keep the window set to show Scratch Sizes. The number on the left side tells you how much memory all open windows are using and the number on the right tells you the amount of RAM available. If the first number is larger than the second, the difference is the amount of Scratch Disk space required. If you don’t have enough unused hard disk space—TILT!
The old drag racer’s axiom that “there’s no substitute for cubic inches” may be paraphrased to “there’s no substitute to RAM.” With RAM prices lower than they have been for a while, why not make a trip to the computer store and purchase a few memory modules for your computer? While you have the case off, why not stuff a 160-GB (or bigger) hard disk in there? You’ll use it.
The Bottom Line
The Windows vs. Mac OS controversy is a quagmire and is the digital version of the Nikon vs. Canon arguments seen on the Web and wherever photographers gather. Most digital imaging programs are cross-platform and while some are Windows-only, the introduction of Apple Computer’s Boot Camp software makes that a moot point. There is no doubt that Apple Computer hung on too long to hardware and software that was too closed. The Windows platform, on the other hand, was so open that often hardware and software components were not so compatible. No matter what system you decide on, one truth remains: Neither platform—Mac OS or Windows—is perfect, and when you make a decision between the two, you get all of the baggage that comes with either choice.
Do what you want with it. In the Mac OS or Windows debate what we have is the classic debate between intransigent forces. My Dad was a “Chevy man,” but other than a 1976 Chevrolet Blazer, I’ve owned more Fords during my life. Don’t lose sight of what imaging is all about: getting great images. The best hardware is whatever helps you get the best images. Just as a truly great photographer can create images no matter what kind of camera that he or she uses, the quality of a person’s digital imaging solution isn’t measured by what kind of computer they use.
This photograph of a vintage airplane was captured originally in color using a Canon EOS 20D with EF-S 10–22-mm lens. Exposure was 1/40 second at f4.0 and ISO 400. It was converted to monochrome using some of the techniques I’ll show you in Chapter 7. The film “frame” was also added digitally using a Photoshop Action that I’ll also introduce to you later. © 2005 Joe Farace.
|
A Bugs Life? |
|
|
More than half the households in the US have a computer, but most of them have more than one user. This results not only in the inevitable turf wars about who gets to use it, but brings up security issues as well. According to the National Cyber Security Alliance (www.csoonline.com), 86% of US broadband users have confidential information stored on their computers, and 79% use the Internet to send sensitive information, but two-thirds don’t have proper firewalls installed. Spyware, software that gathers information for outside sources and is installed without the user’s knowledge, can be found on 91% of broadband users’ computers. Yet, 86% of broadband users felt their computers were “very” or “somewhat safe.” Where does this stuff come from? Fifty-seven percent of Spyware |
comes from music downloads and other from seemingly benign sources. The Windows versions of Internet Explorer seems the most prone to these sorts of attacks so the first step is tighten up its security settings. (If you’re already infected, it may be too late.) Start by opening Internet Options and go to the Security tab. In the ActiveX area, disable anything not marked as “safe and not signed.” For ActiveX marked “safe and signed,” set to the choices to “Prompt.” This approach did not work 100% of the time for me, so I installed a freeware program called Ad-aware (www.lavasoftusa.com) that will “quarantine” Spyware files. The company offers upgraded versions for a modest fee but the freeware version worked for me. |