
Chapter 9. Testing your application
- Testing Griffon applications
- Using FEST for UI testing
- The Spock and easyb plugins
- The CodeNarc, GMetrics, and Cobertura testing and metrics plugins
Let’s pause for a moment and review all you’ve discovered about Griffon so far. First, you’ve learned that all Griffon applications share the same basic structure. You also know that application artifacts are organized by type and responsibility in specific folders on disk. In addition, the MVC pattern is the cornerstone for Griffon’s MVC groups. These, in turn, can be extended by adding other MVC groups within them as members. Finally, you know that you should remember to take threading into account. And you know that all artifacts are glued together via the Groovy language.
You now have models, views, controllers, services, scripts, event handlers, and additional Java/Groovy sources. That’s a lot of stuff! And we’re not even dealing with the extensions provided by Griffon plugins yet. All this leads to the following questions:
- Where do you start testing?
- What would be a good strategy for tackling tests?
- UI testing: go or no go?
- Is the application solid? Are code paths missing?
A sound answer to the first two questions would be: start small, and build up from there. Another possible answer is: start with the test, and then write the production code. The latter is known as test-driven development (TDD). As expected in this type of scenario, people are divided into two camps: those who say TDD works, and those who say that it’s a waste of time. We’re not here to try to convince you either way. But should you choose to write tests first, you’ll face the issue in the third question.
UI testing requires effort. If you do it manually, it quickly becomes boring; plus manual testing doesn’t reliably produce the same results for the same stimuli, because of the human factor involved. Automated UI Testing more often than not requires a lot of setup to be done up front. That’s why many developers skip doing these kinds of tests. They can be brittle, because their setup is elaborate; and rapid changes in the underlying code can render them obsolete, which often spells their doom and rapid departure from the codebase.
In addition, when you’re using a dynamic language, certain aspects of your code are known at runtime only. But you shouldn’t skip testing your software altogether. We think quality should be an integral part of any application, which is why Griffon comes with testing support right from the start. In the immortal words of Phillip Crosby, “Quality is free, but only to those willing to pay heavily for it.” Griffon gives you the tools you need, but it’s up to you to adapt and apply them to your specific scenarios. Aristotle said, “Quality isn’t an act. It’s a habit.” We believe Griffon’s testing facilities will aid you in making that statement a reality.
With all that in mind, let’s start with the build-small-then-bigger approach and see where it leads. Later we’ll come back to UI testing and see if it’s really all that complicated.
First, let’s go over some basic testing principles.
9.1. Griffon testing basics
All the Griffon applications you created in the previous chapters have a test file associated with a controller whenever a MVC group is created. If you’ve used the create-script command target to create a custom script, you might have noticed that a test file was created for it, too. And the same happens for a service when using the appropriate command.
In this section, you’ll create and run some simple tests. You’ll learn how to run individual tests and how to test by type, test by phase, and test by name. You’ll apply this information to testing the service portion of a simple dictionary application. You’ll first create unit and integration tests and inspect the contents of the created files.
9.1.1. Creating tests
The Griffon commands gently remind you that a test should be written for various artifacts. But the fact that a test for a model class isn’t automatically created doesn’t mean it’s exempt of testing. If it makes sense for your code, by all means make a test for your model class. Griffon has two default command targets for creating tests: create-unit-test and create-integration-test. Both create a new test file using a default template that’s suitable for the type of test that is required.
Assuming you’re working on an existing Griffon application (in this case, an empty application named sample), type the following at the command line:
$ griffon create-unit-test first
This command generates a file named FirstTests.groovy under the test/unit/sample directory. Browse to that directory, and open the file in your favorite editor. You should see similar content to the following (white space removed for brevity):
package sample
import griffon.test.*

class FirstTests extends GriffonUnitTestCase {
    protected void setUp() { super.setUp() }
    protected void tearDown() { super.tearDown() }
    void testSomething() { fail("Not implemented!") }
}
Nothing fancy. Worth noting is the fact that the test class extends from GriffonUnitTestCase. This base test class provides a few additions over the standard GroovyTestCase. For example, it exposes all methods from UIThreadManager. There might be further additions to this class in later releases. Keep an eye on the release notes!
Now let’s look at the controller test file that was generated when the application was created. Look in test/integration for a file that bears the name of the application plus the Tests suffix (in this case, SampleTests), and open it in your editor. The following snippet shows the file’s contents:
package sample
import griffon.core.GriffonApplication
import griffon.test.*

class SampleTests extends GriffonUnitTestCase {
    GriffonApplication app
    protected void setUp() { super.setUp() }
    protected void tearDown() {  super.tearDown() }
    void testSomething() { fail("Not implemented!") }
}
Whoa. An integration test class extends from the same base class as a unit test. Well, this means both kinds of tests share the same basic elements. But the other noticeable change is the addition of an app property. This property, in theory, will hold the reference to a running Griffon application—the current application under test.
That might make you wonder about the real difference between these two kinds of tests. You see, when unit tests are run, they do so with the smallest set of automatic dependencies possible: zero. The goal of a unit test is to play around with a component in isolation. For this reason, there’s no application instance available for unit tests, MVC groups, or services.
While it’s true that unit tests should run their components in isolation, there are times when you need to set up a collaborator or a stand-in. This is where mock testing comes into play. There are several Java-based libraries for mocking objects (EasyMock, jMock, Mockito). Groovy has its own version, using its metaprogramming capabilities.
On the other hand, an integration test relies on the actual component relationships being put to the test. This is why an integration test requires a live application.
Now, given that the hierarchy of these tests goes all way back to the basic JUnit Test-Case, you can apply JUnit tricks along with some new ones thanks to the power of Groovy. Refer to Groovy’s Testing Guide (http://groovy.codehaus.org/Testing+Guide) to learn more about all you can do with the language when it comes to testing.
It’s time to run some tests, now that you know how they look.
9.1.2. Running tests
As with many things in Griffon, you can count on a command target to help you at the appropriate time and place. This time it’s for running tests. Every test that was created using the create-*-test command targets is ready to be run. It’s just that the tests do nothing interesting with the code. Nevertheless, go to your command prompt and type
$ griffon test-app
You should see a few messages about the application code being compiled (if it wasn’t up to date already) and then a few more regarding the test code being compiled. Then you’ll see a special block of text that specifically mentions the type and number of tests being run. Here’s the output of running unit tests on the Sample application:
-------------------------------------------------------
Running 1 unit test...
Running test sample.FirstTests...
                    testSomething...FAILED
Tests Completed in 254ms ...
-------------------------------------------------------
Tests passed: 0
Tests failed: 1
-------------------------------------------------------
And here’s the output for the integration tests:
-------------------------------------------------------
Running 1 integration test...
Running test sample.SampleTests...
                    testSomething...FAILED
Tests Completed in 65ms ...
-------------------------------------------------------
Tests passed: 0
Tests failed: 1
-------------------------------------------------------
Depending on how the tests go (PASSED or FAILED), you’ll get a set of reports in text, XML, and HTML format. Inspect the last lines of the output; you’ll see that the reports were placed in the target/test-reports directory. The generated HTML reports use the standard templating and conventions that you may already be familiar with. The XML reports also use the same format as standard JUnit, which means you can mine them for data as you would normally do when working with standard Java projects and JUnit.
From Griffon’s point of view, unit and integration tests are phases, not types. The unit phase may contain different types of tests. So far you’ve seen the standard type. Later in this chapter, you’ll learn about the spock type. We’ll explain phases and types in more detail in the next section.
But there’s an additional side effect of running tests in this manner. Maybe you noticed it already: both unit and integration tests are run one after another with a single command invocation. What if you only want to run unit tests, for quicker feedback? Further, what if you only want to run a single test, independent of its phase or type? The test-app command is versatile in terms of its options. These and other questions will be answered next.
Running tests by phase or type
Specifying a phase of test to be run is a feature found in the Griffon command’s bag of tricks. The same can be inferred about test types. The test-app command uses a naming convention on its parameters to recognize your intentions. That convention is phase:type.
Want to run all JUnit tests in the unit phase? Then type the following:
$ griffon test-app unit:unit
All JUnit test types match their corresponding phase name by default. The default test phases are unit, integration, and other. The other phase is used when script tests are available.
This naming convention is also flexible. You can omit either the phase or the type. If the type is omitted, all test types in the same phase are run. (This will make more sense when we introduce the spock type.) In the meantime, assuming you have both JUnit tests and Spock specifications available in the unit phase, you can run all of them by invoking
$ griffon test-app unit:
But running JUnit tests only and skipping Spock specifications is done by invoking
$ griffon test-app :unit
The amazing thing about defining the test type alone is that you can execute all tests of the same type regardless of the phase they belong to. Running all available Spock specifications, including unit and integration ones, is as simple as calling
$ griffon test-app :spock
Isn’t that a time saver in terms of setup and configuration? We’d like to think so. But we’re not done yet. The next section covers running specific tests by name.
Running tests by name
Sometimes you need to run a single test because it’s the one that’s been giving you trouble all morning. There’s definitely no need to call all of the test’s buddies just to obtain a report on the problem. Again, the test-app command is smart enough to recognize several options, depending on what you throw at it.
Need to run a single test file? Then specify it as the sole argument to the command, like this:
$ griffon test-app sample.First
Note the omission of the Tests suffix in the class name. This is important, because the command will try to match the name to the several types that may be available. Some types use a different file suffix. The command could run more than one test if you have two or more test types that share a name (for example, sample.FirstTests and sample.FirstSpec). No problem. Add a type specifier, and then you can be certain a single type is called:
$ griffon test-app :unit sample.First
Phases, types, and test names are additive. Want to run all tests belonging to a specific package, regardless of their phase and/or type?
$ griffon test-app sample.*
If you want to target a package and all its subpackages, use double asterisks (**) instead of a single asterisk.
You can also run all tests of a specific artifact. For example, suppose you have a multitude of tests but only want to run those that affect services. Type the following:
$ griffon test-app *Service
There’s even a more specific option. You can run a single test method if needed:
$ griffon test-app First.testSomething
All that power in a single, innocent command. Who would have thought it? But we haven’t covered all its tricks. A group of build events is triggered whenever a test runs: events that deal with the overall execution of tests, events that deal with the execution of a particular phase, and events that trigger when a single test starts. The bottom line is that if the testing facilities exposed by the framework aren’t enough for your needs, chances are that you can tweak them via custom scripts and build event handlers.
Let’s build a new application from scratch and add some tests to it.
9.1.3. Testing in action
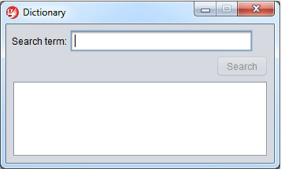
You’ll build an application and exercise it with some tests. The application is a dictionary query; see figure 9.1. You type a word in a text field, click the Search button, and wait for an answer based on the word’s definition.
Figure 9.1. Running Dictionary application
We’ll keep the code simple, because our intent is to show the testing code, not the production code. Don’t forget that you can find the source code for this example at the Griffon in Action GitHub site (https://github.com/aalmiray/griffoninaction).
Setting up the application and writing a test
Start by creating an application named dictionary. You know the magic word already:
$ griffon create-app dictionary
You now have three artifacts (model, view, and controller) and an integration test. You’ll now create a dictionary service. It will serve as your search engine, with the added benefit of a companion dictionary service unit test:
$ griffon create-service dictionary
You’ll fill out the code for the test first; this means you’ll get a failing test as a baseline. Then you can fill in the blanks as much as possible to make the test turn green. With a new test state, you can safely refactor the production code: as long as the tests stay green, you’re doing it right. Your first attempt verifies some error conditions triggered by insufficient or wrong input, as shown in the following listing.
Listing 9.1. Testing for error outputs in DictionaryService

Before you run the test, you have to define two constants and one method in your service. Locate the DictionaryService.groovy file under griffon-app/services/dictionary, and open it in your editor. Make sure its contents resemble the following listing.
Listing 9.2. Adding enough code to DictionaryService to turn the test green
package dictionary

class DictionaryService {
    static String INPUT_ERROR_MESSAGE = "Please enter a valid word"
    static String FIND_ERROR_MESSAGE = "Word doesn't exist in dictionary"

    String findDefinition(String word) {
        null
    }
}
Now you can run the test and see it fail. Execute the test-app command, targeting the unit phase and type; in this way, you avoid running the default integration test created when the application structure was initialized. After the code has been compiled and the test has been run, you should see output similar to the following (minus the power assert and exception information) in your console:
-------------------------------------------------------
Running 2 unit tests...
Running test dictionary.DictionaryServiceTests...
                    testServiceCantFindWord...FAILED
                    testInvalidInput...FAILED
Tests Completed in 419ms ...
-------------------------------------------------------
Tests passed: 0
Tests failed: 2
-------------------------------------------------------
You knew the test was bound to fail from the start. Next you’ll fix the code and make the test succeed.
Does the test pass?
Go back to the service source, and edit the service method by copying the following snippet:
String findDefinition(String word) {
    if(GriffonNameUtils.isBlank(word)) return INPUT_ERROR_MESSAGE
    FIND_ERROR_MESSAGE
}
Also make sure you add an import statement for griffon.util.GriffonNameUtils, a handy class that provides a method that verifies if a String is null or empty, among other things. Run the test again; it should succeed this time.
You finish the service implementation by updating the implementation of the findDefinition() method. Next you’ll add a map as a lookup table for word definitions. The next listing shows the full implementation of the DictionaryService class.
Listing 9.3. DictionaryService with a lookup table to store definitions
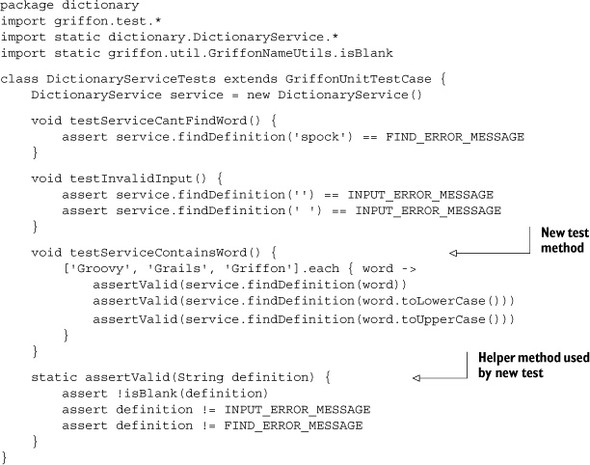
The last step is to update the tests so the reviewed implementation of your service is also tested.
Updating the tests
The following listing displays the entire test case, which now contains a third test method with a helper.
Listing 9.4. Three tests methods exercising DictionaryService
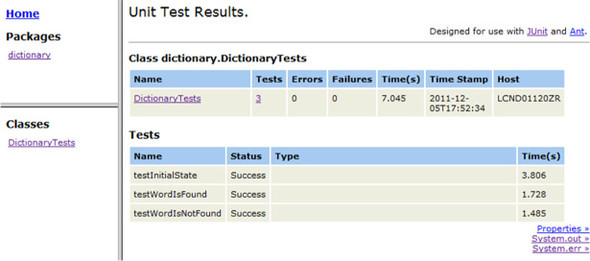
Run the test once more; it should work correctly. Remember that you can browse the resulting reports, which are written in several formats and located in the target/test-reports directory. Figure 9.2 shows, for example, the report generated for your single test case.
Figure 9.2. HTML report of all the tests you ran on the dictionary application. There’s only a single test class with three test methods reported. All succeeded.

That’s all you’ll do with this application for now. You’ve seen how unit and integration tests can be created and run. They fit the bill for starting small and then growing the test codebase as needed. Now let’s look at the other kind of testing that always give developers trouble: UI testing.
9.2. Not for the faint of heart: UI testing
You may have encountered this scenario: when an application is small, it’s fairly easy to run UI tests manually. In other words, you can run the application through a predefined set of scenarios and write down the results. If you notice something doesn’t work right, you can hack some code to fix the problem.
But this situation isn’t scalable. As soon as the application grows, UI testing becomes a dragging weight, then a constant pain, and finally the thing that must be avoided if you want to make the deadline.
Automated UI testing is nothing new, especially to desktop applications. There are, after all, plenty of options, each one with advantages and pitfalls.
If you’re a seasoned Swing developer, you’ve likely heard about the following testing frameworks: Abbot (http://abbot.sourceforge.net/doc/overview.shtml), jfcUnit (http://jfcunit.sourceforge.net), Jemmy (https://jemmy.dev.java.net), and FEST (http://fest.easytesting.org/). These tools work on the assumption that UI components can be found by some programmatic means and that their state can be changed without human intervention. Let’s see how they compare to each other.
9.2.1. Setting up a UI component test
Setting up each project varies from tool to tool. Regardless of how the tool must be installed and its dependencies configured, you’ll face the following challenge: locating the component on the screen.
Some of the previously mentioned tools rely on a helper class called java.awt.Robot. This class is responsible for locating a component on the screen via its coordinates and sending input events as if a human clicked a mouse button on the component or pressed a key. Some rely on a different kind of Robot, but that’s basically what needs to be done in order to automate this kind of test. Other tools work by referencing the live components.
We’ll discuss briefly how each one of the three tools can be used.
Abbot
In Abbot, for example, you must locate a UI component by conventional means, such as by inspecting a container’s hierarchy or accessing a direct reference available in the container instance. Alternatively, you can use Abbot’s finder utilities. Next you instantiate a particular Abbot tester that knows how to work with the type of component you want to test. Finally, you invoke the desired behavior on the tester and assert the component’s state. Here’s a snippet of a ComponentTestFixture that shows how it can be done:
JTextField textField = getFinder().
    find(new ClassMatcher(JTextField))
JButton button = getFinder().find(new Matcher() {
   public boolean matches(Component c) {
      c instanceof JButton && c.text == "Search"
   }
})
JTextArea textArea = getFinder().find(new ClassMatcher(JTextArea))
JTextComponentTester tester = new JtextComponentTester()
tester.actionEnterText(textField, "Griffon")
tester.actionClick(button)
assert "Griffon is cool!" == textArea.text
It works, but it’s a bit verbose. We’ve highlighted two parts of the code. The first shows one of the many options that Abbot exposes to locate a component; this one locates a JTextField by type. The second highlighted bit creates an Abbot helper object with the responsibility of sending stimuli to the located UI components. Perhaps if the finders were wrapped with a friendlier abstraction, you would be able to write less code. Sadly, that abstraction isn’t provided by default by Abbot.
jfcUnit
jfcUnit provides a better abstraction for its find mechanism. The following snippet of a JFCTestCase shows how the same test behavior can be attained with jfcUnit:
Window window = app.windowManager.windows[0]
NamedComponentFinder finder =
     new NamedComponentFinder(JComponent.class, "word")
JTextField textField = (JTextField) finder.find(window, 0)
finder.setName("search")
JButton button = finder.find(window, 0)
finder.setName("result")
JTextArea textArea = finder.find(window, 0)
textField.setText("Griffon")
getHelper().enterClickAndLeave(new MouseEventData(this, button))
assert "Griffon is cool!" == textArea.text
Although the finder utilities are much better than Abbot’s, the API resembles Java as it was before generics were introduced. You need to cast the found component to the appropriate type. The same is true in Abbot. Now we’re down to Jemmy.
Jemmy
Jemmy is popular in the Java Swing community, perhaps due to its close relationship to NetBeans. The following Jemmy snippet illustrates a more concise API for finding components and asserting their state:
Window window = app.windowManager.windows[0]
JFrameOperator window = new JFrameOperator("App title")
JTextFieldOperator textField = new JtextFieldOperator(window)
JButtonOperator button = new JButtonOperator(window, "search")
JTextAreaOperator textArea = new JTextAreaOperator(window)
textField.typeText("Griffon")
button.push()
assert "Griffon is cool!" == textArea.text
Much better. But we omitted a few details that can get messy in Jemmy when combined with Griffon: the proper application initialization inside a Jemmy test case. Of course, you know that these examples are simple and that these frameworks provide other capabilities, such as record-replay, externalized test configuration using XML, and deep finder features. But the truth is that more often than not, you’ll face UI testing code like that you’ve just seen. It’s not pretty, and it’s not easy to read. What if there was a way to apply a DSL-like approach to UI testing—perhaps something similar to the SwingBuilder DSL with which you’re already familiar?
Enter Fixtures for Easy Testing (FEST). It’s aptly named because that’s precisely what it does.
FEST
The origins of FEST can be traced back to an Abbot-based extension for TestNG. It was later reworked from the ground up to be a separate project from Abbot, while also adding support for JUnit. What makes FEST shine is its fluent interface design. Here’s the same test code you’ve seen before, this time as a FEST snippet:
Window mainWindow = app.windowManager.windows[0]
FrameFixture window = new FrameFixture(mainWindow)
window.textBox("word").enterText("Griffon")
window.button("Search").click()
window.textBox("result").requireText("Griffon is Cool!")
That’s concise and readable at the same time. Doesn’t this look like a winning proposition for UI testing? Let’s continue with a real-world example of UI testing using FEST and Griffon.
9.2.2. A hands-on FEST example
Time to get your hands dirty with the FEST API. With the bar green, you can concentrate on building the remainder of the dictionary application as you left it in section 9.1.3.
Controller
The following listing displays half of the application’s logic: the controller. Its job is to process the input typed by the user, call the DictionaryService to find a definition for that input, and then send that definition back to the UI.
Listing 9.5. Implementation of DictionaryController
package dictionary

class DictionaryController {
    def model
    DictionaryService dictionaryService

    def search = {
        model.enabled = false
        String word = model.word

        try {
            String definition = dictionaryService.findDefinition(word)
            execInsideUIAsync { model.result = "${word}: $definition" }
        } finally {
            execInsideUIAsync { model.enabled = true }
        }

    }
}
You can see that the controller requires an instance of DictionaryService; that was to be expected. It also requires three properties to be available in the model. Those properties are as follows:
- word—Contains the input from the user
- result—Holds the word’s definition or an error message
- enabled—Controls the Search button’s enabled state
Model
The model, in turn, is defined by the following listing.
Listing 9.6. Implementation of DictionaryModel
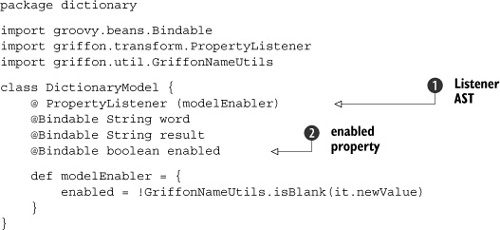
The model contains all three previously discussed properties plus a local Property-ChangeListener wired up using the @PropertyListener AST transformation ![]() . This listener toggles the value of the enabled property
. This listener toggles the value of the enabled property ![]() depending on the value of the word property. The value will be true as long as the word property is neither null nor empty.
depending on the value of the word property. The value will be true as long as the word property is neither null nor empty.
View
The final artifact to be defined is the view, where all the things you wrote previously come together. This is where you see the model properties being bound to UI components.
Listing 9.7. Implementation of DictionaryView

Note that some components like the text fields, button, and text area have a name property. This is because FEST uses the component name to locate components. If a name property wasn’t defined, you would have to resort to finding the component by type, which could result in the wrong component being found, depending on how the components are laid out. The critical part of making any GUI tests reliable is finding the components in a reliable manner; small changes in the layout shouldn’t break the tests. The advantages of declaring this property will become apparent when you create your first FEST test.
There’s one additional step before you can run the application and test it manually. You must install two plugins: miglayout and actions. Otherwise, the migLayout() node won’t be resolved at runtime; nor will the searchAction variable be created automatically in the view. Again, you know the magic words already:
$ griffon install-plugin miglayout
$ griffon install-plugin actions
Run the application to kick its tires. Now, let’s continue with the next task: installing and running FEST.
Installing FEST
It should come as no surprise that Griffon sports a FEST plugin. This plugin not only adds the required build-time libraries but also provides a set of scripts that help you create FEST-based tests. Install the FEST plugin by invoking the following command:
$ griffon install-plugin fest
You’ll notice that two additional scripts are now available to you. You’ll also see that FEST has a dependency on the Spock plugin. Although the FEST plugin provides integration with Spock, it by no means forces you to use Spock to run FEST. But it’s likely that you’ll want to do so once you discover the goodness that Spock brings (we’ll discuss this later in the chapter).
Create a FEST test for this application by invoking the following command:
$ griffon create-fest-test dictionary
It’s likely that you’ll be prompted to overwrite the DictionaryTests.groovy file located at test/integration. Given that you haven’t made changes to this file yet, it’s safe to overwrite it. Now open it in your editor. The next listing shows the content of a freshly created FEST test.
Listing 9.8. FEST test for the Dictionary application
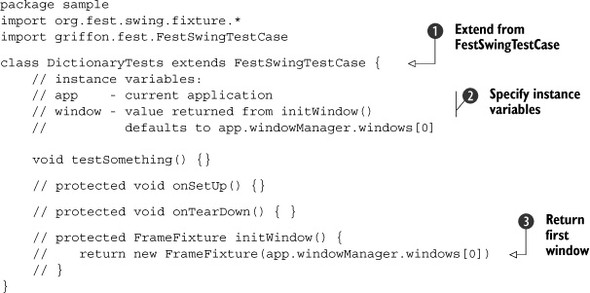
The first thing you notice is that the base test case class is FEST-specific ![]() . This base class takes care of initializing the application up to the correct phase (in this case, the main phase) and sets up a pair of useful properties
. This base class takes care of initializing the application up to the correct phase (in this case, the main phase) and sets up a pair of useful properties ![]() : the app property with which you’re already familiar from integration tests, and a window property that points to a FrameFixture instance. These properties belong to FestSwingTest, the superclass of your test class, which is why they’ve been commented out, as a reminder.
: the app property with which you’re already familiar from integration tests, and a window property that points to a FrameFixture instance. These properties belong to FestSwingTest, the superclass of your test class, which is why they’ve been commented out, as a reminder.
Fixtures are how FEST abstracts a UI component and queries its state. Fixtures are organized in a similar hierarchy to their respective Swing components. There’s a ComponentFixture, a ContainerFixture, and so on. The FEST team has paid close attention to making the design of the FEST API easy to understand. It’s IDE friendly because many methods use proper generic signatures. Its fluent interface design also helps to chain methods. You’ll discover the full impact of these benefits later in this section.
As you can see in the initWindow() method ![]() , the first window managed by the application is returned. This becomes the value of the window property. Be sure to override this method if you need to test a different window.
, the first window managed by the application is returned. This becomes the value of the window property. Be sure to override this method if you need to test a different window.
The next step in this exercise is to fill out the test code.
Your first FEST test
Let’s start with a sanity-check test. If you recall how the model, view, and controller are set up, the Search button starts in disabled mode and is only enabled when the user types a word in the text field. You’ll now write a test to verify that, as shown in the next listing.
Listing 9.9. Test that verifies the Search button is disabled
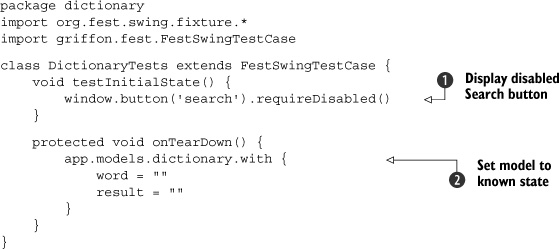
This test turns out to be a walk in the park. Remember setting a name property on the Search button back in listing 9.7? Well, in this test you put it to good use. Notice how the window fixture can locate the button effortlessly by specifying the name of the component you want to find. Pretty much all components can be found in this way.
The button() method on the window fixture returns another FEST fixture, one that knows how to query the state of a pushbutton. You can,
for example, query its text and its enabled state, which is precisely what you need for this test ![]() . FEST’s fixtures provide a set of requireX methods to query and assert a component’s state. The FEST team has gone to great lengths to make error messages comprehensible
and unambiguous. But should you need to check a component’s state directly, or if a requireX method isn’t available in the fixture for some reason, you can get the wrapped component and query it directly. Just remember
that reading properties from a UI component must be done inside the UI thread. This is a task that the FEST fixtures and their
requireX methods do well, and they shield you from dealing with inappropriate threading code.
. FEST’s fixtures provide a set of requireX methods to query and assert a component’s state. The FEST team has gone to great lengths to make error messages comprehensible
and unambiguous. But should you need to check a component’s state directly, or if a requireX method isn’t available in the fixture for some reason, you can get the wrapped component and query it directly. Just remember
that reading properties from a UI component must be done inside the UI thread. This is a task that the FEST fixtures and their
requireX methods do well, and they shield you from dealing with inappropriate threading code.
The remaining code of the test ![]() resets the application’s state by changing property values in the model. It may seem unimportant at this point, because you
only have a single test; but this will become a key aspect for additional tests, because the same application instance is
shared across all integration tests. This means tests must be good citizens and clean up after themselves—otherwise you could
end up with a red bar caused by a false result.
resets the application’s state by changing property values in the model. It may seem unimportant at this point, because you
only have a single test; but this will become a key aspect for additional tests, because the same application instance is
shared across all integration tests. This means tests must be good citizens and clean up after themselves—otherwise you could
end up with a red bar caused by a false result.
Verifying the service once more
Now that you’ve seen FEST in action, you’ll write another test that runs the happy path: typing in a word that exists in the dictionary and clicking the Search button results in the definition being shown in the result area. Pay close attention to the last sentence, and look at the following snippet. Does the text description match the code to the letter?
void testWordIsFound() {
    window.with {
        textBox('word').enterText('griffon')
        button('search').click()
        textBox('result')
            .requireText('griffon: Grails inspired desktop
                          application development platform.')
    }
}
Outstanding! The code matches the description. This is the real power of the FEST API: it’s expressive. Add a bit of Groovy goodness, such as the optional semicolons, and you get a concise DSL for UI testing.
Let’s verify the opposite case: that a word that doesn’t exist results in an error message being displayed. The test mirrors the last snippet, albeit with a few small changes:
void testWordIsNotFound() {
    window.with {
        textBox('word').enterText('spock')
        button('search').click()
        textBox('result')
            .requireText("spock: Word doesn't exist in dictionary")
    }
}
And there you go. These three tests are all that is required to assert that the application is working correctly for now. Assuming all the tests went well, you should end up with a report that looks like figure 9.3.
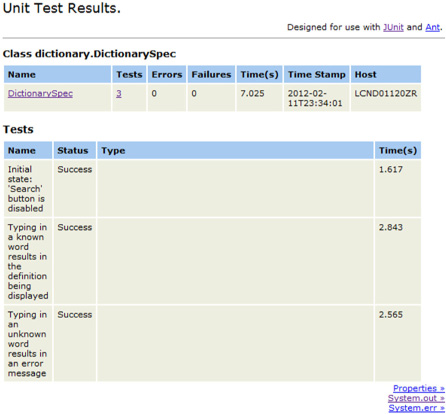
Figure 9.3. HTML report generated for the FEST integration test. All tests succeeded.
The FEST API provides fixtures for all components found in the JDK. There are also a few extensions available for SwingX, JIDE Common Layer (JCL), and even Flamingo. Chances are that there might already be a fixture for the component you need to test. If that isn’t the case, don’t fret; the FEST wiki has plenty of information that will help you dive deeper into the API. The FEST forum is also an active place where you can get your questions answered.
Time to move forward to other types of tests. Yes, it’s time to look at Spock and other goodies.
9.3. Testing with Spock and easyb
We’ve mentioned before that JUnit isn’t the only type of test that can be run when invoking the test-app command. There’s Spock, which we’ve briefly mentioned previously. There’s also easyb, a behavior-driven development (BDD) test framework for Java and Groovy. We’ll cover Spock first, because it’s perhaps the more exotic option, and then we’ll turn to easyb.
9.3.1. Spock reaches a new level
The Spock framework (http://spockframework.org) is the brainchild of Peter Niederwieser, a nice Groovy fellow living in Austria. In Peter’s own words, “Spock takes inspiration from JUnit, jMock, RSpec, Groovy, Scala, Vulcans,[1] and other fascinating life forms.” Spock is a Groovy-based tool for testing Java and Groovy applications. Touting itself as a “developer testing framework,” it can be used for anything between unit and functional tests. What sets Spock apart from the competition is its unique DSL, which lets you write tests that are far more succinct and expressive than, say, JUnit. Besides that, Spock comes with its own tightly integrated mocking framework and provides extensions for popular application frameworks like Grails and Spring.
1 Vulcans?! Seriously: http://en.wikipedia.org/wiki/Vulcans.
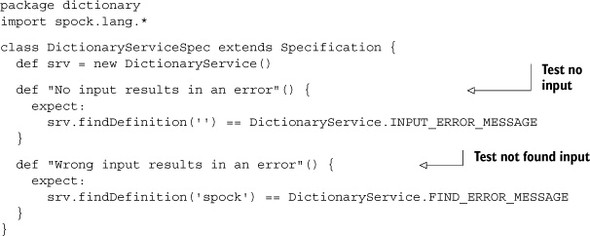
Let’s take a closer look. Install the Spock plugin, and create a unit specification for DictionaryService:
$ griffon install-plugin spock
$ griffon create-unit-spec DictionaryService
You should now have a file named DictionaryServiceSpec.groovy in the test/ unit directory. Open it in an editor, and what do you see? The weirdest name for a test method:
package dictionary
import spock.lang.*

class DictionaryServiceSpec extends Specification {
    def 'my first unit spec'() {
        expect:
            1 == 1
    }
}
It’s true: the name of the method is a Groovy string. In case you didn’t know it, the JVM supports method names with characters that the Java language doesn’t allow, like spaces, but that the Groovy compiler can allow. Therefore, Spock’s AST transform moves test method names into annotations and replaces them with safe names in the AST. The Spock runtime later undoes the effect, for example, by applying the reverse replacement in stack traces. Another feature that might have caught your eye is the usage of a block label and the fact that the expectation (an assertion) doesn’t require the assert keyword.
Spock uses statement labels to divide test methods into blocks, each of which serves a special role. For example, the when block exercises the code under test, and the then block describes the expected outcome in terms of assertions and mock expectations. Another frequently used block is expect, a combination of when and then that’s used for testing simple function calls. Every statement in a then or expect block that produces a value (whose type isn’t void) is automatically treated as an assertion, without having to use the assert keyword.
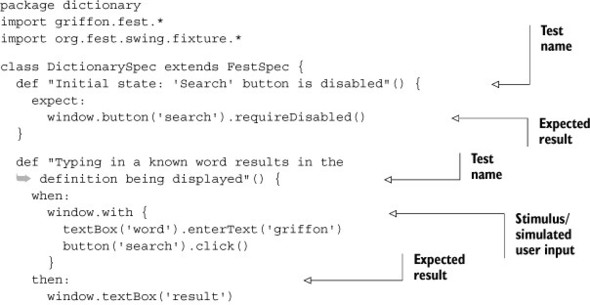
What follows is a crash course on Spock features. You’ll update the Dictionary-Service specification to mirror the previous test you wrote. First you’ll test the error states that occur when invalid input or no input is given to an instance of the DictionaryService. The following listing shows how the specification looks.
Listing 9.10. DictionaryServiceSpec with two test methods
Nothing new here from the original template. You add two test methods for each of the error conditions you may encounter with your service. Perhaps the biggest win so far is a more descriptive test name and implicit assertions. Next you’ll add a third method that checks the existence of words in the dictionary. Recall from listing 9.4 that you had to roll your own assertions and that you looped through a list of words. The following listing shows one way to do it with Spock.
Listing 9.11. DictionaryServiceSpec: correct input results
@Unroll("Entering '#word' results in '#definition'")
def "Correct input results in a definition being found"() {
  expect:
    definition == srv.findDefinition(word)

  where:
   word      | definition
   'Groovy'  | 'An agile and dynamic language for the Java platform.'
   'Grails'  | 'A full stack web application development platform.'
   'Griffon' | 'Grails inspired desktop application development platform.'
}
Pay close attention to the definition line. Notice the usage of two variables that have yet to be defined. Then look at the contents of the where: block. It looks like a table, and the undefined variables appear to be column headers. Now observe the annotation that’s attached to the test method on the first line: you’ll see that the undefined variables are used again. This is a Spock feature called data tables, and it goes like this:
- Spock runs the code block marked with expect: as many times as rows are found in the data table defined in the where: block.
- The column headers represent variable placeholders. For each iteration, they take the appropriate row value according to their column index.
- The @Unroll annotation makes sure a correct number of test methods are reported, even using the variable placeholder values to adjust the method names.
It’s time to run this specification to see what happens. You’ll take advantage of the phase:type test targeting to run this spec and this spec only:
$ griffon test-app unit:spock
After the spec is compiled, you should see output similar to the following:
-------------------------------------------------------
Running 3 spock tests...
Running test dictionary.DictionaryServiceSpec...PASSED
Tests Completed in 217ms ...
-------------------------------------------------------
Tests passed: 5
Tests failed: 0
-------------------------------------------------------
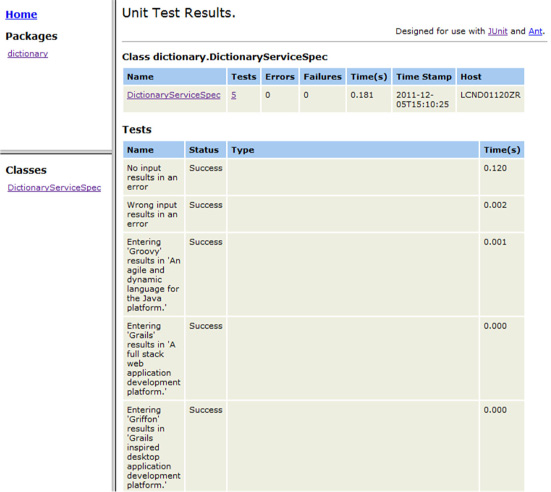
The console report initially states that three Spock tests will be run. Those three tests match the test methods you just wrote. But the number of tests passed is slighter larger—five. This means the @Unroll annotation generated two additional methods, given that there are three rows in the data table. The generated HTML confirms this too, as you can see in figure 9.4.
Figure 9.4. HTML report of DictionaryServiceSpec. Pay close attention to the name of the third method. Notice that the variable placeholders have been replaced with values from the data table.
There are of course more things you can do with Spock, but we’ll leave it for now. Well, not exactly. Curious about using Spock and FEST together? Keep reading!
9.3.2. FEST-enabled Spock specifications
The FEST plugin comes with Spock support out of the box. There’s an additional script named create-fest-spec just waiting to be put to work. Create a FEST specification for your Dictionary application:
$ griffon create-fest-spec Dictionary
This specification will be placed under the test/integration/dictionary directory, given that it requires a running application. Open it, and enter the following code.
Listing 9.12. Full implementation of the DictionarySpec specification
Although we don’t show it, you could use a data table in the first test method. Because this specification and the previous integration test case are so simple, there seems to be little advantage in using Spock and FEST together. But as soon as the tests grow, you’ll notice the difference. Being able to type fewer keystrokes while remaining expressive is a real productivity booster. Figure 9.5 shows the generated reports, which closely resemble previous reports. Spock, FEST, and JUnit integrate seamlessly in Griffon.
Figure 9.5. Test report of a FEST+Spock specification after it runs successfully
That was quite the fun ride! Let’s leave Spock and take a glance at easyb.
9.3.3. easyb eases up BDD
easyb (http://easyb.org) is a BDD[2] framework created and lead by Andrew Glover. If Andy’s name sounds familiar to you, it may be because he is a coauthor of the Groovy in Action book—specifically, of the testing chapter, no less.
BDD is seen by many as the successor to TDD. It allows a team of disparate people (developers, QA, and stakeholders) to come together and agree on what the application must do and how it should do it. Perhaps this doesn’t sound different from a typical waterfall meeting. The catch, however, is that the agreements are recorded in a language that’s nontechnical: that of the stakeholders. Yes, plain natural language. Then another twist comes in: developers can take that language and produce matching code that exercises the application behavior as expected. The trick is in the tool that’s used to record the agreements and execute the code at the same time. Does this sound like a good deal? Let’s try it. Install the easyb plugin, and create a basic story:
$ griffon install-plugin easyb
$ griffon create-unit-story dictionaryService
The file created is named DictionaryServiceStory.groovy and is placed in test/ unit/dictionary. This file contains a user story (a rather simple one) to give you a hint of what easyb can do. The next listing shows the file’s contents.
Listing 9.13. Basic easyb story as created by default
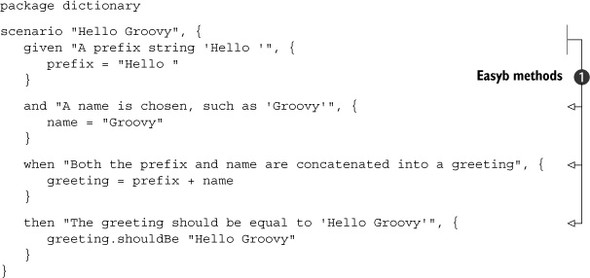
This is a Groovy script with a few keywords ![]() like scenario, given, and, when and then. These keywords are methods that the easyb framework understands. Each method takes two parameters. The first is a String and is typically used to register the behavior in the terms of the stakeholder. The second is what developers write to fulfill
the stakeholder’s expectations, surrounded by a Groovy closure.
like scenario, given, and, when and then. These keywords are methods that the easyb framework understands. Each method takes two parameters. The first is a String and is typically used to register the behavior in the terms of the stakeholder. The second is what developers write to fulfill
the stakeholder’s expectations, surrounded by a Groovy closure.
Running the specification results in a report similar to that written by a JUnit test. But you get an additional report that presents the story in layman’s terms. Run the story by invoking the following command:
$ griffon test-app unit:easyb
After the command has finished, look in target/test-reports/plain. You’ll see two text files. Open the one that has stories in its name. This is what it should contain:
1 scenario executed successfully. (0 behaviors were ignored)
  Story: dictionary service
    scenario Hello Groovy
      given A prefix string 'Hello '
      given A name is chosen, such as 'Groovy'
when Both the prefix and name are concatenated into a greeting
then The greeting should be equal to 'Hello Groovy'
That’s language that stakeholders can understand perfectly. With easyb, you can go from one mode (stakeholder) to the next (developer) and back without much effort.
You might be wondering about the create-integration-story script. Yes, it works under the same rules as a JUnit integration test or a Spock integration specification. Yes, this also means you can combine easyb and FEST. Having several options is great, isn’t it? We won’t reproduce an easyb+FEST story; its content is similar to what you’ve seen already, due to the simple nature of the application. But you can modify the current story to have it exercise the DictionaryService. The following listing defines a single scenario for the happy path: the service is asked for a definition you know for certain can be found.
Listing 9.14. easyb story that tests whether a word can be found
package dictionary
import static dictionary.DictionaryService.*

scenario "DictionaryService can find the word 'Griffon'", {
   given "an instance of DictionaryService is available", {
       service = new DictionaryService()
   }

   when "the word 'Griffon' is used as parameter", {
       result = service.findDefinition('Griffon')
   }

   then "the definition should be found", {
      result.shouldBe "Grails inspired desktop application development
                      platform."
    }
}
Running this story results in the following report found in target/test-reports/plain/ easyb-stories-unit.txt:
1 scenario executed successfully.
  Story: dictionary service
    scenario DictionaryService can find the word 'Griffon'
      given an instance of DictionaryService is available
      when the word 'Griffon' is used as parameter
      then the definition should be found
easyb makes a distinction between stories and scenarios. You can create scenario hierarchies and even have scenarios as preconditions of other scenarios. The possibilities multiply with each scenario you write.
Now you know there are several ways to test a Griffon application, but tests aren’t the only tools you can use to measure the health of an application. You should apply metrics to it too, and that’s precisely the topic we’ll discuss in the next section.
9.4. Metrics and code inspection
Code-analysis tools have existed for the Java language since its early days. A myriad of options exist, both in the open source and commercial software spaces. In this section, we’ll mention the open source Java-based tools, but our focus is on Groovy-based code analysis tools. We’ll look at how they can be used to code issues.
Let’s start with two plugins that deal with Java code.
9.4.1. Java-centric tools: JDepend and FindBugs
A lot of ink has been devoted to JDepend and FindBugs. A quick search on the internet will give you plenty of results ranging from the tools’ official websites to blog posts, forums, presentation slides, and, last but not least, configuration and code examples.
JDepend (www.clarkware.com/software/JDepend.html) is a tool mainly used to measure the coupling within classes. Unfortunately, it gives accurate readings for Java source code only. But given that a Griffon application supports both Groovy and Java sources, it might be a good idea to run this tool against a codebase of moderate to large size. Of course, there’s a JDepend plugin for Griffon that you can install.
FindBugs (http://findbugs.sourceforge.net) is a popular choice with Java developers. This tool comes loaded with tons of rules and metrics that can help make your code rock solid by identifying both common and obscure pitfalls of the Java language. FindBugs can be run against Groovy source too, but there may be some false positives given that the code generated by the Groovy compiler hasn’t been migrated completely (this claim is true for the 1.7.x series at least).
Here’s an example. The compiler generates calls that create new instances of primitive wrappers as was the custom in Java 1.4; that is, the compiler generates bytecode that calls new Integer(1) and new Long(2), for example. Referencing primitive wrappers since Java 1.5 has changed slightly, to Integer.valueOf(1) and Long.valueOf(2). The former calls are inefficient and should be avoided whenever possible, in favor of the latter form. Still, you’ll get accurate readings for your Java source code. As you might expect, there’s a FindBugs plugin for Griffon too.
If these tools are Java-source centric, what can be done for Groovy source? It turns out a couple of tools are available that can produce similar reports, but that work specifically with Groovy source. Those tools are CodeNarc and GMetrics plugins. We’ll also cover the Cobertura plugin.
9.4.2. Reporting Groovy code violations with CodeNarc
The elevator pitch for CodeNarc (http://codenarc.sourceforge.net) is “FindBugs for Groovy code.” Ambitious but true. CodeNarc’s creator, Chris Mair, has done what some thought was a very difficult task: build a static code analysis tool for a dynamic language. What makes CodeNarc special on its own is that it relies on Groovy’s AST transformation framework to walk the Groovy code and discover code violations. Yes, the same AST transformation framework used by @Bindable. Give it a try and see what you get for the Dictionary application:
$ griffon install-plugin codenarc
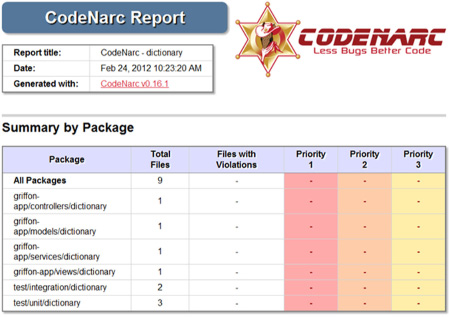
That should do the trick. This plugin adds a new script that calls CodeNarc’s code processor with a standard configuration. You can change and tweak that configuration at will. Be sure to review the plugin’s documentation page (http://griffon.codehaus.org/Codenarc+Plugin) to learn about those tunable configuration flags. Running Code-Narc as follows against the current application yields the report shown in figure 9.6:
$ griffon codenarc
Figure 9.6. CodeNarc report for the Dictionary application. Everything appears to be in order.
Hmmm. The report looks clean. Is it true that the code is well crafted? Yes, at least for CodeNarc’s standard set of violations. You’ll now change the code a bit and run CodeNarc again, to see if you get a different picture of the codebase. Sprinkle a few declared but unused variables in the code, paired with a couple of unnecessary imports. Make sure you catch an exception in the controller code (you already have a try/finally block that can be used for this negative refactoring). Ready? Re-run CodeNarc, and inspect the generated report. You might get one that looks like figure 9.7.
Figure 9.7. Files in violation as found by CodeNarc. The controller fails three rules, whereas the view fails just one.
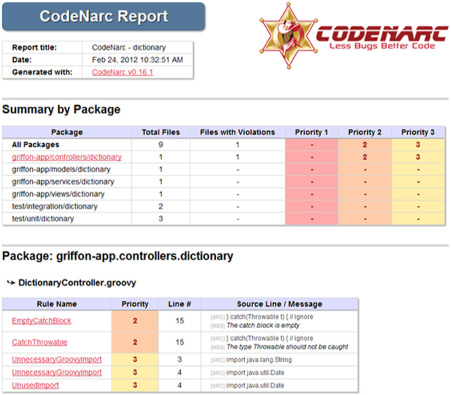
Excellent! Wait—we’re getting excited because the code now fails a set of violations? Ahem. Well, you just verified that the code was in a pristine and healthy condition. The generated CodeNarc report contains links to explanations of each rule validation. It also links to the offending source lines and code, making your job of fixing the problems much easier.
Next in our list of tools is the GMetrics plugin.
9.4.3. Measuring Groovy code complexity with GMetrics
The test bar may be green. The code may be healthy given a certain set of rules. But is it too complex? Is there a tight coupling between two classes that should be broken into a simpler form? These are the questions GMetrics (http://gmetrics.sourceforge.net) can answer for your Groovy code.
GMetrics is another of Chris Mair’s projects. As a matter of fact, GMetrics’ configuration closely mirrors CodeNarc’s. You’ll now install and run GMetrics:
$ griffon install-plugin gmetrics
$ griffon gmetrics
Those commands should install the plugin and run GMetrics with the default configuration.
GMetrics measures three things in your code:
- The number of lines per class
- The number of lines per method
- Cyclomatic complexity[3]
Figure 9.8 shows the report generated against the example codebase.
Figure 9.8. GMetrics report on the Dictionary application. The class and method line numbers look OK, but the cyclomatic complexity is high.
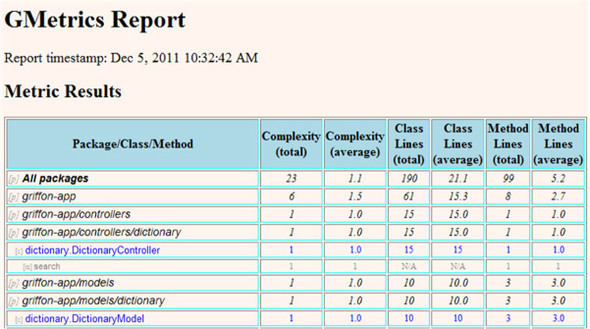
Well, well. Looks like the number of lines for classes and methods are well within a reasonable range. The cyclomatic complexity numbers, on the other hand, are a surprise. Scroll down further, and you’ll see a different picture: the cyclomatic complexity of the test code is really high (16), whereas the cyclomatic complexity of the application is really low (6). The most complex class of the production code is DictionaryService. That was to be expected because it’s the only one that has branching code. A high cyclomatic complexity number isn’t too worrying at the moment. But keep an eye on those numbers; they’ll help you spot potential problems in your test code.
There’s one last tool we’d like to cover. It’s always a good idea to know how much of the production code is exercised by your tests, especially when TDD isn’t the driving methodology. When you follow TDD to the letter, you’ll end up more often than not with 100% code coverage.
9.4.4. Code coverage with Cobertura
When it comes to code-coverage tools for the Java platform, Cobertura (http://cobertura.sourceforge.net) is the one many people think of. That might well be because of its open source nature. Other popular choices for instrumenting code and obtaining a code-coverage measure are EMMA (http://emma.sourceforge.net) and Atlassian’s Clover (www.atlassian.com/software/clover). But when this chapter was written, the Cobertura-based plugin was the only one available. Be sure to visit the Griffon Plugins page (http://artifacts.griffon-framework.org/plugins) to see if a new coverage tool has been added as a plugin. You can install the Cobertura plugin with the following command:
$ griffon install-plugin code-coverage
Once the code-coverage plugin has been installed, you only need to run a set of tests with an additional command flag:
$ griffon test-app –coverage
This command exercises all tests found in the Dictionary application with all production classes instrumented for code coverage. Figure 9.9 shows the coverage report obtained after running this command.
Figure 9.9. Code-coverage report with Cobertura
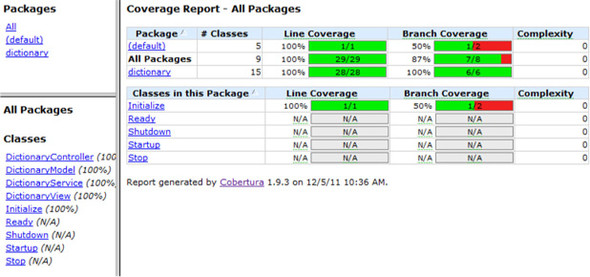
It appears that you have good code coverage: it’s reported at 100%! But the report also shows that one of the classes/scripts isn’t fully covered. The script in question is the Initialize script. Glancing at its content, you discover the truth. At the end of the file is this line:
SwingBuilder.lookAndFeel((isMacOSX ? 'system' : 'nimbus'), 'gtk', ['metal',
  [boldFonts: false]])
It includes a branching statement. Given that the condition is platform-specific, there’s no way you can verify for certain that all lines of code and all branches have been covered. But you’re close. You can leave it as it stands.
In case you’re wondering about code instrumentation, it’s basically a code transformation that inserts new bytecode that registers the execution of code paths. The Cobertura plugin is preconfigured to overwrite the original bytecode with instrumented code, and it also cleans up after itself. Pay close attention to the compiled code before you package and ship it. You don’t want to inadvertently ship a version that contains instrumented code, do you?
It’s been a wonderful journey through the guts of your application. Thanks to Griffon’s testing facilities and its many test-related plugins, you can be certain that your application is in good shape.
9.5. Summary
Testing is one of those tasks that often get relegated to the end of the development cycle. Reasons vary, but typically it’s because writing testing code isn’t as fun as writing production code. The Griffon framework recognizes this and tries its best to make writing and executing test code as fun as doing the same with production code.
Griffon provides a test-app command that comes loaded with a powerful and flexible set of options that allows you to run tests in pretty much any way you want. Test executions are separated into phases and types. Phases can cover many types, and types can span several phases. This is great when you want to run all Spock specifications regardless of their phase, or if you want to run all unit tests regardless of whether they’re JUnit tests, Spock specifications, or easyb stories.
If writing testing code seems like an arduous task, writing UI testing code is often viewed as certain doom. FEST brings a refreshing experience to writing tests from the UI’s perspective, thanks to its fluent interface design, generics-aware API, and powerful abstractions.
You’ve also learned that JUnit is no longer the only game in town. Spock provides a rich testing DSL by stretching the capabilities of the Groovy language. easyb veers to BDD, allowing a disparate team to communicate effectively and get results in their own terms.
Finally, you used CodeNarc, GMetrics, and Cobertura to probe and measure the health of an application.
Now that you know how to build a Griffon application and make sure it’s working correctly, we can examine the last step in the application development cycle: shipping the application to your customers.