
Chapter 11. Working with plugins
- Working with plugins
- Creating your own plugins
We’ve covered a lot of ground discussing what Griffon can do for you, but there’s a limit to what it can do alone. After all, it can’t predict what a future app will need—sometimes Griffon requires a helping hand. This is where plugins fit in.
You’ve seen plugins being put to work before. Recall from chapter 7 that Swing-XBuilder provides additional threading facilities—this builder can easily be added to your application by installing a plugin. In chapter 9 you learned about FEST and easyb, two testing frameworks that can be configured to work with any Griffon application. Using these tools is as simple as installing the appropriate Griffon plugin. And in the last chapter, you learned how platform-specific installers can be created, also via a plugin.
In this chapter, we’ll look at how plugins work and how to make one. First, let’s find out how plugins can be located, installed, and uninstalled.
11.1. Working with plugins
As with all the recurring tasks you can perform with Griffon, there are a few command targets exposed by the griffon command that are available to you when working with plugins.
In this section, we’ll briefly cover each plugin-related target.
11.1.1. Getting a list of available plugins
You may want to know which plugins are already available before you decide to create one. Chances are there’s already a plugin that does what you need.
Invoking the list-plugins command target at your command prompt displays a table of all plugins in the central plugin repository (located at http://artifacts.griffonframework.org). Be mindful that this command will attempt to establish a network connection to a remote server, so in some cases a corporate firewall may prevent you from reaching the server. If this happens, make sure you configure an HTTP proxy before launching the list-plugin command. Griffon includes a set of commands that deal with HTTP proxies, most specifically add-proxy and set-proxy. Figure 11.1 shows the first plugins in that list.
Figure 11.1. A list of available plugins, with their names, versions, and short descriptions
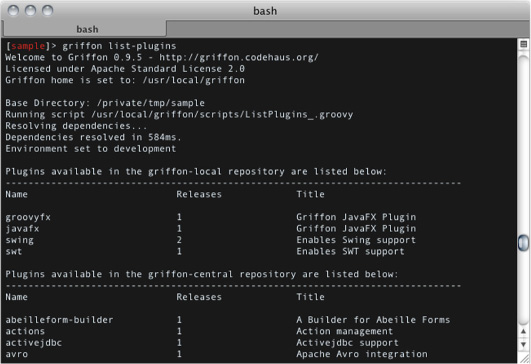
Another way to view available plugins is to point your browser to the following address: http://artifacts.griffon-framework.org/plugins. That page provides additional information about each plugin, such as compatible platforms and UI toolkits. The next command target provides more information about a specific plugin.
11.1.2. Getting plugin-specific information
Now that you know which plugins are available, you may want to know more about a particular plugin without installing it. This can be accomplished by calling the plugin-info command target with the plugin’s name as parameter. Figure 11.2 shows what you get when querying the Spring plugin.
Figure 11.2. Information on the Spring plugin. Notice that this plugin works with every UI toolkit and on every platform.
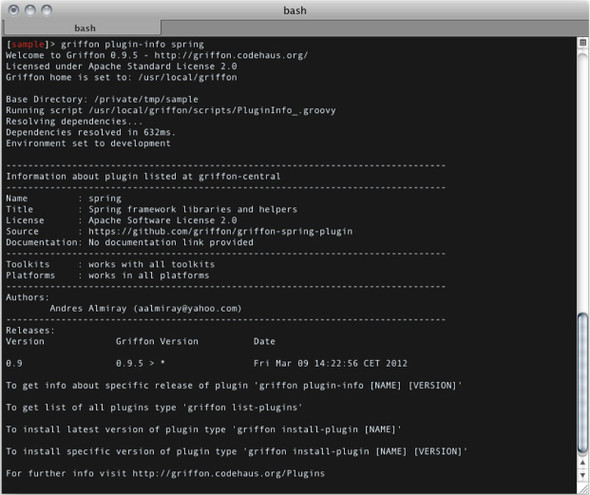
Invoking the command yields the author’s name and email address, which may be useful should you get stuck using the plugin. You also get a link to the plugin’s documentation page and additional information on UI toolkit and platform compatibility. The last line will list all available releases in the repository, should you choose to install a version other than the latest one.
Speaking about installing, that’s our next command target.
11.1.3. Installing a plugin
Installing a plugin is quite easy. You’ve done it a few times already. The most typical method is the following:
$ griffon install-plugin gsql
This will install the latest version of the GSQL plugin (http://artifacts.griffon-framework.org/plugin/gsql).
Alternatively, you can install a specific version if the latest one doesn’t suit your needs. You just need to add a version number as a parameter:
$ griffon install-plugin gsql 0.8
Remember that you can list all available releases of a plugin by invoking plugin-info. What about unreleased plugins? Let’s say a friend of yours is developing a new plugin, and it hasn’t been released yet and you’d like to try it out. Or maybe you’re doing plugin development and want to use your unreleased plugin in a project. Is it possible to install the plugin?
Yes! You can install a plugin if you have access to the zip file that contains the plugin. You need to specify the full path to the zip file as a parameter, instead of the plugin name, like this:
$ griffon install-plugin /scratch/dev/custom/griffon-custom-0.1.zip
No matter how you install the plugin, you’ll see output similar to what’s shown in figure 11.3.
Figure 11.3. Installing the Clojure plugin. Notice that this plugin provides new scripts.
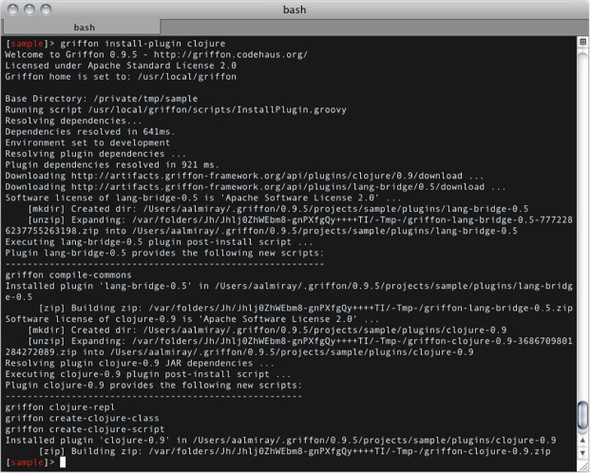
Installing a plugin also installs all of its dependencies. In this case, the Clojure plugin depends on the LangBridge plugin. Both plugins provide new scripts that become available through the griffon command. You saw this in chapter 8 when we looked at build-time events. Notice also that the Clojure plugin creates a new directory when installed (the directory name is src/clojure). You’ll see how that works when you create your first plugin, just a few sections ahead.
Installing a plugin isn’t just a matter of downloading a zip file and expanding its contents in a specific directory—the application’s metadata must be updated too. For example, installing the Clojure plugin in an application named sample would result in these entries in the sample application metadata file (application.properties):
#Griffon Metadata file
#Sun Mar 11 18:20:06 CET 2012
app.griffon.version=0.9.5
app.name=sample
app.toolkit=swing
app.version=0.1
archetype.default=0.9.5
plugins.clojure=0.9
plugins.lang-bridge=0.5
plugins.swing=0.9.5
Next, if you have the option to install a plugin, it makes sense to have an option to remove it as well.
11.1.4. Uninstalling a plugin
To remove a plugin, call the uninstall-plugin command target. To uninstall the Clojure plugin, type
$ griffon uninstall-plugin clojure
This target won’t just remove the plugin files from their install directory; it will also update the application’s metadata properties and trigger uninstall events.
Now that you know how to work with plugins, we’ll look at the two types of plugins you can create.
11.2. Understanding plugin types
We’ve said that plugins extend what Griffon as a framework can do. They can also extend what an application can do. There are two types of plugins: build time and runtime plugins. Build-time plugins are perhaps the easiest to create, but runtime plug-ins give you more bang for your buck. We’ll cover both in this section, starting with build-time plugins.
11.2.1. Build-time plugins
Build-time plugins are usually seen as framework extensions. They extend what Griffon can do, but they aren’t available while the application is running. This is a departure from the Grails plugin system (on which Griffon’s is based) because every plugin in Grails is available both at build time and runtime.
These are the main responsibilities of a build-time plugin:
- Make additional libraries available at runtime—This is what the SwingXBuilder plugin does.
- Provide additional scripts and build-time libraries—The FEST and easyb plugins do this.
- Deliver an addon—Addons are, as you’ll see later in the chapter, runtime plugins.
Of course, you can mix these responsibilities. For example, the Clojure plugin provides new scripts and delivers an addon that allows an application to load Clojure code at any time while running.
Creating a plugin
You create plugins much the same way as you create applications—by invoking a specialized command target:
$ griffon create-plugin foo
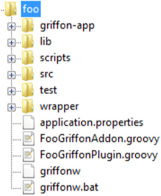
This will create a plugin named foo, whose structure is shown in figure 11.4.
Figure 11.4. The directory structure of a plugin. Notice the resemblance to an application’s structure. The plugin descriptor is highlighted.
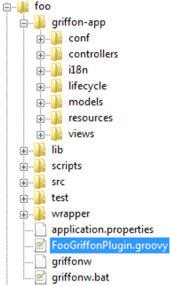
Go ahead and open the plugin descriptor (FooGriffon-Plugin.groovy) in your favorite editor. The following listing contains a summarized version of its contents (comments and reminder text have been omitted).
Listing 11.1. Initial contents of a plugin descriptor
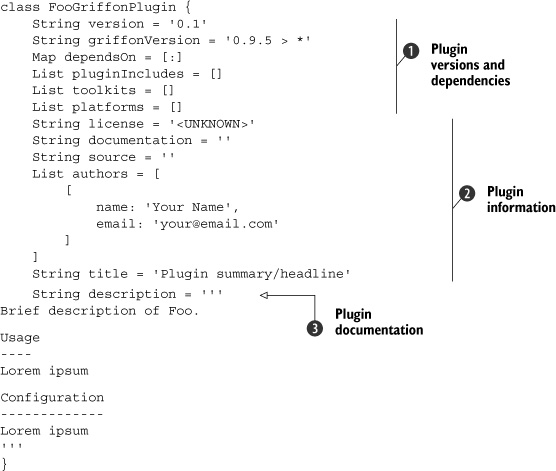
Every plugin must define a version number ![]() . Although the suggested value is a number, you can change the value to be alphanumeric, like 0.2-BETA, or make it a full normal string, like bombastic. Griffon expects the numbering scheme to follow the major.minor.patch pattern but doesn’t enforce it. As a matter of fact,
a popular convention during development is to append -SNAPSHOT to your plugin version, which clearly states that the plugin is currently under development and is not yet ready to be released.
. Although the suggested value is a number, you can change the value to be alphanumeric, like 0.2-BETA, or make it a full normal string, like bombastic. Griffon expects the numbering scheme to follow the major.minor.patch pattern but doesn’t enforce it. As a matter of fact,
a popular convention during development is to append -SNAPSHOT to your plugin version, which clearly states that the plugin is currently under development and is not yet ready to be released.
The next property, griffonVersion, informs the Griffon build with which Griffon versions the plugin can work. It can be set as a simple number or as a range, like this:
lowerBound > upperBound
You can read the previous range as “works with any version from lowerBound up to upperBound, inclusive.” You can use a wildcard (*) for either lowerBound or upper-Bound, but not both at the same time. For example, the following range
* > 1.0
means “any version up to 1.0,” whereas the next one
1.0 > *
means “from 1.0 upwards, including the latest version.”
The last property on the first block, dependsOn, defines which plugins are marked as dependencies. Dependencies are declared in a map by name and version number. The version number may again be a simple number, an alphanumeric string, or even a version range. The following snippet states a dependency on the transitions and rest plugins:
Map dependsOn = [transitions: '0.1.3', rest: 0.2]
Starting from version 0.3, Griffon supports several UI toolkits, not just Java Swing, as well as platform-specific libraries. We won’t get into details right now, but you should know that a plugin can state which platforms it can run on (using the platforms property), and which toolkits it’s compatible with (using the toolkits property).
The plugin information properties ![]() are the plugin’s first line of documentation. The information you place there will be displayed by both the list-plugins and plugin-info command targets, so be sure to write what you think will be useful to you and to others who might use your plugin. Also, be mindful about the license that governs the code you’ll write. It’s always
a good idea to let others know immediately under which rules your code can be used with theirs. The value you specify in the
license property will be displayed every time the plugin is installed.
are the plugin’s first line of documentation. The information you place there will be displayed by both the list-plugins and plugin-info command targets, so be sure to write what you think will be useful to you and to others who might use your plugin. Also, be mindful about the license that governs the code you’ll write. It’s always
a good idea to let others know immediately under which rules your code can be used with theirs. The value you specify in the
license property will be displayed every time the plugin is installed.
The last property you see in the descriptor, documentation ![]() should be a multiline string containing a few paragraphs about how to use the plugin. The format accepted by this string
is Markdown text (http://daringfireball.net/projects/markdown).
should be a multiline string containing a few paragraphs about how to use the plugin. The format accepted by this string
is Markdown text (http://daringfireball.net/projects/markdown).
At this point you can make changes to the descriptor as you see fit. You can also add as many scripts to the plugin as desired (remember to use griffon create-script). You can even add an _Events.groovy script file (as described in chapter 8). This last script will allow your plugin to participate as a build event handler.
Speaking of events, we’ll discuss install and uninstall events next.
Plugin events
Recall from figure 11.3 that the Clojure plugin performs some actions upon installation. Every plugin has the option to execute custom code when installed, and there’s a similar option for when they’re uninstalled. As you may suspect, this behavior is attained via a special pair of scripts that follow a specific naming convention.
Look inside your plugin’s scripts directory. You should see at least three files whose names starts with an underscore (_) character. That character marks those scripts as special—you can’t invoke them directly using the griffon command.
The first file, _Install.groovy, can be used to execute code when the plugin is installed. This is a regular Gant script file; you’re free to place any code that may help your plugin in this script, the most typical scenario being the creation of a directory.
The next file, _Uninstall.groovy, will be called when the plugin is uninstalled. This is the time to clean up any plugin-specific artifacts that should not be present if the plugin is gone. Also be sure to remove any configuration settings related to the plugin that might cause trouble if left behind.
Finally there’s _Upgrade.groovy. This script is called when griffon upgrade is invoked on your application. This is the perfect moment to synchronize any differences between plugin versions installed on an application.
That’s all for now regarding build-time plugins. Let’s continue with runtime plugins and then you’ll be ready to make a plugin of your own.
11.2.2. Runtime plugins
Runtime plugins (or addons, as we prefer to call them) can dramatically enhance what an application can do. They’re responsible for delivering a wide range of runtime elements. Addons are usually packaged within a plugin, which means build-time plugins are the main delivery option for an addon.
An addon can be created by invoking the create-addon command target:
$ griffon create-addon foo
This command will generate an addon descriptor, similar to a plugin descriptor, and will append extra code to the plugin’s special scripts. You’ll typically run this command inside an existing plugin project with the same name. If you don’t, the create-addon command will first create the plugin project and then create the addon descriptor. It’s important to note that the addon descriptor and the plugin names must match; that is, if the addon name is foo, then the name of the plugin must also be foo. That code is needed to configure the addon so it can be used by an application; most of the time it can be left untouched because the Griffon conventions kick in. The convention is that the addon’s name should be the same as the plugin’s. This is enforced if you call create-addon outside of a plugin project; a new plugin matching the addon’s name will be automatically created. Figure 11.5 shows the layout of a typical plugin/addon combination project.
Figure 11.5. An addon named foo has been added to a plugin, also named Foo. The addon descriptor is highlighted.
Open the addon descriptor in an editor, and you’ll see plenty of comments and reminder text for each of the possible contributions an addon can deliver. Table 11.1 summarizes what an addon can bring to an application.
Table 11.1. A list of all possible runtime elements that an addon can deliver to an application. Not all of them need to be specified.
|
Element |
Description |
|---|---|
| factories | Nodes that will become available to MVC members |
| methods | Additional methods to be injected to MVC members |
| props | Additional properties to be injected into MVC members |
| mvcGroups | New MVC groups |
| events | Runtime event handlers |
|
attributeDelegates preInstantiateDelegates postInstantiateDelegates postNodeCompletionDelegates |
Additional strategies used to tweak node building |
Addons have their own life cycle, and they’re also tightly integrated with the runtime event system. The Griffon runtime will fire a series of events before and after each addon has been loaded and configured, and before and after all addons have been processed. You can listen to these events by placing appropriate application event handlers at griffon-app/conf/Events.groovy (see chapter 8 for a quick reminder on how to do that). Table 11.2 summarizes the events pushed by the application while loading addons.
Table 11.2. Events fired by an application while addons are loaded at boot time
|
Arguments |
Description |
|
|---|---|---|
| LoadAddonsStart | app | Fired before any addons are loaded. |
| LoadAddonStart | name, addon, app | Fired just before an addon’s contributions are processed. |
| LoadAddonEnd | name, addon, app | Fired after an addon has been fully processed. |
| LoadAddonsEnd | app, addons | Fired after all addons have been loaded and processed. The addons argument is a map of addon instances keyed by name. |
If you’re curious, you may be wondering about the first lines of an addon descriptor. There are four methods whose signatures match the following snippet:
void addonInit(GriffonApplication app) { ... }
void addonPostInit(GriffonApplication app) { ... }
void addonBuilderInit(GriffonApplication app) { ... }
void addonBuilderPostInit(GriffonApplication app) { ... }
These methods are invoked by an application at specific points during startup. The first method is the local equivalent to the LoadAddonStart event, and the second method is equivalent to LoadAddonEnd. The remaining methods are called before and after builder contributions (factories, methods, properties, and builder delegates) are processed. You aren’t forced to implement these methods; in fact, they’re usually left untouched. You only need to be concerned with them should your addon need to run specialized code while it’s being initialized.
Enough theory—it’s time to build a plugin plus an addon to exercise what you just learned.
11.3. Creating the Tracer plugin and addon
Everybody knows that as an application grows, it gets harder and harder to visualize data flows, particularly when the user interacts with the application. During development, developers often rely on two techniques to keep track of the data flow: either launch the application in debug mode, attach it to a debugger, place some breakpoints at the appropriate places and see the data live, or litter the code with println statements. But there’s a third alternative: dynamically intercept method calls. Seasoned Java developers may recognize this technique as applying an around advice or a before advice, as suggested by aspect-oriented programming (AOP). AOP became popular in the early 2000s and successfully penetrated the enterprise in tandem with the Spring framework (www.springframework.org). If AOP is an alien concept to you, don’t worry. Groovy greatly simplifies applying AOP-like techniques thanks to its extensive metaprogramming capabilities; this means you don’t need to learn an AOP framework nor an AOP API in order to enhance your application.
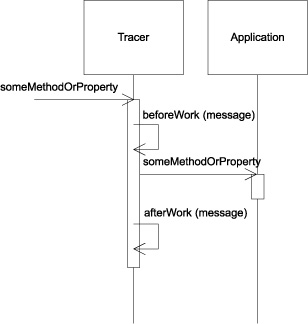
It’s settled, then. You’ll use an AOP-like approach to intercept controller actions and model properties, similar to what figure 11.6 shows. By intercepting a controller action, you’ll know when it has been activated; intercepting model properties will let you know when the data has changed and how.
Figure 11.6. Intercepting a call to an application
You’ll package this new behavior with a plugin/addon combination. This means you can install it at any time, and then uninstall it when it’s no longer needed, thus leaving your code untouched and relieving you from launching a debugger.
11.3.1. Bootstrapping the plugin/addon
The first step is to bootstrap the plugin and addon descriptors. You know what’s coming, don’t you? That’s right! You’ll use the Griffon command-line tools to create both descriptors, as explained in section 11.2.
For this project, you’ll name the plugin Tracer. Execute the following commands at the console prompt:
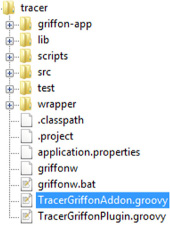
$ griffon create-plugin tracer
$ cd tracer
$ griffon create-addon tracer
You should have now a familiar set of files, similar to those shown in figure 11.7.
Figure 11.7. Contents of the Tracer plugin. You can see the plugin and addon descriptor files created by the Griffon commands. The addon descriptor is selected.
You’ll keep the plugin/addon simple, which means you won’t include any external libraries or create additional files. All the behavior will be concentrated in the addon descriptor. Go ahead and modify the plugin descriptor as you see fit.
Next you need to edit the addon descriptor by adding a skeleton of the behavior you want to provide, as shown in the following listing.
Listing 11.2. Initial addon code in TracerGriffonAddon.groovy
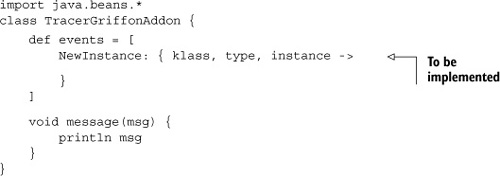
You can see that this addon relies on an event handler to intercept and inject new behavior into a recently created instance. The new code will be injected into every single instance created by the application, regardless of its artifact type—some common artifact types are controller and service, for example. You can further tune this design choice if you want; for example, you could restrict the type to controller and model only.
message() is a generic message-printing method. Alternatives to this implementation would be to use a proper logging mechanism, or to send the message to a file or even to a database. You have the last word on this design choice too—we’re just presenting the basics.
Now it’s time to start adding some behavior to the addon.
11.3.2. Intercepting property updates
For now, you’ll rely on the fact that observable beans publish change events whenever one of their properties changes value. Recall from chapter 3 that Java uses Property-ChangeEvent and PropertyChangeListener to enable change events and their handlers. Adding a PropertyChangeListener to the intercepted instance should be enough for now.
Edit the addon descriptor once more, so that its contents match the following listing. The revised parts are shown in bold.
Listing 11.3. Intercepting property updates on an observable instance
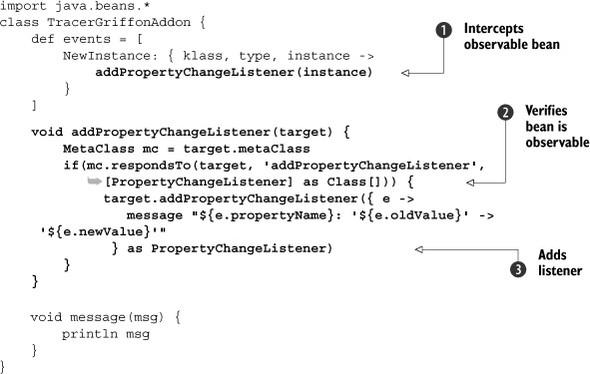
At ![]() you add a call to a helper method that will be responsible for inspecting the bean and applying the new behavior. You can
see at
you add a call to a helper method that will be responsible for inspecting the bean and applying the new behavior. You can
see at ![]() that the helper method doesn’t blindly assume that the instance is observable; it checks via the instance’s metaclass to
see if it responds to the addPropertyChangeListener method. In this way you avoid an exception from being thrown at runtime. Finally at
that the helper method doesn’t blindly assume that the instance is observable; it checks via the instance’s metaclass to
see if it responds to the addPropertyChangeListener method. In this way you avoid an exception from being thrown at runtime. Finally at ![]() you define a closure and cast it to PropertyChangeListener using Groovy’s as keyword. This is much better than defining an inline inner class,[1] don’t you think?
you define a closure and cast it to PropertyChangeListener using Groovy’s as keyword. This is much better than defining an inline inner class,[1] don’t you think?
1 Groovy has supported inner class definitions since version 1.7, but casting a closure is more concise.
11.3.3. Using the plugin
You have enough behavior to try out the plugin. You need to package it before you use it, though. This is again a simple task thanks to the griffon command line. Type the following at your command prompt:
$ griffon package-plugin
You should see a few lines pass by and finally get a griffon-tracer-0.1.zip file in the current directory. The name of the plugin is computed by convention. The version number is taken from the plugin descriptor, so make sure to update that file whenever you want to build a newer version.
You can install the plugin now that it has been packaged. Remember from section 11.1.2 that you can specify the path to a plugin zip if the plugin isn’t available from a repository, which is precisely the case here.
Try installing the plugin in an existing Griffon application—using the install-plugin command and giving it the path of the zip file that was generated by the package-plugin command—and see what happens when you run the application. For illustration purposes, you’ll use a simple yet effective calculator as see in figure 11.8. It takes two inputs and calculates their sum once you click the button. Inputs, the output, and the button’s enabled state are bound to observable properties on the model.
Figure 11.8. The calculator application. The first screen shows the application as it looks when it’s launched. The second screen shows the application after inputs have been entered and the Result button has been clicked.

The application code is shown in the following listing. We won’t discuss it thoroughly as our main concern is the Tracer plugin. First comes the view, where you can see all bindings being set up.
Listing 11.4. The calculator’s view
application(title: 'sample',
  pack:true,
  locationByPlatform:true,
  iconImage: imageIcon('/griffon-icon-48x48.png').image,
  iconImages: [imageIcon('/griffon-icon-48x48.png').image,
               imageIcon('/griffon-icon-32x32.png').image,
               imageIcon('/griffon-icon-16x16.png').image]) {
   gridLayout(cols: 2, rows: 3)
   label 'A:'
   textField(columns: 10,
             text: bind(target: model, 'inputA') )
   label 'B:'
   textField(columns: 10,
             text: bind(target: model, 'inputB') )
   button('Result ->', actionPerformed: controller.click,
          enabled: bind{ model.enabled })
   label text: bind{ model.output }
}
The next listing shows the model. You can appreciate all property definitions. There’s also a local event handler that updates the model’s enable property if both inputs have a value.
Listing 11.5. The calculator’s model
import groovy.beans.Bindable
import griffon.transform.PropertyListener

@PropertyListener(enabler)
class SampleModel {
    @Bindable String inputA
    @Bindable String inputB
    @Bindable String output
    @Bindable boolean enabled = false

    private enabler = { evt ->
        if(evt.propertyName in ['enabled', 'output']) return
        enabled = inputA && inputB
    }
}
Last comes the controller, shown in the following listing. Remember that it uses proper threading to calculate the output outside of the EDT, and then it goes back inside the EDT to update the view by setting the model’s output property.
Listing 11.6. The calculator’s controller
class SampleController {
    def model

    def click = {
        execSync { model.enabled = false }
        String a = model.inputA
        String b = model.inputB
        try {
            Number o = Double.valueOf(a) + Double.valueOf(b)
            execSync { model.output = o }
        } catch(NumberFormatException nfe) {
            execSync { model.output = Double.NaN }
        } finally {
            execAsync { model.enabled = true }
        }
    }
}
If you made the plugin correctly, you should get a console output every time a model property is updated. Launching the application yields
inputA: 'null' -> ''
inputB: 'null' -> ''
Hold on a second! What just happened? If you remember what was discussed in chapter 3, bindings take effect as soon as they’re parsed in a View script; this means both inputs change value from null to empty strings, as those are the values of their respective source text fields. Updating both inputs with values (see figure 11.7) and clicking the button yields the following output in the console:
inputA: '' -> '1'
enabled: 'false' -> 'true'
inputB: '' -> '2'
enabled: 'true' -> 'false'
output: 'null' -> '3.0'
enabled: 'false' -> 'true'
Perfect! Now you know which values are held by model properties at a certain point during the application’s execution, without needing to modify the application’s code. You don’t have a time reference on each output message, though perhaps adding one would be in order; the logging alternative looks more appealing now.
Let’s get back to the tracer plugin in order to intercept whenever a controller action is called.
11.3.4. Intercepting action calls
In the next listing you’ll go back to the plugin sources and edit the addon descriptor. You’ll add another intercept handler to the NewInstance event handler, much like you did before.
Listing 11.7. Updated addon descriptor with additional behavior
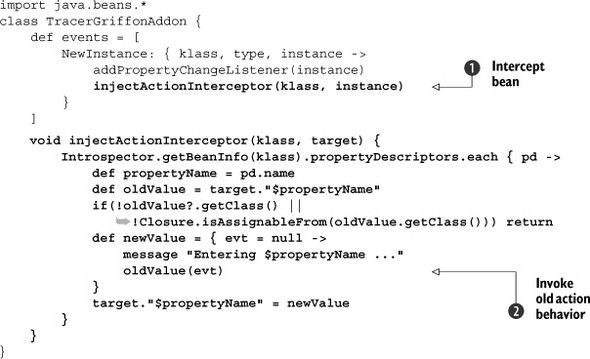
The new handler requires both the instance and its class ![]() because you’re going to use the standard Java Beans inspection mechanism to figure out which properties can be intercepted.
This is better than blindly assuming a specific property format or property definition. The handler then inspects the instance’s
class and iterates over all PropertyDescriptor instances that the class exposes. The handler performs some metaprogramming magic for each property whose value is a closure—it
skips those that don’t match the required criteria. You also save a reference to the current property value, which will allow
you to call the default behavior later on.
because you’re going to use the standard Java Beans inspection mechanism to figure out which properties can be intercepted.
This is better than blindly assuming a specific property format or property definition. The handler then inspects the instance’s
class and iterates over all PropertyDescriptor instances that the class exposes. The handler performs some metaprogramming magic for each property whose value is a closure—it
skips those that don’t match the required criteria. You also save a reference to the current property value, which will allow
you to call the default behavior later on.
Next you define the new value for a target action, which turns out to be another closure. Note how it relies on the previous
saved reference ![]() to the old behavior; this is how you can chain things together. Using Groovy’s closures makes these steps a snap—you’d have
to jump through a few hoops if you were using regular Java instead.
to the old behavior; this is how you can chain things together. Using Groovy’s closures makes these steps a snap—you’d have
to jump through a few hoops if you were using regular Java instead.
The last step is to assign the new behavior to the instance’s property. You can rely on Groovy’s dynamic dispatch capabilities to resolve the actual property name.
But what about the intercepting code? It calls the message() method and then forwards the call to the old behavior. This is known as an around advice in AOP terminology, because you’re decorating the call before it’s executed and then invoking the original behavior. Note that you can remove the original behavior in this manner, either intentionally or inadvertently.
This concludes what you can do with this plugin. It’s time to test the changes. Don’t forget to repackage the plugin by issuing the following command:
$ griffon package-plugin
If at any time you feel you need to start over, at least in terms of packaging, you can issue the clean command. This will remove any compiled sources and the latest version of the plugin zip file.
11.3.5. Running the plugin again
Install the plugin in the same fashion as you did before, by pointing the install-plugin command target to the zip file’s path in your filesystem.
Before you install the plugin, double-check that you have the latest version. Many headaches can be averted by a few seconds of carefully verifying that your tools, artifacts, and sources are in the proper state.
Running the calculator application and clicking the button, following the same steps as you did before, yields the following output on the console. The updated output is shown in bold:
inputA: 'null' -> ''
inputB: 'null' -> ''
inputA: '' -> '1'
enabled: 'false' -> 'true'
inputB: '' -> '2'
enabled: 'true' -> 'false'
Entering click ...
output: 'null' -> '3.0'
enabled: 'false' -> 'true'
There you have it! Of course, we only looked at a small fraction of what addons can do. The most common uses for addons are to provide new node factories and meta-class enhancements, besides event handlers, as you just saw. Be sure to browse the extensive list of plugins and addons that can be found at Griffon’s plugin repository (http://artifacts.griffon-framework.org/plugins). You’ll find plenty of addons that provide node factories, as you’ll see in chapter 12.
Feel free to play around with the Tracer plugin, or better yet, create a plugin of your own. Once you’re comfortable with it, you may want to release it to the public so that others can use it in their own applications. This is the topic of the next section.
11.4. Releasing the Tracer plugin
Releasing a plugin is another task that’s automated by the Griffon command line. Isn’t that great? Back in section 11.2.1, we described the properties that belong to a plugin’s descriptor. The Griffon command line relies on them to generate appropriate metadata in the form of a JSON formatted file.
Perhaps you’ve noticed that file already while packaging your plugins. Here’s the generated metadata for the Tracer plugin (the file’s name is located in target/package/plugin.json):
{
    "type": "plugin",
    "name": "tracer",
    "title": "Plugin summary/headline",
    "license": "<UNKNOWN>",
    "version": "0.1",
    "source": "",
    "documentation": "",
    "griffonVersion":"0.9.5 > *",
    "description": "Brief description of Tracer.

Usage
----
Lorem
     ipsum

Configuration
-------------
Lorem ipsum",
    "authors": [
        {"name":"Your Name","email":"[email protected]"}
    ],
    "dependencies": [],
    "toolkits": [],
    "platforms": []
}
It looks a bit impersonal, because we didn’t update the plugin descriptor with specific information (author, title, and license elements). Nevertheless, it gives you an idea of what information will be stored in the plugin repository that can be used to identify a plugin. This same information is used by the install mechanism when downloading and installing a plugin in an application.
There are at least two approaches to releasing a plugin into the public:
- Manual
- Standard
The manual way gives you more choices in source storage because you’re fully responsible for adding plugins to your source control system. You’re free to choose the hosting solution for the plugin’s zip file and source code. The drawback is that the plugin won’t be visible with the list-plugins and plugin-info command targets, at least not until custom plugin repositories become available in Griffon.[2] You basically package the plugin using the method you now know, and then publish the zip file to a URL where other people can download it.
2 We expect this feature to be ready by the time this book hits the shelves.
The standard way will add all the plugin sources to the Griffon plugin repository. You must be an authorized developer in order to do this, so make sure you send a request to the developer’s list ([email protected]) before attempting to release a plugin using this approach.
After you’re authorized, invoke the following command at your console prompt to release the Tracer plugin using the standard approach:
$ griffon release-plugin
This command target will take care of several tasks:
- Compile the plugin’s sources
- Generating the plugin zip and descriptor
- Uploading the plugin zip to the central repository
- Updating the central plugin metadata
You can appreciate why you need to be an authorized developer to use this release approach.
No matter which approach you follow, it’s always a good idea to send a message to the user list ([email protected]) to let other developers know about the availability of your plugin. Feedback is a powerful tool; rely on your peers to get that feedback sooner rather than later. And don’t forget: release early, release often.
11.5. Summary
Perhaps the greatest strength found in the Griffon framework is its ability to be extended by plugins. This is an inherited feature from Grails. Both frameworks share a lot of traits in their plugin systems; for example, listing, installing, and uninstalling a plugin is virtually the same.
But when it comes to developing a plugin, you’ll start to notice a few differences. Griffon distinguishes between build time and runtime plugins, which are also known as addons. This difference allows Griffon to be precise about the type of artifacts, libraries, and behavior that’s exposed at build time versus at runtime.
A build-time plugin can add new libraries and provide build-time events and scripts. This is basically how you extend the framework’s capabilities. Good examples of this kind of plugin are the testing-related FEST and easyb, because they never affect the running application.
An addon can add not only new libraries but also other runtime aspects, such as application event handlers, metaclass enhancements, and node factories. Addons expose another set of events that can be used to coordinate their initialization; and addons can even communicate with each other, whether they have a strict dependency on one another or not.
Regardless of what kind of plugins you choose to build, you’ll eventually want to publish them so other developers can use them. There are two approaches to achieving this goal, manual and standard, both with their pros and cons. No matter which approach you choose, just remember that the Griffon command line is there to help you get to your goal.
Now it’s time to make your application look great. In the next chapter, we’ll examine different techniques and plugins that can be used to enhance the look of your application.