
Chapter 8. Listening to notifications
- Setting up event handlers on your build
- Setting up application event handlers
- Adding listeners to model updates
- Transforming any class into an event publisher
Think for a moment how your typical work day starts. You get up on time (most likely) because your alarm clock rings. You grab some warm toast for breakfast because you hear it popped from the toaster. On your way to work, you know to stop on the street because the traffic light changes to red.
What is common to all these cases is that you take action as a response to some stimulus, whether auditory (your alarm clock ringing) or visual (the traffic light). It’s as if you’re reacting to signals sent by different agents. Could you imagine your morning routine without all those signals? It could turn out to be a bit chaotic. It might also be tedious, because you’d constantly have to check for a particular condition to see if you could proceed. Sometimes it’s better to react to a signal rather than poll for it.
The same principle applies to applications. You know that during a build, a predefined set of steps must take place. After all, the build must be reproducible every time. But a build should also be extensible: not every shoe fits every foot. Sometimes you’ll need to tweak the build. Signals, or events as we’ll call them from now on, are a perfect fit to make this happen.
In this chapter you’ll see how to use build events to change and/or extend the build process. Next, you’ll take the information you learned about using events during build time and see how the same idea applies to runtime using application events. Finally, you’ll learn how easy it is to add event publishing to any class using the @EventPublisher annotation.
Let’s start by looking at how events can be used to change and/or extend the build process.
8.1. Working with build events
We’re sure you’ve become accustomed to Griffon’s command-line tools by now. As you may recall, the scripts rely on Gant (http://gant.codehaus.org), a Groovier version of Ant (http://ant.apache.org), to work. Each script has a predefined set of responsibilities. Some scripts even piggy-back on others to get the job done. What you may not know is that you can interact with the build process, and even change it, by means of build events.
In this section, you’ll see that the build process uses build events to inform listeners which step the build process is in. Using this information, listeners can take specific actions, such as post-processing resource files after the compile step has finished.
To interact with events, an event handler must be registered. You use a special script to register handlers, and the build system locates the script by means of the naming convention. Before we get into the details of using this script, let’s see how to create scripts with ease.
8.1.1. Creating a simple script
Scripts are just one of many of the Griffon artifacts available to you. You might have noticed the scripts directory located under your application’s root directory; it’s empty by default.
Scripts are simple to create, but just to be on the safe side this first time, let’s rely on the command line. Type the following commands at your prompt:
$ griffon create-app buildEvents
$ cd buildEvents
$ griffon create-script First
This creates a file named First.groovy inside the scripts directory. If you omit the script name, the command will prompt you for one.
Let’s peek into the file you just created:
target(name: 'first',
        description: "The description of the script goes here!",
        prehook: null, posthook: null) {
    // TODO: Implement script here
}

setDefaultTarget('first')
There isn’t much to see, other than the definition of the script’s default target.
If you’re familiar with Ant you’re more than ready to start hacking build scripts. If you’re not, don’t worry; here are a few hints to get you up to speed.
Direct your browser to http://ant.apache.org/manual, and read a few pages, especially those that show how to set up a sample build file. You may notice an example with a snippet similar to this:
<target name="init">
  <mkdir dir="build"/>
</target>
Armed with this knowledge, edit your First script to make it look like this:
target(name: 'first',
        description: "The description of the script goes here!",
        prehook: null, posthook: null) {
    ant.mkdir(dir: "build")
}
setDefaultTarget(first)
Do you see the trick? Basically, you have to transform XML code into Groovy code. You should be able to call any Ant target from within your scripts; just remember to qualify it with the ant. prefix.
Gant scripts are not only a groovier version of Ant’s XML-based scripts, they’re also valid Groovy scripts. We know what you’re thinking right now, and you’re correct: you can use any of Groovy’s features and mix them with Ant targets. Yes, you can mix closures, lists, maps, iterators, and pretty much everything you’ve learned so far pertaining to Groovy. Isn’t that great? Not only do you get rid of XML’s visual clutter, but you also gain a compile time checked script with powerful programming features.
It’s time to continue with build events and their handlers now that you’ve got the basics of scripts.
8.1.2. Handling an event with the events script
To interact with events, you must register an event handler using the specially named script _Events.groovy. You can create it by hand or use the create-script command.
Given that this is a special script, let’s start with a blank file. Fire up your favorite editor, create a text file, paste the following code into it, and save it under scripts as _Events.groovy.
Listing 8.1. Barebones _Events.groovy script listening to a single event
eventCompileStart = {
    println "Griffon is compiling sources"
    ant.echo message: "This message written by an Ant target"
}
Go back to your command prompt, and compile the buildEvents application. You should see the following output:
Welcome to Griffon 0.9.5 - http://griffon.codehaus.org/
Licensed under Apache Standard License 2.0
Griffon home is set to: /usr/local/griffon

Base Directory: /tmp/buildEvents
Running script /usr/local/griffon/scripts/Compile.groovy
Resolving dependencies...
Dependencies resolved in 702ms.
Environment set to development
Resolving plugin dependencies ...
Plugin dependencies resolved in 763 ms.
Griffon is compiling sources
     [echo] This message written by an Ant target
...
Interesting, isn’t it? Toward the bottom, Griffon reassures you that it found your script file as you get the printouts specified in the script itself. This is great; in the event (no pun intended) you didn’t set the correct event handler (more on that in just a moment), you still know your event script was located. Next, Griffon compiles sources, which verifies that a regular Groovy statement can be used on the script. Finally, you use one of Ant’s basic targets, the echo target.
This is all fine and dandy; the script is working correctly because you followed the convention for naming and writing an event handler. Perhaps it’s time to explain that convention, don’t you think? Look again at your _Events.groovy script, and maybe you can spot it.
Event handlers are actually closure properties set on the script’s binding. They’re of the form
event<EventName> = { args -> /* your code*/}
You can infer from _Events.groovy that the Griffon compile script fires a CompileStart event. Table 8.1 summarizes the most common events and the targets that fire them.
Table 8.1. Events you’ll often see in a Griffon script
There are of course more events than these. You’ll find a comprehensive list in the Griffon Guide (http://griffon.codehaus.org/guide/latest/), or you can glance at the scripts source code ($GRIFFON_HOME/scripts) if you’re feeling adventurous.
You now know how to handle an event, but what about publishing one? That’s the topic we’ll cover in the next section.
8.1.3. Publishing build events
If you think writing an event handler was easy, just wait until you see how you publish an event! Every script you write will have the ability to publish events as long as you include the Init script. Luckily, that’s what create-script generates. Let’s write a simple example using the Ping concept.
Create a new script named Ping.groovy. Use create-script to make it easier:
$ griffon create-script Ping
Open it in your editor, and make sure it looks like this:
target(name: 'ping',
        description: "The description of the script goes here!",
        prehook: null, posthook: null) {
    event("Ping", ["Howdy!"])
}
setDefaultTarget('ping')
To add an event handler for the Ping event, open _Events.groovy (or create it in the scripts directory if you don’t have it already). Remember the conventions? Do this:
eventPing = { msg ->
    println "Got '${msg}' from ping"
}
The only thing left to do is test it. Your Ping script is like any other Griffon script, which means you can launch it using the griffon command. Scripts are not only useful for handling events, but also work as an extension mechanism, at least at build time.
Tip
We’ll explain more about Griffon’s extension mechanism, both at build time and runtime, in chapter 11.
To launch the Ping.groovy script, go to your command prompt and type
$ griffon ping
Upon invoking that command, you should see something like this as output:
Welcome to Griffon 0.9.5 - http://griffon.codehaus.org/
Licensed under Apache Standard License 2.0
Griffon home is set to: /usr/local/griffon

Base Directory: /private/tmp/buildEvents
Running script /private/tmp/buildEvents/scripts/Ping.groovy
Resolving dependencies...
Dependencies resolved in 776ms.
Environment set to development
Resolving plugin dependencies ...
Plugin dependencies resolved in 796 ms.
Got 'Howdy!' from ping
Excellent! You just wrote your first custom event paired with an event handler. And it only took a few lines of code.
As you can see in Ping.groovy, publishing an event is only a matter of calling what appears to be a method named event(). This method (which is actually a closure provided by the Init script, if you want to get technical about it) takes two parameters: a String that identifies the type of event to fire and a List of arguments. In this case, the Ping event sends a predefined message as a single argument. Assuming you’re working within the boundaries of a Groovy script, you can send any valid Groovy object as an argument—even closures, if that makes sense for the particular problem at hand.
Now you know what to look for in a Griffon script when determining which events can be fired at a specific point. Just do a search on event(), and you’re in business.
The mechanism to build events is simple yet powerful. Wouldn’t it be great if there was a similar mechanism at runtime? It turns out you can have that too.
8.2. Working with application events
An application can fire events in much the same way as build events are fired. That is, the syntax is the same, but the source is a bit different. Don’t worry, we’ll cover the details. Event handlers, on the other hand, come in several flavors. Given these facts, let’s cover event handlers first. As you might expect, there are some default events published by your application that you can try.
8.2.1. E is for events
We trust you remember the mnemonic rule related to Griffon’s configuration files (see chapter 2 for a refresher). We’re talking about your ABCs: A for application, B for builder, and C for config. Those are the standard (and required) files, but a few more are optional. That’s the case with E for events.
Let’s start with a fresh application. Go to your command prompt, and type
$ griffon create-app appEvents
The simplest way to register an application event handler is to create a file named Events.groovy (be mindful of the missing underscore at the beginning of the filename) and place it under griffon-app/conf. Open your editor and enter the following:
onBootstrapEnd = { app ->
   println "Application bootstrap finished"
}
Save the Events.groovy file, and run your appEvents application. A few lines after the application’s jar has been packed and the application has been launched, you should see this on your output:
Application bootstrap finished
Your event handler is open for business—congratulations! You’ll notice a slight difference from build event handlers. The convention here uses on instead of event as a prefix. This is by design; it marks a clear distinction between build-time and runtime event handlers.
Table 8.2 summarizes all the events fired by every application by default. They are listed in the order you will encounter them as the application loads. All of these events have a single argument: the app instance.
Table 8.2. Application events tied to life-cycle phases
|
Event |
Fired when? |
|---|---|
| Log4jConfigStart | After the application’s logging configuration has been read. |
| BootstrapStart | After the application’s config has been read and before anything else is initialized. |
| LoadAddonsStart | Before any addons have been initialized. |
| LoadAddonStart | Before a specific addon is initialized. |
| LoadAddonEnd | After an addon has been initialized. |
| LoadAddonsEnd | After all addons have been initialized. |
| BootstrapEnd | At the end of the Initialize phase. |
| StartupStart | Before any MVC group is created. Coincides with the Startup life-cycle phase. |
| StartupEnd | After the Startup life-cycle phase has finished. |
| ReadyStart | Before the Ready life-cycle phase starts. |
| ReadyEnd | After the Ready life-cycle phase has finished. |
| ShutdownRequested | When a component calls the shutdown() method on the application. |
| ShutdownAborted | When the Shutdown sequence is aborted by a ShutdownHandler. |
| ShutdownStart | Before the Shutdown life-cycle phase starts. |
Note
If you’re wondering what addons are, skip to chapter 11. But come back to continue learning about application events!
Table 8.3 lists the three other important events fired by an application, which are related to MVC groups.
Table 8.3. Application events launched by createMVCGroup() and destroyMVCGroup()
|
Event |
Fired when? |
|---|---|
| NewInstance | An object is created via app.newInstance() Arguments: Class class, String type, Object instance Example: event("NewInstance", [FooModel, "model", fooModel]) |
| InitializeMVCGroup | Before group members are initialized—that is, before mvcGroupInit() is called Arguments: MVCGroupConfiguration config, MVCGroup group Example: event("InitializeMVCGroup", config, group]) |
| CreateMVCGroup | After an MVC group is created Argument: MVCGroup group Example: event("CreateMVCGroup", [group]) |
| DestroyMVCGroup | After an MVC group is destroyed Argument: MVCGroup group Example: event("DestroyMVCGroup", [group]) |
We hope that tables 8.2 and 8.3 give you enough information to keep you busy with default events. But the Events.groovy script isn’t the only way to register application event handlers. There are a few more techniques, which we’ll discuss next.
8.2.2. Additional application event handlers
You might have glanced at the base interface of all Griffon applications, if you have a curious nature and a thing for reading source code. griffon.core.GriffonApplication defines the following contract related to events:
void addApplicationEventListener(Object handler);
void addApplicationEventListener(String name, Closure handler);
void addApplicationEventListener(String name, RunnableWithArgs handler);

void removeApplicationEventListener(Object handler);
void removeApplicationEventListener(String name, Closure handler);
void removeApplicationEventListener(String name, RunnableWithArgs
  handler);
You can gather from this that
- Any object may become an application event listener.
- Closures and instances of RunnableWithArgs may be registered as application event listeners.
The first statement is true as long as the object follows a specific set of conventions. The conventions are similar to the ones we just laid out for Events.groovy. First, a listener may be a map, a script, or an object. Next, depending on the type of object, you have the following options:
- Map—Keys must match event names. Values must be closures or instances of RunnableWithArgs that take the same number of arguments.
- Script—The same rules as Events.groovy apply: each event handler is of the form on<EventName> = { args -> /* code */ }.
- Object—You must define either a method or a closure property that follows the naming convention. Either of the following will work:
def onEventName = { args -> /* code }
void onEventName(args) { /* code */
Let’s look at an example.
Event handler options in action
Here’s a tip: all controllers are registered as application event listeners automatically. You’ll use that fact in this small example.
Once again, let’s start with a fresh application. Go to your command prompt and type
$ griffon create-app events
Open the EventsController.groovy file in your editor, and paste in the code found in the following listing.
Listing 8.2. EventsController displaying all event-handler options at its disposal
class EventsController {
    void mvcGroupInit(Map params) {
        app.addApplicationEventListener([
            ReadyStart: { a ->
                println "ReadyStart (via Map closure event handler)"
            },
            ReadyEnd: new RunnableWithArgs() {
                public void run(Object[] args) {
                    println "ReadyEnd (via Map runnable event handler)"
                }
            }
        ])
        app.addApplicationEventListener("ReadyEnd") { a ->
            println "ReadyEnd (via Closure event handler)"
        }
     }

    def onReadyEnd = { a
        println "ReadyEnd (via Closure property event handler)"
    }

    void onReadyStart(a) {
        println "ReadyStart (via method event handler)"
    }
}
As you can see, on this controller you define four event handlers, all of them tied to the start and end of the Ready life-cycle phase. A map-based event listener is registered with the application first. Notice that the keys are the same as the events you intend to handle. The map contains two event handlers; the first is defined as a closure, and the second is an instance of RunnableWithArgs. Next a closure is registered as an application event listener; the name of the event is set as the first argument of the register method, and the closure is set as the second argument. Next you use a closure property as an event handler. It looks similar to an action closure, doesn’t it? If that bothers you, then you’ll be happy to know that you can choose a method as an event handler too.
Running the application should yield an output like this:
ReadyStart (via method event handler)
ReadyStart (via Map closure event handler)
ReadyEnd (via Closure property event handler)
ReadyEnd (via Map runnable event handler)
ReadyEnd (via Closure event handler)
Hurray! All the event handlers are working perfectly, and the job wasn’t that hard. The power of convention over configuration manifests itself again.
We need to discuss one last important piece of information regarding application event handlers: their relationship with threading concerns.
Event handlers and threading
As you may recall from chapter 7, developing multithreaded applications in Swing is hard. Fortunately, you discovered how Griffon greatly simplifies working with multiple threads and the EDT, making a difficult task much simpler. What, then, are the implications of publishing multiple events and having several event handlers ready to process those events?
Well, if you send a lot of events in the EDT and also process them in the EDT, you’ll get an unresponsive application. Clearly, there are times when firing an application must be done outside of the EDT, as if the whole call was surrounded with doOutside{} or execOutsideUI{}. But it’s also true that sometimes you want to post an event and return immediately. You can instruct a handler to run inside a particular thread regardless of how the event was published. You can always use any of the threading facilities discussed in chapter 7 to wrap the handler’s body; this way, you’ll be sure the handler will be executed in a particular thread no matter which thread was used to fire the event.
Pay close attention to this threading fact, because it will most likely trip you up if you publish an event in the EDT and expect the handler to behave synchronously. Remembering that controller actions are executed outside the EDT by default means that publishing an event in the body of an action will happen outside the EDT as well.
If you happen to change the default settings for actions, remember to update the event-firing code accordingly. Oh, that’s right, we haven’t discussed how events can be fired. That’s the topic of the next section.
8.2.3. Firing application events
Recall from earlier in this chapter that you fire a build event by calling event(event-Name, args) on your script. Well, firing an application event is done pretty much the same way; the only difference is that you have to qualify the call using the app variable. As an added benefit, all Griffon applications let you fire application events that don’t require an argument without needing to specify an empty list. This is because the remaining contract on griffon.core.GriffonApplication defines the following methods:
void event(String eventName);
void event(String eventName, List params);
void eventAsync(String eventName);
void eventAsync(String eventName, List params);
void eventOutsideUI(String eventName);
void eventOutsideUI(String eventName, List params);
The first pair of methods generates an event that will notify listeners in the same thread as the publisher—in other words, the event is handled synchronously to the publisher. This is the default way to publish application events, because all of them should be handled immediately after they’ve been posted. But if a listener chooses to handle the event in a different thread, it can use any of the threading facilities we discussed in chapter 7.
The second pair of methods posts an event and return immediately. This means event listeners will be notified in a different thread than the publisher. It doesn’t matter if the current thread is the UI thread; these methods guarantee that the event will be handled in a different thread. You can use these methods when your code requires announcing a change but doesn’t need to wait for any listeners to finish processing the announcement.
The final pair is a combination of the previous two. These methods post an event, but listeners may or may not be notified in the same thread as the publisher. The condition that controls which thread is used is whether the publisher’s thread is the UI thread. In other words, if the event is fired outside the UI thread, then the listeners are notified in the same thread—exactly what happens with the first pair. But if the publisher’s thread happens to be the UI thread, the listeners will be notified in a different thread, as with the second pair.
Let’s follow up with another example. You’ll have a controller fire a Ping event and handle it as well.
Setting up PingController
Start by creating a new application name ping. You’ll begin with the event logic and then move forward to the view and model. Open the PingController.groovy file that was created with the application. The following listing shows the minimal code required to achieve your goal.
Listing 8.3. PingController sending and handling a custom application event
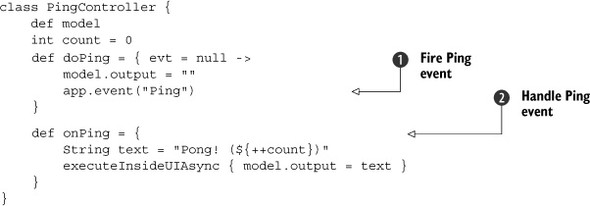
PingController does nothing more than react to an action, triggered by a view element (which you’ll define shortly). The action clears a
value in the model, which will be used to display some kind of result judging by its name. Finally it fires a Ping event ![]() . This event is so simple it doesn’t require arguments. Ping events are handled at
. This event is so simple it doesn’t require arguments. Ping events are handled at ![]() , where you learn that your suspicions about model.output were correct. A counter keeps track of how many times the controller has received a Ping event.
, where you learn that your suspicions about model.output were correct. A counter keeps track of how many times the controller has received a Ping event.
Time to move on to the model.
Setting up pingmodel
You need to add only one property to the model. Open PingModel in your editor. It should look like this:
import groovy.beans.Bindable

class PingModel {
    @Bindable String output = ""
}
Your last task is to fill the details on the view.
Setting up pingview
You know what’s coming, don’t you? From your editor, open PingView.groovy, and then paste in the contents of the following Listing.
Listing 8.4. PingView.groovy
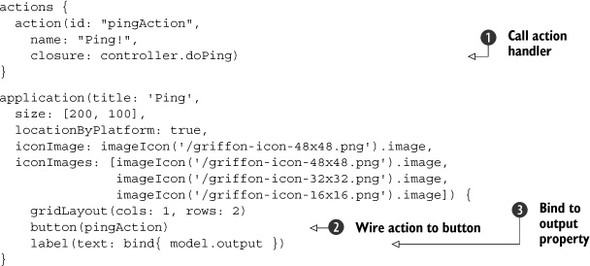
Listing 8.4 shows a bare-bones view. Its responsibilities are defining an action that will call out to the controller’s doPing ![]() action handler. That action is later wired up with a button
action handler. That action is later wired up with a button ![]() , which means a Ping event will be fired every time you click the button. Finally, a label
, which means a Ping event will be fired every time you click the button. Finally, a label ![]() is set up as a witness of the Ping event handler: its text property is bound to the model’s output property.
is set up as a witness of the Ping event handler: its text property is bound to the model’s output property.
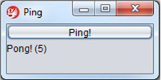
When you run the application, you’ll see a small window with a button and an empty label. Click the button a few times, and you’ll see the label’s text change. Figure 8.1 shows the state of the application after clicking the Ping! button five times.
Figure 8.1. Application after clicking the Ping! button five times
Congratulations! Your first custom application event is up and running. But this example is trivial, and its behavior could easily be attained by means of binding to a model property. What’s the benefit of this approach? Let’s add a second MVC group into the mix to find out.
Getting multiple controllers to communicate
Remember that the create-app command created a default MVC group. For this step, you need to create another MVC group named pong. Use the create-mvc command to make it simpler:
$ griffon create-mvc pong
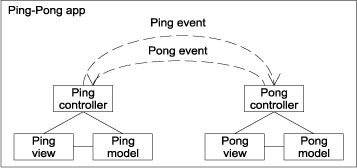
This new MVC group will send a Pong event every time it receives a Ping. You’ll also fix PingController to handle any Pong events that may be sent through the application. Figure 8.2 describes the event flow between MVC groups.
Figure 8.2. When you click the Ping button, the Ping controller fires a Ping event. The event is processed by the Pong controller, which fires a Pong event processed by the Ping controller.
First, open PongController in your editor, and add a Ping event handler that triggers a Pong event. This time you’ll send a message too:
class PongController {
    int count = 0

    def onPing = {
        app.event("Pong", ["Pong! Pong! (${++count})"])
    }
}
PongController also keeps a count of how many pings it has received. The Pong event sends a message to its handlers; that way you know how many Pings PongController has received so far.
Next, back to PingController. You’ll fix it so an instance of the pong MVC group is created, and append a Pong event handler as well. Append the following snippet at the end of the PingController class:
void mvcGroupInit(Map args) {
    createMVCGroup("pong")
}

def onPong = { pongText ->
    execInsideUIAsync { model.pongText = pongText }
}
We chose to have you create an instance of the pong MVC group by calling create-MVCGroup() directly. Of course, this isn’t the only way to do it; you could have added pong to the list of groups to be initialized at startup by tweaking Application.groovy. (Refer to chapter 6 for more information about MVC groups.)
Now, you need to modify the Ping application’s model and view. In the previous code, you can see a reference to model.pongText. This is a new model property, and you need to add it. Do so by appending the following property definition to PingModel:
@Bindable String pongText = ""
The final step is fixing PingView to display the value of model.pongText; otherwise you won’t be able to see if the Ping and Pong event handlers are properly set up! Open PingView again. Locate the layout, button, and label definitions, and overwrite them with the following snippet:
gridLayout(cols: 1, rows: 3)
button(pingAction)
label(text: bind{ model.output })
label(text: bind{ model.pongText })
That should take care of it. You’re ready to launch the application to test it.
Watching your controllers communicate
Type griffon run-app at your command prompt. When the application’s main frame appears, click the button a few times. You should see something like what’s shown in figure 8.3.
Figure 8.3. Playing ping-pong with events

It works! Now you have the basis of intercommunicating controllers via events. You might have noticed that both controllers define a Ping event handler and there’s only one source of Ping events. Extrapolating the conditions of this example, you can have many listeners on the same application event, which is great. But what if you want a bit of privacy? Say you only want Ping and Pong events to be sent between a small set of objects. We’re afraid application events won’t solve this problem. What if the event mechanism could be reused somehow? Aha! That’s the topic of the next section.
8.3. Your class as an event publisher
Glancing back to the previous discussions of how griffon.core.GriffonApplication supports application events and their listeners by means of a set of conventional methods, it looks like you could get away with adding a similar contract to any class. All you would need to do afterward would be to fill in the blanks.
Before you start designing a way to keep track of the multiple options of event listeners—remember, you can register maps, closures, scripts, and any objects—let’s think for a second. This task has already been solved by the framework; surely there’s a piece of reusable code that you can plug into your own classes. It happens that such support exists in the form of an interface named griffon.core.EventPublisher. The contract is as follows:
void addEventListener(Object handler )
void addEventListener(String name, Closure handler)
void addEventListener(String name, RunnableWithArgs handler)
void removeEventListener(Object handler)
void removeEventListener(String name, Closure handler)
void removeEventListener(String name, RunnableWithArgs handler)
void publish(String name, List args = [])
void publishAsync(String namename, List args = [])
void publishOutsideUI(String eventName, List args = [])
Griffon provides a base implementation of the EventPublisher interface as well as a composable component called EventRouter. It’s usually the case that an event-publishing class implements the EventPublisher interface and uses a composed instance of EventRouter to delegate all method calls pertaining to events. Great; armed with this knowledge, you can add that contract to your classes, making sure each method makes a delegate call to a private instance of EventRouter.
If you think this sounds like copying and pasting a lot of boilerplate code, we couldn’t agree more! The task of grafting an EventRouter into a particular class sounds eerily familiar to the task of grafting PropertyChangeSupport into a class to make it observable. Do you remember how the latter was solved? Using the @Bindable annotation and the power of the AST Transformations framework. You can bet there’s a similar solution for this case too.
Enter the @griffon.transform.EventPublisher annotation and its companion AST transformation. By annotating a class with this annotation, you get all the benefits of event publishing. No need to copy and paste code. How’s that for productivity?
We’re sure you’re itching to try this new feature, so let’s dive in! You may be familiar with the game Marco Polo[1] or its variations. In this section, you’ll try your hand at an EventRouter as you simulate four Marco Polo players.
8.3.1. A basic Marco-Polo game
The Marco Polo game requires at least three participants. One of the participants is blindfolded. The others can stay put or move around. The blindfolded player must locate one of the other participants by using sound as a guide. At any given time, this player may shout “Marco!” When that happens, all other players must respond by shouting “Polo!” simultaneously. If the blindfolded player locates another player by touching them, then the latter is blindfolded, everyone takes new positions, and the game restarts.
In this section, you’ll replicate a portion of the Marco Polo game by having a controller serve as the Marco player and a few beans act as Polo players. All objects will communicate via events.
Create the application by typing the following command at your command prompt:
$ griffon create-app marco
The next steps in building this Marco Polo example are as follows:
- Set up the controller (Marco).
- Create the players (Polo).
- Set up the model and view.
Setting up the Controller (Marco)
The controller contains half the logic you want to implement. It should be able to
- Register players as event listeners
- Fire a Marco event at any time
- React to Polo events sent by players
The next listing demonstrates how each of these responsibilities can be implemented. Note that this code doesn’t assert when the searching player locates any of the others.
Figure 8.4. A diagram of several players in the Marco Application triggering “Marco” events at any given time
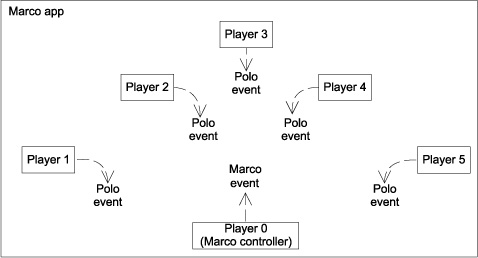
Listing 8.5. MarcoController.groovy
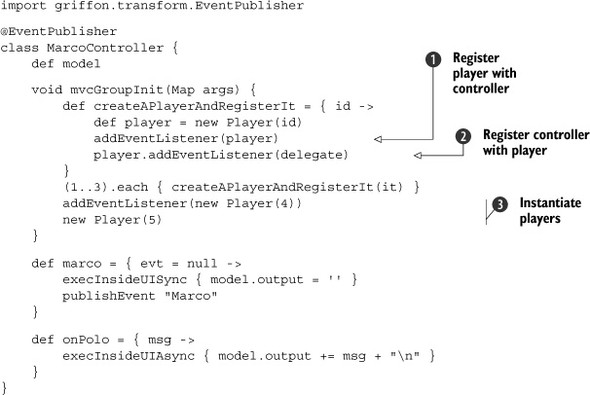
Because any class can be annotated with @EventPublisher, you annotate Marco-Controller with it. The controller still has the ability to publish and receive application events, and now it can publish local events.
All players are initialized during the controller’s initialization phase. A player instance must register itself as a listener
on the controller ![]() ; this way, the player can listen for Marco events. The controller also needs to register itself with the player
; this way, the player can listen for Marco events. The controller also needs to register itself with the player ![]() , because it will listen for Polo events sent by that player. To demonstrate that event listeners aren’t automatically registered,
you create two additional players
, because it will listen for Polo events sent by that player. To demonstrate that event listeners aren’t automatically registered,
you create two additional players ![]() . The first registers itself with the controller, but the controller won’t listen to events published by it. Finally there’s
an unconnected player instance; it won’t listen to events sent by the controller.
. The first registers itself with the controller, but the controller won’t listen to events published by it. Finally there’s
an unconnected player instance; it won’t listen to events sent by the controller.
Now let’s look at the other part of the equation: the Player class.
Setting up the players (Polo)
The Player class is responsible for
- Registering Polo event listeners
- Posting a Polo event when it receives a Marco
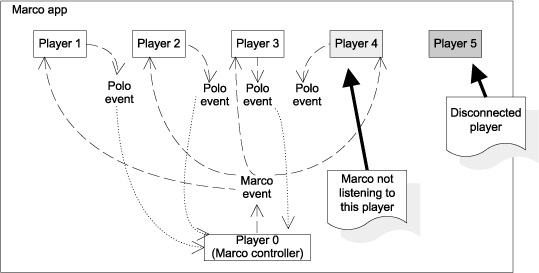
Each Player should have an id to distinguish it from other players. You’ll print out a message every time a Marco event comes in, so you can verify that each player received the event (or, in the case of Player 5, that they didn’t). Figure 8.5 shows the connections between players and events.
Figure 8.5. Marco Polo event flow
Open your editor once more, and create a file named Player.groovy under the src/ main directory. Its contents should be the same as the following listing for now.
Listing 8.6. Player.groovy class receiving and sending events
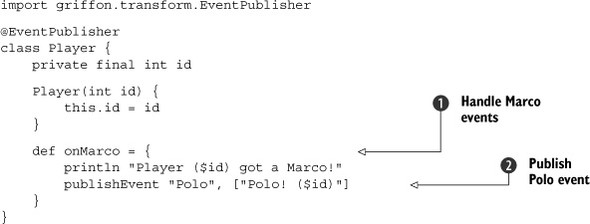
Once more you apply the @EventPublisher annotation to the Player class, making it an automatic event-publishing object like MarcoController. You add a Marco event handler ![]() so players can respond to Marco events. Inside the body of the handler, a printout is made and then a Polo event is published
so players can respond to Marco events. Inside the body of the handler, a printout is made and then a Polo event is published
![]() using publishEvent, a method injected by the @EventPublisher annotation.
using publishEvent, a method injected by the @EventPublisher annotation.
Moving on, you need a model property that will be used by the view to display who answered with a Polo event.
Adjusting the Model and View
The only thing left to do is set up the view details. First, though, make sure Marco-Model’s source code looks like the next listing.
Listing 8.7. MarcoModel.groovy
import groovy.beans.Bindable

class MarcoModel {
    @Bindable String output
}
You need a way to trigger a Marco event from the controller and then display any information that may have been set on the model property you just defined. Sounds pretty straightforward, doesn’t it? The following listing covers all those points.
Listing 8.8. MarcoView.groovy
actions {
    action(id: "marcoAction",
        name: "Marco!",
        closure: controller.marco)
}

application(title: 'Marco! ... Polo!',
  size:[300,160],
  locationByPlatform:true,
  iconImage: imageIcon('/griffon-icon-48x48.png').image,
  iconImages: [imageIcon('/griffon-icon-48x48.png').image,
               imageIcon('/griffon-icon-32x32.png').image,
               imageIcon('/griffon-icon-16x16.png').image]) {
    borderLayout()
    button(marcoAction, constraints: NORTH)
    scrollPane(constraints: CENTER) {
        textArea(text: bind { model.output })
    }
}
All that’s left is to launch the application and see what happens.
8.3.2. Running the application
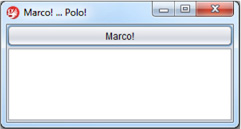
Launch the application by typing griffon run-app at your command prompt. When it launches, you see the application’s main window, as shown in Figure 8.6.
Figure 8.6. Marco application at startup
Click the button. Two things should happen. First, the output at your command prompt should look like the following:
Player (1) got a Marco!
Player (2) got a Marco!
Player (3) got a Marco!
Player (4) got a Marco!
This means Players 1 through 4 received a Marco event, but Player 5 was left out of the game.
Now look at the application’s text area, which should look like figure 8.7.
Figure 8.7. Marco application after a Marco event
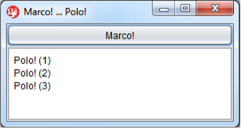
Only Players 1 through 3 responded with a Polo event that the controller heard. Player 4 did respond (as witnessed in the command prompt’s output), but the controller didn’t listen to it. Remember that the fourth player listens for Marco events but the MarcoController doesn’t listen to the player.
That’s all there is to enabling local events in any class.
8.4. Summary
Understanding events and how to use them in the Griffon framework is a practical concept that you’ll use often. Build events are used by the command-line tools to signal when a build step has started or ended. They also serve to signal other scripts when an action can be taken. We gave the example of creating a directory before sources were compiled, but given that scripts are actually Gant scripts, you can use any available Ant target to accomplish what you need to do.
Then we switched gears to application events. You played Ping-Pong to learn about runtime application events. You also saw how to distinguish them from build events. And you discovered how custom events can be fired and handled.
Finally, you played another game, Marco Polo, to learn how to enhance classes with event-publishing capabilities, effectively turning them into local event publishers.
With a newfound appreciation for events under your belt, it’s time to consider testing techniques. The next chapter will look at a few approaches for testing your Griffon applications.