
Chapter 4. Creating a view
- A brief introduction to Swing
- The basics of a Griffon view
- Composing views with legacy source code
Views in Griffon are responsible for composing the visuals aspects of your application. Views are what the user interacts with. There are hundreds of components that you can use to create a view; and no matter which one you choose, you can compose the view in the same manner via a specialized DSL based on Groovy’s SwingBuilder.
Griffon views can also be composed of other views, resulting not just in clever reuse of code but also in a way to display new elements on the fly.
In this chapter, we’ll take a deeper look at Griffon views. We’ll start by examining a classic Swing example and then compare it to a Griffon example that implements the same functionality. After you’ve see how much easier Griffon is, we’ll look at special features of Griffon views and how you can use these features to keep your code organized when you build a large application. We’ll end this chapter by showing how you can integrate views built with NetBeans GUI builder (formerly Matisse) and Abeille Forms Designer into a Griffon application.
We’re about to enter the wild yet amazing world that is Java Swing, If you’re not familiar with Swing, we encourage you to see Swing, 2nd edition (Manning, 2003) for a thorough primer. This chapter assumes you have a fair understanding of Swing.
We’ll start by briefly reviewing Swing before digging into the Groovy SwingBuilder, just to cover the basics. If you’re familiar with Swing concepts, feel free to jump to section 4.2 and get started with SwingBuilder. And if you’re already comfortable with SwingBuilder, you can take the fast path to section 4.3 to learn more about the anatomy of a Griffon view.
4.1. Java Swing for the impatient
The basic premise of Swing is that the UI is a hierarchical tree structure that’s the result of component composition. We’re using the word component to mean any Swing/UI object. Components can be further divided into containers and plain components. A container can contain other containers or plain components. A plain component doesn’t contain any other components. Typical containers in Swing are windows, dialogs, menus and panels; buttons, labels and menu items are examples of plain components. This isn’t a complete list of the available Swing containers and components, but it’s enough to get you started. Figure 4.1 illustrates the Swing components of a simple “Hello World” application.
Figure 4.1. Swing containers and components

Containers and components work together through a parent-child relationship. Containers usually handle how their components are visually arranged by means of a helper layout object. Figure 4.2 illustrates the parent-child nature of the component hierarchy for the “Hello World” application in figure 4.1.
Figure 4.2. “Hello World” component hierarchy
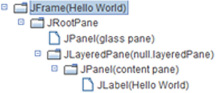
Notice that the Swing component hierarchy is a bit more elaborate than you may have imagined when looking at figure 4.1. The Swing UI toolkit defines a number of intermediate components and containers that take care of handling user events properly and changing the overall UI state. Take for example the glass pane in figure 4.2. When that component becomes active, it will block any further events from being sent to the components behind it—that is, the JLayeredPane and its child components. In other words, it serves as a shield. Developers normally choose this technique to signal that the application is in read-only mode until the current action is finished. A glass pane is where you’ll usually see a waiting clock or an animated icon.
You can change any object and its properties, of course, and plenty of options exist to do so. There are even options that mimic the layout of a web page.
In this section, you’ll get a feel for Swing by looking at the classic Swing “Hello World” application. You’ll also extend the application to accept user input. We’ll complete this section by making some observations about Swing development. On with the show.
4.1.1. “Hello World” the Swing way
You’ll first create the classic “Hello World” in Swing. Nothing fancy, just a window that says “Hello World,” as shown in figure 4.3.
Figure 4.3. “Hello World” in plain Swing. It can’t get much more straightforward than this.
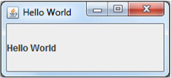
The app is made up of a top-level component (a JFrame), which is a container that holds a plain component (a JLabel) that displays some text. The following listing shows the code for this simple example.
Listing 4.1. A bare-bones HelloWorld Swing application
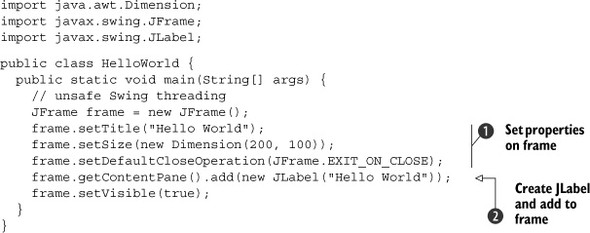
In case you didn’t know already, Java Swing was designed around the time JavaBeans conventions[1] were laid out. It’s no surprise that a Swing component can be configured by means of setting property values. Look what happens
with the frame variable. An instance of JFrame is created using the default constructor. As is customary according to the JavaBeans conventions, a bean defines at least
a no-args constructor. Then some of its properties are mutated ![]() . A property, by definition, consists of a pair of methods that follow a naming convention: T getProp() and set(T prop), where T stands for the property type, getProp() retrieves the property’s value, and setProp() mutates the value accordingly. Finally a JLabel (a component capable of displaying text) is added to the frame’s content pane
. A property, by definition, consists of a pair of methods that follow a naming convention: T getProp() and set(T prop), where T stands for the property type, getProp() retrieves the property’s value, and setProp() mutates the value accordingly. Finally a JLabel (a component capable of displaying text) is added to the frame’s content pane ![]() , and the frame is displayed.
, and the frame is displayed.
This code should look familiar to those with a GTK (www.gtk.org), Qt (http://qt.nokia.com), or Standard Web Toolkit (SWT; www.eclipse.org/swt) background. It may even look similar to what you can do on the web with the Google Web Toolkit (GWT; http://code.google.com/webtoolkit/). This example drives home the point that Swing applications are developed by means of composing a set of components that follow the JavaBeans conventions.
Listing 4.1 omits an important rule when working with Swing, one that’s related to the JVM’s multithreaded nature and Swing’s single-threaded design. It’s safe for sample code to omit this rule, because including the code that enforces it would result in longer examples that may obscure the point we’re trying to make. We’ll discuss threading issues in full detail in chapter 7. For now, we’ll mark unsafe threading code with a comment.
Let’s dig a little deeper and make your simple application take some input and give you a response.
4.1.2. Extending “Hello World”: “Hello Back”
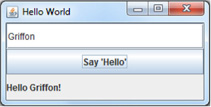
You can extend listing 4.1 with two additional Swing concepts: layouts and event handlers. Instead of having a hard-coded message displayed on a label, you’ll now prompt the user for a name. The application will respond using the user’s input. Figure 4.4 shows the application running.
Figure 4.4. The “Hello Back” Swing application displaying the user’s input after they click the button
To implement this behavior, you need to do the following:
- Build an input field, a button, and a label
- Lay out the components in a meaningful manner
- Register an event handler on the button
The following listing shows the minimal code to make it work.
Listing 4.2. “Hello Back” application that reads user input and displays it in Swing
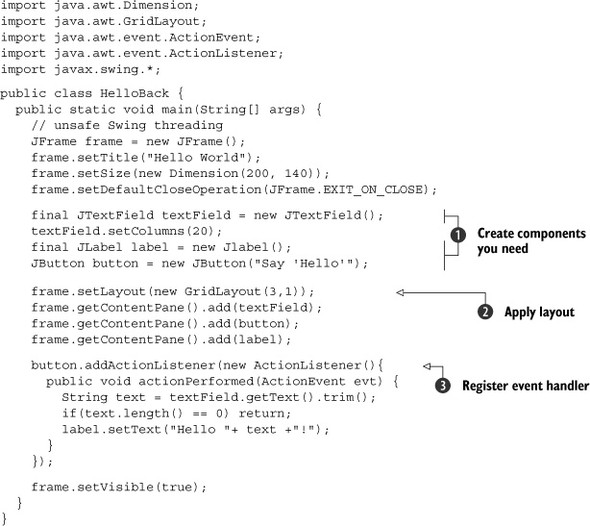
Listing 4.2 fulfills the three goals. First you build the required input field, label, and button ![]() . Notice that the variables that reference the input field and label are marked as final; this will become clear in a minute.
Next you arrange the three components by changing the default layout used by the frame: instead of a BorderLayout, you set it to a Grid-Layout
. Notice that the variables that reference the input field and label are marked as final; this will become clear in a minute.
Next you arrange the three components by changing the default layout used by the frame: instead of a BorderLayout, you set it to a Grid-Layout ![]() with three rows and one column. Then the mystery behind using the final keyword is revealed, when you set the required event handler on the button as an anonymous class
with three rows and one column. Then the mystery behind using the final keyword is revealed, when you set the required event handler on the button as an anonymous class ![]() . As you may know, anonymous classes in Java can’t reference a variable outside of their scope unless it belongs to its parent
class or is marked as final. In this case, the variables are defined inside the same method that defines the anonymous classes,
so you’re forced to use the final keyword to make them visible. This is by no means the only way to implement an application with this behavior, but it’s definitely
the shortest.
. As you may know, anonymous classes in Java can’t reference a variable outside of their scope unless it belongs to its parent
class or is marked as final. In this case, the variables are defined inside the same method that defines the anonymous classes,
so you’re forced to use the final keyword to make them visible. This is by no means the only way to implement an application with this behavior, but it’s definitely
the shortest.
Although this is just the basics of Swing, you should now feel more confident with it. Having a basic understanding of Swing will help you understand SwingBuilder and appreciate how much easier Swing development is when you use Griffon and Swing-Builder. Why do many developers complain about Swing if it appears to be so simple? Alas, Swing isn’t without its kinks.
4.1.3. Swing observations
There are three factors working against Swing’s good reputation, all of which will be explained next:
- Java’s verbosity level —We’ve already established this point. Java is a great language, and Swing is a good UI Toolkit; put them together, and people go crazy, fast. So much code needs to be written to get them to work that not even an IDE can keep you from going mad.
- No Java generics —Swing was conceived and released long before generics made it into the Java language. Although some Java APIs received a facelift when generics were introduced (such as the Java Collections API), Swing was spared them. This means developers must continually check and cast objects returned by Swing classes. At the moment of writing the book, there are no plans in the foreseeable future to change this fact.
- Difficulty of threading —This is by far the most problematic issue with Swing. Threading is a hard task to tackle. It doesn’t matter how well a Java library smooths out the two previously exposed factors, proper threading support can be the deal breaker.
Luckily, Griffon chose to use Groovy’s SwingBuilder. SwingBuilder is a Groovy class for building hierarchical Swing structures. When used with the Groovy language, these structures provide a solution for each of the factors we’ve just mentioned, as explained in the next section.
4.2. Groovy SwingBuilder: streamlined Swing
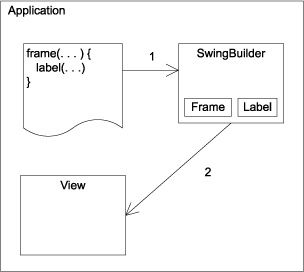
SwingBuilder belongs to a group of helpful Groovy classes that follow the builder pattern.[2] The builder pattern is a commonly used technique for constructing complex object structures. The goal of the builder pattern is to encapsulate the construction details within the builder to provide the developer with an easier method of creating a complex object structure. SwingBuilder takes advantage of the Groovy syntax and lets you declaratively define a hierarchical structure with a small amount of code. Figure 4.5 illustrates SwingBuilder taking a declarative view definition to render the view.
Figure 4.5. How Groovy SwingBuilder creates a view
Without going into too much detail for the moment, let’s just say that Groovy’s metaprogramming capabilities, its native map syntax, and its closures support are a great help in implementing a builder. You’ll see all those features in action in a few moments.
In this section, you’ll build and extend the same “Hello World” application as earlier, first using SwingBuilder and standalone Groovy scripts, then with Griffon. You’ll see how much easier it is to do with Griffon and SwingBuilder than with plain Java. Because the builder understands the context and hierarchical structure, you can write significantly less code.
Let’s tell the world hello with Griffon and SwingBuilder.
4.2.1. “Hello World” the SwingBuilder way
Let’s revisit the “Hello World” application shown earlier in listing 4.1, this time implemented with SwingBuilder.
Listing 4.3. “Hello World” application implemented with Groovy’s SwingBuilder
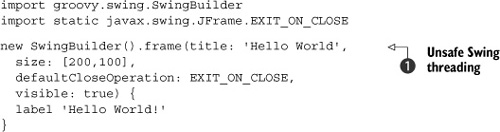
The output is the same as that shown in figure 4.3. When running this application, you may notice that sometimes the label doesn’t appear; this is a side effect of using unsafe
Swing threading code ![]() . You can manually change the size of the frame to force an update, and the label should appear. But if you’re impatient to
learn the proper way to build a Swing application with SwingBuilder while honoring the threading rules, wait no longer; the
following listing provides the answer. SwingBuilder comes with a few methods that make threading a breeze.
. You can manually change the size of the frame to force an update, and the label should appear. But if you’re impatient to
learn the proper way to build a Swing application with SwingBuilder while honoring the threading rules, wait no longer; the
following listing provides the answer. SwingBuilder comes with a few methods that make threading a breeze.
Listing 4.4. “Hello World” with proper threading support
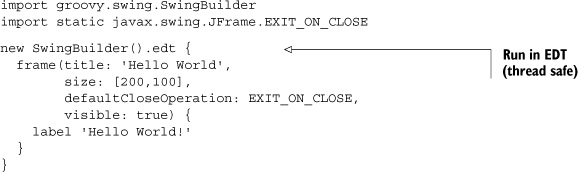
Remember that we’ll cover everything you need to know about Swing and threading in chapter 7. For now, let’s inspect the code in listing 4.4. If you want to, you can flip back to listing 4.1 and see how much the code has changed while still providing the same behavior.
First you need an instance of SwingBuilder; no surprises there. You use that instance to build a top-level component: a JFrame. You do so by invoking the frame() method on SwingBuilder. Note the parameters the method takes: title, size, defaultCloseOperation, and visible properties are available. It isn’t coincidence that they resemble the properties you set in the Java version—they’re the same properties! SwingBuilder uses the Groovy short map literal syntax. Whenever you see a method call in Groovy that looks like method(param1: value1, param2: value2), make no mistake: Groovy will convert it into a map under the covers. The added benefit with SwingBuilder, and builders in general, is that it will use the map’s keys and values to set matching properties on the target object.
The second thing to notice is that SwingBuilder automatically converts a List into a java.awt.Dimension. This is another feature provided by Groovy, and it’s why you don’t need to import that class in the first place.
Finally, somehow the label is added to the frame, but there’s no explicit call to do so—or is there? Notice that the frame() method takes an additional closure as a parameter; inside it, you’ll find the label definition. The closure notation clearly conveys the idea that a parent-child relationship exists within the frame and the label; the builder knows that, and the label is automatically appended to the frame’s children.
SwingBuilder reduces the amount of code you must write by allowing properties to be set without explicit calls to their corresponding setter methods. It’s also aware of the current scope and context of a particular node; that’s how it can embed child components on parent components without you having to make an explicit call to an add or register method on the parent.
Now that you’ve seen the basic “Hello World” implemented with SwingBuilder, it’s only fair that you do the same with the advanced version.
4.2.2. “Hello Back” with SwingBuilder
Again, you’ll use SwingBuilder and Groovy to reduce the amount of code and visual clutter while retaining the same behavior as in listing 4.2. As we showed you with Swing, you’ll enhance your simple app to prompt the user for a name in the next listing. The application UI will display that input.
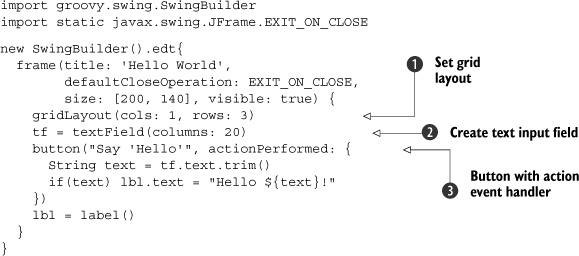
Listing 4.5. Advanced “Hello World” with SwingBuilder
Note
Notice the that edt{} is used to enable proper threading.
Let’s inspect listing 4.5 part by part. It builds a frame just as listing 4.4 did, so you’re on the right track. The new bits are the frame’s layout and its children definitions. The layout is defined
by using the gridLayout() node ![]() , which in comparison to its Java counterpart makes explicit that it has one column and three rows. We intentionally switched the order to highlight the
fact that Groovy’s map literal syntax when used with method calls effectively turns itself into named parameters.
, which in comparison to its Java counterpart makes explicit that it has one column and three rows. We intentionally switched the order to highlight the
fact that Groovy’s map literal syntax when used with method calls effectively turns itself into named parameters.
The next element is the input field ![]() , whose value is stored in a local variable named tf. Next is the button
, whose value is stored in a local variable named tf. Next is the button ![]() along with its event handler. Groovy is able to coerce a closure into an implementation of a single method interface, such
as ActionListener. Add up the fact that Groovy closures accept a default parameter when none is defined, and you get a recipe for short and
concise code. But you can define a parameter for the event handler closure, even its type, as shown in the following equivalent
snippet:
along with its event handler. Groovy is able to coerce a closure into an implementation of a single method interface, such
as ActionListener. Add up the fact that Groovy closures accept a default parameter when none is defined, and you get a recipe for short and
concise code. But you can define a parameter for the event handler closure, even its type, as shown in the following equivalent
snippet:
button("Say 'Hello'", actionPerformed: { ActionEvent evt ->
})
It’s convenient to define an inline ActionListener using the closure notation mentioned earlier, especially when the behavior invoked is small. But as you’ll soon discover, it’s better to define the closures elsewhere (such as in a controller) to boost readability and enforce code reuse.
The final element is the label, which is saved with a variable named lbl. You might wonder how it’s possible for the button to reference the label when such a component hasn’t been defined yet. Well, the label is available by the time the event handler is called; the difference is that the code associated with the event handler is executed not when the builder is assembling the node but rather when the application is up and running and the button is clicked. All local variables, such as tf and lbl, are stored within the context of the builder. The builder is also set as the delegate of the action closure. This is why you can access both variables inside that closure.
There you have it. Groovy’s terse syntax coupled with SwingBuilder allows you to write an application with half the code it would take with regular Java. The code turns out to be more readable and expressive. And the application’s behavior stays the same.
But what do all these things have to do with a Griffon view? We’ll answer that question in the following section.
4.3. Anatomy of a Griffon view
In earlier chapters, we’ve shown you a few applications that rely on well-established conventions. A subset of those conventions specifies how views can be created, but we haven’t fully explained them—until now.
In an application, the view(s) is the portion of the application that a user interacts with to fulfill some goal. It’s what the user sees. Views are used to display information and take user input.
The last section gave you an inkling of what happens behind the curtains when Griffon builds a view. Yes, SwingBuilder plays a key part in the process; but as you’ll soon find out, there’s more to builders and views than meets the eye.
In this section, we’ll look at the role of builders in the creation of views. You’ll see that builders are made of nodes, and we’ll show you what nodes can do.
4.3.1. Builders are key to views
At first glance, a view script is like any other Groovy script, with the peculiarity that it runs under a specific context: an instance of SwingBuilder. SwingBuilder is always available as a delegate, meaning all nodes and variables can be resolved against that particular SwingBuilder instance. That’s half true; more accurately, a view script runs under an instance of CompositeBuilder rather than SwingBuilder.
We mentioned CompositeBuilder in chapter 2 when we discussed Builder.groovy;[3] that file contains the blueprints for creating a CompositeBuilder, which is a special class that helps build a view. Let’s review the contents of a typical griffon-app/conf/Builder.groovy file:
3 Don’t forget your Griffon ABCs: application, builder, config.
root {
    'groovy.swing.SwingBuilder' {
        controller = ['Threading']
        view = '*'
    }
}
root.'SwingGriffonAddon'.addon = true
This file contains two builder definitions. The first definition tells the Composite-Builder that an instance of SwingBuilder must be used. All nodes and methods will be appended to the view, whereas all nodes and methods related to the Threading group will be appended to controllers. By append, we mean the Griffon runtime will use metaprogramming to extend the behavior of the application’s classes. You know this because the view property has * as its value, whereas the controller property has a list made up of a single element that happens to be the group containing all threading-related methods.
In addition to *, you can use the values listed in table 4.1. These values have more specific meanings. The properties that can be used as targets are the names of each MVC member belonging to a group. You saw view and controller already, but know that there may be additional members, such as model.
Table 4.1. List of acceptable values per target
|
Value |
Effect |
|---|---|
| *:factories | Contributes all node factories only |
| *:methods | Contributes all explicit methods |
| *:props | Contributes all explicit properties |
| * | Contributes all nodes, methods, and properties |
SwingBuilder defines a number of node groups, usually paired by behavior or similar characteristics. You’ve seen Threading, but there are also Windows, TextWidgets, Containers, and Binding node groups, to name a few. Please refer to SwingBuilder’s javadoc to learn more about the currently available groups.
The second builder definition instructs the CompositeBuilder that it must load a runtime plugin (or, as we like to refer to it, addon) whose name is SwingGriffonAddon; all of the addon’s nodes will be contributed to views automatically. Addons are Griffon’s answer to extensibility. By applying an addon to an application, you can extend its functionality. You’ll see how it’s done in chapters 11 and 12.
Adding new builders to the application’s configuration is easy. Append a few lines resembling the SwingBuilder line you just saw. For example, you can embed Jide-Builder (http://griffon.codehaus.org/JideBuilder) in this manner:
root {
    'groovy.swing.SwingBuilder' {
        controller = ['Threading']
        view = '*'
    }
    'griffon.builder.jide.JideBuilder' {
        view = '*'
    }
}
root.'SwingGriffonAddon'.addon = true
As an alternative, remember that Builder.groovy is a Groovy view of a properties file. You can also append the following line to the default Builder.groovy file:
root.'griffon.builder.jide.JideBuilder'.view = '*'
Whichever option you pick, you must remember to place all of JideBuilder’s libraries and dependencies in your application’s lib directory; otherwise you’ll get exceptions while compiling your application.
Adding builders to your builder configuration can be automated via plugins. All the builders shown at http://griffon.codehaus.org/Builders have companion plugins that do just that. We’ll discuss how you can make your own plugins in chapter 11. We’ll also provide plenty of information on how views can be extended via builders in chapter 12.
As you can see, configuring the CompositeBuilder component requires no dark magic at all.
Now that you understand where nodes come from, you can put them where they belong: in a view script.
4.3.2. Nodes as building blocks
Initially, all SwingBuilder nodes are available to be used in a view. SwingBuilder comes with a lot of useful nodes from the start. We’ve already mentioned the rule that you obtain the name of a node based on the name of a Swing class: drop the first J from the name and lowercase the following character. Thus JButton becomes button, JTextField becomes textField, and so on.
Nodes not only instantiate a particular JComponent (in the case of SwingBuilder nodes) but also let you change an instance’s properties using property syntax. No more lengthy calls to setter methods. Nodes are also aware of their surroundings. You’ve seen how a parent node knows when and how a child node must be appended. Most nodes use their nested closure as the source of child nodes. Others are smarter and use the closure in other ways.
For example, you’ve seen the combination of action and button nodes. What you might not know is that the action closure can be defined in place in the action node. No, we’re not talking about setting the closure as the value of the action’s closure property, but rather about defining it as a nested closure on the action node itself. This is how it’s done:
action(id: "clickAction", name: "Click me!") { evt ->
    println "You clicked on ${evt.source.class.name}"
}
button(clickAction)
Clicking the button results in the following being printed to the console:
You clicked on javax.swing.JButton
There are other nodes that rely on this technique. We’ll cover registering nodes in chapter 12.
It’s important that you become familiar with all of the preconfigured variables that are available to you in a view script, because many times you’ll need to lean on them to get the results you want:
- app—Every member of an MVC group has access to a variable named app that points to the instance of the currently running application. It’s of type griffon.core.GriffonApplication.
- controller—If the current view has a controller associated with it, then this variable points to that instance. It’s possible to have a view without a controller instance assigned, or even to have a FooView with a BarController. It all depends on how you configure your application.
- model—The model variable points to a model instance. This variable may be null for the same reasons laid out with the previous variable. But most of the time, both model and controller point to valid instances, which also match the view’s logical group. This is the behavior as per the default configuration of MVC groups upon creation.
We’ll cover in detail how MVC groups can be configured when we reach chapter 6.
In addition to preconfigured variables, which Griffon defines to make your job easier, you also have access to a number of extra nodes that help you create custom components.
4.4. Using special nodes
More Swing components exist than those found in the JDK, but it would be a huge task to hunt them all down and make a SwingBuilder node for each one for them. To solve this problem, SwingBuilder includes a few extra nodes that aren’t related to a particular Swing class, which can come in handy when you need to insert a custom Swing component.
Before we get into the subject, remember that each SwingBuilder node accepts a value of the same type as the node, or a subclass. For example, you can use a label node as follows:
label(new JLabel(), text: "This is a label")
label(new MyCustomJLabelClass(), text: "Custom text")
This snippet assumes MyCustomJLabelClass is a subclass of javax.swing.JLabel. This fact is important because the special nodes we’re about to discuss also rely on it.
In this section, we’ll look at five special nodes: container, widget, bean, noparent, and application. We’ll examine what they do and how to use them. Let’s get started by looking at container.
4.4.1. Container
The container node lets you embed any JComponent instance into the hierarchy without restrictions. You may append child nodes to it by defining a nested closure. You may set properties on the instance as you would with any other node. The following are valid usages of the container node:
container(new JTextArea(), cols: 20, rows: 10)
container(new MyCustomJComponent(), name: "componentName") {
    button("This is a button")
}
As it turns out, this node functions like a pass-through node for any JComponent instance. The first line declares a textArea that is 20 columns by 10 rows. It’s identical to
textArea(cols: 20, rows: 10)
If you’re uncertain about the superclass of the object you’d like to embed, container is your best shot.
4.4.2. Widget
The widget node works similarly to the container node with a single difference: it doesn’t support nesting of children. This means that although you can embed a JPanel instance with it, you can’t attach any child components—you’ll get an exception if you attempt to do so. The following snippets show sample usages of this node:
widget(new JPanel())
widget(new JTextArea(), cols: 20, rows: 10)
widget(new JPanel()) {
    borderLayout()
}
In this case, the first two uses of widget are fine, and the third fails.
If widget is more restrictive than container, why have it in the first place? Well, to signal that the node you’re embedding is essentially a leaf node and should by no means contain any nested content.
4.4.3. Bean
The bean node can be seen as an über version of container because it lets you embed any bean instance—it doesn’t matter if it’s an instance of JComponent. This fact has important implications. If the instance you set as the node’s value is indeed a JComponent, then the bean node works the same as container: it’s a pass-through node, and the instance is added into the hierarchy. But if the instance isn’t a JComponent, it won’t be embedded into the hierarchy.
You can take advantage of that fact to bind to and from model properties using the short bind syntax. Here is an example of what it would take to bind a textField’s text property to a name property on the model:
textField(text: bind(target: model, targetProperty: "name"))
Now, using the bean node as a pass-through for the model instance, you get the following snippet:
textField(id: "textSource")
bean(model, name: bind { textSource.text })
Arguably, you added a new line of code, but this version will come in handy the next time you’d like to bind a source to at least two targets.
This node is also useful to configure any instance using properties. It’s as if the instance had its own node, but without a specific name tied to its class.
4.4.4. Noparent
This node has a funny name, but it does exactly what it says. Noparent is a node that accepts child content, but that child content isn’t embedded into the hierarchy. Why is this useful? Well, given that any JComponent-based node inserts its return value into the hierarchy immediately, you won’t be able to manipulate a reference of a JComponent to tweak its properties without inserting it into the hierarchy at that point. Neither container, nor widget, nor bean will help you. But noparent will.
Let’s look at an example. The following snippet shows what happens when you tweak a button inside a panel that has a borderLayout() set:
panel {
borderLayout()
label("contents")
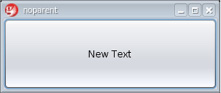
button(aButtonReference, text: "New Text")
}
Instead of the expected result shown in figure 4.6, you the result shown in figure 4.7: the button has replaced the label!
Figure 4.6. Expected result
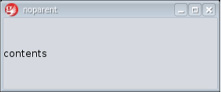
Figure 4.7. Actual result
If the button tweak is surrounded with a noparent node, then you’ll get the expected result—in other words, you’ll get figure 4.6. This is how you can do it:
panel {
    borderLayout()
    label("contents")
    noparent {
        button(aButtonReference, text: "New
     Text")
    }
}
Easy as pie. We need to talk about one more node.
4.4.5. Application
The last node we’ll discuss is the application node. This one doesn’t belong to SwingBuilder per se, but to ApplicationBuilder (one of Griffon’s internal builders).
As we mentioned in chapter 1, this node shields you from the implementation used to construct a main frame for your application. Whether your application is running in standalone or applet mode, this node makes sure to create the appropriate top-level container for you. In standalone mode, the container is a javax.swing.JFrame; in applet mode, it’s a subclass of javax.swing.JApplet.
But you can change the underlying implementation to be used in standalone mode. Recall from chapter 2 that the Application.groovy config script holds the configuration of all MVC groups plus a few other properties pertaining to the application. One of those properties controls the class to be used as the top-level container. You can, for example, choose to use a JRibbonFrame (http://flamingo.dev.java.net) from the Flamingo Swing components suite.
That’s all for now regarding special nodes. Although Griffon goes a long way toward making desktop development easier, in a large application the code can still get unorganized. In the next section, we’ll discuss how to organize the code and manage your view scripts and their helper classes or scripts.
4.5. Managing large views
By now, you know Griffon takes care of creating a default view script every time you create a new MVC group. You also know that a view script is the place to define all UI elements by means of the SwingBuilder DSL. Armed with this knowledge, you may build your UI to a point that the view script is too big or no longer maintainable. What can you do in this case?
In this section, we’ll discuss a few approaches to view management. We’ll start with a tried-and-true approach: reusable code.
4.5.1. Rounding up reusable code
Remember that a view script is like any other Groovy script. This means you can refactor reusable code into classes or closures. If you choose to create classes, you have absolute freedom to choose where to put them. You can leave them in the same directory as your views, you can put them under src/main, or you can put them in a new directory of your choosing inside griffon-app. The important thing is that the compiler will find your sources and compile them along with your views. But we certainly recommend that you stick with the conventional locations, because doing so will make it easier for other developers who join the project to understand how the code is laid out.
If you choose to place reusable code in the form of closures, make sure those closures are defined before they’re used, and be sure to omit the def keyword. If you use def, the closure becomes a method definition on the script; this will change the delegate used on the closure and result in unexpected behavior.
If your view script is still too big, consider the next alternative: additional scripts.
4.5.2. Breaking a large view into scripts
Another option you have at your disposal is breaking a view script into smaller scripts. The trick is figuring out a way to embed the components provided by a secondary script into the primary one. Enter the build() method.
The build() method takes a Class or a Script instance, evaluates its contents, and, in the case of a Script, returns the last expression evaluated. Let’s see how you can take advantage of this.
Meet Swingpad
Griffon bundles a few sample applications that showcase the framework’s features and strengths. One of these applications is called SwingPad. You can think of SwingPad as a view script–oriented version of groovyConsole. Figure 4.8 shows the outcome of running a small view script in SwingPad.
Figure 4.8. SwingPad running a small view script. The right side is the outcome of the code in the editor on the left side.
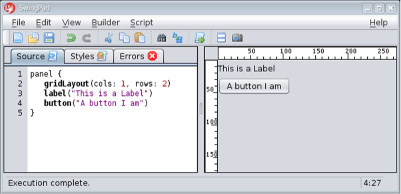
The SwingPad UI uses the screen real estate to display the following elements: a menu bar, a toolbar, the main content, and a status bar. If you were to implement this UI in a single view script, it might look like the following listing.
Listing 4.6. Brief layout of SwingPadView.groovy before breaking it up

Phew! That’s a lot of code. Imagine if you reprinted SwingPadView’s entire contents with the single view script approach—you can bet it would take a lot of pages. And that’s precisely the
problem with keeping the code in a maintainable state: it’s too big to fit in a single editor screen. But you can appreciate
the structure of listing 4.6. Swing actions reused across the application are denoted at ![]() (you can see a glimpse of them at
(you can see a glimpse of them at ![]() and
and ![]() ). And there are clearly code areas that match the UI elements previously identified (
). And there are clearly code areas that match the UI elements previously identified (![]() ,
, ![]() ,
, ![]() ,
, ![]() ).
).
But you can do better than this.
Creating Small Scripts
What if you put each UI element (including the action definitions) into its own script, and leave SwingPadView with the responsibility of piecing them together? This is where the build() method shines. The next listing shows a revised version of Swing-PadView in which every element has been relocated to its own script.
Listing 4.7. Revised SwingPadView
build(SwingPadActions)
application(...) {
   menuBar build(SwingPadMenuBar)
   toolBar build(SwingPadToolBar)
   widget build(SwingPadMainContent)
   statusBar build(SwingPadStatusBar)
}
That’s more manageable, wouldn’t you agree? But there’s a catch. Notice that the UI element scripts are embedded directly using a node after being built. This means each script must return a component that matches the expected type; otherwise the host frame won’t know where to place them. You may notice in the SwingPad codebase that some scripts make an explicit return, whereas others don’t; for example, SwingPadMenuBar returns a reference to the MenuBar node that was built, but SwingPadToolBar doesn’t. There’s a simple explanation: remember that views are also Groovy scripts. The return value of a Groovy script is the last expression that was evaluated. In the case of SwingPadMenuBar, additional elements are being instantiated after the menuBar node, which is why you must explicitly return a reference to the menuBar; on the other hand, in SwingPadToolBar, the last expression evaluated was the toolbar node itself—no need for an explicit return value in this case. The exception to this rule is the main content pane, given that all other areas will be embedded in the appropriate place due to their types.
You may wonder what happens with action variables defined in the actions script. How can you reference them from other scripts? The answer is that all the scripts share the same SwingBuilder instance as delegate. They also share the same binding. Thus any variable tied to the builder can be seen from other scripts. The same principle applies to any variables (including your own closures) found in the binding. This is the sole reason why we suggested that you drop the def keyword when defining reusable blocks of code in the form of closures.
There is yet another alternative for splitting up your code base to keep it nice and tidy.
4.5.3. Organize by script type
In the previous section, you saw how to split SwingPadView from a single script into a primary script and five secondary ones. One of those scripts is named SwingPad-Actions and contains all the action definitions. Now imagine what would happen in a bigger application where each view had a companion actions script. Doesn’t it seem as though actions belong to their own type like views do? Is there something you can do about this?
In chapter 6, we’ll explain how to compose an MVC group using configuration. As a preview, you can alter the number and types of an MVC group.
For illustration purposes, let’s say you want to add an actions element to Swing. Begin by creating a new directory called actions under griffon-app:
$ mkdir -p griffon-app/actions/griffon/swingpad
Place all your action scripts in that directory. Next, edit the application’s configuration file. Remember which file it is? A is for application, so go to griffon-app/conf/Application.groovy and search for the definition of the groups you’d like to tune. For example, you may find the following definition in SwingPad:
SwingPad {
    model     = "griffon.swingpad.SwingPadModel"
    view      = "griffon.swingpad.SwingPadView"
    controller= "griffon.swingpad.SwingPadController"
}
All you have to do is insert a new member definition that follows this convention: the name of the member matches the name of the directory. The next snippet shows how the SwingPad MVC group would look if you added the new member:
SwingPad {
    model     = "griffon.swingpad.SwingPadModel"
    actions   = "griffon.swingpad.SwingPadActions"
    view      = "griffon.swingpad.SwingPadView"
    controller= "griffon.swingpad.SwingPadController"
}
Doesn’t it look like the actions member belonged there from the start? You can do the same for any other groups. Be careful with the member-definition order, because actions are required by the view. By placing the actions definition before the view definition, you instruct Griffon that the actions member must be initialized before the view member.
We’re almost finished, but we have one last topic to discuss in this chapter: how to deal with legacy views.
4.6. Using screen designers and visual editors
We’ve discussed several ways to create s UI using the SwingBuilder DSL. But you may not be able to build a new application from scratch every time. Sometimes it’s best to reuse an existing view, which may rely on external libraries and/or layouts.
In this section, we’ll show you step by step how to integrate legacy views that depend on popular designer tools and libraries. Specifically, we’ll look at how to integrate NetBeans GUI builder–and Abeille Forms Designer–based views into a Griffon MVC group.
4.6.1. Integrating with the NetBeans GUI builder (formerly Matisse)
About the time of JavaOne 2006, a new layout for Swing was announced: the Swing-Layout. Also known as GroupLayout, this layout and its related helpers belong to a larger project within the NetBeans platform called the NetBeans GUI builder (formerly known as Project Matisse). This UI designer tool lets you design a UI using drag-and-drop and property-editing techniques. It has become popular with many Swing developers.
Although UI elements created with the NetBeans GUI builder are easy to update using the tool, the same can’t be said if you choose to do it in a programmatic way. Simply put, GroupLayout was designed with tool support in mind. Porting a GroupLayout-based panel or frame is hard to accomplish by hand—it’s best to leave the work to another tool. That’s right, we’re talking about the Griffon command line.
You may have noticed a peculiar command name when you typed griffon help: the generate-view-script command. This script is able to read GroupLayout definitions and export them into a SwingBuilder friendly script. From there you can apply all the SwingBuilder techniques you already know
Let’s see an example of the script’s usage.
A NetBeans GUI builder view
Assume for a moment that your company has a standard set of dialogs and frames that need to be used in every application. One such component is a Login dialog, which may look like figure 4.9.
Figure 4.9. A basic legacy Login dialog. This dialog was created using the NetBeans GUI builder visual designer.
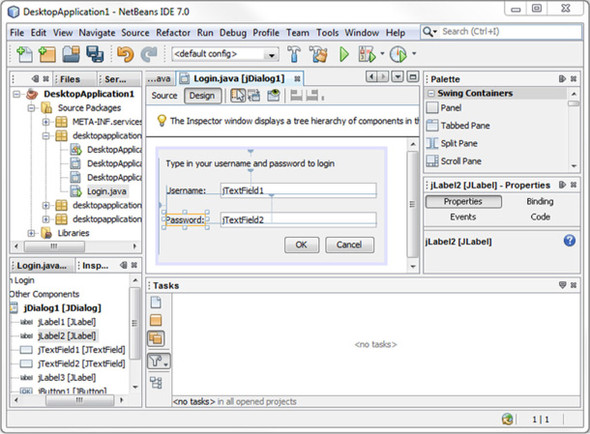
Granted, it looks a bit sparse, but it gets the job done. If you feel like creating the same dialog in NetBeans GUI Builder, then please do so; we’ll be here waiting for you. But remember, before you continue, copy the code for this dialog into your Griffon application’s source directory. Either griffon-app/views or src/main is a good place. Alternatively, you can drop a jar containing the compiled classes into your application’s lib directory. On to the next step.
Generating the view script
Now comes the easy part. generate-view-script takes a single argument: the full qualified class name of your legacy view. If you don’t define an argument, the script will prompt you for one. Before you proceed, make sure you’ve copied the jar that contains GroupLayout’s classes into your lib directory. If you have NetBeans installed, it will be located in modules/ext under the name appframework.<version>.jar. Assuming the name of class you want to include into your application is LoginDialog, the following command invocation should do the trick:
$ griffon generate-view-script LoginDialog
After the command has finished, you should see a new script named LoginDialogView.groovy located in griffon-app/views. The script looks like the following listing.
Listing 4.8. Generated LoginDialogView.groovy script
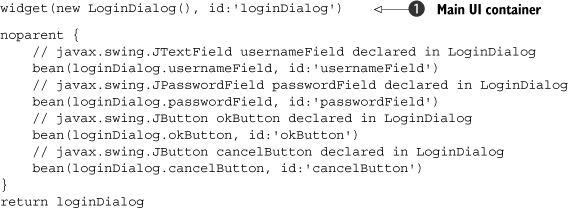
Well, well. Isn’t this interesting? Notice that the generated script uses the special nodes we discussed back in section 4.4. The main component described by the view is embedded into the script ![]() using the widget node. You can change it to container if you intend to make additional tweaks on the component’s children. Next you see the usage of the noparent node in conjunction with the bean node to define references to the dialog’s contents. If you didn’t use the noparent node, the dialog’s contents might be inserted in the wrong place in the node hierarchy.
using the widget node. You can change it to container if you intend to make additional tweaks on the component’s children. Next you see the usage of the noparent node in conjunction with the bean node to define references to the dialog’s contents. If you didn’t use the noparent node, the dialog’s contents might be inserted in the wrong place in the node hierarchy.
Binding the Fields
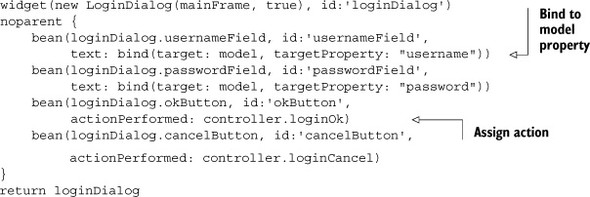
From here you can fine-tune the script, say by adding bindings between model and view, or by adding references to controller actions. The next listing shows an updated version of the generated script after adding a few binding and action references.
Listing 4.9. Updated LoginDialogView.groovy
Now you need to wire this view into an MVC group.
Creating the Login MVC group
To create a new group, type the following at your command prompt:
$ griffon create-mvc login
This command creates a model, view, and controller tied to the Login group. You can safely delete LoginView because you already have a view—you just need to configure it. Open Application.groovy, and locate the definition of the login group. Table 4.2 shows the necessary configuration changes.
Table 4.2. Changing the view associated with the login MVC group
|
Original code |
Revised code |
|---|---|
mvcGroups {
  'login' {
      model      = 'LoginModel'
      view       = 'LoginView'
      controller = 'LoginController'
  }
...
|
mvcGroups {
  'login' {
      model       = 'LoginModel'
      view        = 'LoginDialogView'
      controller = 'LoginController'
  }
...
|
LoginDialogView is now tied to the Login MVC group. All that’s left to do is fill in the model and controller with the properties defined in listing 4.9.
Giving the Login dialog some behavior
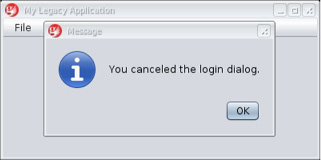
To test whether the view is communicating with the controller, you’ll have Login-Controller respond to input. If you enter a username and password, a message dialog appears with the data you entered (see figure 4.10). And if you cancel the dialog, a confirmation message appears (see figure 4.11).
Figure 4.10. The user entered griffon and random_password in the input fields of LoginDialog, and then clicked OK.
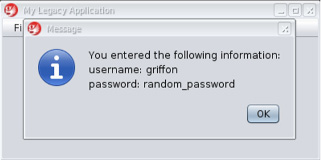
Figure 4.11. The user canceled LoginDialog by clicking Cancel.
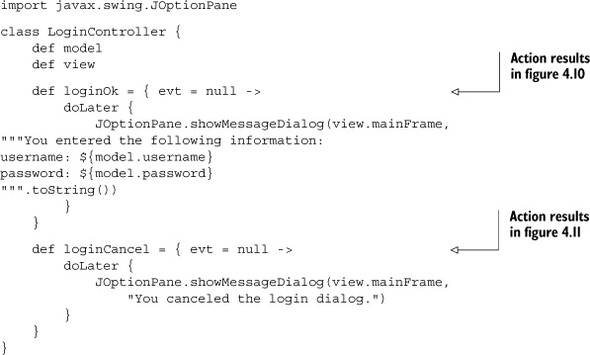
The controller actions that implement this functionality are shown in the following listing.
Listing 4.10. Implementation of LoginController
You still need to create an instance of the login group and display the dialog. That’s the responsibility of a controller, and we’ll give controllers wide coverage in the next chapter. But if you can’t wait any longer to solve the puzzle, remember what you did in your first Griffon application. That’s right, you used a method called createMVCGroup().
The next integration scenario we’ll look at involves Abeille Forms Designer.
4.6.2. Integrating with Abeille Forms Designer
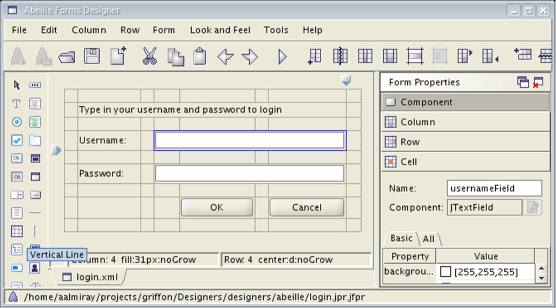
Abeille Forms Designer (http://java.net/projects/abeille/) is another great option for visually designing UIs. Abeille is an open source tool that comes with a WYSIWYG editor and serves as an abstraction over JGoodies FormLayout (http://java.net/projects/forms/) and the JDK’s GridBagLayout.[4]Figure 4.12 shows how LoginDialog would look like had it been made with Abeille Forms Designer.
4 See http://madbean.com/anim/totallygridbag for a funny look at GridBagLayout.
Figure 4.12. The LoginDialog panel edited with Abeille Forms Designer. Notice that the grid can be made explicit to guide you in placing the components.
We must tell you up front that there’s no support for Abeille in the core framework, but you can still use its features if you install a plugin. (We’ll cover all things related to plugins in chapter 11.) You can install the latest version of the Abeille Forms plugin by issuing the following command at your command prompt:
$ griffon install-plugin abeilleforms-builder
Once it’s installed, you’ll get a few new nodes that can be used in your view scripts, the most important of which is formPanel. This node can read a form’s definition, preferably in XML format.
Installing plugins is another way to add new nodes to CompositeBuilder. A number of plugins do just that. We’ll show you how to create such a plugin in chapter 11. We’ll also show you how to interact with the most common plugins that provide new nodes in chapter 12.
Assuming you placed the login form definition (in XML format as exported by Abeille Forms Designer) under griffon-app/resources, you can then tweak LoginView as shown in the following listing.
Listing 4.11. LoginView configured with an Abeille Forms form
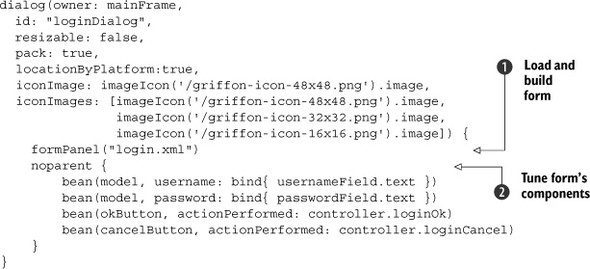
There are a few differences from the NetBeans GUI builder example. The dialog definition is made explicit due to the form
containing just a panel definition. You load and build the form based on its XML definition ![]() . Then you fine-tune each form component by adding binding and action references
. Then you fine-tune each form component by adding binding and action references ![]() . Unfortunately, this code must be written by hand, but as you can see the availability of special nodes makes this task simple.
As a matter of fact, the code resembles what you saw back in listing 4.9 after you fine-tune it.
. Unfortunately, this code must be written by hand, but as you can see the availability of special nodes makes this task simple.
As a matter of fact, the code resembles what you saw back in listing 4.9 after you fine-tune it.
Don’t worry too much if you couldn’t get these examples to run. After all, we didn’t provide you with the code for the legacy forms! But you can compare notes and see the full source code in the book’s source repository.[5]
4.7. Summary
This was a whirlwind ride into Griffon views. We started this chapter by giving a brief overview of the Swing toolkit. You wrote a simple Java Swing “Hello World” application and then had it say something back to you. You also used Groovy SwingBuilder to implement the “Hello World” application. You saw that Griffon does a nice job addressing the drawbacks of the Java Swing version, including threading.
Next we looked at the anatomy of a Griffon view. You saw that builders are key to creating views and that a builder’s DSL makes it easy to create a component tree. Along the way, you learned that Griffon has special nodes to help you use custom and third-party components. We also looked at a couple of techniques for working with large, complex views. For those who prefer using screen painters, Griffon has that covered too: using the output from the NetBeans GUI builder and Abeille Forms Designer in a Griffon application is pretty easy using the special nodes.
You now have a good understanding of Griffon view. But a view by itself doesn’t do much—doing something with user input is the role of controllers and services. In the next chapter, we’ll take a dive into those components.