creating artwork for computer games: from concept to end product
by Martin Bowman
by Martin Bowman
Creating artwork for computer games: from concept to end product
INTRODUCTION
One of the many uses of digital animation today is in the field of Interactive Entertainment. Perhaps more widely known as computer or video games, this is one of the most groundbreaking areas of computer graphics development in the world.
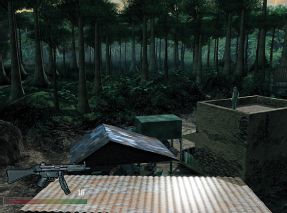
Figs 5.1– 5.3 These images show the first pieces of concept art for a game called Commando. They evoke the feel and excitement that the game should have. Art by Martin Bowman, Faraz Hameed and Gwilym Morris. © King of the Jungle Ltd 2000.
The video games development industry is caught in an upward spiral of increasing development times and art requirements as the hardware that makes the games possible becomes ever more powerful. Ten years ago a game would require only one artist to create all the art resources. Five years ago a small team of five artists would suffice for most projects. In the present day, with teams working on PlayStation2, Xbox, Gamecube and advanced PC games, teams of twenty artists are not uncommon. This huge increase in the quantity and quality of art required by the modern video game has created a boom in the market for skilled artists. This makes the video games profession very appealing to Computer Generated Imaging (CGI) students, who, if they have the correct skills, will find themselves junior positions in the industry.
This chapter will look at:
• How a computer game is made, from concept to final product.
• How to create animations for the industry.
• Career options in the games industry and what skills employers look for.
You will find a list of references, resources and tutorials that may prove useful to the aspiring artist in Chapter 8 and on the website: www.guide2computeranimation.com.
The broad-based nature of this book does not allow for in-depth instruction of animation for games. The chapter will explain the different animation systems used in games and how to work within them to create the best results from the limitations imposed by the hardware.
HOW IS A GAME MADE?
Although creating the artwork for a game is only one part of the whole work, it is a good idea to have an understanding of how a game comes into existence, is finished, published and sold. You will find that whenever you have a grasp of the big picture, it will influence your creativity to a greater beneficial level. This next section will explain the process behind game construction. As usual, the following pieces of information are guidelines only – all companies have their own ways of creating games, but most companies adhere to the following patterns:
The idea
The idea is the start of all games. This is either a concept created by an employee of the developer (usually the games designer) or it is an idea that a publisher has created. Publisher concepts are often the result of a licence that has been bought by them (common ones are film tie-ins, or car brands) and they desire to have turned into a game (figs 5.1–5.3).
Once the concept has been decided upon, a Games Designer in the developer will write a short concept document outlining the aim of the game, how it is played, its Unique Selling Points (USPs), target platforms and audience, and perhaps an estimate of what resources (manpower and software/hardware) will be required to create the game.
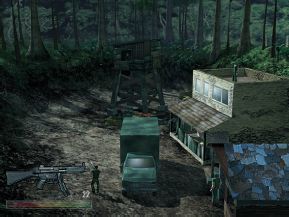
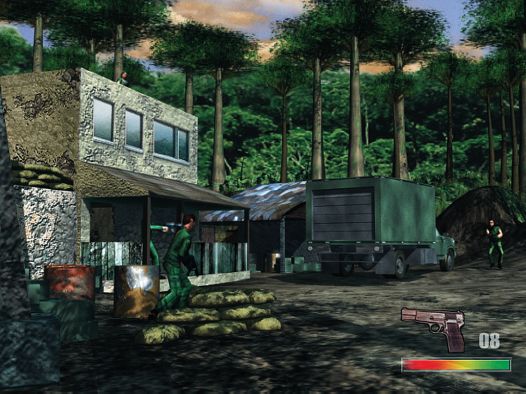
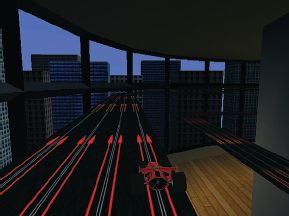
The Games Designer will present this document to the company’s internal Producer, who will evaluate it and if he then agrees with its validity, will arrange with the Creative Director to get a small group of artists to create art for the document. If the resources are available, some programmers may be attached to the project to create a real time concept utilizing the concept art (see figs 5.4–5.6). These productions are often known as technology demos, and, although rarely beautiful, demonstrate that the developer has the skills to create the full game.
Many publishers will tender out a concept to several developers at the same time to see which one creates the most impressive demo, and then pick that developer to create the full game. This makes technology demos a very important test for the developer as they know they may well be competing with their rivals for the publisher’s business.
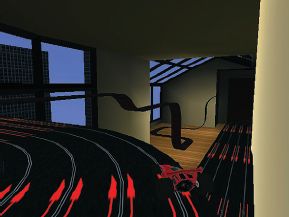
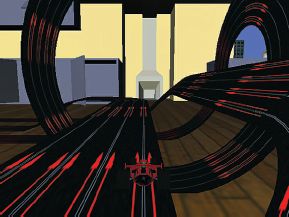
Figs 5.4–5.6 These images show a glimpse of the first technology demo of Groove Rider, a game currently in development and due for release in Summer 2002. Art by King of the Jungle Ltd. © King of the Jungle Ltd 2000.
The evaluation period
Once the technology demo is ready it will be shown to the publisher who requested it, or if it is a concept of the developer, it will be taken to various publishers or they will be invited to the developer’s offices to view the demo. On the strength of this demo the publisher will then decide either to sign the rights to the whole game with the developer, or as is very common these days, they will offer to fund the game’s production for three months. This is usually a good indication that the game will be ‘signed’, a term meaning that the publisher will fund the developer throughout the game’s entire development cycle. At the end of the three-month period the publisher evaluates the work that has been created and if it meets their approval, agrees to fund the project.
Contracts, schedules and milestones
The developer and publisher now spend considerable amounts of time with each other’s lawyers until they agree a contract. This process can often take one to two months! Once the game is signed and in full production, the publisher visits the developer once a month to review progress on the game. These meetings or deadlines are called milestones and are very important to both publisher and developer, as the developer has agreed in its contract to supply a specific amount of work at each milestone. If these deadlines are not met to the publisher’s approval, then the publisher can choose to withhold funding from the developer until the developer is able to meet these criteria. This all means that in order for the developer to get paid every month, it has to impress the publisher at each milestone which often causes great stress on the developer’s staff in the days immediately preceding a milestone.
Crunch time
The game continues its development in this fashion until it gets to about three to six months before its agreed completion date. At this point two things happen. First, the publisher’s marketing department start requiring large amounts of art to be given to them so that they can send it to magazines and websites to start building up some hype for the game. Second, the game should be at a point where most of its gameplay is available for testing. This fine-tuning can turn an average game into a highly addictive entertainment experience. Testing is primarily the job of the developer’s games testers: employees who, during this period often end up playing the game 24 hours a day. Their constant feedback, as well as information from the publisher’s games testers and focus groups, provide the basis for art and code revision, which will hopefully help create a better game.
During the final months of the game’s development cycle, the development team often has to work very long hours, sometimes seven days a week as bizarre bugs are unearthed in the code, or animations need tweaking for greater realism, or any one of a million different unforeseen problems. Localization issues happen at this time as most games have to be playable in different countries, with different social and language issues to contend with. Some graphics are not allowed in some countries – Germany for example bans the use of any form of Nazi imagery, which means that such art has to be altered in World War 2 games so that they can be sold in Germany.
Different countries mean different languages and at this point the developer often finds that the User Interface (UI) which looked so beautiful in English is now horribly crammed and confusing because translating into another language has increased the amount of letters in each word, causing them to be squeezed all over the display (figs 5.7–5.10).

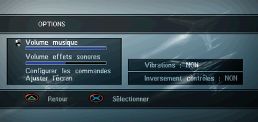
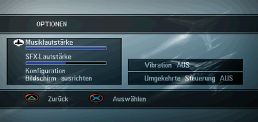
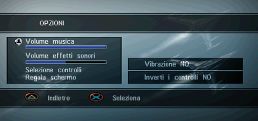
These screen grabs show how cramped a User Interface can get when translated from English to French, German or Italian. Images from Galaga, Destination: Earth. Art by King of the Jungle Ltd. © King of the Jungle Ltd 2000.
Greater problems arise with games that require vocal samples in other languages. These often form longer sentences than the original English and so do not lip synch with character animations well, or take up too much extra memory because of their increased length. As an aesthetic consideration, there is also the problem of getting actors to record convincing speech in other languages. House of the Dead, an arcade zombie shooting game made by a Japanese company, had sections in the game where other characters would talk to each other or the player. These little conversations no doubt sounded like those of people in a stressful life or death situation in Japanese. However, once they had been translated into English, using Japanese actors with poor English acting skills, these sections turned from atmospheric adrenaline-filled scenarios into completely hilarious comedies, as the Japanese actors were unaware of which words or sounds to add the correct vocal stresses to.
If the already stressed developer is making a game for any other platform than the PC, then they have an additional trial to go through: that of the platform owner’s evaluation test. Every game that is created for a console has to pass the respective console owner’s (e.g. Sony with the PlayStation2, Microsoft with the Xbox etc.) strict quality requirements before it is allowed to be released. Games rarely pass submission first time, and are returned to the developer with a list of required changes to be made before they can be submitted again. The reason for these tests is to ensure that a game made for a console will work on every copy of that console anywhere in the world. This means that console games have to be technically much closer to perfection than PC-only titles, whose developers know that they can always release a ‘patch’ or bug fix after the game is released to fix a bug, and let the public download that patch when they need it. Although this is poor business practice, it is a very common situation in the PC games field.
Hopefully, at the end of this long process, the game is still on time for the publisher’s launch schedule (although given the many pitfalls in the development cycle, many games are finished late) and the game is finally unveiled to the press for reviews about two months before it is due on the shelves. These reviews, if favourable, help drive demand for the game, while the publisher’s marketing department tries to get the game as noticed as possible, with the hope of making a huge hit. The publisher also tries to get copies of the game on as many shelves as possible hoping to attract the eye of the casual browser. Sales of the game generate revenue for the publisher, which then pays any required royalties to the developer, which in turn funds the development of another game concept and the cycle starts again.
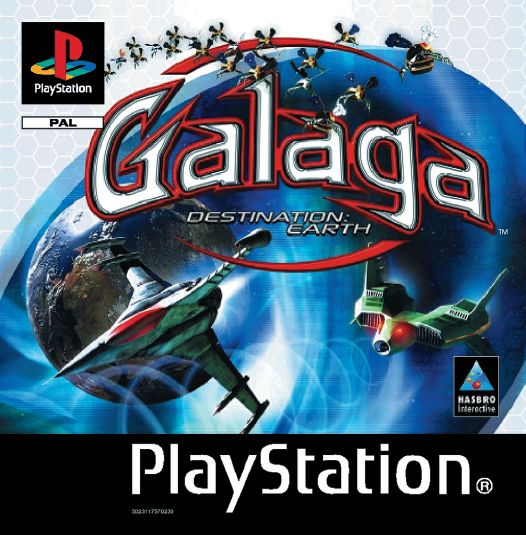
Fig. 5.11 This is the final box art for the European release of Galaga, Destination: Earth on the PlayStation. Art by King of the Jungle Ltd. © King of the Jungle Ltd 2000.
ANIMATION IN THE COMPUTER GAMES INDUSTRY
Animation in the computer games industry can be split into two main areas: Programmer created animation and Artist created animation. Artist created animation can be split up further into different methods, which will be explained later.
Programmer animation
Most games players are completely unaware of how much animation in games is actually created by code rather than keyframes. Programmer animation can vary from the very simple (a pickup or model that bobs up and down while rotating – see figs 5.12–5.15), to the highly complex (all the physics that govern the way a rally car moves across a terrain).
The reason why the programmer would create the code that controls the movement of the car is because this allows the animation to be created ‘on the fly’ enabling the car to respond realistically to the surface it was driving across. An animator would have to create an almost infinite amount of animation sequences to convince the player that the car they are driving was reacting to the surface it was on in a realistic fashion.
Given that the car was animated by a programmer because of the complexity of its nature, you may assume that the previously mentioned pickup with its simple animation would be animated by an animator. This is however not the case. The reason why it is not is because of one simple game restriction on animation: memory. The code that makes the pickup or model spin in one axis (a rotation transformation) while bobbing up and down (a positional transformation) in another axis amounts to a few bytes of data. To get an animator to keyframe the same animation sequence would require several kilobytes of data, or at least 100 times as much memory as the code animation.

Figs 5.12–5.15 A few frames from a pickup animation sequence. Art by Martin Bowman. © Martin Bowman 2001.
These figures of bytes and kilobytes may sound like paltry sums, but if you watch a game like a 3D platformer (Crash Bandicoot or Mario 64 for example) and count how many different animated objects there are in each level, you will soon see why conserving memory space is so essential. If the platform runs out of memory, the game crashes! No game developer wants to release a game that does this as it has a very adverse effect on sales.
Just because a game contains programmer-animated objects in it, doesn’t mean that the animator’s skills are not required. A programmer may write the code that makes the pickup or model animate, but the opinion and advice on how it animates (its speed and the distance it travels in its movements) are usually best supplied by an animator working closely with the programmer. It is the animator’s experience of knowing how fast, how slow, how much etc. the object should move that will bring it to life.
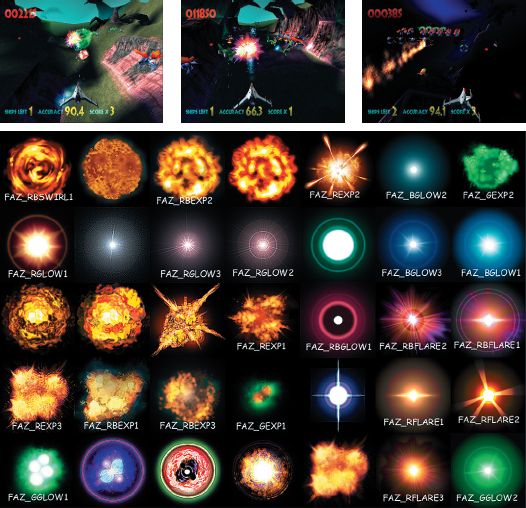
Figs 5.16–5.19 The large image shows a variety of explosion textures that were mapped onto various 3D objects, which can be seen in the smaller pictures, and then animated using scripts to create a huge variety of effects from a very small quantity of textures. Art by Faraz Hameed (fig. 5.16) and King of the Jungle Ltd (figs 5.16–5.19). © King of the Jungle Ltd 2000.
Another form of programmer animation that can involve the animator is scripted animation. Scripted animation is animation made using very simple (by programming standards) scripts or pieces of code. A script is a series of events defined by a programmer to perform a certain action. Each event can be assigned values determining when it can happen and to what degree by animators so that they can achieve more interesting effects. Different explosion effects would be a great example of this (figs 5.16–5.20) – the programmer would write a series of scripts that would govern transformation, rotation and scaling, give them to the animator who would then add his own numerical values to adjust the rate and effect of the animation and apply them to the desired object. This frees up expensive programmer time, allowing them to concentrate on more complex issues. Meanwhile the animators are able to ensure that they get the movement or behaviour of an object correct without having to sit next to a programmer for several hours, while the programmer tries different values to achieve the animation that is in the animator’s mind.
Animator animation
Most of the work that animators create in games takes the form of character animation. Character animation is the art of transforming an inert mass of polygons and textures into a boldly striding hero, a skulking sneaky thief, or anyone of an infinite number of personalities. When animating a character or any object that needs to deform – most animators use a system of bones (figs 5.20–5.21), regardless of whether the final game animation contains them or not. Animating these bones is a skill in itself and understanding and creating animation of a professional richness take time and training. There are a number of ways of animating these bones, and these techniques tend to fall in one of two categories: forward kinematics animation or inverse kinematics animation.
Forward kinematics (FK) & Inverse kinematics (IK)
These are the two main ways of animating a character. Before we look at their uses in computer games, it is a good idea to have a brief explanation of how they work, as many artists do not have a firm understanding of the differences between them.
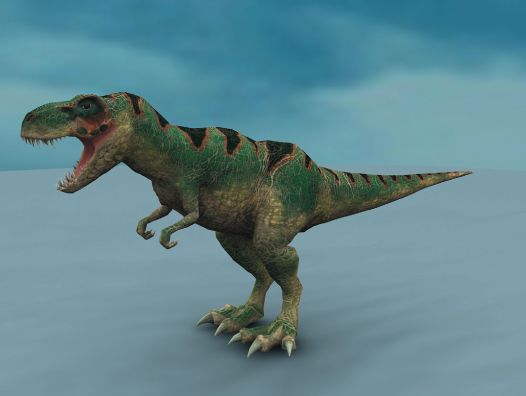
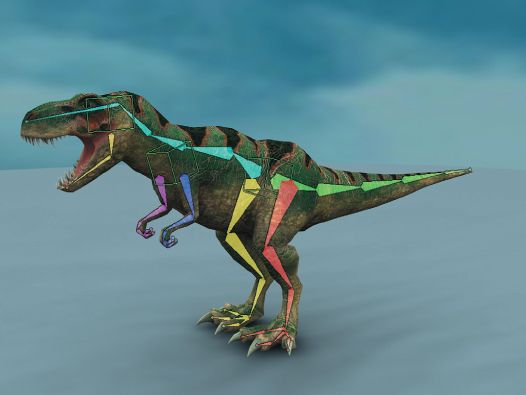
Figs 5.20–5.21 A 5000 polygon Tyrannosaurus Rex designed for the Xbox console. Fig. 5.21 shows the model as the player would see it, fig. 5.22 shows its underlying bones skeleton superimposed on top. Art by Faraz Hameed. © Faraz Hameed 2001.
Basically there are two ways of moving parts of a character’s body so that they appear to move in a lifelike fashion. As an example we will take a situation where a character picks up a cup from on top of a table. If the character was animated with FK, the animator would have to rotate the character’s waist so that his shoulders moved forwards, then rotate his shoulder so that his arm extends towards the table, then rotate the elbow to position the hand next to the cup, and finally rotate the wrist to allow the hand to reach around the cup. This is because the forward kinematics system of animation only supports rotation animation. All the body parts are linked together in the character, but cannot actually move like they do in real life, they can only be rotated into position, whereas in reality the hand of the character would move towards the cup and the joints in the body would rotate accordingly based on the constraint of the joint types to allow the other body parts to move correctly.
Inverse kinematics is a system that models far more accurately the movement of living creatures in reality. If the character had been animated using an IK system, the animator would have moved the character’s hand to the cup, and the IK system (assuming it was set up correctly) would rotate and move the joints of the body to make the character lean forward and grasp the cup realistically without the animator having to move them himself. Although the process of setting a character up for IK animation is quite lengthy and involved, once correct it is a major aid to animation. All the animator has to do in this instance is move one part of the character’s body (the hand) and the rest of the body moves with it in a realistic fashion. Compare the simplicity of this system with the lengthy process of forward kinematics where every joint has to be rotated separately, and you will see why inverse kinematics is the more popular animation system.
Bones
Animators use bone systems to assist them in creating character animations. Animation of 3D characters doesn’t have to be done with bones, but the results of using such a system can usually be generated quicker, more realistically and are easier to adjust than any other way of animating. Underneath the mesh (or skin) of every 3D game character is a system of bones that act quite like a skeleton does in the real world on any creature (figs 5.22–5.25). The bones keep the model together (if it is composed of a series of separate objects, often known as a segmented model) when it moves and also deform the shape of the overlying mesh (in the case of seamless mesh models) so that the character moves realistically without breaking or splitting apart. These bones, when animated move the surface of the body around, much in the same way as muscles on real world bodies move them about and alter the shape of the surface skin. Bones systems, just like real bones act as a framework for the rest of the model to rest upon, just as our bones support all the muscle, skin and organs that cover them.
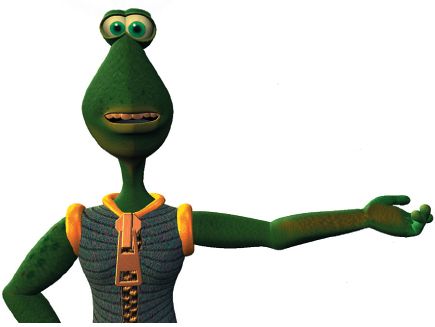
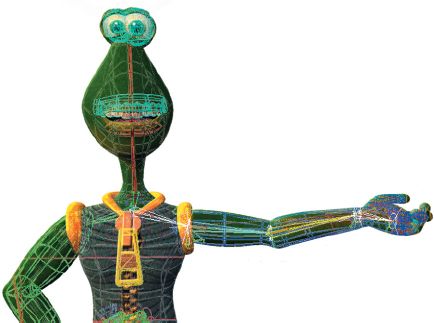
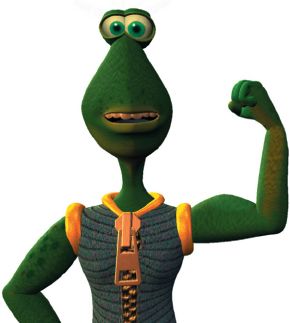
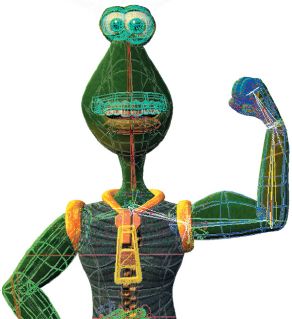
Figs 5.22–5.25 A 3D character from the film B-Movie showing its internal bone skeleton, and also showing how bones can be used to deform a mesh to create the effect of muscle bulge. Art by Gwilym Morris. © Morris Animation 2001.
Depending on whether a model’s bones system is set up for FK or IK will determine how an animator will work with the model.
Forward kinematics bones systems
FK bones have certain limitations in that all animation that is keyframed to the parent bone is inherited or passed down to the child bones in the same chain. The parent bone is also known as the root and is usually placed in the body in the area that the animator wants to keep as the top of the bone system hierarchy. This is usually the pelvis, because it is usually easier to animate the limbs, head and torso of a character from this point as every part of the human body is affected in some way by the movement of the pelvis. A chain is any sequence of linked bones, such as might be drawn from the waist to the torso, to the shoulder, to the upper arm, to the forearm and finally to the hand, to create a chain that could be used to control the movement of that part of the character.
When it is said that child bones inherit the animation of their parents, it means that if an animator rotates a bone in a chain, any bone that is a child of that bone is rotated as well. This happens whether the animator wants that part of the body to move or not. As has been previously described, this makes the process of animating a character that wishes to pick up a cup from a table (or execute any other animation sequence) quite long winded. The animator must first rotate the parent bone which bends the character at the waist, then rotate a shoulder bone to bring the arm round to point in the direction of the cup, then rotate the elbow to aim the forearm at the cup and then finally rotate the wrist to allow the hand to come alongside the cup. Animating the fingers to grasp the cup would require even more work!
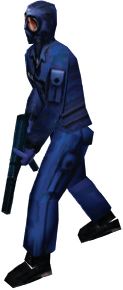
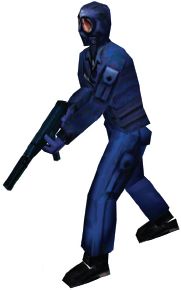
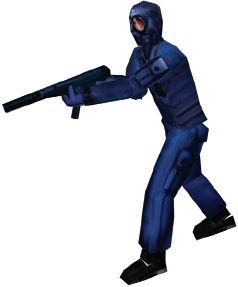
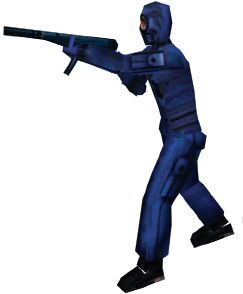
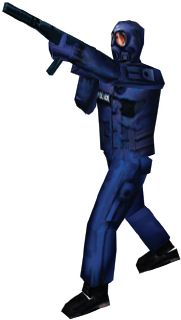
Figs 5.26–5.30 A few frames from a Morph Target Animation sequence for a low polygon segmented model. Art by Gwilym Morris. © Element 1999.
Forward kinematics systems are very easy to set up and also easy to animate with (for the beginner), but become difficult and slow to use when an animator wishes to create complex animation sequences. This is why they are rarely used to animate characters anymore. Inverse kinematics, their more advanced cousin, is by far the most popular form of bones system in use today.
Inverse kinematics bones systems
Inverse kinematics systems require much more forethought when setting a character up than FK does. Once set up though, they are considerably easier to animate with, requiring far less work on the part of the animator. IK systems are more complex because in order to create the most lifelike movement possible, the joints of the character (the top of each bone) require constraints to be set on them so that they cannot rotate in every direction freely, just like the joints in any real creature. If these constraints are not set up correctly, then when the character moves part of its body (e.g. the hand towards a cup), while the hand may move exactly where the animator wanted it to, the bones between the hand and the parent may flail about randomly, spinning like crazy as the IK solver (the mathematics that calculates the movement and rotation of bones between the effector and the root) is unable to work out exactly at what angle of rotation a joint should lock and stop moving or rotating. It is normal practice in computer game animation to set up each IK chain to only contain two bones. This is because when more than two bones are connected in a chain, the mathematics to animate their rotation can be prone to errors as it would require too much processing power to perform proper checking on every joint on every frame, so a simpler real time form of checking is used instead. As long as the animator remembers to only use two bone chains, then there won’t be any unwanted twitching in the model. If a limb or body part requires more than two bones to animate it correctly, then the best solution is to set up one two-bone IK chain, and then link another one, or two-bone chain to it, and then repeat the process until the limb is correctly set up.
ANIMATION TO GAME
Whatever animation system the animator uses (FK or IK) to create his animation sequences, animations are converted into one of three main forms when they are exported to the game engine. The three main forms are morph target animation (MTA), forward kinematics and inverse kinematics. Each has their own benefits and drawbacks, which accounts for the variety of additional versions of each form, as well as the fact that every new game requires something different to every other game’s animation systems.
Morph target animation in computer games
Morph target animation (MTA) works by storing the position of every vertex in the model in space at every keyframe in the animation sequence, regardless of whether any of the vertices moved or whether the original sequence was created using FK or IK. The programmer would take the animation sequence and let it play back on screen, and the model would appear to move because the position of all of its vertices would morph between all the keyframes in the animation sequence (figs 5.26–5.30).
MTA is the easiest form of animation for programmers to export into a game engine and also requires the least amount of CPU time and power to play back on screen in real time. This made it very popular with programmers in the early years of 3D games. For the animator it offered a simple system whereby as long as the target platform had the power to playback the animation in real time, then what the animator had created would be pretty similar to what was displayed on screen.
One last useful function of MTA is its ability to have the playback time of its animation sequences scaled up or down, as well as the physical size of the model. This enables sequences to be sped up or slowed down if desired without the animator having to reanimate the whole sequence again.
However, MTAs have many serious drawbacks. Because all vertices’ positions must be stored as keyframes even when they are stationary, a huge amount of memory must be allocated to storing all this animation data. The early 3D platforms, like the PSOne, had the CPU power to animate MTA characters, but were hampered by only having a very small amount of memory in which to store these animations. This led to characters having very few animation sequences attached to them and with very few keyframes in each cycle, which in turn led to unrealistic motion and characters not having an animation sequence for every type of game interaction that was possible with them. The classic example would be death animations – whether a character was killed by a pistol or a bazooka, the death animation sequence would often be the same to save memory! As you can imagine, this made for some unintentionally hilarious motion on screen.
MTA sequences also suffer from a stiffness of movement, caused when a character has to execute a sudden vigorous movement that must be completed by the animator in a very small amount of frames. Walk and run cycles were often made in 8 frames, and if the character needs to run in an exaggerated fashion, then the character’s limbs would appear to snap from frame to frame in order to cover the distance between each keyframe. This effect is very similar to what happens to models in traditional stop-frame animation if the animation process is not being directed very well.
Because MTAs are a totally rigid, fixed form of animation, the characters animated with this system cannot react exactly to their environment in a believable fashion, without an event-specific piece of animation being created for that particular event. The most obvious example of this would be a character’s walk animation. If an MTA character was to walk along a flat surface, then as long as the animator can avoid any foot slide, the character will appear to walk realistically across that surface. However, as soon as the MTA character starts to climb a hill, unless a specific ‘walk up hill’ animation sequence has been created, the model will continue to use the default walk cycle and a programmer will ensure that the whole body of the character is offset from the hill geometry as the character walks uphill. This causes the character’s feet to look as if they are walking on an invisible platform that is pushing them up the hill, while their whole body is not touching the hill geometry and almost appearing to float in the air, just above the ground! This very unrealistic solution to how to get a character to walk uphill explains why so many games take place on flat surfaces. Where terrain variation does occur, it is either a very shallow angle so the player is unaware of the fact that the character’s feet are no longer attached to the ground, or it is so steep that no character can walk up it.
Forward kinematics in computer games
Forward kinematics animation is the animation system used by most games developers. This is because IK animation still requires more processing power than most platforms have, and it is far more complex to code for than FK. In-game FK animation may be created using IK or FK in the 3D program, and the programmers control the conversion of whatever animation data the animators create into the in-game FK system they are using, including the conversion of bones into the game. FK systems are quite varied from game to game, so not all will have the functions detailed below, and likewise the information below does not cover every possibility.
Unlike normal MTA, a forward kinematics sequence only stores keyframes for every vertex of the model when the animator has specified keyframes in the 3D software’s timeline. These keyframes are stored in the bones of the character, just like they are in the 3D program that the animator used to create the original animation. A character’s arm movement, which may have a keyframe at frames 1, 8, and 16, will only store keyframes at these frames. This saves a huge amount of memory compared to MTA sequences which would save the position information of every vertex at every frame regardless of movement.
The FK sequence plays back on screen by interpolating the movement of the vertices between the keyframes the animator has set up. This makes FK animation appear to be more fluid and smooth than MTA. However, it does require enough CPU power to deform the model’s geometry in real time, which older platforms rarely had available to them. Of course, this real time deformation is only required if the model to be animated is a seamless skin (one with no breaks or splits in the surface of its mesh). Segmented models (ones that are made of individual parts, usually for each joint section) only require their vertices to be moved by the bones system.
Because an FK animation sequence is composed of specified keyframes separated by ‘empty’ frames with no keyframes in them, the model animates between those keyframes using a process known as interpolation (figs 5.31–5.33).
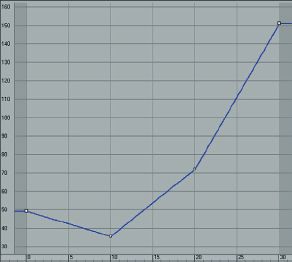
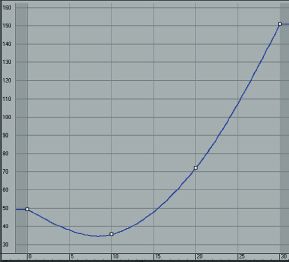
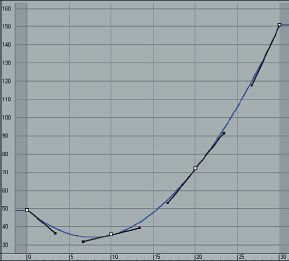
Figs 5.31–5.33 Examples of Linear, Smooth and Bezier interpolation as displayed in a 3D program’s Track or Keyframe Editor. Art by Martin Bowman. © Martin Bowman 2001.
There are many different types of interpolation, and most games use either standard linear interpolation (sometimes called rigid interpolation – see fig. 5.32) which is best thought of as a simple linear movement from one frame to the next with no blending, or smooth interpolation (see fig. 5.33), where the movement from keyframe to keyframe is smoothed out on those frames that lie between the keyframes, which gives a more natural appearance to the animation than linear interpolation can. Smooth is the usual choice for FK animation sequences. Bezier (see fig. 5.34), another form of interpolation, is similar to Smooth but adds the additional control that the way the animation is interpolated between keyframes can be altered to allow it to speed up or slow down dramatically. It is rarely used outside of IK animation as it requires far more processing power than smooth interpolation, although it does allow the most realistic animation movement.
Another benefit that FK animations have over MTA sequences is that they enable the programmers to blend different animation sequences from different parts of the body at the same time, unlike MTAs which must have a separate ‘whole body’ animation sequence for every action they need to display. An FK animated character could contain separate animation sequences for each of its body parts within the same file. This means that the character’s legs could be animated (a walk, crouch or run cycle) while the upper body remained static. The arm movements would be animated (waving, throwing or firing a weapon) in a different part of the file while the lower body remained static.
During game play, the programmers could allow separate animations to play back at the same time, which means the run cycle could be mixed with the waving arms or the throwing arms or the firing weapon arms. This ability to mix and match separate animation sequences frees up lots of memory. If the same amount of animations were required as MTA sequences then a considerably larger quantity of animation files would have to be created, because a separate sequence would have to be created for a run cycle with waving arms, a run cycle with throwing arms, a run cycle with weapon firing arms and then the whole process would have to be repeated for the walk cycles and crouching movement cycles.
FK animation can also scale its playback and size in the same way as MTA, however, FK animation is able to interpolate the frames between keyframes in a smoother fashion, whereas MTA often can’t. The gaps between keyframes still retain their original size as a ratio of the original animation, and these ratios cannot be altered, but by scaling the start and end keyframes towards or away from each other, the entire length of the sequence speeds up or slows down accordingly. This is a very useful function when a games designer suddenly invents a pickup that allows a character to run at twice his normal speed, and there isn’t enough memory for that sequence to be made. A programmer just has to write a piece of code that acts as a trigger for whenever the pickup is collected that causes the run cycle animation to be scaled down by 50%, which makes it play back in half the time, creating the illusion that the character is running at twice his normal speed.
One last very powerful facility of FK animation is that it has the power to contain or be affected by simple collision detection and physics information. Not all games using FK use this function because it does require a lot of processing power. The bones that move the character can have their normal animation sequences switched off by a programmer if required, and changed from FK to IK, to allow non-animator generated real time deformation to occur. This is most commonly used when a character is struck with a violent blow, or a powerful force moves the character. It enables the actual energy of the force to be used to deform the character’s body in a way that still respects the constraints set up in the original 3D program, or uses programmer created ones. This means that a character falls off a moving vehicle, the game engine switches from a movement animation sequence to real time physics to calculate the way the body deforms and moves when it strikes the floor. Of course this physics system also requires collision detection to be built into the game engine so that the character can hit the floor surface, and be deformed correctly by it, regardless of whether the floor surface is a flat plane or a slope. This sort of collision detection is usually only done on the whole body; more complex requirements (such as detection on individual parts of the body) are usually left to IK animation systems.
Inverse kinematics in computer games
IK animation is beginning to be used by a few developers, which means that it will be a few years before the majority of the games development community use it. This is due to the fact that it requires much more processor power than any other form of animation, and is also more complex to code for, as it allows a lot of potentially unforeseeable effects to happen. When an IK animation sequence is converted from the 3D program it was created in to the game, it still retains all the constraints that the animators built into it, but can also hold information on collision detection (collision detection is the process that allows the body of the model to impact with and be repelled by any other physical surface in the game world) and physics at the level of every bone in the character, as opposed to FK systems which can usually only hold this sort of collision detection as a box that surrounds the whole of the character.
IK offers many benefits over FK. It can contain all the constraint information that the animator uses to set up the animation sequences in the 3D program, but keep them in a form that can be used by the game engine. This allows the model to understand collision detection in a realistic fashion. Rather than having to set up an animation for running up a hill, the animator would just create a run cycle on a flat surface, and if the character ran uphill in a game, the IK system would angle the character’s feet so that they were always flush with the floor surface when they touched, unlike FK which would make the character’s feet look like they were on an invisible platform above the hill surface. Because the model contains the constraint information, it understands where it can bend or rotate when it is struck by another object (this is often referred to in the games industry as Physics). This adds a huge amount of realism to games where characters can be shot or hit with weapons – their bodies will move in response to the force of the impact of the weapon, and also in a lifelike fashion. They will no longer be constrained to a single death animation that disregards the power of the killing weapon.
A character can be shot in the shoulder and will be spun about by the impact in the correct direction and may fall to the floor, or against another object and also be deformed by this interaction in a realistic fashion, which convinces the player that the model does actually contain a skeleton underneath its geometry. If the IK system is powerful enough, the character may actually dislodge other objects that it comes into contact with if the game’s physics engine calculates that they are light enough to be moved by the force the character applies to them.
An IK system also allows ‘joint dampening’ to be used on the model’s body so that when it moves, there is a sense of weight and delay in the movements of the joints of the model. Joint dampening is an additional set of instructions that the animator builds into the bones along with the constraints so that some joints can appear to be stiffer than others or have their movements delayed if the model picks up a heavy object, for example.
WHAT ART POSITIONS ARE THERE IN THE GAMES INDUSTRY?
This section will give a quick overview of the many possibilities open to the artist who is interested in working in the games industry.
There are roughly eight different art positions currently in existence, although as the technology advances, new skills are required, and therefore new positions are created all the time. This may sound like the industry requires artists to be very specialized in their chosen area of expertise, but in reality most companies want artists who can demonstrate as wide a portfolio of skills as possible. Many developers, especially smaller ones, will have their artists performing many of the roles listed below. However, if an artist works for a large developer he may find that he has a very defined position and rarely has the opportunity to try new areas of computer graphics.
The list below is not meant to be an exhaustive survey of all the job types available, but it covers the majority. The actual name of each job position and the exact requirements of each vary from company to company.
Art/Creative Director
The Art or Creative Director is the highest position an artist can hold and still have some direct input on the art in the game. The Art Director is in charge of the entire art department of the company. He has the final say on all game artwork, allocates the correct artists to the respective game, hires new artists and is the main art contact with the publisher of the game and the publisher’s marketing department. He makes the decisions about buying new software. He will liaise with the game designers to solve potential gameplay/ art issues, preferably before they arise. He answers directly to the Managing Director. This company structure is common in Europe and America, however, in Japan there is a Director for every individual project who takes this role only for that specific project. He concentrates on the look and feel of the game. This role is becoming more popular in America. Underneath him the Lead Artist solves all the logistical and technical problems.
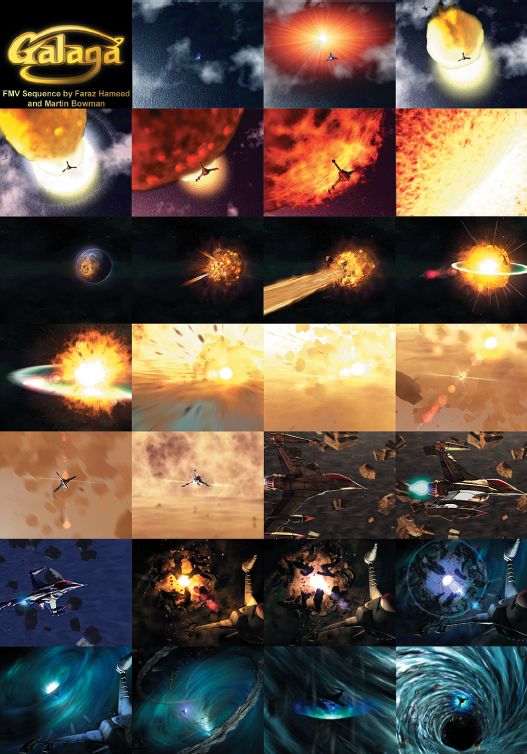
Fig. 5.34 A sequence of stills from an FMV sequence for Galaga, Destination: Earth. Art by Faraz Hameed and Martin Bowman. © King of the Jungle Ltd 2000.
Lead Artist
The Lead Artist is the artist in charge of all the art staff on one project. Lead artists usually have several years of experience as other types of artist before they become Lead Artist. They decide which art tasks are assigned to which artists. It is their job to oversee the quality of all art on their project, to research and solve technical issues and to be the main art contact with the programming team on the project. They will also give advice to the other artists on how to improve their work and demonstrate and teach any new software that the art team may use. They are also the main art contact for the developer’s own internal producer.
FMV/Cinematic Artist
The FMV (full motion video) Artist is usually an artist with a very high technical knowledge of a wide range of software, as well as a trained visual eye for creating animations both of the rendered kind (FMV), and also the in-game rendered cut scene variety. FMV sequences are increasingly expected to achieve the same level of beauty that Pixar or PDI create in their CGI films. The FMV sequence is usually used as an introductory movie to bring the player into the game world’s way of thinking and explain the plot. See fig. 5.35.
A large developer may have its own FMV department, whereas smaller companies may either outsource any FMV requirements to an external company or utilize the talents of the best of their in-game artists. The FMV artists’ skills may combine animation, high detail modeling (polygons and higher order surfaces), texturing, lighting, rendering, compositing and editing, as well as more traditional animators’ skills such as character design, storyboarding and conceptual work.
Lead Animator/Animator
An animator is an artist who has specialized in learning how to create lifelike, believable animations (see fig. 5.36). As good animators are very rare, they are usually employed to do nothing but animate – modeling and texturing skills are left to the modelers and texturers. An animator will know how to animate skinned and segmented characters, by hand or possibly with motion capture data, within the tight restrictions of the games industry. He may also have knowledge of 2D animation techniques – skills that are highly regarded for character animation. The Lead Animator fulfils the role of the Lead Artist, except that he is in charge of the animators on a project, and reports to the Lead Artist. In practice, usually only large developers or companies working on animation heavy projects have a Lead Animator.
3D Modeler
3D Modelers, together with Texture Artists make up the bulk of the artists in the games industry. Quite often the two jobs are mixed together. The modeler’s job is to create all the 3D models used in the game. The modeler may research and design the models himself, or he may work from drawings made by a Concept Artist. Good 3D Modelers know how to make the most from the least when it comes to tight polygon budgets (fig. 5.35), as the platforms for games never have enough processing power to draw all the polygons an artist would like. They may also have to apply textures to their models, a process of constantly reusing textures, but in clever ways so that the game player is unaware of the repetition.
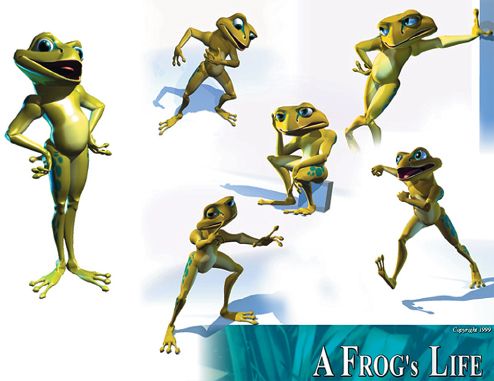
Fig. 5.35 A model sheet showing example poses and expressions of a character created by a Lead Animator, which can be used as reference by other animators. Art by Faraz Hameed. © Faraz Hameed 2000.
Texture Artist
The Texture Artist is the other half of the bulk of the artists in the games industry. He needs to possess an excellent eye for detail, and have a huge visual memory of materials and their real world properties. He should have a good understanding of how real world conditions alter and adjust materials, and be able to draw these images. He should be capable of creating seemingly photorealistic imagery, often with very small textures and restricted palettes of colour, but for more advanced platforms he should be able to draw very large 24-bit textures, often up to 1024 × 1024 pixels in size! He should also know how to draw seamless textures – ones that can be repeated endlessly without the viewer detecting the repetition (see figs 5.37–5.38). It is the work of the texture artist that convinces the player that he is interacting with a ‘real’ world, no matter how fantastic its nature.
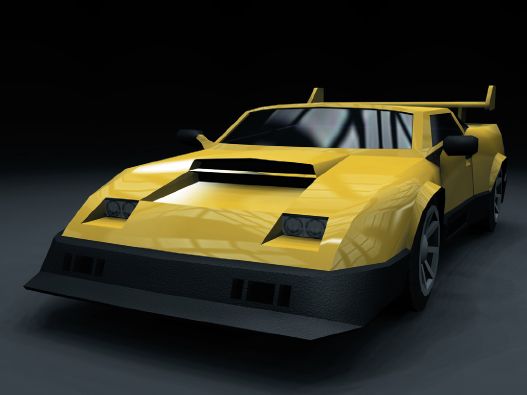
Fig. 5.36 A sports car made of 3000 polygons designed for the PlayStation2 game Groove Rider. Art by Martin Bowman. © King of the Jungle Ltd 2001.
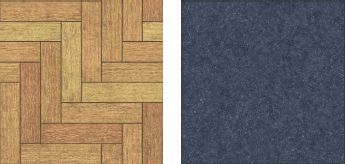
Figs 5.37–5.38 Two examples of repeating seamless textures. Both were drawn by hand without any scans and created for use in Groove Rider. Art by Martin Bowman. © King of the Jungle Ltd 2001.
The Concept Artist is skilled in traditional art techniques. He works closely with the Games Designer to provide imagery that describes the look of the game or evokes the atmosphere the Games Designer hopes to evoke in the game. Many of the Concept Artist’s drawings will be used as reference by the 3D Modelers to create game objects (figs 5.37 and 5.40). This means that the Concept Artist’s work must be beautiful and descriptive at the same time. A Game Concept Artist’s skills are very similar to those used by Concept Artists in the film industry. Potential Concept Artists can learn a huge amount from the wealth of concept material created for films such as Blade Runner or Star Wars. Usually only large developers have dedicated Concept Artists, so usually the Concept Artist doubles up as a Modeler or Texturer as well.
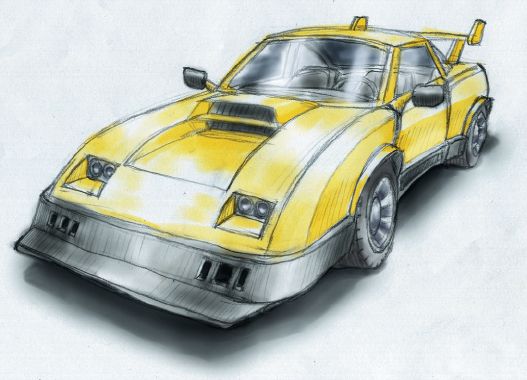
Fig. 5.39 The concept sketch used to create the car model in fig. 5.36. Art by Martin Bowman. © Martin Bowman 2001.
Level Designer
The Level Designer, or Mapper, works with the Games Designer to create the levels or environments in the game. Sometimes they will design the levels themselves, other times the Games Designer or Concept Artist may provide a plan and additional drawings of the look of each level. Level Designers usually use the developer’s in-house tools to layout and map textures onto the game terrain and place objects made by the 3D Modelers into the game environment. See fig. 5.41. The Level Designers give the finished levels to the Playtesters who make alteration suggestions to improve game play. Level Designers need a thorough knowledge of the in-house tools, and an understanding of the more common free level editors (e.g. Q3Radiant, Worldcraft etc.) is helpful.
Summary
As you can tell, the art department in a games developer is an intricately woven construction. All the parts depend on each other for support, with the Lead Artist or Creative Director at the centre making sure the right tasks are done correctly by the people for the job. Making a successful computer game requires a strong team of artists who work well together and can support each other in times of stress.
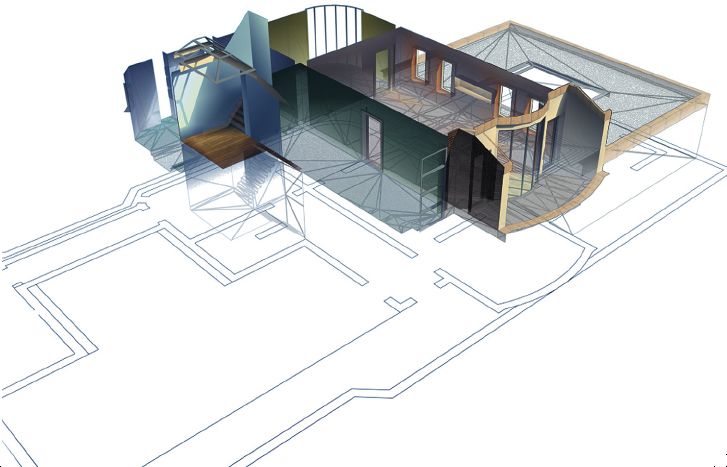
Fig. 5.40 A montage of the original level design plans, wireframe of the level’s geometry and final textured and lit level model from Groove Rider. Art by Martin Bowman. © King of the Jungle Ltd 2001.
WHAT SKILLS DO EMPLOYERS LOOK FOR?
This is a question that many CGI students, or people who wish to work in computer games fail to ask themselves. Most students are unaware that the reason they do not get jobs, or even interviews at least is because the portfolio they sent to the developer does not demonstrate any skills that could be used in computer game development. Unfortunately the work most students create, which may be exactly the right sort of animation or art to achieve high marks in higher education courses, is very far from what a developer wants to see in a portfolio. This does not mean that a student needs to learn two different sets of skills, one for higher education and one for getting a job, it’s just that the student needs to focus their creative efforts while still at college to make work that will pass the course criteria and also look great in a portfolio for approaching games companies with. Many animation students have portfolios with different bits of animation in that are neither specific to Games or to Post-Production, the other job market for CGI animation students. If the student wishes to apply to a company successfully, their portfolio must contain work that relates to the artwork the company creates, or the person reviewing the CV will see no point in inviting them to an interview.
Artists applying to games companies should consider first, what type of art position they want and skew the imagery in their portfolio towards this end, and second, include additional general work that demonstrates skills that could be used in many positions in the company. The reason for this is that although the applying artist may have a definite idea of what job they want (e.g. an animation position), they are unlikely to have good enough or technical enough animation skills for an employer to hire them. If they can present examples of animation for games and also some examples of concept art, modeling, texturing or level design, then they stand a good chance of being hired as a junior artist. If an animation student applies with only animation work in their portfolio, unless it is of outstanding quality (and it very rarely is) they will not get a job because they do not demonstrate the additional general art skills required by a junior artist in a games company.
A junior artist is a general position, meaning the artist creates low priority work while learning about how to create art for computer games. Most animators start off as junior artists, creating models and textures while learning the animation techniques and restrictions from other animators. If they continue to practise and improve then hopefully they may eventually be given the opportunity to move into an animation position.
So what skills does an employer look for in a portfolio? If the artist is applying to be an animator, then they should have examples of the following animation types in their portfolio:
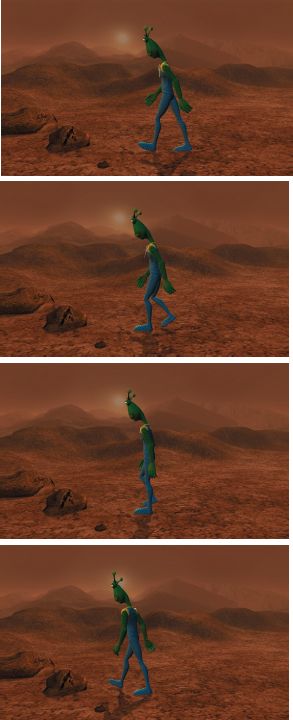
Figs 5.41–5.44 A sequence of stills from a walk cycle from the film B-Movie. Art by Gwilym Morris. © Morris Animation 2001.
• Looping animations (animation sequences which repeat forever without having a visible start or end) using low polygon count models. A walk cycle (in 8 frames or 16 frames) and a run cycle (same criteria as the walk). See figs 5.41–5.44.
• A spoken sentence, lip synched to a close-up of a character’s face.
• An example of two characters interacting (e.g. fighting, talking etc.).
• An example of a character standing still (no one ever stands exactly still, and animations are made of the slight unconscious movements people make when they stand still to prevent a motionless character from looking unreal. Look at Metal Gear Solid 2 or Half Life for examples of this type of animation).
Additional animations that demonstrate good skills would be a walk or run cycle of a four-legged animal such as a horse. Also creating a character that has been exported into a popular PC game, e.g. Quake 3, and utilizes that games animation restrictions shows excellent games animation skills, but may prove to be a very complex task for a non-industry trained animator. Character animations are also a good bonus, with the movement of the character exaggerated to fit its appearance and demeanour – look at the way characters in Warner Brothers cartoons of the 1940s and 1950s move. Of course it is vital that the animations actually occur at a lifelike speed – most animation students animate their characters with extremely slow movements. In reality, only the ill or very old move this slowly, and this type of animation immediately points an applicant out as being a student, and this is not what is usually desired. It is best to impress an employer by appearing to be a professional, not an amateur.
An artist applying to be a Modeler, Texture Artist, Concept Artist or Level Designer should have examples of some of the following in their portfolio:
• Concept art. If you have any traditional drawing skills then use them to create concept images of characters, buildings, environments. Few artists in the games industry have decent traditional skills, and ability in this field will help you get a job even if your CG skills are not quite as good as they need to be. However, these conceptual drawings have to be good – characters must be in proportion, buildings drawn in correct perspective etc. and of a style that is very descriptive so that the drawings could be given to another artist to turn into a 3D model (see figs 5.39 and 5.45). If you do not possess traditional art skills then it is better to spend your time enhancing your modeling/texturing skills than wasting it trying to develop a talent that takes most people years to learn.

Fig. 5.45 A concept sketch of a character for a fantasy game. Art by Martin Bowman. © Martin Bowman 2001.
• Low polygon models. It is quite extraordinary how many students apply to a games company without a single example of a model that could work in a real time environment. Admittedly the term ‘low polygon’ is becoming a misnomer these days with new platforms like the PlayStation2, Xbox and high end PCs capable of moving characters with polygon counts of anything from 1000 to 6000 polygons, unlike the first 3D game characters which rarely had more than 250 polygons to define their shape. If possible it is advisable to demonstrate the ability to model characters or objects at different resolutions. Create one 5000 polygon character, another at 1500 polygons and one other at 250 polygons. This shows the ability to achieve the maximum amount from a model with the minimum of resources available, an important skill as there are still lots of games being made for the PlayStation One (fig. 5.48).
Other important types of low polygon models are vehicles and buildings. Of course these models should be fully textured with texture sizes in proportion to what would be expected of a platform that uses these polygon counts. For example you would probably have either a single 128 × 128 pixel texture at 8-bit colour depth for the 250 polygon character or perhaps 4–8 individual 64 pixel textures at 4-bit colour depth. A 1000 polygon character would probably have a single 256 × 256 pixel texture at 8 bit or 24 bit with possibly an additional 128 pixel texture for the head. The 3000 polygon character would probably have a 512 × 512 pixel texture at 24 bit with another 256 pixel texture for a face. Of course all these guides are very general – some game engines and platforms can handle far more graphics than this, others considerably less.
• Textures. The Texture Artist doesn’t just create textures for characters, he has to be able to create textures for any possible surface that might appear in a game. Excellent examples are terrain textures, e.g. grass, roads, rocks and floor surfaces. See figs 5.39 and 5.46.
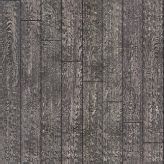
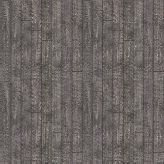
The top image shows a hand-drawn, non-scanned floor texture from Groove Rider. The second image shows how well the same texture can be repeated across a surface without a visible repetition occurring.
• These must tile correctly (which means they can be spread many times across a surface and not have a visible seam at their edges, or contain any pixels that cause a pattern to form when they are repeated) and also look in keeping with the style of the game, whether that is realistic or cartoon.
• Many Games Artists can only create textures from scanned photos, but if you have the ability to hand draw them and make them better than scanned textures, then this will get you a job as a Texture Artist. Other good texture types are clouds, trees and buildings. Also try to have textures from different environments, e.g. mediaeval fantasy, modern day, sci-fi and alien. Textures should be created at different resolutions to show the artist is capable of working with the restrictions of any platform. It would be a good idea to have a few 64 pixel, 4-bit textures from a 15-bit palette to show ability to create PlayStation One textures, with the bulk of the textures in the portfolio at 256 pixels in 8 bit or 24 bit with a few 512 and 1024 pixel 24-bit textures for platforms such as the Xbox. It is also a good idea to provide rendered examples of low polygon models with these textures on them, to show the artist’s skills in texture mapping.
• Vertex colouring. Another useful skill for the Texture Artist is how to paint a model using vertex colours, or enhance a textured model’s appearance with vertex colouring. Vertex colouring is a process where the artist colours the model by painting directly on the polygons without using a bitmap (fig. 5.48).
Every vertex in the model is assigned an RGB (red, green, blue) value, and this value fades into the value of the vertex next to it, creating smooth gradient blends from one colour to the next. Vertex colouring is also good for tinting textures with colour so that the same texture can be reused in the scene more than once and still appear to be different. This saves VRAM memory (the memory on a platform assigned to store textures) which is always helpful as every game in existence runs out of VRAM space at some point in development, and textures have to be removed from the game to ensure that it continues to run at the correct frame rate. Vertex colouring is good at creating nice gradients and subtle light/shadow effects, but it requires lots of geometry to accurately depict a specific design. As it is a subtractive process, if it is to be used with textures, those textures may have to be made less saturated than they normally would be, and possibly lighter as well, because otherwise the vertex colour effects will not be visible on top of the texture (figs 5.49–5.50).
The other reason why vertex colouring is very popular in games is because polygons with only vertex colouring on them render faster than polygons with textures. Some examples of beautiful vertex colouring in games would be the backgrounds in the Homeworld game (all the stars and nebulas), and the characters and skies in Spyro the Dragon.
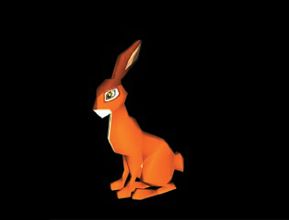
Fig. 5.48 A model coloured only with vertex colouring apart from a bitmap used to draw the eyes. Such models use very little VRAM and are often used on consoles that have low amounts of VRAM. Art by Faraz Hameed. © King of the Jungle Ltd 2000.
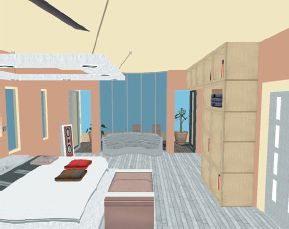
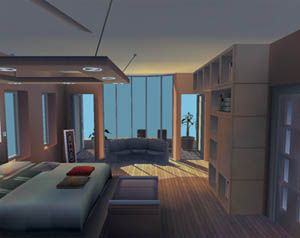
Figs 5.49–5.50 An example of the lighting simulation possible using vertex colouring. The top image shows a level from Groove Rider with just flat vertex colours and textures. The bottom image shows the level after it has been vertex coloured. Vertex colouring and room creation by Martin Bowman, other art by King of the Jungle Ltd. © King of the Jungle Ltd 2000.
• Level designs. These are of greatest importance to an artist who wants to become a Level Designer, but they are excellent additional material for any artist to have as they demonstrate the ability to think spatially, and understand how players should move about their environment. Paper designs are nice, but really need to be backed up with some actual levels created for games such as Quake or Half Life, which are always installed at every developer’s offices, so that they can test a prospective level designer’s skills out first hand, and look around their levels. Before designing a level, the designer really should research the sort of architecture he is planning to recreate digitally. Although most real world architecture rarely fits the level designs you see in games (unless they are set in the real world), it still provides an inspirational starting point.
Another great source of material for level designs is stage or theatre design, which is often created on a deliberately vast scale for visual effect, just like computer games. A lot can be learned about lighting a level to achieve a mood from books on these subjects. Lastly, archaeological books can be great reference for creating tombs, dungeons, fortifications etc. that actually seem real. Although many of the Level Designers that create ‘castle’ levels for games have obviously never seen the real thing, it shouldn’t stop them from getting some books on the subject and creating more believable, immersive environments.
Summary
As you can see, it is vital that the prospective artist decides what sort of position he wants before he applies to a company. If the art in the portfolio tallies with the position that the applicant is applying for, then they have a much greater chance of getting a job than someone who just creates a random collection of work and asks if they can get a job as an ‘artist’. Sadly enough, this is exactly what most students do, so in order to stand out from them, it is a good idea to follow some of the advice given above.
CONCLUSION
This chapter has provided a brief glimpse into the fascinating and constantly evolving computer games industry. Hopefully you will have as many more new questions about the industry as were answered in this short text. If you are one of the many students who wish to work in the industry I wish you good luck and advise patience and perseverance. If you really believe you want this job, then never doubt yourself or give up and perhaps someday I may well be working alongside you! Those of you who want further information and tutorials should turn to Chapter 8, where you will also find useful references for the prospective junior artist.
