
Chapter 1
Navigating the Fretboard and Building Triads
IN THIS CHAPTER
![]() Memorizing notes on strings 6 and 5
Memorizing notes on strings 6 and 5
![]() Getting familiar with whole steps, half steps, sharps, and flats
Getting familiar with whole steps, half steps, sharps, and flats
![]() Using octave shapes and playing intervals
Using octave shapes and playing intervals
![]() Building a triad and chord on each major scale degree
Building a triad and chord on each major scale degree
![]() Access the audio tracks and video clips at
Access the audio tracks and video clips at www.dummies.com/go/guitaraio/
Believe it or not, mastering the guitar fretboard doesn’t require you to memorize every single note on it. Guitar players may play notes all over the neck, but they usually navigate by using shapes and patterns based mainly on the notes on strings 6 and 5.
In the first part of this chapter, you get to know the natural notes along strings 6 and 5 and then use them to track everything else you play on the fretboard with octaves. You see the difference between a half step and a whole step and find out how to fill in the gaps between natural notes with flats and sharps. Finally, you explore intervals and octaves and discover which songs can help you use them. Armed with all that, you can begin to make your way around the guitar neck like a pro and set yourself up for mastering the chord shapes and scale patterns covered in the rest of this book.
 Listen to Track 43 to hear notes, steps, octaves, and intervals.
In the second half of this chapter, you get started with basic chord construction by stacking the major scale in 3rds to form triads and then playing the notes of these triads simultaneously to sound chords. The basic chords you form here are the platforms on which other types of chords are built in Book 3 Chapters 2 and 3. The sequence of major and minor chords that the major scale produces — one of the most important patterns in all of music — is used, among other things, to play chord progressions and chart chord changes (which you begin to explore in Book 3 Chapter 4).
Listen to Track 44 for some examples of what you encounter in this chapter, including chord construction, triads, chords, and the harmonized major scale.
This chapter builds on the basic chord info covered in Book 2 Chapters 1 and 2. If you need a refresher, you may want to refer back to those chapters.
Tracing Back to Strings 6 and 5
Guitar players use the notes on strings 6 and 5 (the low E string and the A string) to track other notes on other strings, so the first thing to do memorize the natural notes on strings 6 and 5. The natural notes are the letters A through G without any flat or sharp signs next to them. Figure 1-1 shows the natural notes on the 6th string between the open position and the 12th fret.
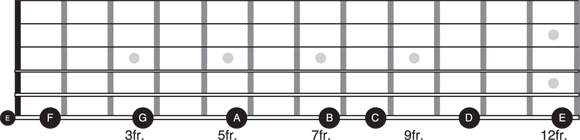
Illustration courtesy of Desi Serna
FIGURE 1-1: The notes on the 6th string.
You may already be familiar with some of these notes because they’re used so frequently, especially as roots (the primary pitch from which a chord gets its letter name) to common chords. For example, the open 6th string is E, and it serves as the root of all open E chords, including E and E minor. To help you keep track of these natural notes, consider the following five key points as you look at the group of fretboard diagrams in Figure 1-2:
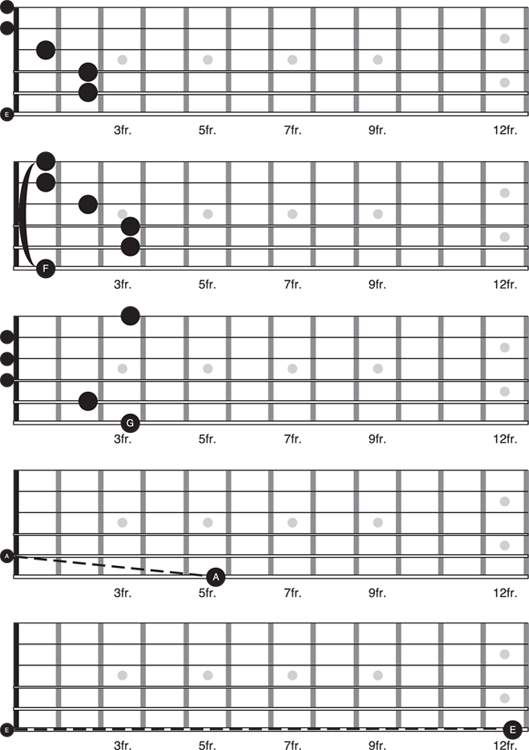
Illustration courtesy of Desi Serna
FIGURE 1-2: 6th string associations.
- The open 6th string is E and the root of an E chord.
- The 1st fret is F and the root of an F chord.
- The 3rd fret is G and the root of a G chord.
- The 5th fret is A, matching the 5th string open, used for relative tuning.
- The 12th fret is E, an octave higher than the same string open (specially marked by two inlays or dots on the fretboard on most guitars).
Instead of looking at the fretboard empty and trying to remember its notes, connect the notes to something familiar, like common chord shapes and other strings. Try playing through the five notes in the preceding list forward and backward, reviewing the associations laid out for you. Call out the notes as you play them to further cement them into your memory.
Figure 1-3 shows the natural notes on the 5th string.
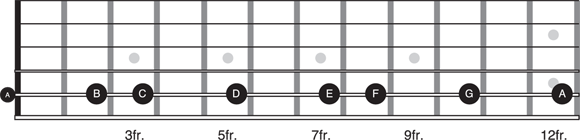
Illustration courtesy of Desi Serna
FIGURE 1-3: The notes on the 5th string.
Just as you do for the 6th string notes, you can associate the notes along the 5th string with common chords and another string, as explained in the following list and shown in Figure 1-4:
- The open 5th string is A and the root of an A chord.
- The 2nd fret is B and the root of a B7 chord.
- The 3rd fret is C and the root of a C chord.
- The 5th fret is D, matching the 4th string open, used for relative tuning.
- The 7th fret is E, an octave higher than the 6th string open.
- The 12th fret is A, an octave higher than the same string open (specially marked by two inlays or dots on the fretboard on most guitars).
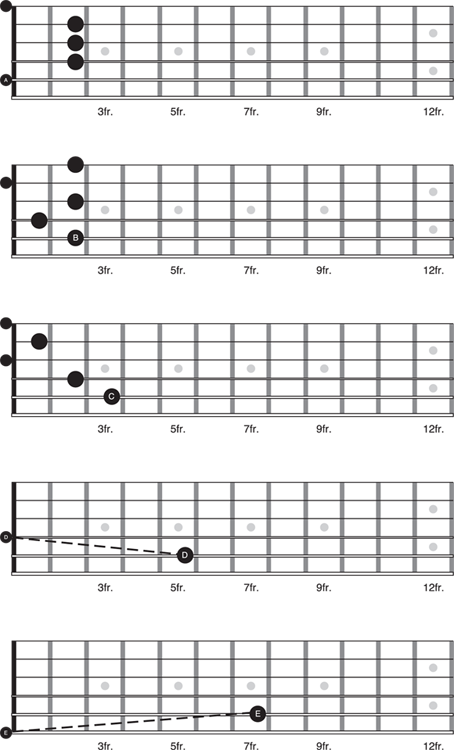
Illustration courtesy of Desi Serna
FIGURE 1-4: 5th string associations.
Moving whole steps and half steps
Musicians measure the distance between pitches (sound frequencies or notes) with intervals called whole and half steps. The distance between one pitch and the next is called a half step or semitone. On a guitar, a half step is one fret. Two half steps make up a whole step or whole tone, which is two frets. For example, E-F and B-C are half steps, and F-G-A-B and D-C-E are whole steps. These pitches are always separated by these distances, regardless of where you play them on the fretboard.
Sharps and flats
The pitches between the natural notes are called flats and sharps. A flat is one half step lower than its corresponding natural note and is marked with the musical symbol ♭. A sharp is a half step higher and is marked with the symbol ♯.
For example, the pitch in between F and G on the 6th string is either F♯, meaning one half step higher than F, or G♭, meaning one half step lower than G. F♯ and G♭ are enharmonic, meaning they’re two different note names with the same pitch.
Grouping notes
To memorize the remaining notes on both strings, think of the notes in groups. Grouping notes together helps you remember string areas that don’t connect easily to a common open chord or open string.
As you review the note groups covered here, take a moment to rehearse all the notes in each group, playing through them forward and backward and calling them out as you go. After you have all these natural notes memorized, you can easily fill in the gaps with flats and sharps.
A-B-C
To start, take the first three notes on the 5th string: A-B-C. You can play this same group of notes with the same spacing beginning at the 5th fret of the 6th string, as shown in Figure 1-5.
Wherever you find an A, B is always a whole step higher, and B and C are always a half step apart. If you memorize these notes on the 5th string between the open position and the 3rd fret, then you also know the notes on the 6th string between the 5th and 8th frets — they’re the same!
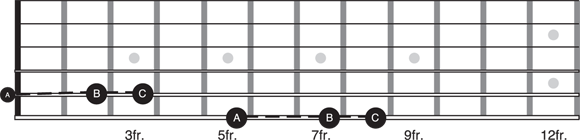
Illustration courtesy of Desi Serna
FIGURE 1-5: A-B-C on strings 5 and 6.
C-D-E
Similarly, you can group the notes C-D-E. These notes are always separated by whole steps. On the 5th string, they’re at frets 3, 5, and 7, and on the 6th string, they’re at frets 8, 10, and 12 (see Figure 1-6).
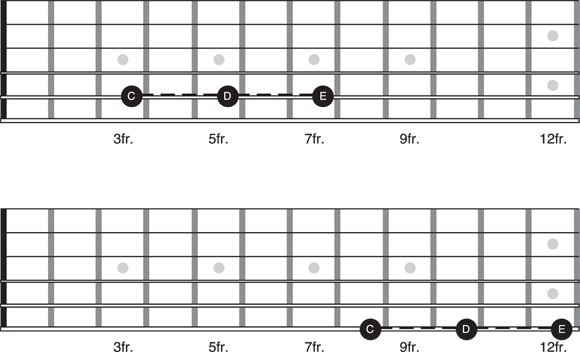
Illustration courtesy of Desi Serna
FIGURE 1-6: C-D-E on strings 5 and 6.
Whenever you’re on a C, you can reach up a whole step to D and another whole step to E. Likewise, whenever you’re on an E, you can reach down a whole step to D and another whole step to C.
E-F-G
You can also group the notes E-F-G on the 6th and 5th strings, as shown in Figure 1-7. On the 6th string, these notes are between the open position and the 3rd fret; on the 5th string, they’re between the 7th and 10th frets.
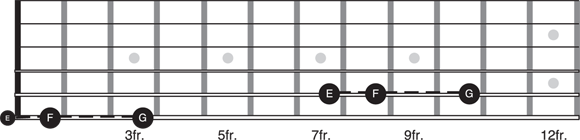
Illustration courtesy of Desi Serna
FIGURE 1-7: E-F-G on strings 6 and 5.
Wherever you find an E, F is always a half step higher, and F and G are always a whole step apart.
F-G-A
Finally, you can group the notes F-G-A, which are always separated by whole steps. On the 6th string, they’re at frets 1, 3, and 5; on the 5th string, they’re at frets 8, 10, and 12 (see Figure 1-8).
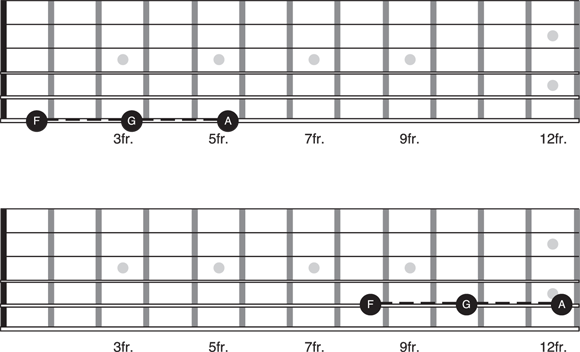
Illustration courtesy of Desi Serna
FIGURE 1-8: F-G-A on strings 6 and 5.
Whenever your 1st finger is on F, you can reach up a whole step to G and another whole step to A. Similarly, whenever your 4th finger is on A, you can reach down a whole step to G and another whole step to F.
Tracking Notes and Playing Octaves
You can use the notes along strings 6 and 5, covered in the preceding section, to track any note anywhere on the fretboard. How? With octave shapes. An octave is the distance between one pitch and another with half or double its frequency. In other words, it’s a higher or lower version of the same pitch. You can also think of an octave as the same pitch in a different register. Octave pitches are also called unison pitches. On the guitar fretboard, octaves follow certain spacings or shapes that you finger in different ways.
In music, the word unison can refer to two identical pitches being sounded by separate or different instruments, including voices. For example, two guitar players both playing their 6th strings open produce unison pitches. Unison can also refer to pitches that are the same but separated by an octave or more. For example, one guitarist playing the 6th string open and another playing the 1st string open, both E, produce unison pitches.
Shaping octaves with your 1st finger on strings 6 and 5
The first octave shape you need to know stems off of strings 6 and 5. Place your 1st finger somewhere on the 6th or 5th string and use another finger to reach over two strings and up two frets: You now have the same note an octave higher. Figure 1-9 shows what this octave shape looks like. Notice that you can also play octaves of the open strings.
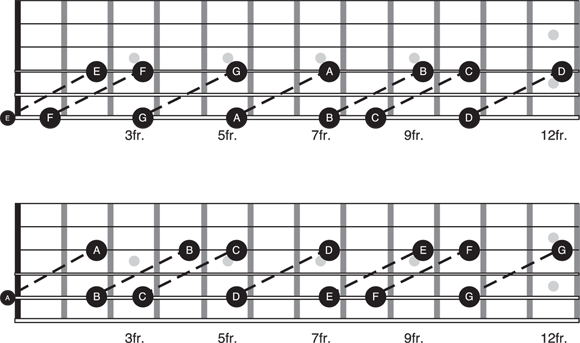
Illustration courtesy of Desi Serna
FIGURE 1-9: Octaves on strings 6 and 5.
You can finger these octave shapes with either your 1st and 3rd fingers or your 1st and 4th fingers — whichever is more comfortable. Guitar players usually opt to strum octave shapes on strings 6 and 5 by using a pick and leaning their fretting fingers back to touch (but not fret) other strings to prevent them from ringing. This technique creates a raking sound from the muted strings. In fact, jazz guitar legend Wes Montgomery was famous for playing melodies and solos by using octave shapes in this fashion, opting to strum across the strings with the pad of his right thumb for a soft, mellow sound. You hear this technique in his song “Bumpin’ on Sunset.” Jimi Hendrix strummed the same kind of octave shapes with a pick, using distortion, for his songs “Fire” and “Third Stone from the Sun.”
For a demonstration on playing octave shapes, watch Video Clip 17.
 If you need to identify a note on string 4 or 3, use octave shapes to trace it back to the notes you have memorized on strings 6 and 5.
Octaves starting on strings 4 and 3
You can play octave shapes with your 1st finger on string 4 or 3 and the octaves on string 2 or 1, although the shapes are slightly different than they are on strings 6 and 5. With the way the 2nd string is tuned (one half step lower), you need to move over two strings and up three frets to reach the octave (see Figure 1-10).
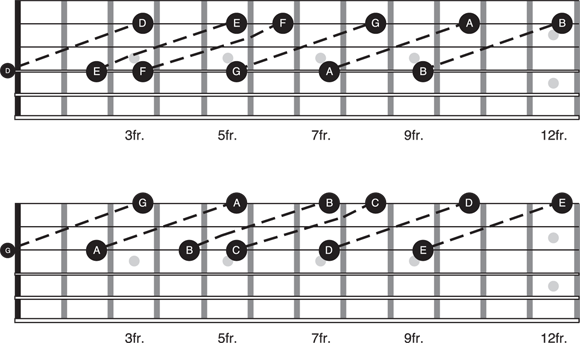
Illustration courtesy of Desi Serna
FIGURE 1-10: Octaves on strings 4 and 3.
If you have to identify a note on string 2 or 1, use octave shapes to trace it back to strings 4 and 3 and then again to strings 6 and 5. However, keep in mind that the 1st string is E, just as the 6th string is E, and the positions of all the notes on both strings are the same.
Octaves that are three strings apart
Another octave shape that’s less common but still good to know reaches over three strings and in the direction opposite the previous shape’s direction. You can play these octaves by placing your 1st finger on either string 1 or 2 and then reaching over to either string 4 or 5 with either your 3rd or 4th finger, as shown in Figure 1-11. Notice that you can also use the open strings.
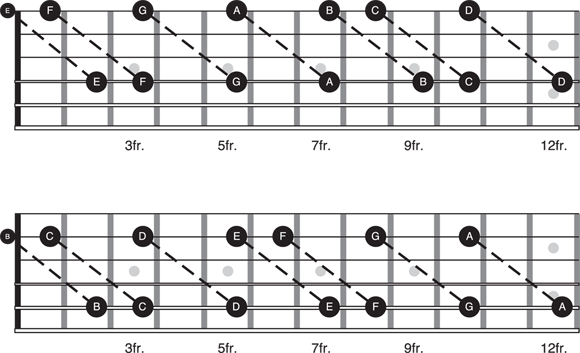
Illustration courtesy of Desi Serna
FIGURE 1-11: Octaves that are three strings apart.
Repeating octaves beyond the 12th fret
The preceding sections cover notes between the open strings and the 12th fret, but what about the fretboard area beyond that? Fortunately, everything — including notes and spacing — repeats at the 12th fret. Just as strings 6 and 5 open are E and A, the same strings are E and A at the 12th fret. Just as the first inlay marker past the open 6th string is G, the first marker past the 12th fret is also G. As you can see in Figure 1-12, the guitar neck between 0 and 12 is identical to the neck between 12 and 24, though your guitar may not have a full 24 frets. Note the fret numbers indicated below the neck diagrams.
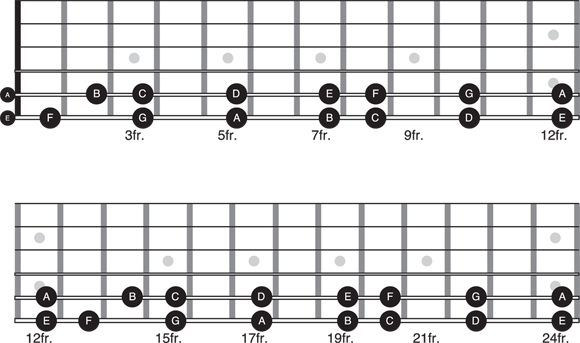
Illustration courtesy of Desi Serna
FIGURE 1-12: Notes open to 12 and from 12 to 24.
After you can identify any note on the fretboard by using various octave shapes to trace it back to a note you have memorized on string 6 or string 5, it’s time to practice your skills. Pick a note and track it across the whole fretboard. For example, see how many E notes you can play.
Measuring the Space between Pitches with Intervals
Just as builders use measurements to identify distances between points, guitarists use intervals to identify distances between pitches. You use intervals to build scales and chords and to describe musical movement.
The tape measure used in music is called the major scale. The major scale has seven pitches that are separated by a series of intervals known as whole and half steps. Here’s what the major scale formula looks like:
W-W-H-W-W-W-H
The Ws represent whole steps, and the Hs represent half steps. Starting on any note, you can follow this basic step formula to produce the major scale. Figure 1-13 shows what the major scale looks like when you start on G.
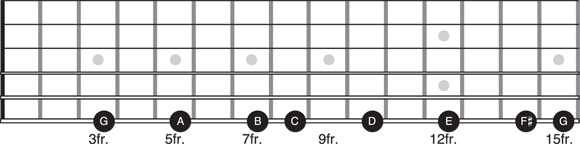
Illustration courtesy of Desi Serna
FIGURE 1-13: Major scale starting on G.
Note: Before you can look at each interval individually, analyze its steps, and explore how it looks on the fretboard, you need to see the major scale in different positions (see Figure 1-14). You don’t have to memorize these scale patterns now; they just provide a visual reference for the rest of this section.
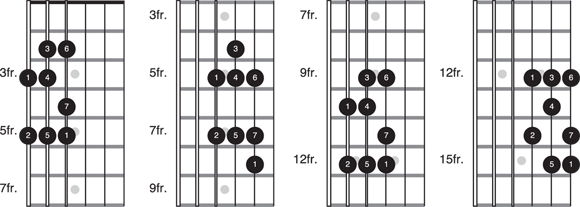
Illustration courtesy of Desi Serna
FIGURE 1-14: G major scale in four positions.
Playing intervals 1 through 7
The distance from the 1st to the 2nd scale degrees in the major scale is called a second interval, from the 1st to the 3rd is called a third, from the 1st to the 4th is called a fourth, and so on. Here’s what makes up each interval:
- 2nd: A whole step above the 1st scale degree.
- 3rd: Two whole steps or over a string and back one fret.
- 4th: Two and a half steps or over one string.
- 5th: Three and a half steps or over a string and up two frets.
- 6th: Four and a half steps or over two strings and back one fret. (The same note is also over one string and up two whole steps.)
- 7th: Five and a half steps or over two strings and up one fret. (A 7th is one half step shy of an octave.)
 When you move from string 3 to 2 to play an interval, you need to move up an extra fret because the 2nd string is tuned a half step lower than the others.
A 3rd is normally over a string and back one fret, but when moving from string 3 to 2, a 3rd is over a string and in the very same fret. Normally a 4th is over one string, but it’s up one fret from string 3 to 2. You see this earlier in the section on octaves where you have to reach up an extra fret between strings 4 and 2 and 3 and 1. Moving from the 6th string to the 1st, everything changes at the 2nd string, and an extra fret is needed. Because the 1st string is tuned to the 2nd string in the same manner that strings 6 to 3 are tuned, intervals between them are normal.
3rds
Guitarists often play harmonic intervals, which are really just intervals you play together to create harmony. Thirds are a common harmonic interval.
To play thirds, play the 1st and 3rd scale degrees simultaneously and then ascend or descend the scale in groups of two with the notes always 3 scale degrees apart. You can do this in five different positions by following the tab in Figure 1-15. You can also hear and see this example in Video Clip 18.

Illustration courtesy of Desi Serna
FIGURE 1-15: Harmonic 3rds in G.
Figure 1-15 and Video Clip 18 show just five examples in the G major scale. You can play in 3rds in other keys by starting at a different fret and using the same interval shapes. For example, start on A at the 5th fret of the 6th string to play 3rds in the A major scale.
Many songs feature guitar parts played in 3rds. One of the best examples is the opening to “Brown Eyed Girl” by Van Morrison. The guitar plays the G major scale in 3rds over the G chord and the C major scale in 3rds over the C chord.
6ths (or inverted 3rds)
Sometimes guitarists invert 3rds by moving the 1st degree up an octave. What was 1-3 becomes 3-1. The interval is inverted, get it? For example, G-B would become B-G. Figure 1-16 shows examples of inverting the 3rd G-B.

Illustration courtesy of Desi Serna
FIGURE 1-16: Inverted 3rds.
With intervals, you always count from the note in the lowest position to the note in the highest position. Thus, inverted 3rds are more commonly called 6ths. G to B is 3 scale degrees (G-A-B, one-two-three), so the interval is called a 3rd. B to G, on the other hand, is 6 scale degrees (B-C-D-E-F♯-G, one-two-three-four-five-six), so it’s called a 6th.
You can play through the whole scale in 6ths in two different positions by following the tab in Figure 1-17. Because you only want to sound the notes in the tab and not the other strings, and because these interval shapes are two strings apart, you need to either fingerpick or apply some left-hand muting technique (like you do with octave shapes).

Illustration courtesy of Desi Serna
FIGURE 1-17: Playing in 6ths.
Harmony-wise, when you play in 6ths, you hear 3rds and roots, but technically, the distance between each pair of notes from low to high is identified as a 6th.
5ths
By far, the most popular harmonic interval among guitar players is the 5th. After all, a root and a 5th make up the so-called power chord that appears in almost every distorted rock song ever recorded. A 5th is written as G5, A5, and so on in a chord chart. Figure 1-18 shows the G scale in 5ths in two different positions. Notice that the 7th scale degree has a 5th that’s different from all the rest. It naturally occurs one half step lower in the scale and is called a flat 5th.

Illustration courtesy of Desi Serna
FIGURE 1-18: 5ths in G.
4ths (or inverted 5ths)
Sometimes guitarists invert 5ths by moving the lower note up an octave while keeping the upper note the same. For instance, G-D would become D-G. Figure 1-19 illustrates two examples for you.
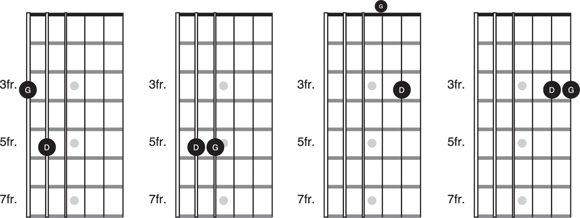
Illustration courtesy of Desi Serna
FIGURE 1-19: Inverted 5th.
Inverted 5ths are called 4ths for the same reason that inverted 3rds are called 6ths. G to D is a 5th (G-A-B-C-D), while D to G is a 4th (D-E-F♯-G). You can play the G major scale in 4ths by following the tab in Figure 1-20.

Illustration courtesy of Desi Serna
FIGURE 1-20: Playing in 4ths.
In harmony, when you play in 4ths you hear the upper note of the interval as the root and the lower one as the 5th, but technically, the distance between each pair of notes from low to high is a 4th. By far the most famous example of using 4ths is in the song “Smoke on the Water” by Deep Purple. The opening guitar riff uses 4ths in G minor. Other songs include “Money For Nothing” by Dire Straits and “Wish You Were Here” by Pink Floyd.
Filling in the gaps with flats and sharps
Like the spaces between natural notes, the spaces between intervals are filled with flats and sharps. For example, the 1st and 2nd major scale degrees are a whole step apart, meaning they have a pitch in between them. This pitch is called a flat 2nd (♭2) because it’s one half step lower than a 2nd interval. Here are the rest of the flats between the major scale degrees:
- Flat 3rd (♭3): The pitch in between 2 and 3
- Flat 5th (♭5): The pitch in between 4 and 5
- Flat 6th (♭6): The pitch in between 5 and 6
- Flat 7th (♭7): The pitch in between 6 and 7
Figure 1-21 shows flat intervals on the fretboard marked in black.
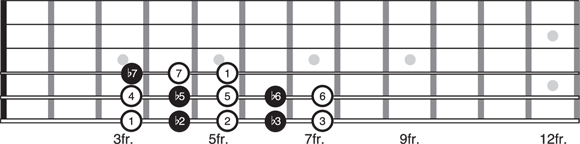
Illustration courtesy of Desi Serna
FIGURE 1-21: Flat intervals.
Some flats can also be considered sharps. For example, you can also call a flat 5th a sharp 4th (♯4). However, musicians usually use the term flat in these cases because flats are used to identify minor intervals. For example, a flat 3rd is also called a minor 3rd, a flat 6th is also called a minor 6th, and a flat 7th is also called a minor 7th.
While playing in 3rds, you may notice that some 3rds are one half step lower than others. For example, in the G major scale, G and B (G-A-B) are two whole steps apart, while A and C (A-B-C) are only one and a half steps apart. In music, the distance from G to B is major, while the distance from A to C is minor, which is why the same intervals are called major and minor 3rds.
When you play the major scale in 3rds (see Figure 1-15), note that three of the scale degrees have major 3rds, and four have minor 3rds. Specifically, the formula is major-minor-minor-major-major-minor-minor. They each have what’s called a perfect 5th, except for the last one (which has a flat 5th).
Harmonizing the Major Scale to Build Triads and Chords
A triad is a set of three notes stacked in 3rds. Playing in 3rds means that you start on a scale degree, count it as “1,” and then move to the scale degree that is three away, “3.” For example, the G major scale is G-A-B-C-D-E-F♯. If you start counting from G, then the 3rd is B (G-A-B, 1-2-3). If you start counting from A, then the 3rd is C (A-B-C, 1-2-3).
A triad is three notes that are all a 3rd apart. For example, in the G major scale, G and B are a 3rd apart and B and D are a 3rd apart. Together all three of these notes are a 3rd apart, called two consecutive 3rds. G-B-D make a G triad. You also call the members of the triad root, 3rd, and 5th because counting from the starting point, G, B is the 3rd degree and D is the 5th.
G |
A |
B |
C |
D |
E |
F♯ |
1 |
2 |
3 |
4 |
5 |
6 |
7 |
G |
B |
D |
||||
1 |
3 |
5 |
Harmonizing a root, 3rd, and 5th together (in other words, playing them simultaneously) produces a chord. Basically, the difference between any old chord and a triad is that a chord is a group of three or more notes, and a triad is specifically a root, 3rd, and 5th.
You build triads on all scale degrees by following a formula of 3rds. Not all triads are the same. Because of the half step and whole step formula of the major scale, some 3rds are closer or farther apart than others. As a result, there are major triads and minor triads. One triad is diminished.
Major triad: Building from the 1st scale degree of the major scale
Building a triad starting from the 1st degree of the major scale produces a major triad. Sounding the triad’s notes produces a major chord. In the first diagram in Figure 1-22, you see all 7 degrees of the G major scale in one sample position. In the second diagram, you see just the root, 3rd, and 5th triad. When you strum all three of these triad notes simultaneously, you play a chord. Specifically, this chord is G major — G because the root is G and major because the distance between the root and 3rd is two whole steps, which make up a major 3rd. The third diagram in Figure 1-22 shows you that the actual note names of the G triad are G, B, and D.
Need help building and playing triads? Watch Video Clip 19.
A G major chord is always made from the notes G-B-D; however, you can have more than one occurrence of each note. For example, you can play a G major chord as G-B-D-G or G-B-D-G-B. You can even stack the notes out of order like this: G-D-G-B. Whatever order you play the notes in and however many occurrences of each note you play, all combinations of G-B-D produce harmony that’s recognized as a G major chord.
Figure 1-23 shows a handful of common G major chord shapes. Notice that they all use the same notes, although not necessarily in the same number or order. Chords like the ones shown here are considered triads because, technically, they’re still based on three pitches even though they vary in the exact number and order of their notes.
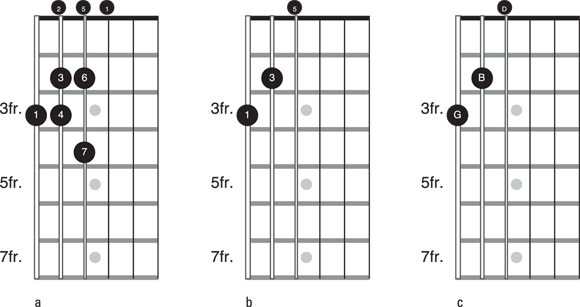
Illustration courtesy of Desi Serna
FIGURE 1-22: G major scale and G triad.
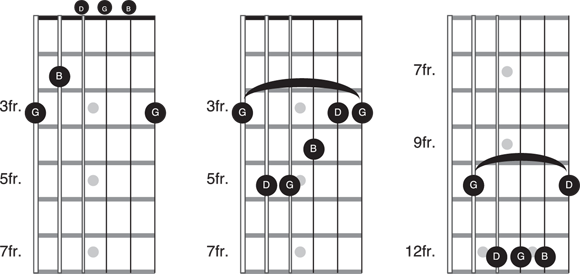
Illustration courtesy of Desi Serna
FIGURE 1-23: G major chords.
Minor triad: Building from the 2nd scale degree of the major scale
Using the G major scale introduced in the preceding section, count one-two-three-four-five from the 2nd degree, A (A-B-C-D-E), and take every other note, 1-3-5 or A-C-E. This is an A minor triad — A because the root is A and minor because the distance from 1 to 3 is a step and a half, which makes up a minor 3rd or flat 3rd (♭3) interval.
Figure 1-24 shows you how to build a triad from the 2nd major scale degree, A. The major scale used here is exactly the same as the one used for the previous triad, G major. The only difference is that you’re now counting from the 2nd scale degree, A, to determine its 3rd and 5th. The G note was left at the 3rd fret of the 6th string blank so that you know not to start on it.
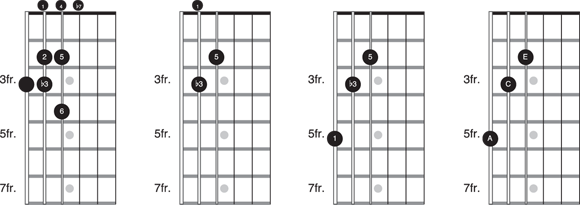
Illustration courtesy of Desi Serna
FIGURE 1-24: A minor triad.
You can play the note A either on the open 5th string or at the 5fth fret of the 6th string. You need to do the latter to play the triad as a chord. From the figure, you can see that the notes of this A minor triad are A-C-E.
Figure 1-25 shows a handful of common A minor chord shapes. Notice that they all use the same notes, although not necessarily in the same number or order. (In case you don’t know, an “X” at the top of a string indicates that you don’t play that string.)
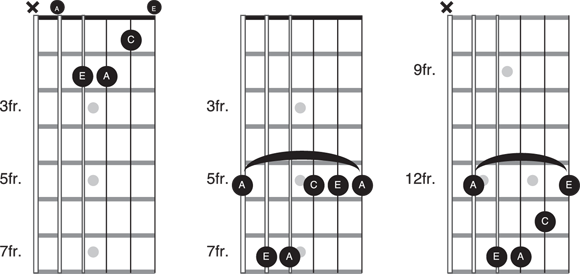
Illustration courtesy of Desi Serna
FIGURE 1-25: A minor chords.
The Seven Triads of the Major Scale
After you understand how to build triads (see the preceding section), you can continue to build on each degree in the G major scale (refer to Figure 1-14 in Chapter 2 for G major scale patterns). Try doing this on your own on the fretboard. Here’s what the completed scale looks like in triads:
- G: G-B-D, G major
- A: A-C-E, A minor
- B: B-D-F♯, B minor
- C: C-E-G, C major
- D: D-F♯-A, D major
- E: E-B-G, E minor
- F♯: F♯-A-B, F♯ minor ♭5 (also called a diminished triad)
By following the tab in Figure 1-26, you can play through all seven major triads in three different ways. The first four measures put each interval on a separate string. The next four measures put the 3rd and 5th on the same string. The last four measures put the root and 3rd on the same string. Remember that the triad notes are exactly the same in all three examples; each version just uses some notes in a different location.
Playing triads one note at a time, as shown in Figure 1-26, is often done in riffs and bass lines. Guitar riff examples include:
- “Centerfield” by John Fogerty
- “Manic Depression” by Jimi Hendrix
- “Tightrope” by Stevie Ray Vaughan
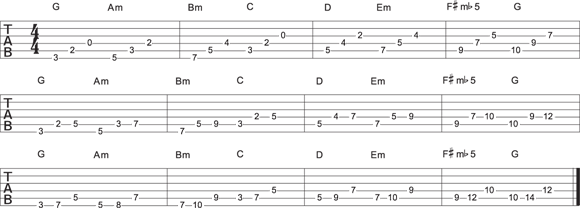
Illustration courtesy of Desi Serna
FIGURE 1-26: Major scale triads in G.
Bass examples include:
- “Ob-La-Di, Ob-La-Da” by The Beatles
- “Hound Dog” by Elvis Presley
- “Stir It Up” by Bob Marley and the Wailers
Playing the Chord Sequence of the Major Scale
If you take each triad from the major scale and play its notes as a common chord shape, you get the seven chords shown in Figure 1-27. The chords are shown first in the open position and then as barre chords that move up the neck along the 6th and 5th strings.
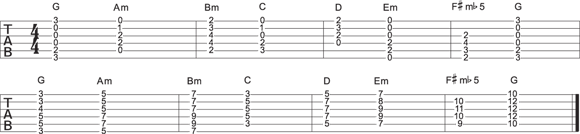
Illustration courtesy of Desi Serna
FIGURE 1-27: Major scale chords in G.
You can hear and see the G major scale chords by watching Video Clip 20.
Notice how the 1st, 4th, and 5th scale degrees produce major chords, while the 2nd, 3rd, and 6th scale degrees produce minor chords. These six chords are the ones most commonly used in music, so memorize their qualities. From 1 to 6, the sequence is major-minor-minor-major-major-minor.
Say and play that sequence over and over because it’s one of the most important patterns in music. After all, you don’t just see it in the G major scale. Because you construct every major scale by using the same intervals, all the scales produce the same types of triads and the same major/minor chord sequence. So the 1st degree of every major scale makes a major chord, the 2nd makes a minor, and so on.