
Chapter 6. Alternative HBase clients
- Creating scripts in the HBase shell
- Programming the shell with JRuby
- Using asynchbase
- Working with the REST gateway
- Using the Thrift gateway
All interaction with HBase we’ve covered thus far has focused on using the Java client API and the library that comes bundled with HBase. Java is a core part of the Hadoop stack’s DNA, and you can’t decouple the two easily. Hadoop is written in Java; HBase is written in Java; the stock HBase client is written in Java. There’s only one problem: you may not use Java. You might not even like the JVM. You still want to use HBase. Now what? HBase provides you with alternate clients (both JVM-based as well as those that don’t require the JVM) that you can use when Java isn’t an option.
In this chapter, you’ll see how to interact with HBase in other ways. Each section presents a miniature, self-contained application built using the client that is being explained. Each of these toy applications communicates with HBase using a different type of client. Each section follows the same structure: introduce the context, install any necessary support libraries, build out the application step-by-step, and summarize the results. Each application is independent of the others, so feel free to skip around to what you find useful. No new theory or HBase internals are covered here, just simple recipes for using HBase from non-Java and non-JVM languages.
This chapter starts by exploring alternative online access methods. First you’ll see how to script HBase externally via UNIX shell scripts. Next you’ll see how to use the JRuby interface on top of which the HBase shell is implemented. After that, you’ll explore asynchbase, an alternative Java client library that is designed for asynchronous interaction. Finally, as promised, you’ll move beyond Java and the JVM and explore both the REST and Thrift gateways to HBase, using Curl and Python, respectively.
6.1. Scripting the HBase shell from UNIX
The simplest way to program HBase is by scripting the HBase shell. You’ve had a brief introduction to how to use the shell in the earlier chapters. Now you’ll take that knowledge and build a useful tool. Every database installation needs to maintain its schema, and HBase is no different.
In the relational world, management of schema migrations is a prevalent source of headache. Broadly speaking, this headache comes from two sources. The first is the tight coupling between schema and application. If you want to add a new attribute to a persisted entity, it usually means adding a new column to a table somewhere. When you’re working on a young product, especially in a young company, rapid iteration is crucial to your application’s success. Using a relational database, adding a new column requires a schema change. Over time, your database schema becomes the sum total of the original design plus each of these incremental changes. The core relational system isn’t well suited for managing these changes, and thus they become an effort of software engineering. Some RDBMSs ship powerful tools for managing these kinds of issues, but many don’t. This brings us to the second headache.
The changes themselves often take the form of SQL scripts called migrations. These scripts must be run in order because each builds on the last. For long-lived, successful data-driven applications, it’s common to find a schema folder containing tens or even hundreds of these files. Each file name starts with a number indicating its position in the migration sequence. Slightly more sophisticated versions of migration management exist, but they’re ultimately tools to support the execution of these migration scripts in the proper order.
HBase also has a schema that must be managed. The first problem is less an issue with HBase. Within a column family, columns need not be predefined. The application can change incrementally without a change to the HBase schema in such a case. But introducing a new column family, changing attributes of an existing column family, or adding a new table does require a schema change. You could create a custom application for each migration, but that would be terrible. Instead, you can replicate the same migration-management scheme used for relational systems by scripting the HBase shell. This section will show you how to create these scripts.
You can find the completed init_twitbase.sh script from this section in the Twit-Base project source at https://github.com/hbaseinaction/twitbase/blob/master/bin/init_twitbase.sh.
6.1.1. Preparing the HBase shell
The HBase shell comes as part of the default HBase installation. It’s launched via the $HBASE_HOME/bin/hbase script. Depending on how you installed HBase, that script may also be on your $PATH. As you saw in chapter 1, launch the shell like this:
$ $HBASE_HOME/bin/hbase shell
You’ll enter the shell application and receive a greeting:
HBase Shell; enter 'help<RETURN>' for list of supported commands.
Type "exit<RETURN>" to leave the HBase Shell
Version 0.92.1, r1298924, Fri Mar  9 16:58:34 UTC 2012

hbase(main):001:0>
Now that you’ve verified your shell installation, you can get down to scripting it.
6.1.2. Script table schema from the UNIX shell
Way back when learning HBase, you started development on the TwitBase application. One of the first things you did with TwitBase was to create a users table using the HBase shell. As TwitBase grew, so did your schema. Tables for Twits and Followers soon emerged. All management code for those tables accumulated in the InitTables class. Java isn’t a convenient language for schema management because it’s verbose and requires building a custom application for each migration. Let’s reimagine that code as HBase shell commands.
The main body of code for creating a table in InitTables looks mostly the same for each table:
System.out.println("Creating Twits table...");
HTableDescriptor desc = new HTableDescriptor(TwitsDAO.TABLE_NAME);
HColumnDescriptor c = new HColumnDescriptor(TwitsDAO.INFO_FAM);
c.setMaxVersions(1);
desc.addFamily(c);
admin.createTable(desc);
System.out.println("Twits table created.");
You can achieve the same effect using the shell:
hbase(main):001:0> create 'twits', {NAME => 't', VERSIONS => 1}
0 row(s) in 1.0500 seconds
If you’re familiar with the Ruby programming language, the create command may look conspicuously like a function invocation. That’s because it is. The HBase shell is implemented in JRuby. We’ll look more at this link to JRuby later in this chapter.
Five lines of Java reduced to a single shell command? Not bad. Now you can take that HBase shell command and wrap it in a UNIX shell script. Note that the line exec hbase shell may be slightly different for you if the hbase command isn’t on your path. You handle that scenario in the final script, shown in listing 6.1:
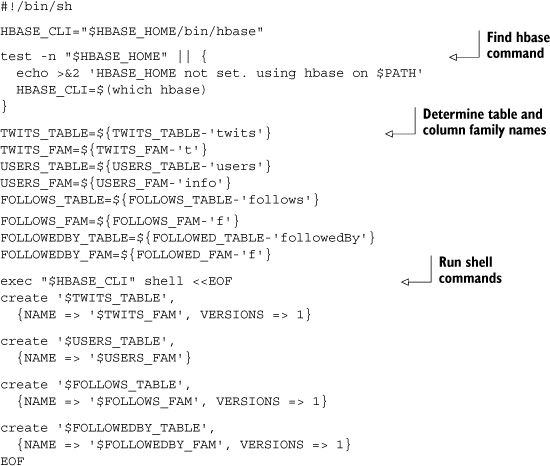
#!/bin/sh

exec $HBASE_HOME/bin/hbase shell <<EOF
create 'twits', {NAME => 't', VERSIONS => 1}
EOF
Adding the other tables to your script is easy:
exec $HBASE_HOME/bin/hbase shell <<EOF
create 'twits', {NAME => 't', VERSIONS => 1}
create 'users', {NAME => 'info'}
create 'followes', {NAME => 'f', VERSIONS => 1}
create 'followedBy', {NAME => 'f', VERSIONS => 1}
EOF
At this point, you’ve moved your table and column family names out of Java. Overriding them on the command line is now much easier:
#!/bin/sh

TWITS_TABLE=${TWITS_TABLE-'twits'}
TWITS_FAM=${TWITS_FAM-'t'}

exec $HBASE_HOME/bin/hbase shell <<EOF
create '$TWITS_TABLE', {NAME => '$TWITS_FAM', VERSIONS => 1}
create 'users', {NAME => 'info'}
create 'followes', {NAME => 'f', VERSIONS => 1}
create 'followedBy', {NAME => 'f', VERSIONS => 1}
EOF
If you update your application code to read those same constants from a configuration file, you can move your schema definition completely out of the Java code. Now you can easily test different versions of TwitBase against different tables on the same HBase cluster. That flexibility will simplify the process of bringing TwitBase to production. The complete script is shown next.
Listing 6.1. UNIX shell replacement for InitTables.java
This was a primer on how you can use the HBase shell to create scripts that make it easy to do janitorial tasks on your HBase deployment. The HBase shell isn’t something you’ll use as your primary access method to HBase; it’s not meant to have an entire application built on top of it. It’s an application itself that has been built on top of JRuby, which we study next.
6.2. Programming the HBase shell using JRuby
The HBase shell provides a convenient interactive environment and is sufficient for many simple administrative tasks. But it can become tedious for more complex operations. As we mentioned in the previous section, the HBase shell is implemented in JRuby.[1] Behind the scenes is a nice library exposing the HBase client to JRuby. You can access that library in your own scripts to create increasingly complex automation over HBase. In this example, you’ll build a tool for interacting with the TwitBase users table, similar to the UsersTool you wrote in Java. This will give you a feel for interacting with HBase from JRuby.
1 JRuby is the Ruby programming language implemented on top of the JVM. Learn more at http://jruby.org/.
Programming HBase via this JRuby interface is one step above the shell in terms of sophistication. If you find yourself writing complex shell scripts, a JRuby application may be a preferable approach. If for whatever reason you need to use the C implementation of Ruby instead of JRuby, you’ll want to explore Thrift. We demonstrate using Thrift from Python later in this chapter; using it from Ruby is similar.
You can find the completed TwitBase.jrb script from this section in the TwitBase project source at https://github.com/hbaseinaction/twitbase/blob/master/bin/TwitBase.jrb.
6.2.1. Preparing the HBase shell
The easiest way to launch your own JRuby applications is through the existing HBase shell. If you haven’t already done so, locate the shell by following the instructions at the beginning of the previous section.
Once you’ve found the hbase command, you can use that as the interpreter for your own scripts. This is particularly useful because it handles importing the necessary libraries and instantiates all the classes you’ll need. To get started, create a script to list the tables. Call it TwitBase.jrb:
def list_tables()
  @hbase.admin(@formatter).list.each do |t|
    puts t
  end
end

list_tables
exit
The variables @hbase and @formatter are two instances created for you by the shell. They’re part of that JRuby API you’re about to take advantage of. Now give the script atry:
$ $HBASE_HOME/bin/hbase shell ./TwitBase.jrb
followers
twits
users
With everything in place, let’s start working with TwitBase.
6.2.2. Interacting with the TwitBase users table
A great thing about writing code for the shell is that it’s easy to try out. Launch the shell, and explore the API. Scanning over the users table requires a handle to the table and a scanner. Start by acquiring your handle:
$ hbase shell
...
hbase(main):001:0> users_table = @hbase.table('users', @formatter)
=> #<Hbase::Table:0x57cae5b7 @table=...>>
From the table, create a scanner. Specify the scanner options using a regular hash. The scanner constructor looks for a few specific keys in that hash, including "STARTROW", "STOPROW", and "COLUMNS". Scan over all users, returning only their username, name, and email address:
hbase(main):002:0> scan = {"COLUMNS" => ['info:user', 'info:name',
'info:email']}
=> {"COLUMNS"=>["info:user", "info:name", "info:email"]}
hbase(main):003:0> users_table.scan(scan)
=> {"GrandpaD"=>
     {"info:email"=>"timestamp=1338961216314, [email protected]",
      "info:name"=>"timestamp=1338961216314, value=Fyodor Dostoyevsky",
      "info:user"=>"timestamp=1338961216314, value=GrandpaD"},
    "HMS_Surprise"=>
     {"info:email"=>"timestamp=1338961187869, [email protected]",
      "info:name"=>"timestamp=1338961187869, value=Patrick O'Brian",
      "info:user"=>"timestamp=1338961187869, value=HMS_Surprise"},
    "SirDoyle"=>
     {"info:email"=>"timestamp=1338961221470,
  [email protected]",
      "info:name"=>"timestamp=1338961221470, value=Sir Arthur Conan Doyle",
      "info:user"=>"timestamp=1338961221470, value=SirDoyle"},
     "TheRealMT"=>
      {"info:email"=>"timestamp=1338961231471, [email protected]",
       "info:name"=>"timestamp=1338961231471, value=Mark Twain",
       "info:user"=>"timestamp=1338961231471, value=TheRealMT"}}
Now you have everything you need to iterate over the keypairs produced by the scanner. It’s time to start building the script.
A slight diversion in the API, the block version of scan() condenses each column into a string of the format "column=..., timestamp=..., value=...". Parse out the data you’re interested in, and accumulate the results:
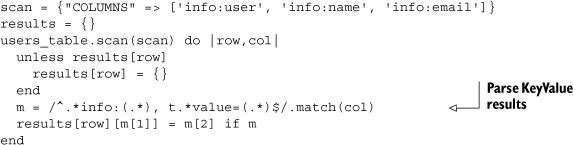
The regular expression extracts just the qualifier and cell value from the scan result. It accumulates that data in the results hash. The last step is to format the results:
  results.each do |row,vals|
    puts "<User %s, %s, %s>" % [vals['user'], vals['name'], vals['email']]
  end
Now you have everything you need to complete the example. Wrap it up in a main(), and ship it! The final TwitBase.jrb script is shown in the following listing.
Listing 6.2. TwitBase.jrb: programming the HBase shell
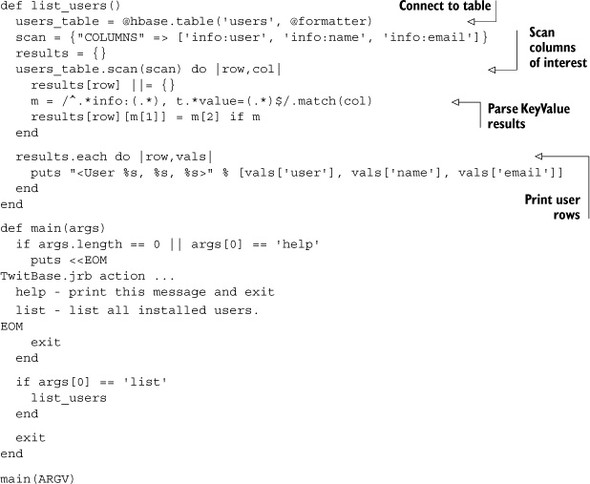
With your script in order, set it to executable and give it a try:
$ chmod a+x TwitBase.jrb
$ ./TwitBase.jrb list
<User GrandpaD, Fyodor Dostoyevsky, [email protected]>
<User HMS_Surprise, Patrick O'Brian, [email protected]>
<User SirDoyle, Sir Arthur Conan Doyle, [email protected]>
<User TheRealMT, Mark Twain, [email protected]>
That’s all there is to it. Programming the JRuby interface is an easy way to explore prototypes on top of HBase or automate common tasks. It’s all built on the same HBase Java client you’ve used in previous chapters. For the next sample application, we’ll move off the JVM entirely. HBase provides a REST interface, and we’ll demonstrate that interface using Curl on the command line.
6.3. HBase over REST
One of the factors that prevents people from experimenting with HBase is its close relationship with Java. There are a couple of alternatives for people who are willing to run HBase but want nothing to do with Java for their applications. Whether you’re exploring HBase or you want to put an HBase cluster directly in the hands of your application developers, the REST interface may be appropriate. For the uninitiated,[2] REST is a convention for interacting with objects over the web. HBase ships with a REST service that you can use to access HBase, no Java required.
2 Just in case you’ve never encountered REST, here’s a nice introduction: Stefan Tilkov, “A Brief Introduction to REST,” InfoQ, www.infoq.com/articles/rest-introduction.
You refuse Java and reject REST? You’re incorrigible! Never fear, HBase has a solution for you as well: Thrift. In practice, the REST service is rarely used for critical application paths. Instead, you’ll want to use the Thrift bindings. The next section covers exactly this: communicating with HBase from a Python application over Thrift.
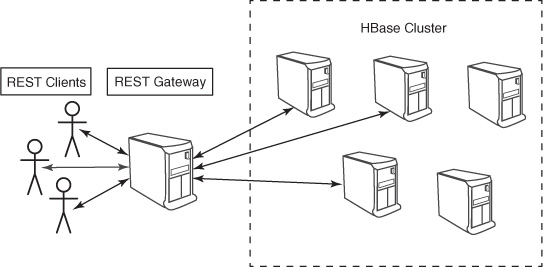
The REST service runs as a separate process and communicates with HBase using the same client API we explored earlier. It can run on any machine configured to communicate with HBase. That means you can spin up a cluster of REST service machines to host your cluster. Well, almost. The Scanner API is stateful and requires resource allocation, which happens only on the machine that receives the request. That means a client using the scanner must always return to the same REST host while performing that scan. Figure 6.1 loosely illustrates the network topology of a REST gateway deployment.
Figure 6.1. A REST gateway deployment. All client activity is funneled through the gateway, greatly reducing client throughput. Clustering the REST gateway machines can mitigate some of this limitation. Clustering introduces a new limitation, however, forcing the client to only use the stateless portions of the API.
The REST service also supports a number of response formats, controlled by the Content-Type request header. All endpoints support XML, JSON, and Protobufs. Many of the status and administrative endpoints also support plain text. The appropriate header values are text/plain, text/xml, application/json, application/x-protobuf, and application/octet-stream.
6.3.1. Launching the HBase REST service
Get started by launching the REST service. You’ll need HBase installed and configured correctly. Running the service as an active process is done using the same hbase base command used to launch the shell:
$ hbase rest
...
usage: bin/hbase rest start [-p <arg>] [-ro]
 -p,--port <arg>   Port to bind to [default: 8080]
 -ro,--readonly    Respond only to GET HTTP method requests [default:
                   false]
Launch the REST service, listening on port 9999, like this:
$ hbase rest start -p 9999
...
INFO mortbay.log: jetty-6.1.26
INFO mortbay.log: Started [email protected]:9999
Verify that your service is up and running by launching a new terminal and issuing a simple curl command. All the cool kids these days are using JSON, so you will too. We’ve even taken the liberty of cleaning up the output for your enjoyment:
$ curl -H "Accept: application/json" http://localhost:9999/version
 {
    "JVM": "Apple Inc. 1.6.0_31-20.6-b01-415",
    "Jersey": "1.4",
    "OS": "Mac OS X 10.7.4 x86_64",
    "REST": "0.0.2",
    "Server": "jetty/6.1.26"
}
That’s the short version about the REST service. If you want info about the underlying cluster, you’ll need to ask for that separately:
$ curl -H ... http://localhost:9999/version/cluster
"0.92.1"
The actual command used to generate that snippet is `curl -H "Accept:application/json" http://localhost:9999/version 2>/dev/null | python-mjson.tool`. We’ll continue to gloss over the headers and show beautified output, even though the full command isn’t explicitly shown.
Notice in the first terminal window that the service is logging the requests it received. This is handy for debugging.
Running the REST service as a daemon is almost as easy. Depending on your installation, the hbase-daemon.sh script may not be on your PATH. If not, look in your HBase installation directory, HBASE_HOME/bin. Once you’ve found it, launch the daemon:
$ hbase-daemon.sh start rest -p 9999
starting rest, logging to logs/hbase-hbase-rest-ubuntu.out
Again, prove to yourself the service is running. This time request a list of tables:
$ curl -H ... http://localhost:9999/
{
    "table": [
        {
           "name": "followers"
        },
        {
            "name": "twits"
        },
        {
            "name": "users"
        }
    ]
}
Now you’re in business. Time to explore HBase over HTTP.
6.3.2. Interacting with the TwitBase users table
With your service running, it’s time to reach right into HBase. Want to find out Mark Twain’s password? You just need his rowkey and the column. Thinking about the logical HBase data model, a map of maps, it’s easy to guess what the RESTful URI will be. Construct the request:
$ curl -H ... http://localhost:9999/users/TheRealMT/info:password
{
    "Row": [
        {
            "Cell": [
                {
                    "$": "YWJjMTIz",
                    "column": "aW5mbzpwYXNzd29yZA==",
                    "timestamp": 1338701491422
                }
            ],
            "key": "VGhlUmVhbE1U"
         }
    ]
}
You wanted a single cell from a single row in a single table, and that’s what you received. The Cell object has three fields. column and timestamp should be self-evident; $ is the cell’s value.
This output format is indeed JSON. It differs from idiomatic JSON in a couple of key ways, because it’s generated using the same library and with the same rules used to generate XML. The $ field is an example artifact of this implementation detail. Another is experienced when PUTting new values: attribute order matters.
When in doubt, check the source code. The classes used to render data from the REST service are well documented[3] and clearly describe the schema they expect to produce and consume.
3 Find the REST service’s model documentation at http://mng.bz/PyHp.
Rowkeys, columns, and values are all bytes to HBase, so they’re returned as Base64-encoded Strings. Because you’ve stored the passwords as simple Strings, you can decode them enough to find the value using the base64 utility:
$ echo "YWJjMTIz" | base64 --decode
abc123
Let’s give Mark a better password. The simplest way to write data is to send raw bytes. This time, you’ll specify the Content-Type header to indicate how you’re sending the data. In this case the value you want to write is an ASCII string, so there’s no complication:
$ curl -XPUT
  -H "Content-Type: application/octet-stream"
  http://localhost:9999/users/TheRealMT/info:password
  -d '70N@rI N0 70t0R0'
To continue using JSON, you’ll also need to Base64-encode the data before you send it. Start by encoding the new value. Be sure to include the -n option to echo, or you’ll introduce an unintentional newline character at the end of the new password:
$ echo -n "70N@rI N0 70t0R0" | base64
NzBOQHJJIE4wIDcwdDBSMA==
Now send the message body. This is a case where attribute order matters. Be sure to place the $ last in the Cell object map. Don’t forget to specify the Content-Type header to indicate you’re sending JSON. The full command is as follows:
$ curl -XPUT
  -H "Content-Type: application/json"
  http://localhost:9999/users/TheRealMT/info:password
  -d '{
    "Row": [
        {
            "Cell": [
                {
                    "column": "aW5mbzpwYXNzd29yZA==",
                    "$": "NzBOQHJJIE4wIDcwdDBSMA=="
                }
            ],
            "key": "VGhlUmVhbE1U"
         }
    ]
}'
The REST service log will confirm data was received. The (truncated) log line will look something like this:
rest.RowResource: PUT http://localhost:9999/users/TheRealMT/info:password
rest.RowResource: PUT {"totalColumns":1...[{... "vlen":16}]...}
The REST service also exposes a simple table listing. A GET sent to the table will provide a listing of the entire table. The same endpoint exposes basic filter scanning using an asterisk (*) for prefix matching. To find all users whose username starts with the letter T, use the following:
$ curl -H ... http://localhost:9999/users/T*
{
    "Row": [
        {
            "Cell": [
                ...
            ],
            "key": "VGhlUmVhbE1U"
        },
        ...
    ]
}
For a slightly more granular scan, you can instantiate a scanner on the server and ask it to page through results. Create a scanner over all users whose username is less than I, paging one cell at a time. The REST service will return an HTTP 201 Created response code with the URI of your scanner instance. Use the -v option on curl to see the response code:
$ echo -n "A" | base64
QQ==

$ echo -n "I" | base64
SQ==

$ curl -v -XPUT
  -H "Content-Type: application/json"
  http://localhost:9999/users/scanner
  -d '{
    "startRow": "QQ==",
    "endRow": "SQ==",
    "batch": 1
}'
...
< HTTP/1.1 201 Created
< Location: http://localhost:9999/users/scanner/133887004656926fc5b01
< Content-Length: 0
...
Use the location in the response to page through scan results:
$ curl -H ... http://localhost:9999/users/scanner/133887004656926fc5b01
{
    "Row": [
        {
            "Cell": [
                {
                    "$": "ZnlvZG9yQGJyb3RoZXJzLm5ldA==",
                    "column": "aW5mbzplbWFpbA==",
                    "timestamp": 1338867440053
                }
            ],
            "key": "R3JhbmRwYUQ="
         }
    ]
}
Repeated calls to this URI will return consecutive scan results. Once the row list is exhausted, further calls to the scanner instance will return the HTTP response code 204 No Content.
That’s the gist of using the HBase REST gateway. When it comes to doing anything more than exploring a cluster, you’ll want to use the Thrift gateway instead. We cover that in the next section.
6.4. Using the HBase Thrift gateway from Python
When you live in the world beyond Java, the most common way to interact with HBase is via Thrift.[4] Thrift is a language and set of tools for generating code. Thrift has an Interface Definition Language (IDL) for describing services and objects. It provides a networking protocol for communication between processes using those object and service definitions. Thrift uses the IDL you describe to generate code for you in your favorite languages. Using that code, you can write applications that communicate with each other using the lingua franca provided by Thrift.
4 Originally a project out of Facebook, Thrift is now an Apache project. Learn more at http://thrift.apache.org/.
HBase ships a Thrift IDL describing a service layer and set of objects. It also provides a service implementing that interface. In this section, you’ll generate the Thrift client library for interacting with HBase. You’ll use that client library to interact with HBase from Python, completely outside of Java and the JVM. We chose Python because its syntax is approachable to both novice and seasoned programmers. The same approach applies for interacting with HBase from your favorite language. At the time of this writing, Thrift supports 14 different languages.
In part because of Thrift’s ambitions to support so many languages, its IDL is relatively simple. It lacks features common in many languages, such as object inheritance. As a result, the HBase interface via Thrift is slightly different from the Java client API we’ve explored thus far.
An effort[5] is under way to bring the Thrift API closer to Java, but it remains a work in progress. An early version is available with HBase 0.94, but it lacks some key features like filters and access to coprocessor endpoints.[6] The API we’re exploring here will be deprecated upon completion of this effort.
5 For more details, see the JIRA ticket “Thrift server to match the new Java API”: https://issues.apache.org/jira/browse/HBASE-1744.
6 Well, you can access them, but you have to modify the Hbase.thrift file for each endpoint you want to expose. For details, see “Make Endpoint Coprocessors Available from Thrift,” https://issues.apache.org/jira/browse/HBASE-5600.
The beauty of using the Thrift API is that it’s the same for all languages. Whether you’re using PHP, Perl, or C#, the interface is always the same. Additional HBase feature support added to the Thrift API is additional feature support available everywhere.
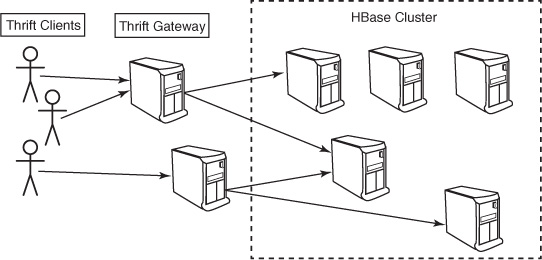
The Thrift gateway isn’t without limitations. Notably, it suffers the same throughput challenges as the REST gateway. All client connections are funneled through a single machine that communicates with the cluster on their behalf. Because the Thrift client opens a connection to a single instance for the duration of its session, clustering Thrift gateways is easier than with REST. Still, portions of the API are stateful, so a disconnected client will lose access to allocated resources when it opens a new connection. Figure 6.2 illustrates the network topology of a Thrift gateway deployment.
Figure 6.2. A Thrift gateway deployment. All clients are funneled through the gateway, greatly reducing client throughput. Clustering is easier because the Thrift protocol is session-based.
Python is the language for this exercise, so let’s begin by creating a Python project, complete with an HBase client library. The final code for this project is available in the GitHub repository, https://github.com/hbaseinaction/twitbase.py.
6.4.1. Generating the HBase Thrift client library for Python
To build the Thrift client library, you need Thrift. Thrift isn’t packaged yet, so you’ll have to build it from source. On a Mac, that’s easy because Thrift is available through Homebrew:[7]
7 Homebrew is “The missing package manager for OS X.” Find out more at http://mxcl.github.com/home-brew/.
$ brew install thrift
...
==> Summary
/usr/local/Cellar/thrift/0.8.0: 75 files, 5.4M, built in 2.4 minutes
Those running other platforms will need to build Thrift manually. See the Thrift Requirements[8] doc for details specific to your platform.
8 Apache Thrift Requirements: http://thrift.apache.org/docs/install/.
Once that’s done, verify that your build is alive and well:
$ thrift -version
Thrift version 0.8.0
You thought you were going to get through this whole book without downloading the HBase source code, didn’t you? Sorry to disappoint you. If you want a Thrift client, you’ll need to grab the source:
$ wget http://www.apache.org/dist/hbase/hbase-0.92.1/hbase-0.92.1.tar.gz
...
Saving to: `hbase-0.92.1.tar.gz'
$ tar xzf hbase-0.92.1.tar.gz
With the HBase source in hand and Thrift installed, you’re interested in one file: src/ main/resources/org/apache/hadoop/hbase/thrift/Hbase.thrift. That’s the IDL file that describes the HBase service API and related objects. Skim through it—the Thrift IDL is legible. Now you have everything you need to generate the Python client.
Start by creating a project directory for yourself and generating the HBase client bindings:
$ mkdir twitbase.py
$ cd twitbase.py
$ thrift -gen py ../hbase-0.92.1/src/main/resources/org/apache/hadoop/hbase/
     thrift/Hbase.thrift
$ mv gen-py/* .
$ rm -r gen-py/
You’ve created a project called twitbase.py and generated the HBase Python library. Thrift generated its code in a subdirectory called gen-py. By moving all that up into your project, you can easily import the code into your application. Look at what was generated:
$ find .
./__init__.py
./hbase
./hbase/__init__.py
./hbase/constants.py
./hbase/Hbase-remote
./hbase/Hbase.py
./hbase/ttypes.py
You also need to install the Thrift Python library. These are the core components common across all Thrift services used from Python, so you can install them globally:
$ sudo easy_install thrift==0.8.0
Searching for thrift==0.8.0
Best match: thrift 0.8.0
...
Finished processing dependencies for thrift
Alternately, this library is also part of the source you compiled. You can copy these files into your project as you did with the HBase client. From within the twitbase.py directory, you do so as follows:
$ mkdir thrift
$ cp -r ../thrift-0.8.0/lib/py/src/* ./thrift/
Verify that everything worked as expected. Launch Python, and import both the Thrift and HBase libraries. No output means everything is as it should be:
$ python
Python 2.7.1 (r271:86832, Jul 31 2011, 19:30:53)
...
>>> import thrift
>>> import hbase
Be sure to run these commands from within the twitbase.py directory, or the import statements will fail. With the client library ready to go, let’s start the server component.
6.4.2. Launching the HBase Thrift service
The server component ships with HBase, so it doesn’t involve all the setup required by the client library. Launch the Thrift service the same way you launch the shell, using the hbase command:
$ hbase thrift
...
usage: Thrift [-b <arg>] [-c] [-f] [-h] [-hsha | -nonblocking |
       -threadpool]  [-p <arg>]
 -b,--bind <arg>   Address to bind the Thrift server to. Not supported by
                   the Nonblocking and HsHa server [default: 0.0.0.0]
 -c,--compact      Use the compact protocol
 -f,--framed       Use framed transport
 -h,--help         Print help information
 -hsha             Use the THsHaServer. This implies the framed transport.
 -nonblocking      Use the TNonblockingServer. This implies the framed
                   transport.
 -p,--port <arg>   Port to bind to [default: 9090]
 -threadpool       Use the TThreadPoolServer. This is the default.
Make sure HBase is up and running, then launch the Thrift service. The default settings should be fine:
$ hbase thrift start
...
ThriftServer: starting HBase ThreadPool Thrift server on /0.0.0.0:9090
With both the client and server ready, it’s time to test them. Open a terminal window in your twitbase.py project directory, and once again launch Python:
$ python
Python 2.7.1 (r271:86832, Jul 31 2011, 19:30:53)
...
>>> from thrift.transport import TSocket
>>> from thrift.protocol import TBinaryProtocol
>>> from hbase import Hbase
>>> transport = TSocket.TSocket('localhost', 9090)
>>> protocol = TBinaryProtocol.TBinaryProtocol(transport)
>>> client = Hbase.Client(protocol)
>>> transport.open()
>>> client.getTableNames()
['followers', 'twits', 'users']
It took you a little while to get here, but it all works! Now you can get down to business.
6.4.3. Scanning the TwitBase users table
Before you start writing code, let’s explore at the interpreter a little more to get a feel for the API. You’re interested in scanning the users table, so let’s start with a scanner. Examining the Hbase.IFace class in Hbase.py, it looks like scannerOpen() is the simplest method. It returns a scanner ID you can call on the Thrift server. Let’s try it:
>>> columns = ['info:user','info:name','info:email']
>>> scanner = client.scannerOpen('users', '', columns)
>>> scanner
14
Here you’ve asked for an unbounded scanner over the users table, returning only three qualifiers from the info column. It happens to have the ID 14. Let’s take the first row and see what you get:
>>> row = client.scannerGet(scanner)
>>> row
[TRowResult(
  columns={'info:email': TCell(timestamp=1338530917411,
                               value='[email protected]'),
           'info:name': TCell(timestamp=1338530917411,
                               value='Mark Twain'),
           'info:user': TCell(timestamp=1338530917411,
                               value='TheRealMT')},
  row='TheRealMT')]
scannerGet() returns a list with a single TRowResult. That row has a columns field that is a dictionary from column qualifier to a TCell instance.
Now that you know what you’re working with, let’s build out a class to wrap up all these details. Call that helper class TwitBaseConn and give it a constructor to hide all these Thrift connection details. Also, be sure to close() anything you open():
class TwitBaseConn(object):
    def __init__(self, host="localhost", port=9090):
        transport = TSocket.TSocket(host, port)
        self.transport = TTransport.TBufferedTransport(transport)
        self.protocol = TBinaryProtocol.TBinaryProtocol(self.transport)
        self.client = Hbase.Client(self.protocol)
        self.transport.open()

    def close(self):
        self.transport.close()
This defines a default constructor that will connect to the Thrift service running locally. It also adds an extra layer to the networking stack, wrapping the socket in a buffer. Now add a method to handle scanning rows from the users table:
def scan_users(self):
    columns = ['info:user','info:name','info:email']
    scanner = self.client.scannerOpen('users', '', columns)
    row = self.client.scannerGet(scanner)
    while row:
        yield row[0]
        row = self.client.scannerGet(scanner)
    self.client.scannerClose(scanner)
That takes care of reading rows and cleaning up after the scanner. Those rows are full of Thrift library details, though, so let’s add another method to pull out the data you want:
def _user_from_row(self, row):
    user = {}
    for col,cell in row.columns.items():
        user[col[5:]] = cell.value
    return "<User: {user}, {name}, {email}>".format(**user)
This method loops through the TCells and creates a string from their contents. Update scan_users() to call this method instead of returning the raw rows:
def scan_users(self):
    columns = ['info:user','info:name','info:email']
    scanner = self.client.scannerOpen('users', '', columns)
    row = self.client.scannerGet(scanner)
    while row:
        yield self._user_from_row(row[0])
        row = self.client.scannerGet(scanner)
    self.client.scannerClose(scanner)
Great! All that’s left is to wrap it up in a main(), and you can give it a spin. The final TwitBase.py script is shown next.
Listing 6.3. TwitBase.py: connecting to TwitBase from Python via Thrift
#! /usr/bin/env python

import sys

from thrift.transport import TSocket, TTransport
from thrift.protocol import TBinaryProtocol

from hbase import Hbase
from hbase.ttypes import *

usage = """TwitBase.py action ...
  help - print this messsage and exit
  list - list all installed users."""

class TwitBaseConn(object):
    def __init__(self, host="localhost", port=9090):
        transport = TSocket.TSocket(host, port)
        self.transport = TTransport.TBufferedTransport(transport)
        self.protocol = TBinaryProtocol.TBinaryProtocol(self.transport)
        self.client = Hbase.Client(self.protocol)
        self.transport.open()

    def close(self):
        self.transport.close()

    def _user_from_row(self, row):
        user = {}
        for col,cell in row.columns.items():
            user[col[5:]] = cell.value
        return "<User: {user}, {name}, {email}>".format(**user)

    def scan_users(self):
        columns = ['info:user','info:name','info:email']
        scanner = self.client.scannerOpen('users', '', columns)
        row = self.client.scannerGet(scanner)
        while row:
            yield self._user_from_row(row[0])
            row = self.client.scannerGet(scanner)
        self.client.scannerClose(scanner)

def main(args=None):
    if args is None:
        args = sys.argv[1:]

    if len(args) == 0 or 'help' == args[0]:
        print usage
        raise SystemExit()

    twitBase = TwitBaseConn()

    if args[0] == 'list':
        for user in twitBase.scan_users():
            print user

    twitBase.close()

if __name__ == '__main__':
    main()
The main() is super simple. It opens the connection, calls the scan, prints the results, and closes the connection again. With Python, there’s nothing to compile. You do need to make the file executable, though, which is a one-liner:
$ chmod a+x TwitBase.py
Now you’re ready to try it:
$ ./TwitBase.py list
<User: TheRealMT, Mark Twain, [email protected]>
<User: GrandpaD, Fyodor Dostoyevsky, [email protected]>
<User: SirDoyle, Sir Arthur Conan Doyle, [email protected]>
<User: HMS_Surprise, Patrick O'Brian, [email protected]>
Nicely done! You have everything you need to start building HBase applications in Python. Next up, we’ll explore an entirely new Java language client, asynchbase.
6.5. Asynchbase: an alternative Java HBase client
The HBase Java client is completely synchronous. When your application interacts with HBase through the HTableInterface, every action blocks your application thread while HBase can respond to the request. This behavior isn’t always desirable. Some applications don’t need to wait on the server to respond before continuing with the execution path. In fact, the synchronous dependency on the server is detrimental to many user-facing applications.
Asynchbase[9] is an alternative HBase client, also written in Java. It’s fully asynchronous, which means it doesn’t block the thread of the calling application. It makes thread safety a priority, and its client API is designed for use in multithreaded applications. The author of asynchbase strives for maximal client performance and maintains a set of benchmarks[10] comparing asynchbase to the stock HBase client.
9 Learn more about asynchbase at https://github.com/stumbleupon/asynchbase.
10 Benchmarks, including reproduction instructions and results, can be found attached to this HBase JIRA ticket: “Asynchbase PerformanceEvaluation,” https://issues.apache.org/jira/browse/HBASE-5539.
Asynchbase is built on an asynchronous library called async.[11] It’s modeled after the asynchronous processing component of the Python Twisted[12] library. Async allows you to build parallel data-processing pipelines by chaining successive actions onto asynchronous computations. An explanation of the concepts core to these projects is beyond the scope of this section. We provide you with some of the basics but recommend that you explore these related projects and concepts on your own if you’re serious about using asynchbase. Asynchronous programming is relatively uncommon and can be unintuitive. It’s a different way of thinking, albeit an important one, when considering a user-facing application dealing with large amounts of data at the back end.
11 Async provides asynchronous event processing in Java: https://github.com/stumbleupon/async.
12 Twisted provides a Deferred object for building chains of nonblocking event handlers. The Deferred documentation is available at http://twistedmatrix.com/documents/current/core/howto/defer.html.
The primary notable deployment of asynchbase is OpenTSDB, an application covered in detail in a later chapter. Both asynchbase and OpenTSDB are written and maintained by the same community of users. That community is relatively small in comparison to the wider HBase community. As with any open source project, caution is advised when approaching a project that has not yet achieved critical mass. That said, the popularity of asynchbase is growing.
Another serious consideration for choosing asynchbase is multiversion support. HBase releases are labeled with a version number of the form major.minor.patch. This book tracks HBase version 0.92.x, or major version 0, minor version 92, and an unspecified patch level. When using the stock client, your client major and minor versions must match the cluster major and minor versions.[13] You can use a 0.90.3 client with any 0.90.x cluster, but it isn’t compatible with a 0.92.x cluster. The asynchbase client, on the other hand, supports all HBase releases since version 0.20.4 (released mid-2010). That means your client code is entirely decoupled from your cluster deployment. This can be a huge win when considering client code that can’t be upgraded as frequently as the cluster.
13 This versioning scheme is roughly outlined in the Apache Release Management guide: http://mng.bz/6uvM.
In this example, you’ll build an alternative client to the TwitBase users table using the asynchbase client. The final code for this project is available in the GitHub repository, https://github.com/hbaseinaction/twitbase-async.
6.5.1. Creating an asynchbase project
To get started, you’ll need a new Java project. The simplest way to create one is using Maven archetypes. Maven archetypes are prebuilt project templates that provide basic Maven project scaffolding. For this you’ll use the simplest, the quickstart archetype. You can follow along here to create the project.
Create the project structure using the archetype:generate command:
$ mvn archetype:generate
  -DarchetypeGroupId=org.apache.maven.archetypes
  -DarchetypeArtifactId=maven-archetype-quickstart
  -DgroupId=HBaseIA
  -DartifactId=twitbase-async
  -Dversion=1.0.0
After Maven downloads any missing dependencies, it will prompt you to confirm the parameters. Press Enter and let it do its thing. This will create a directory called twit-base-async in the current directory. It’s populated with a basic “hello world” command-line application.
The next thing to do is add asynchbase to the project as a dependency. A file called pom.xml in the top-level project directory manages the Maven project. Edit the generated pom.xml, and add a couple of new <dependency> entries to the <dependencies> block:
<dependencies>
  <dependency>
    <groupId>org.hbase</groupId>
    <artifactId>asynchbase</artifactId>
    <version>1.3.1</version>
  </dependency>
  <dependency>
    <groupId>org.slf4j</groupId>
    <artifactId>slf4j-api</artifactId>
    <version>1.6.6</version>
  </dependency>
  <dependency>
    <groupId>org.slf4j</groupId>
    <artifactId>slf4j-simple</artifactId>
    <version>1.6.6</version>
  </dependency>
  ...
</dependencies>
Let’s also add maven-assembly-plugin to the pom.xml file. This will allow you to create a JAR containing all of the project’s dependencies and simplify launching the AsyncTwitBase application. Add a new <build> block to the <project>:
<project ...>
  ...
  <build>
    <plugins>
      <plugin>
        <artifactId>maven-assembly-plugin</artifactId>
        <version>2.3</version>
        <executions>
          <execution>
            <id>jar-with-dependencies</id>
            <phase>package</phase>
            <goals>
              <goal>single</goal>
            </goals>
            <configuration>
              <descriptorRefs>
                <descriptorRef>jar-with-dependencies</descriptorRef>
              </descriptorRefs>
              <appendAssemblyId>false</appendAssemblyId>
              </configuration>
            </execution>
          </executions>
        </plugin>
      </plugins>
    </build>
  </project>
Now is a good time to make sure everything works. Go ahead and build and run your application with the following commands. You should see the following output:
$ mvn package
[INFO] Scanning for projects...
[INFO]
[INFO] ---------------------------------------------------------------
[INFO] Building twitbase-async 1.0.0
[INFO] ---------------------------------------------------------------
...
[INFO] ---------------------------------------------------------------
[INFO] BUILD SUCCESS
[INFO] ---------------------------------------------------------------
[INFO] Total time: 12.191s

$ java -cp target/twitbase-async-1.0.0.jar HBaseIA.App
Hello World!
Now your project is ready to start using asynchbase.
6.5.2. Changing TwitBase passwords
Let’s create an application to randomize the passwords of all users in the system. This kind of thing would be useful if your TwitBase deployment suffered a security breach. You’d like your application to scan through all users in the users table, retrieve the user’s password, and generate a new password based on the old one. You also want the application to notify the user of the security breach and inform them as to how they can retrieve their account. You’ll do all this by chaining successive actions using async’s Deferred and Callback objects. The workflow as a Callback chain is illustrated in figure 6.3.
Figure 6.3. Building a data-processing pipeline with Callbacks. Each step takes output from the previous one, processes it, and sends it to the next, until a final result is reached.
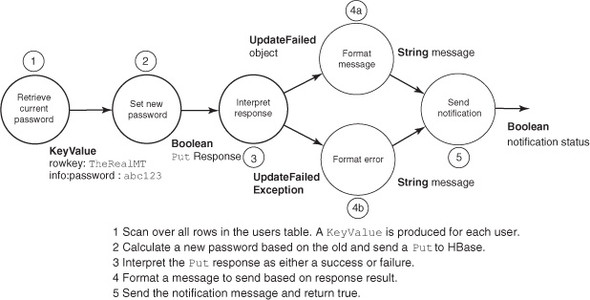
Wiring a Callback instance onto a Deferred instance chains successive steps together. This is done using the addCallback family of methods provided by the Deferred class. Callbacks can also be attached to handle error cases, as you see in step 4b. Async calls these Errbacks, a term consistent with the terminology used in Twisted Python. The final result of a Callback chain is retrieved by calling join() on the associated Deferred instance. If the Deferred is finished processing, calling join(long timeout) returns immediately with a result. If the Deferred’s Callback chain is still processing, the current thread blocks until either the Deferred completes or the timeout, in milliseconds, expires.
With your newfound understanding of the async data-processing pipeline and a rough idea of the pipeline you want to build, let’s start building it.
The Asynchronous HBase Client
Your primary entry point into asynchbase is the HBaseClient class. It manages your interactions with the HBase cluster. Its responsibility is something of a combination of both HTablePool and HTableInterface from the stock client.
Your application needs only a single instance of HBaseClient. Much like an HTableInterface, you need to make sure you close it after you’re finished using it. Using the stock client, you would do this:
HTablePool pool = new HTablePool(...);
HTableInterface myTable = pool.getTable("myTable");
// application code
myTable.close();
pool.closeTablePool("myTable");
In asynchbase, you have the following:
final HBaseClient client = new HBaseClient("localhost");
// application code
client.shutdown().joinUninterruptibly();
This snippet creates an instance of HBaseClient that talks to an HBase managed by localhost. It then closes that instance and blocks the current thread until the shutdown() method completes. Waiting on shutdown() to complete is necessary to ensure that all pending RPC requests are completed and the thread pool is properly disposed before the application exits. shutdown() returns an instance of the Deferred class, which represents an operation executing on another thread. Waiting is accomplished by calling one of the join family of methods on the Deferred instance. Here you call joinUninterruptibly() because you want to ensure that the client resources are cleaned when you’re finished. Note that if your thread is interrupted while waiting on joinUninterruptibly(), it will still be marked as interrupted.
You’ll use this client instance to create a Scanner. The asynchbase Scanner is similar to the ResultsScanner with which you’re already familiar. Create a Scanner against the users table, and limit its results to the info:password column:
final Scanner scanner = client.newScanner("users");
scanner.setFamily("info");
scanner.setQualifier("password");
Use this Scanner instance to walk the rows in your table by calling nextRows(). Like the other asynchronous operations in this library, nextRows() returns a Deferred instance. Like the stock scanner, you can request a specific number of results per page by passing a number to nextRows(). To help emphasize the asynchronous nature of the application, let’s limit the scan results to a single row per page.
Limiting your scanner to a single row per request will significantly hinder your application performance. The only reason we do so here is to maximize the opportunity for failure scenarios to trigger. You’ll see what we’re talking about later in the section.
Each returned row consists of a list of its cells. These cells are represented by instances of the KeyValue class. In order to walk the page of returned rows, you loop over a list of lists of KeyValue instances:
ArrayList<ArrayList<KeyValue>> rows = null;
while ((rows = scanner.nextRows(1).joinUninterruptibly()) != null) {
  for (ArrayList<KeyValue> row : rows) {
    // ...
  }
}
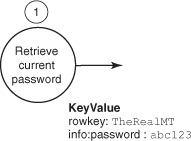
Like the call to shutdown(), this code blocks the current thread until all results are available before consuming them. Scanning rows asynchronously doesn’t make a lot of sense when you’re interested in maintaining row order. By joining on each Deferred instance, you realize the scan results into the rows variable. Parsing the results is similar to consuming KeyValue objects in the stock client. This is step 1 from the state diagram, illustrated in figure 6.4.
Figure 6.4. Step 1 is to scan over all rows in the users table. A KeyValue is produced for each user.
The code looks like this:
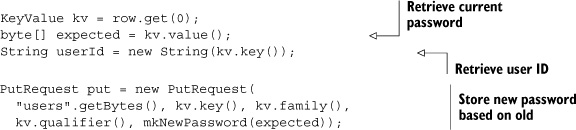
The scanner was limited to returning the info:password column, so you know there will be only a single KeyValue per result row. You take that KeyValue and pull out the bits relevant to you. For this example, the old password is used to seed the new password, so pass it into the mkNewPassword() method. Create a new Put instance, which asynchbase calls a PutRequest, to update the user’s password. The last step is to construct a Callback chain and attach it to the PutRequest invocation.
Thus far you’ve implemented all of step 1 and most of step 2 from figure 6.3. Before you start chaining Callbacks, let’s write a couple of methods to help you watch the asynchronous application at work.
Developing an Asynchronous Application
Developing and debugging asynchronous applications can be tricky, so you’ll set yourself up for success. The first thing you want is to print debugging statements with their associated thread. For this, you’ll use the logging library SLF4J, the same logging library used by asynchbase. The following line gives you what you need:
static final Logger LOG = LoggerFactory.getLogger(AsyncUsersTool.class);
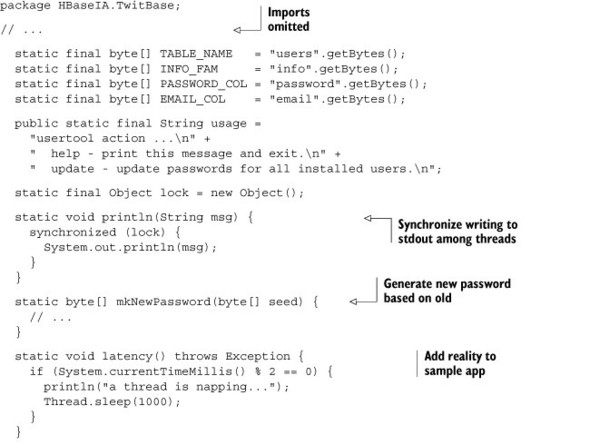
To help explore the asynchronous nature of this code, it’s useful to introduce simulated latency into the system. The method latency() will occasionally delay processing by forcing the thread to sleep:
static void latency() throws Exception {
  if (System.currentTimeMillis() % 2 == 0) {
    LOG.info("a thread is napping...");
    Thread.sleep(1000);
  }
}
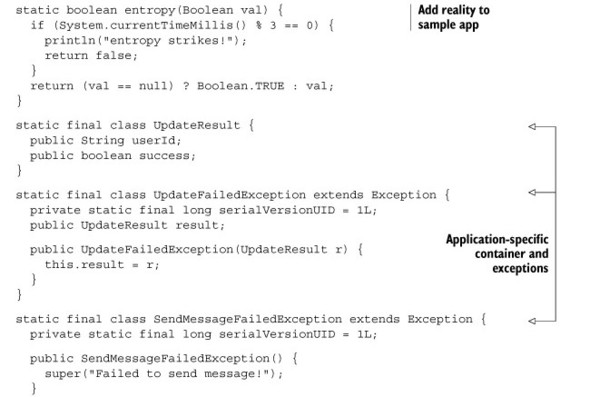
You can do the same by introducing occasional failures, slightly less frequently, with the entropy() method:
static boolean entropy(Boolean val) {
  if (System.currentTimeMillis() % 3 == 0) {
    LOG.info("entropy strikes!");
    return false;
  }
  return (val == null) ? Boolean.TRUE : val;
}
You’ll call latency() at the beginning and end of each Callback to slow things down a little. Call entropy() on the result produced by step 2 so you can exercise the error handling provided by step 4b. Now it’s time to implement Callbacks for each of the remaining steps.
Chaining Successive Actions Using Callbacks
Step 3 in the data pipeline is to interpret the response generated by the PutRequest sent to HBase. This step is summarized in figure 6.5.
Figure 6.5. Step 3 is to interpret the Put response as either a success or a failure.
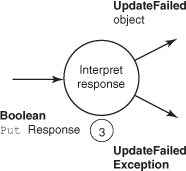
You’ll do this by implementing async’s Callback inter-face. The implementation receives a Boolean from the HBase response and generates an UpdateResult instance, an object specific to your application. The UpdateResult class is simple, just a package for data:
static final class UpdateResult {
  public String userId;
  public boolean success;
}
Step 3 can also throw an UpdateFailedException when the PutRequest fails or when entropy() strikes. Async looks for Exceptions, either thrown by or returned by Deferred and Callback instances, to trigger the error-handling callback chain. You implement your own exception so you can package a little context along with the exception. It looks like this:
static final class UpdateFailedException extends Exception {
  public UpdateResult result;

  public UpdateFailedException(UpdateResult r) {
    this.result = r;
  }
}
Now you can implement your Callback to handle step 3. The responsibility of this class is to translate the asynchbase response into an application-specific datatype. You’ll call it InterpretResponse. It has a constructor to pass in the user ID; that way you know which user you were processing when you received this response. The meat of the code is in the UpdateResult call(Boolean response) method. This method starts and ends by calling latency(). It also takes the response received from HBase and subjects it to entropy(). This is purely for the purposes of your understanding. The real work is in taking the response and either constructing an UpdateResult instance or throwing an UpdateFailedException. Either way, there’s not much work involved. You can imagine performing an arbitrarily complex operation in your real working code:
static final class InterpretResponse
    implements Callback<UpdateResult, Boolean> {

  private String userId;

  InterpretResponse(String userId) {
    this.userId = userId;
  }

  public UpdateResult call(Boolean response) throws Exception {

    latency();

    UpdateResult r = new UpdateResult();
    r.userId = this.userId;
    r.success = entropy(response);
    if (!r.success)
      throw new UpdateFailedException(r);

    latency();
    return r;
  }
}
InterpretResponse is the most complex Callback in this example, so if you’re still following, you should be in good shape. This Callback has either performed its transformation or detected an error and bailed. Either way, the decision of what Callback to invoke next is left up to async. This is an important concept when thinking about these data-processing pipelines. Each step in the chain is ignorant of the others. Notice that the type signature of InterpretResponse implements Callback<UpdateResult, Boolean>. Those generic types correspond to the signature of the call() method. The only thing that links step 3 to step 4 is the contract between them in the form of type signatures.
For the next step, you’ll implement the successful case first: step 4a from the state diagram. For context, figure 6.6 illustrates both steps 4a and 4b.
Figure 6.6. Steps 4a and 4b format a message to send based on response result.

This step takes the UpdateResult produced in step 3 and converts it into a String message, perhaps to send to the user via email or to update a log somewhere. Thus, step 4a is implemented by a Callback<String, Update-Result>. Call this one ResultToMessage:
static final class ResultToMessage
    implements Callback<String, UpdateResult> {

  public String call(UpdateResult r) throws Exception {
    latency();
    String fmt = "password change for user %s successful.";
    latency();
    return String.format(fmt, r.userId);
  }
}
Again, you’re calling latency() at the beginning and end of the call() method. Otherwise, there’s nothing fancy here. Construction of the message is simple, and it looks like it’s appropriate for the user. There’s also nothing going on to throw an Exception, so you won’t consider an Errback chain for this step.
The Errback defining step 4b is similar to the Callback in 4a. It’s also implemented as a Callback, this time parameterized on String and UpdateFailedException. The processing work is almost identical, except it retrieves the user ID context from the Exception instead of an UpdateResult:
static final class FailureToMessage
    implements Callback<String, UpdateFailedException> {

  public String call(UpdateFailedException e) throws Exception {
    latency();
    String fmt = "%s, your password is unchanged!";
    latency();
    return String.format(fmt, e.result.userId);
  }
}
Both ResultToMessage and FailureToMessage produce a String for their output. That means they can be chained to the same Callback instance for the final step, 5. Step 5 is handled by SendMessage and is an implementation of Callback<Object, String>; see figure 6.7.
Figure 6.7. Step 5 sends the notification message.

SendMessage should either succeed, in which case it returns true, or throw a SendMessageFailed-Exception. There’s nothing special about the failure Exception; it’s application-specific for the sake of clarity in the example. SendMessage looks like this:
static final class SendMessage
    implements Callback<Boolean, String> {

  public Boolean call(String s) throws Exception {
    latency();
    if (entropy(null))
      throw new SendMessageFailedException();
    LOG.info(s);
    latency();
    return Boolean.TRUE;
  }
}
Again, you have a little latency() and entropy() to keep things interesting. Either the message is delivered or an Exception is thrown. In this case, there is no Errback to chain into the data pipeline, so that error needs to be handled in client code. With the processing pipeline implemented, let’s return to the code consuming the scanner.
Wiring Up the Data Pipeline
When you last saw your user application, it was reading rows off the scanner and building PutRequest objects to initiate the processing pipeline, essentially step 1 from the state diagram. The last thing to do is to send those Puts off to HBase and pass the response down the Callback chain, as shown in figure 6.8.
Figure 6.8. Step 2 calculates a new password based on the old and sends a Put to HBase.
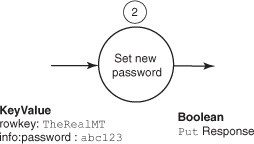
This is where you finally get your hands on a Deferred instance! For this example, you use the method Deferred<Boolean> HBaseClient.compareAndSet(PutRequest put, byte[] expected) instead of put() to simplify explanation of the Callback chain. This is the atomic version of put(). compareAndSet() returns a Deferred instance that, once join()ed, will return a Boolean. That’s the entry point for chaining Callbacks. The chaining looks like this:

Each consecutive call to addCallback() returns the same Deferred instance but with its type updated to correspond to the return type of the attached Callback. So, executing step 2 returns a Deferred<Boolean>, and after chaining the Callback for step 3 it becomes a Deferred<UpdateResult>. Chaining on steps 4a and 4b is done using addCallbacks(), with an s. This returns a Deferred<String>, which is typed by the return type of the success case. The error case in async is always typed by an Exception, so it need not be specified in the Deferred. Step 5 turns it into a Deferred<Boolean>, the type ultimately consumed by the application.
Each row in the scan result has a corresponding Deferred<Boolean> whose execution you want to see completed. The only way to see the results of the full Callback chain for each row is to collect the final Deferred<Boolean> instances and join() on them. This is the same code as before, just with the extra bookkeeping of collecting the Deferred<Boolean> instances:
ArrayList<Deferred<Boolean>> workers
  = new ArrayList<Deferred<Boolean>>();
while ((rows = scanner.nextRows(1).joinUninterruptibly()) != null) {
  for (ArrayList<KeyValue> row : rows) {
    // ...
    Deferred<Boolean> d = ...;
    workers.add(d);
  }
}
Notice that your list of workers preserves the order in which the rows were produced. This isn’t particularly useful for this example because you’ve been careful to keep track of necessary context as you go using the custom UpdateResult and Update-FailedException classes. You could as easily accumulate state out at this level, for instance, by creating a Map of user ID to Deferred<Boolean> results. Because you’re not interested in any specific result, you can join on all the Deferred instances as a group. The last step is to invoke join() and accumulate the results of your processing:
Deferred<ArrayList<Object>> d = Deferred.group(workers);
try {
  d.join();
} catch (DeferredGroupException e) {
  LOG.info(e.getCause().getMessage());
}
Your machine is executing them all in the background simultaneously. When you call join(), async gives you back all the results of the processing chains for each worker. If any component of the chain threw or returned an instance of Exception along the way, it throws that Exception for you to catch here. The Deferred that encapsulates all of the individual Deferred instances wraps those exceptions in the Deferred-GroupException. Unpack it with a call to getCause() to see the underlying error.
To round it all out, let’s give the command-line application a meaningful name. Rename the file src/main/java/HBaseIA/App.java something useful like AsyncUsersTool.java, move it into an appropriate package path, and update the class name and package as well. Your final AsyncUsersTool will look like this.
Listing 6.4. Complete asynchbase client to TwitBase: AsyncUsersTool
The final step is to configure the logger. You want to do this so you’ll be able to see your log messages, and, in particular, so you can see which thread is doing what work. Create a new file at src/main/resources/simplelogger.properties with the following content:
org.slf4j.simplelogger.showdatetime = false
org.slf4j.simplelogger.showShortLogname = true

org.slf4j.simplelogger.log.org.hbase.async = warn
org.slf4j.simplelogger.log.org.apache.zookeeper = warn
org.slf4j.simplelogger.log.org.apache.zookeeper.client = error
6.5.3. Try it out
Make sure you have HBase running and have populated the users table. Refer back to chapter 2 if need be. Build your asynchbase client application just like the TwitBase Java project:
$ mvn clean package
[INFO] Scanning for projects...
[INFO]
[INFO] ---------------------------------------------------------------
[INFO] Building twitbase-async 1.0.0
[INFO] ---------------------------------------------------------------
...
[INFO] ---------------------------------------------------------------
[INFO] BUILD SUCCESS
[INFO] ---------------------------------------------------------------
Now you can run it by invoking your new class:
$ java -cp target/twitbase-async-1.0.0.jar
  HBaseIA.TwitBase.AsyncUsersTool update
196 [main] INFO AsyncUsersTool - received a page of users.
246 [client worker #1-1] INFO AsyncUsersTool - a thread is napping...
1251 [client worker #1-1] INFO AsyncUsersTool - a thread is napping...
2253 [main] INFO AsyncUsersTool - received a page of users.
2255 [main] INFO AsyncUsersTool - received a page of users.
2256 [client worker #1-1] INFO AsyncUsersTool - a thread is napping...
3258 [client worker #1-1] INFO AsyncUsersTool - a thread is napping...
3258 [main] INFO AsyncUsersTool - received a page of users.
4259 [client worker #1-1] INFO AsyncUsersTool - entropy strikes!
4259 [client worker #1-1] INFO AsyncUsersTool - entropy strikes!
4260 [client worker #1-1] INFO AsyncUsersTool -  Bertrand91, your password
is unchanged!
4260 [client worker #1-1] INFO AsyncUsersTool - a thread is napping...
...
It works! You now have a working baseline from which to build a suite of asynchronous applications around HBase.
6.6. Summary
The decision to deploy HBase ties you to the JVM, at least on the server side. But that decision doesn’t restrict your client application options. For managing schema migrations, we recommend becoming comfortable with scripting the HBase shell. If your migrations are particularly complex, or if you feel like building an ActiveRecord[14] style migration tool, definitely explore the JRuby library on which the shell is built. If you’re working with Java, we recommend that you give asynchbase serious consideration. Asynchronous programming can be a challenge, but you’re already stepping up to learn HBase, so we think you can handle it.
14 ActiveRecord is the database abstraction library commonly use in Ruby and famously used in Ruby on Rails. It defines a schema-migration pattern that is superior to other tools with which we’re familiar. Check it out at http://ar.rubyonrails.org/.
Outside of the JVM, you have REST and Thrift. REST is easy to get started with because it doesn’t require anything in your target language other than an HTTP client. Launching the REST gateway against your cluster is simple, and it even scales reasonably well. Although REST is convenient, Thrift is likely the way to go. Thrift provides some measure of language-agnostic API definition and has seen more usage in the community than REST. As always, such decisions are best made on a case-by-case basis.