We'll start as usual by copying our application template that we created in Chapter 1, The Task at Hand, and renaming the files to piano.html, piano.css, and piano.js. We also need touchEvents.js that we created in the previous chapter.
Inside piano.js, we'll change the application object to PianoApp:
function PianoApp()
{
    var version = "6.1",
        audioManager = new AudioManager("audio");
We create an instance of AudioManager and pass in the path to our audio files, which will be the audio folder. Now let's open our HTML file and add all of the piano keys:
<div id="keyboard">
    <div id="backboard"></div>
    <div class="keys">
        <div data-note="2C" class="piano-key white"></div>
        <div data-note="2C#" class="piano-key black"></div>
        <div data-note="2D" class="piano-key white"></div>
        <div data-note="2D#" class="piano-key black"></div>
        <div data-note="2E" class="piano-key white"></div>
        <div data-note="2F" class="piano-key white"></div>
        <div data-note="2F#" class="piano-key black"></div>
        <div data-note="2G" class="piano-key white"></div>
        <div data-note="2G#" class="piano-key black"></div>
        <div data-note="2A" class="piano-key white"></div>
        <div data-note="2A#" class="piano-key black"></div>
        <div data-note="2B" class="piano-key white"></div>
        <!-- third octave not shown -->
        <div data-note="4C" class="piano-key white"></div>
    </div>
</div>
Inside of the "main" element, we add a <div> tag with id set to keyboard. Inside there we have a <div> tag that will be the backboard and a <div> tag that will contain all of the keys. Each key is defined by an element that contains a class of piano-key and a class of either white or black depending on the key color. Each key element also has a data-note custom data attribute. This will be set to the name of the piano key's note and will also be the name of the matching audio file.
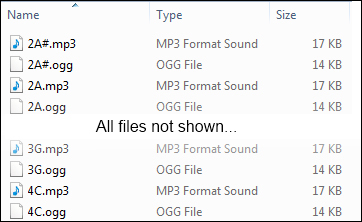
Our piano has two full octaves of piano keys. Each key has its own audio file. Since each octave has 12 notes, and we have one more C note at the end of the keyboard, we will have 25 audio files named 2C through 4C. We want to supply audio files in both Ogg and MP3 formats to support all browsers, so in all we have 50 audio files:
Let's open piano.css and style the application. First of all we'll make the application take up the whole browser window by setting position to absolute and setting all of the position values to 0. We'll give it a linear gradient from white to blue:
#app
{
    position: absolute;
    top: 0;
    bottom: 0;
    left: 0;
    right: 0;
    margin: 4px;
    background-color: #999;
    /* browser specific gradients not shown */
    background: linear-gradient(top, white, #003);
}
We also set the footer selector's position attribute to absolute and bottom to 0, so it hugs the bottom of the window:
#app>footer
{
    position: absolute;
    bottom: 0;
    padding: 0.25em;
    color: WhiteSmoke;
}
In the main section, we set text-align to center, so the keyboard is centered on the page:
#main
{
    padding: 4px;
    text-align: center;
}
Now let's style the keyboard to make it look like a real piano keyboard. First, we give the entire keyboard a gradient from dark brown to light brown and a shadow to give it some depth:
#keyboard
{
    padding-bottom: 6px;
    background-color: saddlebrown;
    /* browser specific gradients not shown */
    background: linear-gradient(top, #2A1506, saddlebrown);
    box-shadow: 3px 3px 4px 1px rgba(0, 0, 0, 0.9);
}
Next, we style the backboard, which hides the tops of the keys. We give it a dark brown color, make it 32 pixels high, and give it a shadow to add depth. In order to get the shadow to draw over the piano keys, we need to set position as relative:
#backboard
{
    position: relative;
    height: 32px;
    background-color: #2A1506;
    border-bottom: 2px solid black;
    box-shadow: 3px 3px 4px 1px rgba(0, 0, 0, 0.9);
}
All of the piano keys share some base styling that is defined with the piano-key class. First, we set display as inline-block so they stay on the same line and also have width and height. Then we give the bottom a border radius to make them look rounded. We'll also set the cursor property to pointer so the user gets an indication that they can be clicked:
#keyboard .piano-key
{
    display: inline-block;
    border-bottom-right-radius: 4px;
    border-bottom-left-radius: 4px;
    cursor: pointer;
}
Finally, we get to the black and white keys' styles. The white keys are a little wider and taller than the black keys. We also give them an ivory color and a shadow. Lastly, we need to set z-index to 1, because they need to be displayed behind the black keys:
#keyboard .piano-key.white
{
    width: 50px;
    height: 300px;
    background-color: Ivory;
    box-shadow: 3px 3px 4px 1px rgba(0, 0, 0, 0.7);
    z-index: 1;
}
The black keys are a little smaller than the white. In order to make the black keys show over top of the white keys, we give set z-index to 2. To make them seem to be in between the white keys, we set their position properties to relative and use a negative left offset to move them over top of the white keys. We also need a negative right-margin value, so the next white key gets pulled over and under it:
#keyboard .piano-key.black
{
position: relative;
width: 40px;
height: 200px;
left: -23px;
margin-right: -46px;
vertical-align: top;
background-color: black;
box-shadow: 2px 2px 3px 1px rgba(0, 0, 0, 0.6);
z-index: 2;
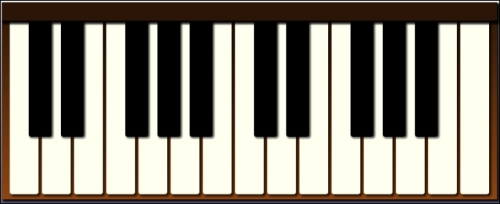
}This is how our piano would look:

The first image shows the keys with no margins set. Doesn't look much like a real keyboard, does it? The next image shows what it looks like with the left margin set. It's getting better but the white key hasn't moved over. Setting the right margin takes care of that.
We created a new HTML5 piano application starting with our application template. We defined all of the keys in HTML and then we styled them using negative offsets and margins to make the keys line up like a real keyboard.
There you have it! We now have a two octave keyboard that looks pretty darn realistic: