
10
Mending and Breaking Electronics
In this chapter, we will look at taking things apart and putting them back together again, or just taking them apart to salvage components.
In today’s throw-away society, many consumer electronics items that stop working go directly into the garbage. Economically, they are simply not worth paying someone to repair. However, that does not mean it is not worth trying to repair them. Even if the attempt fails, some serviceable components may be scavenged for use in your projects.
How to Avoid Electrocution
When working on something that is powered by household electricity, NEVER work on it when it is plugged into the outlet. I actually like to have the electrical plug for the appliance right in front of me, so that I know it is not plugged in. Household electricity kills many people every year. Take it seriously!
Some devices, such as switch mode power supplies, contain high-value capacitors that will hold their charge for hours after the device has been unplugged. These capacitors are simply biding their time, waiting for some unsuspecting fingers to complete the circuit.
Unless it is a very small capacitor, it should not be discharged by shorting the leads with a screwdriver. A large capacitor at high voltage can supply huge amounts of charge in a fraction of a second, melting the end of the screwdriver and flinging molten metal around. People have been blinded by capacitors exploding in this manner, so don’t do it.
Figure 10-1 shows the safe way to discharge a capacitor.
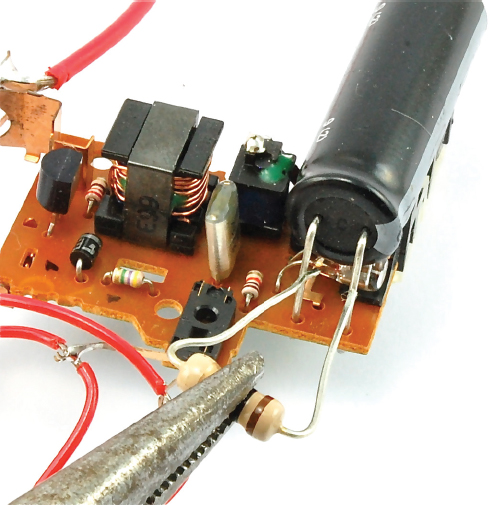
FIGURE 10-1 Safely discharging a capacitor
The legs of a 100Ω resistor are bent to the right fit for the capacitor contacts and held in the teeth of a pair of pliers for a few seconds. You can use the highest setting of your voltmeter to check that the capacitor has discharged to a safe level (say, 50V). If you have a high-wattage resistor, all the better. If it is not high enough power, it will break, but not in as spectacular a way as a capacitor being discharged dangerously.
Some devices that can pack a painful and sometimes lethal punch are:
• Old glass CRT TVs
• Switch-mode power supplies
• Camera flash guns and disposable cameras with a flash
How to Take Something Apart AND Put It Back Together Again
It is often said that “any fool can take something apart, but putting it back together is a totally different matter.”
Just remember that taking things apart usually voids their warranty.
By following a few simple rules, you shouldn’t have any problems.
• Have a clear working area with lots of room.
• As you take out the screws, place them in the same pattern on your worktop as they were in the case they came out of. Sometimes the screws can be different sizes. If they are likely to be knocked or roll about on the surface, then push them into a piece of expanded polystyrene or something similar.
• After undoing the screws, when you come to take the case apart, watch out for any little plastic bits like switch buttons that might fall out. Try and keep them in place until you are ready to remove them.
• If something looks tricky, draw a sketch or take a photograph. (I tend to take a lot of photographs when repairing things, like with a hair dryer or straighteners, that have a large mechanical design component.)
• Try not to force things apart. Look to see where the clips are.
• If all else fails, try cutting the case apart with a handsaw (something your author has resorted to in the past), and then later glue the case back together.
How to Check a Fuse
The most convenient problem to fix in an appliance is the fuse. It’s convenient because it is easy to test and easy to fix. Fuses are basically just wires designed to burn out when the current flowing through them gets too high. This prevents further damage to more expensive components, or can stop a fire from starting.
Sometimes fuses are clear, so you can see that the wire inside them has broken and that they have “blown.” Fuses are rated in amps and will generally be labeled to show the maximum current in A or mA they can take. Fuses also come as “fast blow” and “slow blow.” As you would expect, this determines how fast the fuses react to over-current.
Some household electrical plugs contain a fuse holder, and you can also find fuses on PCBs. Figures 10-2a-c show the inside of a UK fused plug and also a fuse holder on the PCB for the author’s multimeter.
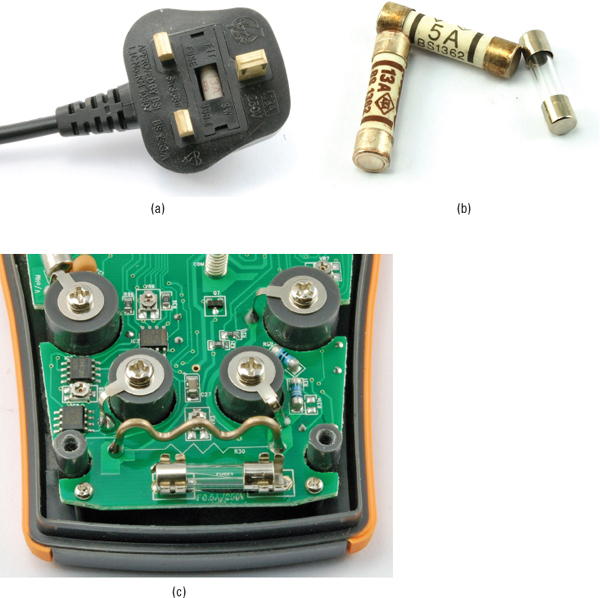
FIGURE 10-2 Fuses
You have used your multimeter in Continuity mode enough times now that you can probably guess how to test a fuse (Figure 10-3).

FIGURE 10-3 Testing a fuse with a multimeter
If a fuse has blown, there may be a good reason for this. Occasionally, however, they blow for other reasons, such as a momentary spike in the electric power lines or when turning on a heating element on a particularly cold day. So, generally, if there is no obvious sign of a problem with the device (look for wires that have come lose, or any sign of charring), then try replacing the fuse.
If the fuse immediately blows again, don’t try another. You should instead find the source of the problem.
How to Test a Battery
Spent batteries are, of course, another common reason for something not working. Simply measuring the voltage will tell you very quickly if the battery is empty.
During testing, if a 1.5V battery like an AA or AAA is showing less than 1.2V, or a 9V battery is showing less than 8V, it is probably time to throw it away. However, the voltage of a battery shown when it is not powering anything can be a little misleading. For a more accurate picture, use a 100Ω resistor as a “dummy” load. Figure 10-4 shows a resistor and multimeter being used to assess the state of the battery.

FIGURE 10-4 Testing a battery using a resistor and multimeter
How to Test a Heating Element
If you have a suspect heating element from an oven, hair dryer, or so on, you can check it by measuring its resistance. As with anything using household electricity, only do this when the appliance is completely disconnected.
It’s a good idea to roughly work out what you think the resistance should be before you measure it. So, for example, if you have a 2-kW 220V heating element, then rearrange:
P = V2 / R
to
R = V2 / P = 220 × 220 / 2000 = 24Ω
Calculating what you expect before you measure it is always a good idea, because if you measure it first, it is all too easy to convince yourself that it was what you were expecting. For instance, one time your humble author convinced himself that a suspect element was fine because it was showing a resistance of a few hundred ohms. Eventually, it transpired that there was a light bulb in parallel with the heating element and that the element itself was instead broken.
Finding and Replacing Failed Components
When something stops working on a PCB, it is often the result of something burning out. This sometimes leads to charring around the component. Resistors and transistors are common culprits.
Testing Components
Resistors are easy to test with a multimeter set to its resistance range. Although the results can be misleading, you can test them without removing them. Most of the time, you are looking for an open circuit, very high resistance, or sometimes a short (0Ω).
If your multimeter has a capacitance range, these too can easily be tested.
Other components are less easily identified. It is usually possible to make out some kind of device name on the case. A magnifying glass is sometimes useful, as is taking a digital photograph and then zooming in to a high magnification. Having found some kind of identifying mark, type it into your favorite search engine.
Bipolar transistors can also be tested (see the section “How to Use a Multimeter to Test a Transistor” in Chapter 11). However, if you have a spare, it is often easier just to replace it.
Desoldering
There is definitely a knack to desoldering. You often have to add more solder to get the solder to flow. I find it quite effective to draw the solder off onto the tip of the soldering iron, which I keep cleaning using the sponge.
Desoldering braid (Appendix – code T13) is also quite effective. Figure 10-5 shows the steps involved in using desoldering braid to remove the solder from around a component lead so it can be removed.
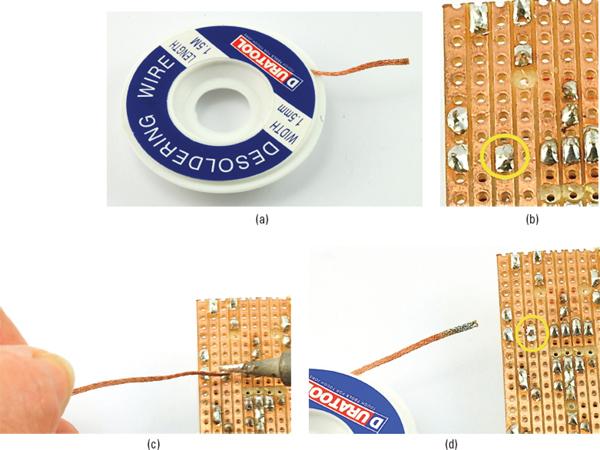
FIGURE 10-5 Using desoldering braid
Desoldering braid (Figure 10-5a) is supplied in small lengths on a small reel. You do not need much. It is braided wire impregnated with flux that encourages the solder to flow into it and off the PCB or stripboard copper.
Figure 10-5b shows the joint (circled in yellow) that we are going to remove the solder from. Press the braid onto the joint with the soldering iron (Figure 10-5c) and you should feel the blob of solder on the joint start to melt into the braid. Remove the braid while everything is hot and you should see a nice clean joint with the solder transferred to the braid (Figure 10-5d).
Cut off the section of the braid with solder on it and throw it away.
You may have to do this a couple of times to remove enough solder to release the component.
Replacement
Soldering in the replacement component is straightforward, you just have to make sure you get it the right way around. This is where photographing the board before making the replacement can be a good idea.
How to Scavenge Useful Components
Dead consumer electronics are a good source of components. But be selective, because some components are really not worth saving. Resistors are so cheap that it is really not worth the effort of removing them.
Here is what I look for when scavenging:
• Any kind of motors
• Connectors
• Hookup wire
• Seven-segment LED displays
• Loudspeakers
• Switches
• Large transistors and diodes
• Large or unusual capacitors
• Screws nuts and bolts
Figure 10-6 shows the insides of a dead video cassette recorder, with some of the more interesting parts for scavenging labeled.

FIGURE 10-6 Scavenging from a VCR
The easiest way to remove a lot of components, and things like hookup wire, is simply to snip them with wire cutters. The same applies to large electrolytic capacitors and other items, as long as they still leave leads long enough to use. Alternatively, you can desolder the items.
How to Reuse a Cell Phone Power Adapter
Everything you make in electronics requires a power source of some sort. Sometimes this will be batteries, but often it is more convenient to power the device from your household electricity.
Given that most of us have drawers stuffed with obsolete mobile phones and their charges, it makes sense to be able to reuse an old mobile phone charger. If they are newish phones, they may well have some kind of standard connector on them like a mini-USB or micro-USB, but many older phone models had a proprietary plug, used only by that phone manufacturer.
There is nothing to stop us from taking such an adapter and putting a more standard plug on the end of it, or even connecting the bare wires to screw terminals.
Figure 10-7 shows the steps involved in putting a different type of connector, such as a 2.1mm barrel jack, on the end of an old cell phone charger.
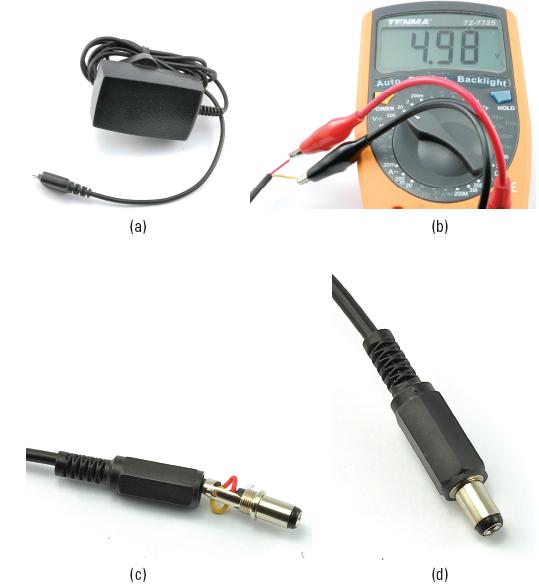
FIGURE 10-7 Attaching a barrel jack to a cell phone charger
The charger is of the “wall-wart” type that plugs directly into an electrical outlet. The connector is of a type long since discontinued (Figure 10-7a). The charger has a label saying that it can supply 5V at 700mA, so the first step is (making sure the charger is unplugged) to chop off the existing connector and strip the bare wires. There should be two wires, and if one is black and one is red, then the red one is usually positive and the black negative. In this case, the wires are red and yellow. Whatever colors the wires are, it is always a good idea to use a multimeter to check the polarity (Figure 10-7b).
Remember to put the lead through the plastic body of the barrel jack before you start soldering!
You can then solder on a barrel jack plug (Appendix–code H11). This is much the same procedure we used for an audio lead in the section “Hacking Audio Leads” in Chapter 9. Figure 10-7c shows the plug ready to solder, while Figure 10-7d displays the final lead ready to use.
Summary
In this chapter, we have discovered some of the treasures that can be rescued from dead electronic equipment and also briefly looked at testing and mending.
If you want to learn more about mending things, I recommend the book How to Diagnose and Fix Everything Electronic by Michael Geier (McGraw-Hill/TAB, 2011).
..................Content has been hidden....................
You can't read the all page of ebook, please click here login for view all page.