CHAPTER 3
USER-MODE ROOTKITS
Attackers always find ways to weaponize those technologies that are designed to do something to aid users and employ it to their advantage. Rootkit technology is one of those technologies that have been abused over and over again. It was abused so much that the term rootkit became synonymous with malware. But in the strictest sense and definition of the word, a rootkit is not malicious. It is a technology. A rootkit is a technology represented in code or as a set of tools that enables root-level or administrator-level access on a computer system. This technology, or the technology being utilized by the different kits that include this capability, became very popular with attackers because it gave them the keys to the kingdom. Having root-level or administrator-level access on a computer system has enabled them to do anything they want—especially the most important thing when it comes to the malware’s survival and persistency of infection, that is, hide malware and maintain access to or a foothold on the compromised system.
Well, rootkits and their functionality have changed over the years. Because the underground community has quickly adopted the functionality of these applications, it helps to understand where rootkits came from, why they have adapted to their environment, and what attackers will be doing with them in the future.
The predecessor of the first rootkit was actually not a rootkit at all but a set of applications that removed evidence of an intrusion from a machine. So-called log cleaner kits were found as early as 1989 on hacked systems and helped attackers cover their tracks as they broke into system after system. These automated applications would be executed by an attacker as soon as he or she got administrative access to a server. The tools would seek out the various log files that identified which user was logged in and what commands that user executed. Once these files were found, the applications would open the files and either strategically remove certain logs or delete the entire file. As a result, any footprint left by the initial hacking session was deleted or removed.
While log cleaners helped cover up initial access to a system, attackers wanted to always be protected from a system administrator discovering they had been on the company’s server. This requirement led to the creation of the first-generation rootkit, which served one major purpose—execute commands for an attacker without being seen. Traditionally, an attack would consist of the attacker exploiting a vulnerable network service such as inetd, a Unix application that connects network sockets to applications; cleaning the logs; and then adding a new user to the system so the attacker could access the system again. This backdoor account is common even today as attackers want to maintain access to a system.
The problem with adding a new user is that administrators can see it. To prevent this, the first-generation rootkit combined log cleaners and new versions of common command-line tools in Unix such as ls, which listed files in a directory, and ps, which listed what programs were running on the system. These new versions removed the newly created backdoor user’s files and processes from the tools’ output.
Rootkit-capable malware, or simply rootkits in today’s parlance, is an example of a technology created as a utility for administrators that has been weaponized by attackers.
Rootkits
This book defines a rootkit as “an undetected assembly or collection of programs and code that allows a constant presence on a computer or automated information system.” Unlike some other software such as exploits or malware, rootkits generally will continue to function even if the system has been rebooted.
Why is this definition important? This definition states several key differences between rootkits and other types of software like Trojans, viruses, or applications. For example, removing the word undetected from the definition would change the definition to that of a system management software package or remote administration software. However, the fact that the software is undetected and provides a constant connection to the system implies that the software provides a backdoor for easy future access. Rootkits are also purposefully written to be undetected via traditional or common methods within the security industry. This is important to note because many past viruses or Trojans did not have stealth as their primary function.
Because the software is designed to be undetectable, the rootkit will attempt to remain incognito and hide its functions to avoid discovery by anti-rootkit tools. Most Windows rootkits will attempt to hide drivers, executable (.exe and .dll) and system files (.sys), ports and service connections, registry key entries, services, and possibly other types of code such as backdoors, keyloggers, Trojans, and viruses. Given the impact of a software package gaining root access to a system and residing in a stealthy manner, system administrators and network defenders around the globe are gravely concerned. The focus of many recent rootkits has been to cooperate with malware in order to hide the malware’s remote command-and-control functionality. Malware requires remote access to infected workstations, and rootkits provide the stealth to allow the malware to run undetected.
Although this book will use the terms undetected and hidden interchangeably, no rootkit is ever undetectable or truly hidden. Every rootkit can be detected, but traditional applications or techniques may not find every rootkit by default. Furthermore, the difficulty and time required to detect a rootkit properly may not be worth the effort.
Besides stealth, rootkits are normally associated with elevating privileges of a non-root user to root-level privileges. This functionality is mostly associated with Unix rootkits and those targeting newer versions of Windows that utilize User Account Control (UAC). Although the original goal of a rootkit (and hence the name’s origin) was to elevate privileges, remaining undetected and ensuring control over an infected machine have now become much more profitable to attackers.
It is also important to point out that rootkits, in general, can be persistent on disk or they can be memory based. Persistent rootkits will remain on the system disk and will load each time the system boots. This requires the code to be configured to load and run without human interaction (which can lead to detection using some of the more common detection methods). Persistent rootkit code is stored in a nonvolatile location like the file system or Registry. Memory-based rootkits run purely in memory and are lost with a system boot. Memory-based rootkits are much more difficult to detect on a running system.
Timeline
Rootkits have evolved over time. Starting off as a simple set of tools to help maintain access to a machine, they have evolved into vicious applications that hide themselves and other files, are difficult to remove, and aid other malware. The following is a quick timeline to give you an understanding of the rootkit’s evolution:
• Late 1980s First log cleaners found.
• 1994 First SunOS rootkits found.
• 1996 First Linux rootkits appear in the wild.
• 1997 Loadable kernel module–based rootkits are mentioned in Phrack.
• 1998 Silvio Cesare releases the first non-LKM kernel-patching rootkit code. Back Orifice, a fully featured backdoor for Windows, is released.
• 1999 NT Rootkit, the first Windows rootkit, is released by Greg Hoglund.
• 2000 t0rnkit libproc rootkit/Trojan is released.
• 2002 Sniffer backdoors start to show up in rootkits. Hacker Defender is released, becoming one of the most used Windows rootkits.
• 2004 Most rootkit development in Unix stops as the focus shifts to Windows. FU rootkit is released and introduces a new technique to conceal processes.
• 2005 Sony BMG rootkit scandal occurs. First use of rootkit technology for commercial use.
• 2006 Rootkits become part of almost every major worm and virus. Virtual rootkits start to be developed.
• 2007 The first variant of Mebroot comes out that modifies the Master Boot Record (MBR). With its rootkit technology, it is able to hide itself and maintain access through the installation of a backdoor that allows for remote access by an attacker.
• 2008 Rootkits in the wild start to leverage the boot process to install themselves by adapting code from eEye Bootroot rootkit.
• 2008 The second variant of Mebroot is released.
• 2010 Alureon is reported to have the capability to bypass the mandatory kernel-mode driver-signing requirement of Windows 7 64-bit by compromising the system’s Master Boot Record (MBR).
• 2011 Webroot reports the first BIOS rootkit in the wild called Mebromi.
• 2011 ZeroAccess rootkit is discovered.
• 2012 The infamous ZeroAccess rootkit comes out with a new variant, utilizing user-mode rootkit technology
• 2013 Avatar rootkit sample is discovered. It bypasses detection by host intrusion prevention systems (HIPSs).
• 2015 Hacking Team rootkit comes to light. It uses a Unified Extensible Firmware Interface (UEFI) Basic Input/Output System (BIOS) rootkit that enables its remote control system agent to persist in a system even after a new hard disk with a fresh OS is installed.
Major Features of Rootkits
Rootkit technology is designed to elevate privileges on a computer system. This escalation provides attackers with two major features that are quite useful when conducting an attack campaign against a target:
• Maintain access
• Conceal existence through stealth
Maintain Access
The first major feature of a rootkit is to maintain access. Maintaining access to a hacked system is very important for an attacker. With the ability to log back into a server with full administrative privileges, the attacker can leverage the server for other attacks, store data, or host a malicious website. Attackers maintain access by installing either local or remote backdoors. A local backdoor is an application that, once executed, will give normal users full administrative privileges on the system. Local backdoors were common in early rootkit development, as many attackers of systems were actually normal users trying to elevate their privileges. Rootkit technology makes the elevation of privileges possible. Furthermore, attackers would keep a local backdoor around, in addition to a local backdoor user account, just in case the remote backdoors didn’t work.
Remote backdoors were generally the best way to go. Early rootkits had a variety of remote backdoors. The stealth and sophistication of the backdoors is what sets each rootkit apart. The types of remote backdoors generally fall into three categories: Network Socket Listener, Trojan, or covert channels.
Network-Based Backdoors Rootkits have used a variety of network-based backdoors throughout the years, and some are still widely used today. The standard network-based backdoor utilized telnet or a shell running on a high port on the system. For example, the attacker would modify inetd so a command shell would open when a user connected to port 31337. This backdoor dates back to the 1980s and was used in the 1990s as well. Attackers used TCP, UDP, and even ICMP, although UDP and ICMP were much less reliable and generally didn’t work too well. The communication stream was commonly plaintext, although later versions of the network-based backdoors started using encryption in order to hide their traffic if a sniffer was placed on the machine or on a network that the machine was connected to.
The problem with these network-based backdoors was that they were easily detectable by simply running a port scan on the system with the backdoor or by using a network firewall that blocked all inbound ports except those that serviced real customers. Very few of these backdoors did any type of authentication or verification of the users logging in, so some attackers would just scan the Internet looking for backdoors that they could simply access and take over from another attacker.
Used as a last resort for most attackers, another network-based rootkit really didn’t run on the network at all but was accessible via the hacked system’s web server. These Common Gateway Interface, or CGI, scripts would be installed in a directory on the web server and would execute user-defined commands and show the output in the browser. Local backdoors could then be used in conjunction with this script to regain control of a machine in case an administrator removed the backdoor account or network-based backdoor application.
As time passed and we moved into the 2000s, Windows became the primary focus of rootkit developers, and attackers started leveraging network backdoors such as Back Orifice to maintain remote access to Windows devices. Back Orifice, released in late 1999, provided an attacker with remote control of Windows devices. An enhanced version, released in late 2000, provided plug-in architecture with plug-ins that allowed the attacker to see remotely what was on the screen of the machine running Back Orifice, what was typed on the keyboard, and to install software, view stored passwords, and run arbitrary programs. Back Orifice primarily used TCP as its communications protocol, but it was configurable. Once Back Orifice was released, the functionality it provided was adopted and integrated into many other pieces of malware and rootkits in the Windows environment.
Stealth: Conceal Existence
The second major feature of rootkits is their ability to conceal any evidence of their existence on the system. As we mentioned, rootkits evolved from programs that attackers used to remove the logs on a system they broke into. As rootkits started to morph into those that provided continual “root” access to the system, a new requirement to hide any files or registry keys that the rootkit needed to operate became essential. If the rootkit hid these items, the system administrator and anti-rootkit tools would have a much harder time detecting the rootkit. Most rootkits will hide files they generate, any files specified by the user of the rootkit, and any network connections the rootkit generates. What to hide is usually specified in a configuration file or hardcoded into the rootkit itself.
The latest generations of rootkits use their stealth abilities to help other malware such as programs that steal usernames, passwords, and bank account information by hiding them from users and anti-malware tools. The teaming of malware with rootkits has caused rootkit developers to improve the quality and effectiveness of their stealth techniques dramatically. When rootkits were first detected in Unix environments, they generally only implemented their hiding capabilities using one method; for example, they would filter out files when the tool ls was used but not when a custom tool that read files from the file system was executed. Windows rootkits, such as the one used by Rustock.C, used multiple methods to ensure nothing was missed. These methods will be tackled in later chapters.
Stealth is a major component of any rootkit, and the chapters in this book will spend much time explaining the concepts and techniques that rootkit developers use to implement their stealth capabilities. Why is stealth so important for us to talk about? Simply because most rootkit detection tools detect the changes that the stealth functionality makes to the system to find the rootkit itself!
Types of Rootkits
There are generally two types of rootkits: user mode and kernel mode. User-mode rootkits run within the environment and security context of a user on the system. For example, if you were logged into your workstation as the user cmedina and did not have administrative privileges, the rootkit would filter and give backdoor access to all applications running under the cmedina account. Generally, most user accounts also have administrative privileges, so a user-mode rootkit can also prevent system-level processes such as Windows services from being affected by its stealth functionality.
Although this book primarily focuses on Windows malware and rootkits, there is another type of rootkit in the Unix world that is very similar to a user-mode rootkit. This rootkit, commonly referred to as a library rootkit, filters calls that applications make to various shared system libraries. Because they are not tied directly to a specific username, these rootkits can be more effective than standard user-mode rootkits but not as effective or hard to remove as kernel-mode rootkits.
Kernel-mode rootkits operate within the operating system at the same level as drivers for hardware such as your graphics card, network card, or mouse. Writing a rootkit for use within the kernel of an operating system is much more difficult than writing a user-mode rootkit, and it requires a much higher skillset from the attacker to implement. Furthermore, because many operating systems change portions of their kernel with updates and new versions, kernel rootkits don’t work for all versions of Windows. Since the rootkit operates like a driver does in the kernel, it also has the ability to increase the instability of the operating system. Normally, this is how most people find out they have a rootkit running on their system: they notice a slowdown in performance or the appearance of blue screens or other errors that cause the system to reboot spontaneously.
Some kernel rootkits also typically skip using API calls and just jump directly to the code that is executed when an API is called. Another instability of the direct jump is when that code gets moved after a system update.
Several types of rootkits will be discussed in later chapters of this book, including kernel-mode, virtual, database, and hardware rootkits, but in this chapter we will concentrate and begin with the user-mode rootkit.
User-Mode Rootkits
Throughout the rest of this chapter, we’ll discuss several types of user-mode rootkits, defining them, explaining their functionality, and then providing examples of and countermeasures for different rootkits.
What Are User-Mode Rootkits?
Now that we’ve established a common definition for a rootkit, as discussed at the beginning of this chapter, we can further define it to include additional rootkit types. We define a user-mode rootkit as “an undetected assembly or collection of programs and code that is resident in userland and that allows a constant presence on a computer or automated information system.” For the purposes of this book, userland is defined as “application space that does not belong to the kernel and is protected by privilege separation.” Essentially, all user-mode applications run at the user’s account privilege level within the system and not as part of the operating system. For example, if you logged into your Windows workstation as cmedina, the user-mode rootkit would operate as the cmedina user. All permissions and policies such as “deny policies” or “deny permissions” are still in effect and will limit the rootkit to what it can access. Even though users are generally looked on as least privileged and their access to files and directories is reduced, the users of most workstations in today’s home and corporate environments run as administrative users on the local workstation. Being an administrative user on the local workstation gives the user-mode rootkit full reign over the local workstation.
For the purposes of explanation, the user-mode rootkits discussed in this chapter will all be Windows rootkits. Although the functionality is extremely similar in *nix and Windows systems, there have been more widespread variants of Windows-based rootkits as compared to other operating systems. And although user-mode rootkits are not simple to develop by any means, they are easier to create and distribute for Windows platforms than *nix flavors.
The popularity of the operating system, the amount of free source code available, and the amount of documentation for officially supported hooking mechanisms makes developing user-mode rootkits in Windows simple. How easy is it? Well, even with this ease of development, attackers decided that too much time and effort were required to download some source code and compile it, so a common and effective user-mode rootkit, Hacker Defender, was made available for purchase underground, originally for about $500 U.S. dollars. The source code for Hacker Defender and other user-mode rootkits is publicly available for download as well in case you want to customize it for your own rootkit. As open-source rootkits have become more common, it has become easier for inexperienced attackers to get into the game.
The quick turnaround time between building a user-mode rootkit and deploying it for Windows aided the spread of malware that required the user-mode rootkits to hide the malware from the Windows Task Manager, Registry, and file system. User-mode rootkits were widely adopted and started to become commonplace, so the security industry responded with techniques to detect them. Nowadays, user-mode rootkits are not very effective and are relatively easily detected with most antivirus products. We would even argue that user-mode rootkits are useless, but many pieces of malware still employ user-mode rootkit techniques so understanding their methods in order to continue to detect and analyze them is important.
Background Technologies
Because the rootkit relies on achieving a stealth state, it must intercept and enumerate the Application Programming Interface (API) in user mode and remove the rootkit from any results returned. API hooking has to be implemented in an undetected way so as not to notify the user or administrator of the rootkit’s presence. Because API hooking is critical to understanding how a user-mode rootkit works, we will spend some time talking about it and the techniques used to hook the API.
There are a couple of possible ways to implement the hooking we just described. Some are supported by Microsoft and others are not. This is important because it means that the intent of the rootkit is dependent on the rootkit author and can range from system monitoring, such as a keylogger installed by your employer; theft; or installation of other software. One example that spurred great outrage and scrutiny was the rootkit that Sony BMG incorporated into CDs during 2005. Sony CDs installed copies of the Extended Copyright Protection (XCP) and MediaMax-3 software on computers when the user played them. This rootkit was discovered by security researcher Mark Russinovich while testing a new version of RootkitRevealer at SysInternals. Although an old example, the XCP case exemplifies the importance of hiding and remaining undetected for legitimate purposes and why a rootkit’s maliciousness is really based on the author’s intent. The XCP rootkit was designed to hide all files, registry entries, and processes that started with $sys$. The intention was that Sony’s Digital Rights Management (DRM) solution would leverage the hiding capabilities created by the rootkit to ensure DRM was never removed from the machine and that if a user attempted to take information from a DRM CD, it was unusable. However, any application, including malware, could take advantage of this capability and hide itself by simply prefixing $sys$ to its filename. With the Sony example, a commercial entity chose to use a rootkit with what some would argue were good intentions, but they improperly executed their intentions. Of course, other malicious rootkit authors could use the same technology techniques that the XCP application used and have very different intentions.
![]()
While there has been lengthy debate around rootkit use, usefulness, and intent for years, we will not engage in any of that in this portion of the book. Our objective is to supply information about rootkit functionality, practical examples, and countermeasures.
Before we get too involved, we’ll review some computing, programming, and operating system structure concepts that are key to understanding the context of rootkit functionality. These Windows resources, libraries, and components are the targeted subjects of rootkit functionality and are utilized in order to hide, mask, or otherwise conceal system activity.
Processes and Threads
A process is an instance of a computer program being executed within a computer system, whereas threads are the subprocesses (spawned from the process) that execute individual instructions, generally in parallel. For example, executing a rootkit process on a system can spawn multiple threads simultaneously. The difference between a process and a thread is critical because almost every major user-mode rootkit technique deals with the thread and not the process.
Architecture Rings
Within x86 computer system architecture, there are protection rings that privilege and protect against system faults and unauthorized access. The ring system provides and allows certain levels of access, generally through CPU modes. These rings are hierarchical, beginning with Ring 0, which has the highest level of access, to Ring 3, which has the lowest level of access. In most operating systems, Ring 0 is reserved for memory and CPU functions, for example, the kernel operations. There are two rings supported in the Windows OS that are important for the purposes of rootkit functionality: Ring 0 and Ring 3. Threads running in Ring 0 are in kernel mode, and, you guessed it, threads running in Ring 3 are user mode. We will go into much more detail about protection rings when we discuss kernel-mode rootkits, so as we move forward, remember this: OS code executes in Ring 0, and application code executes in Ring 3.
System Calls
User-mode applications interface with the kernel by executing system calls, which are specific functions that are exported from Dynamic Link Libraries (DLLs) provided by the operating system. When applications make system calls, the execution of the determined system calls are routed to the kernel via a series of predetermined function calls. This means that when system call A is executed, function calls X, Y, and Z are always executed in that order. The rootkit function will utilize these standard operating system calls in order to execute. Within the following examples, we will point out several areas where a rootkit can hijack, or hook, the predetermined system call path and add a new function to the path.
For example, if a user-mode application wanted to list all of the files in a directory on the C drive, the application would call the Windows function FindFirstFile(), which is exported from kernel32.dll. To adjust the system call path, a user-mode rootkit would find the function in kernel32.dll and modify it so when the function was called, the rootkit’s code would be executed instead of the code found in kernel32.dll. Traditionally, a rootkit would simply call the real code in kernel32.dll and filter the results before returning them to the application.
In an effort to increase the stability of the operating system, Microsoft implemented virtual addresses within each process so each user application cannot interfere with other applications executed by other users. Therefore, when an application requests access to a certain memory address, the operating system intercepts that call and may deny access to that memory address. However, because every Windows user-mode application runs within its own virtual memory space, the rootkit needs to hook and adjust the system call path in the memory space of every running application on the system to ensure that all results are filtered properly. In addition, the rootkit needs to be notified when a new application is loaded, so it can also intercept that application’s system call. This technique is different than kernel-mode hook techniques that do not require continual interception of system calls. Specifically, a kernel-mode rootkit can hook and intercept a single kernel system call and all user-mode calls will then be intercepted.
Dynamic Link Libraries
Dynamic Link Libraries, or DLLs (.dll), are the shared libraries within Microsoft’s Windows operating systems. All Windows DLLs are encoded in the Portable Executable (PE) format, which is the same format as executable (.exe) files. These libraries are loaded into an application at runtime—when the program is executed—and remain in their predetermined file location. Each DLL can be dynamically or statically mapped into the application’s memory space so the DLL’s functions are accessible by the application without having to access the DLL on disk. When a DLL is dynamically mapped, the DLL’s functions are loaded by the application during execution. An important benefit is that dynamically linked libraries can be updated to fix bugs or security problems, and the applications that use them can immediately access the fixed code. When the DLL is statically compiled into the application, the functions from the DLL are copied into the application binary. This allows programmers to link libraries while compiling and eliminates the need for additional copies of the same libraries or plug-ins.
It is important to point out one specific DLL: Kernel32.dll is a user-mode function that handles input/output, interrupts, and memory management. This DLL is significant because many people believe the DLL resides in the kernel—it does not reside in the kernel, although the name may suggest it does; it works with User32.dll in userland.
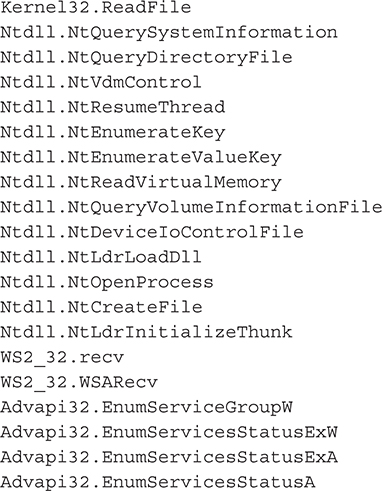
API Functions
The Application Programming Interfaces (APIs) utilized within the Windows operating system are the direct line of communication for any programming language. There are eight categories that control all system access from the Windows operating system. Table 3-1 describes these WinAPI categories, their relationships, and locations.
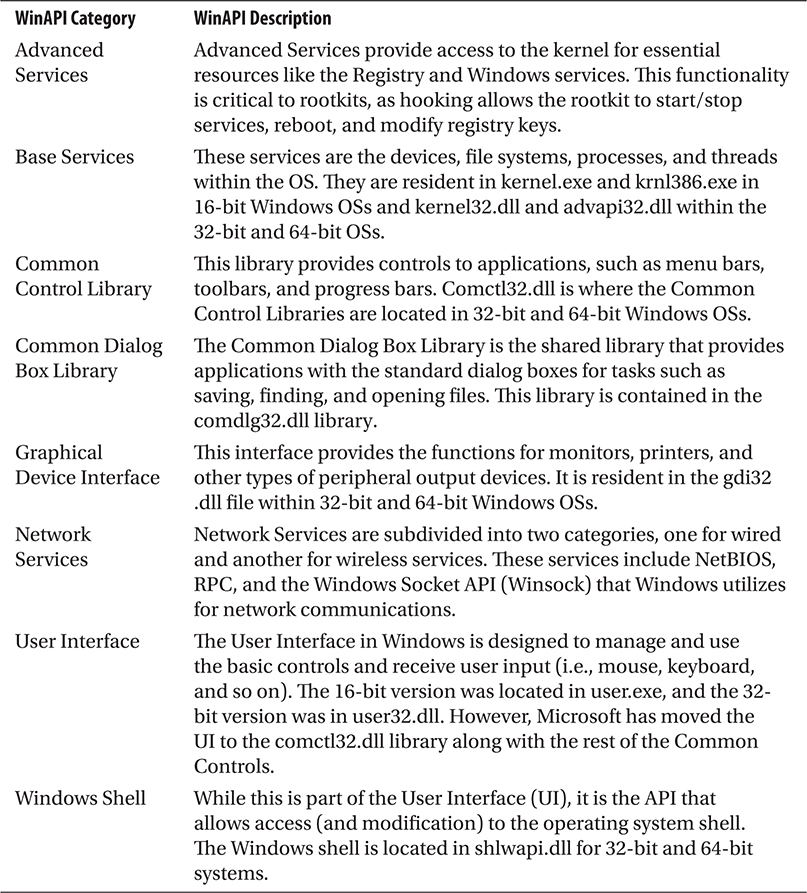
Table 3-1 Windows API Categories
In 64-bit Windows operating systems, the DLLs still carry the *32 names for compatibility reasons. For example, kernel32.dll is not named kernel64.dll in 64-bit Windows; it is still kernel32.dll even if it is a 64-bit binary. You will notice that there are two groups in 64-bit Windows: system32 and syswow64. System32 contains 64-bit binaries, whereas syswow64 contains 32-bit binaries. Syswow came from “Windows on Windows 64” that runs in user mode and maps 32-bit calls to the Windows kernel into an equivalent 64-bit call. Confusing right?
To make things clearer, there is more information on the Windows API elements, from 16- to 64-bit applications, on the Microsoft Development Network (MSDN) located at http://msdn.microsoft.com. Each of these APIs is important, as they each have functions that need to be hooked, detoured, or modified so a rootkit can function. The rootkits that are more malicious and effective will ensure they intercept functions in each class of service; otherwise, anti-detection tools may be able to determine the rootkit’s presence.
Injection Techniques
This section explains the basics of some of the more complex functions and techniques utilized by user-mode rootkits. The first step for any user-mode rootkit is to inject its code into the process where it wants to install a hook. Here, we review the injection techniques commonly used. We only focus on the basics because much complexity has been added to techniques that utilize user-mode hooks within their applications in past years, which makes giving an example of a perfect hook impossible. Enhanced antivirus, 64-bit operating systems, and managed code (which is code that runs under a virtual machine) mean each injection and hooking technique has its own pros and cons, and a single technique is not 100 percent effective on its own.
Before a rootkit can hook a function and divert the execution path of a function within a process, the rootkit must place itself in the process it wants to hook. This usually requires injection of a DLL or other stub code that makes the process execute the rootkit’s code. If the rootkit author cannot get code to execute inside the process, his or her code won’t be able to hook the function calls within that process.
So how does the DLL injection process work? There are three main ways to inject new code into a process: Windows hooks, CreateRemoteThread with LoadLibrary(), and a variation of CreateRemoteThread.
Windows Hooking
Within the Windows operating system, much of the communication for applications that have graphical interfaces happens through the use of messages. An application that is compiled to receive messages will create a message queue that the application will read new messages from when the operating system posts them. For example, within a Windows application, when you click an OK button with your left mouse button, a message named WM_LBUTTONDOWN is sent into the application’s message queue. The application will then read the message, respond to the message by performing a set of actions, and then wait for the next message. Console applications (those that do not have a standard “Windows” user interface) can also register to receive Windows messages, but traditional console applications do not handle or deal with Windows messages.
Message communication is important within Windows applications because Microsoft has created a method to intercept, or hook, these messages for all applications that a specific user runs. Although this is a Microsoft-supported interface and has many legitimate uses, it also has many questionable ones. Traditionally, these include keyloggers and dataloggers within spyware and malware applications. Because Microsoft supports this method, much documentation is available. As a matter of fact, the first article about message hooking in MSDN is dated 1993! Because this method is supported, it is extremely effective, simple, and, more importantly, reliable.
This approach has limitations, however. Traditional console applications that do not handle Windows messages cannot be hooked via this method. Furthermore, as mentioned before, the Windows hooks that are installed using this method will only hook processes that are running under the user context that installed the hook. This limitation may seem like a deal breaker but normally is not, as almost all applications a user executes run within the user’s context, including Internet Explorer and Windows Explorer, and, therefore, are not affected by this limitation.
As we mentioned, this method is very well documented so we will provide only a brief review of how it works. Essentially, a developer must create a DLL that has a function that will receive Windows messages. This function is then registered via the operating system by calling the SetWindowsHookEx() function.
Let’s look at some code. We have a DLL, named Hook.dll, that exports a function call, HookProcFunc. This function handles all of the intercepted Windows messages. Within our hooking installation application, we create the following:
Note that we did not include code to load the DLL, which would be accomplished by calling LoadLibrary(). Now that HookProc has been installed, the operating system will automatically inject the Hook.dll into each process executed by the user and ensure that the Windows messages are passed to the HookProcFunc() before the real application, such as Internet Explorer, receives them. The HookProcFunc is pretty simple:

This hook function looks to see if it was passed a message of HCBT_KEYSKIPPED, which is sent whenever a keypress is removed from the system queue of keypresses, so it will be received whenever a key is pressed on a keyboard. The hook function then checks to make sure the key pressed is a valid key, and if it was the ENTER key, it enters a new line character in the log file; otherwise, it writes the character that maps to the keyboard.
Although a very simple example, this is really all that is required to write a Windows hook-based keylogger. Using this approach, you can also capture screenshots of the desktop every time a specific Windows message is received or even turn on audio recording. Some spyware and malware have been known to capture screenshots. They will capture not only the application that was hooked but also anything else on the screen. The biggest drawback to this method is that it is easily detectable, and you can get samples of code in the wild that prevent your application from falling victim to this method.
There is another problem that occurs with most implementations of Windows hooks: the hook never seems to “take effect.” Because the operating system takes the burden of ensuring a hook is placed into a process, it needs to safeguard the reliability of the operating system by making sure the OS will not crash when the hook is installed; therefore, the hook is installed when the process receives a new message into its queue. If no message is received before the UnhookWindowsHookEx() function (which unhooks the message queue) is called, the rootkit hook will never be installed. This happens more than you might think, especially if the rootkit is very specific about the type of processes it wants to hook, the duration the target processes execute, and the implementation of the hook. To prevent this problem from occurring, the application that sets the hook should also send a "test message" to the hook it’s looking for to ensure the DLL and the hook are properly installed in the process.
CreateRemoteThread with LoadLibrary()
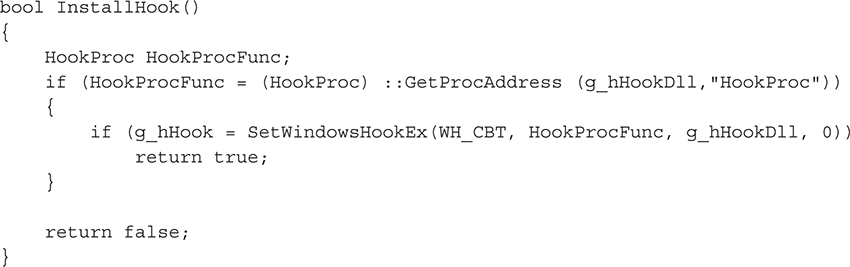
When it comes to DLL injection, there are two common methods for injecting a DLL into a process within the various Windows operating systems. The first is the function, CreateRemoteThread, which starts a new thread in a specified process. Once this thread is loaded into the process, the thread executes code within a specific DLL that the rootkit authors provide. In addition to the details we will provide here, there are thousands of examples on the Web, including some stable hooking engines that provide source code, so fire up Google to get your dose of CreateRemoteThread hooking. If that doesn’t work, our friends at Microsoft have published the thread function details within the MSDN at http://msdn.microsoft.com.
The argument for the CreateRemoteThread() contains the name for the DLL to inject, in this example, evil_rootkit.dll. In order to resolve the imports, the code executes the LoadLibrary() function (with the help of GetProcAddress()) when the thread is started in the remote process. As this code will be executing in a separate address space, we must modify the string’s reference. We accomplish this by using the VirtualAllocEx() function and writing the string to the new, usable address space. By passing the pointer to RemoteString(), the code is able to load and we can close the handle.
This code will create a new thread in the target process that was opened by OpenProcess(); that thread will then call LoadLibrary() and insert our evil_rootkit .dll into the process. Once the DLL is loaded, the thread will exit and the process will now have our evil_rootkit.dll mapped into its process space.
This injection technique will not work when you are trying to inject a DLL from 64-bit processes into 32-bit processes or vice versa, due to the Windows-on-Windows for 64-bit (WoW64) kernel. Specifically, 64-bit processes require pointers that are 64 bits so the pointer we passed to CreateRemoteThread()for LoadLibrary() would need to be a 64-bit pointer. Because our injection application is 32 bits, we cannot specify a 64-bit pointer. How do you get around this? Have two injection applications—one for 32 bits and one for 64 bits.
CreateRemoteThread with WriteProcessMemory()
The second way to inject a DLL into a process involves a little bit more stealth. Instead of having the operating system call LoadLibrary(), CreateRemoteThread() can execute your code. What you do is actually use WriteProcessMemory(), which is what we utilized to write the name of our DLL in the previous process, to write the entire set of functions into the process’s memory space and then have CreateRemoteThread() call the function just written into the process’s memory.
This approach has many obstacles, and we will work through each. First, let’s see what our process, which contains the example code we want in the target process, looks like in memory and what the target process’s memory will look like once we copy our data into the target process via WriteProcessMemory(). The code we will review for this section was written by the authors for the book.
As you can see in Figure 3-1, we must copy the data for our function into the target process. Also, any data such as configuration parameters, options, and so on, must be copied to the target as well because the NewFunc cannot access any data from the injection process once it is copied to the target process. What type of data would you copy to the target process for NewFunc?
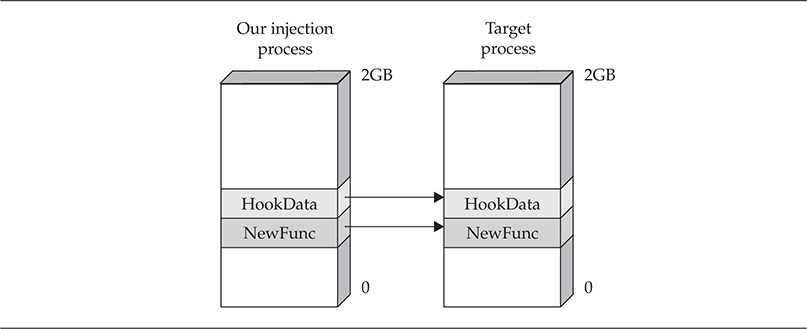
Figure 3-1 A structure to inject data into a new hooked process
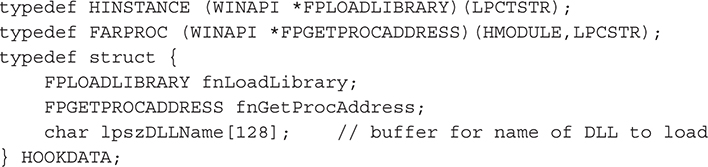
Well, one of the problems with using this method is that the code you copy to the target process cannot reference any external DLLs other than kernel32.dll, ntdll.dll, and user32 .dll because they are the only DLLs guaranteed to be mapped and accessible at the same memory address for every process. User32.dll is not guaranteed to be mapped to the same address, but usually is. Why Microsoft developers chose to always assign the same address is up for debate, but many think it is related to performance or for backward-compatibility reasons. So if you want to access any DLL functions that may not be available in the target process, you must pass a pointer to the functions you want to use, such as LoadLibrary() and GetProcAddress(). Furthermore, because static strings are stored within a binary’s .data section, any static strings that are used within NewFunc will not be copied to the target process; therefore, all strings should also be passed into NewFunc by copying them to the target process using WriteProcessMemory(). Since there is so much data to copy, we recommend creating a structure that contains everything you need to pass, so you can easily reference all the data, instead of having to constantly compute offsets and save the memory addresses of the locations where you copied the data. Here’s a structure named HOOKDATA:
Once the data you need to pass is defined and the function you want to inject is defined, you need to copy the NewFunc, which is the function that will be executed when the thread starts in the target process. To copy data from one location to another, you need to know the size of the data. You can determine the size of NewFunc either by manually disassembling the code and adding up the bytes or by using the following hack:
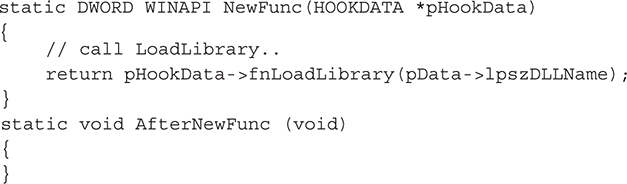
The function, AfterNewFunc, will normally be placed directly after the NewFunc code when compiled, so you can leverage the compiler and do simple math to return the size of NewFunc:
DWORD dwCodeSize = (PCHAR)AfterNewFunc - (PCHAR)NewFunc;
Now that you know the size of your code, you can copy it to the target process and create your thread!
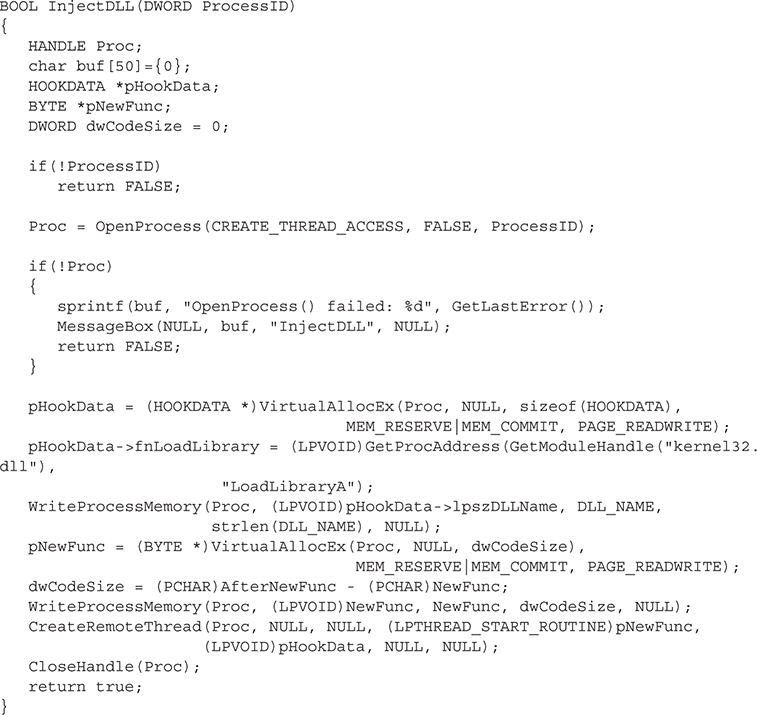
The code is currently executing in the new process that executes a function that can load your evil DLL or perform other hooking activities that we’ll talk about later in this chapter.
Advanced DLL Injection for Nonsystem Processes
Another technique to get code to execute in another process was mentioned at rootkit.com in an article by xshadow titled, “Executing Arbitrary Code in a Chosen Process (or Advanced DLL Injection).” xshadow’s research and implementation were beneficial to the updating of the injection technique in the Vanquish rootkit. More information about this can be found at https://github.com/bowlofstew/rootkit.com/tree/master/xshadow/vanquish-0.2.1.
This process is similar to the methods just described, with one exception: Instead of creating a new thread in the target process, you hijack a current thread and have it execute the code and then return to what it was doing.
The methodology works as follows:
1. Monitor the creation of new processes.
2. When a new process is created, find the thread handle of the first thread.
3. Call the SuspendThread() function on the thread handle to pause execution of the thread.
4. Change the first few assembly instructions of the thread (which would be the normal code the process wants executed) to a LoadLibrary call that will execute the code and load a DLL into the process’s arbitrary memory space.
Step 4 is the most difficult of the operations simply because the developer must know how processes execute and how the various registers within the CPU work. Let’s take a quick course on assembly to describe how to implement Step 4.
Within the x86 architecture, a small set of CPU storage areas (registers) quickly processes instructions. The registers listed in Table 3-2 are important to understand when working with assembly code and performing system manipulation.

Table 3-2 The Most Common x86 CPU Registers
The Step 4 process works in the following order to execute this DLL injection. First, we retrieve the context flags of the thread with GetThreadContext(). This information contains the information for the processor registers described in Table 3-2.
The next step is to copy the code to an arbitrary address in the process memory space. We did this in the example for CreateRemoteThread/WriteProcessMemory by finding the address of our function and copying it into the target process. We do the same thing here. There is a gotcha that you have to watch out for though. So the hijacked thread continues to execute properly, when our code is called, we need to ensure that all of the registers we described in Table 3-2 have the same value as they did before our code was executed. There is a nice assembly instruction called pushad, and its counterpart, popad, that will push a copy of all of the registers into memory and then push them back to their various values. A simple call to pushad and popad at the start and end of the function will take care of this entire problem; all we need to focus on is executing the LoadLibrary() call within our function.
Now that we have the code in the target process, we must adjust the thread’s context (which includes the next instruction to execute) to execute our code. We mentioned that we need to retrieve the thread’s context, which we can do by calling GetThreadContext(). This function returns a structure filled in with all of the context for the thread, including the various registers. Look at the header file winnt.h, included with the free Windows SDK and freely downloadable from MSDN, for the full details of this structure, as it is beyond the scope of this book.
![]()
Now that we have the context for our thread, we can adjust the values of the context with the code. First, we need to define the function that will execute the pushad/popad and our LoadLibrary() call. This is simplest in assembly, as shown in this code listing:

Note that the two memory addresses have placeholder values (0xAAAAAAAA and 0xBBBBBBBB) because they need to be replaced with the real values defined in the injection function.
![]()
Anything after a semicolon (;) is a comment and not assembly.
Because all assembly instructions can also be defined in hex, we need to convert this assembly into a series of hex characters and replace the placeholder address values. Once the values are in hex, we can place them into ASCII representation (printable characters we can put into our source code). Once we convert the assembly to hex and store the data within a variable named pbData, we have

We also included the text string EVIL_ROOTKIT.DLL at the start of the hex codes simply to make only one memory allocation within the target process instead of two (one for the string and one for the function code). Before we do anything with this code, we should get the address of LoadLibrary() and replace the 0xBBBBBBBB address in pbData with the address of LoadLibrary().
Now that we have this data (pbData), we need to allocate memory for it in the target process and copy the data to the process’s memory:

pCodeBase now contains a pointer to the memory in the target process, and it contains a copy of the assembly code and the name of the DLL. Then we simply have to update the code one final time with the proper address for the name of the DLL that we need to pass to LoadLibrary(). Recall that LoadLibrary needs a parameter with an address that exists and is accessible within the target process, which is why we made it part of the code that we copied to the target process. Because we placed the name of the DLL at the start of the copied code, we know the address where the string starts and can replace the 0xAAAAAAAA value with the address of pCodeBase. Lastly, we need to tell the thread to start executing itself at the beginning of our code, which follows directly after the name of the DLL:
![]()
Then, we set the context into the thread and replace the existing context and have the thread start and execute the code:
![]()
That is a brief explanation of an advanced DLL injection technique, but other support code is required to get this technique to work. Samples of code are available on the Web as well as the practical code implementation in Vanquish. Although this technique is quite detailed and technical, it is not present in the wild too much other than in the Vanquish rootkit. Most malware and rootkits utilize the first or second DLL injection method. This final method will also not work in a 64-bit environment unless it is rewritten to work with 64-bit offsets. Furthermore, this technique will not work on managed code (for example, .NET), as .NET takes over the thread before it can be suspended.
Hooking Techniques
Although there are several methods and techniques for hooking processes, we’ll discuss two in relation to rootkit technology. The first is Import Address Table hooking and the second is inline function hooking.
Import Address Table Hooking
This technique is fairly simple and is widely used in programming, both nefarious and benign. When an executable is loaded, Windows reads the Portable Executable (PE) structure located within the file and loads the executable into memory. The PE format, a modified Unix file format, is the name of the file format of all EXE, DLL, SYS, and OBJ files within Windows and is critical to Windows architecture. The executable will list all the functions that it requires from each DLL. As this process is dynamic, these variables need to be loaded for access prior to runtime. The Windows loader is able to populate a table of all the function pointers called the Import Address Table (IAT). By creating this IAT, the executable is able to make a single jump when each API is called to identify the memory location of the required library. This technique allows runtime performance to be fast while initial loading of an executable may be slower.
All a rootkit DLL needs to do now is change the address of a specific function in the IAT, so when the application goes to call the specific function, the rootkit’s function is called instead.
Inline Function Hooking
The second technique for hooking is referred to as inline function hooking. This technique modifies the core system DLLs by replacing the first five bytes of the targeted function with rootkit instructions. By creating a jump to the rootkit, the hooked function can control the function and alter the data return.
Hooking Engines
Since user-mode hooking has become rather prolific, many vendors utilize hooking for legitimate reasons such as licensing, data protection, and even simple application functionality. Because of these requirements, a variety of hooking engines have been developed to aid developers in producing user-mode hooks. These same engines can also be used by rootkit authors, although we haven’t seen too much of this in the wild.
EasyHook Probably the most complete and stable hooking engine, EasyHook has many capabilities that go far beyond a simple user-mode hooking engine. Here is how the author of EasyHook describes it:
EasyHook starts where Microsoft Detours ends. EasyHook supports extending (hooking) unmanaged code (APIs) with pure managed ones, from within a fully managed environment like C# using Windows 2000 SP4 and later, including Windows XP x64, Windows Vista x64, and Windows Server 2008 x64. Also 32- and 64-bit kernel-mode hooking is supported as well as an unmanaged user-mode API, which allows you to hook targets without requiring a NET Framework on the customer’s PC. An experimental stealth injection hides hooking from most of the current AV software.
What is important about EasyHook is that the author has done a very good job at ensuring the hooking capabilities are stable for injecting and removing a hook.
EasyHook has a long list of features. Here is a summary that may help you decide to make EasyHook the choice for your hooking project. Furthermore, by reviewing the source code of EasyHook (yes, it is open-source software), you can see well-coded examples of the hooking techniques described previously.
• A so-called Thread Deadlock Barrier (TDB) eliminates many core problems when hooking unknown APIs.
• You can write managed hook handlers for unmanaged APIs, for example, write hooks in C#!
• You can use all the convenience managed code provides, like .NET Remoting, Windows Presentation Foundation (WPF), and Windows Communication Foundation (WCF).
• It is a documented pure unmanaged hooking API for speed and portability.
• Support is provided for 32- and 64-bit kernel-mode hooking, including the bypassing of PatchGuard!
• No resource or memory leaks are left in the hooked process.
• A stealth injection mechanism is included that won’t raise the attention of any current antivirus software.
• EasyHook32.dll and EasyHook64.dll are pure unmanaged modules and can be used without any .NET framework installed!
• All hooks are installed and automatically removed in a stable manner.
• Support is provided for Windows Vista SP1 x64 and Windows Server 2008 SP1 x64 by utilizing totally undocumented APIs to allow hooking into any terminal session.
• You will be able to write injection libraries and host processes compiled for any CPU, which will allow you to inject your code from 32-bit DLLs into 64-bit processes and from 64-bit DLLs into 32-bit processes using similar techniques in almost all cases.
If you need to hook or want to learn the ins and outs of how to write a hook properly in user mode, definitely check out EasyHook (https://easyhook.github.io/).
User-Mode Rootkit Examples
Several common rootkits have been discovered and analyzed over the past decade; however, two “classic” examples stand out. The following sampling will provide a detailed context into how the user-mode rootkit works—and its relationship to the WinAPIs and to associated Trojans.
 Vanquish

Vanquish is a user-mode rootkit designed around DLL injection techniques in order to hide files, folders, and registry entries. It also contains the ability to log passwords. The version used for this writing is Vanquish v0.2.1, as it was lying around and we haven’t ever had any problems with it. A copy of this code is available via a quick search on Google. There are two things to remember, however: 1) Antivirus software will probably detect this package and try to quarantine or remove it, and 2) it is designed to be run with administrator privilege.
Vanquish can be run in 32-bit versions of Windows 2000, XP, and 2003 as stated by its author. There is a possibility that it will run with errors or completely fail in new versions of Windows such as Windows 7 and Windows 10, but we have not tested it in these new environments.
Components
The software package includes the following files and intended functionality. The directories of the .zip package include the Vanquish folder and the bin directory. The components of the software package are detailed in Tables 3-3 and 3-4.

Table 3-3 Description of Vanquish Installation Files

Table 3-4 Vanquish.dll Submodules, Feature Descriptions, and Affected Services Functions
Vanquish DLLs
The vanquish.dll includes submodules that perform a variety of functions once the DLL has been injected into a process. Table 3-4 provides information on the submodules, what features they provide to the Vanquish rootkit, and which Windows services functions they affect.
Put Them Together and What Have You Got…
Each of the DLL injections provides a unique service to the rootkit as they all hook independent APIs and create a new process. The DLL injection in the earlier (pre 0.1–beta9) versions of Vanquish used the CreateRemoteThread injection technique. This was modified in order to eliminate the occasional occurrence of the processes completing prior to being hooked, which was discussed previously. What good is a hooked DLL that is visible to the user? So the version that we used (v0.2.1) utilizes the advanced DLL injection described earlier in this chapter.
Vanquish is installed on the target box by running the setup.cmd batch file. This batch initiates the installer.cmd script, which will check for previous installations of Vanquish and perform the rootkit installation. The installer calls vanquish.exe to perform an advanced DLL injection of the vanquish.dll with the aid of inline function hooking.
 Vanquish Countermeasures
With user-mode rootkits, there are two basic thought processes concerning effective countermeasures. The first is preventive, effective computer security practices, and the second is reactive use of the myriad of rootkit detection tools that have become popular over the last several years. As Vanquish is about the easiest rootkit to defend against because its source code is available and it doesn’t require any advanced stealth metrics, talking about network security and defense seems prudent, so that you are less likely to be victimized by a rootkit.
Computer Security Practices
Although it should come as no surprise, the primary reason for unknowingly owning a rootkit is through system compromise. While antivirus technology has evolved over the past 30 years, great advances in firewalls, intrusion detection and protection systems, network access controls, and web monitoring have also changed the enterprise security posture. Despite the plethora of tools and technologies, however, there continues to be an ever-increasing number of compromised systems that could have most likely been eliminated by following sound computer security practices. The best technology in the world does not provide any value if users and administrators can bypass the security controls by not following proper processes or company policies.
Rootkits can easily be placed on systems through several different attack vectors such as worms, P2P, or Trojans, so using port blocking, firewalls, and web monitoring as a preventive strategy could possibly save you a lot of time removing and rebuilding infected machines. Strong password policy enforcement, elimination of group and shared accounts, and social-engineering awareness will also greatly assist in reducing the number of machines that can be remotely compromised by malware.
Rootkit Detection
Several rootkit detection tools can be used for detection and removal of different rootkits and types of rootkits, and Vanquish can be detected by all of them. The most common rootkit detection tools are listed in Table 3-5.

Table 3-5 Recommended Detection Software for User-Mode Rootkits
Hacker Defender
Hacker Defender, aka HxDef, is likely the most identified rootkit in the wild. It was developed and released by Holy Father and Ratter/29A and designed for Windows NT/2000/XP. We have not tested it on the latest versions of Windows. HxDef is a highly customizable rootkit that contains a configuration settings file, a backdoor, and a redirector. These tools make for an extremely powerful rootkit. The concept of this program is to hook key Windows APIs in order to take control of the individual functions. Once these functions are controlled, the rootkit is able to handle some of the API data calls. In the process, it is also able to handle and hide any file, process, service, driver, or registry key that is configured, making itself a nearly invisible rootkit.
Although this rootkit is detectable, as are all rootkits, HxDef has given many incident handlers, system administrators, and forensics investigators a run for their money. As we jump into the features and capabilities of this program, please note that we will be working with HxDef version 100r.
HxDef gives the user the ability to install and run as a service or to run without being a service. Running as a service allows the rootkit to continue to execute even after a reboot. HxDef can also reload its .ini file to update the program configurations and, of course, to uninstall. One caveat with using the default .ini file is that once you install the program, all the HxDef files will disappear because this is a function of the rootkit. In order to uninstall, you must know which directory you installed the program in, so make sure to document that.
To remove HackerDefender from a system, the following syntax would be used:
![]()
Once uninstalled, the user will not be able to find any instances of the HxDef100 program files.
Here is a sample of the installation from the hxdef100r directory:

Next, you install the application by running the installer:
![]()
Now all copies of HxDef (hxdef*) files are no longer viewable from system consoles or windows:

Notice the 0 bytes, which is an illusion that HxDef copies are no longer in existence.
The configuration file contains several lists that can be customized so the rootkit provides the greatest level of service. HxDef will run without any configuration changes; however, if changes are made, it is important to point out that lists must have headers, even if there is no content. Each of the configuration file lists provides great rootkit capabilities. Table 3-6 describes the configuration file lists and acceptable arguments.
Table 3-6 hxdef100.ini File Lists and Acceptable Formats
Figure 3-2 is a preconfigured sample of the hxdef100.ini configuration file. The list headings have been manipulated (list headings are inside the brackets), as well as the default values, in order to make searching for key terms like hxdef or Hidden Processes extremely difficult.

Figure 3-2. Sample of a preconfigured hxdef100.ini configuration file
Hooked API Processes
The following API processes are hooked from the rootkit upon installation. HxDef performs in-memory DLL injection of the NtEnumerateKey API through NtDll.dll via function hooking.
Backdoor
Included in the program is a basic backdoor program. The rootkit hooks several API functions connected with receiving packets through network services. When the inbound data request packet equals a predefined 256-bit-long key, the backdoor will authenticate the key and service. Once this is completed, a command shell, typically cmd.exe, is created as it was defined in the hxdef100.ini file under [Settings]. All further data will be redirected to this shell for any open port on the server, except for unhooked system services.
The program bdcli100.exe is the client to connect to the backdoor:
HxDef Countermeasures
HxDef can be extremely difficult to detect and clean from compromised machines. The common versions of HxDef can be detected by IceSword by viewing the ports screen. Other rootkit detection tools are not always successful in discovering the hooked APIs with this rootkit. Several years ago, Holy Father offered modified versions of the HxDef code for sale and named them Silver and Gold. These for-pay versions included support for the code and custom modifications for specific situations where additional stealth or antivirus evasion was required. These versions have not become widely detected in the wild, so detection may be more difficult. The one copy that was examined in writing this chapter was detected with IceSword.
Summary
This chapter has provided an introduction to rootkits in general, along with several computing terms and functions that rootkits rely on in order to manipulate computer systems.
We have covered the major features of rootkits:
• Maintain access
• Conceal existence
We also covered the types of rootkits, namely
• User-mode rootkits
• Kernel-mode rootkits
In this chapter, we focused more on user-mode rootkits. The first type of rootkit covered showed how user-mode rootkits function in the userland space and how they use DLL injection and process hooking to take over systems. Although not the most complex or damaging type of rootkit, user-mode rootkits can still severely affect users. As rootkit developers needed to ensure that their rootkits stayed on the attacked machine longer and filtered all types of processes, including system processes, they started to focus on using kernel-mode rootkits to implement the functionality of their user-mode rootkits. These kernel-mode rootkits are much more effective at providing stealth for malware and are much more difficult to detect. In the next chapter, you’ll learn more about kernel-mode rootkits.