
CHAPTER 10
ROOTKIT DETECTION
Knock, knock, a guest raps on the door of your house. You open the door and tell the guest, “No one is here.” The guest says, “OK,” and leaves. Seems a little odd right? Well, that’s a metaphor for rootkit detection. You see, rootkit detection is an oxymoron. If a rootkit is doing its job properly, it controls the operating system or application completely and should then remain hidden from anything attempting to discover it.
For example, the majority of kernel rootkits should be able to prevent every major rootkit detection technology that operates in userland from working properly because the kernel controls what data is passed into userland. If a rootkit detector running as a normal user application attempts to scan memory, the rootkit running in the kernel can detect this and provide fake memory for the rootkit detector to analyze (for instance, telling the rootkit detector that “No one is home”). This sounds easy, but actually implementing anti-rootkit detection functionality is much harder for the rootkit author to implement than writing the rootkit itself so many don’t bother. The lack of available source code, the number of rootkit detection tools, and time are all factors that make anti-rootkit detection functionality pretty much nonexistent in the wild. The fact that implementing anti-rootkit functionality is so complex and difficult plays in the good guys’ favor—the white hats—because most of the time we can win the battle and detect and remove the rootkit.
The Rootkit Author’s Paradox
What’s interesting about rootkits is that, by nature, they’re paradoxical. The rootkit author has two core requirements for every rootkit he or she writes:
• The rootkit must remain hidden.
• The rootkit must run on the same physical resources as the host it has infected; in other words, the host must execute the rootkit.
If the OS or, in the case of a virtual rootkit, process/machine must know about the rootkit in order to execute it, then how can the rootkit remain hidden? The answer: most of the time, the rootkit can’t remain hidden.
You must remember that rootkit detection, like all malware detection, is an arms race, and the arms race is advanced by each opposing side as needed. As new rootkit techniques are employed, researchers from different security vendors come up with solutions to reveal the presence of the malware being hidden by the rootkit. To get ahead of the arms race, researchers don’t wait for the next rootkit technology to be discovered. The researchers themselves find ways to root a system and formulate a solution for it. This falls under the umbrella of advanced projects, in which new technology and advances in hardware and software are analyzed for possible holes that a rootkit can take advantage of.
A Quick History
With every arms race, knowing where you’ve been so you can understand where you’re going is important, so a quick history of rootkit detection is in order. The first attempts to find rootkits didn’t involve detection. Instead, they involved prevention. Anti-rootkit technology focused on preventing malicious kernel drivers or userland applications from executing or being loaded by the operating system. Of course, this approach worked until the rootkit authors started analyzing how the applications prevented the rootkits from loading and developed new ways to load the rootkits.
For example, the Integrity Protection Driver (IPD) prevented kernel-mode rootkits from loading by hooking the functions in the System Service Dispatch Table (SSDT)—NtOpenSection and NtLoadDriver—and ensuring only predetermined drivers could call those functions. If a rootkit attempted to load and it wasn’t in the predetermined list, the rootkit would be prevented from loading.
This approach had two initial problems. First, it relied on an initial “clean” or “pristine” baseline to create the predetermined list of allowed drivers. Second, rootkit developers, such as Greg Hoglund, found ways to circumvent the IPD by using ZwSetSystemInformation to load the driver. The IPD authors immediately updated their tool, but so many new methods continued to be published on how to bypass the IPD that it has become relatively ineffective.
IPD’s approach to preventing unknown or unapproved software from loading was to employ the whitelist technology used by many personal firewall companies. All of the problems of whitelisting technology were also apparent within IPD and IPD-like applications. One of the major issues with the whitelisting approach is that the detection application must hook or analyze every possible entry point that an unknown kernel driver (e.g., rootkit) can use to load. The latest version of IPD has over eight different entry points, not including the number of use cases those eight entry points are connected to. For example, the Registry can be used to load kernel-based rootkits. The Registry, however, uses symbolic links, where one name actually references another name, to enable certain functionality; this means that whitelisting applications must realize that the HKEY_LOCAL_MACHINE in the Registry is not the same as in the kernel. The kernel will receive RegistryMACHINE instead. Multiply the possible registry/filesystem symbolic links by the number of entry points to be monitored, and you can see what a daunting task it is for an anti-rootkit developer!
A new type of whitelisting then emerged that still had the same problems as the existing technique but was much more accurate—cryptographic signing. In this technique, the kernel was asked to execute a process, but before the kernel executed the process, it verified with a key authority that the unique key located within the process was okay. Similar to how SSL encryption works within your web browser, this technique would effectively not allow any unknown applications from accessing the computer hardware, therefore not allowing malware to even execute!
Because the whitelisting approach was very time intensive, developers moved to a tried-and-true method—signature-based detection. Many of the first public rootkits, and even more common rootkits from the past decade, are easily detected by signatures. Signature-based detection is a process whereby an application stores a database of bytes, strings of bytes, and combinations of bytes that, when detected within a binary, mark the binary as malicious. For example, if the binary contained the hex string 0xDEADBEEF at position 1145 in the file, then the binary may be considered malicious. Although rudimentary, this method has been the primary antivirus and anti-rootkit detection method for years. This is why it is important to identify the rootkit code being employed to subvert a system. With this information in hand, identifying a rootkit via signature is easy. Whereas the first few signature systems were extensions of antivirus technology that relied on signature matching of files in the file system, new techniques use memory signatures to identify malicious code executing on the system. The process works rather well for public rootkits because their binaries are available for the analysts who can make binary signatures to review. Private, custom-written rootkits will not be detected by signature-based systems until analysts get ahold of the binaries so they can create signatures to catch it in the future.
Once signature-based systems started to be bypassed, a new set of approaches were developed. Commonly referred to as either crossview or tainted view, the majority of the current rootkit detection applications use this new technique. The tainted-view approach works by comparing different snapshots of the system such as the type of processes running, the hardware installed on the machine, or the names and numbers of functions required to execute a specific system task and seeing where a difference occurs. The assumption is that the view of data executed one way won’t match the view of the data when executed a different way if a rootkit is on the system. The view by the user is considered the tainted view. The view seen by the hardware is considered the clean or trusted view. For example, the rootkit detector takes a snapshot of the processes that are currently running according to the userland APIs; this is the tainted view. The rootkit detection tool would then take a snapshot of the processes running according to the internal threading structures in the kernel that control process execution; this is the clean view. Next, the rootkit detector compares these two snapshots and generates a list of processes in the clean view that are not in the tainted view. Those processes are considered hidden and, therefore, malicious and should be investigated by the rootkit detector operator. Figure 10-1 illustrates this comparison.

Figure 10-1 Tainted view versus clean view
The tainted-view approach works whether you are comparing files, processes, registry keys, structures within memory, or even areas of memory such as those used by the operating system’s internals. When this approach was first developed, it was very powerful and detected many rootkits. Almost all of the rootkit detectors available today employ the tainted-view technique as their main method for discovering rootkits. The differences among the various rootkit detectors are the methods used to implement the clean view and the steps the detectors take to ensure the clean view or the detector itself hasn’t been tampered with. Although we refer to this method as the tainted-view approach, others refer to it as the cross-view or clean/un-clean view approach. Regardless, the methodology is the same.
The tainted-view approach has a major flaw that some rootkits take advantage of, however. The tainted-view concept works based on the supposition that the lower-level clean view will report different data and that the rootkit cannot control the data returned by the technical processes that produce the clean view. You know from Chapters 4 and 5 that advanced rootkits, such as kernel rootkits and virtual rootkits, essentially control everything but the actual scheduling of processing time within the system and can return any type of data to a user-mode application.
As previously discussed, there are many ways to hook a rootkit in kernel or user mode. Here are a few that we’ve discussed:
• The Hypervisor
• System Service Dispatch Table (SSDT)
• Inline function hooks (detours)
• I/O Request Packet (IRP) handlers
• System boot loader
Each of these techniques has various issues that make detection either easy or hard when implementing the tainted-view detection approach.
One of the first rootkit detection tools to utilize a tainted-view approach was Patchfinder by Joanna Rutkowska. Patchfinder assumed that most rootkits needed to extend or modify an execution path to accomplish their goals. Say the standard list of functions executed by the operating system to open a file was kernel32.OpenFile() followed by ntdll .NtOpenFile(), which then switched to the kernel function ZwOpenFile. Patchfinder first totaled the number of instructions required to perform this operation and then attempted to detect changes in the execution path for a specific function or functions within a kernel driver, because an increasing number of instructions was a good indicator that a rootkit was installed on the system.
Returning to our example, if kernel32.OpenFile() was hooked and the rootkit added 128 more bytes of instruction, then Patchfinder would find the difference in the sizes of the execution paths and issue an alert that the machine might be compromised. Patchfinder operated by taking a baseline at system boot of all the kernel drivers in memory and counting the number of instructions contained in each driver’s specific execution path, commonly referred to as execution path analysis. Patchfinder did this by utilizing the debug registers within the CPU to watch each instruction execute in the CPU. Often called single stepping, this debugging technique was commonly used by developers when testing software. Patchfinder would then periodically rescan the system and compare the number of instructions recorded during the baseline to the latest scan. This approach worked fairly well, but because Windows was a dynamic and extendable operating system through using file-system filter drivers and network drivers such as firewalls, legitimate cases occurred in which an execution path changed and a rootkit was not actually installed. To counteract these situations, Patchfinder used statistics to determine whether the additional instructions were legitimate or not. The statistical approach worked, but false positives still got through, and Patchfinder could be easily defeated by rootkits that were written to detect when they were being traced or “single-step” debugged, a process developers use to walk through each instruction executed by a program or driver.
Details on Detection Methods
Before we dive into the tools and applications that are available to detect rootkits, we want to spend some time dissecting how the various tools implement tainted-view detection against the many hooking methods available to a rootkit developer. To learn how to write your own rootkit detector using these detection methods, see the Appendix, where we walk you through developing your own rootkit tool. We purposefully minimized the amount of programming code in this chapter in order to illustrate the concepts and not just fill up pages with source code. If you want to dive directly into the source code, read this section and then turn to the Appendix.
System Service Descriptor Table Hooking
One of the simplest and most used techniques, System Service Descriptor Table, or SSDT, hooking, is fairly easy to detect, and almost every tool available detects SSDT hooks. In Chapter 4, we discussed how SSDT hooking works and mentioned that SSDT hooking became the most commonly used method simply because of how easy it is to implement. The Windows kernel keeps a table of all functions that are exported for use by drivers. A rootkit author simply needs to find this table and its shadow version, which is used by the GUI subsystem, and replace the pointer in the table that points to the real location for the kernel function with the rootkit’s version of the kernel function. By replacing that pointer in the KiServiceTable, which stores the address of all kernel functions within the operating system, the rootkit author changes the overall flow of memory within the table. For example, if you use WinDBG to look at the structure of a normal KiServiceTable, you’ll notice a trend:
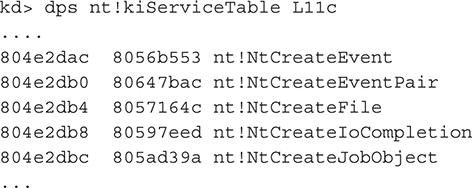
You can see that all of the functions are generally in the 0x80000000 range. Now, look at what happens when you install a rootkit that uses SSDT hooking:

You can see that nt!NtCreateFile, which was located at address 0x8057164c, has been replaced by a function with a new address that cannot be resolved by the debugger. The new address is 0xf985b710, which is hex notation for the byte at decimal 4,186,289,936. That address definitely does not fall in the 0 to 0x80000000 (2,147,483,648) range.
Most SSDT hookers use that simple logic by finding the lowest and highest pointer values in the table that properly map to the addresses found in ntoskrnl.exe. If a function pointer address in the table falls outside that range, you have a good indicator that the function is hooked.
IRP Hooking
The method for detecting IRP hooking is the same as for detecting SSDT hooking. Each driver exports a set of 28 function pointers to handle I/O request packets. These functions are stored within the driver’s DRIVER_OBJECT, and each function pointer can be replaced with another function pointer. As you can guess, this means the DRIVER_OBJECT acts very similarly to KiServiceTable. If you scan the DRIVER_OBJECT and compare each function pointer address to see if that address falls within the driver’s address range, you can determine if the function pointer has been hooked for that specific IRP.
Inline Hooking
Inline hooking, or detours, is the process of rewriting the first few instructions for a function with other instructions that cause a jump to a rootkit’s function. This method is preferred to replacing a function pointer address, as you can see how simple it is to detect those. Although preferred, this method of hooking is not always easy or even possible. Nevertheless, the process for detecting whether a function has been detoured is the same as the process for detecting SSDT hooking.
The anti-rootkit tool will load the binary that contains the function that could be hooked and stores the instructions for the function. Some rootkit detection defense tools will only analyze the first X number of bytes to improve speed. Once the real function’s instructions are stored, the instructions that are loaded into memory are compared to the real function’s instructions. If there are any discrepancies, this may indicate the function has been detoured.
Interrupt Descriptor Table Hooks
The Interrupt Descriptor Table (IDT) is hooked in the same way as the SSDT and IRP hooking methods. The table has a set of function pointers for each interrupt. To hook the interrupt, the rootkit replaces the interrupt with its own function.
Direct Kernel Object Manipulation
Direct Kernel Object Manipulation (DKOM) is a unique hooking method because the author manipulates objects in the kernel that may change between service packs or even patches released by Microsoft. Detecting modified kernel objects requires understanding what type of objects you want to detect. For example, rootkits will frequently use DKOM to hide processes by adjusting the EPROCESS structure and removing the process they want to hide from the process list.
To detect a hidden process that uses DKOM, you have to look at the other places where the information you require may be stored. For example, the operating system usually has more than one place for storing information such as processes, threads, and so on, as many different portions of the operating system require this information. Because of this, if the rootkit author only removes the process from the EPROCESS list, the anti-rootkit author can check the PspCidTable and compare the Process IDs (PIDs) from the two lists, searching for discrepancies.
IAT Hooking
Hooking doesn’t just happen in kernel mode. User-mode hooking occurs frequently and is quite easy to implement. One of the more prominent user hooks is the IAT hook. IAT hook detection is straightforward. First, rootkit detectors find the list of DLLs that a process requires. For each DLL, the detector loads that DLL and analyzes the imported functions and saves the import addresses for those DLL functions. The rootkit detector then compares that list of addresses with the imported addresses being used by all of the DLLs within the process being examined. If the detector finds any discrepancies, this indicates the imported function may be hooked.
Legacy DOS or Direct Disk Access Hooking
Another detection method uses legacy DOS or Direct Disk Access with assembly instructions. The concept is simple; it assumes that a modern rootkit manipulates modern structures to hook and hide itself. Thus, by employing older methods to read files, you can identify whether certain files are hidden. For example, most rootkits are accompanied by files to persist their code through reboots. This detection method makes this assumption—that a file is present as either the main rootkit code or as part of it. Using INT 13, which is associated with reads from the HDD itself, allows the detection technology to list the directory structure, and when comparing it with the modern method of determining directory structure (i.e., Windows APIs), discrepancies may pop out. If the files are determined to hide, then this method allows you to either scan that file with signatures and/or inform the user that a “potential rootkit” may be present.
Remediation usually just involves moving or neutralizing the hidden file and then performing a reboot. After the reboot, the rootkit will no longer protect the associated files, placing them at the mercy of the signature-based scanner to identify and delete, along with associated registries.
Windows Anti-Rootkit Features
Windows certainly has its flaws, but to its credit, Microsoft has invested significant resources in securing and hardening its operating systems since Windows XP Service Pack 3, Vista, and all the way up to the latest version of Windows, Windows 10. In fact, Microsoft even has a System Integrity Team Blog located at http://blogs.msdn.com/si_team/. Although the latest post is dated 2008, it still contains lots of useful information. In 2005, Microsoft unveiled a new suite of technologies, starting with SDL and continuing today with Microsoft Edge, that supports advances in system integrity. These technologies are
• Secure Development Lifecycle (SDL) Windows Vista was the first operating system released by Microsoft to use SDL, which was essentially a modification to Microsoft’s software engineering process to incorporate required security procedures.
• Windows service hardening Microsoft claims to run more of its core services using restricted privileges, so if malware or rootkits take over the service, the operating system will prevent privilege escalation.
• No-execute (NX) and address space layout randomization (ASLR) These two techniques were mainly added to help prevent buffer overflows, an exploit technique that rootkits sometimes use.
• Kernel patch protection (KPP) Better known as PatchGuard, KPP prevents any program from modifying the kernel or kernel data structures such as the SSDT and IDT. This development was a major blow to rootkit authors and antivirus vendors alike. KPP is only enforced on 64-bit systems.
• Required driver signing On 64-bit systems, all kernel-mode drivers must be digitally signed by approved entities or they will not be loaded by the kernel.
• BitLocker drive encryption Primarily considered a full-disk encryption solution, Microsoft also considers it a component of overall system integrity because it possesses an operation mode that communicates with a trusted key stored in a hardware TPM.
• Authenticode Microsoft introduced this application signing service to allow vendors to sign their applications so the kernel can check the provided hash at runtime to ensure it matches the Authenticode signature.
• User Account Control (UAC) This technology enforces industry best practices for regular user accounts such as least privilege and limited roles.
• Software restriction policy This term is fancy for software control on an enterprise via Group Policy. Simply put, if, in Group Policy, an administrator has not approved the installation on the system of a certain piece of software, the software will not install.
• Microsoft Malicious Software Removal Tool (MSRT) This is Microsoft’s anti-malware product that uses traditional signature-detection techniques.
• Microsoft Edge The new evolution of Internet Explorer was introduced by Microsoft in Windows 10. It boasts of all the security features included in the latest version of Internet Explorer and more.
Microsoft’s introduction of these technologies proved to be a landmark in their history, as they represented the first major commitment of resources and marketing to directly address rootkits, malware, and operating system security in general.
Windows 7, 8, and 10 have employed additional methods to increase security in these systems. For example, starting in Windows 10, User Protection Always-ON (UPAO), which is part of the Windows Security Center (WSC), now requires that systems have antivirus, anti-spyware, and a firewall enabled at all times, and WSC will enable Microsoft Defender and Windows Firewall automatically if no similar protection exists. Another functionality introduced by Microsoft in Windows 8 is ELAM, or Early Launch Anti-Malware, a feature that antivirus vendors that pass certain criteria can use for loading and scanning before any other kernel elements can establish themselves, including rootkits.
Software-Based Rootkit Detection
Many anti-rootkit applications are available on the Internet now. All of the major commercial antivirus vendors integrate anti-rootkit products with their tools or provide them for free. When the anti-rootkit applications were first released, they focused mostly on proof-of-concept ideas to help solve detection problems. For example, VICE is a free tool that detects hooks by resolving function pointers in the kernel’s SSDT or in user mode and ensuring they point to the proper application. For example, if a resolved address from the SSDT points to test.sys when it should point to ntoskrnl.exe, a rootkit might be hooking that function. How do you know whether a specific entry in the SSDT points to ntoskrnl.exe or not? You simply iterate through the list of drivers registered with the OS and compare the function pointer address within the SSDT entry to the driver’s base and end address. If the value in the SSDT is within that range, then it is located in that driver. If you don’t find a driver with that address, it’s probably a rootkit.
When VICE was first released, it was one of a kind because it implemented a new technique that no one had seen before: it detected both userland and kernel hooks and could discover normal IAT hooks, inline function hooks, and SSDT hooks; however, VICE was complex, not very user friendly, and didn’t clean any rootkits it found. The majority of the applications discussed in this section are similar to VICE. Very few tools available today have risen to the level that an end user can employ the tool effectively. Many tools are still very difficult to understand, cause many false positives, and fail to clean up or quarantine properly, which causes the end user more grief.
Software-based rootkit detectors are beneficial when used together with other software-based rootkit detectors and with certain directions. For example, one tool will detect something that another tool does not or one tool may partially remove an item but another will remove it more thoroughly by removing additional files or registry keys. Running each of these tools (as most are free) is the best method for detecting and removing rootkits properly. We recommend using tools that are highly rated by industry magazines, industry experts, or security companies. But be wary, because having all of these running in the background to protect the system may affect system performance. A good balance has to be achieved. As this can be different for each system, experimentation is highly recommended.
When it comes to tackling rootkits, it is important to understand the various tools that have been developed to combat rootkits. Each tool offers different perspectives on how to detect the presence of a rootkit in a system.
Live Detection vs. Offline Detection
Before discussing the tools available for rootkit detection, we need to explain the context of the analysis being performed. In the digital forensics world, the terms live and offline indicate whether the analysis is performed on the suspect system or a duplicate of the suspect system in a lab. Live forensics involves performing analysis at the same time evidence is collected—while the system is powered on, running, and in a state where the memory can be gathered. Live systems also allow you to collect much more robust data in that the malware or rootkit is still running and can respond to stimuli such as reading from a directory or writing a file to the disk. That data also includes changes in system memory that can be captured during a live analysis. Offline analysis, often referred to in the forensic world as deadbox forensics, involves first collecting digital evidence in a live environment but then analyzing that evidence on another machine.
The important distinction here is where the analysis is done. If it is done on the suspect system in a live manner, then the malware has a chance to taint the evidence and thereby taint the analysis. As we’ve discussed, rootkits can easily hide their processes from command-line tools like netstat, which lists incoming and outgoing network connections, routing tables, and various network-related statuses. Thus, if a forensic examiner relies on running netstat on the suspect machine with a rootkit on it, chances are high the analysis will be incorrect or be purposefully misguided.
Rootkit detection falls victim to the same limitations as forensic analysis: live detection can almost always be defeated by resident rootkits. Thus, this concept of live versus offline has some bearing on the choice of methodologies used by the rootkit detection tools discussed in this section (some tools take a hybrid approach). The live versus offline debate is also a focal point in the arms race discussion because successful rootkit detection ultimately relies on one issue: which one gets installed or executed on the system first. Furthermore, offline analysis is much more difficult to implement because you don’t have the benefit of the operating system to help analyze structures, access data types, and so on. All of the functions that the operating system performs must be re-created in a tool to enable the offline analysis to resemble live analysis.
System Virginity Verifier
The System Virginity Verifier (SVV) is a tool written by Joanna Rutkowska that implements a unique method to determine if a rootkit is on a system. SVV checks the integrity of critical operating system elements to detect a possible compromise. Because each driver and executable on a system is composed of multiple data types, SVV will analyze the code portion of the binary, which contains all of the executable code such as assembly instructions, and the text section of the binary, which contains all of the strings such as module names, function names, or the titles of buttons and windows. SVV will analyze and compare the code and text sections of kernel modules that are loaded into memory with their physical representation on the file system, as shown in Figure 10-2. If a difference is detected between the physical file and the image, or a copy of that file is detected in memory, SVV determines the type of change and generates an infection-level alert. The infection level helps the user identify the severity of the modification and determine whether that modification is malicious.

Figure 10-2 System Virginity Verifier compares drivers on disk to memory.
Although the tool was last updated in 2005 and must be run from the command line, the tool is still effective and used for experimentation purposes and can aid users who are technical enough to understand the output generated. Furthermore, SVV also demonstrates some of the problems that rootkit detection tools encounter such as reading memory in kernel mode for other kernel- and user-mode applications. Reading memory seems like a simple operation but a couple of items cause problems:
• Use of __try/__except will not protect the system from page faults in nonpaged memory.
• Use of MmIsAddressValid() will introduce a race condition and is unable to access swapped memory.
• Use of MmProbeAndLockPages() may crash the system for various reasons.
What does this mean? Essentially, for any application, accessing memory that it does not own, even in a read-only situation, is unreliable. This fact makes it very difficult to analyze rootkits loaded into memory reliably. The only dependable method for analyzing memory is to perform an offline dump of the memory.
IceSword and DarkSpy
IceSword and DarkSpy are also tainted-view approach detectors, but they require a high amount of user interactivity. For example, analysis of the current running processes and loaded kernel modules can be refreshed by the user when the environment changes, such as when the user opens a web browser (see Figure 10-3). Although these tools are quite accurate and detailed, they are difficult to use and require a high level of skill. IceSword is used by people during forensic analysis of live machines and to dive into how unknown malware functions.

Figure 10-3 List of loaded kernel drivers report by IceSword
IceSword is unique in that it allows the user to look at the system in a couple of different ways in order to determine if a rootkit is present. As shown in Figure 10-4, instead of automatically trying to determine if there is a difference in the tainted view versus the trusted, or clean, view, IceSword allows the user to actually browse the file system or Registry to see the difference.

Figure 10-4 IceSword allows you to find the information hidden by rootkits.
As you can see in Figure 10-4, the Registry cannot see the key named rootkit, but IceSword can see it through its interface to the Registry. Manually comparing the Registry using one function call with another function call requires a deep understanding of where rootkits may place registry keys or files. The use of alternative data streams in NTFS or advanced registry hiding methods may defeat IceSword, however.
In addition to IceSword’s manual nature, Figure 10-4 illustrates some of the advanced techniques that IceSword employs to ensure rootkits cannot hide. For example, the title of the window shown in Figure 10-4 is “zqxo110387,” which is a random value created by the application. IceSword will randomly create new names for its window titles and files, and it randomizes other areas of its executable file to remain a step ahead of the attackers.
IceSword is not perfect, and even with manual review, a rootkit can avoid detection. In Figure 10-5, IceSword lists the kernel modules loaded into memory; however, rootkit.sys, which is the rootkit we installed for this example, is not listed even though we know it’s running, because the rootkit has hidden itself from the Registry.

Figure 10-5 IceSword, although powerful, doesn’t detect this rootkit.
RootkitRevealer
RootkitRevealer was one of the first user-friendly tools released. Written by Bryce Cogswell and Mark Russinovich of SysInternals, which was acquired by Microsoft, RootkitRevealer used a cross-view approach and focused only on the file system and Registry. Although this tool has been phased out by Microsoft, it is still a good tool to use to identify and learn more about rootkits.
This tool is fast, simple, and effective. A user simply runs the utility, selects File | Scan, and waits a minute or so for the system to be analyzed. For example, in Figure 10-6, even though RootkitRevealer does not scan for loaded kernel modules, it quickly detects both the hidden registry keys and the files being hidden by the rootkit.
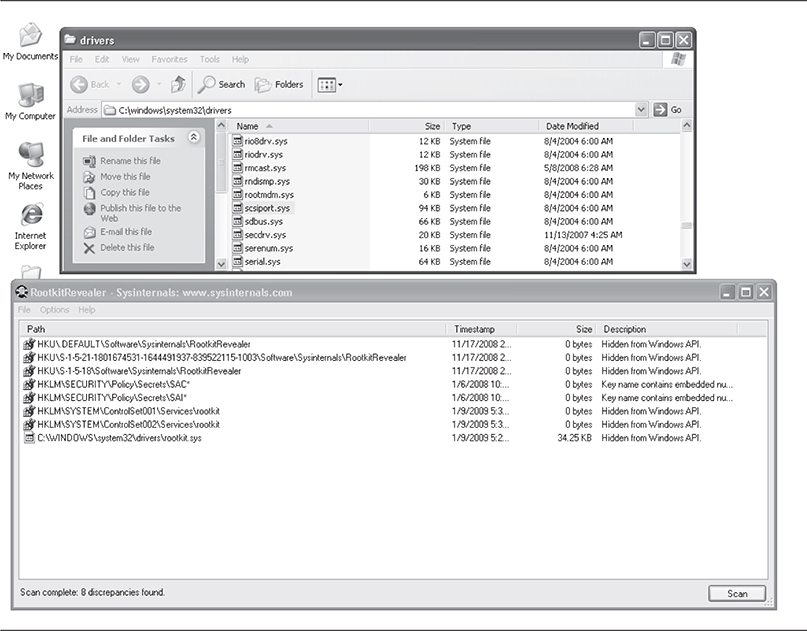
Figure 10-6 RootkitRevealer can help you find the rootkits that keep themselves hidden.
F-Secure’s BlackLight Technology
F-Secure’s BlackLight technology implements the tainted or cross-view approach mentioned earlier and was the first tool to do this and provide a simple, clean, and friendly user interface. Although BlackLight has been bypassed by rootkits that are written to avoid or bypass detection schemes that rely on the tainted-view approach, BlackLight is still useful because you can “quarantine” hidden files by renaming them and rebooting, which should prevent the rootkit from loading. One drawback is that you can’t rename the files themselves as BlackLight handles this automatically. Figure 10-7 gives an example.
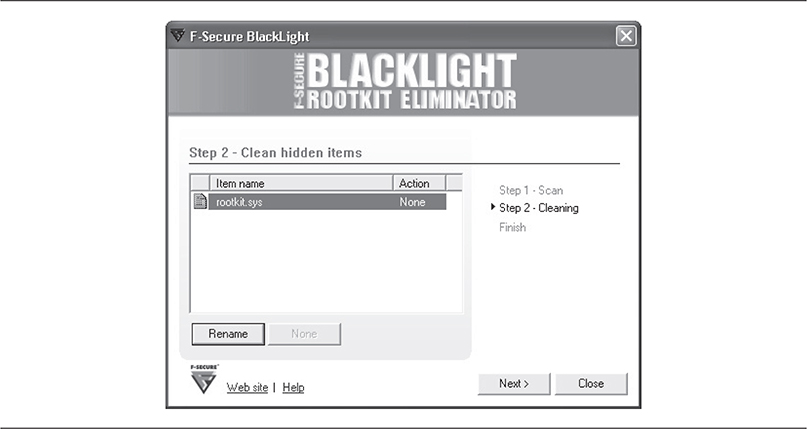
Figure 10-7 Blacklight: a simple but effective interface reduces the number of decisions the user needs to make.
What makes this tool special is that when it was first released, BlackLight used a novel approach to detecting DKOM rootkits that hide processes. Instead of simply relying on a different view of the process list such as PspCidTable, BlackLight brute-forced every possible PID and tried opening the PID with the OpenProcess() function. If the OpenProcess()succeeded and the PID was not in the PspCidTable or EPROCESS list, the process had most likely been hidden on purpose.
As the arms race has intensified and rootkit developers have found new ways to bypass BlackLight and other rootkit detection tools, F-Secure has changed its underlying algorithms and approach. F-Secure BlackLight is now merged into F-Secure’s protection technologies so there is no need to have this rootkit detection engine as a separate tool.
Rootkit Unhooker
Although Rootkit Unhooker was last updated in 2007, it can still be used to test existing and new rootkits and as an experimental tool to help you better understand how rootkits work. Rootkit Unhooker is a tool for advanced users, however. Its functionality is deep and broad, although not as broad as GMER, a tool we will discuss next. Rootkit Unhooker allows the user to peer into the system in a variety of ways, including viewing the SSDT, Shadow SSDT, low-level scans of the file system by accessing the hard drive directly instead of through the OS, process tables, and so on. As you can see in Figure 10-8, Rootkit Unhooker was able to find the hooks placed in the TCP/IP stack by the rootkit.
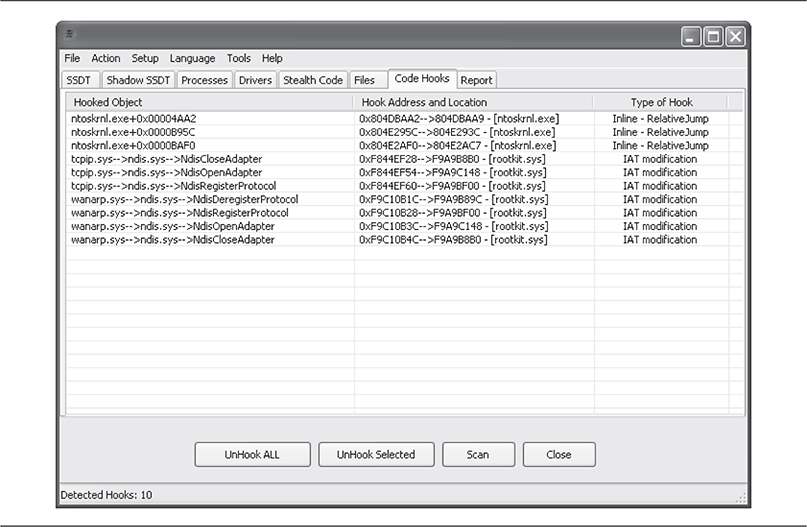
Figure 10-8 Rootkit Unhooker, not for the faint of heart, requires a deep understanding of the operating system.
By simply right-clicking and selecting UnHook Selected, you can remove the rootkit’s TCP/IP filtering. Figure 10-9 shows the rootkit disabled and the code hooks removed. Being able to quickly remove the rootkit’s capability to continue to operate even without removing the rootkit itself reduces the impact of an infection dramatically. Furthermore, the Rootkit Unhooker helps with forensic investigations in which the researcher is trying to determine each and every type of functionality within a rootkit. In this case, the researcher may want to disable the hooks but still keep the driver in memory for analysis.
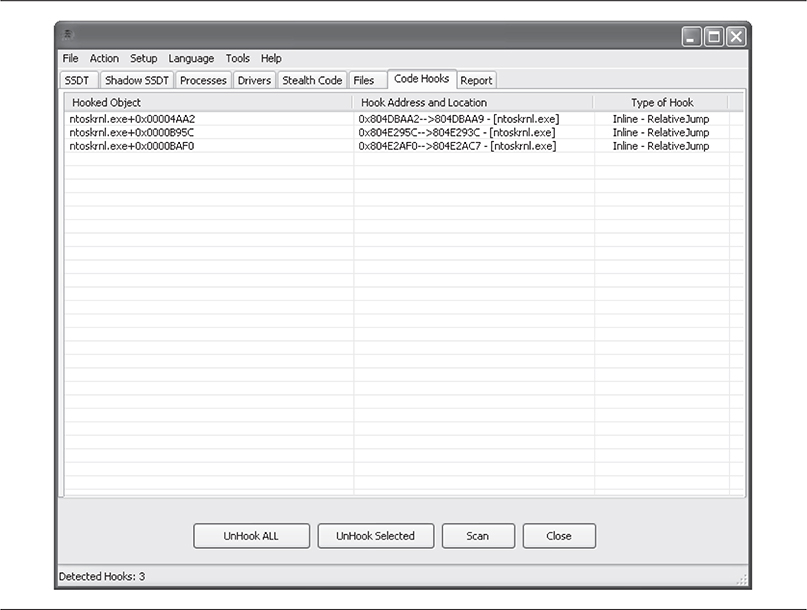
Figure 10-9 Even uncommon hooking techniques can be detected by Rootkit Unhooker.
In addition to the removal methods that disable or remove an infection, Rootkit Unhooker provides the capability to cause a blue screen of death (BSOD). This is important; a forensic investigator may want to hook up debugging software such as WinDBG via serial port or USB to the machine and, by forcing a BSOD, obtain a copy of all memory at the time of the crash. The investigator can then do an offline memory analysis to learn more about the rootkit.
![]() Although Rootkit Unhooker is complex and feature rich and very verbose in its output, it is unstable and will cause a BSOD on some machines when you try to close the application or perform some of the malware removal operations such as unhooking a function or wiping a file. Causing BSODs while on a live system with real disk activity may render the system unbootable.
Although Rootkit Unhooker is complex and feature rich and very verbose in its output, it is unstable and will cause a BSOD on some machines when you try to close the application or perform some of the malware removal operations such as unhooking a function or wiping a file. Causing BSODs while on a live system with real disk activity may render the system unbootable.
GMER
GMER is the tool for the sophisticated, though not expert, user. It provides pretty much every possible type of rootkit detection methodology into a single tool. GMER also provides limited cleanup capabilities. Furthermore, it is updated frequently, it is supported by the community, and many anti-rootkit advocates recommend it to users who are trying to determine if their system is infected. Specifically, GMER starts scanning the system immediately when launched. GMER looks for hidden files, processes, services, and hooked registry keys. GMER has all the features of every other rootkit detection tool and automates their use. Figure 10-10 shows an example of GMER first loading without any user interaction.
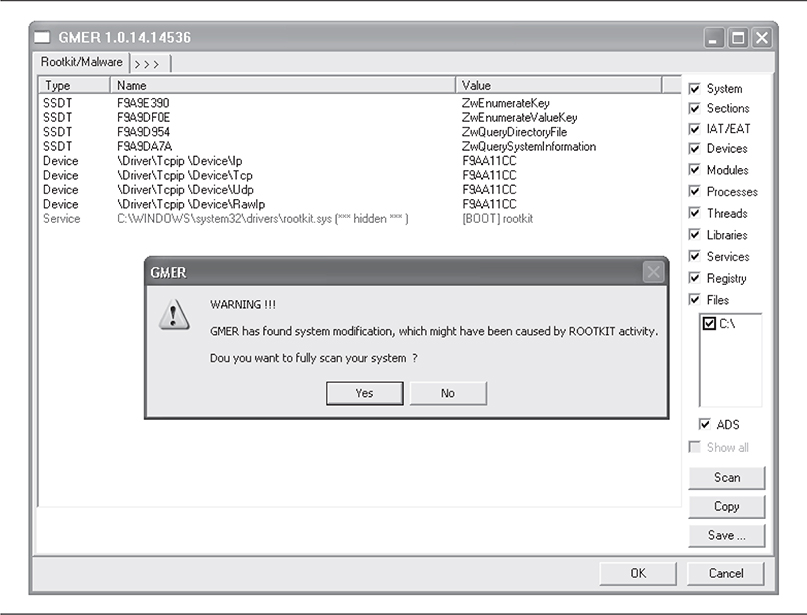
Figure 10-10 GMER’s already at work.
As Figure 10-10 shows, the infection was immediately detected and color coded to show the user that he or she needs to address the problem immediately and potentially perform an in-depth system scan. GMER’s ease of use, and the fact that it provides very technical users with the tools they need, has helped speed its adoption. GMER has the ability to simply disable a hidden service by adjusting the Registry so the service can’t launch if you want to investigate it. Other rootkit detection tools use cleanup methods such as deleting the hidden file, and GMER can do this as well. Similar to Rootkit Unhooker, GMER also allows the user to perform a low-level scan of the Registry or file system while operating a familiar-looking interface, as shown in Figure 10-11. Low-level analysis means that GMER will not utilize common APIs and will access the Registry directly through the files stored on the hard drive.

Figure 10-11 GMER performing a low-level scan and finding the rootkit
GMER has been quite useful ever since it was first published. Because of its support of Windows 10, it is an essential tool for detecting the presence of rootkits.
Helios and Helios Lite
Helios and Helios Lite are rootkit detection tools by MIEL Labs. Both tools use similar methods for detecting rootkits. Helios is a resident program for active detection and remediation of rootkits, whereas Helios Lite is a stand-alone binary that can quickly scan a system for SSDT hooks, hidden processes, hidden registry entries, and hidden files.
Helios Lite uses a GUI program to communicate with its kernel-mode driver, helios.sys. Together these two components are able to detect most rootkit hooking and hiding techniques. Helios consists of a .NET GUI user-mode application, two library/DLLs, and a kernel driver, chkproc.sys.
To detect hidden processes, Helios Lite uses the cross-view approach discussed previously. It obtains a low-level view of the active process/thread list by reading a kernel structure called PspCidTable. This table stores information about running processes and threads. Helios Lite then compares the information stored in this table with the result of high-level Windows API calls and notes any discrepancies that may represent a hidden process. Figure 10-12 shows Helios Lite detecting a Notepad process hidden with the FU rootkit.

Helios uses the same technology but with a different approach. Helios attempts to actively monitor and prevent rootkits from infecting your system. Figure 10-13 shows the basic user interface before any scanning or active defense has begun.
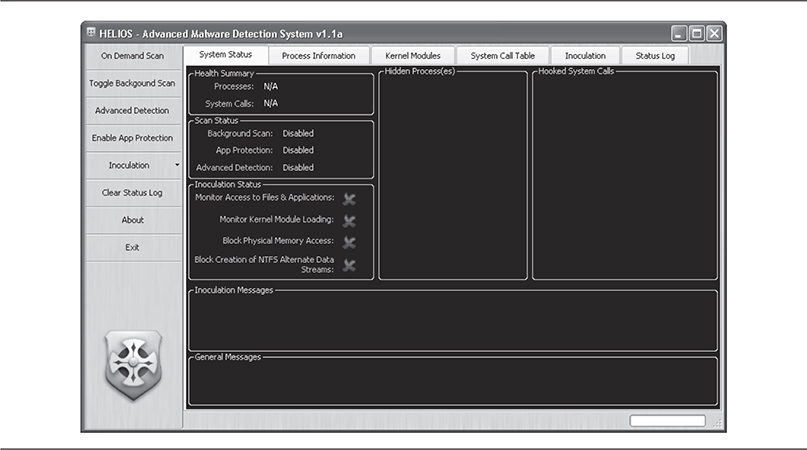
By clicking On Demand Scan, you can instantly assess the integrity of your system. Figure 10-14 shows the wealth of information Helios reveals—information about not only the infection, but also how Helios determined the infection’s existence.

Figure 10-14 Helios finding the hidden process
Notice the entry for the hidden process, notepad.exe. Helios reports that the Image Path field is empty (FU clears this field) and that clearly this is a hidden process. But the most useful piece of information that Helios reports is which techniques failed to see the process and which ones successfully detected it. The columns ZQSI, Eprocess List, and Eproc Enum refer to the three data points in the cross-view analysis Helios used to find hidden processes. The first, ZQSI, refers to the Win32 API ZwQuerySystemInformation(), which is used to obtain a process listing from kernel or user mode. The second, Eprocess List, walks the linked list of EPROCESS structures. The third, Eproc Enum, brute-forces all of the possible process ID numbers. If any of these data points differ, Helios reports it. At this point, you can link the notepad.exe process back into the EPROCESS list by clicking Unhide.
What makes Helios truly unique is its active defense features. By clicking Toggle Background Scan, Helios will automatically poll the system to see if anything has changed. This makes Helios somewhat of a real-time reporting tool for malware/rootkit infection. Additional monitoring capabilities are available under Inoculation and include Monitor Kernel Module Loading, Block Access to Physical Memory, and Monitor Access to Files and Applications. The Advanced Detection and Enable App Protection defense features are not fully implemented in the free product.
Both Helios and Helios Lite boast a slick user interface backed by proven research and extensive documentation/whitepapers. The extremely intuitive interface design and functionality make this a strong candidate for any rootkit detection toolkit.
McAfee Rootkit Detective and RootkitRemover
McAfee was one of the first commercial vendors to release a free rootkit detection utility. Releasing Rootkit Detective in 2007 (not too long after competitor F-Secure released BlackLight in 2006), McAfee’s Avert Labs instantly received praise from the security community.
Rootkit Detective was about as simplistic a tool as its plain name suggests, allowing users to view hidden processes, files, registry keys, hooked services, IAT/EAT hooks, and detour-style patches. The GUI interface consisted of a single pane with radio buttons you could select to change the active screen. Rootkit Detective also offered basic remediation capabilities when findings were displayed. Figure 10-15 shows the basic remediation actions available for our hidden notepad.exe process: Submit, Terminate, and Rename.

Figure 10-15 Rootkit Detective
As new rootkit technologies came out of the woodwork, McAfee released a new tool called RootkitRemover. It is a stand-alone tool that can detect and remove ZeroAccess, Necurs, and TDSS rootkits. According to McAfee Labs, future versions of the tool will contain coverage for more rootkit families. Figure 10-16 shows RootkitRemover during a scanning session. More information about this new tool can be found at http://www.mcafee.com/us/downloads/free-tools/how-to-use-rootkitremover.aspx.
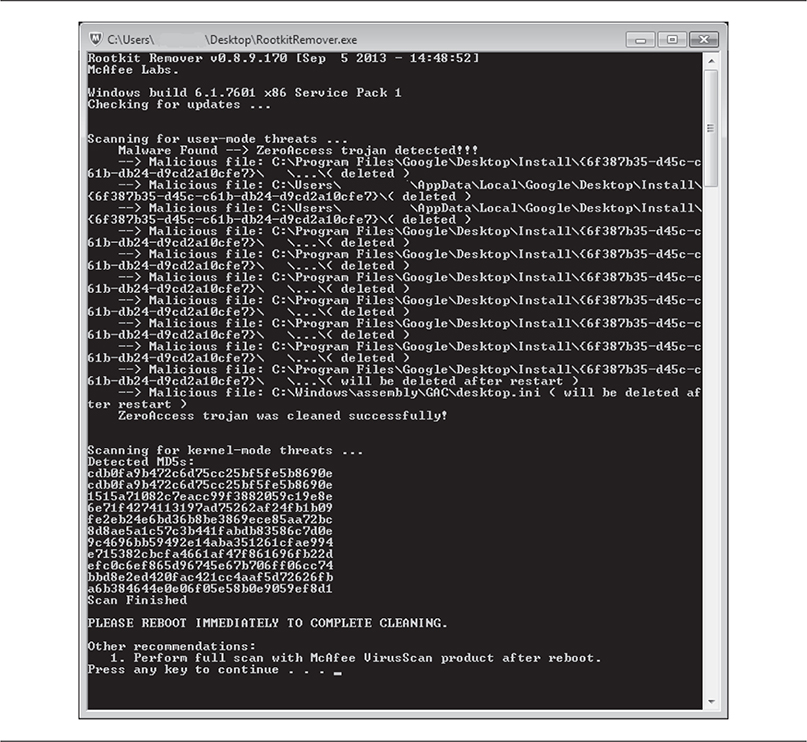
Figure 10-16 RootkitRemover (Source: www.mcafee.com)
TDSSKiller
The TDSSKiller started as a rootkit remover for the infamous TDSS Rootkit. Because of its effectiveness and popularity among researchers and users, it has expanded to include other rootkit families. As of this writing, the supported families include
• Rootkit.Win32.TDSS
• Rootkit.Win32.Stoned.D
• Rootkit.Boot.Cidox.A
• Rootkit.Boot.SST.A
• Rootkit.Boot.Pihar.A, B, and C
• Rootkit.Boot.CPD.A
• Rootkit.Boot.Bootkor.A
• Rootkit.Boot.MyBios.B
• Rootkit.Win32.TDSS.MBR
• Rootkit.Win32.ZAccess.aml,C,E,F,G,H, I, J, K
• Rootkit.Boot.SST.B
• Rootkit.Boot.Fisp.A
• Rootkit.Boot.Nimnul.A
• Rootkit.Boot.Batan.A
• Rootkit.Boot.Lapka.A
• Rootkit.Boot.Goodkit.A
• Rootkit.Boot.Clones.A
• Rootkit.Boot.Xpaj.A
• Rootkit.Boot.Prothean.A
• Rootkit.Boot.Plite.A
• Rootkit.Boot.Geth.A
• Rootkit.Boot.CPD.B
• Backdoor.Win32.Trup.A, B
• Backdoor.Win32.Sinowal.knf,kmy,
• Backdoor.Win32.Phanta.A, B
• Virus.Win32.TDSS.A, B, C, D, E
• Virus.Win32.Rloader.A
• Virus.Win32.Cmoser.A
• Virus.Win32.Zhaba.A, B, C
• Trojan-Clicker.Win32.Wistler.A, B, C
• Trojan-Dropper.Boot.Niwa.A
• Trojan-Ransom.Boot.Mbro.D, E
• Trojan-Ransom.Boot.Siob.A
• Trojan-Ransom.Boot.Mbro.F
TDSSKiller has support for Windows 10, making it valuable for detecting rootkits that cross over to Windows 10. If you are so inclined, consider experimenting on any of these malware families by executing them in Windows 10 and then using TDSSKiller to detect them.
You can find more information about TDSSKiller at https://support.kaspersky.com/viruses/disinfection/5350.
Bitdefender Rootkit Remover
Unlike other rootkit removers, Bitdefender Rootkit Remover can be started immediately with no need for reboot. It can detect the following malware families:
• Mebroot
• Known TDL Families (TDL/SST/Pihar)
• Mayachock
• Mybios
• Plite
• XPaj
• Whistler
• Alipop
• Fengd
• Fips
• Guntior
• MBR Locker
• Mebratix
• Necurs
• Niwa
• Ponreb
• Ramnit
• Stoned
• Yoddos
• Yurn
• Zegost
You can learn more about Bitdefender Rootkit Remover at https://labs.bitdefender.com/projects/rootkit-remover/rootkit-remover/.
Trend Micro Rootkit Buster
RootkitBuster is Trend Micro’s flagship anti-rootkit tool. It scans for rootkits by detecting anomalies in hidden files, registry entries, processes, drivers, services, ports, and the MBR (Master Boot Record). This tool can be readily launched and includes support for Windows 10. More information about this tool can be found at https://www.trendmicro.com/download/rbuster.asp.
Malwarebytes Anti-Rootkit
Malwarebytes Anti-Rootkit is currently in beta. Aside from detecting rootkits, it also gives you the option of removing them from your system. Learn more about this tool at https://www.malwarebytes.com/antirootkit/.
Avast aswMBR
Avast aswMBR uses virtualization technology to detect the presence of rootkits. The downside is that your system must support hardware virtualization. Avast aswMBR can detect the following malware families:
• TDL4/3 (Alureon)
• ZAccess
• MBRoot (Sinowal)
• SST
• Cidox
• Pihar
You can find more information about this tool at http://public.avast.com/~gmerek/aswMBR.htm.
Commercial Rootkit Detection Tools
The majority of commercial (in other words, ones you have to pay for) rootkit detection tools are not very sophisticated and are easily bypassed by the latest rootkits. The reason for this is that commercial security companies cannot rely on the latest rootkit detection technology because most of that technology is not reliable enough for millions of average users. Granted, this is not true of every security software company, but those in the rootkit community believe the free tools such as Rootkit Unhooker and GMER are much better at detection than their commercial counterparts.
Furthermore, since the majority of commercial software vendors grew from signature-matching roots, they attempt to use signature methods to identify rootkits before using the aforementioned techniques. We’ve discussed the pros and cons of signature-based detection techniques in previous chapters. Sadly, when it comes to commercial software vendors, they fall into the “when you only have a hammer everything looks like a nail” category, which means if you only have one method to detect something, then it looks like everything can be detected using that method.
Of course, only using one method did not stop commercial software vendors from trying to establish a market where none existed. HBGary, the first to make the scene in 2003, was founded by former rootkit author Greg Hoglund. Marketed as a risk mitigation company, HBGary actually specialized in reverse engineering and advanced rootkit detection. Their long-standing flagship product, HBGary Inspector (a stand-alone software debugger), was discontinued in late 2007 and integrated into their new incident response product named Responder. Responder allowed forensic investigators to capture and analyze physical memory for rootkits and malware. HBGary had become a lead competitor in the field of enterprise forensics and rootkit detection. HBGary is now owned by CounterTack. With this acquisition, CounterTack built on the technology of Responder and released Responder Pro, which supports not only Windows but Linux as well.
Other players in the industry soon responded, and the race to control the evolving market was in full swing. Newcomers like Mandiant and HBGary began to challenge the mainstays of Guidance Software and AccessData, challenging the notion that disk forensics and cursory volatile data analysis were sufficient for forensic investigations. Enterprise products like HBGary’s Responder and Mandiant’s Intelligent Response incorporated analysis techniques to detect advanced malware from memory snapshots. Introducing these simple capabilities into a commercial product drastically changed the landscape of digital forensics, malware analysis, and rootkit detection.
As a result, free tools exploded on the scene in 2008, as each company strove to prove their malware analysis and rootkit detection capabilities. Some of these tools included the following:
• HBGary FlyPaper found malware/rootkits in memory and prevented them from unloading or terminating.
• Mandiant Red Curtain analyzed program binaries statically to determine their malicious capabilities, scoring each binary with a numeric value and color code, indicating the likelihood that the binary was malicious. It used techniques like entropy analysis to search for common malware tactics such as packing, encryption, and other characteristic traits. Although not a novel concept, Red Curtain is still a useful free tool to keep in your toolkit.
Today, the market for commercial rootkit detection tools is tough because of the freely available rootkit removal tools that are effective enough to earn the trust of researchers and users.
Most of the companies mentioned have focused on developing their rootkit detection capabilities in the area of forensic memory analysis.
Offline Detection Using Memory Analysis: The Evolution of Memory Forensics
The advancement in rootkit detection and digital forensics in the commercial products just discussed was due in large part to a resurgence of interest in a research area that has been around the digital forensics community for some time. This research area is called memory forensics and addresses two broad challenges:
• Memory acquisition How do investigators capture the contents of physical memory in a forensically sound way?
• Memory analysis Once a memory dump has been obtained, how do you carve artifacts and evidence from that blob of data?
So what does memory forensics have to do with rootkit detection? The answer is memory forensics gives you another place to look for malware and rootkits. Consider the case of digital forensics. Traditionally, digital forensic investigations focused on acquiring and analyzing evidence from hard drives with basic collection of volatile data (information gathered from system memory such as a list of running processes, system time and identifying information, network connections, and so on). However, a joint study by NIST and Volatile Systems in 2008 showed that current analysis methods covered less than 4 percent of the evidence available in volatile storage, such as physical memory (see http://www.4tphi.net/fatkit/papers/aw_AAFS_pubv2.pdf). Not having solid and admissible evidence in court has led to the use of system integrity checking, a method to ensure the system is in a state such that the data collected is admissible and correct.
In other words, digital forensics techniques were not doing enough to detect malware in memory. Furthermore, as malware and rootkits evolved over time, they became stealthier, largely eliminating their reliance on the hard drive altogether by hiding in memory. This forced forensic tools to advance as well, and we saw this advancement become mainstream with the release of the products discussed in the previous section. In the discipline’s early stages, we witnessed the somewhat clumsy merging of the formal discipline of digital forensics with the elusive concept of rootkit detection.
In 2014, Wylie Shanks wrote a paper that, as stated in its abstract, covered the important roles of digital forensics, memory analysis, and malware sandboxing in enhancing incident response practices. The tools discussed in the paper included Mandiant Redline, Volatility, and Cuckoo Sandbox (see https://www.sans.org/reading-room/whitepapers/incident/enhancing-incident-response-forensic-memory-analysis-malware-sandboxing-techniques-34540).
The commercial tools were certainly not the first tools to marry the concept of memory acquisition and analysis with rootkit detection techniques. We could argue that the first community to latch onto the idea and subsequently bring it into the mainstream to commercial companies was the digital forensics community. Specifically, in 2005, the Digital Forensic Research Workshop (DFRWS, http://www.dfrws.org) posed a challenge to its community: reconstruct a timeline of an intrusion given a dump of physical memory. One of the winners, George M. Garner of GMG Systems, Inc., wrote a tool called KNTList that was able to parse information from the memory dump, reconstruct evidence such as process listings and loaded DLLs, and analyze the memory dump to decipher the intrusion scenario. The tool became so popular that GMG Systems made KNTList into a suite of analysis tools for digital investigations. It still remains one of the most respected and widely used toolkits in the forensics industry.
Over the past few years, several free tools for memory acquisition have been released, including
• Win32dd by Matthew Suiche
• Memory DD (mdd) by Mantech
• Nigilant32 by Agile Consulting
And just about every major forensics company includes a memory acquisition capability in their product, though most of these products are severely lacking in analysis of memory dumps. Most of these tools are fairly self-explanatory, so we’ll not go into further detail about their use or functionality.
Fewer memory analysis tools are available because analysis is the more difficult process. There are, however, two fairly powerful free tools available that we’ll cover: Volatility Framework by Volatile Systems and Memoryze by Mandiant.
Volatility Framework
VolatilityFramework is a memory analysis environment with an extensible underlying framework of tools based on research by AAron Walters of Volatile Systems. AAron is recognized as one of the founders of modern advanced memory analysis techniques. He was one of the co-authors of the FATkit paper, which helped raise awareness of the need for memory forensics in the digital investigation process.
At its core, Volatility contains a library of Python scripts that perform parsing and reconstruction of data structures stored in a memory dump of a suspect system. The low-level details of this parsing, reconstruction, and representation are abstracted from the user, so detailed knowledge of the Windows operating system is not required. Volatility also supports other memory dump formats, including raw memory dumps using dd, Windows hibernation files (stored in C:hiberfil.sys), and crash dumps.
Volatility provides basic information that it parses from the memory dump, including
• Running processes and threads
• Open network sockets and connections
• Loaded modules in user and kernel mode
• The resources a process is using, such as files, objects, registry keys, and other data
• The capability to dump a single process or any binary in the dump
Figure 10-17 shows a simple process listing parsed from a sample memory dump using the Volatility core module pslist.

Figure 10-17 Volatility performing a simple process listing
This data can then be analyzed and correlated by the investigator. Typically, an investigator knows the techniques the rootkit or malware is using (for example, hooking or patching), so all that remains is to look for evidence of that technique from the data Volatility provides.
We won’t explore the inner workings of Volatility, but understanding the basic scanning technique Volatility uses to recognize operating system structures in the memory dump is important (other techniques are used, but we only cover basic scanning). Volatility uses its knowledge of Windows symbols and data structures to build signatures based on fields that uniquely define critical data structures. For example, a process is represented in memory by the EPROCESS data structure. This structure contains many fields that no other Windows data structure contains. Therefore, Volatility uses its knowledge of what unique fields define various structures and then scans through memory looking for those indicators.
Let’s take our old friend FU as an example. As mentioned in Chapter 4, we know that one of this rootkit’s capabilities is to hide processes and modules using Direct Kernel Object Manipulation (DKOM). Specifically, it alters kernel structures in memory that Windows uses to maintain a list of these items. By altering the structure directly in memory, it automatically taints any API function call—whether native (e.g., part of ntoskrnl) or Win32—that requests that information from Windows.
DKOM, however, does not affect offline memory analysis. As we noted earlier, the major advantage of offline analysis over live analysis is that you’re not dependent on the operating system or its components (such as the object manager) to give you information. Instead, you can carve that information out of memory yourself.
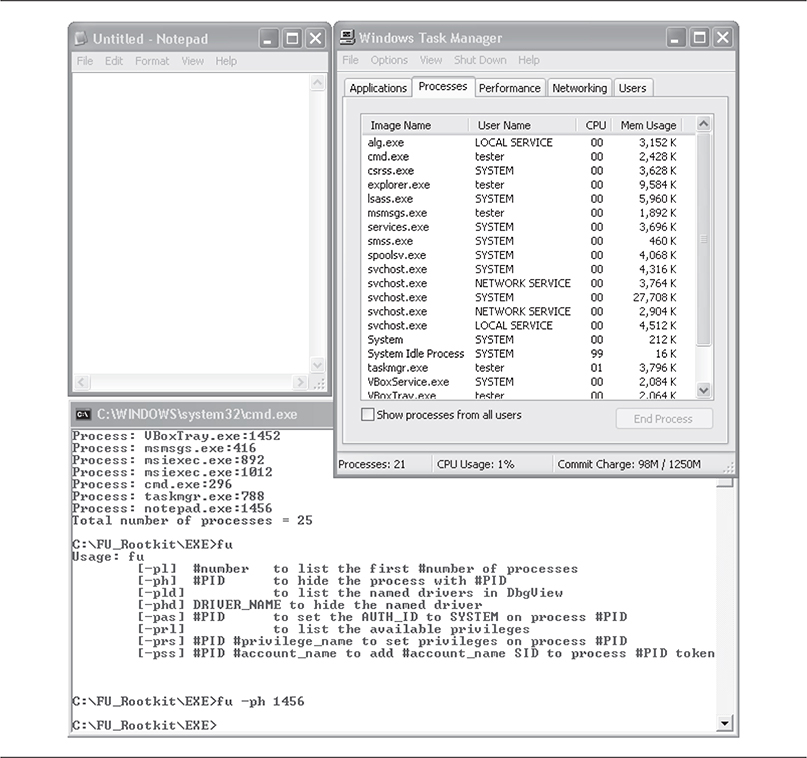
You can issue a command to the FU rootkit to hide a process. This operation is shown in Figure 10-18. The command was issued to FU in the command prompt window, and the result can be seen in the Windows Task Manager window: no notepad.exe process is listed, even though the Notepad application is clearly running.
Using one of the memory acquisition tools previously mentioned (in this case win32dd), you can take a snapshot of physical memory, as shown in Figure 10-19.

Figure 10-19 Taking a snapshot of physical memory
After capturing physical memory, you can then use Volatility to discover the rootkit’s hidden process using the pslist and psscan2 modules. The pslist module finds the data structure in the memory dump that Windows uses to maintain a list of active processes. This data structure is a linked list; hence, this scanning technique is often referred to as list walking. The disadvantage of this technique is that rootkit tricks like DKOM will fool the scanner because DKOM removes a process from this list. For more information on how DKOM can remove items from a list in memory, read Chapter 4.
Using psscan2, however, you are able to detect the hidden process. The psscan2 module scans memory in a linear fashion in search of EPROCESS data structures. Each EPROCESS structure found in a memory dump represents a process in Windows. Therefore, if psscan2 reports an EPROCESS structure for a process you don’t see in the pslist output, then the process is possibly hidden. The output from pslist and psscan2 is shown in Figure 10-20.
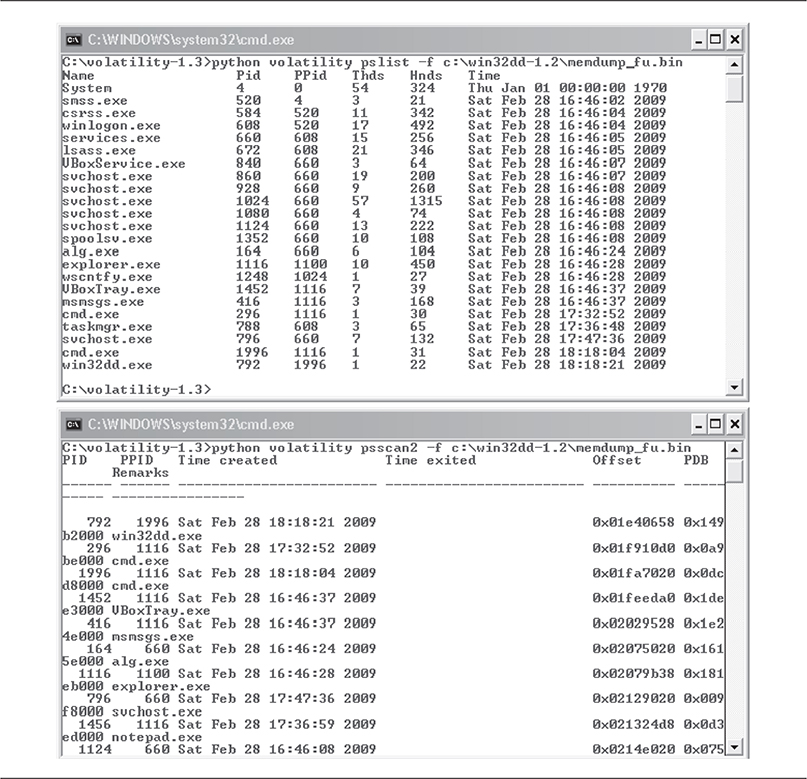
Figure 10-20 Output from pslist (top) and psscan2 (bottom)
Notice that the Notepad application’s process, notepad.exe, does not show up in the pslist output, but it does appear in psscan2 output. This discrepancy should immediately alert the analyst to investigate this process further. By understanding the shortcomings of the scanning techniques behind each module, the analyst would be able to conclude that DKOM-style rootkit tactics were in play.
The next step for the analyst would be to inspect the notepad.exe process using Volatility’s procdump module. This module will parse, reconstruct, and dump the process image to a binary executable that can be further analyzed in a debugger. The debugger would provide the investigator with the lowest-level view of the suspicious program’s capabilities.
Extending the Power of Volatility with Plug-Ins
The true power in Volatility lies in its extensible framework, which allows investigators to write their own plug-ins that use the core capabilities of the framework. Plug-ins are simply higher-level modules that rely on the basic classes and functions provided by the core Volatility modules.
Essentially, Volatility does the hard work of mining and exposing the data to the analyst, whose job is to draw meaningful conclusions about the data. To that end, numerous plug-ins have been written since the release of Volatility 1.3, including plug-ins to detect advanced code injection and the presence of rootkits, bots, and worms. This extensibility allows investigators to implement detection techniques produced by researchers who may not have the time to actually implement the technique in code.
An example of the power of this framework is the Malfind plug-in written by Michael Hale Ligh (https://github.com/volatilityfoundation/volatility/wiki/Command-Reference-Mal). This plug-in can detect a class of malware that uses code injection to hide its presence on the system. The general malware technique that this module detects is the injecting of a malicious DLL into a target process and then the modifying of that process’s image by removing and/or clearing certain internal data structures that would reveal its presence to diagnostic tools such as ProcessExplorer (a free tool that provides functionality similar to Windows Task Manager).
The Malfind plug-in relies on detecting memory that is being used by the injected code. The address of this memory is stored in a data structure called a Virtual Address Descriptor (VAD). When a process is created, it is allocated a large amount of virtual RAM to use during its lifetime. However, it rarely uses all of this available space, so Windows maintains a list of what addresses the process actually uses. This list is stored inside the individual process in a structure called a VAD tree, where each node in the tree is an address to a location in memory being used (a single VAD). The VAD tree is an excellent resource for analysts to inspect because loaded malware must use the structure by design and cannot clear or remove its entries without eliminating its ability to run.
When Malfind runs, it uses the VAD information exposed by core Volatility modules to detect these locations in memory that the malware/rootkit is using.
Malfind and other Volatility plug-ins illustrate the immense sharing and collaboration opportunities in the Volatility Framework. Even though Malfind was developed by Michael Hale Ligh, the techniques behind it are based on research by Brendan Dolan-Gavitt on VADs. The synergy provided by the Volatility Framework allows field investigators to leverage and implement the ideas produced by the forensics research community.
An ever-expanding list of Volatility plug-ins is maintained at http://www.forensicswiki.org/wiki/List_of_Volatility_Plugins.
Memoryze
In contrast to the offline nature of Volatility, FireEye’s Memoryze is a memory analysis tool capable of finding rootkits and malware in both memory dumps and on live systems. Since we covered offline memory analysis using Volatility, we’ll only briefly mention Memoryze’s capabilities in this area. Memoryze is based on the agent component of Mandiant’s flagship product, Mandiant Intelligent Response (MIR), before they were acquired by FireEye.
Memoryze has several components:
• XML audit scripts Mandiant refers to these as execution scripts or audit scripts, and they serve as a configuration file for the Memoryze program. Seven of these audit scripts define the parameters for various analysis capabilities.
• Memoryze.exe The program binary that reads configuration data from the XML settings files and imports the necessary libraries/DLLs to perform the analysis.
• Batch scripts These DOS batch scripts are provided for user convenience. A user can execute the batch scripts that will populate the XML audit script settings interactively. All of the capabilities in the audit scripts are exposed to the batch scripts via command-line switches.
• Core libraries These DLLs provide the low-level analysis capabilities used in the program.
• Third-party libraries These are DLLs from open-source programs such as Perl Compatible Regular Expressions (PCRE) for regular expression searching and ZLIB for compression.
• Kernel driver The product’s core libraries generate a kernel driver named mktools.sys and insert it into the program’s directory whenever Memoryze.exe is successfully executed. This driver provides the kernel-mode component for the application, where most of the data is collected for later analysis.
Memoryze not only provides features you’ll find in Volatility, but also offers additional live analysis capabilities, including
• Acquiring all or part of physical memory, including an individual process’s address space
• Dumping program binaries from user mode and drivers from kernel mode
• Information about active processes such as open handles, network connections, and embedded strings
• Rootkit detection via hook detection in the SSDT, IDT, and driver IRP tables
• Enumerating system information such as processes, drivers, and DLLs
Memoryze reports its results in XML format meant for consumption in an XML viewer such as FireEye’s Redline. However, the XML reports can also be viewed in any modern browser.
To detect the process that was hidden in earlier examples in this chapter, we simply execute the Process.bat batch script with no parameters. This batch script populates the XML Audit Script ProcessAuditMemory.Batch.xml and then launches Memoryze.exe with the necessary switches. The XML report shows the notepad.exe process; however, it does not indicate that the process was hidden. Thus, an analyst must have an idea of what to look for to make the most of the tool’s features.
Although Memoryze provides memory acquisition capabilities, there are several open-source alternatives that have already been discussed. Memoryze’s main advantage is the capability to perform this analysis on a live system. Some may consider this a disadvantage, since performing live analysis also subjects the tool to active deception from live rootkits and malware. Indeed, this is one of the driving design principles behind Volatility’s offline analysis model. Hook detection is not a native capability of Volatility; however, the extensible framework provides analysts with the capabilities to develop such detection plug-ins on their own.
Virtual Rootkit Detection
In Chapter 5, we discussed how virtual rootkits came about as a result of enterprises moving to virtualized systems. When virtual rootkits first appeared, they were thought to be undetectable. A study released at the end of 2007 from Stanford and Carnegie Mellon University, Compatibility Is Not Transparency: VMM Detection Myths and Realities, debunked the myth that virtual rootkits were undetectable. The researchers concluded that producing a Virtual Machine Manager that perfectly emulated the true hardware was fundamentally infeasible. If it wasn’t infeasible to produce a perfect VM rootkit, then how would you go about detecting one? The research, which may be potentially inaccurate (only time will tell), focuses on the fact that many researchers, users, and system administrators are using VMM detection to determine if a virtual rootkit is installed. The premise is that if a machine is VMM capable but is not running virtualization, then if a VMM is detected, it must be a rootkit.
Most VMM detection is simple and relies on detection of known virtualized hardware, resources, or timing attacks. For example, if the network card is of a specific type such as VMWare or Virtual PC indicating the OS is running under a VMM, that could mean the OS is also being controlled by a rootkit.
This type of thinking is flawed, mostly because almost all enterprise environments have adapted on-premise or in-the-cloud virtualization due to cost, availability, and reliability. These are just a few legitimate reasons why servers and workstations now run mostly in a virtualized environment. The initial thinking of simply detecting if your operating system is running underneath a hypervisor will not be enough to prove a rootkit has control of your system.
Beyond VMM detection, there are not many other techniques that can help determine if a virtual rootkit such as BluePill is executing. The majority of attacks are simply executed to determine if a VMM is in place.
In 2013, a paper came out of the University of North Carolina written by Xiongwei Xie and Weichao Wang that delved into detecting rootkits on virtual machines. The paper, which is titled “Rootkit Detection on Virtual Machines through Deep Information Extraction at Hypervisor-level” (see http://webpages.uncc.edu/wwang22/Research/papers/Xie-SPCC-13.pdf), proposes an interesting detection mechanism that is worth a read and experimentation.
They have proposed to design a rootkit detection mechanism for virtual machines through deep information extraction and reconstruction at the hypervisor level. Through accessing the important components of a VM such as the kernel symbol table, the hypervisor can reconstruct the VM’s execution states and learn the essential information such as the running processes, active network connections, and opened files. Through cross-verification among the different components of the reconstructed execution states of the VM, we can detect both the hidden information and the anomalous connections among them.
Hardware-Based Rootkit Detection
All of the anti-rootkit solutions discussed are software based, but creating software to remove malicious software is very difficult, as both pieces of software have to fight for the same resources and devices. So if software-based rootkit detection isn’t working, how about implementing hardware-based rootkit detection? One company did just that. Founded in 2004, Komoku was funded by the United States Defense Advanced Research Projects Agency (DARPA), Department of Homeland Security, and the Navy to create hardware and software rootkit detection solutions. Komoku created a hardware-based solution called CoPilot, a high-assurance PCI card capable of monitoring a host’s memory and file system at the hardware level. CoPilot scanned and assessed the operating system on the workstation or server in near real time and looked for anomalies instead of trying to find a specific rootkit.
The U.S. government stated that the deployment of the PCI-based rootkit detector had been successful, but because CoPilot was funded by the U.S. government, it was not available for purchase by the public. Furthermore, with the acquisition of Komoku by Microsoft in March 2008, many believed Microsoft would not continue development of CoPilot, and that belief became a reality.
In 2004, Grand Idea Studios created a PCI expansion card that can capture RAM from a live system; the product, which holds a U.S. patent, is called Tribble and was produced by Brian Carrier and Joe Grand (Kingpin of L0pht fame). Tribble is a PCI expansion board that can capture the RAM of a live system for analysis. It is available for exclusive license from Grand Idea Studio (http://www.grandideastudio.com/tribble/).
In 2005, BBN Technologies, which was later acquired by Raytheon in 2009, developed a hardware device that plugs into a server or workstation and will take a copy of the RAM from the machine for analysis. This device is known as a Forensics RAM extraction device (FRED). However, this tool only provides the ability to capture the RAM from a live running system. It is up to the researcher to use other analysis tools to determine whether the content of the RAM contains malicious code.
Even with these advances in hardware memory acquisition and rootkit detection, much more remains to be done. In 2007, Joanna Rutkowska proved that even with hardware detection, specifically crafted rootkits could evade detection. Using the AMD64 platform, Joanna showed how a rootkit could theoretically provide a different view of the CPU and memory to a hardware device, therefore, potentially circumventing or removing the memory signatures of the rootkit itself and eluding detection. Even if hardware detection was the best solution, it was hard to get your hands on these products. The easiest one so far is Tribble, which can be requested from Grand Idea Studio, but the approval for granting the exclusive license rests solely with the manufacturer. It is not like your typical software or hardware solution where you can simply purchase it as long as you have the budget to do so.
We mentioned previously that memory analysis is very difficult because memory is constantly changing. Many of the hardware approaches that were introduced found new ways of obtaining a snapshot of memory that was both accurate and reliable, while not interfering with the system itself. Technology is constantly evolving. As new operating systems are introduced and new hardware that supports them is manufactured, the number of undocumented and documented structures that must be analyzed within an offline memory dump will definitely increase. New approaches to extracting live or hot memory will require more research and development, and the human analysis portion will require more and more prerequisite knowledge.
Summary
Detecting rootkits is challenging. The techniques used by rootkit detection tools are easily defeated by attackers who spend the time required to ensure their rootkits are not detectable by these tools. The fundamental techniques employed by the rootkit detection tools are flawed and can be bypassed. Even though the rootkit detectors are bypassable, many rootkit authors don’t even attempt to prevent rootkit detection because most attacks do not require that they be hidden. This is particularly true for hit-and-run attacks in which the malware only needs a short period of time in the target system. Furthermore, because many rootkits operate at a level above the user, a cursory look at the file system or Registry may create the illusion that no rootkit is installed so the user doesn’t have to run a rootkit detection tool.
Hardware-based rootkit detection shows some promise, but is not perfect and requires additional costs. Although companies are being funded by the U.S. government to develop such systems, no commercial hardware-based rootkit detection technology is available. The closest one is Tribble, which requires the approval of its manufacturer.
Finally, the majority of software-based rootkit detection tools are available for free but require a high level of skill to analyze the data produced properly. Many of the techniques used by the rootkit detection tools have been incorporated into commercial products that can be purchased and deployed across an entire enterprise. Because no single tool can find all types of rootkits, using a variety of rootkit detection and removal tools is recommended, along with executing multiple tools to ensure a rootkit is removed properly from a system.