3. Equipment

In addition to the materials in the last chapter, you’ll need some equipment to do the processes in this book. While some processes may require advanced printers or printing services, most can be done on a desktop printer, as long as they use pigment inks.
As we work though this book, you’ll need to be familiar with creating or installing printer profiles on your particular system (see Chapter 2 for details). You’ll also need the imaging software of your choice (I recommend Adobe Photoshop and Adobe Photoshop Lightroom) and need to understand how to create and print images in it. I’ll give you some specific tips for these processes in this chapter and throughout the book, but if you need more information, I’d recommend the many helpful guides to using Photoshop and Lightroom published by Peachpit Press (www.peachpit.com).
Caution
Keep in mind that equipment you use for art should not be used for food preparation or other purposes.
For an updated product list (since products may change over time), see the book’s website: www.hackingthedigitalprintbook.com.
For those who have read Digital Alchemy or The Last Layer, most of the information in this chapter will be familiar, though there are a number of updates throughout. I recommend reviewing the section on backups, and it’s always a good idea to review the safety warning at the end of the chapter.
Backups
It is your responsibility to yourself, your sanity, and your artistic legacy to preserve the digital portions of your work in a recoverable format. As image file formats change, it’s important to convert them during the period when both old and new are supported. Otherwise, you may have a collection of bits that only a very expensive data conversion service can salvage. It’s also very important to place your data on multiple storage devices so that if one fails or becomes obsolete, you have a backup. I try to keep two copies of my important files on two different kinds of media. In the past, I kept one set on an external hard drive, and another on a DVD-R. But with the size of my files growing and the cost of hard drives dropping, I’m switching to just using two different external hard drives—disks are cheap! That avoids the problem with DVD-Rs going bad just sitting on a shelf and having to periodically burn new disks. I also rotate my drives whenever the warranty expires, which ensures that I won’t have problems with obsolete interfaces—I had to recover some information from an old SCSI drive recently, and it was a real challenge. For extra caution, you could store one of the copies in a fire safe or at an offsite location. I generate far too many images to try to back them up online, but you may want to consider those services as well.
One caution: Be careful relying on some of the modern RAID array devices that use a proprietary format as a sole means of backup. If the company goes out of business or the enclosure dies, you’re facing an expensive data recovery effort or you may simply be out of luck. Archival copies should be in formats that are as close to universal as possible.
Image Capture
For the chapter on custom textures, you’ll either need a scanner (Figure 3.1) or a camera to convert your modified digital, hand-worked textures back into digital format.

Printers and Ink
I’ve designed the processes in this book so that you can do almost all of them on your desktop printer, but you can also scale up to larger formats. I use Epson, HP, and Roland printers in my own studio and have found them to be excellent machines. The key requirement is that whatever printer you use must use pigment (rather than dye) inks for the processes to work. Check your manual or the manufacturer’s website to be sure. If you find that your transfers have ink left on the film or a magenta cast, then the printer probably has dye-based ink. Make sure that you use the actual brand-name ink cartridges. I’ve found that replacement inks (especially the refills) may not produce reliable colors and may vary the amount of ink laid down on the media.
Printer models are changing almost as often as software versions, so check out the book’s website (www.hackingthedigitalprintbook.com) for more information.
Desktop Printers
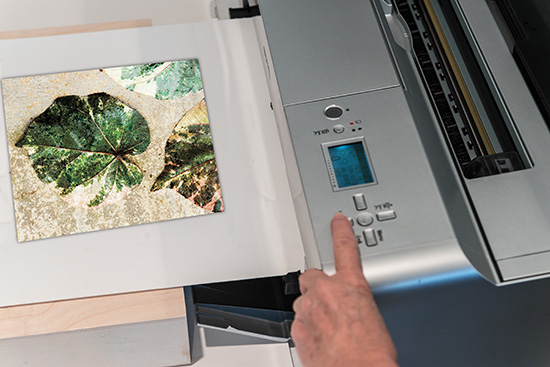
Many (but not all) desktop photographic printers use pigment inks, while a number of all-in-ones use dye inks. Some even use a mixture of pigment- and dye-based inks. Check your printer specifications to make sure it uses pigment inks. Some inexpensive Epson all-in-one printers use Durabrite pigment inks. Most other inexpensive Epson printers use Claria, dye-based ink. Other printers, like the Epson R2000 and R3000 series, use pigment inks and allow you to print directly from your mobile device (Figure 3.2) without using a computer at all.

Hint
Some Epson printers don’t support printing directly on clear media because the printer can’t see the clear film. Simply use some double-stick tape (the kind that releases) to attach a white sheet of paper to the back of the film, and put only one sheet in the printer at a time (Figure 3.3).

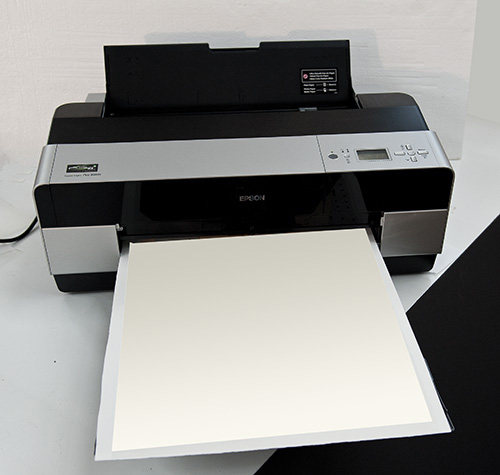
The Epson 3880 is an excellent mid-sized printer that can produce very high-quality work. This one uses Epson UltraChrome K3 Ink with Vivid Magenta in 80 ml cartridges. These larger cartridges save a lot of money in ink costs, but you do have to be careful when switching between Matte Black and Photo Black ink. The printer has both, but since they share ink lines, every time you change between the two types of black ink you’ll lose some ink when the printer purges the lines of the other type.
Hint
It’s important to look at the total cost of a printer when making a purchase decision. Often, manufacturers will sell printers at a very low cost but then charge high prices for ink. Choosing a printer that is a bit more expensive may save a lot of money in the long run if you do a lot of printing and the ink is cheaper. There are a number of good resources on the Internet that have current “price per page” figures on different printer models.
Some desktop Epson printers, as well as many other brands and models, have what are called pizza wheels or star wheels in them. These are rollers that help hold down a print as it passes through the machine. Unfortunately, they can cause marks on your final print. The transfer film that I recommend usually will not be a problem if you select a wider platen gap on the printer front panel and slow the time between print head passes (Figure 3.4).
Note that some printers like the Epson 3880 keep the wheels up when flat loading from the front, so that’s another way to avoid the problem—check your printer manual for details. This is particularly useful when loading custom collage substrates into a printer (Figure 3.5).
Large-Format Printers
For large-format printers, the Epson 7000 and 9000 series printers are great choices, as is the HP Z3200, which I use for most of my image transfer work (Figure 3.6). They work well for printing on transfer film and have outstanding print quality for photographs. If you have an older Z3100, there’s an after-manufacture replacement bar for the exit pizza wheels that keeps them off the media as it exits (contact HP for more information). The Z3200 lets you select (and you should) “Wheels up” when you make your printer profile.

For Epson, I recommend the 7900 series 24-inch printers as a good starting point for wide format printing. The Epson 7800 and 9800 printers are available used and are real workhorse machines, so that’s another option. Keep an eye out for any of the Epson printers that use the 350 ml ink cartridges, which can save a lot of money on ink.
When you build a custom substrate, the Epson 7900 or 9000 series (24 inches or wider) work the best (Figure 3.7). They have a vacuum platen that holds the media down and away from the print heads, with a platen gap of 1.5 mm (see below). And as a bonus, they don’t have the pizza wheels. Good examples of these printers are the Epson 9800 or 9900, which can print on a variety of custom substrates as well as on paper and transfer film.

FIGURE 3.7 Printing on premium transfer film. I’ll use this image later to make a decal by transferring it to a carrier sheet.
One challenge that you may have is that substrates are usually specified in English or decimal units (inches), while the printer specifications are in metric units (millimeters). You can convert between the two: 1 inch is 25.4 millimeters, and 1 millimeter is 0.0394 inches. Table 3.1 gives you some examples of various thicknesses, but always check with the manufacturer of your printer and substrate, as specifications may change.

Platen Gaps
The only downside to the Z3200 printer is that it has only a 0.8 mm platen gap (the distance between the platen and the print head), and so isn’t really suited for custom substrates or direct imaging on thick substrates. If you’re using a thicker substrate on a Z3200, you can use the Adjust Profile menu to increase the platen gap to maximum, but it’s still only the 0.8 mm maximum. The Epson 4000 and 9000 series printers will generally accept media 1.5 mm thick (about the thickness of a new US penny). Some of the desktop printers that print on DVDs will also handle media that thick (but make sure they use pigment inks). Most other Epson printers will accept either 1.2 or 1.3 mm media (about the thickness of a US dime). Be careful, though, because as models change, these tolerances may differ. Always check your specific printer specifications before using a thick substrate.
Read the manual to determine how to set the platen gap, and be very careful: Many printers unexpectedly reset this to the default.
Caution
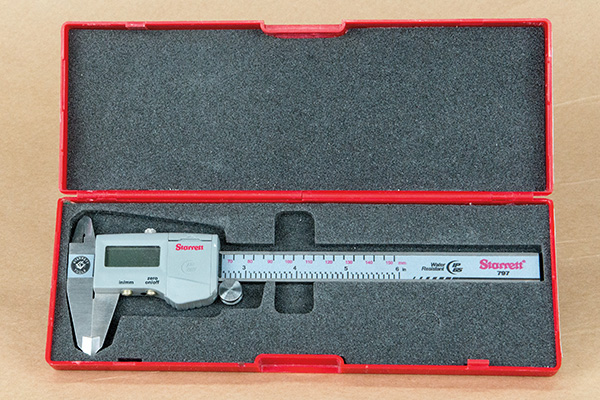
Head strikes—letting the print head hit the media—are bad. If you’re in doubt, don’t risk your printer by using media that’s too thick. I carry a digital caliper (Figure 3.8) with me when I shop for new substrates and media.
Using a Service Bureau
There are two other kinds of printers used in this book: 3D printers which I’ll talk more about in Section 4, and UV printers which are in Chapter 18. Some 3D printers have dropped in price to under $1500, which is in the range of affordability for schools and some artists. UV printers, while they’ve dropped in price, are generally not available to individual artists, and only a few schools can afford them. For both of these printers, you can outsource your printing to a service bureau. Shapeways (www.shapeways.com) is an excellent resource for 3D printing. With the advent of the new Roland LED UV printers (with white and gloss ink!), they are affordable enough that most major metro areas now have a local print shop with a UV printer. Given the maintenance and cost of the UV printers, I suggest you do what I do—outsource the imaging work to one of these fine providers. I love this new technology; it allows me to produce images that simply can’t be done any other way.
Computers and Software
I’ve come a long way from that first Apple ][+ computer. My new Retina MacBook Pro has more computing and graphics power than my Mac Pro of only a few years ago. That’s a good thing, too—the image files I work with have grown from a few kilobytes to several gigabytes. The hardware technology has now reached a plateau where the standard machines can do everything I ask of them, and pretty darn quickly (I drink a lot less coffee and tea than I used to—no time for breaks). Tablets are an interesting technology—you couldn’t pry my iPad out of my hands—but they generally don’t have the computing power necessary to do heavy image processing...yet.
Software has taken advantage of all this computing power—the latest versions of Lightroom and Photoshop are nothing short of amazing. While those are the tools that I use and recommend, you won’t need heavy image-manipulation skills to use these processes—in my workshops, we shoot pictures with our iPhones and print directly to an Epson printer with very little manipulation. For most work, though, you’ll probably need to be able to do some basic image manipulation and to print using a specific printer profile.
Other Equipment
There are a number of different tools that we’ll need for the processes in this book. I search thrift stores and garage sales for old blenders, mixers, and containers—once you’ve used any tool for art, you should never use it for food again. Clearly label everything, and keep your materials separate. In particular, I avoid using water bottles and coffee cups for art materials—it’s too easy to grab the wrong one when you’re pondering your work. Do not mix food with photography or art, except at your opening reception!
Appliances
To prepare the light-sensitive emulsion, you’ll need a collection of household appliances. Never use any of these items for purposes other than art, so search the secondhand and discount stores for inexpensive options. A food dehydrator is handy though not essential for drying the plant material. An inexpensive Pacific Mount laminator (Figure 3.9) is a great tool to have in your studio—it works much better than putting things between sheets of plywood and driving over it in your driveway (that works too, but things tend to squirt out onto the concrete). If you don’t have a laminator and would rather not use the car, you can use anything else that’s heavy, from a lawn roller filled with water to a custom-made steel brayer (Figure 3.10); see your local tool and die shop. A small brayer is an inexpensive tool for smaller images.
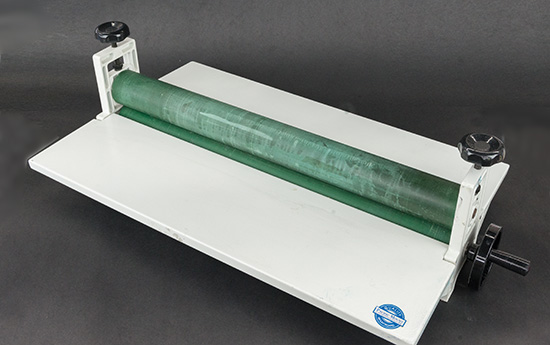
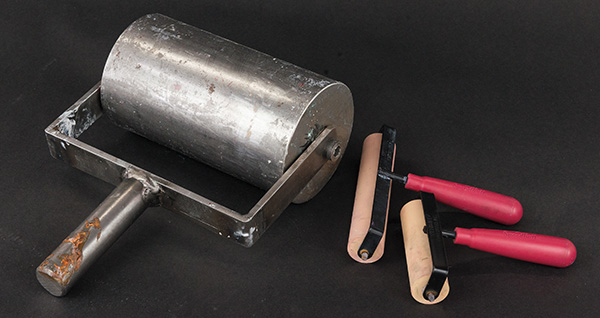
FIGURE 3.10 A brayer like this steel one may have had a previous job rolling out very large pie crusts.
Odor Reducer
Many times in my studio I work with materials that build up odors (like when the pork gelatin rots if I forget to add the preservative). While not a substitute for a commercial-certified air cleaner, I’ve found that by using a box fan with a charcoal furnace filter I can reduce the odors in my studio. This is not a substitute for adequate ventilation. You can find these filters online (Figure 3.11). Place the filter on the intake side of a box fan (the suction will hold it in place). I put the filter in a plastic bag when not using it, and change them fairly often.
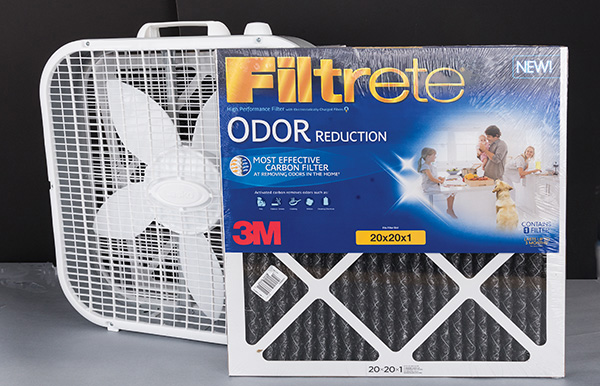
FIGURE 3.11 This fan helps reduce the odor in my studio—but I still follow the instructions on my materials to ensure I have adequate ventilation. I use the 3M Filtrate 1200 Home Odor Reduction 20×20×1 filter with activated carbon.
Carrier Sheets
In my previous books, we used carrier sheets to hold substrates for direct imaging. In this book, we’ll use these sheets as a surface to make decals.
The carrier sheets (Figure 3.12) we’ll use most often are made from polypropylene or polyethylene, both of which release almost every coating that we can put on them. Other plastics won’t work; for example, we can’t use polycarbonate because the decals cannot be removed from this plastic.

These sheets come in a variety of thicknesses, and I recommend using an ultra-thin (0.016 inches) carrier sheet made from polyethylene. The material is flexible yet rigid enough to avoid warping. Check the book website or your Internet search engine for sources for these sheets. I also like to work on ¼-inch thick white polypropylene slabs (Figure 3.13). These are super smooth and stay flatter than the sheets, so they’re great for building decals.

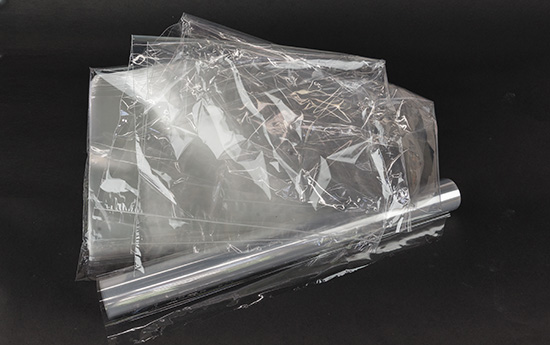
Two other options are a polyethylene sheet, like those used as laundry bags, or a cellophane sheet, like the ones used to wrap flowers (Figure 3.14). I really like the bag flowers come in because it’s water clear and I can flip it over to see what my substrate is going to look like. I avoid using plastic sheets from the hardware store (except as drop cloths) because many of them have an oily surface and are cloudy.
Work Surface
We’re going to get messy. Coatings may flow off panels and onto the table (and maybe even the floor!). You’ll need a large table that’s completely level—use a level in all four directions and put wedges under the feet (tape them down) as needed. To catch most of the runoff, cover the table with a sheet of polypropylene plastic and tape it to the underside of the table. You can also use a large cookie tray for runoff, as long as it’s nonstick. If you’re not working in a studio with a concrete floor, you may even want a drop cloth underneath.
Using an Alignment Board
Nothing is more frustrating than having the perfect image and the perfect substrate and then rolling down the transfer film and having it off square or misalign. I’ve developed this procedure for creating an alignment board after many frustrating attempts to do this process by hand. Make sure you set this up before you coat your substrate with your transfer medium!
Hint
Turn off any fans, especially overhead ceiling fans, as they’ll drop dust on the transfer. Working in an air-conditioned room solves the dust problem and also removes moisture from the air so things will dry faster.
To roll your film down using an alignment board:
1. If your printed film has the white edge-tape, go ahead and remove it.
2. Place a second panel, the same thickness as your substrate (I’m using a second white polypropylene panel in this example), on the work surface against the edge of your substrate. This is your alignment board.
3. Place your printed film, printed side down, on the substrate surface (Figure 3.15).

4. Tape one edge of the film to the alignment board using blue painter’s tape. This is why we leave an extra 3 to 4 inches of blank film around our printed image (Figure 3.16).

5. Roll the imaged film around a cardboard tube from the substrate to the alignment board. Make sure that the ink is on the outside of the tube—the ink side is a bit dull. For small images, it may be easier just to fold the film back, as I’m doing here.
Hint
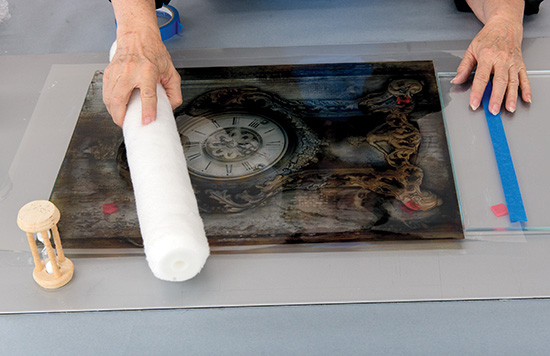
For small works, tape the film to the alignment board, and then fold it back. When the art panel is ready, use a soft paint roller to push the image onto the surface.
6. Move the alignment board off to the side and then prepare your substrate with the transfer medium (Figure 3.17).

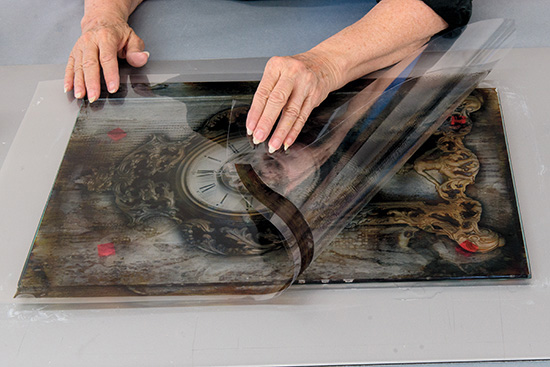
7. When you’re ready to do the transfer, move the print and alignment board back up against the substrate, and then carefully unroll the print onto your transfer medium. Make sure you do not let the film flop down at any point or you’ll end up with a distorted image (Figure 3.18).

8. Carefully press the surface of the film down to the substrate to ensure that it’s completely in contact with the transfer medium. By rolling down the film, you’ll avoid having bubbles trapped between the film and the surface. Remove the tape, and push the alignment board aside (Figure 3.19).
9. After waiting the required time, pick up the far corner of the film and diagonally pull off the substrate in the opposite direction you rolled it down. Discard the film (Figure 3.20).
Coating Applicators
To spread precoats evenly and quickly on a substrate, you need to use a coating rod, bar, or applicator. The best coating applicator is a #50 coating application or Mayer rod (Figure 3.21). This is a straight rod and has a stainless steel wire wrapped around it. As you pull the rod, the wire keeps the coating at an even thickness across the entire substrate. It is a bit expensive, but if you plan to coat a lot of smooth paper, metal, or plastic, it’s a wise investment.

Caution
Never use a coating rod to apply SuperSauce Solution, SuperSauce Concentrate, or WonderSauce. These products are not water soluble when dry and will clog the wires in the rod—use only water-soluble materials with coating rods.
Another coating tool we’ll use is a foam brush. This is an inexpensive alternative to the coating rod, but the downside is that because there are air pockets in the foam, you can get bubbles trapped in thicker precoats. I’ve found that many of the cheap foam brushes just don’t hold up very well, but the ones from Jen Manufacturing are excellent. It’s always best to apply just a single coat, so it’s worth spending a bit of time practicing.
Don’t shake the coating because it’ll create bubbles in it. If you accidently do shake it, either pour it through a very fine strainer to filter out the bubbles or wait for the bubbles to rise to the top and skim them off.
To apply a precoat to a substrate:
1. Put a little double-sided tape on the back side of your substrate; press it to your work surface.
2. If you’re using a coating rod, apply a thick line of the precoat to your work surface but above the top of your substrate. Place your coating rod above that line, and draw the rod across the substrate in one smooth motion. Hold the rod still without twisting—draw it, don’t roll it (Figure 3.22).

3. If using a foam brush, apply a thick line of precoat directly to your substrate, and lightly spread it across the entire substrate with the foam brush. Make sure that your last run across the substrate is in one direction so that you remove any excess precoat and leave an even, smooth layer.
Other Tools
You’ll need all the basics, including measuring cups and spoons, spatulas, and several 1- and 2-quart Pyrex dishes for mixing and heating materials. Canning jars can also work for heating and storing the materials. You’ll also need items such as blue painter’s tape, masking tape, duct tape, tack cloth, steel wool, a hobby razor knife, a soft rubber brayer, a wire brush, strainers, various containers, and measuring cups. Last, you’ll need a strainer for some processes. I prefer polypropylene because the materials don’t stick to it as easily, and it slides across the surface without making marks.
Caution
If your thermometer has a laser pointer on it, follow all safety instructions on the tool.
Some of these processes require specific temperature measures. While candy or probe thermometers work, I strongly recommend investing in an infrared thermometer. They are accurate, read instantly, and allow you to measure temperatures without handling the materials or containers.
Many of the coatings can have bubbles after applying them. To pop them, use a Rocket Blaster, found at a photo supply store, or something similar to have precise control as you force the bubbles to pop with the air blast. A small hair dryer also works well. To pop bubbles that appear between the image and the substrate as you do the transfer, while the transfer is still wet pop the bubbles with a pin dipped in isopropyl alcohol. Wait until the surface is dry to the touch (about two hours), cover the image with a polypropylene plastic bag, and then use a foam block or your fingertips to rub the spot down to the substrate.
To heat materials, you’ll need a microwave. And if you really get hooked on these processes, you may want a small refrigerator that can be dedicated to your artwork.
Most of these processes also involve specific times, so you’ll need an accurate timer, either an iPhone for a single job or separate inexpensive 3-minute egg timers for multiple jobs.
Tip
For some projects you’ll make custom tools that allow you to create surface textures (Figure 3.23); I’ll show you how later in the book.

Last, you’ll need a random orbital sander for some processes. These sand a surface evenly without leaving swirls, and really save your arms and hands.
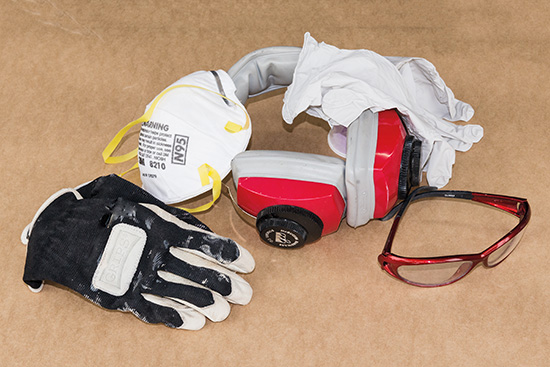
Safety Equipment
For all of this equipment, always read the labels to make sure it’s appropriate for the materials or equipment you’re using. Likewise, read and follow all safety precautions on the product labels.
You’ll need a good pair of safety glasses or eye shields. While it’s tempting to rely on eyeglasses, they’re no substitute for real safety glasses. These should wrap around your face and protect you from splashes. Make sure you get ones that are impact resistant or impact proof. Always wear them when doing any of these processes. They should also provide 100 percent protection from UV light.
You’ll need appropriate protective gloves. Make sure you wear them any time you’re working with liquids or powders. You’ll also need work gloves to wear when sanding materials.
Many of these processes involve fine-powdered pigments or vapors, so you’ll need a safety mask suitable for that particular use.
SuperSauce Solution and isopropyl and grain alcohol are volatile and flammable. Keep them away from heat and ignition sources (including the inside of your car on a hot day), and ensure that you have adequate ventilation. I prefer to use these outside to avoid problems. You should also have a fire extinguisher suitable for alcohol fires available in your studio.
If you have questions about exactly what safety equipment to buy, ask at the store when you purchase the items (Figure 3.24).