
The objective of this chapter and the lessons that it encompasses is to guide you step by step to prepare your development environment to start test automation developments with Selenium and C#. You will be identifying important packages you need to add to your test automation projects and the purpose of each of those packages as well as the use of the packages. Additionally, you will explore the required setup to enable developing Selenium-based test automations with Python language in Visual Studio. Preparing your development environment with open source test automation framework MAQS and SpecFlow would pave the way to exploring capabilities of these frameworks to enhance test automations development in the coming chapters.
Lesson 2.01: Set Up a Test Project with Selenium in Visual Studio
This lesson will guide you in how to set up Visual Studio project for functional UI test automation with Selenium using the available NuGet packages. You will be writing a sample test to verify whether you have set up your test project with all the required packages.
Prerequisites: You are running Visual Studio 2017 on Windows 10 or on Windows Server 2012 R2 or a newer version of the Windows server. You should have Google Chrome version 67 or later installed. You should have intermediate level of C# language proficiency.
Setting Up Visual Studio Test Project
- 1.
In Visual Studio 2017, select Files ➤ New ➤ Project.
- 2.In the New Project pop-up window, select Test under Visual Studio C# and select Unit Test Project from the test project list. Give a Name for the project, specify a Solution Name, select Location and click on the OK button. Leaving Create directory for solution checked will allow you to have a new directory created for the new solution in the selected location (see Figure 2-1).
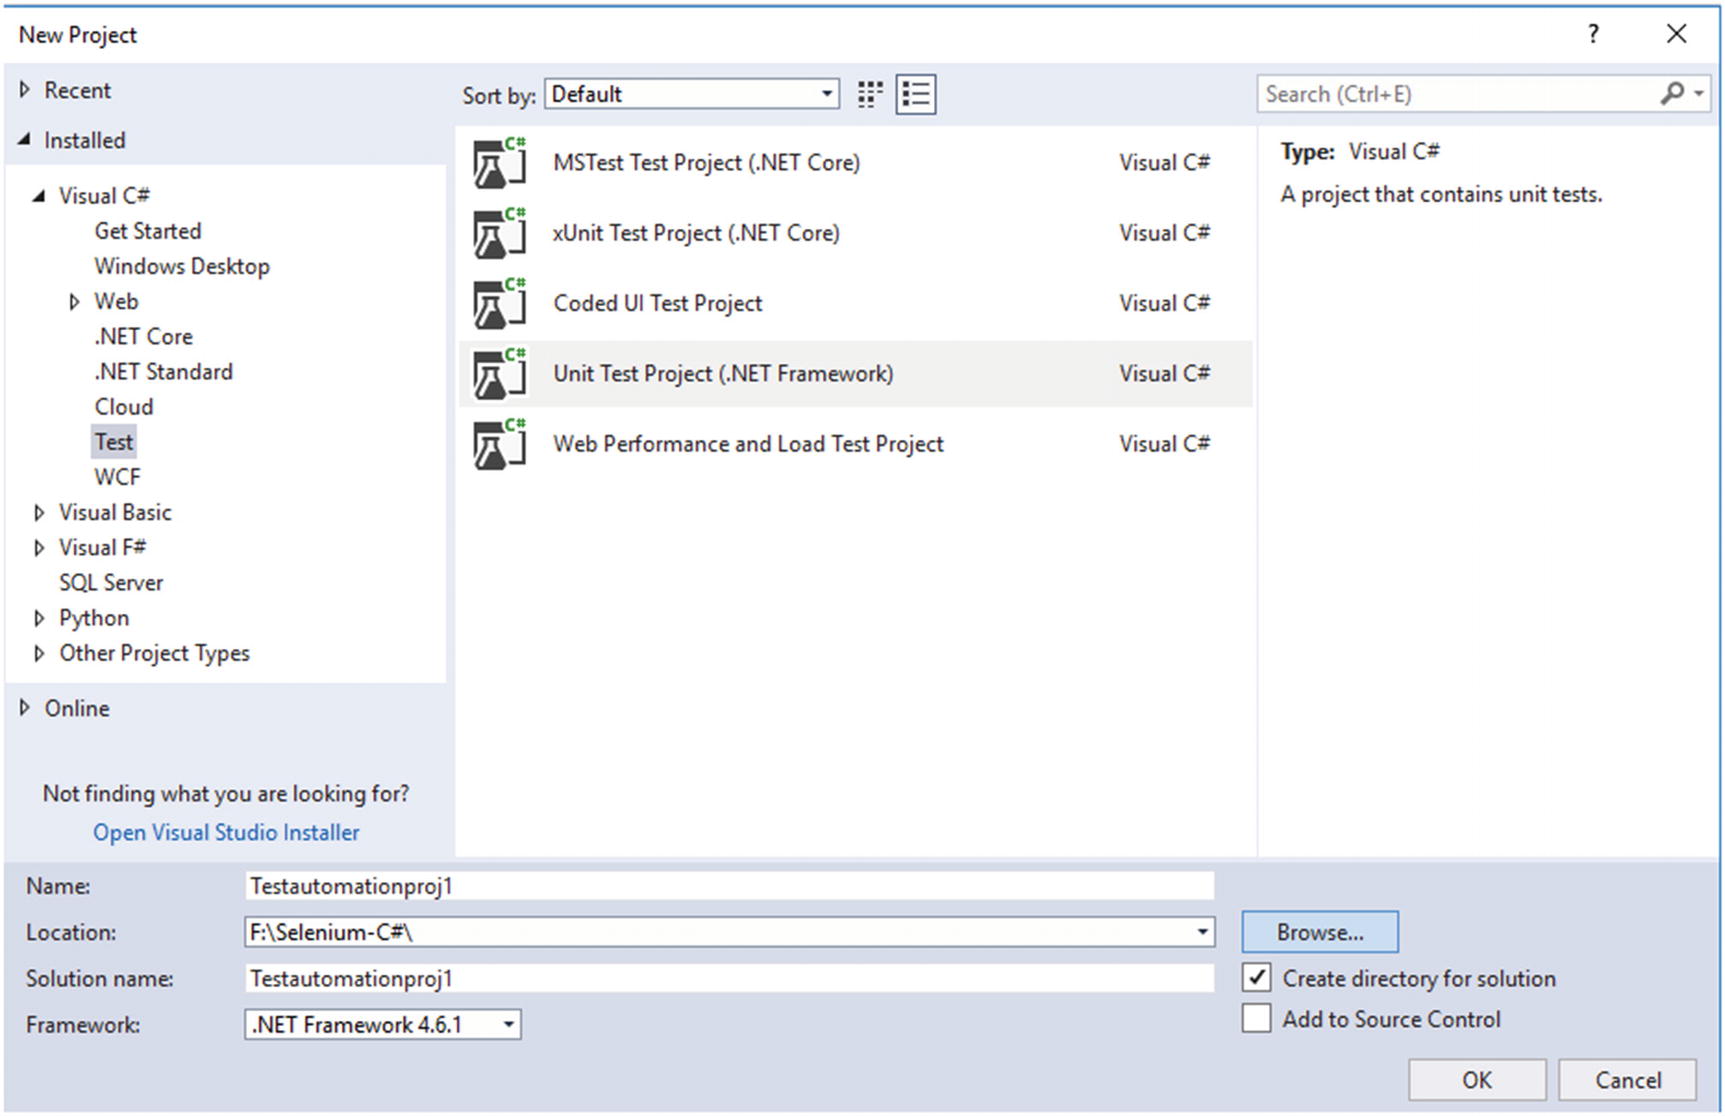 Figure 2-1
Creating a new test project
- 3.Next, we need to install a few required packages to enable writing Selenium base UI test automation code. Let’s identify each of these NuGet packages.
Selenium.WebDriver: A web automation framework that comes as a NuGet package, which allows execution of UI tests against different browsers, and supports different programming languages.
Selenium.Support: The NuGet package contains supportive methods and classes required to handle explicit waits, which are used to wait for activities to be completed in the application being tested.
Selenium.WebDriver.ChromeDriver: The NuGet package contains the executable ChromeDriver that is required to run UI automation tests using the Google Chrome browser.
DotNetSeleniumExtras.WaitHelpers: The NuGet package contains the expected conditions implementation with .NET binding, which we will explore in detail in Chapter 3. The expected conditions implementation with .NET binding is deprecated in the latest Selenium.Support NuGet package. This portion of the code has been migrated to the DotNetSeleniumExtras.WaitHelpers package.
- 4.Let’s see how to add the aforementioned NuGet packages to the test project created in the earlier step of this lesson, using the Selenium.WebDriver NuGet package installation as an example. Open the NuGet Package Manager by clicking Tools ➤ NuGet Package Manager ➤ Manage NuGet Packages for the Visual Studio Solution (see Figure 2-2).
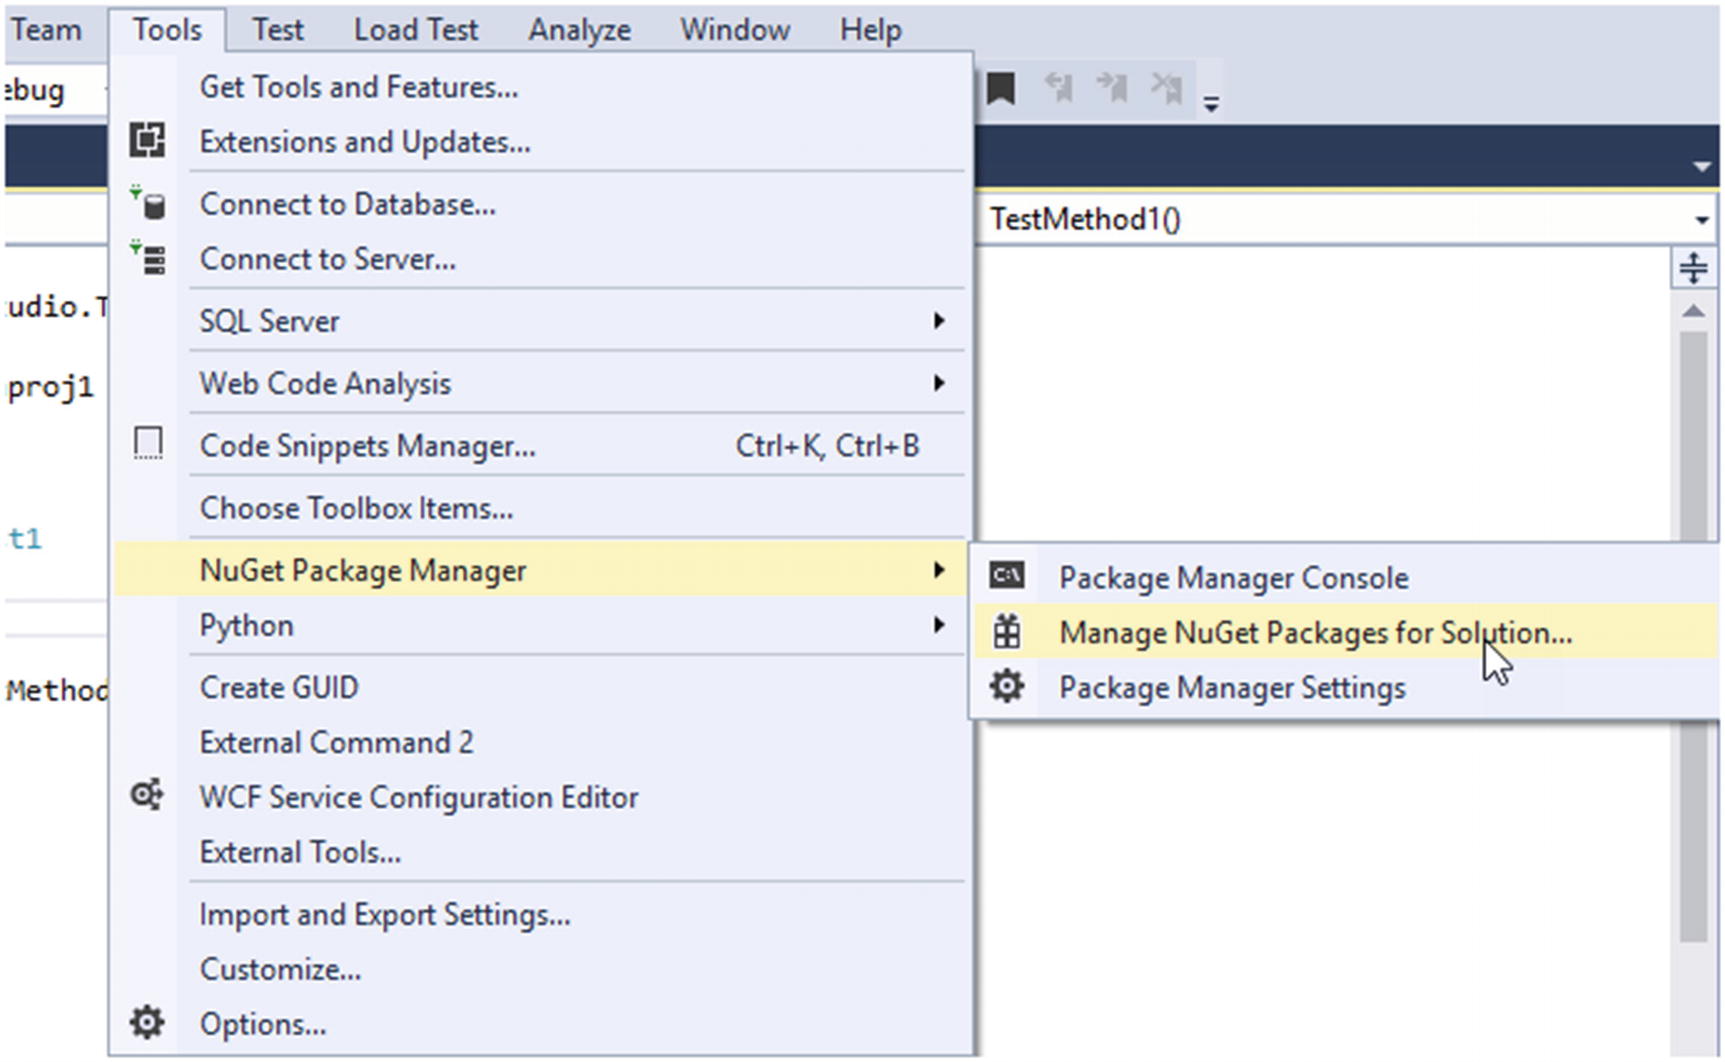 Figure 2-2
Manage NuGet packages
- 5.In the Browse tab of the Manage Packages for Solution window, search for Selenium.WebDriver. Select the test project created in the earlier step and click on Install to get the Selenium.WebDriver NuGet package installed to the test project (see Figure 2-3).
 Figure 2-3
Adding a NuGet package to a project
- 6.
After clicking the Install button, there may be a preview changes pop-up displayed. If the preview changes to pop-up is displayed, click on OK in the pop-up window to proceed with installation.
- 7.
Next, we need to install Selenium.Support and Selenium.WebDriver.ChromeDriver packages. You can skip installing the DotNetSeleniumExtras.WaitHelpers NuGet package for now, as we are not using the expected conditions scenarios in this chapter. We can install the DotNetSeleniumExtras.WaitHelpers NuGet package later when we need it in Chapter 3. To install any NuGet package, follow the steps described for Selenium.WebDriver installation.
- 8.Click on the Installed tab of Manage Packages for Solution window and you will find all installed packages listed there (see Figure 2-4).
 Figure 2-4
Installed packages
- 9.In Solution Explorer, expand project references to find installed Selenium packages. You can see installed packages are available as references in the project (see Figure 2-5).
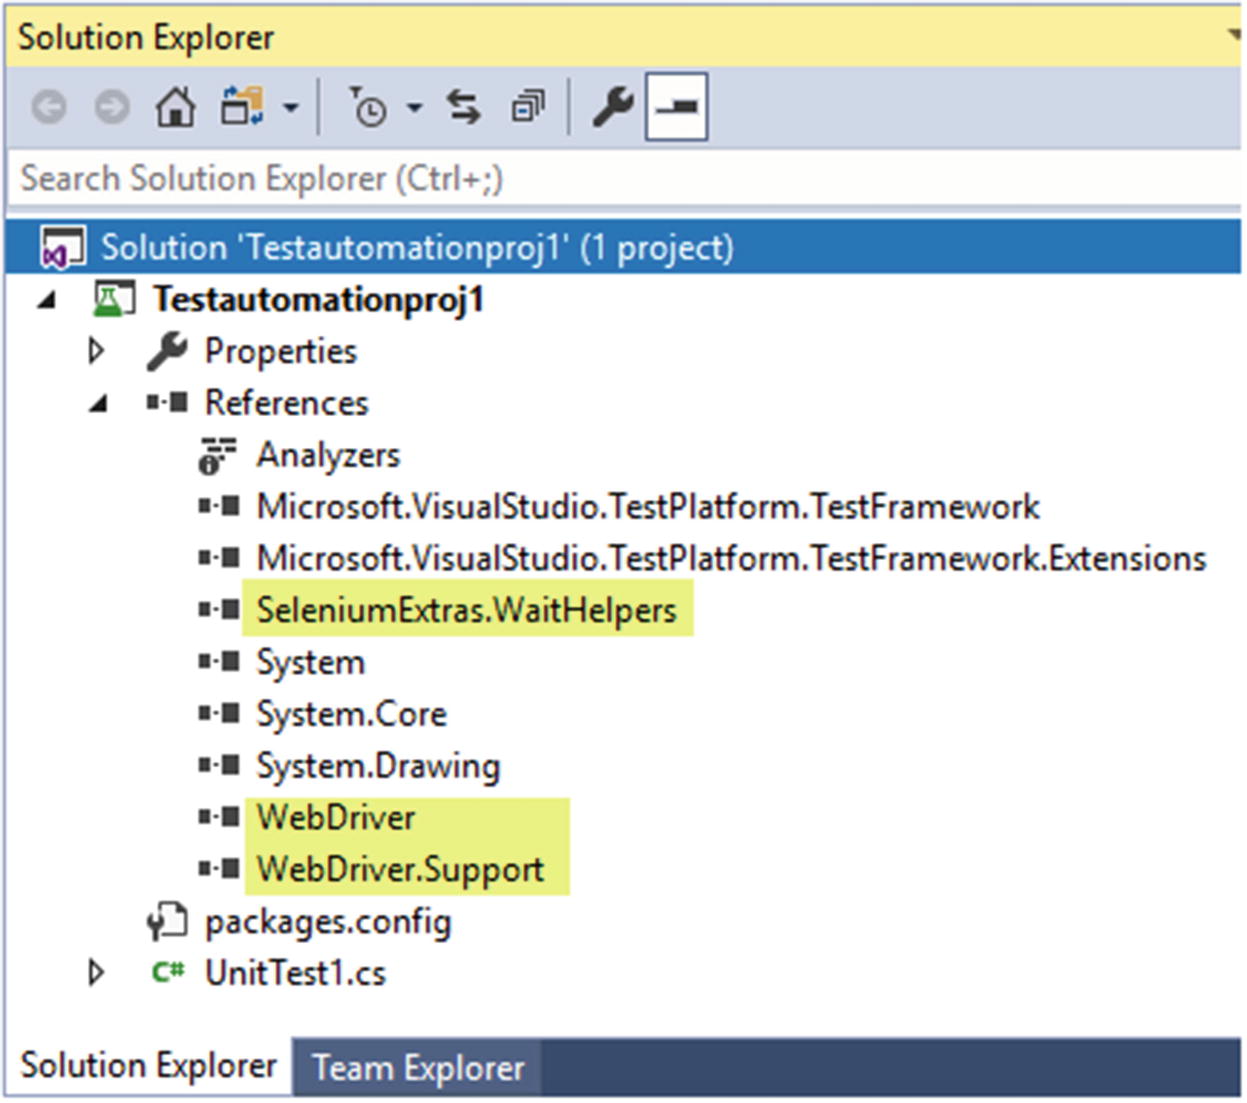 Figure 2-5
Packages in project references
Following the steps mentioned earlier, we have completed setting up the initial requirements to start writing functional UI tests with Visual Studio using Selenium.
Verifying the Test Project
- 1.In Solution Explorer, find the UnitTest1.cs file and double-click on it to open. Inside this class you can find a method named TestMethod1 with [TestMethod] attribute applied to it. MSTest is the default test runner and framework of Visual Studio. These attributes in the test class file are used to communicate with MSTest framework. Following are the few attributes you can use in a test class.
[TestInitialize]: Used to identify the method that allocates and configures resources needed by all tests in the test class.
[TestCleanup]: Used to identify the method that is used to free resources obtained by the tests in the test class.
[TestProperty]: Specify the test-specific property on a method.
[TestClass]: Used to identify classes that contain the test method.
[TestMethod]: Used to identify the test method.
- 2.Add the following lines of code in the method named TestMethod1. The first line initializes ChromeOption instance, and the second line adds an argument to maximize the browser. It is a good practice to maximize the browser before executing tests since a browser open with a small display area can affect the web element finding process.ChromeOptions option = new ChromeOptions();option.AddArgument("—start-maximized");
- 3.Then initialize the Chrome web driver instance and pass option as a parameter to maximize the web browser.IWebDriver driver = new ChromeDriver(option);
- 4.Set up the WebDriverWait instance where you can specify the time period for explicit wait. Explicit wait will make the web driver wait for expected conditions to become true. If the conditions are not satisfied, it will wait for the maximum timeout period (specified as 30 seconds in the following statement) before throwing a “NoSuchElementException”. The usage of condition with WebDriverWait is explained in a later step of the method we are implementing.WebDriverWait wait = new WebDriverWait(driver, TimeSpan.FromSeconds(30));
- 5.Next, you need to use the web driver and navigate to a given url. For this example, let’s use google.com as our test website.driver.Navigate().GoToUrl("https://www.google.lk/");
- 6.
Now we have launched the Chrome browser and navigated to the web page; next, we need to perform actions on UI elements on the web page. How can you identify elements in a web page with Selenium? Selenium identifies elements using eight locators. We will discuss on all those locators in Chapter 3.
- 7.To identify the locator for this simple test, navigate to the Google search page with the Chrome browser. Then right-click on the search text box and select inspect, or press F12 and then click on the search text box.
 Figure 2-6
Inspecting element
- 8.This will open the Developer Tools window, and in it you can identify one of the locators, such as element ID of the search text box inside the highlighted area, as shown in Figure 2-7 .
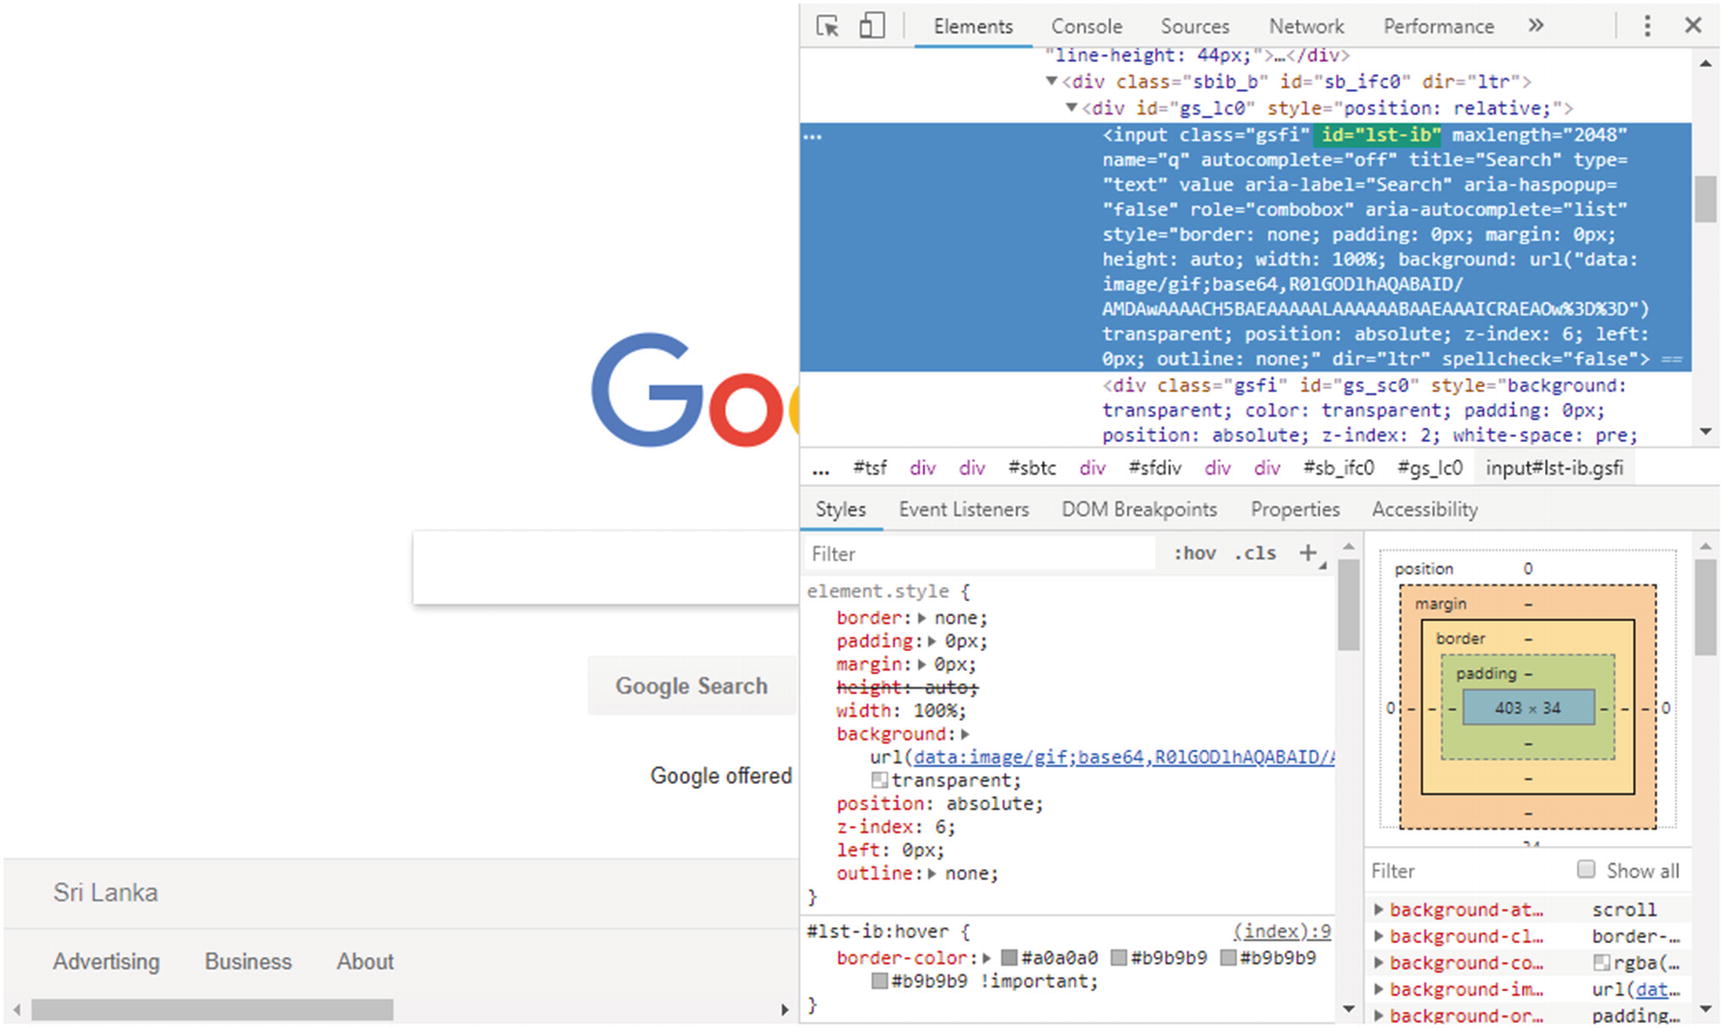 Figure 2-7
Element ID as a locator
- 9.Add the following code line to the method that says web driver to wait until the Google search box becomes clickable. Here we have used the ElementToBeClickable condition to achieve that and used element ID “lst-ib” as the locator. This statement will make the web driver wait until the search test box is available to type text in it, once we navigate to the google.com web page. Wait will timeout in 30 seconds if the search text box does not become available and clickable, which throws an exception making the test fail.wait.Until(SeleniumExtras.WaitHelpers.ExpectedConditions.ElementToBeClickable(By.Id("lst-ib")));
- 10.
Once the search text box becomes clickable, you can find it with search text element ID as the locator. Remember there are other locators that we are going to discuss in Chapter 3.
IWebElement textField = driver.FindElement(By.Id("lst-ib"));
- 11.Now we have identified the search text box (web element) and we can perform actions on it. The following code segment shows how to type text in a Google search text box using the SendKeys method in a web element.textField.SendKeys("Selenium");
- 12.The next three lines of code identify the search button element and click on it. To locate the search button in the following code, we have used a different locator named CssSelector.wait.Until(SeleniumExtras.WaitHelpers.ExpectedConditions.ElementToBeClickable(By.CssSelector("input[value='Google Search'][class='lsb']")));IWebElement searchButton = driver.FindElement(By.CssSelector("input[value='Google Search']"));searchButton.Click();
- 13.Next we need to verify the action has succeed. To do that, we can use assertions. In this test we are typing the word “Selenium” in the Google search text box and click on the Google search button. Clicking on the search button page should navigate to the search results page. Hence, we have to verify whether the search result page opened or not and this can be done by verifying the search result page title using the following code line:Assert.AreEqual(true, wait.Until(SeleniumExtras.WaitHelpers.ExpectedConditions.TitleContains("Selenium - Google Search")));
- 14.After all the test steps are completed, you need to close the browser. In this sample code you can use the Dispose method to close all open browser windows and safely end the session as you are reaching the end of the method.driver.Dispose();
- 15.The completed method should look the following:using System;using Microsoft.VisualStudio.TestTools.UnitTesting;using OpenQA.Selenium;using OpenQA.Selenium.Chrome;using OpenQA.Selenium.Support.UI;namespace Testautomationproj1{[TestClass]public class UnitTest1{[TestMethod]public void TestMethod1(){ChromeOptions option = new ChromeOptions();option.AddArgument("—start-maximized");IWebDriver driver = new ChromeDriver(option);WebDriverWait wait = new WebDriverWait(driver, TimeSpan.FromSeconds(30));driver.Navigate().GoToUrl("https://www.google.lk/");wait.Until(SeleniumExtras.WaitHelpers.ExpectedConditions.ElementToBeClickable(By.Name("q")));IWebElement textField = driver.FindElement(By.Name("q"));textField.SendKeys("Selenium");wait.Until(SeleniumExtras.WaitHelpers.ExpectedConditions.ElementToBeClickable(By.CssSelector("input[value='Google Search']")));IWebElement searchButton = driver.FindElement(By.CssSelector("input[value='Google Search']"));searchButton.Click();Assert.AreEqual(true, wait.Until(SeleniumExtras.WaitHelpers.ExpectedConditions.TitleContains("Selenium - Google Search")));driver.Dispose();}}}
- 16.Now build the test project in Visual Studio. Then, open the Test Explorer window by clicking Test ➤ Windows ➤ Test Explorer in the Visual Studio menu. The test we created will appear in Test Explorer, as shown in Figure 2-8, and you can execute it by clicking Run All. Or you can right-click on the test and run it or run with debugging.
 Figure 2-8
Running a test
 Figure 2-9
Executed test
- 17.
When you run the test method, the Chrome browser will open, navigate to the Google search page, and perform each step of the test method.
- 18.
After execution, the completed Test Explorer shows test method status and execution time. If the test method failed, the Test Explorer displays the failure reason, the code line that has an issue, and the cause of the issue. Test Explorer in Visual Studio is very helpful to diagnose the issues with test code, which we will discuss further in Chapter 3.
With the aforementioned sample test, we have verified the test project is equipped with all NuGet packages to execute functional UI tests. Further, you now understand how to identify web elements using locators, how to use explicit waits, and how to perform basic action on each element.
In this lesson, you have learned how to set up Visual Studio 2017 to do functional test automation using Selenium web driver and how to create a simple test project to execute UI tests using Test Explorer.
Lesson 2.02: Set Up a Test Project with Selenium and Python in Visual Studio
You can learn how to set up Visual Studio for test automation with Selenium using Python as the language in this lesson. Further, you will be able you write a sample test to verify that you have set up Python with Selenium test project correctly.
Prerequisites: You must have Visual Studio 2017 or later and the Chrome browser installed on your machine. You must be familiar with setting up Visual Studio and its workloads.
Setting up Visual Studio to Work with Python
- 1.Open Visual Studio Installer in the Start menu of Windows (see Figure 2-10).
 Figure 2-10
Open Visual Studio Installer
- 2.Click on the Modify button in the Visual Studio edition you have installed on your machine in the opened Visual Studio Installer window. Select the check box for Python development workload and click on the modify button to install it (see Figure 2-11).
 Figure 2-11
Installing Python workload
- 3.
Once the installation is completed, launch the Visual Studio.
- 4.
To create the Python project in Visual Studio, select Files ➤ New ➤ Project.
- 5.In the New Project pop-up window, select Python and Select Python Application from the project list. Give a Name for the Project, specify a Solution Name, select Location, and click on the OK button. Leaving Create directory for solution checked will allow you to have a new directory created for the new solution in the selected location (see Figure 2-12).
 Figure 2-12
Creating a Python project
- 6.
Now we need to add unit test class to the project in order to start writing our tests using Selenium and Python. In Solution Explorer, right-click on project and select Add ➤ New Item.
- 7.Select the Python Unit Test item from the file list displayed in the pop-up window. Give a name for the test class and click on the Add button to add the unit test file to the project (see Figure 2-13).
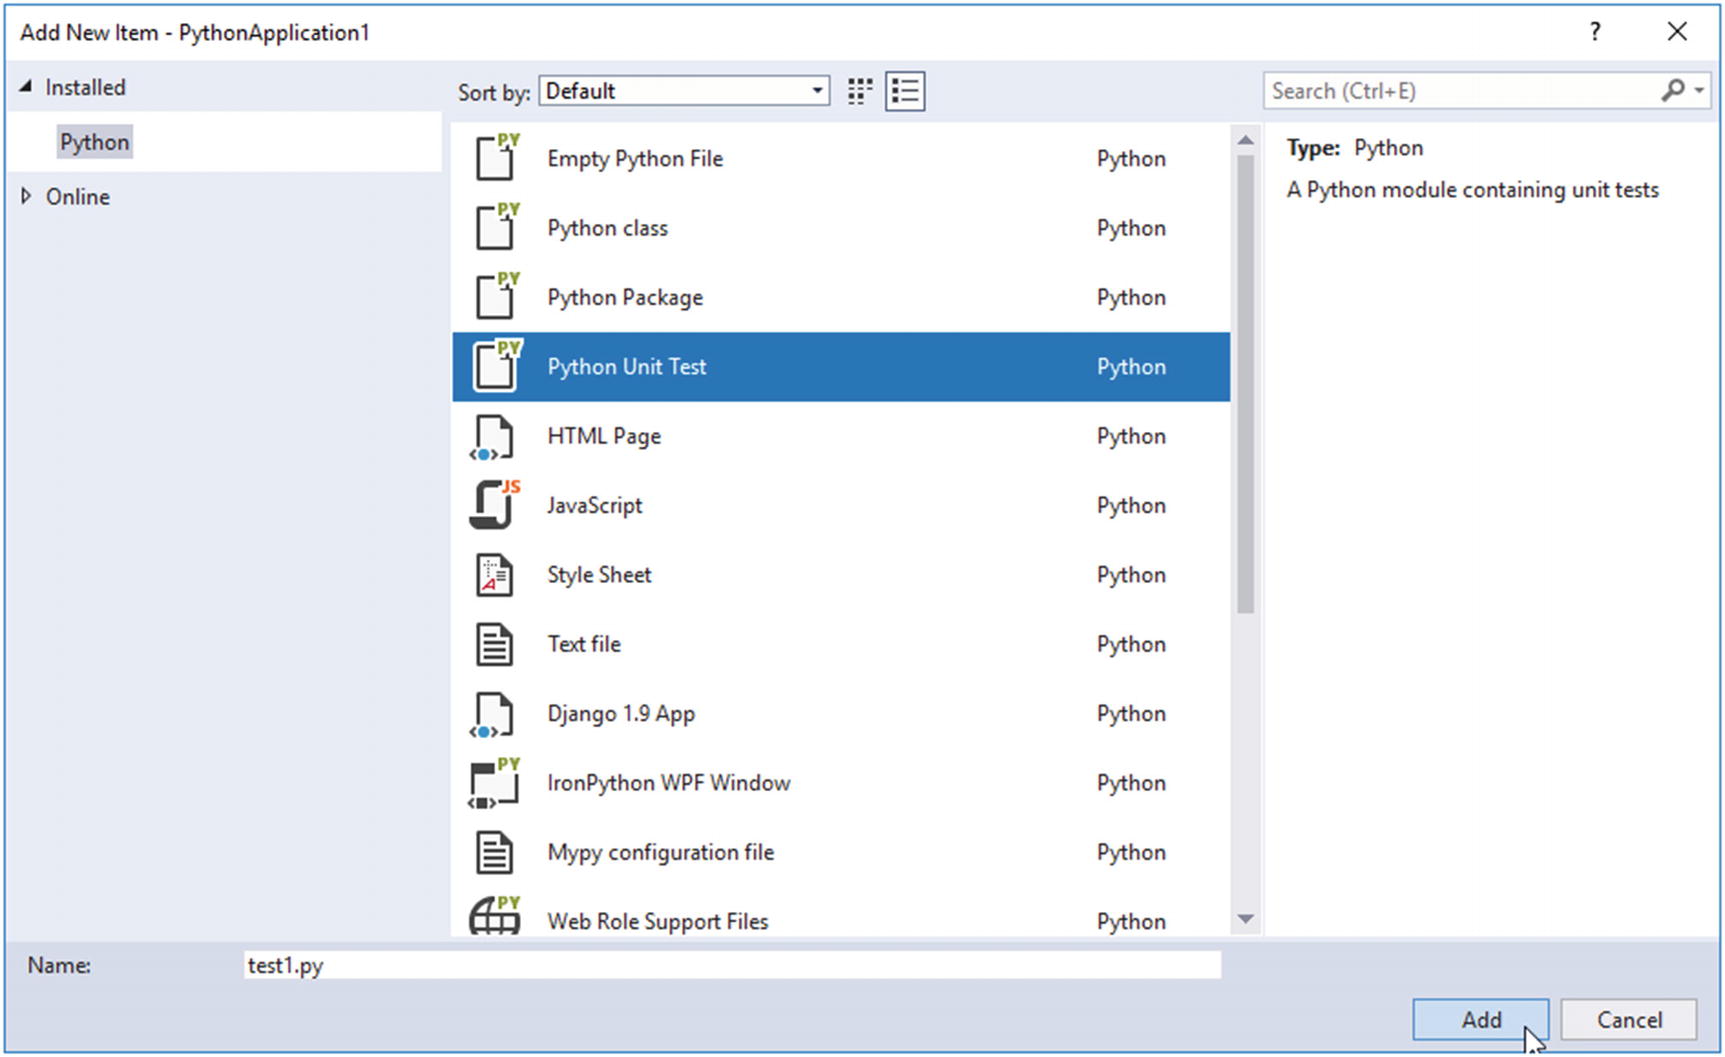 Figure 2-13
Adding Python Unit Test class
- 8.If you inspect the newly added Python Unit Test class file, it contains code, as shown in Figure 2-14. unittest is a module that is imported to allow you to create a derived class from unittest.TestCase, which you can see was created with the name Test_test1 by default. Further, a sample test case was created, which was set to throw a “Not Implemented” exception.
 Figure 2-14
Python Unit Test class
- 9.Next, we need to add the required packages to develop tests. You can install packages by right-clicking on Python Interpreter and clicking on Install Python Packages. Python Interpreter (“Python 3.6 (64 bit) (global default)” in Figure 2-15) can be found by expanding the Python Environments node in Solution Explorer. By default, two packages are already available in the Python Interpreter.
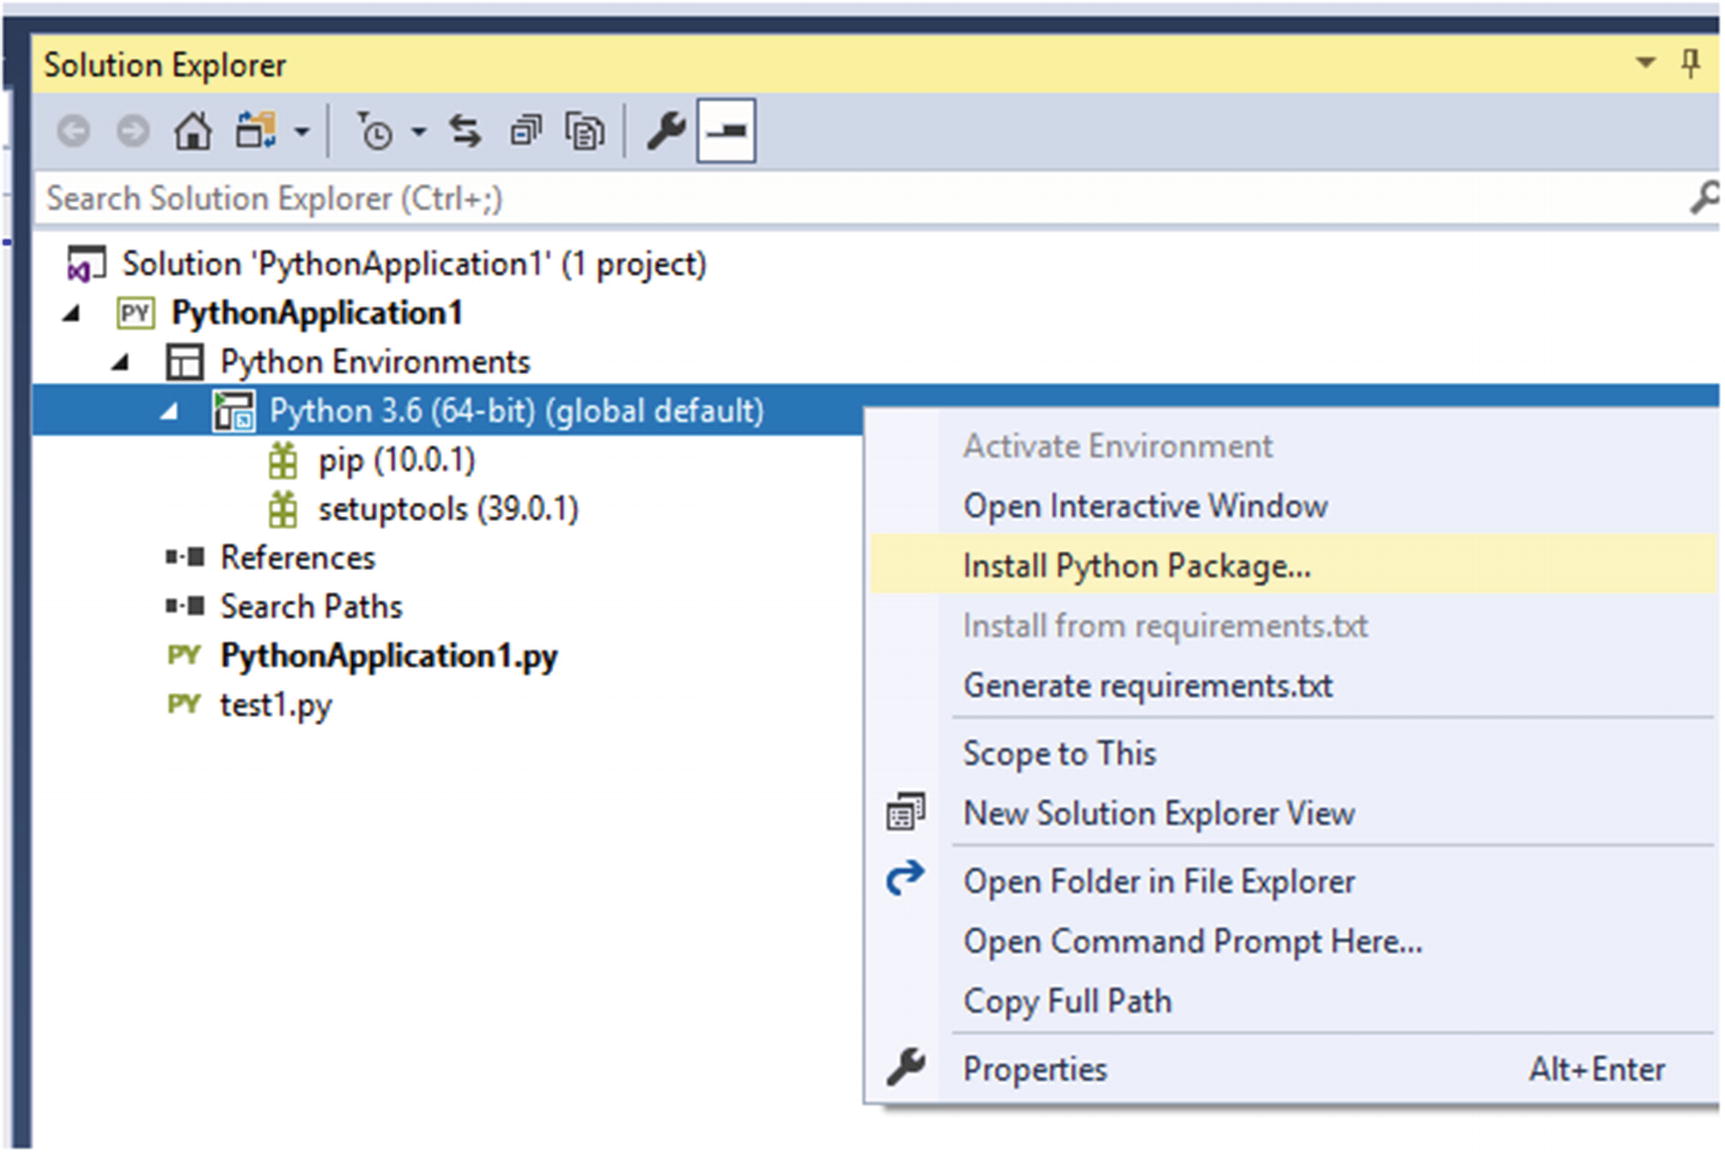 Figure 2-15
Open Python environment
- 10.In the search box that appears under the drop-down, which is selected as “Packages (PyPI)” in the Python Environments window, search for Selenium. From the search results displayed, you can click on Install Selenium to get the Selenium added to the project we created.
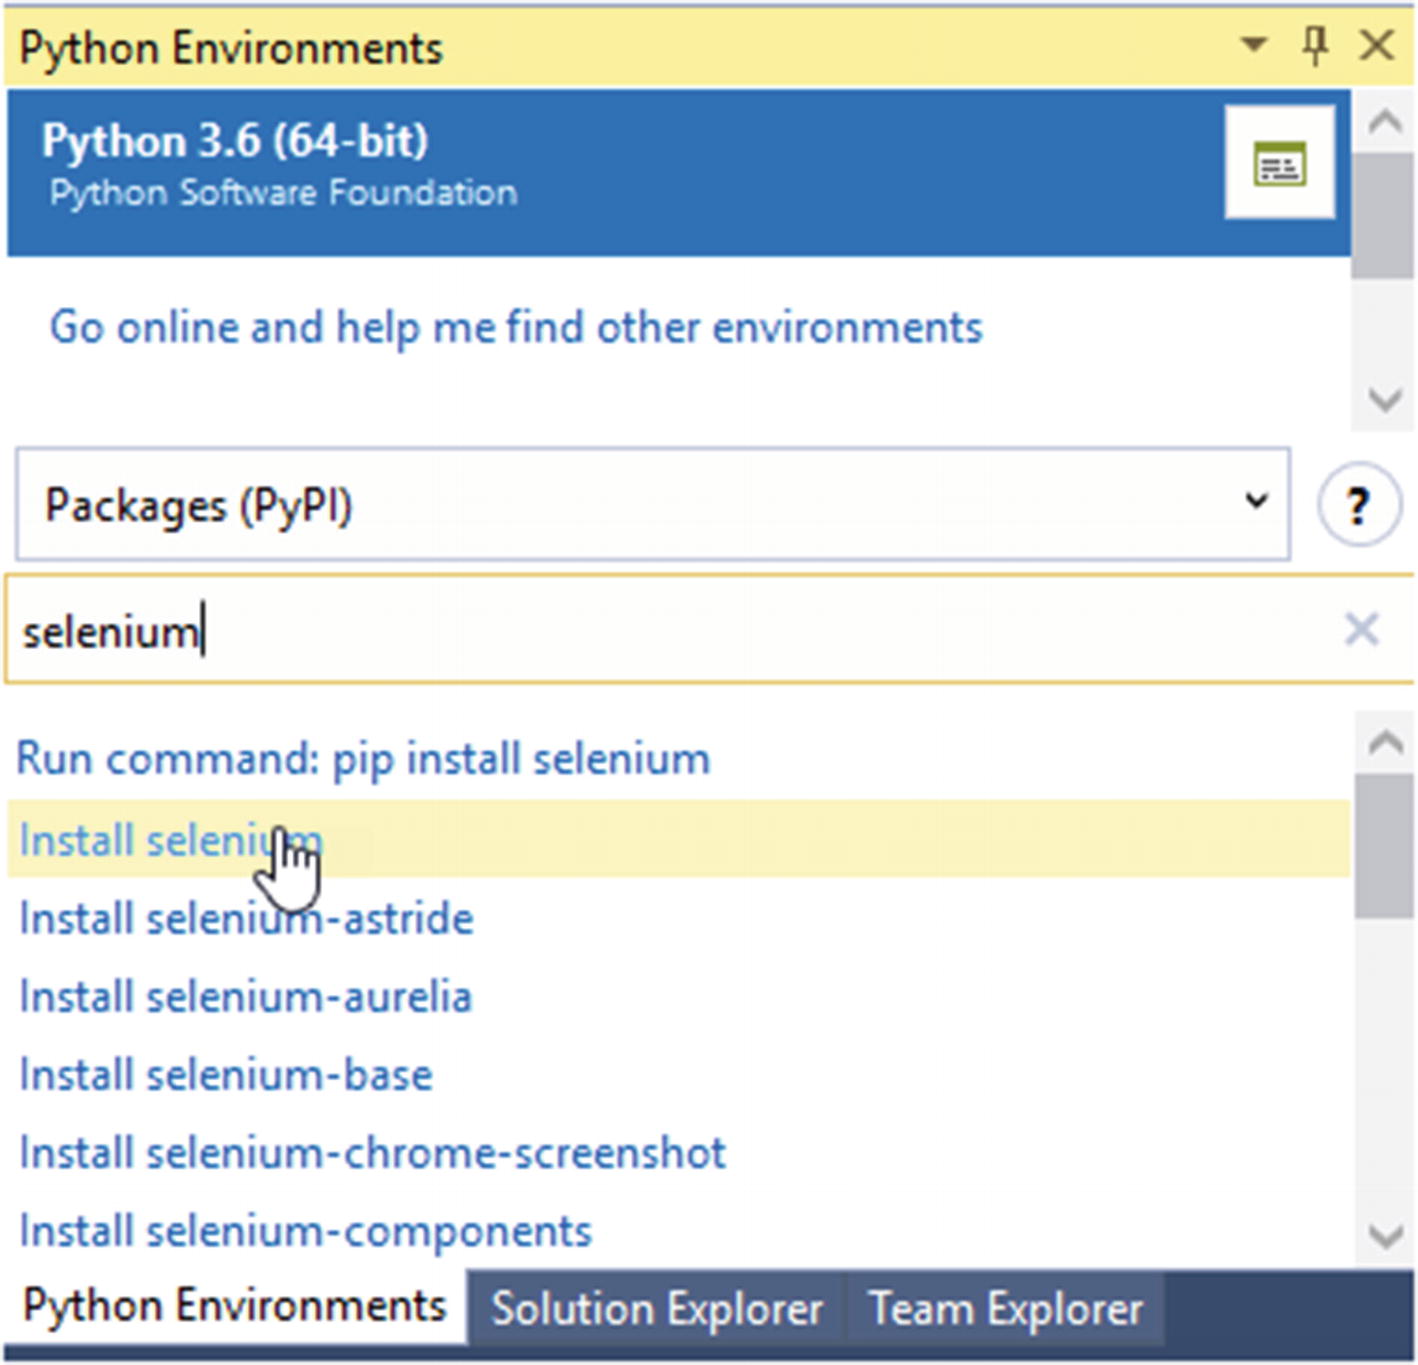 Figure 2-16
Installing the Selenium package for Python
- 11.
You can download the Chrome driver and add chrome.exe to the project folder. You can download chromedriver version 2.41 here: https://chromedriver.storage.googleapis.com/index.html?path=2.41
Download chromedriver_win32.zip file and extract the file. You can find the chromedriver.exe file inside the extracted folder. Copy and paste this chromedriver.exe to the project folder.
We have set up the project with all packages and now the project is ready for writing test code with Selenium using Python.
Executing Sample Python Test Code
- 1.Open the Unit Test class file you created earlier and add the following code lines just below the import unit test statement:from selenium import webdriverfrom selenium.webdriver.support.wait import WebDriverWaitfrom selenium.webdriver.common.by import Byfrom selenium.webdriver.support import expected_conditions as ExpectedConditionEach import enables the following mentioned functionality:
webdriver: Enables writing tests that use Selenium web driver.
WebDriverWait: Allows handling waits for test conditions.
By: Allows searching for web elements in a web page.
ExpectedCondition: Allows implementation of expected conditions for waits to locate elements in a web page.

Imports
- 2.Replace the code line self.fail("Not implemented") (highlighted in Figure 2-17) with following two code lines:driver=webdriver.Chrome()driver.get('https://www.google.lk/')If chromedriver.exe is not inside the project folder, you need to give the chromedriver.exe location path as a parameter when creating the chrome driver instance, which is done in the first code line. We have added chromedriver.exe to the project folder previously. Therefore, the driver path is not given in the sample code. However, if you have chromedriver.exe in a different location other than the project, you can specify the first line similar to following with the chromedriver.exe path:driver=webdriver.Chrome("F:Selenium-pythonChromeDriverchromedriver.exe")
The second code line from earlier allows navigation to a given web page, where we are using the google.com URL in this instance.
- 3.Below the first two code lines with the same indentation (indentation is used to define method, code block, or class scope in Python), add the following line of code to enable explicit wait time to wait until the page elements meet the given expected condition. If this time-out passes, the test case will fail with the TimeoutException. This sample code uses 60 seconds as the wait time:wait=WebDriverWait(driver,60)
- 4.Let’s implement clicking of the “I’m Feeling Lucky” button of the Google search page, which should open the “Google Doodle” page. The “I’m Feeling Lucky” button element locators need to be identified to be able to click it. As explained in Lesson 2.01, you can use developer tools by pressing F12 or right-clicking on an element and click Inspect. The “Name” Locator of the “I’m Feeling Lucky” button is used with the following code. The second code line clicks on the button.feelingButton=wait.until(ExpectedCondition.element_to_be_clickable((By.NAME,"btnI")))feelingButton.click()
- 5.Then click on the button; if the button is functioning correctly, then page should navigate to the “Google Doodle” page. The following line verifies the page has successfully navigated to the correct page by checking the page title:self.assertEqual(True,wait.until(ExpectedCondition.title_contains("Google Doodles")))
- 6.At the last statement of the test case, use the “quit” method of the web driver to close the browser window.driver.quit()The fully implemented code should be similar to the following code. It is important to note the code indentation, as it defines the scope of code.import unittestfrom selenium import webdriverfrom selenium.webdriver.support.wait import WebDriverWaitfrom selenium.webdriver.common.by import Byfrom selenium.webdriver.support import expected_conditions as ExpectedConditionclass Test_test1(unittest.TestCase):def test_A(self):driver=webdriver.Chrome()driver.get('https://www.google.lk/')wait=WebDriverWait(driver,60)feelingButton=wait.until(ExpectedCondition.element_to_be_clickable((By.NAME,"btnI")))feelingButton.click()self.assertEqual(True,wait.until(ExpectedCondition.title_contains("Google Doodles")))driver.quit()if __name__ == '__main__':unittest.main()
Similarly to the test case implemented with C# and Selenium, the test case implemented in this lesson with Python and Selenium will be available in the Test Explorer window, which will allow you to run or debug the test case.
In this lesson, you have learned how to set up a Visual Studio Python project to work with Selenium and Python to develop functional UI test case.
Lesson 2.03: Set Up Test Project with Visual Studio and MAQS Open Framework
Let’s explore how to set up Visual Studio for test automation with MAQS (Magenic’s Automation Quick Start) open framework. MAQS helps you to quickly set up test automation project and provides utilities to enhance the test automation writing experience. In this lesson, you will be able you write a sample test to verify that you have set up your test project successfully with the MAQS framework. You can learn more about MAQS here: https://github.com/Magenic/MAQS .
Prerequisites: You must have Visual Studio 2017 or later and the Chrome browser installed on your machine.
Setting Up Visual Studio for Work with MAQS Open Framework
- 1.You must install .NET Framework version 4.7.1 before setting up a test project with MAQS 5. To install .NET Framework 4.7.1, you can use Visual Studio installer and select the .NET Framework 4.7.1 components from the individual component list (see Figure 2-18).
 Figure 2-18
Install .NET Framework 4.7.1
- 2.Go to Visual Studio Market Place ( https://marketplace.visualstudio.com/ ). In the search tab, search for the MAQS Open Framework and click on MAQS Framework from the search results.
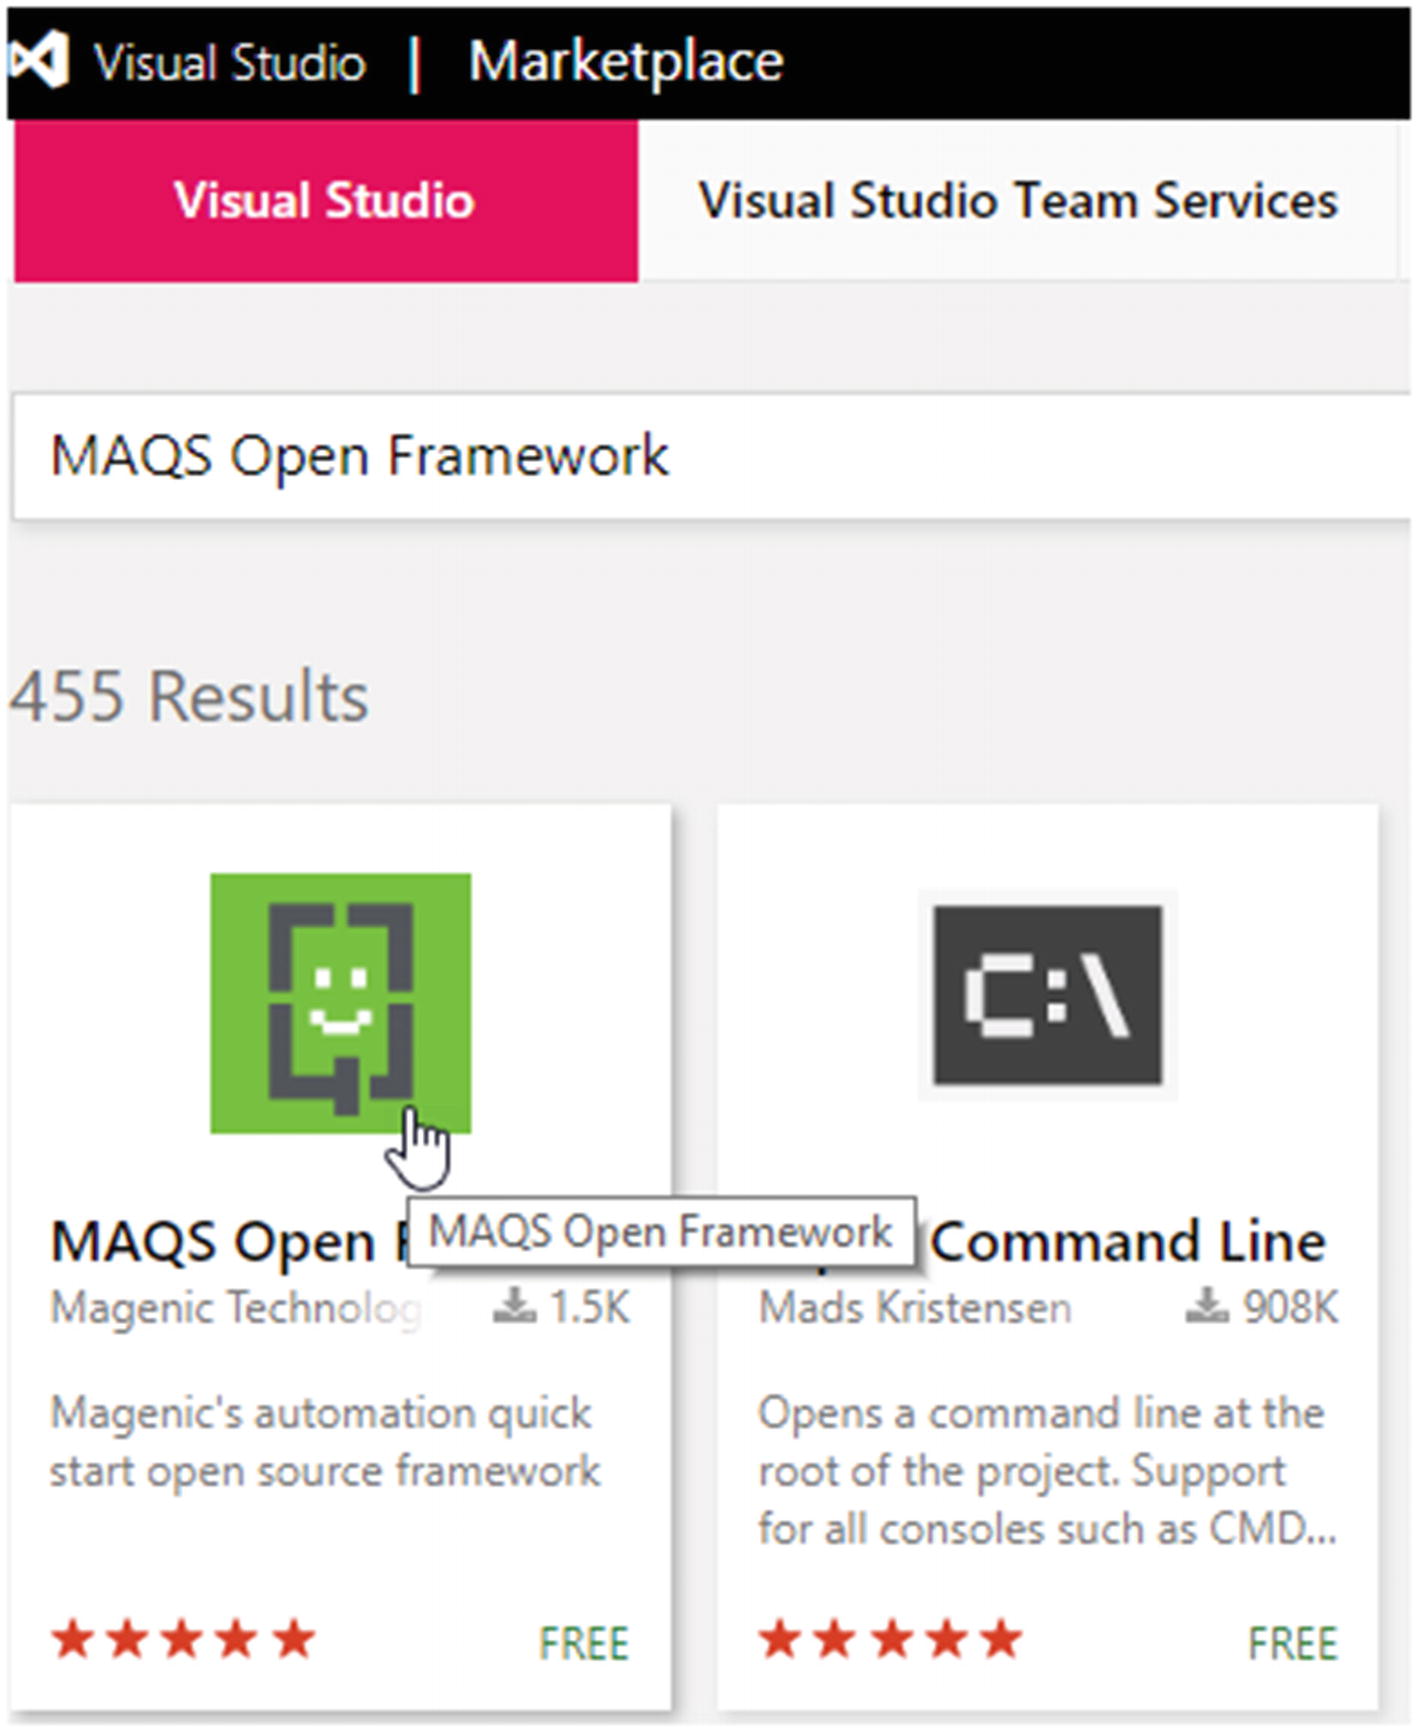 Figure 2-19
MAQS in Visual Studio marketplace
- 3.
Click the download button to download MAQS.
- 4.Open the Maqs.vsix file and run this file to install MAQS Framework for Visual Studio. Instead of going to Visual Studio marketplace directly, you can install MAQS from within Visual Studio by Clicking on Tools ➤ Extensions and Updates (if you use Visual Studio to download the extension to get it installed, you need to close the Visual Studio, and once the extension is installed, you can open it again). Then you have to search for MAQS and download it (see Figure 2-20).
 Figure 2-20
Download MAQS from VS
- 5.
After installing the MAQS extension for Visual Studio, create a new project by clicking Files ➤ New ➤ Project in Visual Studio.
- 6.In the New Project pop-up window select Magenic’s Open Test. In the project window you can see the Maqs Framework – Selenium project is selected. Give a Name for the Project, specify a Solution Name, select Location and click on the OK button. Leaving Create directory for solution checked will allow you to have a new directory created for the new solution in the selected location (see Figure 2-21).
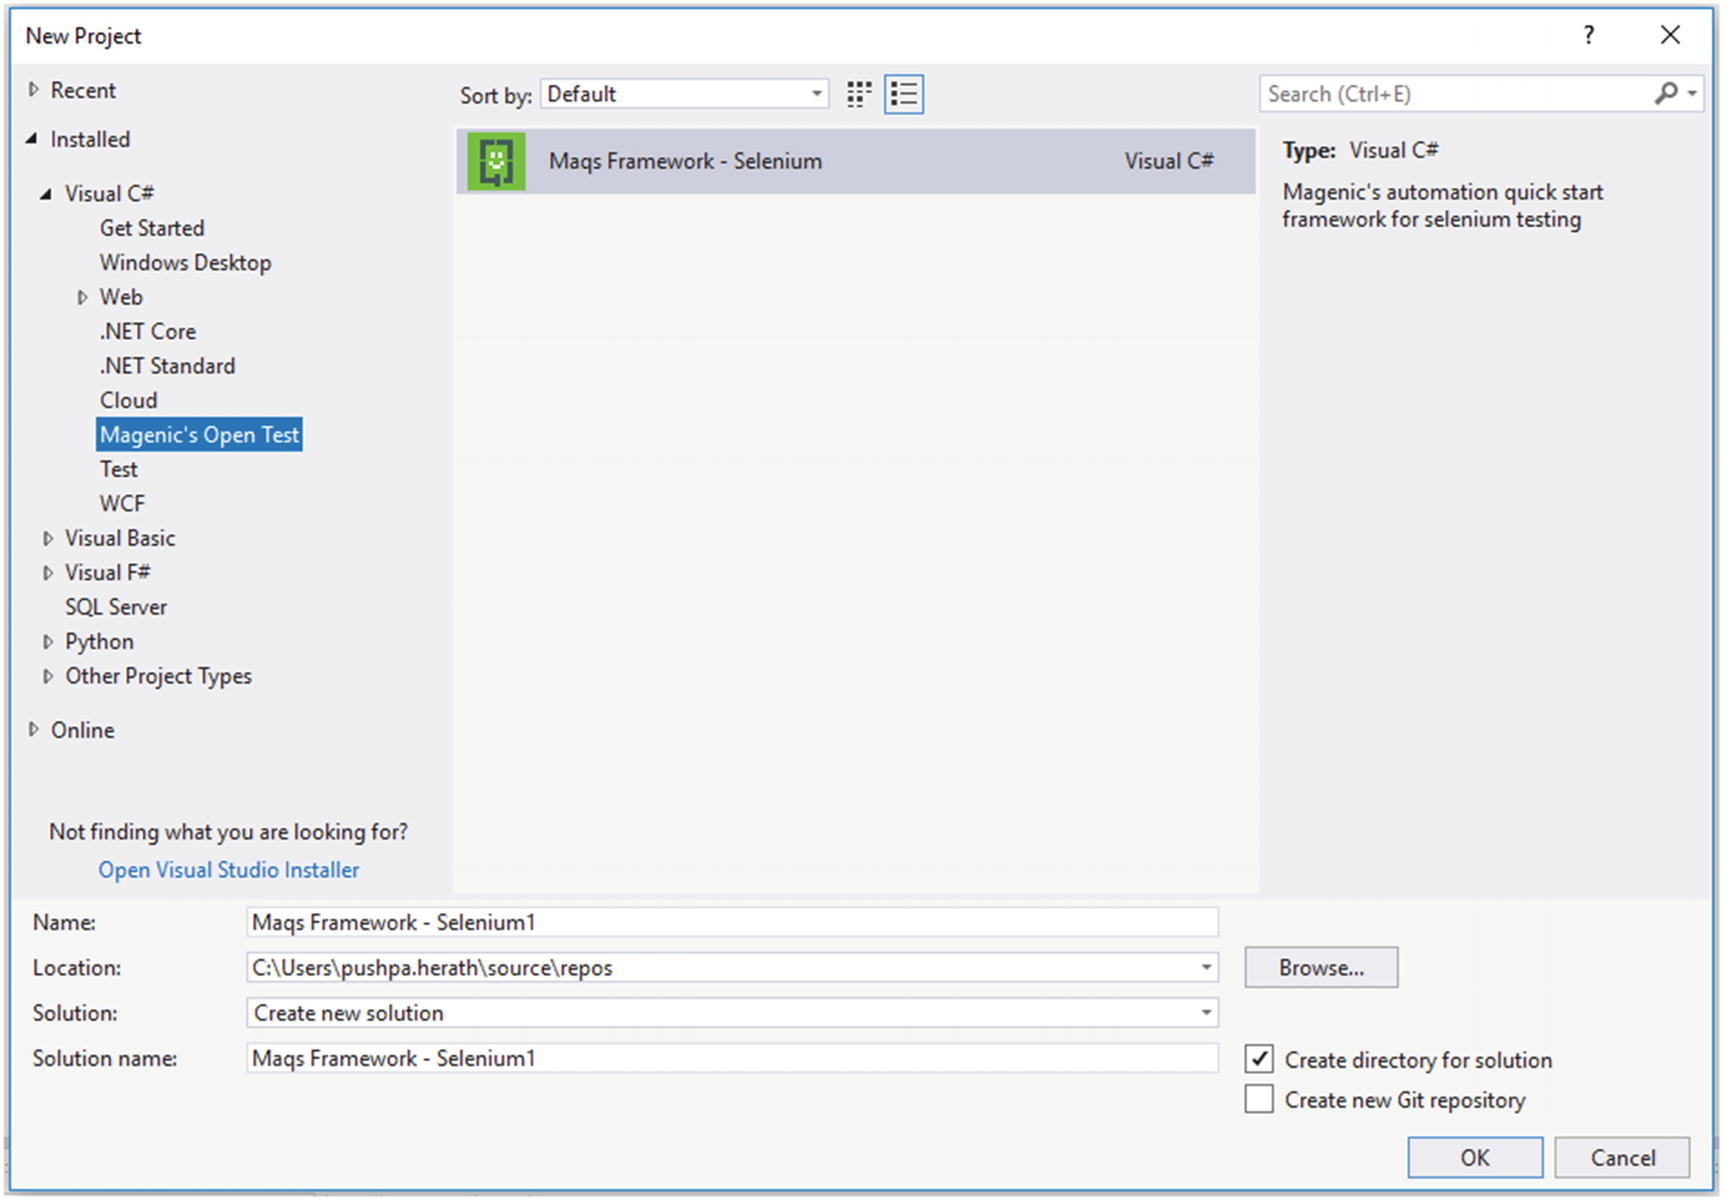 Figure 2-21
Create test project with MAQS
- 7.
Build the project so that it restores the MAQS NuGet package to retrieve all needed dependencies and compile the project.
With these steps, we have successfully set up the MAQS Open Framework for Visual Studio and created a test project using it.
Executing Sample Test Code with MAQS Open Framework in Visual Studio 2017
- 1.In Solution Explorer, under the test project, the SeleniumTests.cs file can be found. Open this file to view pre-written test cases. Build the solution in Visual Studio and you will see test cases appear in the Test Explorer window. Run these tests to verify whether the MAQS-based project is set up correctly (see Figure 2-22).
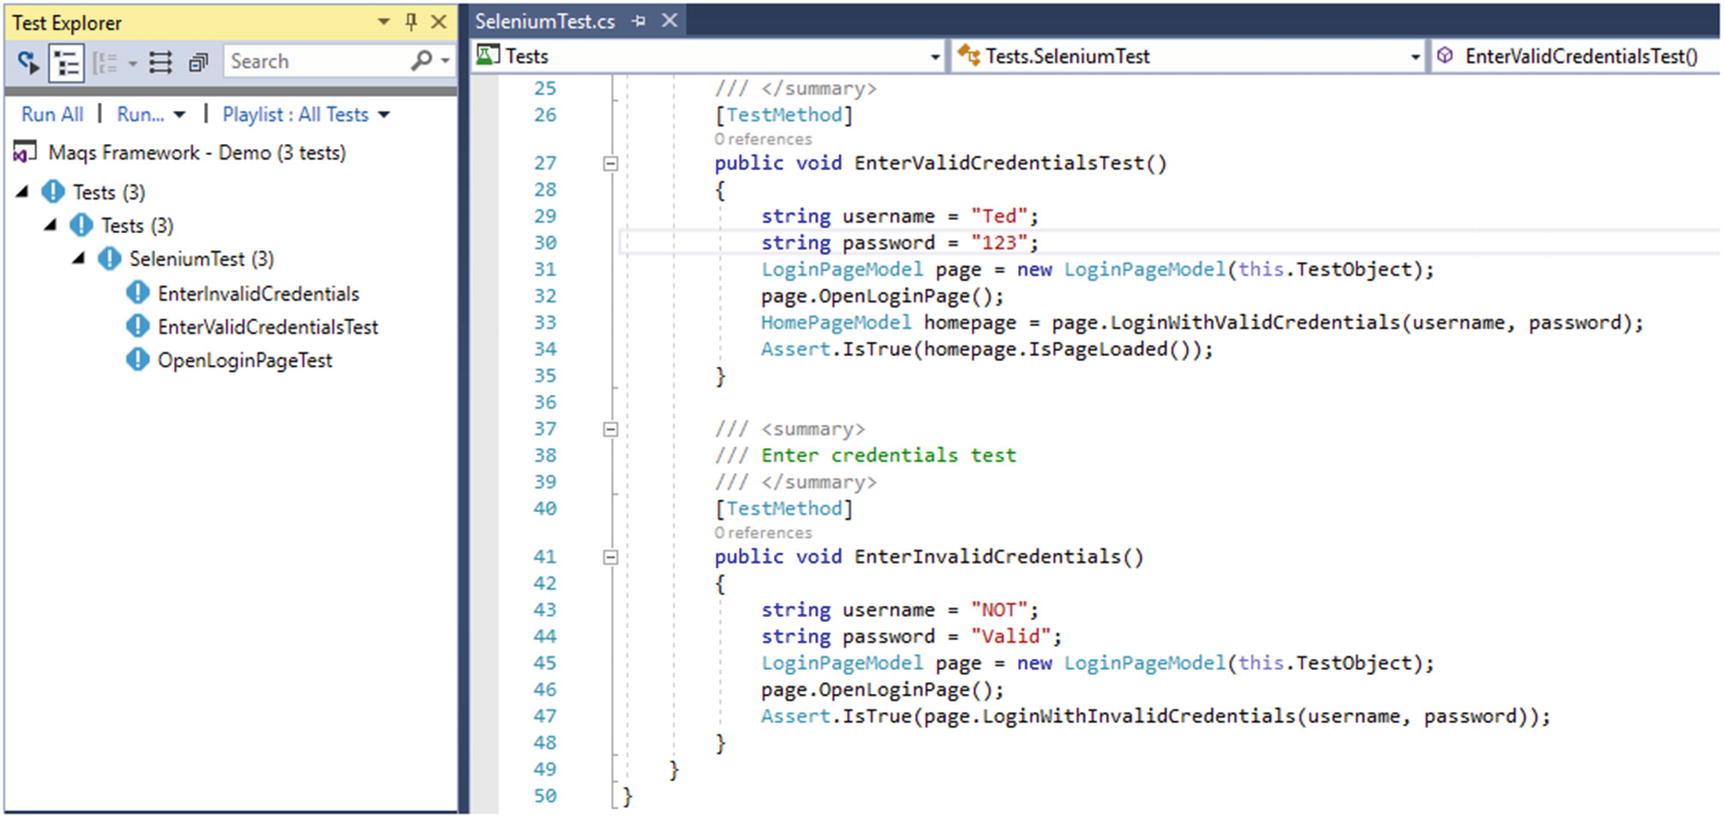 Figure 2-22
Sample tests by MAQS
If the tests are executed successfully, you have set up the test project correctly in Visual Studio with the MAQS framework. We will discuss the benefits of using MAQS and the utilities provided by it in detail in Chapter 3.
Lesson 2.04: Set Up A Test Project with Visual Studio and SpecFlow
SpecFlow is an open source testing framework that supports behavior-driven development (BDD). It lets us define application behavior in English text using a language called Gherkin. This will enhance collaboration of technical and business staff involved in a software project on the project requirements implementation and verification. You can find more information here: https://specflow.org/ .
This lesson will guide you on how to set up Visual Studio for test automation with the SpecFlow Framework. Then you will write a sample test to verify whether you have set up your test project correctly with SpecFlow.
Prerequisites: You need Visual Studio 2017 or later, and since this lesson demonstrates using the Chrome driver, the Chrome browser should be installed on your working machine.
Setting Up Visual Studio to Work with SpecFlow and Selenium
- 1.As the first step, it is recommended to add the SpecFlow Visual Studio integration to Visual Studio. It is not mandatory to do so, but when the integration is added, it requires less effort to configure SpecFlow for Visual Studio. However, adding this extension does not provide you with a specific project template. To add the SpecFlow integration to Visual Studio, you can use the Extensions and Updates window in Visual Studio by clicking Tools ➤ Extensions and Update menu item. In the Extensions and Updates window, search for SpecFlow and download the extension (see Figure 2-23). You have to close Visual Studio to get the extension installed and, once done, you can open Visual Studio again.
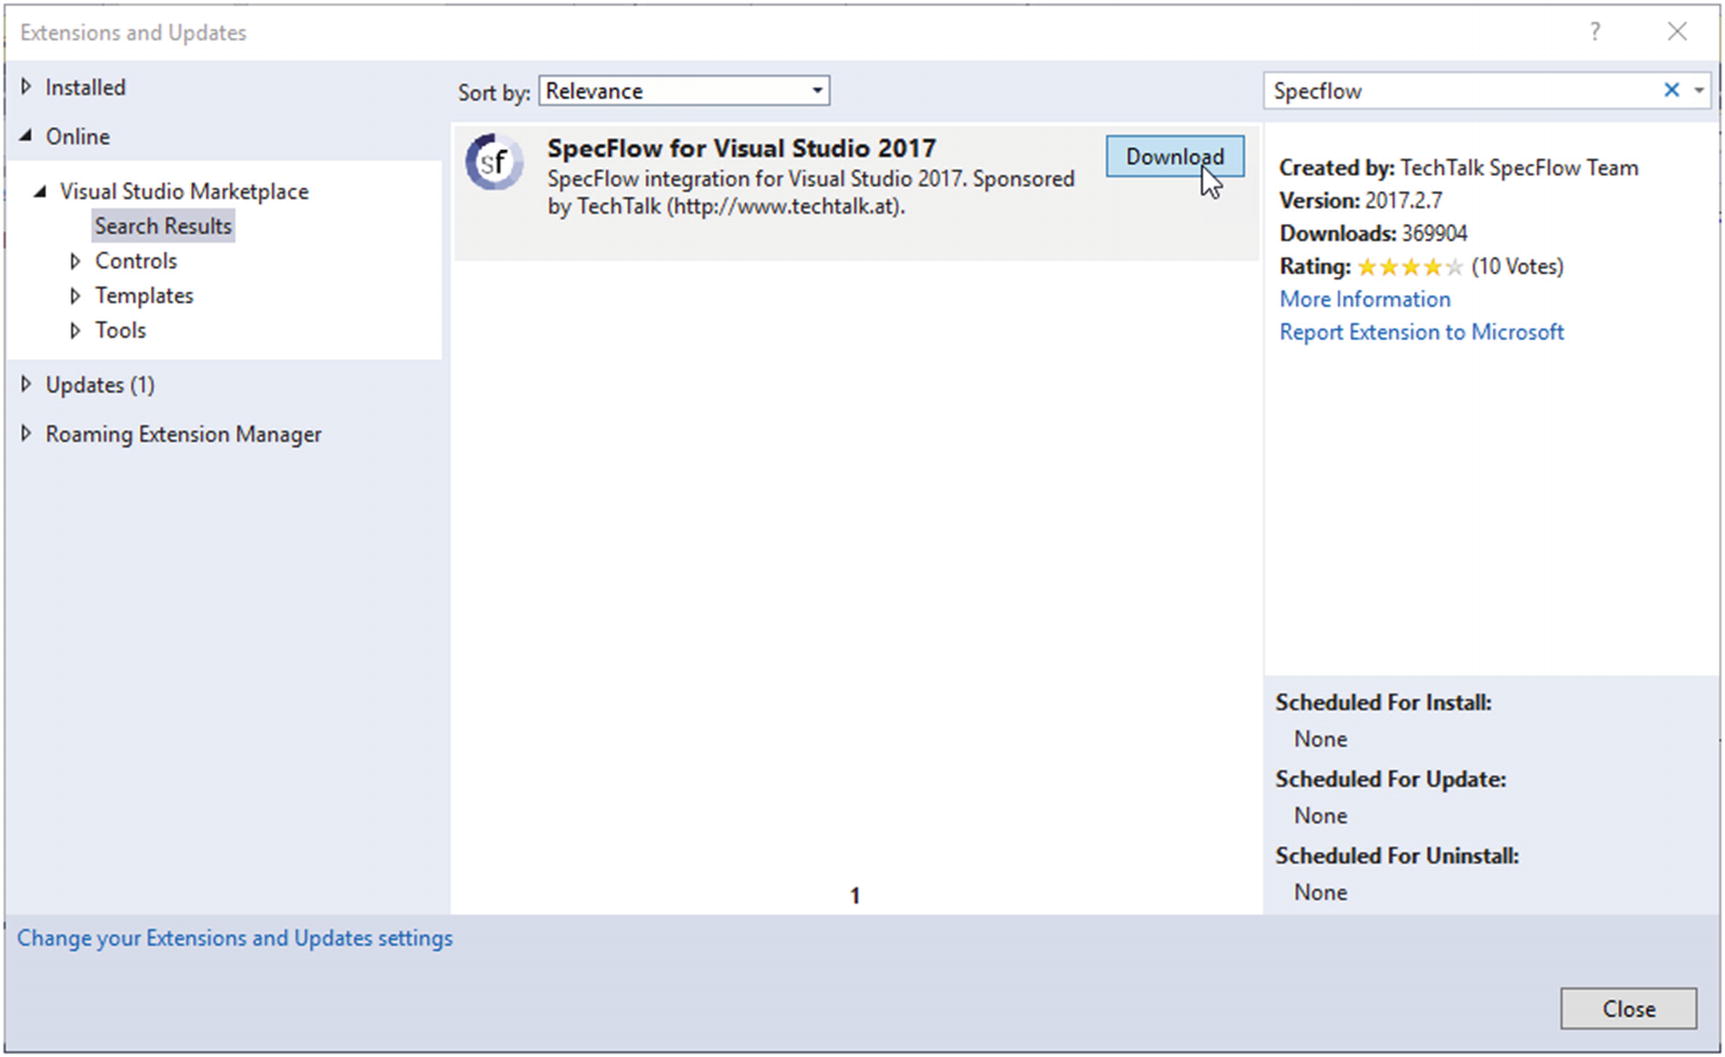 Figure 2-23
SpecFlow extension for Visual Studio
- 2.
Once you are done setting up the extension, create a test project in Visual Studio by clicking File ➤ New ➤ Project.
- 3.In the New Project pop-up window, select Windows Desktop under Visual C#. Select Class Library from the list of projects in the project window. Give a Name for the Project, specify a Solution Name, select Location, and click on the OK button. Leaving Create directory for solution checked will allow you to have a new directory created for the new solution in the selected location (see Figure 2-24) .
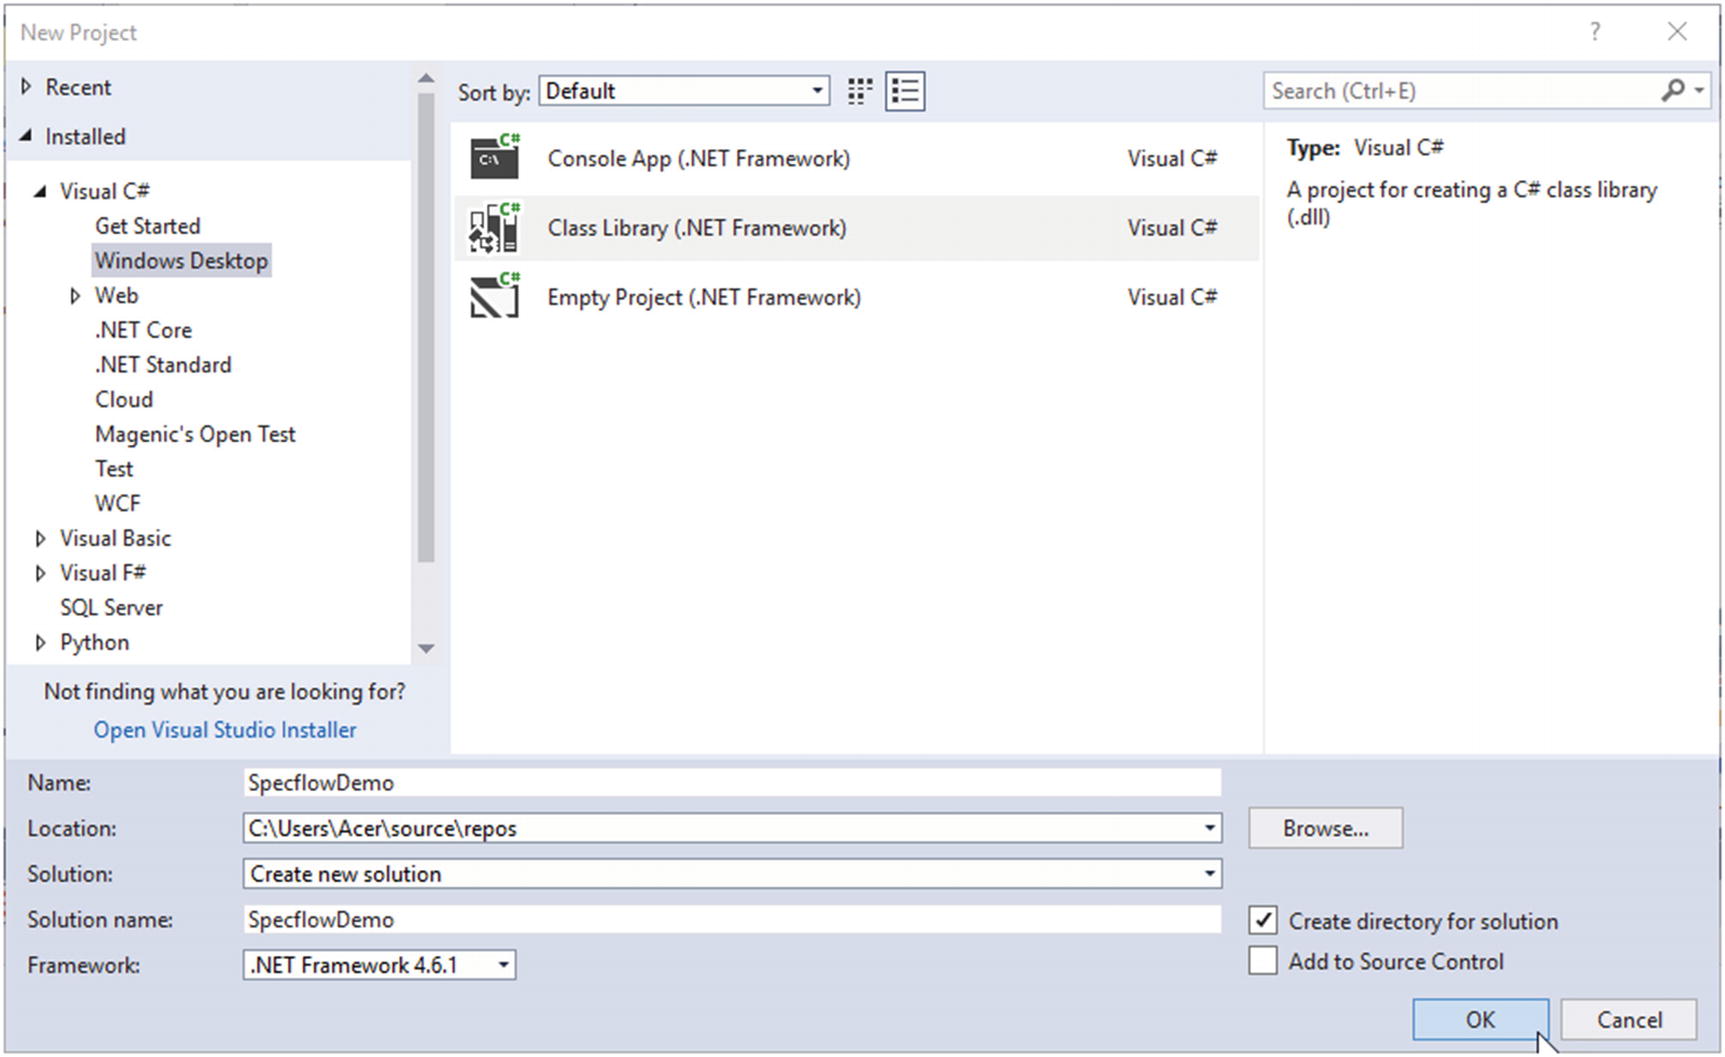 Figure 2-24
Creating project
- 4.Few NuGet packages are required to set up the SpecFlow for the project we created in step 3. Open the NuGet package management window for the solution by right-clicking on the solution in Solution Explorer and clicking “Manage NuGet Packages for solution” in the pop-up menu. Search for SpecFlow in the Browse tab of the NuGet package management window, select SpecFlow NuGet package (which contains techtalk.SpeckFlow.dll, which is required to implement SpecFlow-based tests). Install the SpecFlow NuGet package to the project you created (see Figure 2-25).
 Figure 2-25
Installing SpecFlow NuGet package
- 5.Next you have to install NUnit for the project. Why NUnit? In reality, SpecFlow needs a test framework, and it supports few test frameworks, such as NUnit, xUnit, MbUnit, and MSTest. These test frameworks facilitate running tests with SpecFlow in Visual Studio using the Test Explorer. However, you can use SpecFlow+Runner ( https://specflow.org/plus/runner/ ), which comes with a cost but provides integration with Test Explorer without having to use other test frameworks. Further, SpecFlow Runner provides detailed reporting features integrated with Visual Studio. But, let’s skip the SpecFlow runner and try to deal with free stuff in the lessons in this book. To set up the NUnit framework, go to the NuGet package manager, search NUnit in the Browse tab, and install NUnit for the project (see Figure 2-26).
 Figure 2-26
Installing NUnit package
- 6.Then install NUnit3TestAdapter using the NuGet Package Manager. This is a supportive package required to work with NUnit.
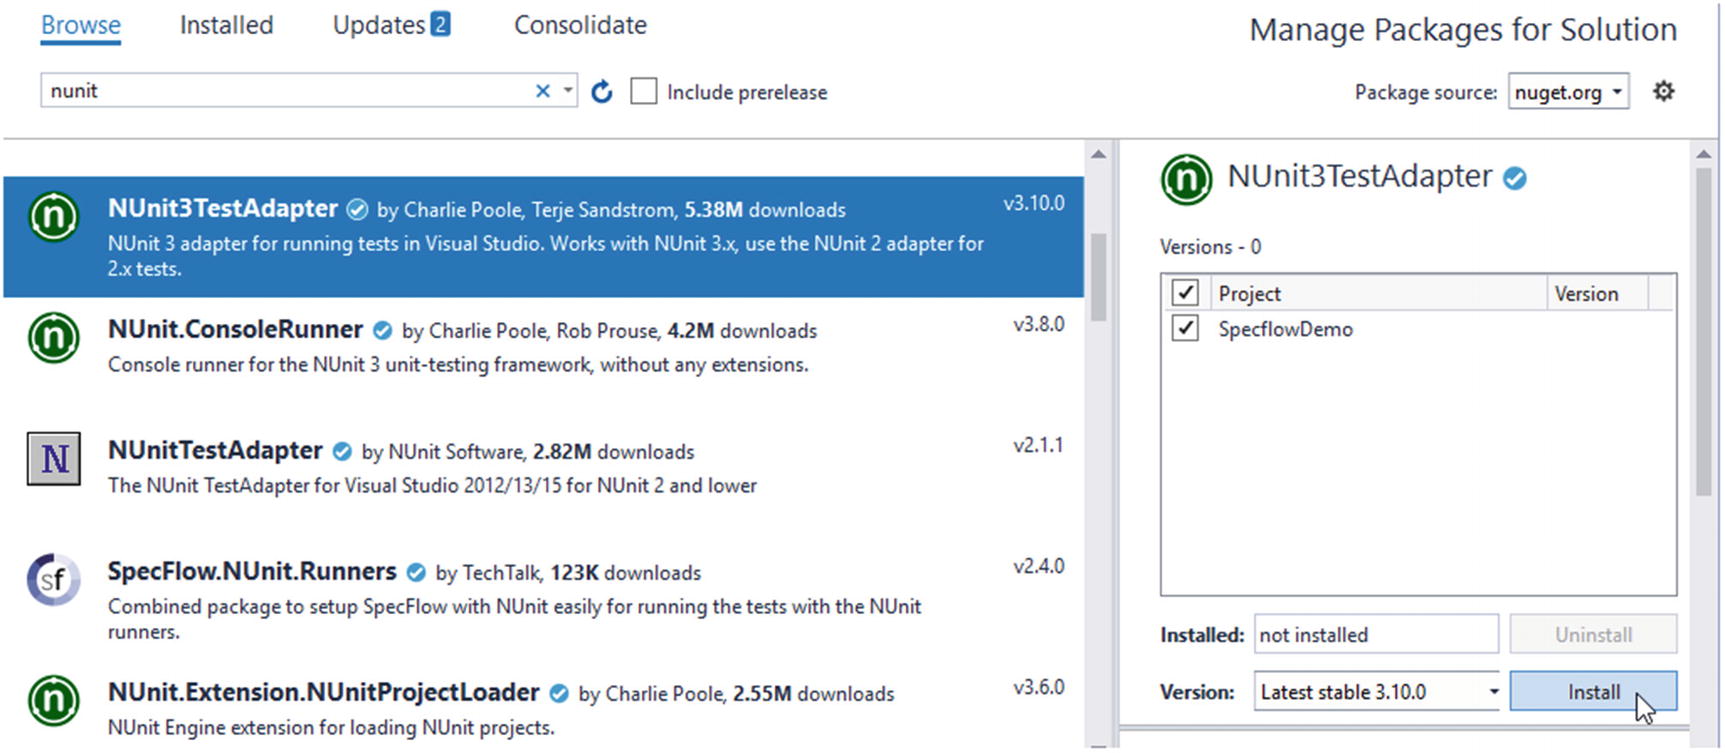 Figure 2-27
Installing NUnit3TestAdapter package
- 7.
Install Selenium.WebDriver, Selenium.Support, Selenium.Chrome.WebDriver, and DotNetSeleniumExtras.WaitHelpers packages using the NuGet package manager.
With these steps, we have set up the project for writing SpecFlow-based tests in Visual Studio.
Execute Sample Test with the SpecFlow Framework
- 1.We have to add a feature file to the project that will be used by SpecFlow to define acceptance criteria for features, such as use-cases or user stories. The feature file uses Gherkin language syntax, which was introduced by Cucumber ( https://cucumber.io/ ). It is a good practice to create a separate folder inside the project to add feature files. Hence, create a new folder inside the project to add feature files. Add feature file to the project by right-clicking on the feature folder in Solution Explorer and select Add ➤ New Item. Select the SpecFlow feature file from the new items pop-up by clicking on Visual C# Items. Give a meaningful name and click on Add (see Figure 2-28). You can see all SpecFlow items in Visual C# items due to the SpecFlow extension we installed for Visual Studio.
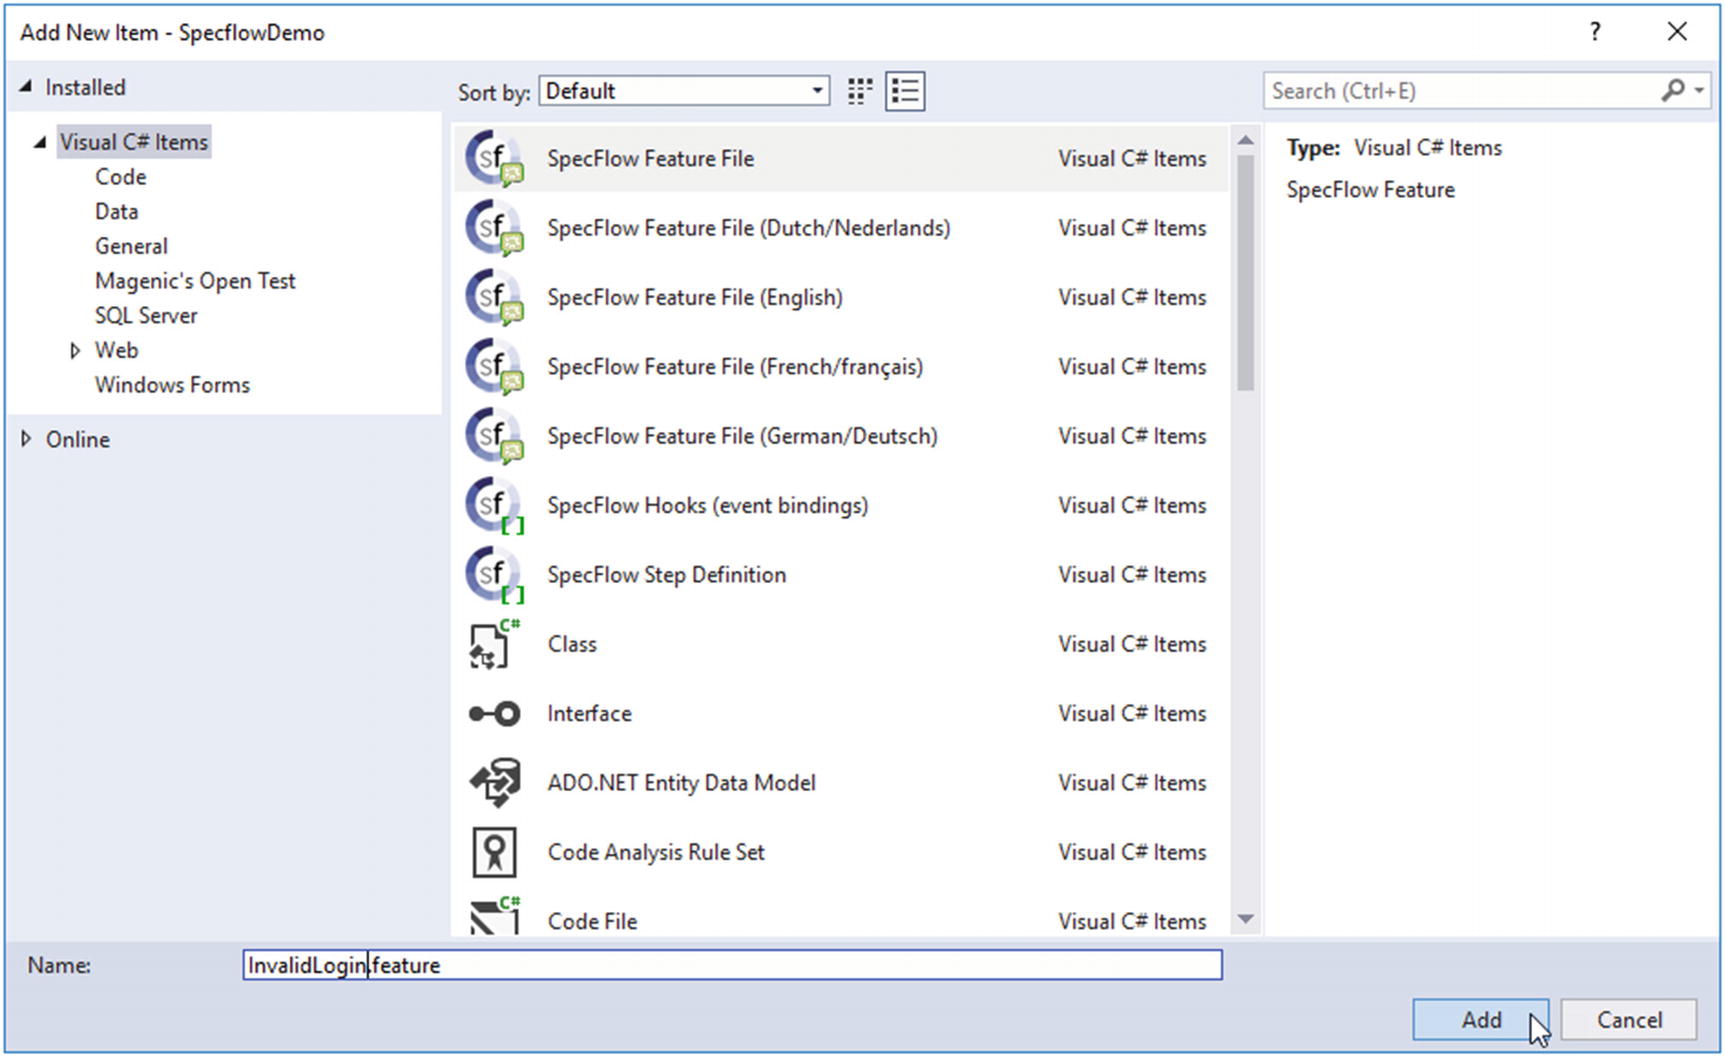 Figure 2-28
Adding Feature file
- 2.Feature file is where we describe the scenario. Gherkin language syntax will let anybody understand the software behavior easily since it is written in business domain-specific English language. This language has little syntax. The following are the main syntax items and uses:
Feature: used to specify the description of the feature
Scenario: used to specify the description of the scenario
Background: used to specify the action to be taken before each scenario in the feature file is executed
Given: used to specify the precondition of the scenario
And: used to specify the additional preconditions and actions
When: used to specify the action
Then: used to specify the results of the action
- 3.In the new Feature file added, you can add scenarios that need to be tested, as shown in the following sample feature file, which tests invalid login. The scenario explained here is a user trying to log in to the web application by giving an invalid username and password. Because a preconditioned user is at the home page of the web site and next action, navigate to the login page is given as an additional precondition. Then enter an incorrect username and password and click on the login button. Finally, verify the validation message as a result of these actions.Feature: Invalid LoginIn order to restrict the access to the userprofileas a non registered user of web site i should not be able to log into the website@mytagScenario: Unsuccessful Login with invalid credentialsGiven User is at the home pageAnd Navigate to login pageWhen User enter incorrect user name and passwordAnd Click on the signin buttonThen Validation message should display and browser should close
- 4.After you generate the Feature file, you need the step definition file to do automation scripting. Step definition is a code with a pattern attached to it. To generate a step definition file, right-click on feature file code and select Generate step definition (see Figure 2-29).
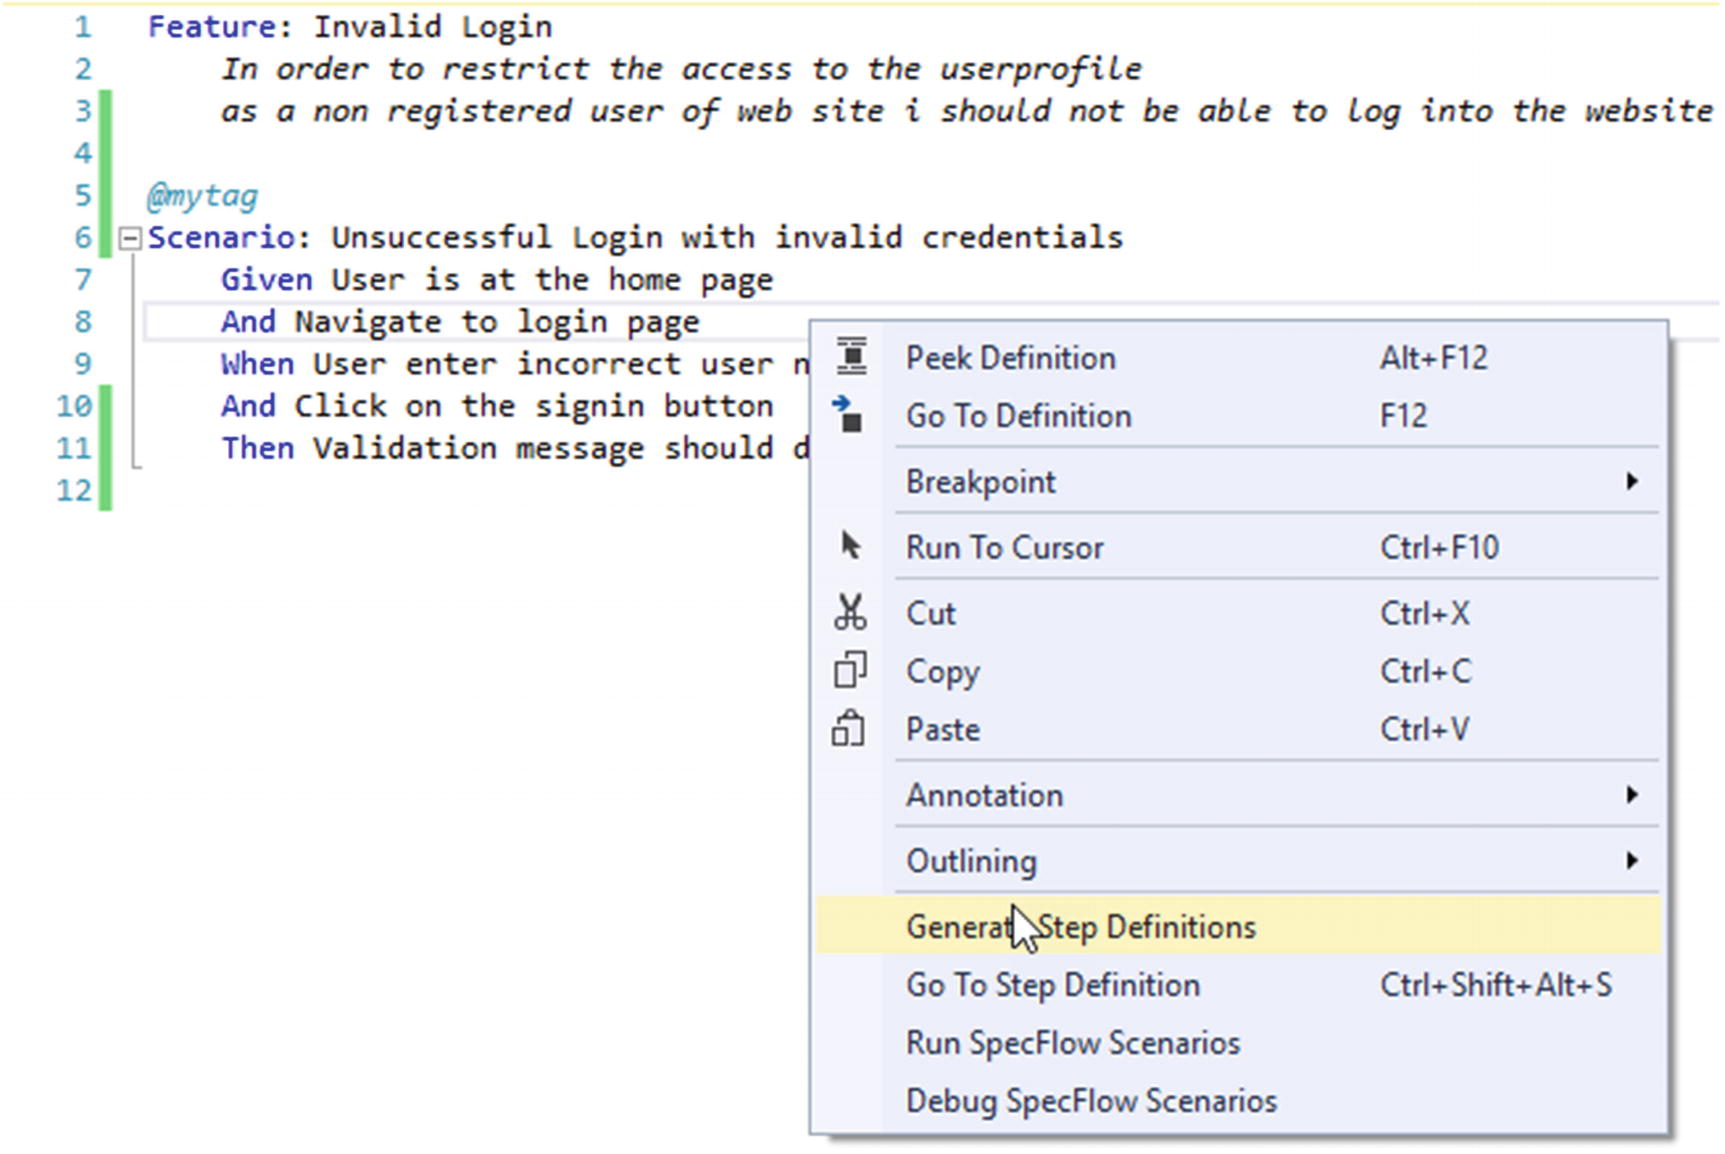 Figure 2-29
Generate Step Definition file
- 5.The “Generate Step Definition Skeleton” pop-up window will be displayed with all given steps of the feature file scenario. You can decide which steps should be included in the step definition file. Then click the Generate button (see Figure 2-30).
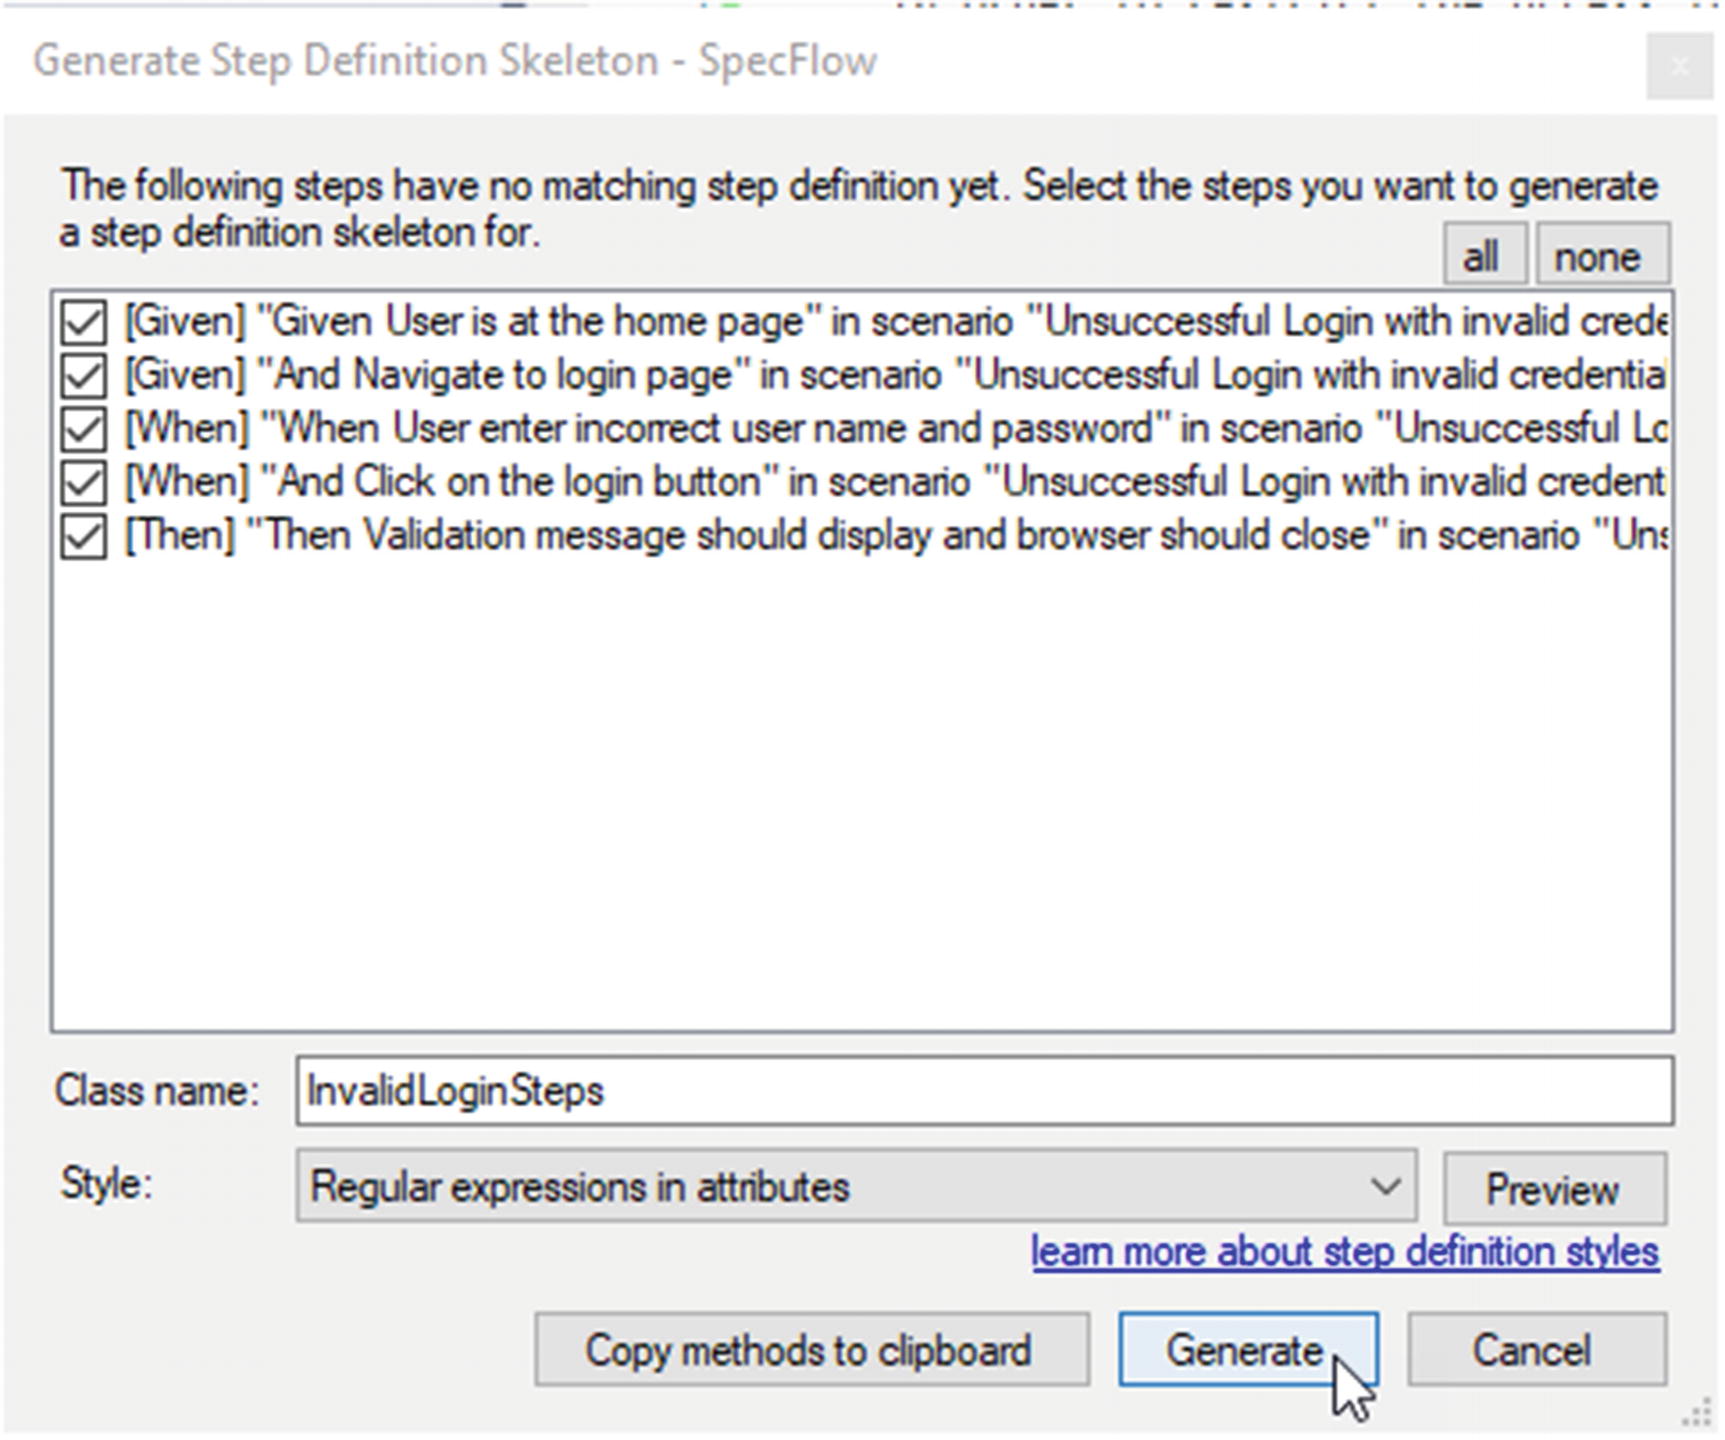 Figure 2-30
Select steps for Step Definition
- 6.After clicking on the Generate button, another pop-up will be displayed where you can give location of the definition file. Select the default project folder and click on the Save button (see Figure 2-31).
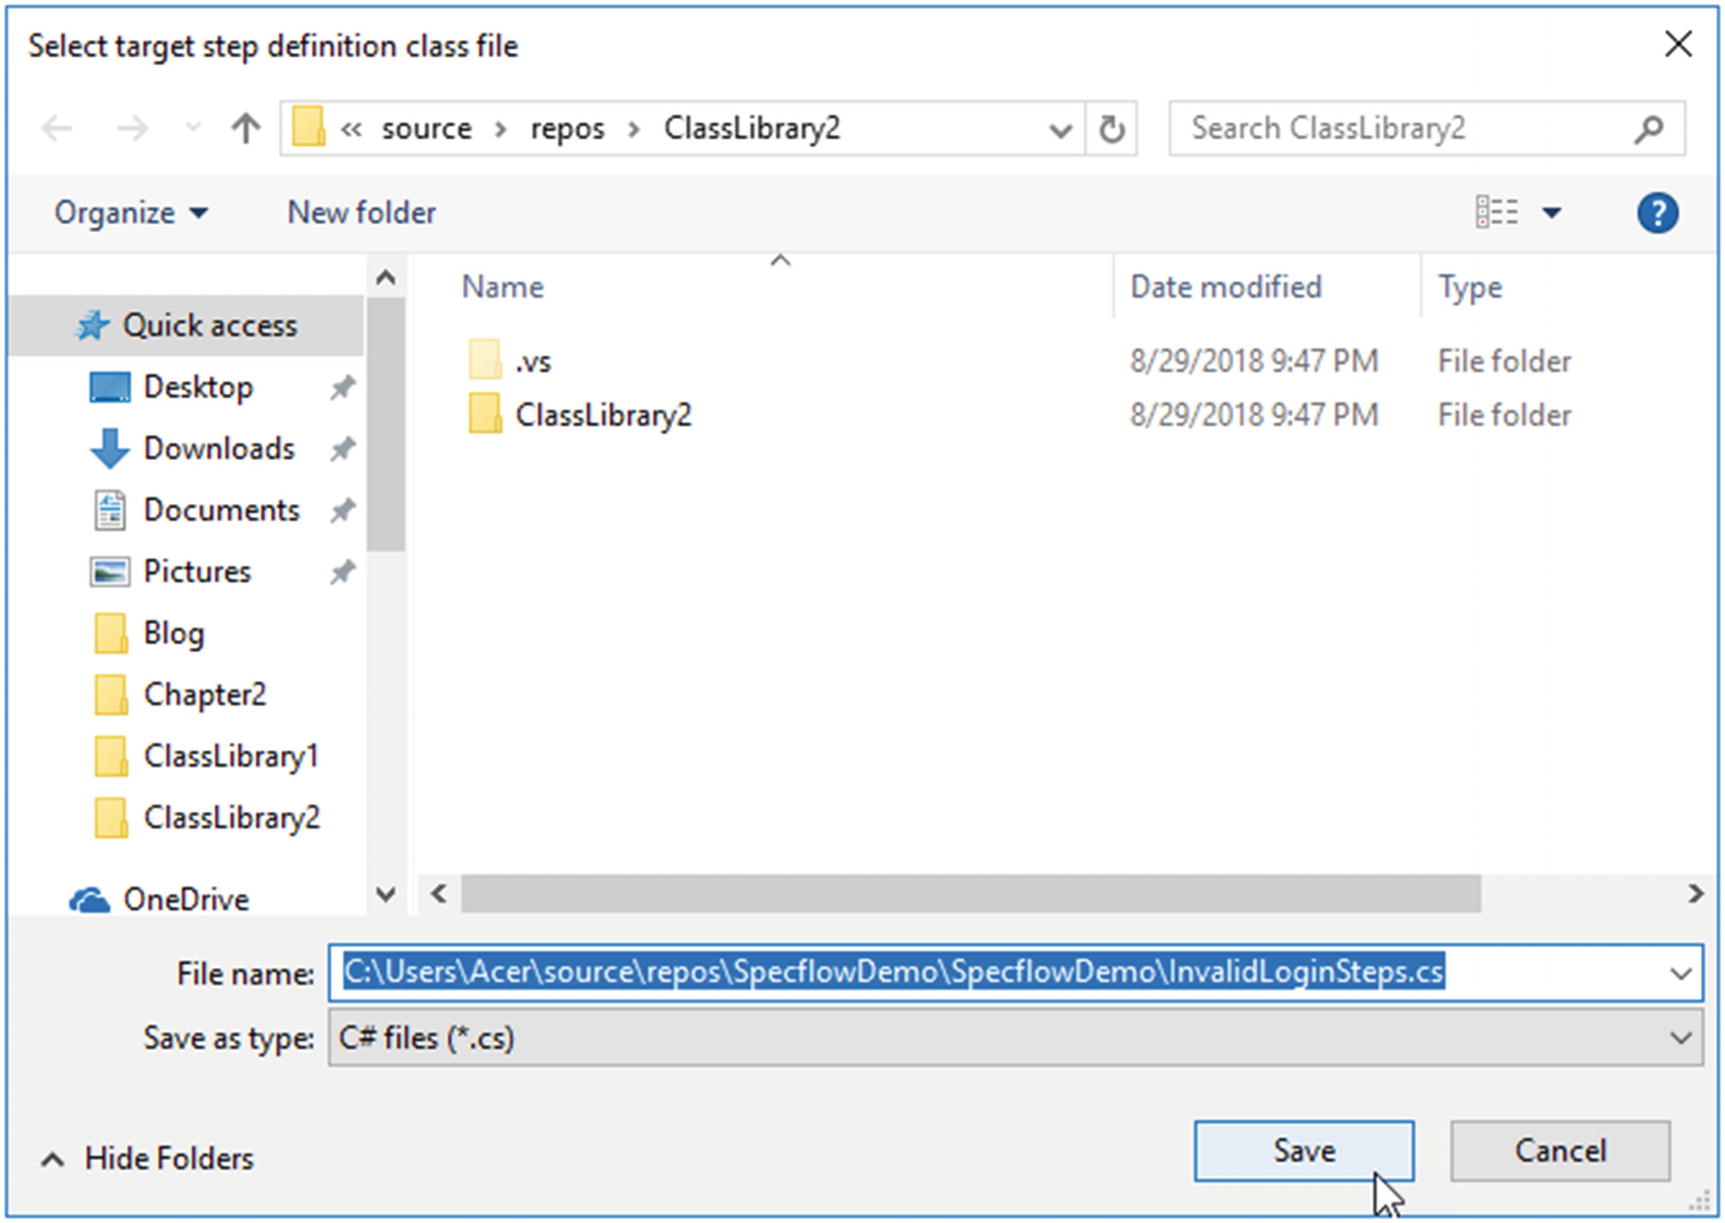 Figure 2-31
Save Step Definition file in the project folder
- 7.
In the Feature file, each step explains an action that needs to be taken while testing the scenario. In step definition, sample code with method structure will be created according to the Feature file scenario steps and you have to fill the method body.
- 8.The following code shows the completed step definition code. You can download all the source code for this project from https://github.com/chamindac/Book-Test-Autmation-VS/tree/master/Chapter%202/Lesson%202.04 :
- a.
Method1: GivenUserIsAtTheHomePage() - Open the Chrome browser, maximize the browser, and navigate to home page of web site.
- b.
Method2: GivenNavigateToLoginPage() - Navigate to the Login page (GitHub is used here).
- c.
Method3: WhenUserEnterIncorrectUserNameAndPassword() - Enter invalid username and password.
- d.
Method4: WhenClickOnTheLoginButton() - Click on the sign in button of the login page.
- e.
Method5: ThenValidationMessageShouldDisplayAndBrowserShouldClose() - Verify validation message and close the browser:
using NUnit.Framework;using OpenQA.Selenium;using OpenQA.Selenium.Chrome;using OpenQA.Selenium.Support.UI;using System;using TechTalk.SpecFlow;namespace SpecflowDemo{[Binding]public class InvalidLoginSteps{IWebDriver driver;WebDriverWait wait;[Given(@"User is at the home page")]public void GivenUserIsAtTheHomePage(){ChromeOptions option = new ChromeOptions();option.AddArgument("—start-maximized");driver = new ChromeDriver(option);driver.Navigate().GoToUrl("https://github.com");}[Given(@"Navigate to login page") ]public void GivenNavigateToLoginPage(){wait = new WebDriverWait(driver, TimeSpan.FromSeconds(30));driver.FindElement(By.LinkText("Sign in")).Click();wait.Until(SeleniumExtras.WaitHelpers.ExpectedConditions.UrlContains("https://github.com/login"));}[When(@"User enter incorrect user name and password")]public void WhenUserEnterIncorrectUserNameAndPassword(){driver.FindElement(By.Id("login_field")).SendKeys("ABC");driver.FindElement(By.Id("password")).SendKeys("123");}[When(@"Click on the signin button")]public void WhenClickOnTheSigninButton(){driver.FindElement(By.Name("commit")).Click();}[Then(@"Validation message should display and browser should close")]public void ThenValidationMessageShouldDisplayAndBrowserShouldClose(){IWebElement validationMsg = wait.Until(SeleniumExtras.WaitHelpers.ExpectedConditions.ElementIsVisible(By.Id("js-flash-container")));StringAssert.Contains("Incorrect username or password", validationMsg.Text);driver.Dispose();}}}
- a.
- 9.
Build the project in Visual Studio after filling the methods with code as shown in step 8. Test Explorer should appear in the test after you build the project.
- 10.
Sometimes tests may not appear in Test Explorer even after building the project successfully. In this case, you may have to update the App.config file of the project. This App.config file gets added to the project when we initially add the SpecFlow NuGet package.
- 11.Open the App.config file and modify the configuration file by adding line <unitTestProvider name=“NUnit”/> as shown here:<?xml version="1.0" encoding="utf-8"?><configuration><configSections><section name="specFlow" type="TechTalk.SpecFlow.Configuration.ConfigurationSectionHandler, TechTalk.SpecFlow" /></configSections><specFlow><unitTestProvider name="NUnit" /><!-- For additional details on SpecFlow configuration options see http://go.specflow.org/doc-config --></specFlow></configuration>
- 12.
Now the test method should appear in the Test Explorer window. Right-click on method and select Run Selected Tests.
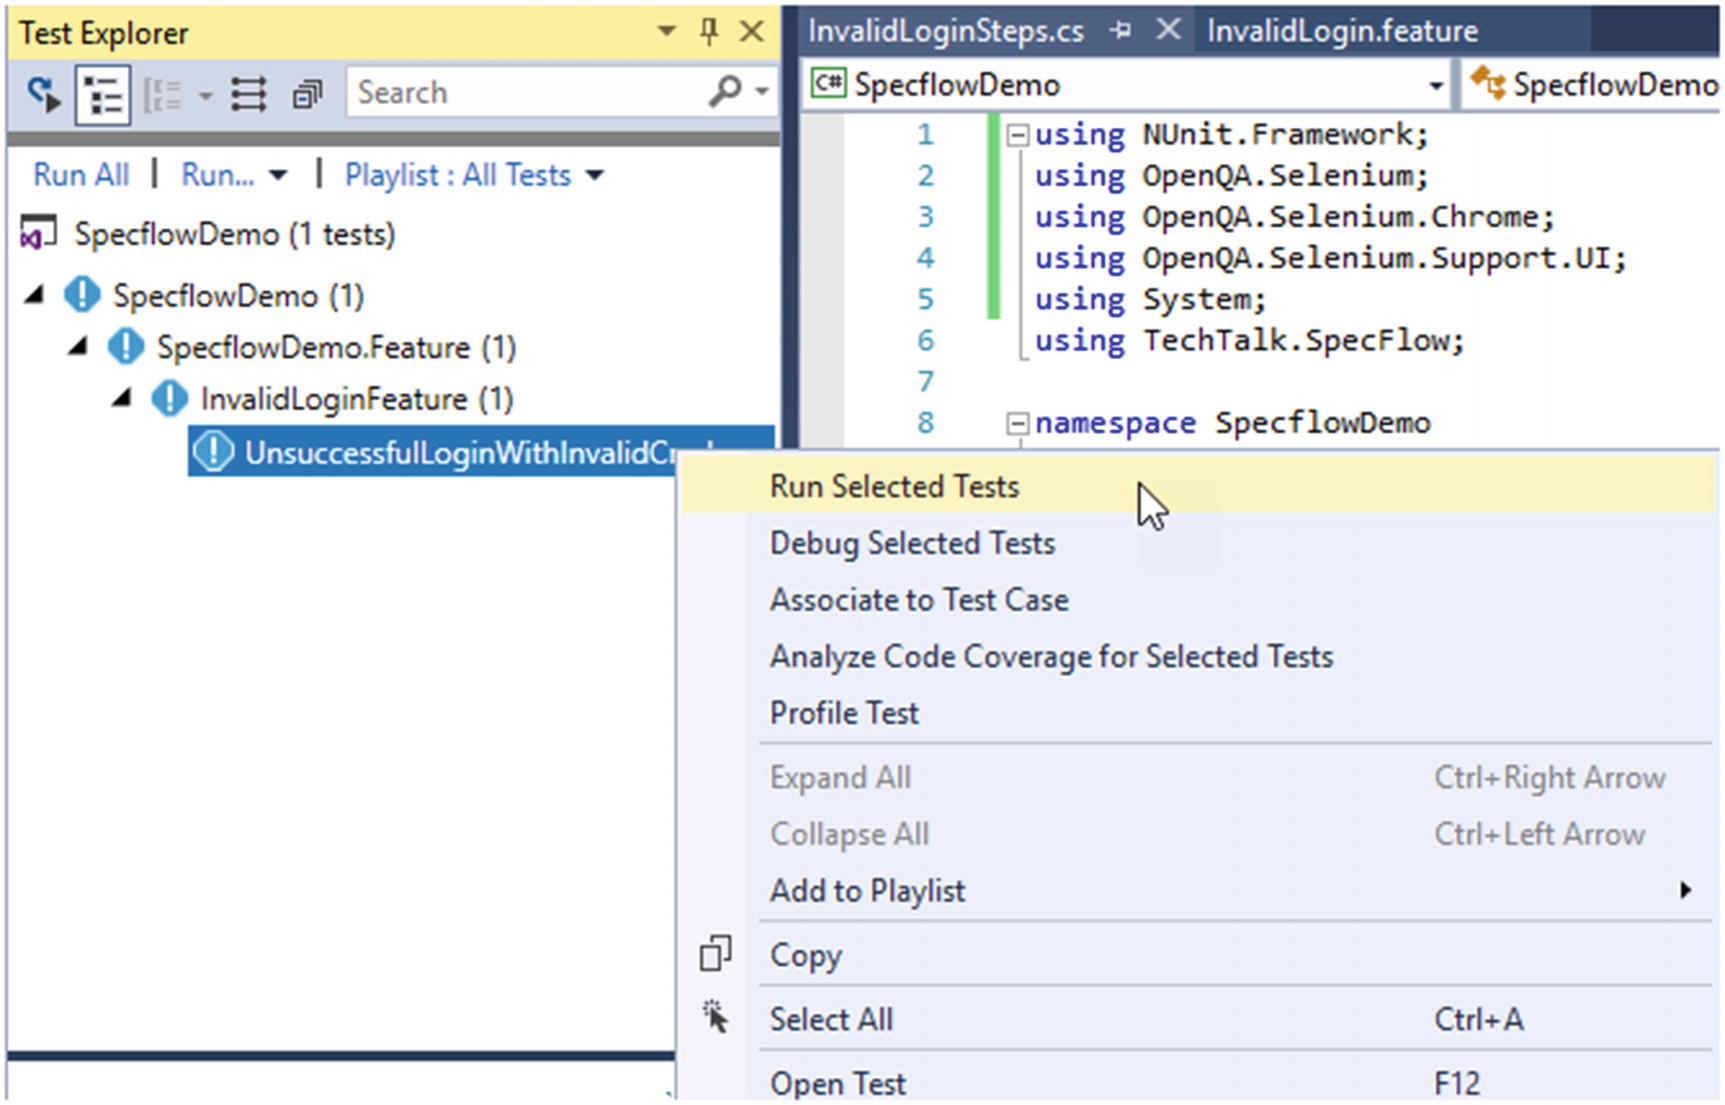
Running SpecFlow-based tests
You have learned how to set up Visual Studio to work with SpecFlow and Selenium within this lesson by setting up a project and then writing and executing a sample scenario.
Summary
In this chapter, you have obtained hands-on experience with setting up Visual Studio for Selenium with C# and Python languages. Additionally, you have learned how to use MAQS and SpecFlow frameworks inside Visual Studio. These lessons will be helpful as you continue on to the next chapter, where we will be deep-diving into different needs and scenarios of implementing automation testing for web and windows applications.