© Chaminda Chandrasekara, Pushpa Herath 2019
Chaminda Chandrasekara and Pushpa HerathHands-On Functional Test Automationhttps://doi.org/10.1007/978-1-4842-4411-1_4

4. Functional Testing for Windows Apps

Chaminda Chandrasekara1  and Pushpa Herath2
(1)
Dedigamuwa, Sri Lanka
(2)
Hanguranketha, Sri Lanka
 

The objective of this chapter is to guide you on development of functional test automation for windows applications using different technologies. You will find lessons with code examples on how to automate windows applications with Coded UI, Sikuli, and Winium.

Lesson 4.01: Create a Test Project with Coded UI and C#

Let’s begin by setting up a Coded UI test project to start writing automated functional testing for Windows applications.

Prerequisites: You must be running Visual Studio 2017 on Windows 10 or on Windows Server 2012 R2 or a newer version of Windows server. You must have intermediate level of C# language proficiency.

Install the Coded UI test component in Visual Studio 2017

Here are the steps:
  1. 1.

    Launch the Visual Studio Installer.

     
  2. 2.
    In the Visual Studio Installer, go to the Individual components tab and select the Coded UI test under Debugging and testing section (see Figure 4-1).
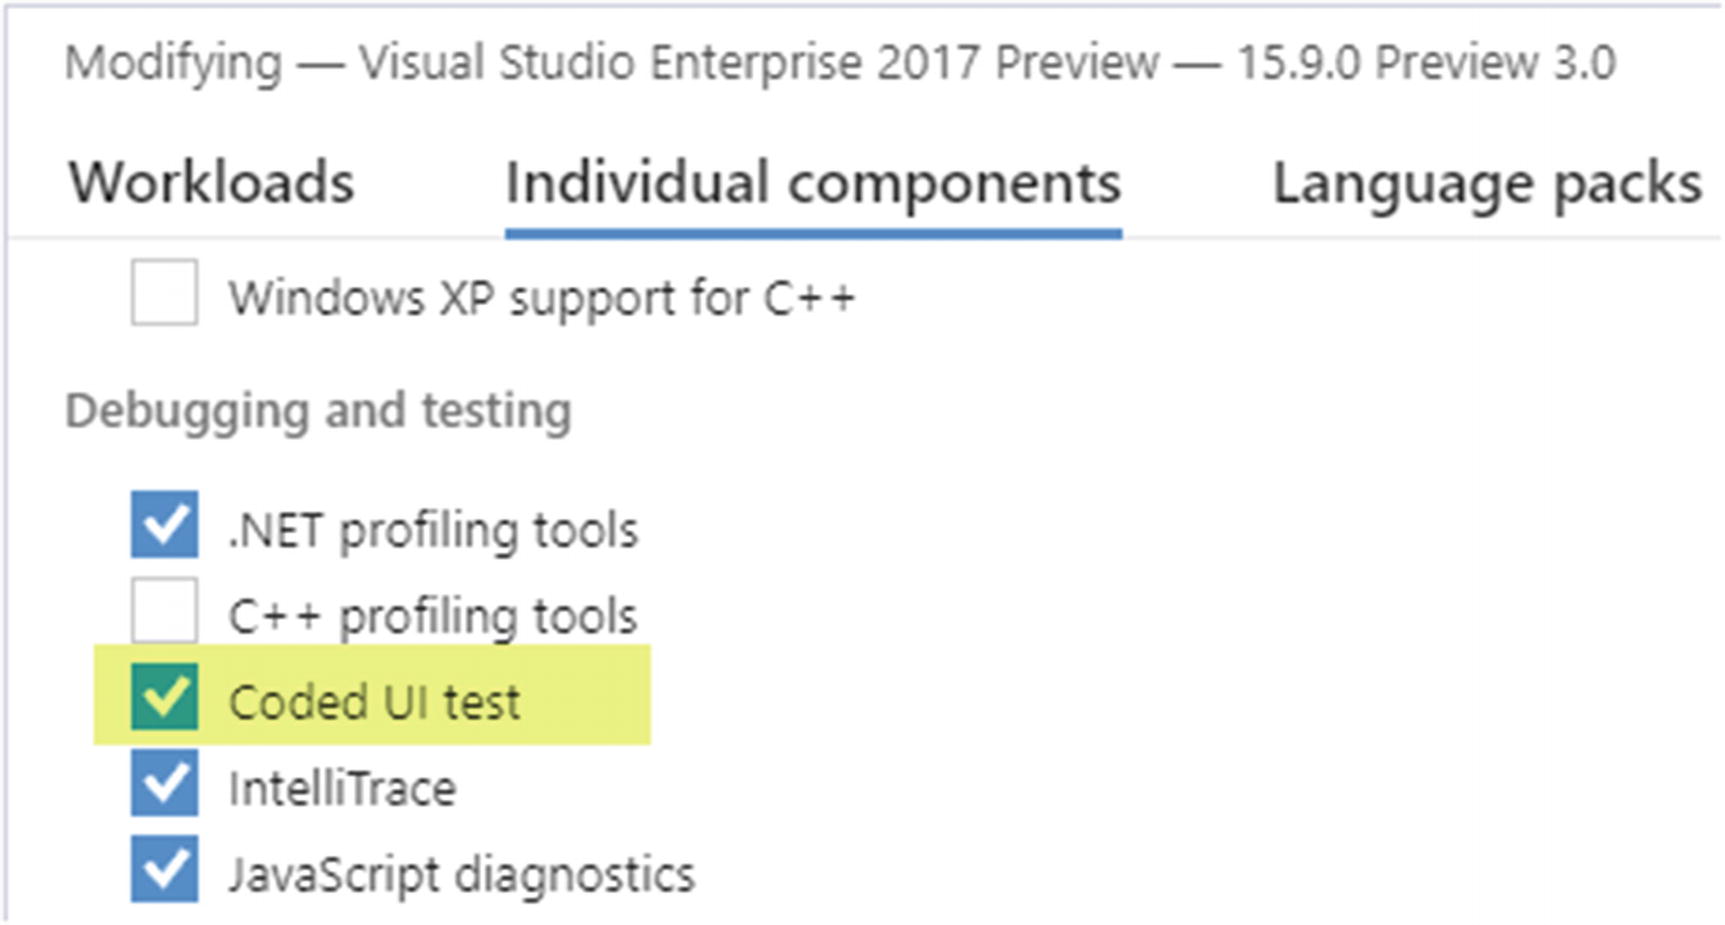
    ../images/473577_1_En_4_Chapter/473577_1_En_4_Fig1_HTML.jpg
    Figure 4-1

    Coded UI component in Visual Studio Installer

     
  3. 3.

    Click on Modify to apply the changes to Visual Studio.


Setting Up the Visual Studio Test Project

Let’s begin setting up the Visual Studio test project with C# and Coded UI following the steps described here:
  1. 1.

    In Visual Studio 2017, select Files ➤New ➤ Project.

     
  2. 2.
    In the New Project pop-up window, select Test under Visual Studio C# and select Coded UI Test Project from the test project list. Give a Name for the Project, specify a Solution Name, select Location, and click on the OK button. Leaving Create directory for solution checked will allow you to have a new directory created for the new solution in the selected location (see Figure 4-2).
    ../images/473577_1_En_4_Chapter/473577_1_En_4_Fig2_HTML.jpg
    Figure 4-2

    Create new Coded UI project

     
  3. 3.
    After adding a new Coded UI project, the Generate Code for Coded UI Test dialog will pop up. Select Record actions, edit UI map or add assertions, and select OK (see Figure 4-3).
    ../images/473577_1_En_4_Chapter/473577_1_En_4_Fig3_HTML.jpg
    Figure 4-3

    Generate code for Coded UI test pop-up dialog

     
The Coded UI Test Builder will appear (see Figure 4-4).
../images/473577_1_En_4_Chapter/473577_1_En_4_Fig4_HTML.jpg
Figure 4-4

Coded UI Test Builder

Coded UI Test Builder can be opened this way only for newly created projects. Afterward you can open Coded UI Test Builder using following methods.

Method 1

Go to Test ➤ Generate Code for Coded UI Test ➤ Use Coded UI Test Builder (See Figure 4-5).
../images/473577_1_En_4_Chapter/473577_1_En_4_Fig5_HTML.jpg
Figure 4-5

Open Coded UI Test Builder Method 1

Method 2

Open CodedUITest1.cs file from Solution Explorer.
  1. 1.

    Right-click within either a test method or property of Coded UI test class.

     
  2. 2.

    Select Generate Code for Coded UI Test ➤ Use Coded UI Test Builder (see Figure 4-6).

     
../images/473577_1_En_4_Chapter/473577_1_En_4_Fig6_HTML.jpg
Figure 4-6

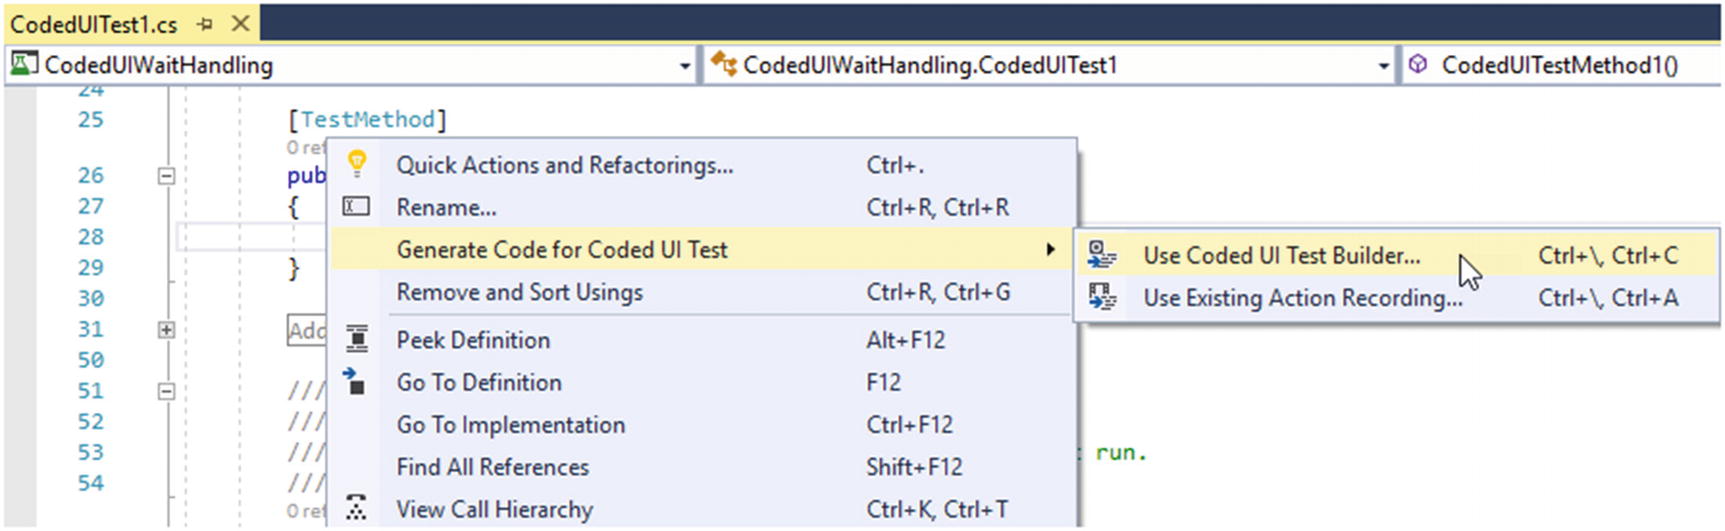
Open Coded UI Test Builder Method 2

Within this lesson you learned how to create a Coded UI test project and launch the Coded UI Test Builder. In the next lesson, we will discuss how to handle windows elements.

Lesson 4.02: How to Capture Windows Elements

You know while we work with web elements or windows elements, those elements need to be identified uniquely before performing any action on them. You may remember we discussed different locators in Chapter 2. Similarly, windows elements can be identified uniquely using various windows attributes. Let’s discuss how to capture Windows elements in this lesson.

We know developer tools in web browsers can be used to inspect web elements. When it comes to Windows elements, the Coded UI test builder can be used to identify Windows elements.

Let’s identify the Coded UI test builder first (See Figure 4-7).
../images/473577_1_En_4_Chapter/473577_1_En_4_Fig7_HTML.jpg
Figure 4-7

Coded UI Test Builder Features

  1. 1.

    Record Icon

    To start recording, click on the record icon and perform the scenarios you want to test. Click the same record icon to pause and resume the recording.

     
  2. 2.

    Recorded Actions

    This will display all the steps recorded so far.

     
  3. 3.

    Add Assertions

    You can find all the available property values of windows elements and add assertions to verify different actions.

     
  4. 4.

    Generate Code

    After recording the actions needed to be performed in the test, you can generate code to perform those actions by using this option.

     
  5. 5.

    Coded UI Test Builder Close Button

    Can be used to close Coded UI Test Builder window.


We have a fair understanding of Coded UI Test Builder icons now. You will be able to learn more about these options in a future lesson in this chapter.

As we have discussed, the Add Assertion window displays property values of Windows elements. We can use this option and find attributes of each Windows element. Let’s see how we can find attribute values of the Windows File Explorer icon in the Windows task bar.

Double-click on the Add Assertion icon of the Coded UI Test Builder and hold the mouse button. Then move the cursor over the File Explorer icon in the taskbar. You can see the mouse cursor has turned into a crosshair, and the highlighting option is enabled. It highlights controls after you hover the mouse over the control. When the cursor is on the control, release the mouse. Then the Add Assertion window will open with property values (see Figure 4-8).
../images/473577_1_En_4_Chapter/473577_1_En_4_Fig8_HTML.jpg
Figure 4-8

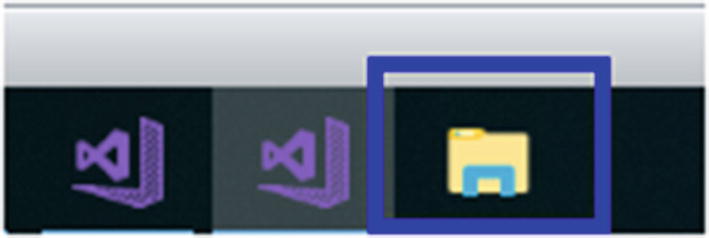
Identify controls of the highlighted area

Now you can check property values in the Add Assertions window as follows (see Figure 4-9).
../images/473577_1_En_4_Chapter/473577_1_En_4_Fig9_HTML.jpg
Figure 4-9

Add Assertion window with property values

So far, we have learned how to identify a control. Let’s try to write a simple code to click on the File Explorer icon on the Windows taskbar.

The Add Assertion window displays the control structure. If you examine Figure 4-9, you can identify UIFileExplorerButton is inside the UIRunningapplicationToolBar and the toolbar control is inside the UIRunningapplicationWindow. So, when locating the controls, first we need to identify the window control and then need to identify the matching toolbar control inside the window control. Finally, we need to find the button control inside the toolbar control.

Select UIRunningapplicationWindow and read control property values (see Figure 4-10).
../images/473577_1_En_4_Chapter/473577_1_En_4_Fig10_HTML.jpg
Figure 4-10

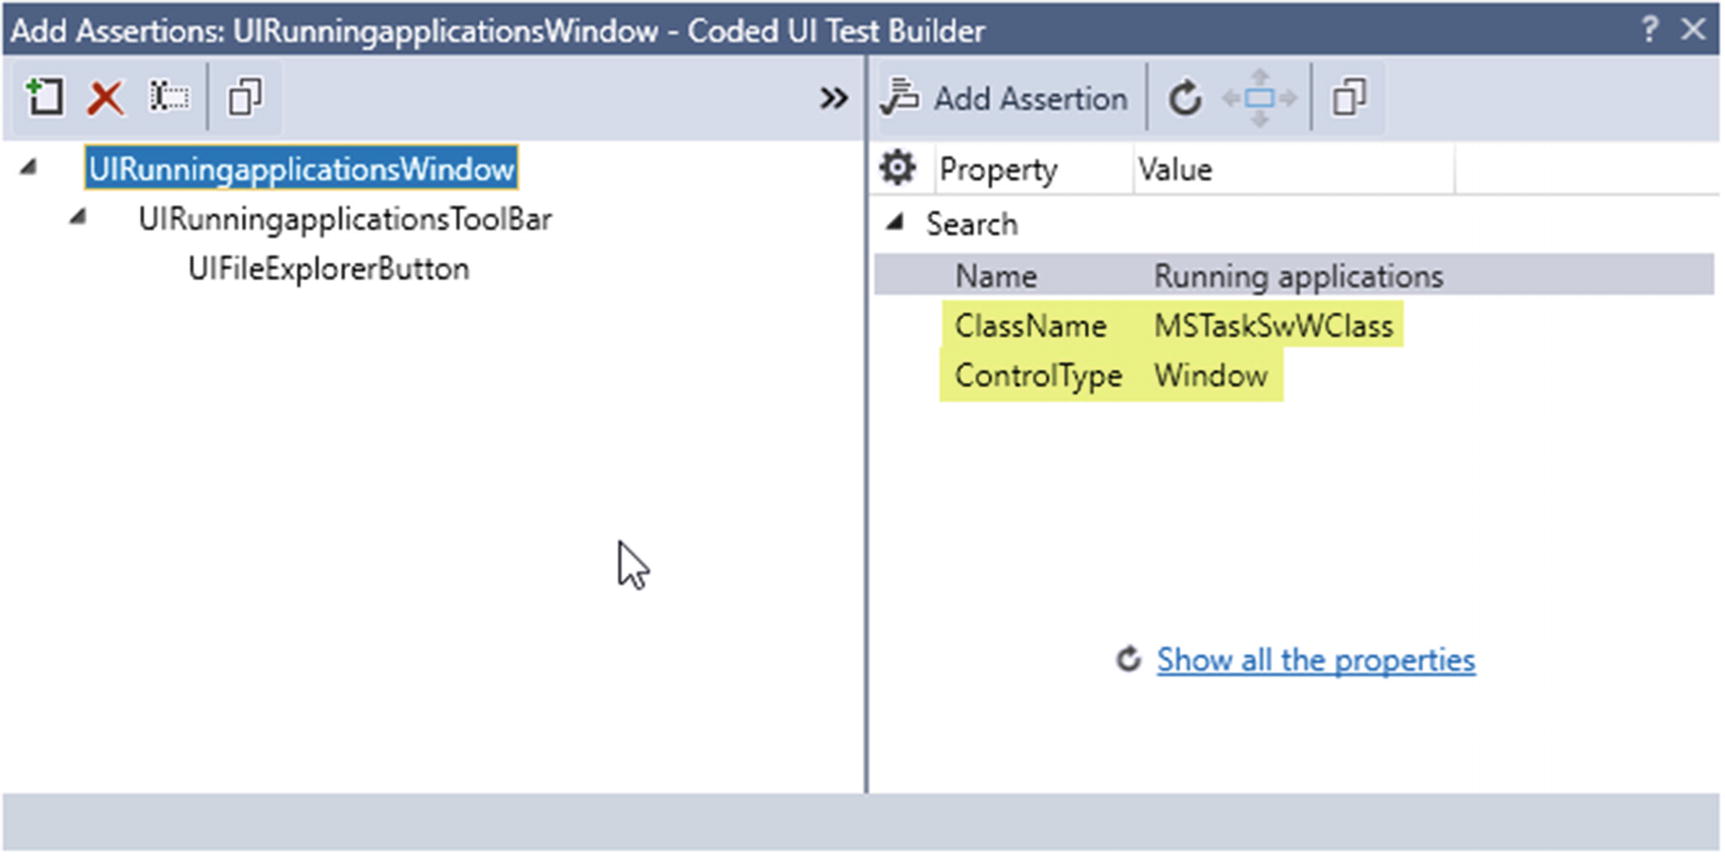
UIRunningapplicationsWindow properties

Let’s use ClassName and ControlType values to identify this control. Next let’s find property values of the UIRunningapplicationsToolBar control (see Figure 4-11).
../images/473577_1_En_4_Chapter/473577_1_En_4_Fig11_HTML.jpg
Figure 4-11

UIRunningapplicationsToolBar control properties

Let’s use the Name attribute to identify this control. UIFileExplorerButton property values can be identified as shown in Figure 4-12 .
../images/473577_1_En_4_Chapter/473577_1_En_4_Fig12_HTML.jpg
Figure 4-12

UIFileExplorerButton control properties

Now we know property values of each control. Let’s try to write a test method to click on the File Explorer icon.

Add Microsoft.VisualStudio.TestTools.UITesting.WinControls as a reference to the project. Then use the namespace in the code to work with the Windows controls (see Figure 4-13).
../images/473577_1_En_4_Chapter/473577_1_En_4_Fig13_HTML.jpg
Figure 4-13

Reference files

Let’s move to Test Method and add the code as follows.

We first need to find the window control. So initialize the new instance of WinWindow class. Then give the property values of window control that need to be found.
WinWindowparentWindow=newWinWindow();
parentWindow.SearchProperties["ClassName"]="MSTaskSwWClass";
parentWindow.SearchProperties["ControlType"]="Window";
Next we need to give search property values of the toolbar inside the window control. So, initialize the new instance of WinToolBar class while providing the parent control as parameter.
WinToolBartoolBar=newWinToolBar(parentWindow);
toolBar.SearchProperties["Name"]="Runningapplications";
Finally, initialize the WinButton instance and provide toolbar instance as a parent control.
WinButtonbutton=newWinButton(toolBar);
button.SearchProperties["Name"]="File Explorer";
button.SearchProperties["ControlType"]="Button";
Steps to identify controls are completed now. Next you can perform click on button control.
Mouse.Click(button);
You can find complete test method code as follows:
[TestMethod]
public void CodedUITestMethod1()
{
    WinWindow parentWindow = new WinWindow();
    parentWindow.SearchProperties["ClassName"] = "MSTaskSwWClass";
    parentWindow.SearchProperties["ControlType"] = "Window";
    WinToolBar toolBar = new WinToolBar(parentWindow);
    toolBar.SearchProperties["Name"] = "Running applications";
    WinButton button = new WinButton(toolBar);
    button.SearchProperties["Name"] = "File Explorer";
    button.SearchProperties["ControlType"] = "Button";
    Mouse.Click(button);
}
You can execute the Coded UI test method by right-clicking on the test method in Test Explorer and select Run Selected Tests (see Figure 4-14) .
../images/473577_1_En_4_Chapter/473577_1_En_4_Fig14_HTML.jpg
Figure 4-14

Run a test method using Test Explorer

You learned about the Coded UI Test Builder and how to find window control property values in this lesson. Additionally you learned how to perform action on controls by using a sample code.

Lesson 4.03: Element Commands

This lesson will show you the mouse actions and keyboard actions on window controls. Source code for this lesson can be found at https://github.com/chamindac/Book-Test-Autmation-VS/tree/master/Chapter%204/Lesson%204.03/CodedUIWaitHandling

Click( )

The Coded UI Click() method can be used to simply click on window controls or perform various complicated click actions. Let’s discuss different ways of using the Click() method.

Mouse.Click( )

Click on the current position where the cursor is located.
[TestMethod]
public void Click()
{
Mouse.Click();
}

Mouse.Click(UITestControl Control)

Click on the given control. In the following example, the File Explorer icon in the taskbar is the window control to click on.
[TestMethod]
public void MouseClickonControl()
{
            WinWindow parentWindow = new WinWindow();
            parentWindow.SearchProperties["ClassName"] = "MSTaskSwWClass";
            parentWindow.SearchProperties["ControlType"] = "Window";
            WinToolBar toolBar = new WinToolBar(parentWindow);
            toolBar.SearchProperties["Name"] = "Running applications";
            WinButton button = new WinButton(toolBar);
            button.SearchProperties["Name"] = "File Explorer";
            button.SearchProperties["ControlType"] = "Button";
            Mouse.Click(button);
}

Click(ModifierKeys modifierKeys)

When we need to use modifier keys such as Shift, Control, or Alter keys, we can pass the modifier key value as the parameter and perform a click action. The following example shows how to click while pressing the Windows modifier key.
[TestMethod]
public void ClickModifierKey()
{
    Mouse.Click(ModifierKeys.Windows);
}

Click(Point ScreenCoordinate);

Click on the given screen coordinates provided as parameter values. The following example gives (x,y) values as (0,0).
[TestMethod]
public void ClickOnPoint()
{
    Mouse.Click(Point.Empty);
}

Click(UITestControl Control,MouseButtons Button);

Click a given mouse button on a given control. You can click on different mouse buttons. For example, it allows clicking on the left, right, or middle mouse button. The following sample code shows how to right-click on the File Explorer icon in the task bar.
[TestMethod]
public void RightClickonControl()
{
    WinWindow parentWindow = new WinWindow();
    parentWindow.SearchProperties["ClassName"] = "MSTaskSwWClass";
    parentWindow.SearchProperties["ControlType"] = "Window";
    WinToolBar toolBar = new WinToolBar(parentWindow);
    toolBar.SearchProperties["Name"] = "Running applications";
    WinButton button = new WinButton(toolBar);
    button.SearchProperties["Name"] = "File Explorer";
    button.SearchProperties["ControlType"] = "Button";
    Mouse.Click(button, MouseButtons.Right);
}

Click(UITestControl Control,Point relativeCoordinate);

Click on a given control on a given point relative to the control. The following sample code explains how to click on a given point of a given control.
[TestMethod]
public void ClickonControlPoint()
{
    WinWindow parentWindow = new WinWindow();
    parentWindow.SearchProperties["ClassName"] = "MSTaskSwWClass";
    parentWindow.SearchProperties["ControlType"] = "Window";
    WinToolBar toolBar = new WinToolBar(parentWindow);
    toolBar.SearchProperties["Name"] = "Running applications";
    WinButton button = new WinButton(toolBar);
    button.SearchProperties["Name"] = "File Explorer";
    button.SearchProperties["ControlType"] = "Button";
    var buttonPosition = button.BoundingRectangle;
    Point relativePoint = new Point(buttonPosition.X + 5, buttonPosition.Y - 5);
    Mouse.Click(button, relativePoint);
}

Click(UITestControl Control, MouseButtons Button, ModifierKeys, Point relativeCoordinate)

You can click a mouse button on given coordinates of the control along with modifier keys. Relative coordinates help to click on a position relative to the control.

Click(MouseButtons Button, ModifierKeys, Point screenCoordinate)

You can click on the given coordinates of the control along with given modifier key. Screen coordinates allows clicking on a position in relation to the whole screen.

Click(UITestControl Control, ModifierKeys modifierKeys);

Click on a given control while pressing a given modifier key.

DoubleClick( )

In Coded UI, there are more options to perform double-click on the control. Let’s see different type of double-clicks.

DoubleClick( );

Double-click at the location of the mouse cursor.
[TestMethod]
public void DoubleClick()
{
    Mouse.DoubleClick();
}

DoubleClick(UITestControl Control)

Double-click on the given control. The following sample code shows how to double-click on the File Explorer icon in the taskbar.
[TestMethod]
public void DoubleClickControl()
{
    WinWindow parentWindow = new WinWindow();
    parentWindow.SearchProperties["ClassName"] = "MSTaskSwWClass";
    parentWindow.SearchProperties["ControlType"] = "Window";
    WinToolBar toolBar = new WinToolBar(parentWindow);
    toolBar.SearchProperties["Name"] = "Running applications";
    WinButton button = new WinButton(toolBar);
    button.SearchProperties["Name"] = "File Explorer";
    button.SearchProperties["ControlType"] = "Button";
    Mouse.DoubleClick(button);
}

DoubleClick(MouseButtons Button)

Double-click the given mouse button at the current mouse pointer position. The following sample code is for double-clicking the left mouse button.
[TestMethod]
public void DoubleClickMouseButton()
{
    Mouse.DoubleClick(MouseButtons.Left);
}

DoubleClick(ModifierKeys modifierKeys)

Double-click at the current mouse pointer position while pressing the given modifier key. The following code is for double-clicking while pressing the windows key.
[TestMethod]
public void DoubleClickModifier()
{
    Mouse.DoubleClick(ModifierKeys.Windows);
}

DoubleClick(Point screenCoordinate)

Double-click on given screen coordinates. The following sample code shows double-click on (0,0) location.
[TestMethod]
public void DoubleClickPoint()
{
    Mouse.DoubleClick(Point.Empty);
}
  1. 1.

    DoubleClick(MouseButtons button, ModifierKeys, Point screenCoordinates): Will double click the given mouse button while pressing a given modifier key at given screen coordinates.

     
  2. 2.

    DoubleClick(UITestControl control, MouseButtons button, ModifierKeys, Point relativeCoordinates): Will double-click the given mouse button while pressing a given modifier key at given coordinates relative to a given UI control.

     
  3. 3.

    DoubleClick(UITestControl control, ModifierKeys modifierKeys): Will double-click while pressing a given modifier key on a given UI control.

     
  4. 4.

    DoubleClick(UITestControl control, MouseButtons button): Will double-click the given mouse button on a given UI control.

     
  5. 5.

    DoubleClick(UITestControl control, Point relativeCoordinate): Will double-click on given coordinates of a given UI control.


These are the available DoubleClick methods. You can use these according to your requirements.

Hover( )

Hover allows the mouse pointer hover operation simulation in the Coded UI tests.

Hover(Point screenCoordinate)

Hover the mouse over given screen coordinates. The following sample code is for hovering the mouse over the (0,0) point.
[TestMethod]
public void MouseHoverPoint()
{
    Mouse.Hover(Point.Empty);
}

Hover(UITestControl control)

Hover the mouse over a given control. In the following code, hover the mouse over the File Explorer icon in the taskbar.
[TestMethod]
public void MouseHoverToControl()
{
    WinWindow parentWindow = new WinWindow();
    parentWindow.SearchProperties["ClassName"] = "MSTaskSwWClass";
    parentWindow.SearchProperties["ControlType"] = "Window";
    WinToolBar toolBar = new WinToolBar(parentWindow);
    toolBar.SearchProperties["Name"] = "Running applications";
    WinButton button = new WinButton(toolBar);
    button.SearchProperties["Name"] = "File Explorer";
    button.SearchProperties["ControlType"] = "Button";
    Mouse.Hover(button);
}

Hover(Point screenCoordinate, int millisecondsDuration)

Hover the mouse over a given screen coordinate and hold the execution for the given time period before moving to the next code line.
[TestMethod]
public void MouseHoverDuration()
{
    Mouse.Hover(Point.Empty, 2000);
}

Hover(UITestControl control, Point relativeCoordinate);

Hover the mouse over the coordinates relative to a given control.

Hover(UITestControl control, Point relativeCoordinate, int millisecondDuration)

Hover the mouse over the given coordinates relative to a given control and hold the execution for the given period of time before moving to the next code line.

MoveScrollWheel

Moving the scroll wheel of the mouse can be simulated in the Coded UI tests with this method.

MoveScrollWheel(int wheelMoveCount)

Move the scroll wheel a given number of times. In the following sample code, scroll 20 times.
[TestMethod]
public void MoveScrollwithScrollCount()
{
    Mouse.MoveScrollWheel(20);
}
  1. 1.

    MoveScrollWheel(int wheelMoveCount, ModifierKeys modifierKeys): Will move scroll wheel given number of times while pressing a given modifier key on the current focused control.

     
  2. 2.

    MoveScrollWheel(UITestControl control, int wheelMoveCount): Will move scroll wheel a given number of times on the given UI control.

     
  3. 3.

    MoveScrollWheel(UITestControl control, int wheelMoveCount, ModifierKeys modifierKeys): Will move the scroll wheel a given number of times on a given UI control while pressing a given modifier key.


StartDragging

StartDragging methods allow us to start dragging a control from a given location to a location that should be specified with a StopDragging method.
  • StartDragging(UITestControl control): Will start dragging the given UI control.

  • StartDragging(UITestControl control, MouseButtons button): Will start dragging the given UI control using the given mouse button.

  • StartDragging(UITestControl control, Point relativeCoordinate): Will start dragging the given UI control in the given coordinates of the UI control.

  • StartDragging(): Will start dragging the control in the current mouse pointer position.

  • StartDragging(UITestControl control, Point relativeCoordinate, MouseButtons button, ModifierKeys modifierKeys): Will start dragging the given UI control in the coordinates relative to the given UI control, using the given mouse button, while pressing the given modifier key.

StopDragging

After start dragging there should be the end point to stop dragging action. The StopDragging method is used to tell the end-point. The following are the StopDragging methods available.
  • StopDragging(Point pointToStop): Will stop dragging a control on the given coordinates.

  • StopDragging(int moveByX, int moveByY): Will stop dragging a control after moving a given number of pixels horizontally and vertically.

  • StopDragging(UITestControl control, int moveByX, int moveByY): Will stop dragging a control say A to control B, after moving a given number of pixels horizontally and vertically relative to the given UI control B, which would be the control that is the place holder of the control A that is being dragged and dropped.

  • StopDragging(UITestControl control): Will stop dragging the control that is being dragged, after dragging it to the given UI control.

  • StopDragging(UITestControl control, Point relativeCoordinate): Will stop dragging the control that is being dragged, after moving it to the given coordinates relative to the given UI control.

The following sample code shows how to use StartDragging and StopDragging methods. In the following code, the File Explorer icon in the taskbar is moved a given number of horizontal and vertical number of pixels.
[TestMethod]
public void StartDragAndDrop()
 {
     WinWindow parentWindow = new WinWindow();
     parentWindow.SearchProperties["ClassName"] = "MSTaskSwWClass";
     parentWindow.SearchProperties["ControlType"] = "Window";
     WinToolBar toolBar = new WinToolBar(parentWindow);
     toolBar.SearchProperties["Name"] = "Running applications";
     WinButton button = new WinButton(toolBar);
     button.SearchProperties["Name"] = "File Explorer";
     button.SearchProperties["ControlType"] = "Button";
     Mouse.StartDragging(button);
     Rectangle desktopWindow = WinWindow.Desktop.BoundingRectangle;
     Mouse.StopDragging(desktopWindow.Width / 4, desktopWindow.Y);
 }

SendKeys

SendKeys method allows you to type text in an input control.
  • SendKeys(UITestControl control, string text, ModifierKeys, bool isEncoded, bool isUnicode): Will type the provided text in the given UI control while pressing the given modifier key. Can provide if text should be encoded and if text is in Unicode.

  • SendKeys(string text, ModifierKeys, bool isEncoded, bool isUnicode): Will type the provided text in the currently focused UI control while pressing the given modifier key. Can provide if text should be encoded and if text is in Unicode.

  • SendKeys(UITestControl control, string text, ModifierKeys, bool isEncoded): Will type the provided text in the given UI control while pressing the given modifier key. Can provide if text should be encoded.

  • SendKeys(string text, ModifierKeys, bool isEncoded): Will type the provided text in the currently focused UI control while pressing the given modifier key. Can provide if text should be encoded.

  • SendKeys(string text, ModifierKeys modifierKeys): Will type the provided text in the currently focused UI control while pressing the given modifier key.

  • SendKeys(UITestControl control, string text, bool isEncoded): Will type the provided text in the given UI control while pressing the given modifier key. Can provide if text should be encoded.

  • SendKeys(string text, bool isEncoded): Will type the provided text in the currently focused UI control. Can provide if text should be encoded.

  • SendKeys(UITestControl control, string text): Will type the provided text in the given UI control.

  • SendKeys(string text): Will type the provided text in the currently focused UI control.

  • SendKeys(UITestControl control, string text, ModifierKeys modifierKeys): Will type the provided text in the given UI control while pressing the given modifier key.

The following sample code shows how to open the File Explorer window and type the word “currency” in the search field.
[TestMethod]
public void TypeValues()
{
    WinWindow dialog = new WinWindow();
    dialog.SearchProperties["ClassName"] = "MSTaskSwWClass";
    dialog.SearchProperties["ControlType"] = "Window";
    WinToolBar toolBar = new WinToolBar(dialog);
    toolBar.SearchProperties["Name"] = "Running applications";
    WinButton button = new WinButton(toolBar);
    button.SearchProperties["Name"] = "File Explorer";
    button.SearchProperties["ControlType"] = "Button";
    Mouse.Click(button);
    WinWindow dialog2 = new WinWindow();
    dialog2.SearchProperties["ClassName"] = "CabinetWClass";
    dialog2.SearchProperties["ControlType"] = "Window";
    WinEdit winSearch = new WinEdit(dialog2);
    winSearch.SearchProperties["Name"] = "Search Box";
    Keyboard.SendKeys(winSearch, "Currency");
}

We have learned possible mouse and keyboard actions on Windows controls in this lesson.

Lesson 4.04: Handle Element Waits

In web apps test automation, we learned about implicit and explicit waits in Selenium. Likewise, windows apps also need wait handling mechanisms. When it comes to the Coded UI framework, there are various wait methods. Let’s try to identify those methods in this lesson. You can use them similarly to what you have done with the Selenium waits, which we have discussed in detail in Chapter 3 on web-based test automation.
  • WaitForControlEnabled

    Wait for the control to be enabled. This can be used to check the status of the control and wait until control is enabled before performing any action on it.

  • WaitForControlReady

    Wait for the control to be ready to accept mouse and keyboard inputs. When performing actions on UI elements, those elements take different time durations to appear on the UI. This method can be used to hold execution until the UI control is fully loaded and ready to accept actions on it.

  • WaitForControlExist

    Waits for the control to appear in the UI. While doing UI test automation, there are situations where we need to verify pop-ups, validations, and message boxes. But these controls appear in the UI after performing a specific action and it may take different time durations for them to appear in the UI. For this type of a situation, WaitForControlExist method can be used.

  • WaitForControlNotExist

    Wait for controls to disappear from the UI. As an example, you can consider a situation where we get a window pop-up in the middle of the test and we need to close that and continue testing. The close button of the window pop-up is clicked to close the window and we need a small amount of time to change focus from the window pop-up to the application. We can use the WaitForControlNotExist method to check whether the pop-up window has closed.

  • WaitForControlPropertyEqual

    Wait for the specified property of the control to have the given value. As an example, in a situation where we do calculations and we need to verify that the calculated value is equal to a given value, we can use the WaitForControlPropertyEqual method.

  • WaitForControlPropertyNotEqual

    Wait for a specified property of the control to have the opposite value. As an example, you can consider a condition that normally returns a value of “false” but in a specific situation returns “true.” We can use this wait method to verify a returned value.

  • WaitForControlCondition

    Wait for a specified predicate return to be true. As an example, a method returns a Boolean value when several conditions are true. You can use this method to wait till the method returns true.

    In this lesson, we have explored the available wait methods in the Coded UI test framework.

Lesson 4.05: Coded UI Test Builder–Record and Playback

After going through this lesson, you will be able to get an idea on how to work with the Coded UI record and playback feature, which allows you to record your actions in a manual testing and create a test automation script from it using Coded UI, which can be replayed to execute the tests next time. Source code of this lesson can be found at https://github.com/chamindac/Book-Test-Autmation-VS/tree/master/Chapter%204/Lesson%204.05/CodedUIRecordPlayback
  1. 1.

    Create new coded UI project. You can see UIMap.cs file in Solution Explorer.

     
  2. 2.

    Open Coded UI test builder.

     
  3. 3.
    Click on the Start Recording button and perform actions you want to record (see Figure 4-15).
    ../images/473577_1_En_4_Chapter/473577_1_En_4_Fig15_HTML.jpg
    Figure 4-15

    Click on the Start Recording button

     
  4. 4.

    Perform steps in the application under testing. After performing actions you want to record, you can click on the Pause Recording button, in the same location as the Start Recording button, to pause the recording.

     
  5. 5.
    The next step is to generate code to perform actions we recorded. To do that, click on the Generate Code icon of the Coded UI Test Builder. You can give a method name and add a description. After that, click on Add and Generate button to generate code (see Figure 4-16).
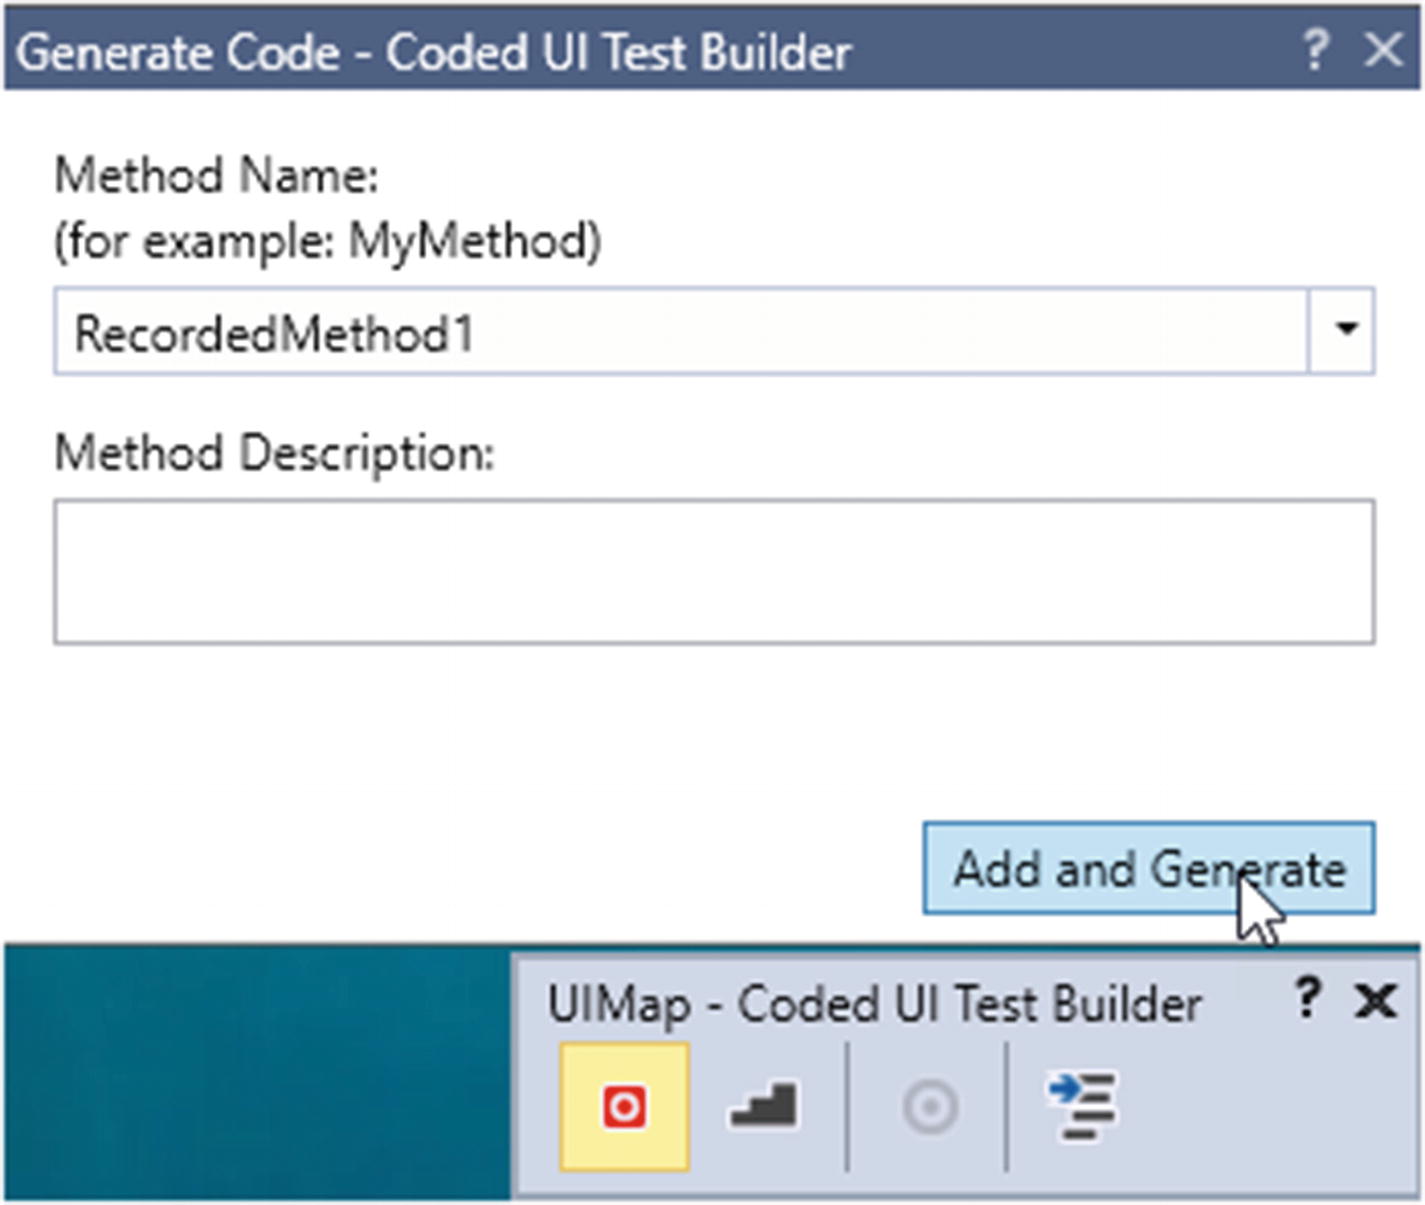
    ../images/473577_1_En_4_Chapter/473577_1_En_4_Fig16_HTML.jpg
    Figure 4-16

    Generate Code

     
  6. 6.
    Now go and check Solution Explorer and you will find that UIMap.Designer.cs file has been added. Open this file and you will find recorded steps inside this class (see Figure 4-17).
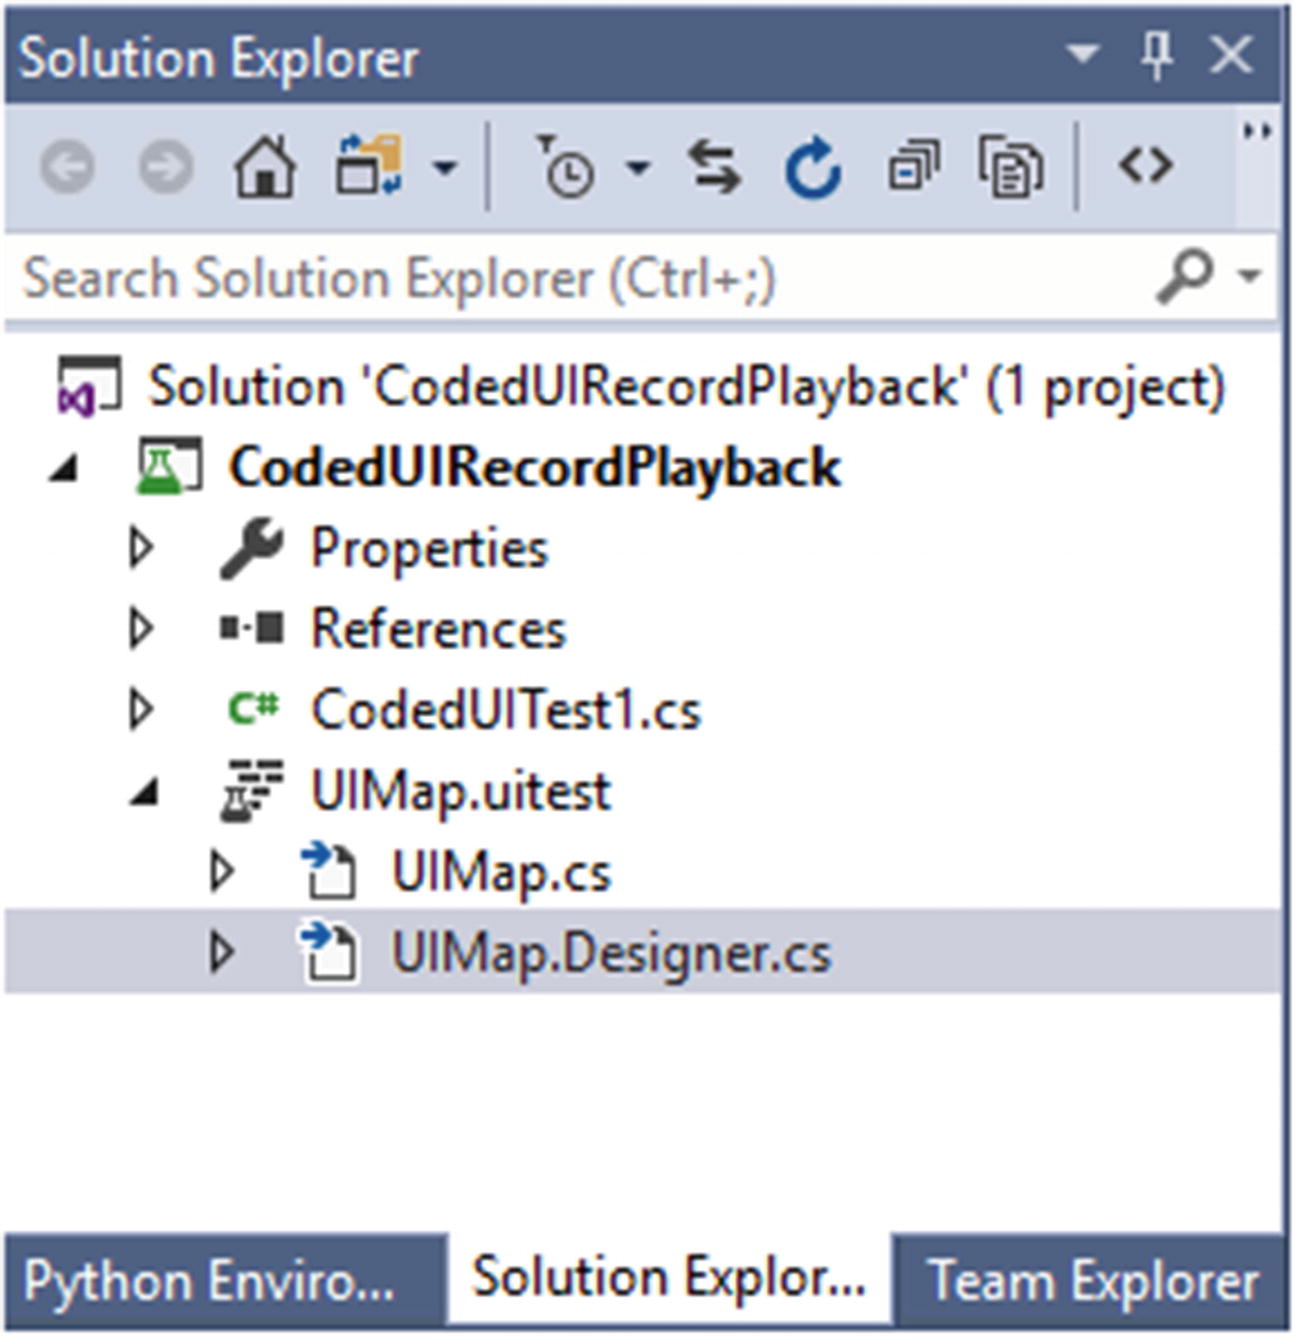
    ../images/473577_1_En_4_Chapter/473577_1_En_4_Fig17_HTML.jpg
    Figure 4-17

    UIMap.Designer.cs file

     
Open the CodedUITest1.cs file and you will find a new line has been added to the test method.
[TestMethod]
public void CodedUITestMethod1()
{
    this.UIMap.RecordedMethod1();
}

You can open UIMap.Designer class to see the complete recorded code. Execute this method to test the recorded scenario.

Even though record and playback of tests this way seems easy, it is not a recommended way to develop test automation code. Tests generated this way contain unwanted code steps and are not clean or easily understandable, causing issues in maintenance of test code.

Lesson 4.06: Automation Code Example with Coded UI with C#

So far, we have discussed controls and commands of Coded UI in previous lessons. With this lesson, you will be able to learn sample test code using Coded UI and C#. Source code of this lesson can be found at https://github.com/chamindac/Book-Test-Autmation-VS/tree/master/Chapter%204/Lesson%204.06/CodedUIDemo .
  1. 1.

    Create a text file in the pictures section of file explorer and give it the name “Currency.”

     
  2. 2.

    Create a folder in the pictures section of File Explorer and give it the name “Camera Roll.”


The following explained test method will open up the File Explorer and move to the pictures section. Then it will verify if the folder Camera Roll exists. Next it will search that the file named Currency is available by performing a search in Windows File Explorer.

All required reference assemblies should be added to the project. Then refer to the namespaces in the top of the class file.
using Microsoft.VisualStudio.TestTools.UITesting;
using Microsoft.VisualStudio.TestTools.UnitTesting;
using Keyboard = Microsoft.VisualStudio.TestTools.UITesting.Keyboard;
using Microsoft.VisualStudio.TestTools.UITesting.WinControls;

We are now ready to write the test code.

Initialize a new instance of the WinWindow class and provide property values of the controls that need to be found before performing actions. The first step should be to open the File Explorer window. To open the File Explorer, click on the File Explorer icon in the taskbar.
WinWindow win1 = new WinWindow();
win1.SearchProperties["ClassName"] = "MSTaskSwWClass";
win1.SearchProperties["ControlType"] = "Window";
WinToolBar toolBar = new WinToolBar(win1);
toolBar.SearchProperties["Name"] = "Running applications";
WinButton button = new WinButton(toolBar);
button.SearchProperties["Name"] = "File Explorer";
button.SearchProperties["ControlType"] = "Button";
Mouse.Click(button);
After opening the File Explorer window, click on the pictures tab of the side menu.
WinWindow win2 = new WinWindow();
win2.SearchProperties["ClassName"] = "CabinetWClass";
win2.SearchProperties["ControlType"] = "Window";
WinTreeItem winTreeItem = new WinTreeItem(win2);
winTreeItem.SearchProperties["ControlType"] = "TreeItem";
winTreeItem.SearchProperties["Name"] = "Pictures";
Mouse.Click(winTreeItem);
Verify the folder called “Camera Roll” is available.
WinListItem winListItem = new WinListItem(win2);
winListItem.SearchProperties["ControlType"] = "ListItem";
winListItem.SearchProperties["Name"] = "Camera Roll";
Assert.AreEqual(winListItem.DisplayText, "Camera Roll");
Type string “Currency” in the search field.
WinWindow searchArea = new WinWindow(win2);
searchArea.SearchProperties["ClassName"] = "DirectUIHWND";
WinPane quichAccess = new WinPane(searchArea);
quichAccess.SearchProperties["ControlType"] = "Pane";
quichAccess.SearchProperties["Name"] = " Search Quick access";
WinEdit winSearch = new WinEdit(quichAccess);
winSearch.SearchProperties["Name"] = "Search Box";
Keyboard.SendKeys(winSearch, "Currency");
Find the complete test code as follows.
[TestMethod]
public void CodedUITestMethod1()
{
    WinWindow win1 = new WinWindow();
    win1.SearchProperties["ClassName"] = "MSTaskSwWClass";
    win1.SearchProperties["ControlType"] = "Window";
    WinToolBar toolBar = new WinToolBar(win1);
    toolBar.SearchProperties["Name"] = "Running applications";
    WinButton button = new WinButton(toolBar);
    button.SearchProperties["Name"] = "File Explorer";
    button.SearchProperties["ControlType"] = "Button";
    Mouse.Click(button);
    WinWindow win2 = new WinWindow();
    win2.SearchProperties["ClassName"] = "CabinetWClass";
    win2.SearchProperties["ControlType"] = "Window";
    WinTreeItem winTreeItem = new WinTreeItem(win2);
    winTreeItem.SearchProperties["ControlType"] = "TreeItem";
    winTreeItem.SearchProperties["Name"] = "Pictures";
    Mouse.Click(winTreeItem);
    WinListItem winListItem = new WinListItem(win2);
    winListItem.SearchProperties["ControlType"] = "ListItem";
    winListItem.SearchProperties["Name"] = "Camera Roll";
    Assert.AreEqual(winListItem.DisplayText, "Camera Roll");
    WinWindow searchArea = new WinWindow(win2);
    searchArea.SearchProperties["ClassName"] = "DirectUIHWND";
    WinPane quichAccess = new WinPane(searchArea);
    quichAccess.SearchProperties["ControlType"] = "Pane";
    quichAccess.SearchProperties["Name"] = " Search Quick access";
    WinEdit winSearch = new WinEdit(quichAccess);
    winSearch.SearchProperties["Name"] = "Search Box";
    Keyboard.SendKeys(winSearch, "Currency");
}

In this lesson, we have learned how to write a simple Coded UI test to work with Windows applications.

Lesson 4.07: Using Sikuli for Windows App Testing

Sikuli is a GUI automation tool. It can be used to automate anything you see in the UI with image recognition mechanism. This can be used to automate both web and Windows applications. Mostly Sikuli is used to automate flash images and websites. We can introduce Sikuli as follows:
  • It is an open source tool.

  • Can automate Windows applications

  • Can automate Desktop applications

  • Can automate flash objects

Let’s try to learn Sikuli with the sample code provided in this lesson. Source code of this lesson can be found at https://github.com/chamindac/Book-Test-Autmation-VS/tree/master/Chapter%204/Lesson%204.07/SikuliDemo .
  1. 1.

    In Visual Studio 2017, select Files ➤ New ➤ Project.

     
  2. 2.

    In the New Project pop-up window, select Test under Visual Studio C# and select Unit Test Project from the test project list. Give a Name for the Project, specify a Solution Name, select Location, and click on the OK button. Leaving Create directory for solution checked will allow you to have a new directory created for the new solution in the selected location.

     
  3. 3.

    Go to Tools ➤ NuGet Package Manager ➤ Manage NuGet Packages for Solution.

     
  4. 4.

    Install Sikuli4Net package (see Figure 4-18).

     
../images/473577_1_En_4_Chapter/473577_1_En_4_Fig18_HTML.jpg
Figure 4-18

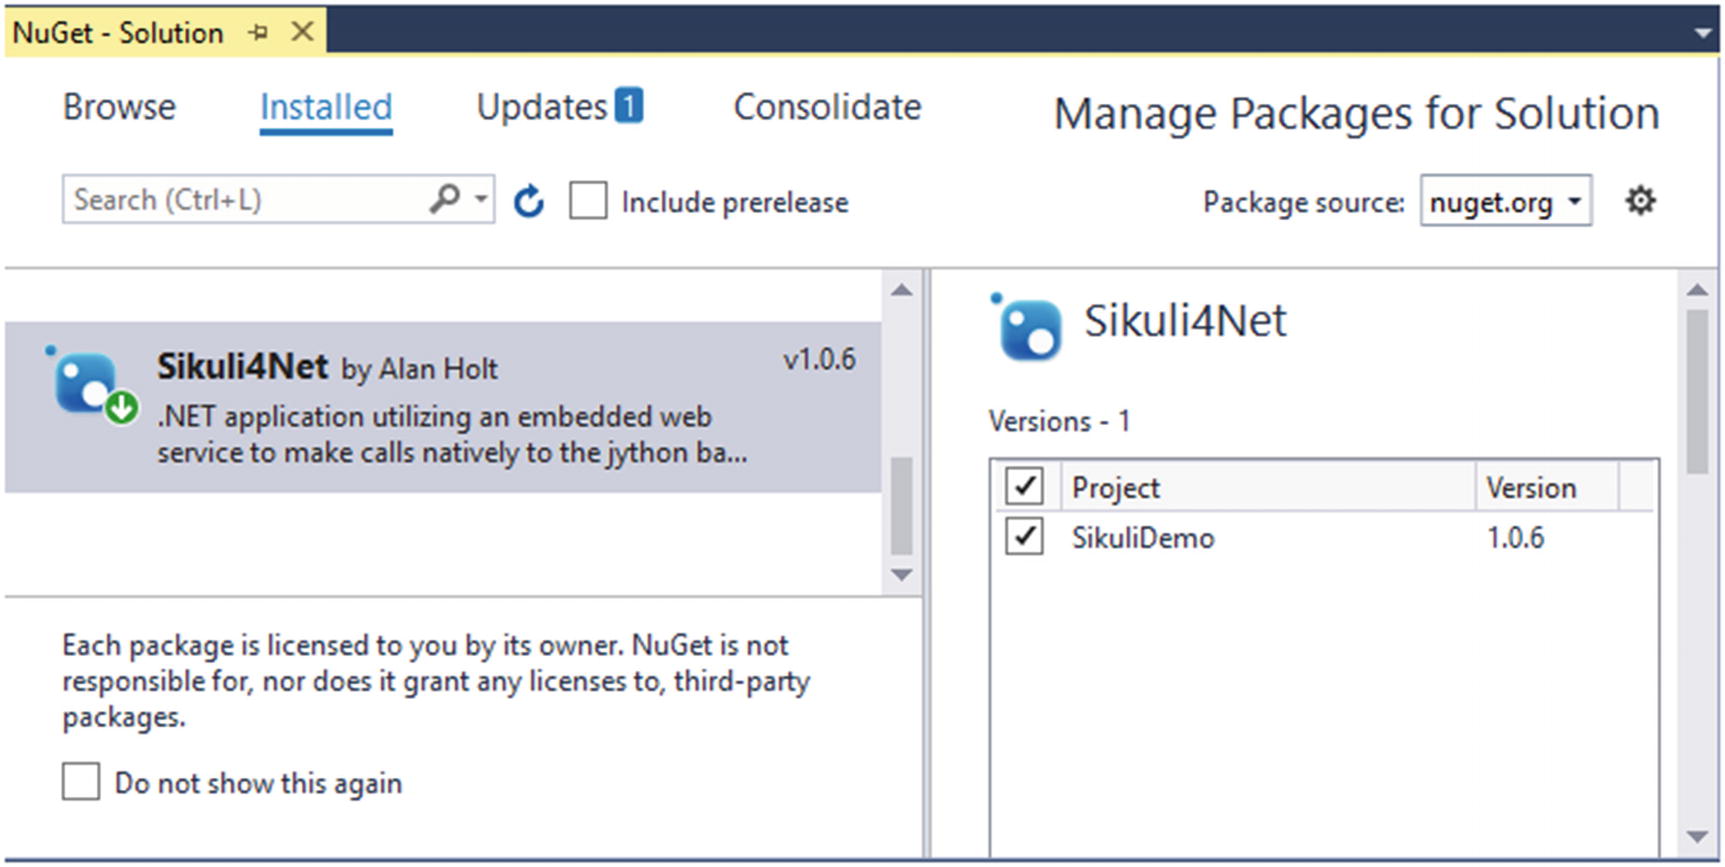
Install the Sikuli4Net package

Now we can write a sample code. With this code we are going to search for Notepad; select Notepad from the search results and verify Notepad is opened.
  1. 1.

    Open the UnitTest1.cs file.

     
  2. 2.
    Add reference files to the project as follows:
    using Microsoft.VisualStudio.TestTools.UnitTesting;
    using Sikuli4Net.sikuli_REST;
     
  3. 3.

    Then create a Screen class object to access classes.

     
Screen screen = new Screen();
  1. 4.

    Then identify the patterns going to match. For example:

     
Pattern pattern1 = new Pattern(imagepath);
We have four patterns that we are going to match within this sample test. We can keep those patterns as follows. You can find the images mentioned in the following code at https://github.com/chamindac/Book-Test-Autmation-VS/tree/master/Chapter%204/Lesson%204.07/SikuliDemo . Download them and put them on your local drive folder and change the path of following code accordingly.
Pattern pattern_SearchImage = new Pattern("F:\SikuliImages\Sikuli-search.png");
Pattern pattern_searchTextField = new Pattern("F:\SikuliImages\sikuli-searchfield.png");
Pattern pattern_searchResult = new Pattern("F:\SikuliImages\sikuli-searcresult.png");
Pattern pattern_notepad = new Pattern("F:\SikuliImages\sikuli-notepad.png");
The first pattern to match is the Windows search icon in the taskbar. Find the pattern and click on it using the following code lines:
screen.Find(pattern_SearchImage);
screen.Click(pattern_SearchImage);
Then enter a value to search.
screen.Find(pattern_searchTextField);
screen.Type(pattern_searchTextField,"NotePad");
Select the Notepad image among the search results.
screen.Find(pattern_searchResult);
screen.Click(pattern_searchResult);
Finally, verify the Notepad application is visible.
Assert.AreEqual(true,screen.Exists(pattern_notepad));
Find the complete code as follows:
using Microsoft.VisualStudio.TestTools.UnitTesting;
using Sikuli4Net.sikuli_REST;
namespace SikuliDemo
{
    [TestClass]
    public class UnitTest1
    {
        [TestMethod]
        public void TestMethod1()
        {
            Screen screen = new Screen();
            Pattern pattern_SearchImage = new Pattern("F:\SikuliImages\Sikuli-search.png");
            Pattern pattern_searchTextField = new Pattern("F:\SikuliImages\sikuli-searchfield.png");
            Pattern pattern_searchResult = new Pattern("F:\SikuliImages\sikuli-searcresult.png");
            Pattern pattern_notepad = new Pattern("F:\SikuliImages\sikuli-notepad.png");
            screen.Find(pattern_SearchImage);
            screen.Click(pattern_SearchImage);
            screen.Find(pattern_searchTextField);
            screen.Type(pattern_searchTextField,"NotePad");
            screen.Find(pattern_searchResult);
            screen.Click(pattern_searchResult);
            Assert.AreEqual(true,screen.Exists(pattern_notepad));
        }
    }
}

In this lesson, we have used the Sikuli framework to execute test automations, which is based on image matching.

Lesson 4.08: Using Winium for Windows App Testing

Winium is a Selenium-based open source automation framework for the Windows platform. This tool is similar to Selenium. You can find more info here: https://github.com/2gis/Winium .

You can download Winium.Desktop.Driver from this location: https://github.com/2gis/Winium.Desktop/releases .

Source code of this lesson can be found at https://github.com/chamindac/Book-Test-Autmation-VS/tree/master/Chapter%204/Lesson%204.08/Winium-Demo .

Let’s try to test the Windows application using Winium with C# in this lesson.
  1. 1.

    In Visual Studio 2017, select Files ➤ New ➤ Project.

     
  2. 2.

    In the New Project pop-up window, select Test under Visual Studio C# and select Unit Test Project from the test project list. Give a Name for the Project, specify a Solution Name, select Location and Click on OK button. Letting Create directory for solution checked will allow you to have a new directory created for the new solution in the selected location.

     
  3. 3.

    Go to Tools ➤ NuGet Package Manager ➤ Manage NuGet Packages for Solution.

     
  4. 4.

    Add the following NuGet package, which is the only one required for the Desktop operations. The other two packages in Figure 4-19 are related to mobile applications.

     
../images/473577_1_En_4_Chapter/473577_1_En_4_Fig19_HTML.jpg
Figure 4-19

Install Winium.Elements.Desktop NuGet

Winium.Elements.Desktop (see Figure 4-19)

Now Visual Studio is ready to work with Winium. Let’s write a simple code to learn how automate Windows apps with Winium.

To write an automation code we need to identify property values of each control. We can use Coded UI to identify UI property values.

In this lesson, let’s try to write a simple test code. As a pre-requisite, create a folder called BookWork in the desktop. The test scenario is to open the File Explorer and select Desktop tab, then search for BookWork folder.

Add references to the test class file.
using Microsoft.VisualStudio.TestTools.UnitTesting;
using OpenQA.Selenium.Winium;
Initiate the DesktopOptions instance and give the location of the application that we are going to test.
DesktopOptions opt = new DesktopOptions();
opt.ApplicationPath = @"C:Windowsexplorer.exe";
Then initiate the WiniumDriver instance by giving driver path and option. You have to copy the WiniumDriver downloaded as a prerequisite of this lesson to a local drive folder and provide the path in the following code instead of the hardcoded path used:
WiniumDriver driver = new WiniumDriver(@"C:UsersAcersource eposUnitTestProject2UnitTestProject2inDebug", opt);
Now File Explorer is opened. Select Desktop from the quick access area to search for it.
driver.FindElementByName("Desktop").Click();
Then type the word “BookWork” in the search field:
driver.FindElementByName("Search Box").Click();
driver.FindElementByName("Search Box").SendKeys("BookWork");
You can find the complete code as follows:
using Microsoft.VisualStudio.TestTools.UnitTesting;
using OpenQA.Selenium.Winium;
namespace Winium_Demo
{
    [TestClass]
    public class UnitTest1
    {
        [TestMethod]
        public void TestMethod1()
        {
            DesktopOptions opt = new DesktopOptions();
            opt.ApplicationPath = @"C:Windowsexplorer.exe";
            WiniumDriver driver = new WiniumDriver(@"F:Selenium-C#Winium-DemoWinium-DemoinDebug", opt);
            driver.FindElementByName("Desktop").Click();
            driver.FindElementByName("Search Box").Click();
            driver.FindElementByName("Search Box").SendKeys("BookWork");
        }
    }
}

In this lesson, you learned how to set up Visual Studio to work with Winium and start automation testing with Winium. Instead of Winium, it is recommended that you use a new Microsoft tool based on Selenium for Windows application test automation. This Windows application driver can be found at https://github.com/Microsoft/WinAppDriver and can be used similarly to Winium following the documentation available at GitHub.

Summary

This chapter mainly focused on introducing the Windows app test automation tools to readers. You explored how to start working with different tools that can be used to automate windows UI.

In the next chapter, we will discuss data management options for test automations.

..................Content has been hidden....................

You can't read the all page of ebook, please click here login for view all page.
Reset
18.220.11.34