The objective of this chapter is to guide you to start automation development using different languages and Selenium. Through the first few lessons you will be identifying important of web element locators and commands. Then you can find lessons with code examples of how to automate web application with Selenium, C#, Python, SpecFlow, and the open source automation framework MAQS.
You already learned how to set up Visual Studio project for functional UI test automation with Selenium using the available NuGet packages in Chapter 2. Within this chapter we are going to discuss web element locators, commands with sample codes to improve your ability to write automation tests with Selenium. You will be writing a sample test to verify each web element locator and command, which are explained in the next two lessons.
Prerequisites: You must be running Visual Studio 2017 on Windows 10 or on Windows Server 2012 R2 or newer version of Windows server. You must have Google Chrome version 67 or later installed. You must have intermediate level of C# language proficiency.
Let’s begin setting up Visual Studio functional test project with C# and Selenium by following the steps described below:
1.
In Visual Studio 2017, select Files ➤ New ➤ Project.
2.
In the New Project pop-up window, select Test under Visual Studio C# and Select Unit Test Project from the test project list. Give a Name for the Project, specify a Solution Name, select Location and Click on the OK button. Leaving Create directory for solution checked will allow you to have a new directory created for the new solution in the selected location.
3.
Next install the following NuGet packages to enable writing Selenium-based UI test automation code.
Selenium.WebDriver
Selenium.Support
Selenium.WebDriver.ChromeDriver
DotNetSeleniumExtras.WaitHelpers
With this project created, let’s move on to the next lesson to start exploring the using different locators.
Lesson 3.02: How to Capture Web Elements
Identifying web elements uniquely within the webpage is an important requirement of test automation. Locators are the HTML properties that act as a unique address of the web elements that help to identify the web elements uniquely. You will explore the Selenium locators in detail by performing the steps described in this lesson.
Following are the most common web elements that can be found in almost all the web applications:
Text box
Button
Drop Down
Hyperlink
Check box
Radio button
Suppose there is more than one text box on a web page and we need to add values to each text box. To do that, we need to identify each text box uniquely. Selenium has eight types of locators that we can use to uniquely identify web elements.
Following are the eight Selenium web element locators:
ID
Name
Class Name
CSS Selector
Link Text
Partial Link Text
Tag Name
XPath
Prerequisites: You must be running Visual Studio 2017 on Windows 10 or on Windows Server 2012 R2 or a newer version of Windows server. You must have Google Chrome version 67 or later installed. You need an intermediate level of C# language proficiency. We will be using sample application available on GitHub (https://github.com/dotnet-architecture/eShopOnWeb) to perform steps in this lesson. Set up the application as an Azure web app or host it in IIS following the instructions available in GitHub.
You must identify web element locators available for each UI element. So, you can find available locator values with Developer tools as follows:
1.
Open the Chrome web browser and navigate to the eShop application web page.
Hover and click on the web element that needs to know the locator values. Figure 3-3 shows how to inspect locators of the “Login” link on the web page. You can find HTML properties of the “Login” link in the highlighted area of the DOM explorer, as shown in Figure 3-3.
Figure 3-3
Inspect element locators of the Login link
Now we know what the Selenium locators are and how to identify locator values using the Developer Tools window. Let’s look at an explanation of each of the locators with examples.
Locator: ID
The ID locator is considered the most famous and accurate locator. Let’s try to identify element using ID and to perform action on it.
1.
Open the web browser and navigate to the Account/SignIn page of the eShop web application.
2.
Inspect locator of e-mail text field. Inside the highlighted area you can find the ID property of the e-mail text field. (See Figure 3-4).
Figure 3-4
Inspect element of the e-mail field
Figure 3-5 image shows a magnified image of the highlighted area.
Figure 3-5
HTML properties of the e-mail field
You can see the input field has id locator. Let’s try to write a small test script to enter value to the e-mail field.
The following steps describe the code given below:
This locator is also similar to id. You can identify name property value within HTML pages, and we can use the name attribute to locate the web elements.
You can see the web element values of the password input field highlighted in Figure 3-6.
Figure 3-6
Inspect password field
Let’s understand how the Name locator works with a sample code.
When an element does not have ID or name, using the CSS selector is the best alternative. CSS selectors are patterns that match against elements in the element hierarchy.
Let’s try to identify different types of CSS Selectors.
Direct Child
Let’s try to identify the CSS Selector of <a> HTML tag in Figure 3-9 using a sample code. You can see it is a direct child of a <div> and the <div> has a value defined for class attribute.
Figure 3-9
HTML code sample to identify CSS Selector: direct child concept
When we write CSS Selectors we can use different attribute values. A dot (.) represents class attribute and # represents an id. This <div> has the class attribute value. We can create a CSS selector with a dot attribute. In the CSS Selector, > represents a direct child in following code.
There are situations where we need to access sub-child of an element.
In this HTML (see Figure 3-10), you can see <section> tag and inside it a <div> tag. The anchor tag is inside the <div> tag. This makes <a> a sub-child of <section>. In this type of situation, you can write CSS Selector as follows. As you can see in this code that segment space is used to represent a sub-child, instead of >, which was used to identify a direct child with CSS Selector.
Figure 3-10
HTML code sample to identify CSS Selector: sub-child concept
We can use the next sibling concept to find the next adjacent element inside same parent. The HTML code in Figure 3-12 has three <sections> inside the <article> tag.
Figure 3-12
HTML code sample to identify CSS Selector: next sibling
If we need to locate the <a> tag inside the third <select> tag, we can write CSS Selector as follows. We can see there are three sections and we need to access the third section. So we can give value section:nth-of-type(3) to find the third section. The space before and after > does not matter here, as with > we are specifying to locate the child. The flowing locator says, in class row, find the child section tag that is in the third position and then locate a child <a> tag.
This allows you to match part of the string when defining CSS Selectors.
To match prefix use ^.
Let’s consider there are anchor tags with id value starting with txt_ipval and the rest of id is a dynamic value. You can define CSS selector as follows:
CSS: a [id^='txt_ipval_ ']
To match a suffix use $.
Suppose there is an anchor tag whose id ends with txt_endval. You can write CSS Selector as follows:
CSS: a[id$='_txt_endval']
To match substring use *.
Suppose there is an anchor tag with an id value that contains txt_val as part of id. We can write CSS Selector as follows:
CSS: a[id*='txt_val']
Match with Inner Text
You can use the text value of element when defining CSS Selector. Let's consider there is HTML code that has an anchor tag with text “Log Out”. You can write the CSS Selector as follows:
CSS: a: contains ('Log Out')
So far you have learned on different types of CSS Selectors. The following section describes how to inspect elements and write sample code using CSS Selector.
Using CSS Selectors
Let’s try to find CSS Selector of the Login button of the eShop web application. After inspecting the element, you can see there are multiple classes used for the single button. In such situation we have to join classes and find accurate value. The Login button has four different classes. Let’s use all four classes as CSS Selector value. See Figure 3-14.
Figure 3-14
Inspect element of the Login button
You can see HTML elements of the Login button clearly in Figure 3-15.
Figure 3-15
HTML element value of the Login Button
The following code explains how to perform click action on the Login button after locating the Login button using the CSS Selector:
1.
Open the Chrome browser.
2.
Navigate to the Login page of the eShop web application.
This locator is used to find the web element by matching the specified Tag Name.
Figure 3-18 shows how to inspect elements of drop-down field.
Figure 3-18
Inspect element values of brands drop-down field
You can identify element values of drop-down field clearly (see Figure 3-19).
Figure 3-19
HTML element value of” brand” drop-down field
Figure 3-20
Inspect element values of the “Register as new user” Link
The drop-down field has the select tag. In the following sample code, you can see the drop-down field is identified using the tag value, and a click action on it is performed.
1.
Open the Chrome browser.
2.
Navigate to the home page of the eShop web application.
3.
Click on the first drop-down of the page. If there is more than one select tag on the page, the following code Clicks on the first select tag element.
Web element can be found using part of the link text. This allows you to identify an element that contains text that matches the specified partial link text.
Inspect element values of the “Register as new user” Link. (see Figure 3-21).
Figure 3-21
HTML element of” Register as new user” Link
The following sample code shows how to find element using the partial link text locator and perform click action on it.
1.
Open the Chrome browser.
2.
Navigate to the Login page of the eShop web application.
3.
Click on the “Register as new user” link after finding it with the partial link text.
IWebElement registerNewUser = driver.FindElement(By.PartialLinkText("Register as a"));
registerNewUser.Click();
}
Locator: XPath
There are two types of XPaths: Relative XPath and absolute XPath.
Absolute XPath
It is a direct way to locate and element.
It starts from the root.
It starts with a single slash (/).
/html/body/div/div[2]/div[3]/form/input[1]
Relative XPath
It starts with a double slash (//)
It starts a search from anywhere in the HTML DOM.
//*[@id="logoutForm"]/section[2]/a[2]/div
XPath Example
Figure 3-22 shows how you can find XPath easily with chrome driver.
Figure 3-22
Inspect element value of” My account” link
1.
First inspect the element.
2.
Then right-click on the highlighted area of DOM and select copy ➤ Copy XPath.
3.
When you perform paste on the notepad you can see XPath of the element and can use it to locate an element.
Let’s try to find the relative XPath of “My account” <div> of the following HTML DOM (see Figure 3-23). logoutForm is a unique id in this page. We can start searching from this unique ID and provide the entire path up to div. In the following HTML code, you can see there are two sections and we need to access the second section. Inside that section, you can see two anchor tags, and we need to access the second one. Inside that <a> tag you can see <div>, which we need to access. So we can write XPath as follows:
Figure 3-23
HTML code of logout form
//[@id='Logoutform']/section[2]/a[2]/div
We identified the relative XPath of <div>, and you can try to perform an action of the identified element as shown in following sample code:
1.
Open the Chrome browser.
2.
Navigate to the home page of the eShop web application.
3.
Locate and click on the Login link and navigate to the login page.
We discussed all eight locators in detail within this lesson, and by now you should have a good understanding about web element locators and how to use them.
Lesson 3.03: Web Elements Commands
While we use web applications, we perform different actions on web elements. So, when we do test automation, we have to automate every action a user performs on web elements. In the previous lesson, we talked about web element locators. Let’s talk about web element commands within this lesson.
We will be using the eShop application and (https://jqueryui.com/droppable) to demonstrate commands in this lesson. First, let’s explore built-in web element commands.
Command: Click
Clicking is the most common way to interact with elements. Click action can perform on many elements such as buttons, links, check boxes, and many more.
Click (): void
accepts nothing as parameters and returns nothing.
Get the values of the specified attribute of the element.
GetAttribute(string attributename) : string
accepts attribute name as parameter and returns attribute values or returns null if value is not set.
The HTML code in Figure 3-24 has an input field that has the attribute called type. If we need to read the value of the attribute from the code, we can use the GetAttribute method.
Figure 3-24
HTML code sample
The following sample code shows how to read attribute value using GetAttribute method:
You can check the output of test case to see attribute value.
To check test case output, select test case from the Test Explorer and click on the Output link. Then test output will be shown (see Figure 3-25).
Figure 3-25
Test Output
Command: GetCssValue
Get the value of CSS property of the current element.
GetCssValue(string CSSPropertyName):string
accepts name of the CSS property as a parameter and returns the value of the specified CSS property.
The following sample code describes how to get background color of the specified element. You can go to test outputs to check the value of the property.
Advance user interaction API contains an Actions class to support Webdriver in handling keyboard and mouse events such as drag and drop, clicking multiple elements with the control key, etc. Let's explore few Action commands available with Selenium Webdriver in the following sections.
Command: ClickAndHold
It will click-and-hold at the location of the source element and then move to the location of the target element.
You can see in Figure 3-27 that the web page has <div> that needs to drag and drop into another <div>.
Figure 3-27
HTML code sample of drag element and drop area
This HTML code sample has a drag element ID and drop area ID inside an iframe. We cannot locate elements inside the iframe from outside the iframe. So before identifying element locators, we need to move into the iframe first.
You can switch over the elements in iframes in one of three ways:
By Index
By Name or Id
By Web Element
The following code shows how to switch to iframe using index of the iframe:
We know each web application page has its own page loading time. Sometimes this time varies due to different reasons, including the following:
Database calls made by website
Slow browsers
Slow internet connection
Because of different page loading times, we need a way to wait until elements are available and can be located in DOM to detect them in the test automation code. Selenium has different types of wait handling mechanisms. Let’s discuss these wait handling methods in this lesson.
First let’s try to understand what would happen if the code is not handling waits properly. See the following sample code:
After executing this code, you will see the browser opens; type text “Selenium” in the Google search field. Then the test fails with NoSuchElementException . This error is either due to locator in the script being incorrect or the specified element not being loaded by the time the code tries to detect it. See Figure 3-28.
Figure 3-28
Test fail message
Let’s add wait time and try to execute the same test steps.
The Selenium web driver provides two types of waits.
Implicit Wait
Implicit wait tells the web driver to wait a certain amount of time in each find element step across the script, until the element is found. If element is found within the specified implicit wait time, then execution continues. Otherwise the execution fails with a timeout. Implicit wait is easy and simple to apply.
The following code shows sample code with implicit wait:
You can see this sample code has a 30-second implicit wait time. After executing this code, you can see the test passes.
Note
You may have seen automation scripts that have used Thread.sleep() waits. But this is not a good practice for high-quality automation script, because Thread.sleep freezes test execution for specific amount of time. The code will freeze for a specified time duration no matter whether elements are loaded or not in the DOM. This unnecessary wait time will increase the overall test execution time and reduce the effectiveness of test automation usage.
Let’s try to write code to perform the same Google search steps with thread sleep using 5000 milliseconds of sleep time.
Explicit wait demands waiting for certain conditions to occur before proceeding further in the code, with a specified timeout. If the finding element does not meet the specified condition within a given time period, it throws a TimeOutException.
Let’s modify the Google search code with explicit wait and try to execute the code.
[TestMethod]
public void GoogleSearchWithWait()
{
IWebDriver driver = new ChromeDriver();
WebDriverWait wait = new WebDriverWait(driver, TimeSpan.FromSeconds(30));
You can see the execution time difference of each method in Figure 3-29. You can see how Thread.Sleep of 5 seconds affects the execution time when comparing the time without using thread sleep. You can imagine how much it will slow down the test execution by using many thread sleep statements just by looking at the effect of using one.
Figure 3-29
Test execution time comparison
Let’s try to identify a few available conditions of Selenium to be used with explicit waits in the next section of this lesson.
ElementExists
ElementExists is an expectation for checking that the element is present in the DOM of a page. This does not mean that the element is visible.
ElementIsVisible is an expectation for checking that element is present in the DOM of a page and is visible. The element is also displayed and has height and width that is greater than 0.
Parameters: The locator
Returns: IWebElement once it is located and visible
This is an expectation for checking that an element is either invisible or not present/available in the DOM.
Parameters: The locator
Returns: True if the element is not displayed; otherwise, false.
Suppose after clicking on a save button, you need to wait until the busy indicator disappears to indicate save operation is done. In such situations, you can use this expectation, InvisibilityOfElementLocated.
InvisibilityOfElementWithText
InvisibilityOfElementWithText is an expectation for checking that an element with a given text is either invisible or not present/available in the DOM.
Parameters: The locator, Text of the element.
Returns: True if the element is not displayed; otherwise, false.
TextToBePresentInElement
This is an expectation for checking if the given text is present in the specified element.
Parameters: The WebElement, Text to be present in the element.
Returns: True once the element contains the given text; otherwise, false.
Now you know expected conditions available in Selenium. The following sample code uses the earlier described expected conditions and waits for these conditions to occur during the test execution. The following test method can be used as an example for the use of expected conditions:
You learned different type of waits and effect of each mechanism on overall automation test performance. Also, you explored different types of wait conditions available in Selenium.
Lesson 3.05: C# Automation Code Example
Now you have good understanding on Locators, Selenium Webdriver commands, and Selenium wait handling. Let’s try to write a simple code with Selenium and C#. Following is the scenario we are going to test in this lesson using Selenium and C#.
eShop web application visitors can register on an online web site by giving an e-mail and password and confirming the password. They then click on my account link to navigate to manage user account page. The user can see added user info on that page.
1.
First you need to add the required references to the test class.
using System;using Microsoft.VisualStudio.TestTools.UnitTesting;using OpenQA.Selenium;using OpenQA.Selenium.Chrome;using OpenQA.Selenium.Support.UI;using ExpectedConditions = SeleniumExtras.WaitHelpers.ExpectedConditions;
2.
The following code part is used to launch the Chrome driver and navigate to the eShop web application home page. Then it defines 30 seconds as wait time.
string userEmail = "[email protected]";ChromeOptions option = new ChromeOptions();option.AddArgument("--start-maximized");IWebDriver driver = new ChromeDriver(option);driver.Navigate().GoToUrl("http://eshop-testweb.azurewebsites.net/");
WebDriverWait wait = new WebDriverWait(driver, TimeSpan.FromSeconds(30));
3.
Next click on the Login link on the home page and make sure it waits a maximum of 30 seconds to locate the Login link. In the event that the Login link does not become visible within 30 seconds, code will be failing with a timeout exception.
When clicking on the “my account” link, you should be moved to the Manage user account page. You can verify the user has moved to the user management page successfully by checking that the e-mail of the user is available on that page.
You learned how to use locators, commands, and wait conditions when automating a test scenario using Selenium with C#.
Lesson 3.06: Python Automation Code Example
You tried sample code with Selenium and C# in the previous lesson. Let’s try to write sample code with Selenium and Python.
Let’s write a test case to test following scenario.
As a registered user of an online shopping site, I want to login to the site using my user name and password and then add a product to the basket. Then I should be able to view a list of products in the basket.
You have learned how to set up Visual Studio to work with Python and create a project in a previous the second chapter. Keep in mind that Python code heavily relies on indentation to identify scopes, unlike C#, where { and } are used for the same purpose.
1.
First create a Python application project and add Python unit test file to project.
2.
Open unit test file and add the following code lines just below the import unittest statement:
from selenium import webdriverfrom selenium.webdriver.support.wait
You were able to get an idea of how to work with different locators, commands, and wait handling mechanisms while working with Selenium and Python code in this lesson.
Lesson 3.07: MAQS Framework with C# Automation Code Example
You learned how to set up Visual Studio to work with MAQS in Chapter 2. As you already know, one of the main advantages of the MAQS framework is we do not need to spend time performing initial set up of package installation and configurations. After creating a project with MAQS, you may have to change configuration values using App.config file under the Test project according to your project requirements.
Page Object Model is used in the project created with MAQS. Page Object Model is an object design pattern where web pages are represented as classes. The elements of the page are represented as variables in the class.
Scenario: First navigate to the home page of the eShop web application and click on the Login link on the home page to go to the login page. Enter user e-mail and password to login to the user account. After logging in to the account you will find the My orders link. Click on the My orders link and verify the page has navigated to the My orders page.
1.
Let’s start by changing configuration values. Open App.config file and change WebSiteBase value to URL of the eShop web application you have hosted in IIS or in Azure. Also, you can see the browser configuration area where you can select different browsers. By default, the Chrome browser is selected. All our lessons are presented with the Chrome browser. So, we can keep the default value as it is. See Figure 3-30.
Figure 3-30
App.config file
We have to create class files for each page mentioned in this scenario. We can create the following classes under PageModel folder.
HomePage.cs
UserLoginPage.cs
MyOrders.cs
2.
To add new class files to the PageModel folder, right-click on the PageModel folder in the Solution Explorer and select Add ➤ New Item.
3.
The New Item pop-up will be opened. Select Magenic’s Open Test, then select Maqs Selenium Page Model Class. Give the name as HomePage.cs and click on the Add button. See Figure 3-31.
Figure 3-31
Add MAQS Selenium Model Class
Follow the same steps to add UserLoginPage.cs and MyOrders.cs.
After going through the following section, you will be able to understand methods in each class and use of them.
HomePage.cs
Below are the methods in the HomePage.cs with an explanation of each method action.
IsPageLoaded(): Check that Login link is displayed on the page to verify the page has loaded.
NavigateToHomePage(): Navigate to home page.
ClickonLoginLink(): Click on Login link to navigate to Login page.
SelectMyOrdersLink(): Click on My orders link to navigate to My orders page.
/// Initializes a new instance of the <see cref="MyOrders" /> class.
/// </summary>
/// <param name="testObject">The selenium test object</param>
public MyOrders(SeleniumTestObject testObject)
{
this.testObject = testObject;
}
/// <summary>
/// Gets the sample element
/// </summary>
private LazyElement Sample
{
get { return new LazyElement(this.testObject, By.CssSelector("#CSS_ID"), "SAMPLE"); }
}
/// <summary>
/// Check if the page has been loaded
/// </summary>
/// <returns>True if the page was loaded</returns>
public bool IsPageLoaded()
{
return this.Sample.Displayed;
}
///<summary>
///
/// </summary>
public void VerifyMyOrderPage()
{
this.testObject.WebDriver.Wait().UntilPageLoad();
Assert.AreEqual(true, this.testObject.WebDriver.FindElement(By.CssSelector(".container > h1")).Text.Equals("My Order History"));
}
}
}
Adding the Test Class
We have added all three classes to the project and have written methods inside each class to perform different tasks. Next, we have to add a test class and access these PageModel classes from there.
To add a new test class, right-click on Tests in Solution Explorer and select Add ➤ New Item.
The new item pop-up will displayed. Select Magenic’s Open Test then select Maqs Selenium VS Test Class. Give it the name TestClass and click on Add. See Figure 3-32.
Figure 3-32
Add Maqs Selenium VS Test Class
Now that we have added a test class, we can write a test method as shown in Figure 3-32.
using Magenic.Maqs.BaseSeleniumTest;
using Microsoft.VisualStudio.TestTools.UnitTesting;
using PageModel;
// TODO: Add reference to object model
// using PageModel;
namespace Tests
{
/// <summary>
/// TestClass test class
/// </summary>
[TestClass]
public class TestClass : BaseSeleniumTest
{
/// <summary>
/// Registered user login
/// </summary>
[TestMethod]
public void LoginToUserAccount()
{
HomePage homePage = new HomePage(this.TestObject);
homePage.NavigateToHomePage();
Assert.AreEqual(true,homePage.IsPageLoaded());
homePage.ClickonLoginLink();
UserLoginPage loginToSite = new UserLoginPage(this.TestObject);
loginToSite.LogInToUserAccount();
homePage.SelectMyOrdersLink();
MyOrders myOrders = new MyOrders(this.TestObject);
myOrders.VerifyMyOrderPage();
}
}
}
You can see inside the test method class that instances of the page object model classes are initialized and methods are called to perform the test steps.
Lesson 3.08: SpecFlow Framework with C# Automation Code Example
Create a New Windows Desktop project, as described in Chapter 2.
2.
Then Add Feature file to the project that describes the scenario you are going to test. (see Figure 3-33).
Figure 3-33
Feature File
3.
After adding the feature file to the project, you can add a step definition file where we write test methods.
Let’s try to identify each section of step definition.
At the top of the class file, you can find all the required references getting added.
using NUnit.Framework;using OpenQA.Selenium;using OpenQA.Selenium.Chrome;using OpenQA.Selenium.Support.UI;using System;using TechTalk.SpecFlow;using ExpectedConditions = SeleniumExtras.WaitHelpers.ExpectedConditions;
When you go through the step definition class file, you can see there are separate methods for each step-in feature file. You will be able to find Webdriver and WebDriverWait has initialized at the beginning.
IWebDriver driver;
WebDriverWait wait;
Then the first method is used to launch the web browser and navigate to the home page of the eShop web application.
[Given(@"user is at home page")]public void GivenUserIsAtHomePage()
wait = new WebDriverWait(driver, TimeSpan.FromSeconds(30));
}
The second method is used to navigate to the login page by clicking on the Login link on the home page. Then it clicks on the “Register as a new user?” link to move on to the new user registration page.
[Given(@"navigate to registration page")]public void GivenNavigateToRegistrationPage()
{
IWebElement loginLink= wait.Until(ExpectedConditions.ElementToBeClickable(By.LinkText("Login")));loginLink.Click();IWebElement registerNewUser = wait.Until(ExpectedConditions.ElementExists(By.LinkText("Register as a new user?")));registerNewUser.Click(); }
The next step is to provide user details to register with the eShop website.
[When(@"user enter valid email password and confirm password")]public void WhenUserEnterValidEmailPasswordAndConfirmPassword() {
In this lesson you learned how to work with different locators, commands, and wait handling mechanisms, while working with SpecFlow and Selenium using C#.
Summary
In this chapter, you explored different locators available in Selenium and gained good understanding on different commands. Further, you learned wait handling mechanisms and their use in test automation scripts. With sample scenario implementations using various tools, you were provided with required experience and knowledge on how and when to use different types of locators, commands, and waits.
In the next chapter, we will explore possibilities of using test automation to test Windows applications.

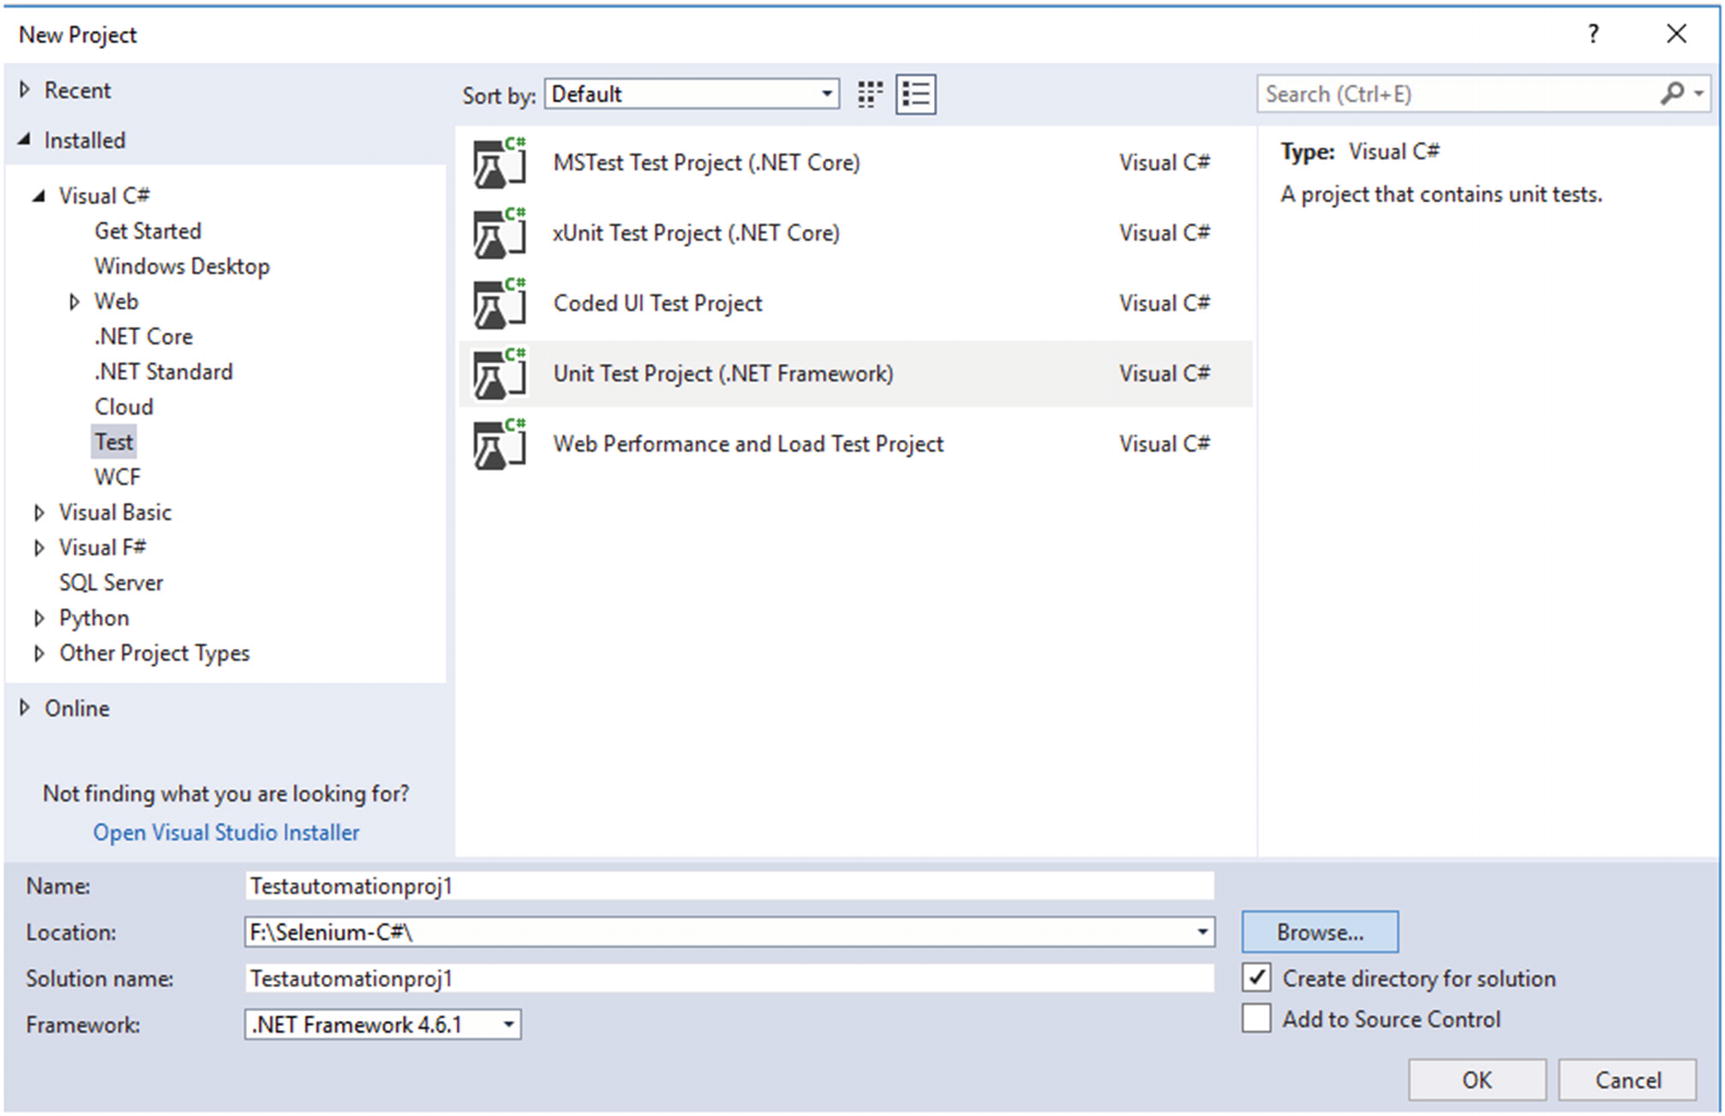 Figure 3-1
 Figure 3-2
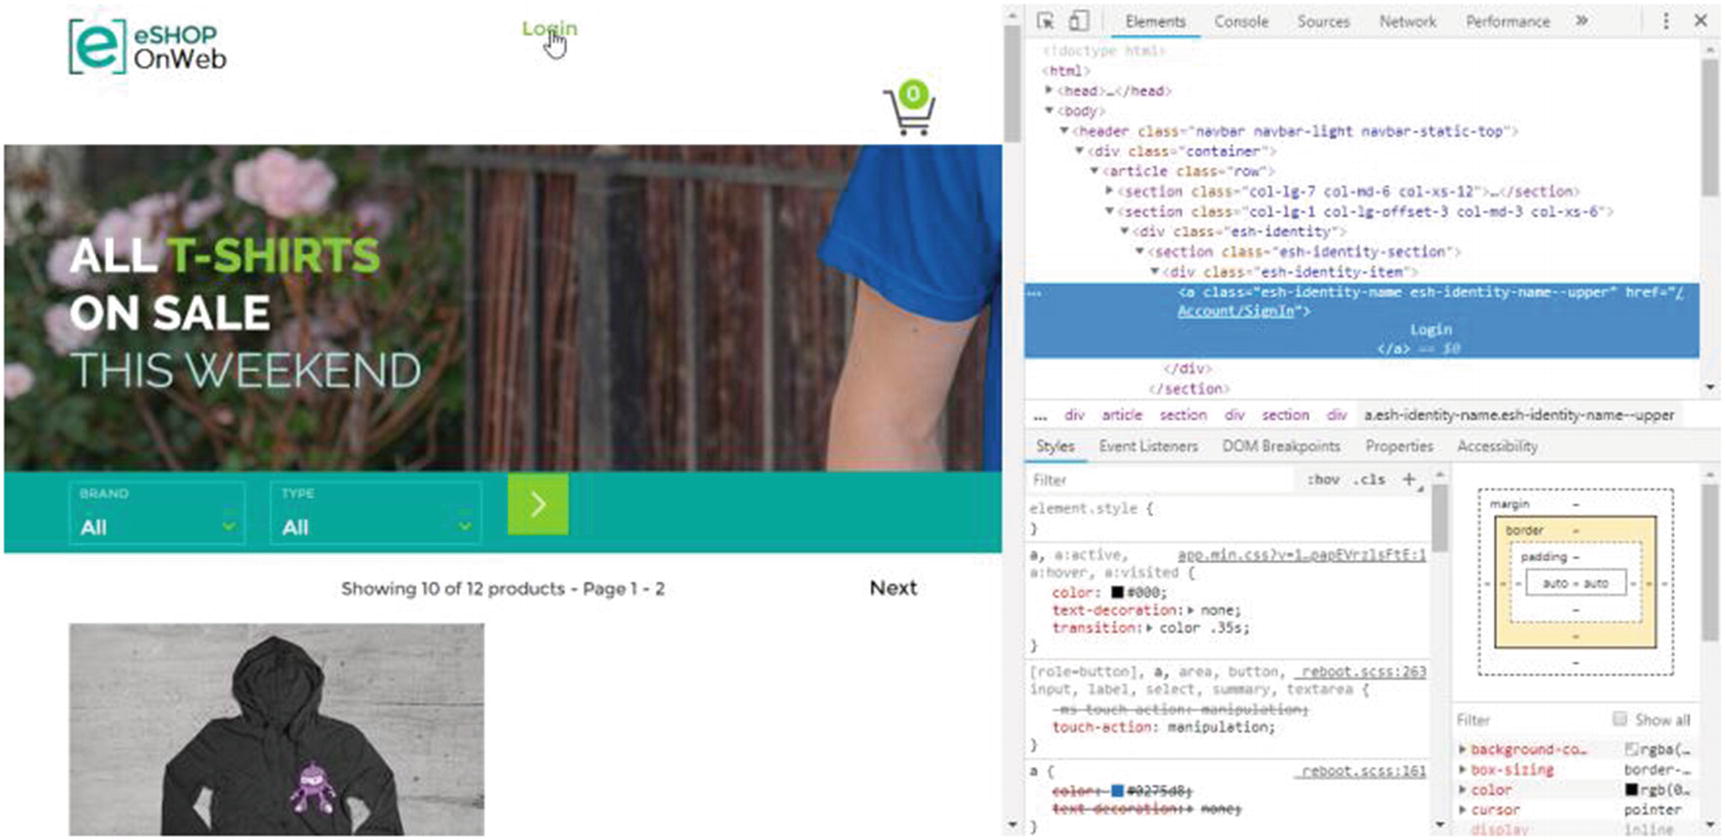 Figure 3-3
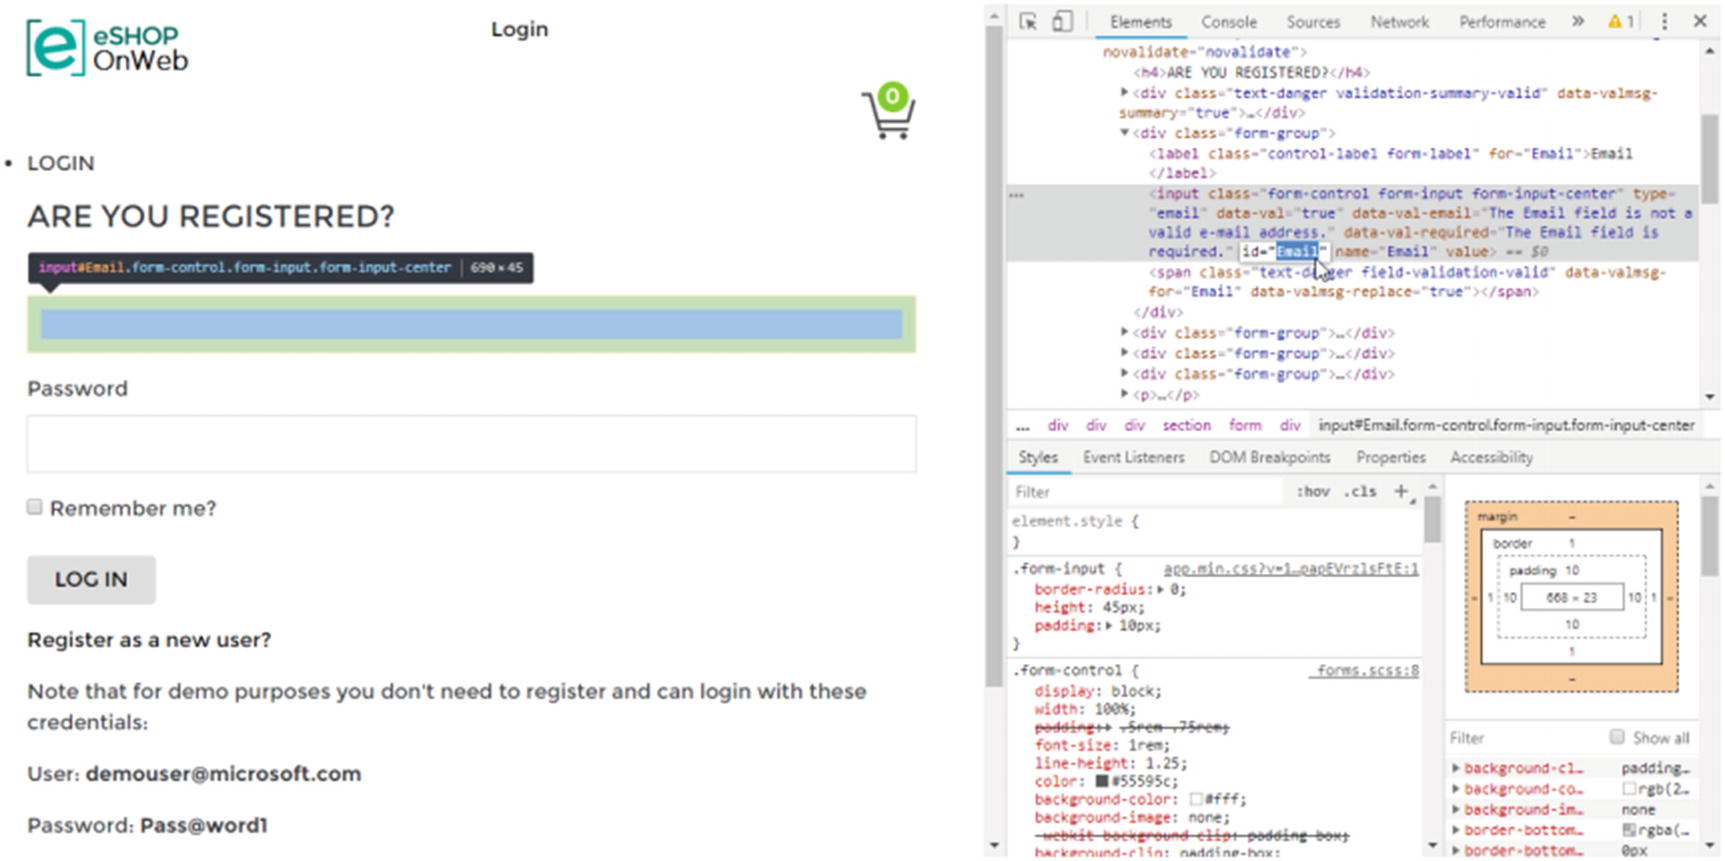 Figure 3-4


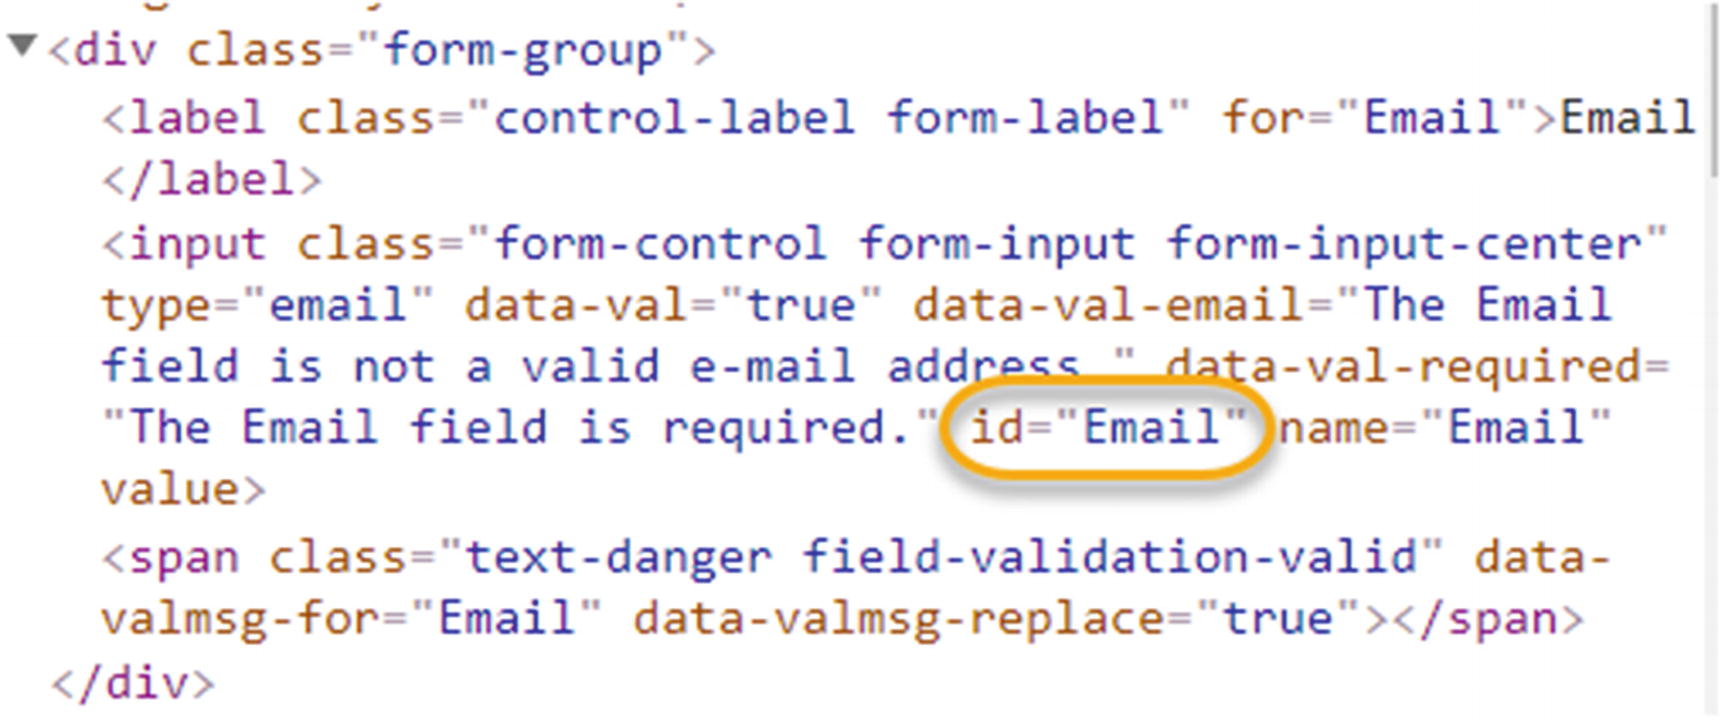
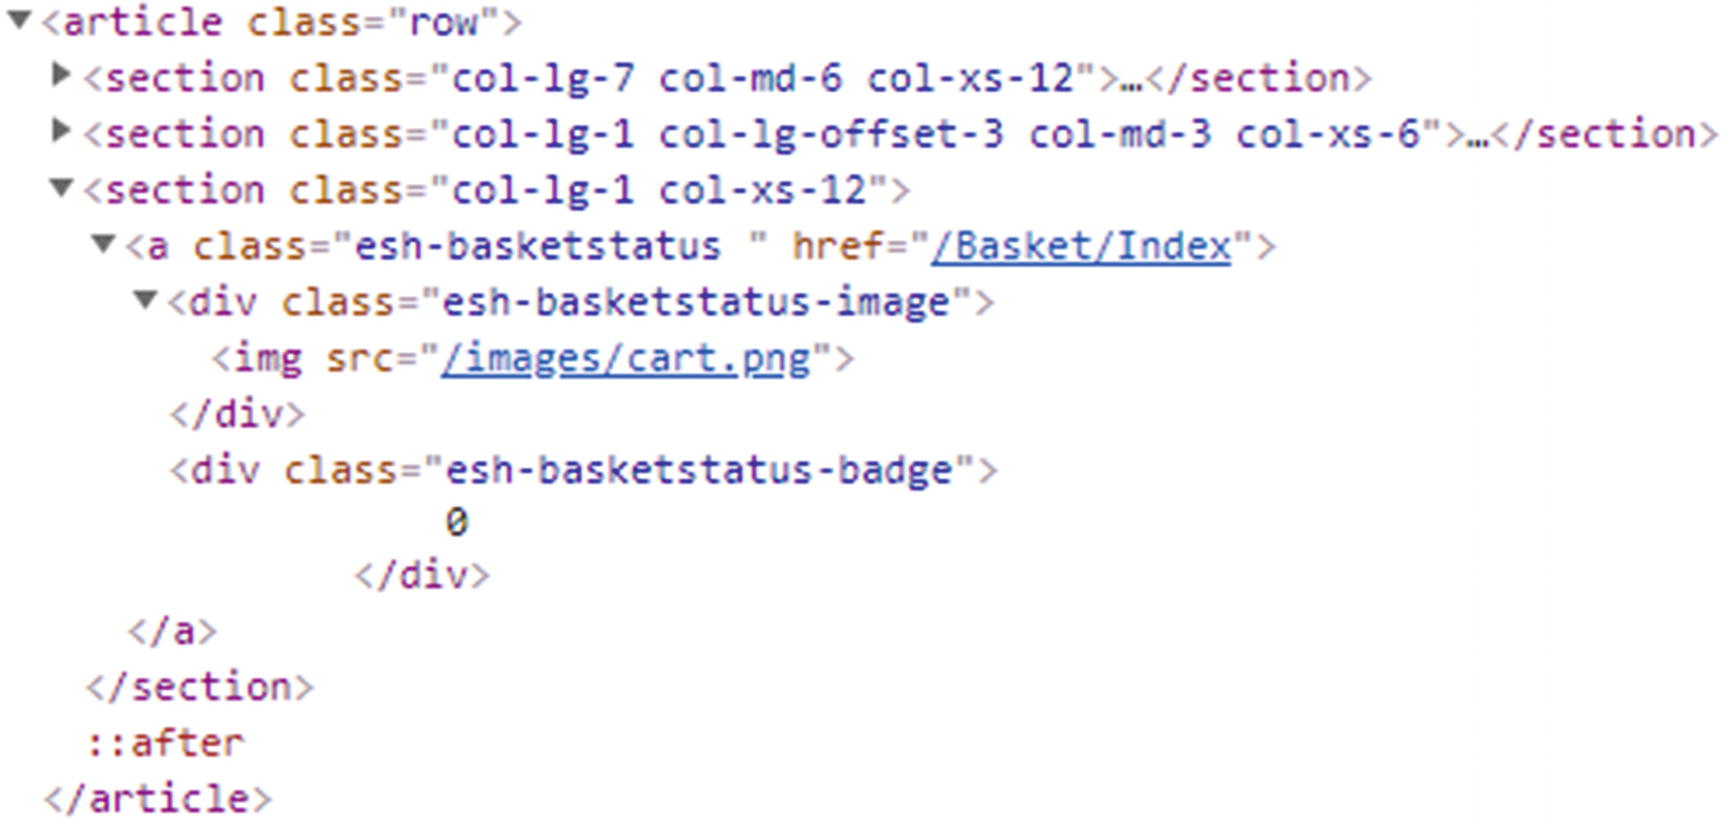

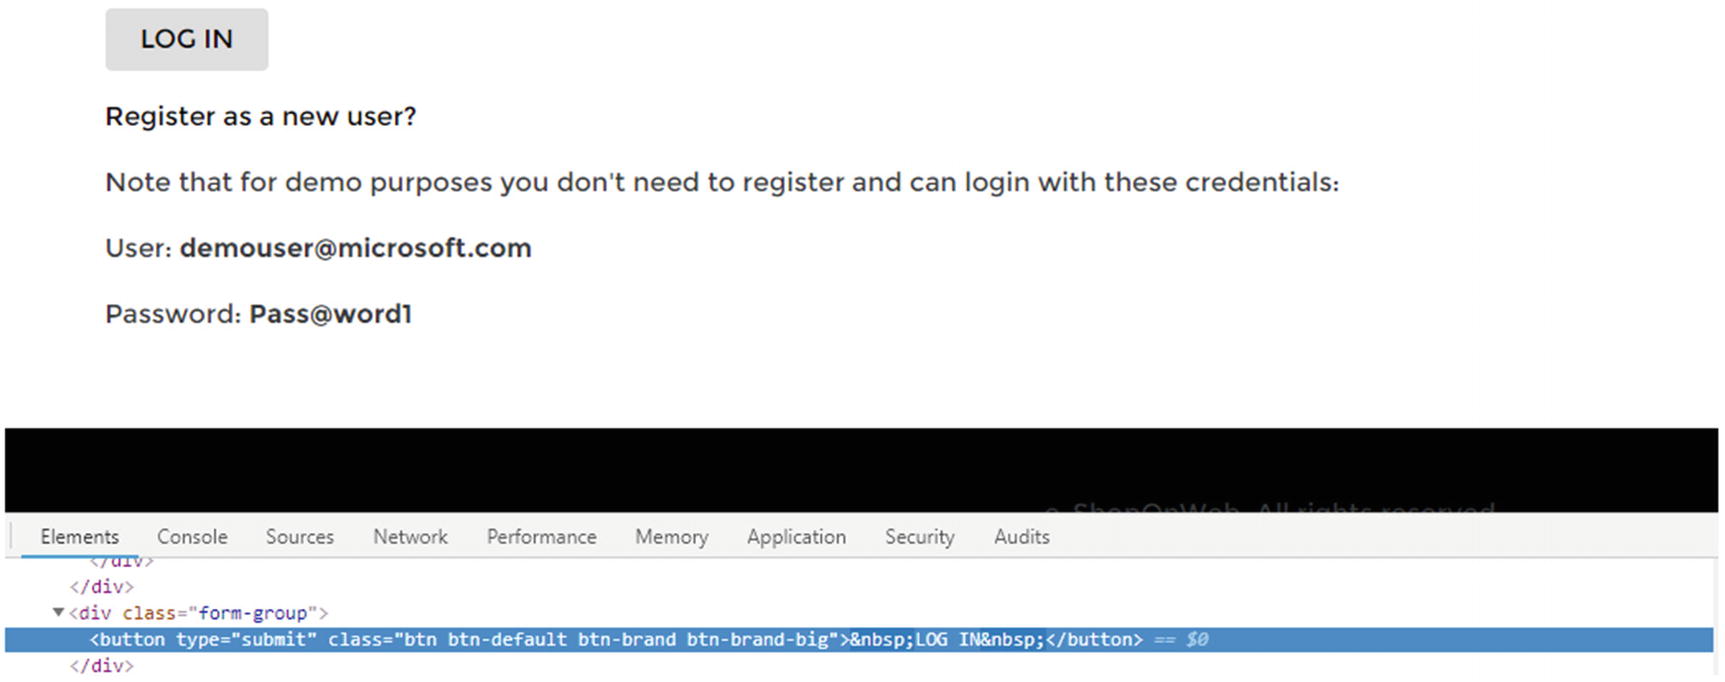

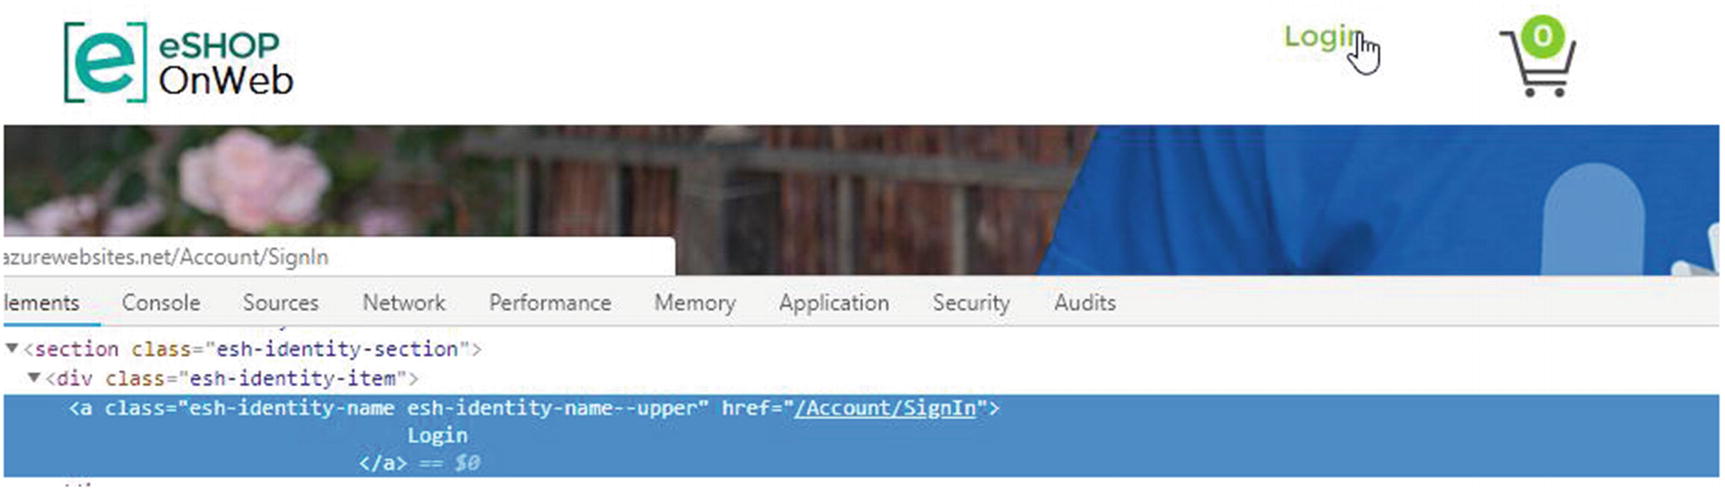
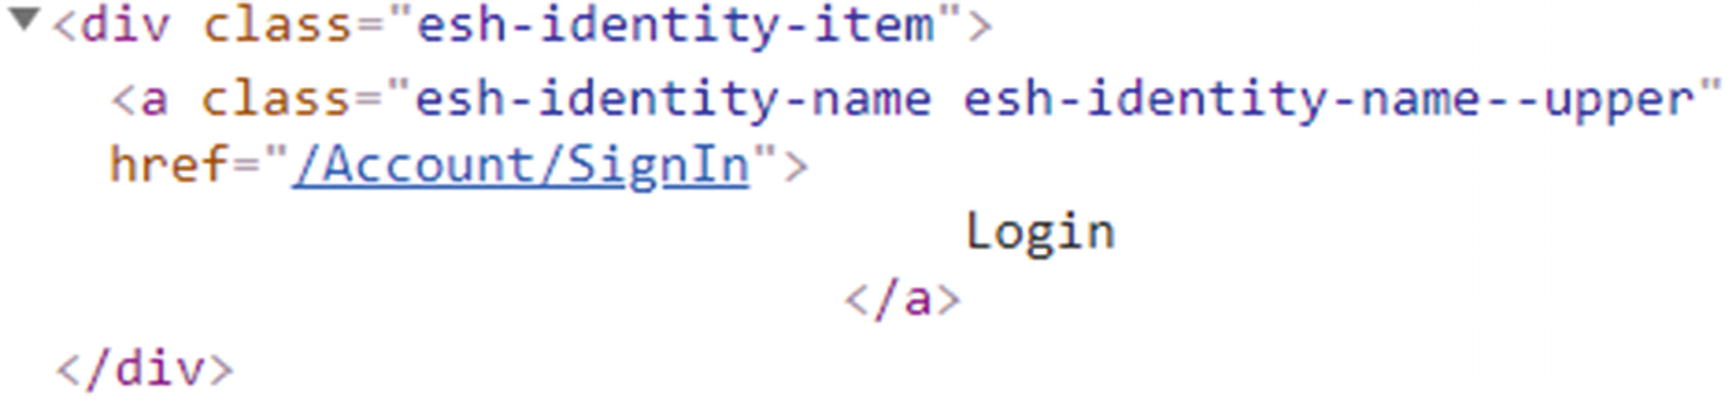


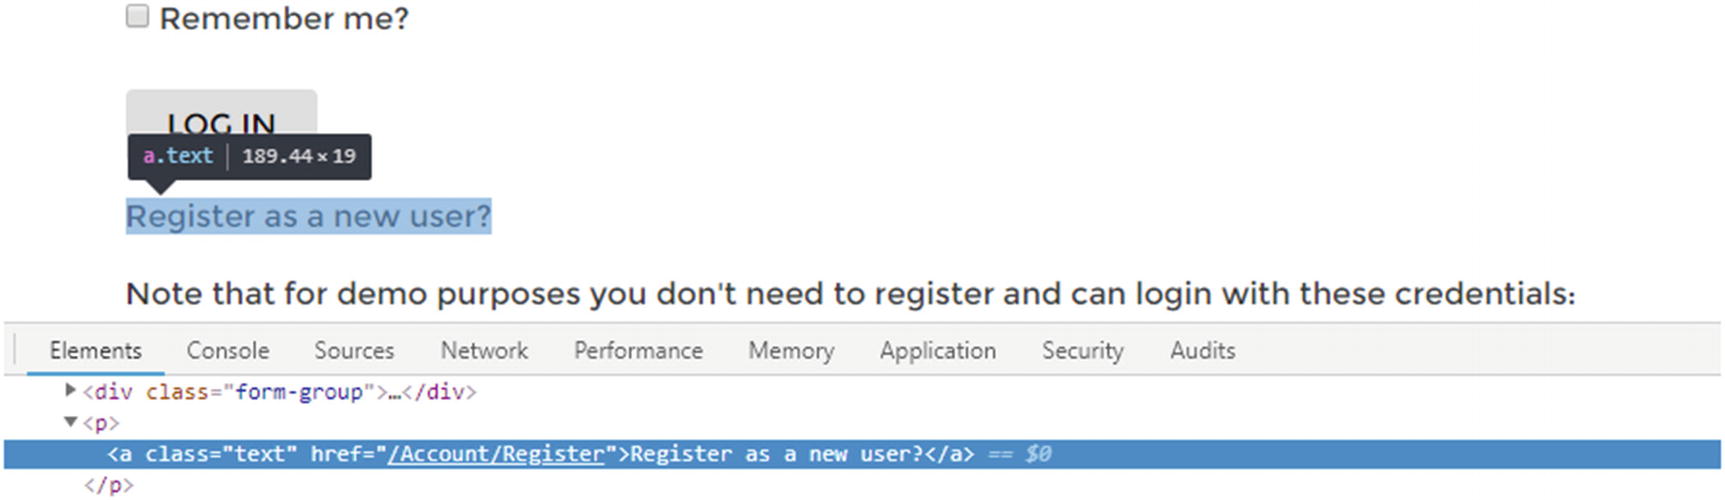

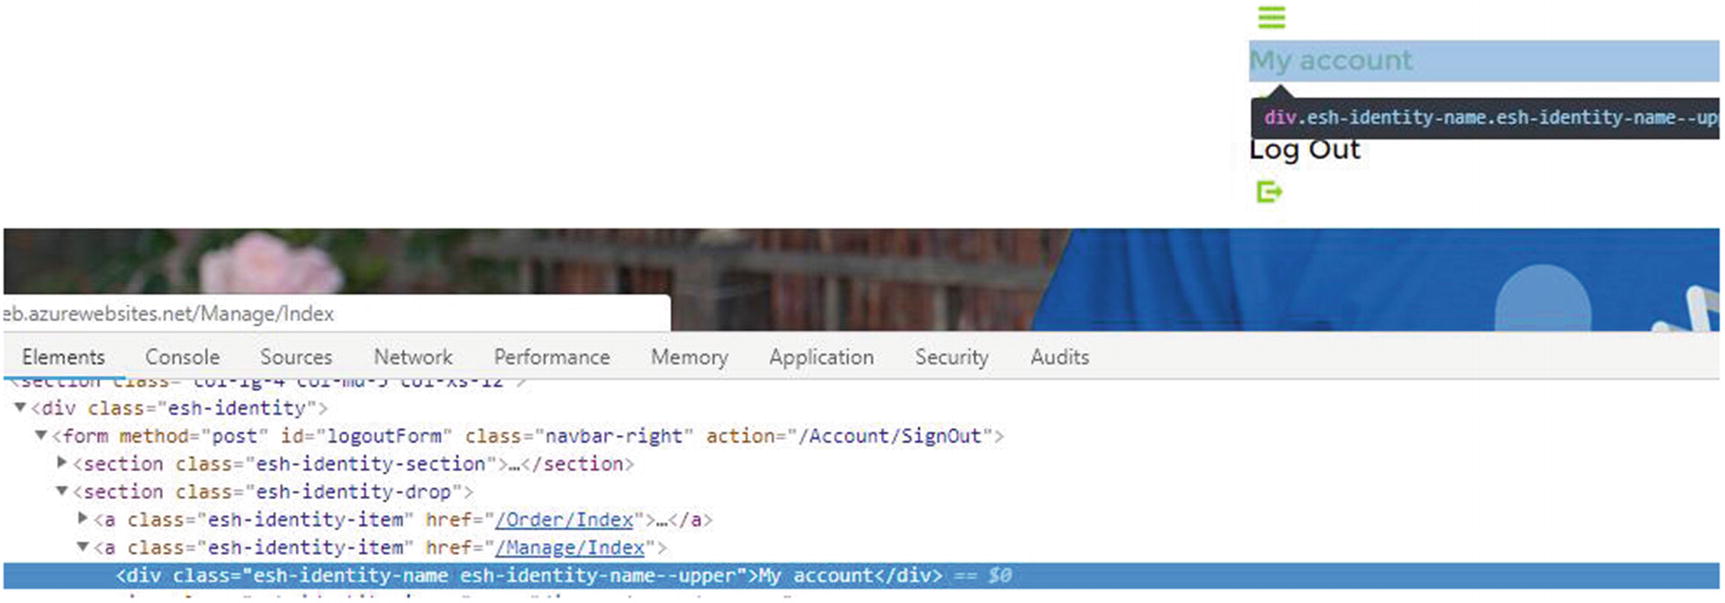

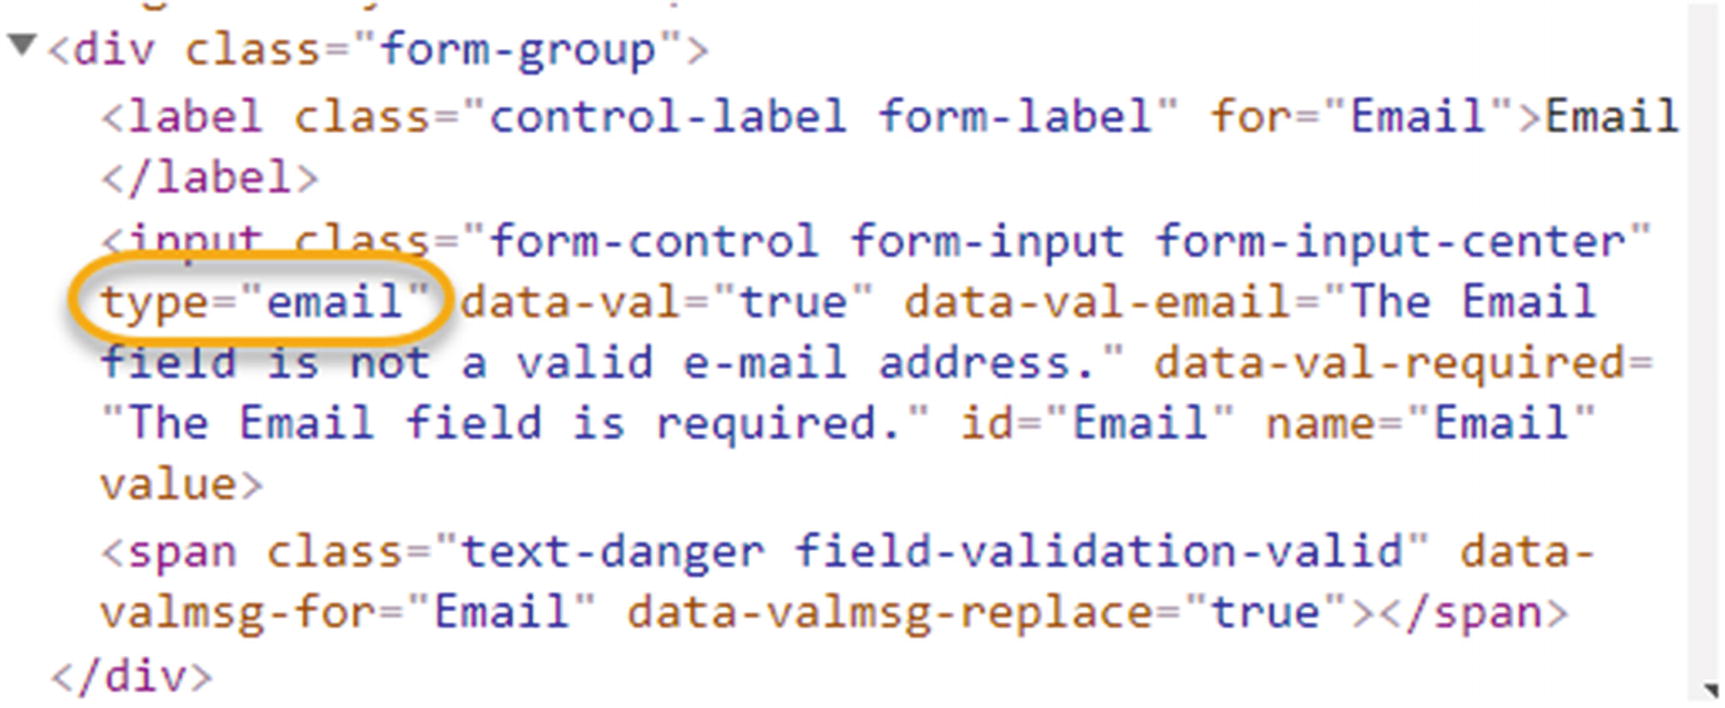


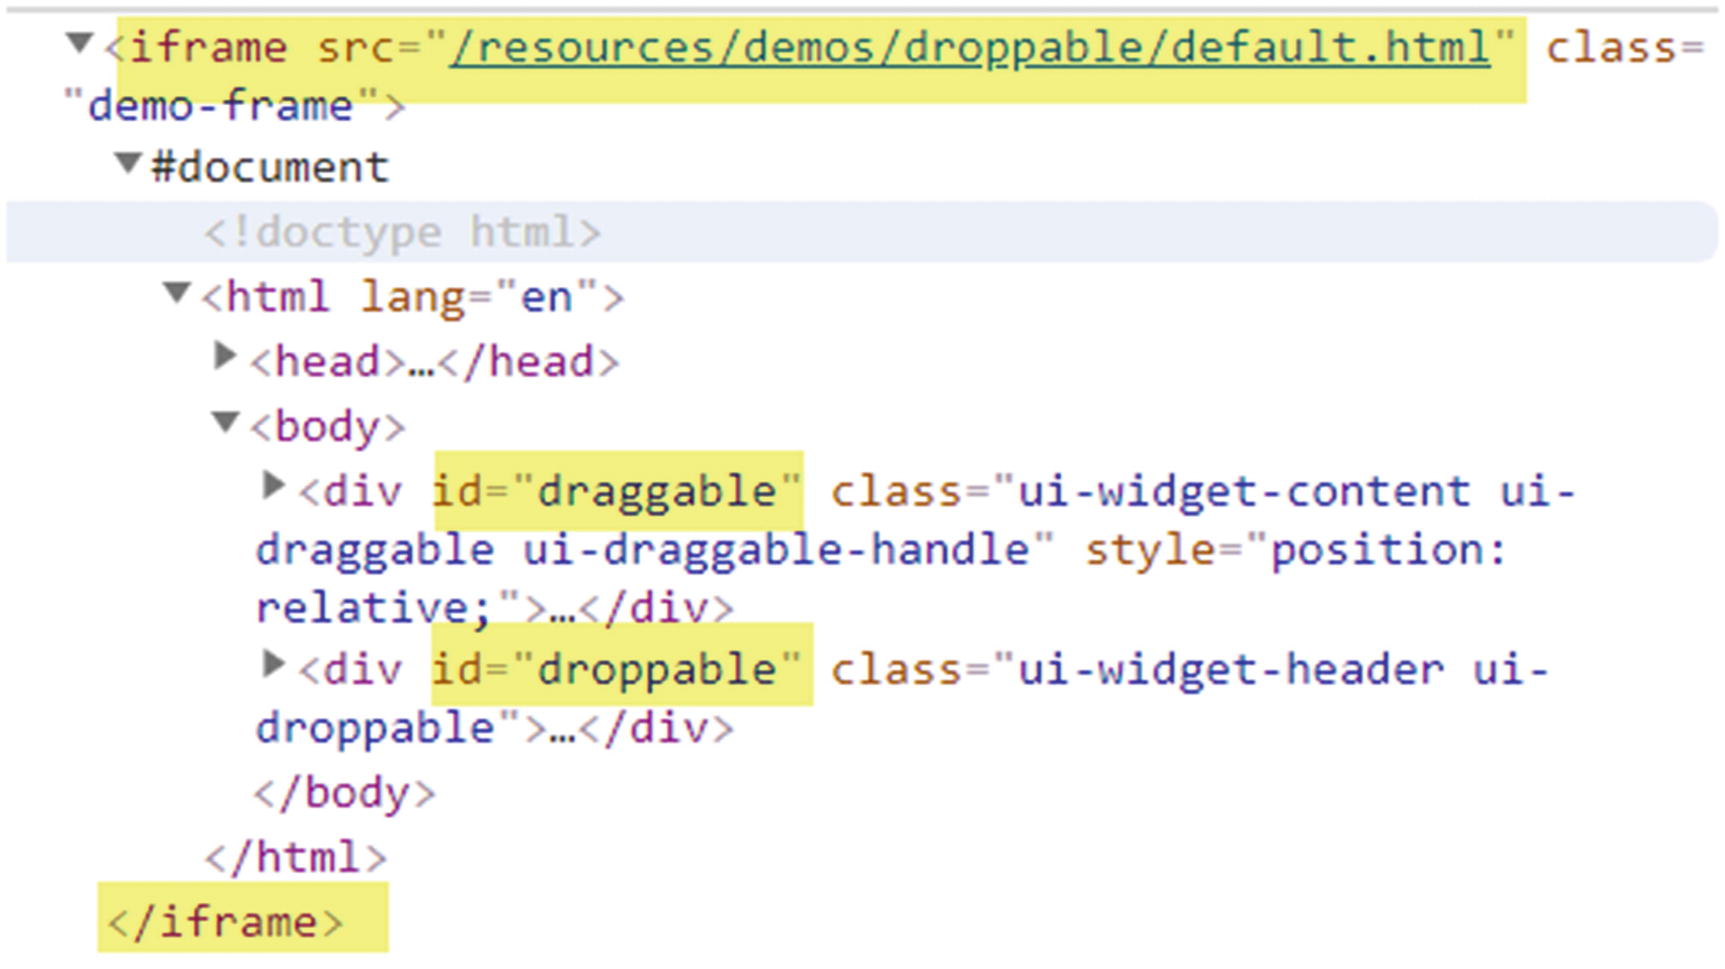
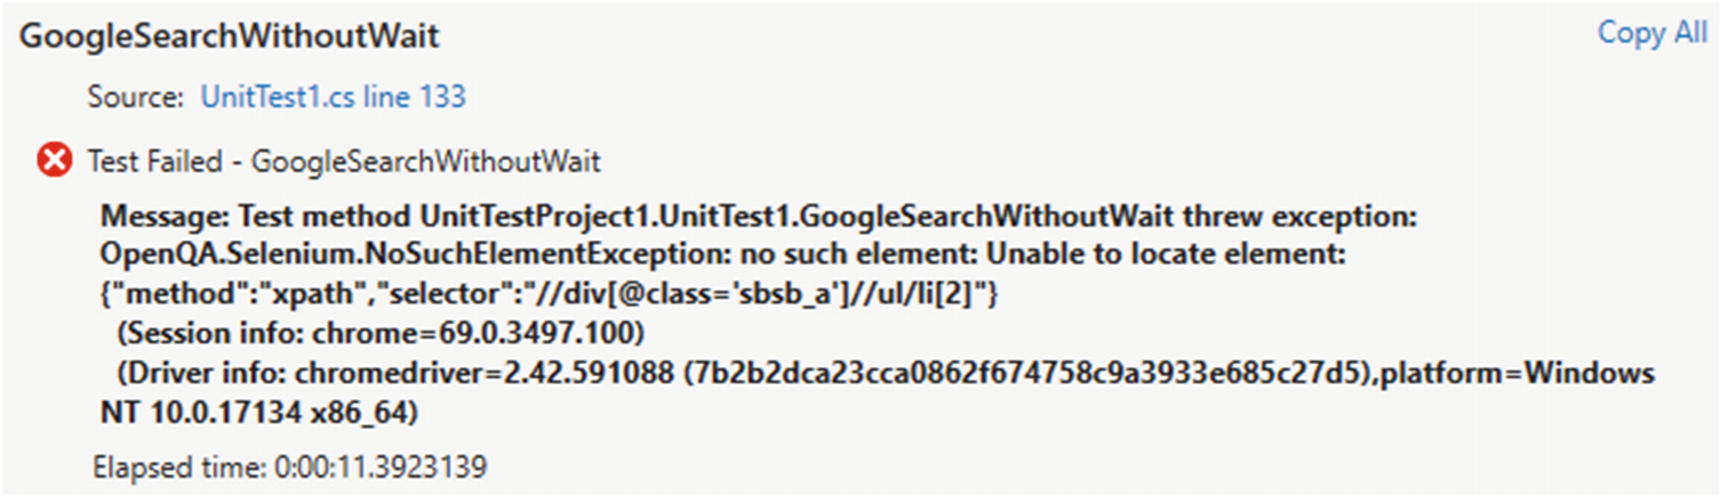

 Figure 3-30
 Figure 3-31
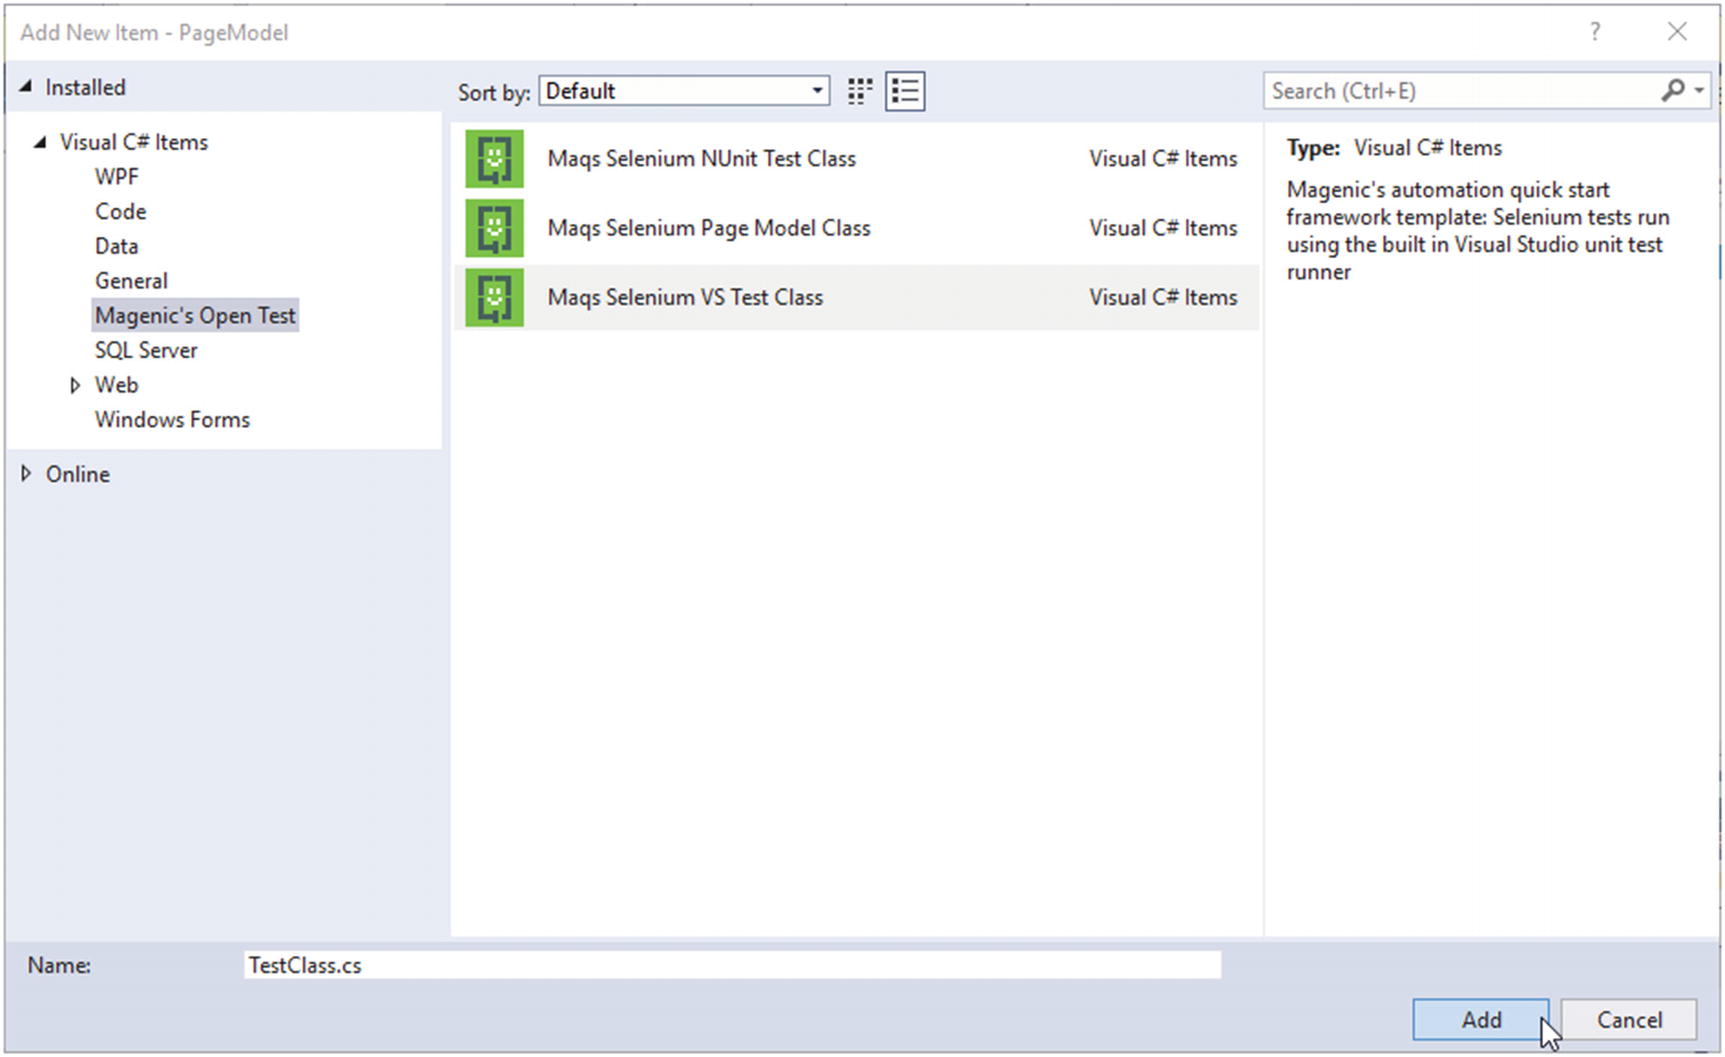
 Figure 3-33