
To avoid dependencies between tests: For example, to run the delete or update user test, you have to execute the Create User test first. This prevents execution of tests independently and blocks the ability to execute tests parallel and in distributed mode using multiple test clients. It is important to run automated tests independently and in parallel to allow fast execution and increased quality of the test results.
To avoid using prerequisite test case code to create/manage required data: Creating test data using test code may increase test execution time significantly. If the test data is not created as planned, whole test suite may fail in the execution.
Avoid the complexity in test code: Trying to implement test data creation with another set of tests cause complexity in tests and even in analysis of results. Test code would be messy and distinguishing between data creation tests and actual tests may become challenging over time.
Configuration data: Data that is required for the system to properly function. These data may be connection settings or system-level parameters defining or affecting the behavior of a given system.
Reference data: Data that the system needs to enable the functionality to be executed. For example, this can be list of country names, states in a given country, etc.
Scenario data: Data that is required to execute each individual test. For example, an opened and activated savings account should be available in a banking system to test the first cash deposit functionality in a test.
Test Data: Data to be used in execution of the tests. For example, to test create user operation in a system, you may need collection of usernames and passwords.
In this chapter, let’s explore the possibilities of using test data in a more robust way through hands-on lessons.
Lesson 5.01: Using External Data Sources to Keep Test Data
For keeping data that is required to execute tests, you can use external data sources such as an SQL database, an Excel file, or a csv file, etc. A configuration file can be used to keep the connection information of the data source and define the data source—for example, the table to be used.
- 1.
Open the Solution from Chapter 3 Lesson 3.05 in Visual Studio. The test written in that example is adding a new user to an eShop Web Application. However, the username and password are hardcoded in the test code in this example.
- 2.
Let’s create a list of usernames and passwords in an SQL Database table to be used as test data. Open the SQL Server Object Explorer in Visual Studio and connect to (localdb)MSSQLLocalDB. Then create a new database named TestData and add a table named Users with two varchar (50) fields. The UserName field as primary key and password field should be the two fields.
- 3.Add a few usernames such as those shown in Figure 5-1 to the Users table created.
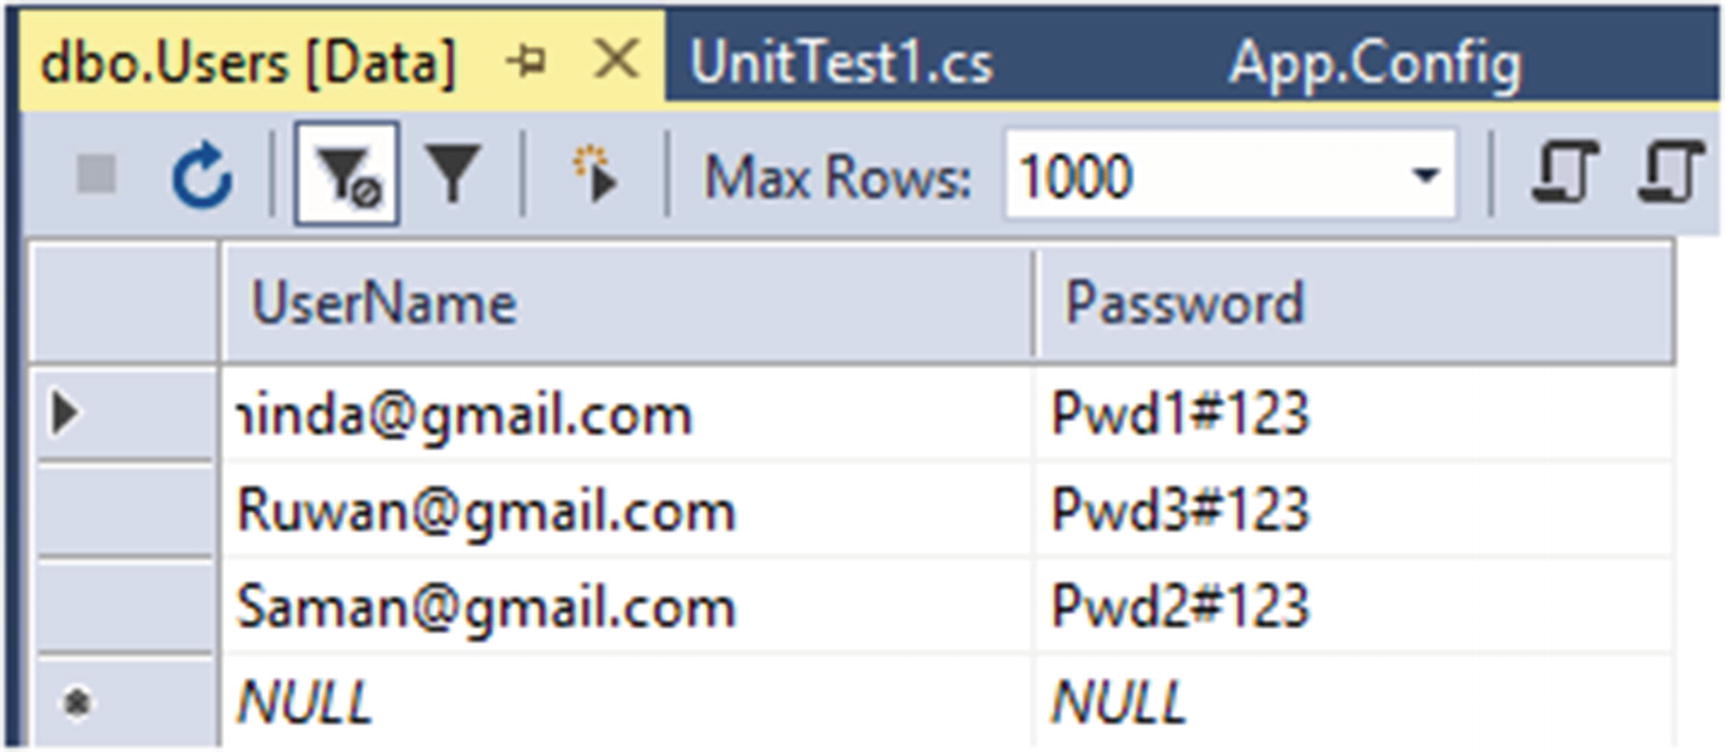 Figure 5-1
Data in SQL Table
- 4.Add an App.config file to the unit test project and add the following content to it. In the connection string, the database name is set to TestData and integrated security is used with the local SQL database server available in Visual Studio. In the data source, the name is given as MyDataSource and the table name of the Users table is specified as dataTableName. Setting Sequential to the data access method allows the execution of the test sequentially for each data row found in the table.<?xml version="1.0" encoding="utf-8"?><configuration><configSections><section name="microsoft.visualstudio.testtools" type="Microsoft.VisualStudio.TestTools.UnitTesting.TestConfigurationSection, Microsoft.VisualStudio.TestPlatform.TestFramework.Extensions" /></configSections><connectionStrings><add name="MyDataCon" connectionString="Data Source=(localdb)MSSQLLocalDB;Initial Catalog=TestData;Integrated Security=True;Connect Timeout=30;Encrypt=False;TrustServerCertificate=True;ApplicationIntent=ReadWrite;MultiSubnetFailover=False" providerName="System.Data.SqlClient" /></connectionStrings><microsoft.visualstudio.testtools><dataSources><add name="MyDataSource" connectionString="MyDataCon" dataTableName="Users" dataAccessMethod="Sequential"/></dataSources></microsoft.visualstudio.testtools></configuration>
- 5.Add the System.Data assembly reference to the UnitTest project. Open the UnitTest1.cs and add the following code to the UnitTest1 class. This TestContext will be used to retrieve the data when the tests are executed.private TestContext context;public TestContext TestContext{get { return context; }set { context = value; }}
- 6.Add the new attribute DataSource to the AddNewUser method available in the UnitTest class .[DataSource("MyDataSource")]
- 7.Replace the hardcoded username and passwords in AddNewUser method so that the complete code of the class are similar to following.using System;using Microsoft.VisualStudio.TestTools.UnitTesting;using OpenQA.Selenium;using OpenQA.Selenium.Chrome;using OpenQA.Selenium.Support.UI;using ExpectedConditions = SeleniumExtras.WaitHelpers.ExpectedConditions;namespace UnitTestProject1{[TestClass]public class UnitTest1{private TestContext context;public TestContext TestContext{get { return context; }set { context = value; }}[TestMethod][DataSource("MyDataSource")]public void AddNewUser(){string userEmail = context.DataRow["UserName"].ToString();string userpassword = context.DataRow["Password"].ToString();ChromeOptions option = new ChromeOptions();option.AddArgument("--start-maximized");IWebDriver driver = new ChromeDriver(option);driver.Navigate().GoToUrl("http://eshop-testweb.azurewebsites.net/");WebDriverWait wait = new WebDriverWait(driver, TimeSpan.FromSeconds(30));IWebElement loginLink = wait.Until(ExpectedConditions.ElementIsVisible(By.LinkText("Login")));loginLink.Click();IWebElement registerNewUser = wait.Until(ExpectedConditions.ElementToBeClickable(By.LinkText("Register as a new user?")));registerNewUser.Click();IWebElement emailField = wait.Until(ExpectedConditions.ElementToBeClickable(By.Id("Email")));emailField.SendKeys(userEmail);IWebElement passWordField = wait.Until(ExpectedConditions.ElementToBeClickable(By.Id("Password")));passWordField.SendKeys(userpassword);IWebElement confirmPassWordField = wait.Until(ExpectedConditions.ElementToBeClickable(By.Id("ConfirmPassword")));confirmPassWordField.SendKeys(userpassword);IWebElement registerButton = wait.Until(ExpectedConditions.ElementToBeClickable(By.CssSelector(".btn.btn-default.btn-brand.btn-brand-big")));registerButton.Submit();IWebElement myAccountLink = wait.Until(ExpectedConditions.ElementToBeClickable(By.LinkText("My account")));myAccountLink.Click();Assert.AreEqual(true, wait.Until(ExpectedConditions.TextToBePresentInElementValue(By.Id("Email"), userEmail)));driver.Quit();}}}
- 8.Notice the two statements reading the data from test context at the beginning of the method, which are shown in the following code. Then the variables userEmail and userPassword are used in the rest of the code.string userEmail = context.DataRow["UserName"].ToString();string userpassword = context.DataRow["Password"].ToString();
- 9.
Build the UnitTestProject1 and execute the test AddNewUser from the Test Explorer window in Visual Studio. You will see the test get executed for the number of times equal to the number of data rows in the Users table in the TestData table we have created (see Figure 5-2).

Executed test for data available in the Users table
In this lesson, we have discussed the capability of using external data sources for keeping the test data. You may use try different external data sources such as csv files or Microsoft Access Database, etc. for the purpose of keeping test data, and set up the data source similarly to what we have done in the lesson.
Lesson 5.02: Cleaning Test Data After Test Execution
In the previous lesson we discussed the capability of using external data sources to store test data. However, if you try to run the AddNewUser test without changing the test data for the second time, the test will fail, as it is not allowed to register the same username twice in the example eShop Web application. This shows the importance of cleaning up the test data at the end of a test execution.
To clean up the test data, you must have a good understanding of the system database structure and the data in it. An alternative option would be to use an API or the UI of the system to remove the registered users in this scenario. However, the most efficient way would be to remove the users directly from the database, which would minimize the test execution time. Depending on the complexity of the system under testing, you should decide on an option of test data clean-up using a database or APIs of the system or UI of the system. Remembering the option of using database scripts to clean up is the most efficient, but it is the riskier implementation. API is a good choice, if available. However, using UI via a set of another set of selenium test steps should be the last option and should be avoided as much as possible, as it would add additional time to test execution and make the tests messy, unmaintainable, and complex.
Prerequisites: You must have completed the previous lesson of this chapter and have the source code available to you from that lesson. However, complete source code from this lesson is available here: https://github.com/chamindac/Book-Test-Autmation-VS/tree/master/Chapter%205/Lesson%205.02/UnitTestProject1 . We will be using a sample application available in GitHub ( https://github.com/dotnet-architecture/eShopOnWeb ) to perform steps in this lesson. Set up the application as an Azure web app or host it in IIS following the instructions available on GitHub.
- 1.
Open the Solution from the previous lesson of this chapter in the Visual Studio.
- 2.Modify the App.Config of the UnitTestProject1 to include the following line in the ConnectionsStrings section. Make sure to replace the database server name, user id, and the password of the SQL Server where you have set up the eShop Web Application databases.<add name="SystemIdentityCon" connectionString="Data Source=databaseserver;Initial Catalog=eshopidentity;User ID=userid;Password=userpassword;Connect Timeout=60;Encrypt=True;TrustServerCertificate=False;ApplicationIntent=ReadWrite;MultiSubnetFailover=False" providerName="System.Data.SqlClient" />
- 3.The complete App.App configuration should be similar to the following:.<?xml version="1.0" encoding="utf-8"?><configuration><configSections><section name="microsoft.visualstudio.testtools" type="Microsoft.VisualStudio.TestTools.UnitTesting.TestConfigurationSection, Microsoft.VisualStudio.TestPlatform.TestFramework.Extensions" /></configSections><connectionStrings><add name="MyDataCon" connectionString="Data Source=(localdb)MSSQLLocalDB;Initial Catalog=TestData;Integrated Security=True;Connect Timeout=30;Encrypt=False;TrustServerCertificate=True;ApplicationIntent=ReadWrite;MultiSubnetFailover=False" providerName="System.Data.SqlClient" /><add name="SystemIdentityCon" connectionString="Data Source=databaseserver;Initial Catalog=eshopidentity;User ID=userid;Password=userpassword;Connect Timeout=60;Encrypt=True;TrustServerCertificate=False;ApplicationIntent=ReadWrite;MultiSubnetFailover=False" providerName="System.Data.SqlClient" /></connectionStrings><microsoft.visualstudio.testtools><dataSources><add name="MyDataSource" connectionString="MyDataCon" dataTableName="Users" dataAccessMethod="Sequential"/></dataSources></microsoft.visualstudio.testtools></configuration>
- 4.Create a new folder in UnitTestProject1 with the name CleanupScripts. Then add a new SQL file named RemovenewUser.sql to that folder. Open the SQL file and add the following script to it to enable deleting a given user. In the properties window of Visual Studio for the SQL file, select Copy always in the Copy to Output Directory property.delete from dbo.AspNetUsers where username = '{0}'
- 5.Add System.Configuration as a reference to UnitTestProject1. Then add the following using statements in the UnitTest1.cs file.using System.Configuration;using System.Data.SqlClient;using System.IO;
- 6.Add the following method to the UnitTest1 class to enable cleanup after each test method in the class. The attribute TestCleanup triggers this method after each test method execution. Method retrieves the username to delete from the test context data. Then load the script from the SQL file and replace the username to delete in the file. Using the SQL connection created referring to the connection string of the identity database of the eShop Web Application, a command is executed to delete the newly added user.[TestCleanup()]public void Cleanup_RemoveNewUser(){string userToDelete = context.DataRow["UserName"].ToString();string deleteUserScript = File.ReadAllText(@".CleanupScriptsRemovenewUser.sql");deleteUserScript = string.Format(deleteUserScript, userToDelete);using (SqlConnection conn = new SqlConnection(ConfigurationManager.ConnectionStrings["SystemIdentityCon"].ConnectionString)){conn.Open();using (var cmd = new SqlCommand()){cmd.Connection = conn;cmd.CommandType = System.Data.CommandType.Text;cmd.CommandText = deleteUserScript;cmd.ExecuteNonQuery();}}}
- 7.Complete code of the UnitTest1.cs file should be similar to the following:using System;using System.Configuration;using System.Data.SqlClient;using System.IO;using Microsoft.VisualStudio.TestTools.UnitTesting;using OpenQA.Selenium;using OpenQA.Selenium.Chrome;using OpenQA.Selenium.Support.UI;using ExpectedConditions = SeleniumExtras.WaitHelpers.ExpectedConditions;namespace UnitTestProject1{[TestClass]public class UnitTest1{private TestContext context;public TestContext TestContext{get { return context; }set { context = value; }}[TestMethod][DataSource("MyDataSource")]public void AddNewUser(){string userEmail = context.DataRow["UserName"].ToString();string userpassword = context.DataRow["Password"].ToString();ChromeOptions option = new ChromeOptions();option.AddArgument("--start-maximized");IWebDriver driver = new ChromeDriver(option);driver.Navigate().GoToUrl("http://eshop-testweb.azurewebsites.net/");WebDriverWait wait = new WebDriverWait(driver, TimeSpan.FromSeconds(30));IWebElement loginLink = wait.Until(ExpectedConditions.ElementIsVisible(By.LinkText("Login")));loginLink.Click();IWebElement registerNewUser = wait.Until(ExpectedConditions.ElementToBeClickable(By.LinkText("Register as a new user?")));registerNewUser.Click();IWebElement emailField = wait.Until(ExpectedConditions.ElementToBeClickable(By.Id("Email")));emailField.SendKeys(userEmail);IWebElement passWordField = wait.Until(ExpectedConditions.ElementToBeClickable(By.Id("Password")));passWordField.SendKeys(userpassword);IWebElement confirmPassWordField = wait.Until(ExpectedConditions.ElementToBeClickable(By.Id("ConfirmPassword")));confirmPassWordField.SendKeys(userpassword);IWebElement registerButton = wait.Until(ExpectedConditions.ElementToBeClickable(By.CssSelector(".btn.btn-default.btn-brand.btn-brand-big")));registerButton.Submit();IWebElement myAccountLink = wait.Until(ExpectedConditions.ElementToBeClickable(By.LinkText("My account")));myAccountLink.Click();Assert.AreEqual(true, wait.Until(ExpectedConditions.TextToBePresentInElementValue(By.Id("Email"), userEmail)));driver.Quit();}[TestCleanup()]public void Cleanup_RemoveNewUser(){string userToDelete = context.DataRow["UserName"].ToString();string deleteUserScript = File.ReadAllText(@".CleanupScriptsRemovenewUser.sql");deleteUserScript = string.Format(deleteUserScript, userToDelete);using (SqlConnection conn = new SqlConnection(ConfigurationManager.ConnectionStrings["SystemIdentityCon"].ConnectionString)){conn.Open();using (var cmd = new SqlCommand()){cmd.Connection = conn;cmd.CommandType = System.Data.CommandType.Text;cmd.CommandText = deleteUserScript;cmd.ExecuteNonQuery();}}}}}
- 8.
Now you can run the AddNewUser test multiple times with the same data in the Users table of the TestData database, as the code is making sure the test data used in the test is immediately removed after the test execution.
This lesson helped you to understand the usage of the TestCleanup method to effectively use the test data and get them cleaned up after the test execution in functional test automation.
Lesson 5.03: Making the Test Data Cleanup Robust
In the previous lesson, we discussed how to clean up the test data being used in a test execution. However, is that implementation a robust one? To check this and make the previous lesson test cleanup code more robust and stable is the purpose of this lesson.
Prerequisites: You must have completed the previous lesson of this chapter and have the source code available to you from that lesson. However, complete source code of this lesson is available here: https://github.com/chamindac/Book-Test-Autmation-VS/tree/master/Chapter%205/Lesson%205.03/UnitTestProject1 . We will be using a sample application available on GitHub ( https://github.com/dotnet-architecture/eShopOnWeb ) to perform the steps in this lesson. Set up the application as an Azure web app or host it in IIS following the instructions available on GitHub.
- 1.
Open the Solution from the previous lesson of this chapter in the Visual Studio.
- 2.Add the following new test method to UnitTest1 class, which is evaluating the assert to true with the intention of passing the test on all scenarios.[TestMethod]public void TestMethod2(){Assert.AreEqual(1, 1);}
- 3.
Build the project and execute all tests from the Test Explorer window.
- 4.As expected, the newly added test method fails in the cleanup attempt, as no new user is added, which was the expected case in the previous lesson implementation of test data cleanup. The error is thrown because the test context has no data row, as expected in the cleanup, for the newly added test method (see Figure 5-3).
 Figure 5-3
Failing in the cleanup
- 5.
Let’s get this issue fixed so that we can implement test data cleanup in a robust way.
- 6.As the first step, add the following using a statement to the UnitTest1.cs to allow the use of generic lists in C#.using System.Collections.Generic;
- 7.Then add a new private variable type of List<Action> to the Unittest1 class. We are going to add cleanup methods as an action list in the test class.private List<Action> TestCleanupMethods = new List<Action>();
- 8.Remove the TestCleanup attribute from the Cleanup_RemoveNewUser method . Make the userToDelete a parameter for the method. Complete method code should be as shown here after modification.public void Cleanup_RemoveNewUser(string userToDelete){string deleteUserScript = File.ReadAllText(@".CleanupScriptsRemovenewUser.sql");deleteUserScript = string.Format(deleteUserScript, userToDelete);using (SqlConnection conn = new SqlConnection(ConfigurationManager.ConnectionStrings["SystemIdentityCon"].ConnectionString)){conn.Open();using (var cmd = new SqlCommand()){cmd.Connection = conn;cmd.CommandType = System.Data.CommandType.Text;cmd.CommandText = deleteUserScript;cmd.ExecuteNonQuery();}}}
- 9.Add the following statement to the AddNewuser test method just after retrieving test data from the test context (see Figure 5-4). The statement will add remove method with user e-mail value as a parameter to the list of actions we have created as a private variable in the UnitTest1 class. You can even consider placing this statement just after adding the new user to the eShop Web Application. The script we have written to delete a user will not return a failure even if we do not have a user to delete. Hence, placing the following statement just after retrieving test data also should be fine.TestCleanupMethods.Add(() => Cleanup_RemoveNewUser(userEmail));
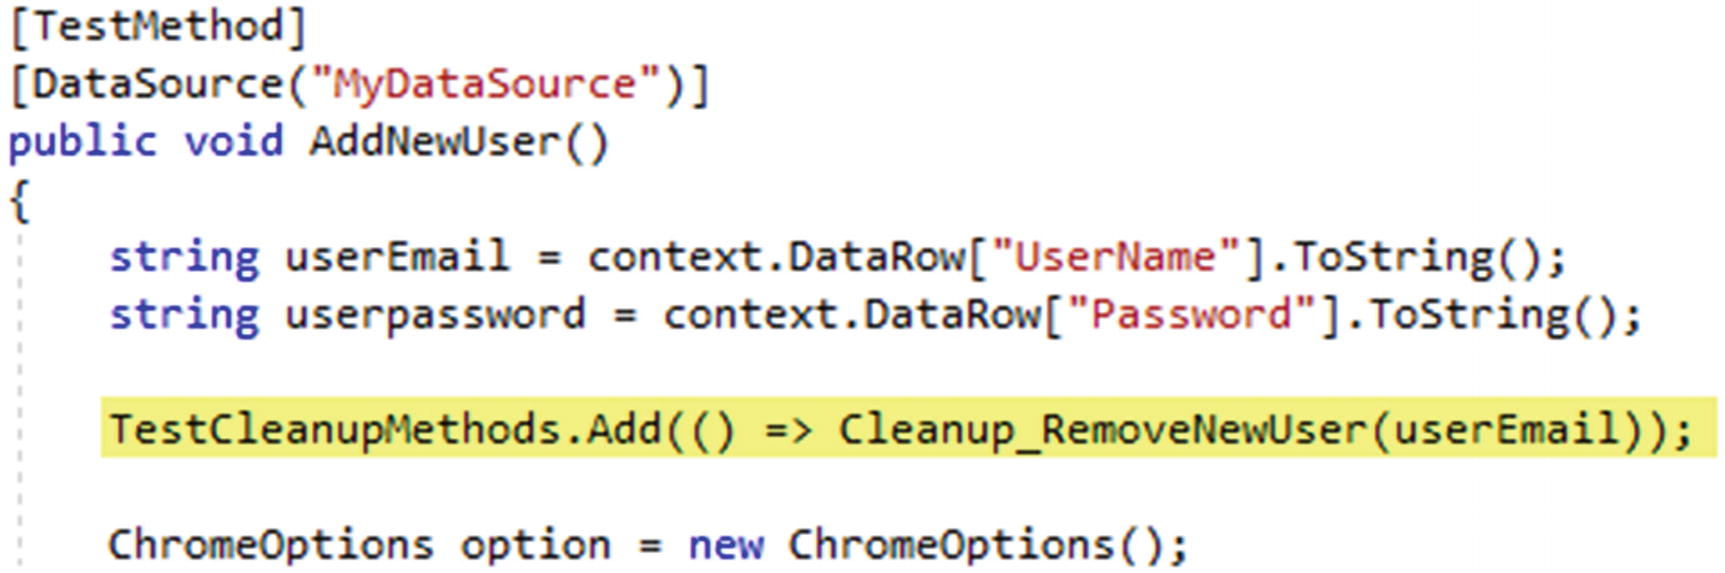 Figure 5-4
Add cleanup method to list of actions
- 10.
As shown here, you can define any number of test data cleanup methods and add them to the list, as appropriate, in the relevant test methods. Even one test method may have multiple cleanup method requirements based on the complexity of the test method.
- 11.Then add a cleanup all method that will be calling the cleanup methods in the action list. Reverse ordering the list helps to execute the last added cleanup method first, which would be an effective solution when the test data required to be cleaned up are in a relational database and have multiple cleanup methods with dependencies. Further, this implementation will allow calling individual cleanup methods when they are added to action list. This makes the newly added test method TestMethod2 execute without failing, as it is not adding any cleanup method to the action list.[TestCleanup]public void Cleanup_All(){TestCleanupMethods.Reverse();foreach (var cleanupMethod in TestCleanupMethods){cleanupMethod();}}
- 12.The complete code of Unittest1.cs should be as follows after completing all the aforementioned steps.using System;using System.Collections.Generic;using System.Configuration;using System.Data.SqlClient;using System.IO;using Microsoft.VisualStudio.TestTools.UnitTesting;using OpenQA.Selenium;using OpenQA.Selenium.Chrome;using OpenQA.Selenium.Support.UI;using ExpectedConditions = SeleniumExtras.WaitHelpers.ExpectedConditions;namespace UnitTestProject1{[TestClass]public class UnitTest1{private TestContext context;private List<Action> TestCleanupMethods = new List<Action>();public TestContext TestContext{get { return context; }set { context = value; }}[TestMethod][DataSource("MyDataSource")]public void AddNewUser(){string userEmail = context.DataRow["UserName"].ToString();string userpassword = context.DataRow["Password"].ToString();TestCleanupMethods.Add(() => Cleanup_RemoveNewUser(userEmail));ChromeOptions option = new ChromeOptions();option.AddArgument("--start-maximized");IWebDriver driver = new ChromeDriver(option);driver.Navigate().GoToUrl("http://eshop-testweb.azurewebsites.net/");WebDriverWait wait = new WebDriverWait(driver, TimeSpan.FromSeconds(30));IWebElement loginLink = wait.Until(ExpectedConditions.ElementIsVisible(By.LinkText("Login")));loginLink.Click();IWebElement registerNewUser = wait.Until(ExpectedConditions.ElementToBeClickable(By.LinkText("Register as a new user?")));registerNewUser.Click();IWebElement emailField = wait.Until(ExpectedConditions.ElementToBeClickable(By.Id("Email")));emailField.SendKeys(userEmail);IWebElement passWordField = wait.Until(ExpectedConditions.ElementToBeClickable(By.Id("Password")));passWordField.SendKeys(userpassword);IWebElement confirmPassWordField = wait.Until(ExpectedConditions.ElementToBeClickable(By.Id("ConfirmPassword")));confirmPassWordField.SendKeys(userpassword);IWebElement registerButton = wait.Until(ExpectedConditions.ElementToBeClickable(By.CssSelector(".btn.btn-default.btn-brand.btn-brand-big")));registerButton.Submit();IWebElement myAccountLink = wait.Until(ExpectedConditions.ElementToBeClickable(By.LinkText("My account")));myAccountLink.Click();Assert.AreEqual(true, wait.Until(ExpectedConditions.TextToBePresentInElementValue(By.Id("Email"), userEmail)));driver.Quit();}[TestMethod]public void TestMethod2(){Assert.AreEqual(1, 1);}[TestCleanup]public void Cleanup_All(){TestCleanupMethods.Reverse();foreach (var cleanupMethod in TestCleanupMethods){cleanupMethod();}}public void Cleanup_RemoveNewUser(string userToDelete){string deleteUserScript = File.ReadAllText(@".CleanupScriptsRemovenewUser.sql");deleteUserScript = string.Format(deleteUserScript, userToDelete);using (SqlConnection conn = new SqlConnection(ConfigurationManager.ConnectionStrings["SystemIdentityCon"].ConnectionString)){conn.Open();using (var cmd = new SqlCommand()){cmd.Connection = conn;cmd.CommandType = System.Data.CommandType.Text;cmd.CommandText = deleteUserScript;cmd.ExecuteNonQuery();}}}}}
- 13.
With this implementation, both the tests should execute fine and should clean the new user added with the AddnewUser test (see Figure 5-5). So, this implementation allows the tests to be executed with the test data any number of times, in a robust and stable manner.
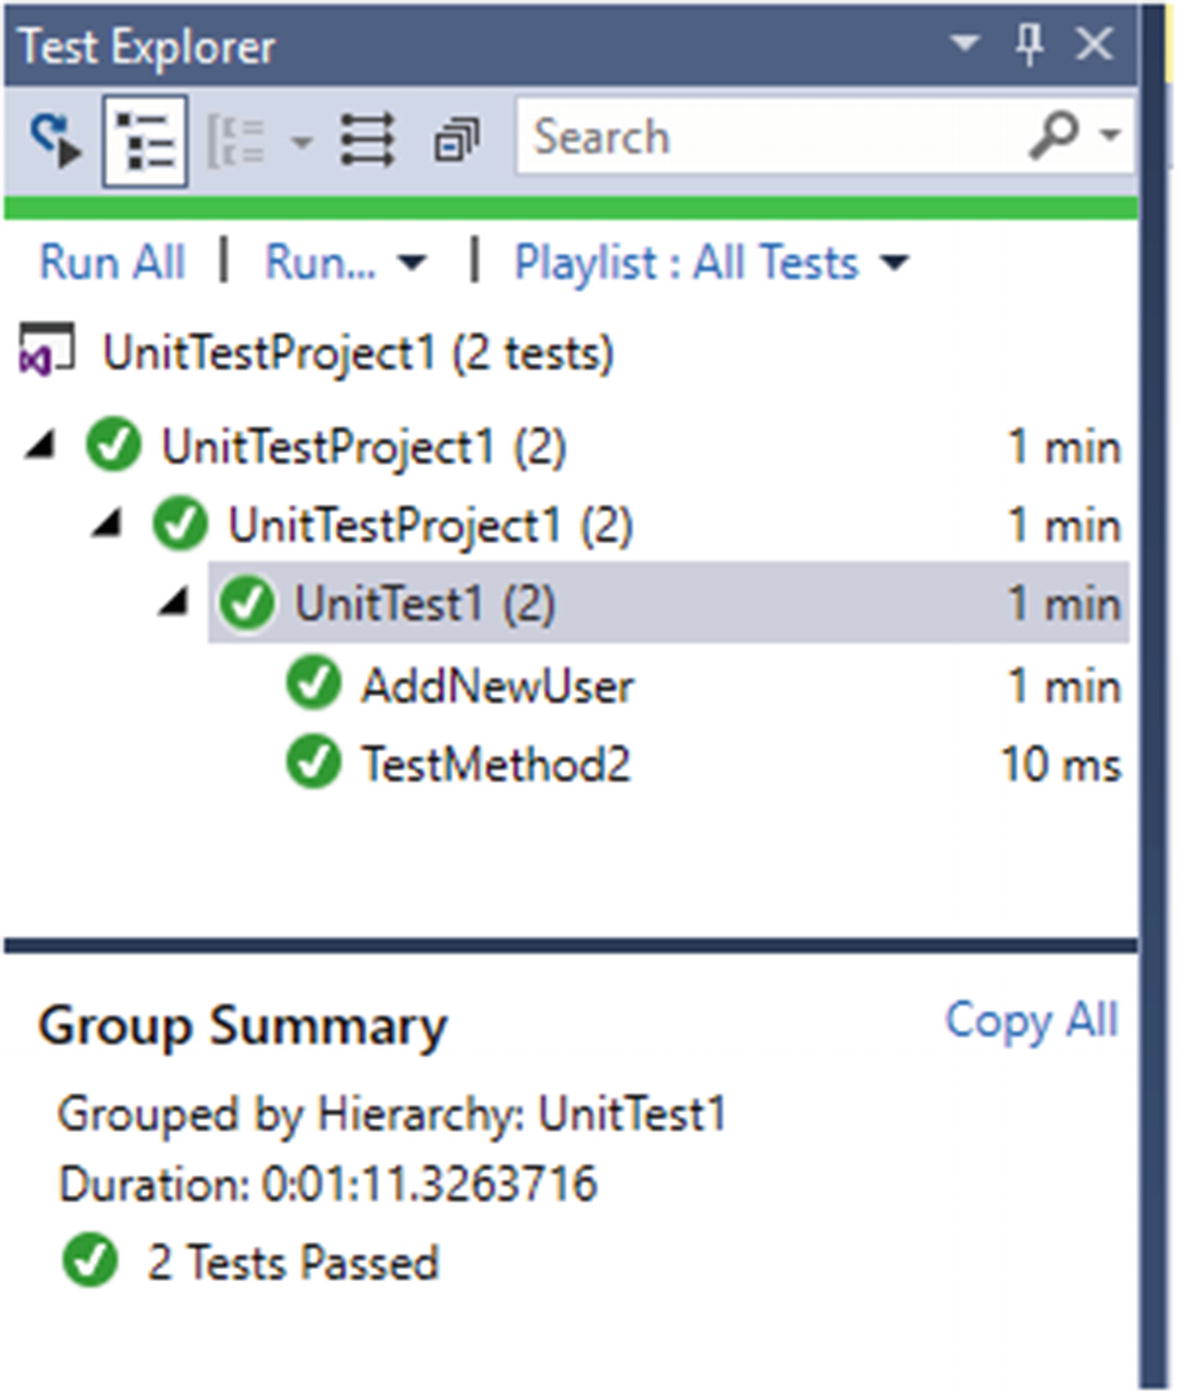
Both tests passed
We have made the test data cleanup we have implemented in the previous lesson robust and stable in this lesson.
Summary
In this chapter, we have focused on test data management and cleanup test data after execution of tests with hands-on lessons.
For handling configuration reference data, it is advisable to use database scripts, to populate them, and to have a pre-test check method implemented to validate if all data required is populated in the system databases. You could even opt to manually add these data to the system via system UI, and then keep a backup of the database and restore it before the execution to make the tests run on pre-prepared environment. However, this implementation would be challenging in a situation where the system is undergoing bigger changes even affecting the database schemas.
For handling test scenario data, it is recommended that you use scripts to add required data to the database directly or use application system APIs if available. You should try to avoid using Test Initialize to implement the call to test scenario data adding, as it will be a messy implementation if there are multiple tests written in the same test class. Rather you should use the actual test method to call the scripts to generate the test data required for the scenario. This is easier to implement in systems when they mature; however, it would be a challenging to implement scenario-based test data creation in rapidly changing applications.
In the next chapter, we will discuss the possibilities of integrating test automation code into CI/CD pipelines to make the execution of tests to happen in a fully automated manner.