
Chapter 9. Connecting the UI to Our Contracts
Let’s get started with creating our DApp’s UI. We’ll use a frontend framework called React to implement the features we need to allow our users to interact with the blockchain. React will help us to easily create a frontend application with different routes for a user to navigate through, input forms and buttons for them to submit data, and more. In this chapter, we’ll learn how to use React to work with the blockchain and submit functions that will read and write to the blockchain.
Why React?
First of all, what is React? React is a JavaScript library built by Facebook that is used to build frontend applications or the client side of an application. If your application uses React, anything that a user sees—the view layer—is being served from the React application. React uses components and data management, such as reducers and actions, along with providing JSX (a syntax extension) and a Virtual DOM, not to mention easily reusable library code that will help you build out the frontend to your application fast.
If you do become a blockchain engineer, most likely you’ll need to be familiar with Web3 and React to develop Web3 applications. To learn more about React, take a look at its official site.
Why do we want to use React? React is the most widely used frontend framework with Truffle. Because it is so widely used, it’ll make finding documentation and answers to your questions so much easier. Most of the questions you’ll find on Stack Overflow about the frontend and Ethereum will use React. In addition, most of the tutorials you’ll find online will be written using React.
We’re going to use React Box. React Box is lightweight scaffolding that will allow us to quickly interact with our smart contracts through a React frontend. You can view the documentation on the React Box GitHub repository and play around with it yourself. While React is a frontend framework, React Box is a quick way to get a React application running and interacting with Web3. Without React Box, we’d need to create a bunch of folders and setup that would hold our contracts, migrations, and Web3 setup.
Let’s get started with setting up React Truffle Box so we can read and write to the blockchain.
Dev Setup
Now, let’s set up our Greeter contract with React Truffle Box. We’ll need to follow the steps in the React Truffle Box repository.
Create a new directory:
mkdir greeter-dapp
Change into the new directory:
cd greeter-dapp
Install Truffle globally:
npm install -g truffle
And run this command inside it to unbox the React Truffle Box:
truffle unbox react
Your Greeter project should now include the following files:
greeter
├── client
│   └──src
├── contracts
│   └──
├── migrations
├── test
└── truffle-config.js
Our React application can be found inside /client/src in our greeter directory. Here you’ll find all the frontend files we’ll be using in this chapter and later on with our fundraiser application.
Let’s start with getting our contracts imported to React and running with Truffle so we can call the methods from our Greeter contract and interact with them in the frontend of our application.
Truffle
Later in this chapter, we’ll import our own Greeter contracts. But let’s first get everything running with the standard React Truffle Box default contracts. Later on when you build your own Truffle applications, you can follow this same process to build your own unique blockchain application.
First, we’ll run the following command to start our Truffle server:
truffle develop
truffle develop not only starts up your server for you, but creates accounts with ether that you can use with your DApp for testing. It also includes private keys and a mnemonic that you can use.
When it is running, you’ll see something similar to this in your terminal:
Truffle Develop started at http://127.0.0.1:9545/

Accounts:
(0) 0xb94454c83ff541c82391b4331e75d2e2b16bae9e
(1) 0xf1f8d85aef05e7587cbc3ddae9753f4865a3a349
(2) 0xe6a27378e478eb6d3fe2d97c916e8b4813889d1e
(3) 0x3e41e8e0cdace3079cd6084380f00cd855cd28ea
(4) 0x135d3e70c2a2633141a433fa349d18d3dcf36c40
(5) 0x3c84bd6957fc3d6093be672df7e2b40caa427f5e
(6) 0x661c74f3765d87ab881fe09eec4ef019fc8098bd
(7) 0x44ee71f3e047ac88b203775621a4e8bfd4112b24
(8) 0x3a9553825d228b6c2f5fdfcc6d6cd2a96a527c0a
(9) 0x2ddb954595ef1a9f5f27ed22e04f3009c8789a03

Private Keys:
(0) 98831bde4e476ffc7dd7021860bd93c4a0ac95b08368057256db49cef900990d
(1) 632b963c3d3b1b03197e6120fb5200bbfe155f36f60c9e0a461a046aca3e53e6
(2) df389a349ae4f7c29fc4da3ee70e5bdc0bf7e4eeeeb3cafcecb38cb43266bb1f
(3) 88eb15bb7e98a24b76eafcbecd4de419c17f2c5b00cb129ab84b276857d9f303
(4) 11b862620fd7150ba20a255a88bd4046c9d674d36d297811e06008fde588983a

Mnemonic: flush cupcake slice area urban slice motor click rocket response
lobster sustain((("mnemonics")))

⚠️  Important ⚠️  : This mnemonic was created for you by Truffle. It is not secure.
Ensure you do not use it on production blockchains, or else you risk losing funds.

truffle(develop)>
Copy http://127.0.0.1:9545/ and the first private key you see from the output after running truffle develop. We’ll be using them later.
Once you see the interactive Truffle console is up, we can compile our Greeter contract with the compile command:
truffle(develop)> compile
Here’s the output:
Compiling your contracts...
===========================
> Compiling ./contracts/Migrations.sol
> Compiling ./contracts/SimpleStorage.sol
Running compile will create JSON files of all your contracts under build/contracts in your project.
Next, we’ll deploy the default React Truffle Box contracts to our test Ethereum network by running the following:
migrate
Here’s the output:
Starting migrations...
======================
> Network name:    'develop'
> Network id:      5777
> Block gas limit: 0x6691b7


1_initial_migration.js
======================
   Deploying 'Migrations'

2_deploy_contracts.js
=====================

   > Saving migration to chain.
   > Saving artifacts
   -------------------------------------
   > Total cost:           0.0021003 ETH


Summary
=======
> Total deployments:   2
> Final cost:          0.00732816 ETH
Now that we have the Truffle side of things ready to go, let’s get our React application up and running.
React Truffle Box Setup
Before we get the development of our frontend application started, we need to switch our MetaMask network to match what we saw earlier when we ran truffle develop. We need this to be the same so we’re connecting to the right localhost and serving up the right information.
When we ran truffle develop, we saw this:
Truffle Develop started at http://127.0.0.1:9545/
Copy http://127.0.0.1:9545/ to your clipboard. Next, we need to open MetaMask and import that network. Open the MetaMask extension and select Main Ethereum Network. We’ll need to select Custom RPC and enter http://127.0.0.1:9545 where it says New RPC URL.”
You should see this in the MetaMask extension after selecting Custom RPC, as illustrated in Figure 9-1.

Figure 9-1. Select a custom RPC to connect to Truffle
Next, we’ll need to import one of the fake test accounts that we saved earlier. In MetaMask, select the top right circular icon where you’ll see something similar to the dropdown in Figure 9-2.

Figure 9-2. Import your test account from the Truffle Develop console
Paste the private key in the MetaMask import and select Import (see Figure 9-3).
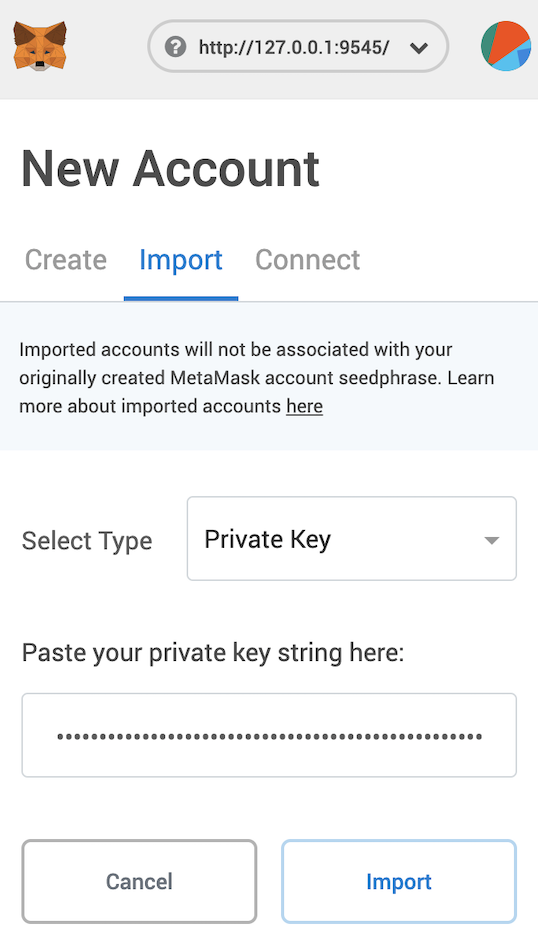
Figure 9-3. Enter your private key to import your test account
If the account was successfully imported, you’ll see a bunch of ether show up in your new account, as illustrated in Figure 9-4.
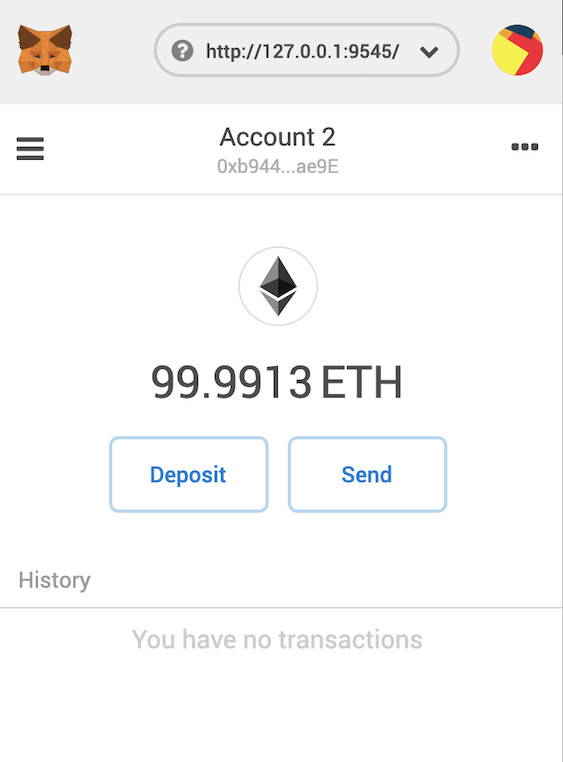
Figure 9-4. What the successful addition of your test account should look like
Now that we have Truffle and MetaMask up and running, we’ll get the React application running.
Change to the src directory inside of our Greeter repository and install the dependencies:
cd client // this is the cd command that lets you move into directories
npm i
After everything is installed, we can start the frontend of your application so we can actually see the app in action:
npm run start
Now you’ll be able to see your DApp in your browser if you navigate to http://localhost:3000/. It should look similar to Figure 9-5.
You should see MetaMask pop up asking you to accept a connection request. See Figure 9-6.
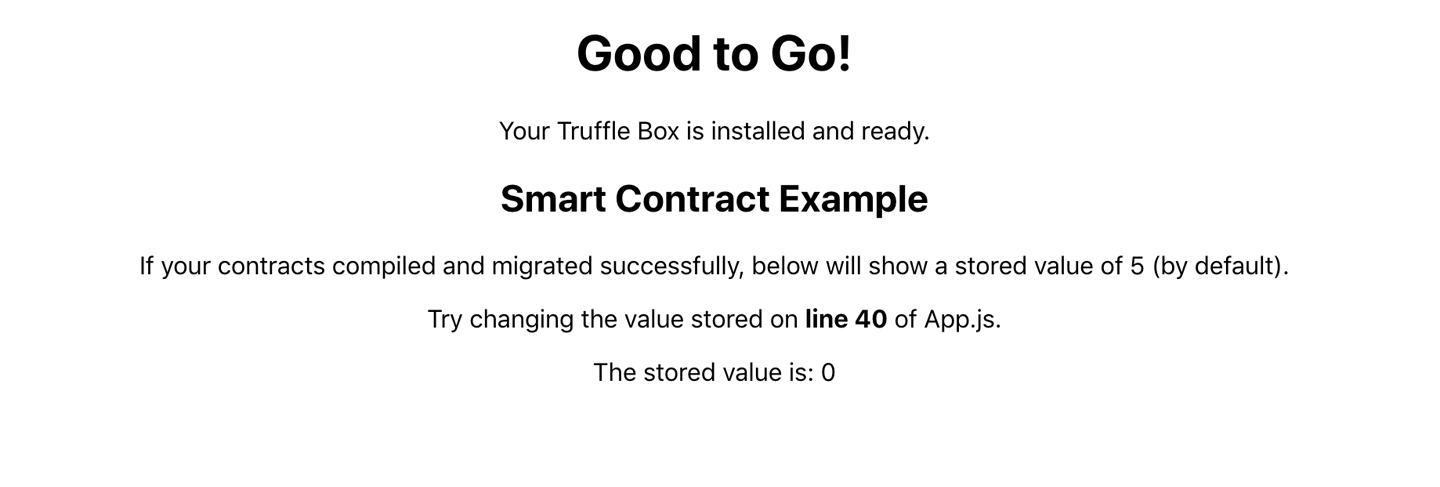
Figure 9-5. Congratulations! If your app is running properly, it should look like this.
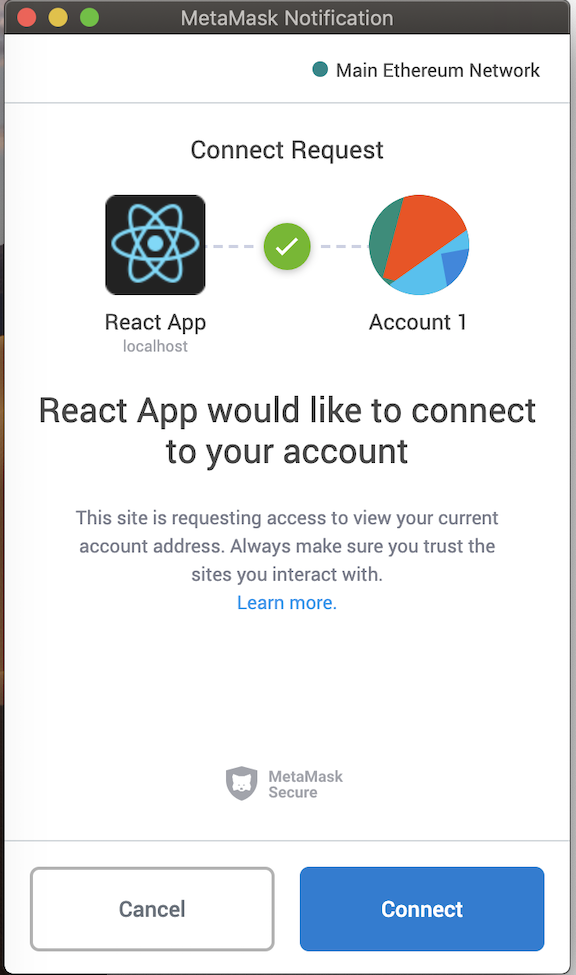
Figure 9-6. Accept the React Box application setup
Now that we have our basic application up and running, let’s import our contracts so we can use the Greeter contract.
Importing our Greeter Contracts
Currently, we’re using the default contracts with React Box. We’ll need to import our Greeter contracts written previously so we can interact with them. Go back to our Greeter contract repository, and copy the Greeter.sol file. In the contracts file in our Greeter repository we just created, create a new file:
touch contracts/Greeter.sol
Open up the Greeter repository in your text editor and paste the Greeter contract into that file.
Create a new file for the migration like we did previously:
touch migrations/3_deploy_greeter.js
We’ll now run our compile and migrate commands again so we can be sure we’re interacting with the new Greeter contract we’ve imported. If we don’t do this, our Truffle Develop terminal will still be interacting with the standard React Truffle Box contracts.
After our contracts have successfully compiled and the migrations are finished, let’s open up our client directory in our application and get started on creating a UI for our own contracts.
Open up the App.js file. We’re going to modify some of the code to interact with our contracts. Start by removing all the standard Truffle boilerplate in the return function. Your code should now look like this:
return (
  <div className="App">
  </div>
);
Let’s add our own Greeter contract header now:
return (
  <div className="App">
    <h1>Greeter</h1>
  </div>
);
Next, instead of importing the boilerplate contract SimpleStorage, let’s import our Greeter contract so we can start calling methods from the Greeter contracts that we wrote earlier:
import GreeterContract from "./contracts/Greeter.json";
Still in the App.js file, and in the componentDidMount function, we’ll replace the following line with our Greeter contract network ID:
const deployedNetwork = SimpleStorageContract.networks[networkId];
This will allow us to actually connect to our Greeter contract:
const deployedNetwork = GreeterContract.networks[networkId];
In the same componentDidMount function, replace the SimpleStorage contract with our own GreeterContract reference:
const instance = new web3.eth.Contract(
  GreeterContract.abi,
  deployedNetwork && deployedNetwork.address,
);
Now let’s add our Greeter contract so our users can interact with it through our React frontend.
Adding Our Greeter Contract Functionality
We’re going to need to make a few more modifications to the App.js boilerplate code before we can work with our Greeter contract.
In our App.js file, we’ll need to use Web3 so we can connect to an Ethereum network. In our componentDidMount method, we’ll access Web3 and store it in our React state. We’ll stick with most of the boilerplate code, with a few additions.
To set up our Greeter contract to work with our frontend, we’ll first need to get rid of some of the boilerplate code from Truffle Box. We’ll first need to change the state of our App.js component to match our contracts code:
state = { storageValue: 0, web3: null, accounts: null, contract: null };
Where it says storageValue: 0, we’ll replace that with a new state to store our return from our greeting function. Now, instead of storageValue: 0, you can replace that with greeting: '' as shown here. This will use the React state to display our greeting to the user:
state = { greeting: '', web3: null, accounts: null, contract: null };
Next, we’ll need to replace the current runExample function code with our own. Remove all the old code from Truffle Box, except for the following code:
runExample = async () => {
  const { accounts, contract } = this.state;

};
Now, let’s add our own code, which we’ll call our Greeter contract, and set our React state:
const response = await contract.methods.greet().call()

this.setState({ greeting: response });
We’ll want to call our Greeter contract method right after the first line in runExample. That will store the response from our greet() method in a const.
After we’ve gotten our response, we’re setting our React state with the response, as you can see with greeting: response.
Next, we need to return our new React state from our render function! Replace the current render function with the following code:
render() {
    if (!this.state.web3) {
      return <div>Loading Web3, accounts, and contract...</div>;
    }
    return (
      <div className="App">
        <h1>Greeter</h1>

        {this.state.greeting}
      </div>
    );
  }
We’re accessing our React state and now rendering it in our page. You should now see “Hello World” on localhost:3000 (Figure 9-7).

Figure 9-7. The home page of your application should be displaying “Hello World!”
Congratulations! You’ve just displayed your first contract response on a React application! But what if we want to display our greeting? In the next section, we’ll update our greeting in the UI through a user interaction.
Setting Our Greeting Through React
Our next step will be setting a new greeting using React. Right now, our contract is only returning the default greeting. We’ll use the setGreeting function in our Greeter.sol file and set our own message.
Let’s start with creating a React text input so we can write our own message to set. Here is a simple form that we’ll add right after {this.state.greeting} in our render function:
<form>
  <label>
    New Greeting:
    <input type="text" value={this.state.greeting}
        onChange={this.handleGreetingChange} />
  </label>
</form>

<button onClick={this.formSubmitHandler}> Submit </button>
After your app rerenders, you should now see your new input on the screen, as illustrated in Figure 9-8.

Figure 9-8. Your application can now interact with users through an input
If you type something in right now, nothing happens! Let’s fix that.
First, create the empty skeleton functions for our onSubmit and onChange actions:
formSubmitHandler = () => {
  // do awesome Web3 stuff here!
}

handleGreetingChange = (e) => {
  // update our react state here
}
Ultimately, we’re going to use Web3 in our formSubmitHandler function to connect to our contract and update our greeting. But let’s first start with getting the data from our user into our handleGreetingChange function.
We’ll need to update our onChange function in our input form, as shown here. This will allow us to access the actual input from the user in our function:
<input type="text" value={this.state.greeting}
    onChange={e => this.handleGreetingChange(e)} />
In the handleGreetingChange function, we need to now grab the data from our input when the function is invoked. Add the following code to your handleGreetingChange function:
handleGreetingChange = (e) => {
  const inputVal = e.target.value
  this.setState({ greeting: inputVal })
}
This function will now grab the input from the user and set the state. We are just updating the state, however, and not yet sending it to the blockchain. If you refresh the page right now, you’ll see the data isn’t stored. Let’s work on that next.
In our formSubmitHandler function, we need to first grab the state for our current greeting input so we know what information we want to send to the blockchain.
formSubmitHandler = async () => {
  const { accounts, contract, greeting } = this.state
}
We’ll just need to add one last thing now to get our data to the blockchain. We’ll use Web3 to interact with our setGreeting method from our contract:
formSubmitHandler = async () => {
  const { accounts, contract, greeting } = this.state;
  const updatedGreeting = await contract.methods.setGreeting(greeting)
}
Now if you type something into the input form, and click submit, which calls our submit action, our data is actually saved on the blockchain. A transaction permanently exists on the blockchain with our new greeter input. If we refresh our page again, we can see our greeter frontend has changed.
Summary
In this chapter, we learned about React and how it’s the most popular framework to use with Ethereum and smart contract development. Most of the tutorials online and answers on Stack Overflow for frontend development with Truffle use React.
Interacting with our smart contract was made easy by using React Truffle Box for our frontend application. And with React, we created a few simple actions and inputs that let us set our greeter message in the blockchain.
We also learned more about Web3 and MetaMask and how we can actually use these tools to connect to the blockchain and our smart contracts.
In the next chapter, we’ll use all the information we learned to create a more complicated frontend for our Fundraiser contract.