
Chapter 13: Exploring the Software Life Cycle
In previous chapters, we explored many different aspects of Java application development. Starting from the Software Development Life Cycle (SDLC), which includes requirements collection and architecture design, we focused on many different technological aspects, including frameworks and middleware.
At this point, several cross-cutting concerns need to be looked at, regardless of the kind of application we are building and the architectural style we choose.
In this chapter, we are going to explore such aspects. We will start with things such as the maintenance of source code (including versioning and branching strategies), ranging through to some core topics related to deploying, Continuous Integration/Continuous Delivery (CI/CD), and other concepts related to the SDLC in its entirety.
In this chapter, these are the topics we are going to cover:
- Source Code Management
- Testing
- Deploying
- Continuous integration/continuous delivery (and deployment)
- Releasing
- Maintenance
I'm almost sure that in your professional life, you will already have had the opportunity to become familiar with these topics. Indeed, these are often taken for granted.
Nevertheless, by the end of this chapter, you will have a complete view of the entire process, which will be really useful in structuring and maintaining a functional and efficient software toolchain.
Now, let's start with Source Code Management (SCM).
Technical requirements
You can find the source code used in this chapter here: https://github.com/PacktPublishing/Hands-On-Software-Architecture-with-Java/tree/master/Chapter13.
Source Code Management
SCM is a pretty basic concept and should be considered, of course, mandatory in any software project (including very small ones). Nowadays, SCM is synonymous with Git (more on that soon); however, many alternatives have been used over the years, including Concurrent Versions System (CVS) and Apache Subversion (SVN).
The basic function of SCM is backing up, sharing, and versioning source code. However, there are many nuances to these features. So, let's have a closer look at Git.
Introducing Git
Git was created by Linus Torvalds, the creator of the Linux OS, as a tool for supporting the development of the OS itself.
Apart from the history of the project, Git has many interesting characteristics that make it a de facto standard:
- It is heavily decentralized. With Git, every developer can work with a local repository, benefitting the versioning of files, branching, and more features, even in the absence of a remote server (such as in a disconnected environment). This also makes it really scalable from a performance point of view.
- With Git, every version is associated with a cryptographical hash ID. In this way, the history of files can be easily reconstructed, and it makes it hard to tamper with them.
- Git relies on well-known and frequently used protocols, such as HTTP, SSH, and FTP. This makes it easy to use in existing environments.
Git encompasses a lot of different commands and features; however, the basics for using it are as follows:
- git init [local folder]: This is the command used to initialize a new repository locally.
- git clone [repository]: This creates a local copy of an existing repository. In the case of an authenticated repository, there are many different ways of authenticating, including passing the username and password as part of the URL (using something such as git clone: https://username:password@remote). However, better options (such as using tokens) are advisable.
- git add [files to be added]: This adds a set of files to a staging area (which is basically an intermediate step before committing to a repository).
- git commit -m [commit message]: This commits the files from the staging area to a repository.
- git branch [branch name]: This creates a new branch. A branch (which is a concept common to many SCM systems) is a way of storing a set of implementations that can potentially have an impact on the rest of the system (such as a new major version) in an isolated area. Such developments can then be merged with the main developments.
- git tag [tag name]: This creates a new tag. A tag is similar to a branch, but it's basically immutable. It is commonly used to mark a specified important event in the code (such as a release) to make it easier to identify the situation of the code in that particular moment, and potentially rebuild it.
- git push [remote] [branch]: This pushes the local changes to a remote repository on the specified branch.
These Git commands and, in particular, the concept of branching and tagging are very powerful tools. How they are used has become more and more structured over time, creating some specified workflows. In the next sections, we'll see some ideas on this.
Git Flow
Despite the name, Git Flow (and other similar techniques) is not a prerequisite of Git, and, in theory, could also be implemented with SCM tools, which are different from Git. However, it is common to implement this kind of technique together with Git.
Git Flow is an articulated way of managing and storing developments, creating releases, and, in general, structuring the way the code is handled.
Git Flow is based on a number of branches coexisting constantly and can be implemented manually or by using some tools created to support such a way of working.
The core line where the code is stored is called the Main branch. The developers are not supposed to work directly on this branch. Instead, a develop (Dev) branch is created from it to store the work in progress. In order to work on a feature, each developer copies the Dev branch into a purposely created Feature branch, which is created to contain a specific feature. When a feature is completed, it's merged back into the Dev branch. In theory, since just a few features are developed, the merge operation should not be too difficult (since not much code has changed). The following diagram illustrates this:
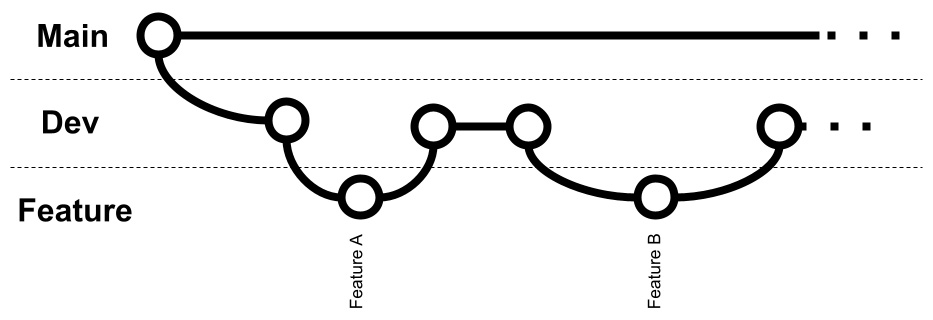
Figure 13.1 – Feature development in Git Flow
As we can see, the simplest situation is when features are developed one after the other, hence the feature we just developed has to be merged back. However, in real situations, it's common to have more than one feature developed in parallel, so the merge back into the Dev branch can be slightly more difficult.
When enough features are developed (and have been merged into the Dev branch), a new branch is created from the Dev branch, called Release. The Release branch should have some kind of a feature freeze, meaning that all the code committed into this branch must only have the goal of releasing and not adding any new features. This means that while tests are going on against the code in the Release branch, developers are supposed to commit bug fixes (if any) in this branch.
Other files needed for the release (such as documentation and scripts) can be added there. When the release is ready, the code in the branch will be tagged (that is, freezed to a specific version). Then, the Release branch is merged back into the Main and Dev branches so that the developments for the upcoming versions can begin, as shown in the following diagram:
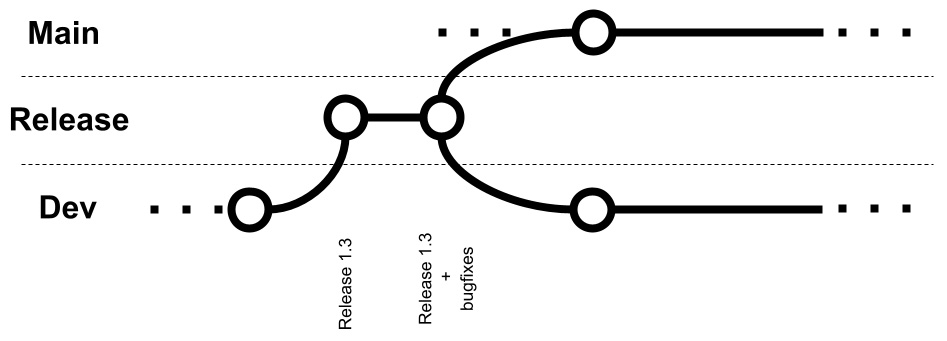
Figure 13.2 – Release management in Git Flow
As we can see, when working on a release, all the code is supposed to be modified in the Release branch itself for fixing the issues that prevent this particular release from going into production. Once everything is ready and the production release is successful, the code in the Release branch (including the freezed code for that release plus the bug fixes, if any) is merged back into the Main and Dev branches.
If an issue happens in production, an ad hoc Hotfix branch is created from the Main branch for the purpose of production fixes and merged back as soon as possible, as shown here:
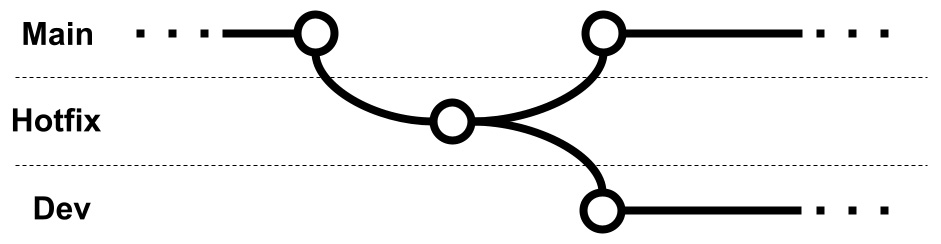
Figure 13.3 – Hotfix development in Git Flow
As seen in the diagram, in the case of a hotfix, the code should come from the Main branch and the fixes must be done in the Hotfix branch. The changes must then be merged back to both the Main and Dev branches.
Git Flow seems a bit difficult, and indeed it requires a lot of different branches and merge operations. But it's also considered not very well suited for modern application development techniques, such as CI/CD and DevOps. For such situations, trunk-based development is considered a better choice.
Trunk-based development
Trunk-based development is much simpler than Git Flow. Basically, every developer works on the same branch (the main branch, usually). They are allowed to create branches for local developments, but it's advised to make them as short-lived as possible, and merge them back to the main branch as soon as possible (at least daily). This needs to be done so that the developments are consistent, the tests should pass, and the changes should not break anything else in the project.
With this in mind, trunk-based development is often seen as a perfect pair with CI/CD (more on this later in the chapter). It is possible (and common) to have automated processes constantly checking for the integrity of the main branch (such as after every merge), and in the case of tests failing, changes could be reverted; or, someone in the team (usually the developer of such changes) should focus on fixing the issues. The main branch can be released in production at any time (carrying all the latest developments). Before each release, the code is tagged for traceability and reproducibility of the release.
Trunk-based development, other than being easier to implement and maintain, requires less effort for change management, as merges are smaller and they happen quite often.
On the other hand, it requires great experience and dedication from every project contributor as it increases the possibility of bugs or other bad code slipping into the main trunk (and, theoretically, into production). A related topic to branching strategies is the versioning standard.
Semantic versioning
As we said, during each release, the source code is frozen (usually with a tag) and uniquely identified for maintenance purposes.
However, there are many different theories on what the best way for versioning releases is, as in choosing a unique identifier.
A method that I find particularly elegant and effective is semantic versioning.
Semantic versioning is commonly used in open source projects and basically associates each release with three numbers, in the form of x.y.z (for example, 1.2.3). Changes to each of these numbers have a precise meaning:
- The first number (represented by x in our example) is called the major version. An increase in the major version implies major updates, including new features, re-architecture, technology changes, and, most importantly, potentially breaking changes (including changes in the APIs exposed).
- The second number (represented by y in our example) is called the minor version. An increase in the minor version implies new functionalities, which can also be non-trivial but are supposed to be backward compatible, so avoid changing the APIs exposed.
- The third number (represented by z in our example) is called the patch version. An increase in this version just implies bug fixes. No new features should be included (unless very trivial) and, of course, no breaking changes in the APIs exposed.
An increase in the major version implies that minor and patch versions are reset to 0. So, if we make big changes for version 1.2.3 (by breaking the APIs), the next release should be 2.0.0.
Similarly, an increase in the minor version resets the patch version to 0, so for version 1.2.3, if there are new features that are backward compatible, we go to version 1.3.0. Needless to say, each version can go to double figures with no impact on the other versions. Hence, an increase in the minor version of the software in version 1.9.3 means going to version 1.10.0.
After the three numbers compose the version, it is possible to add an optional label. Common labels are RELEASE (identifying a version released in production), ALPHA (identifying a preliminary version, not intended for production), and Release Candidate (RC) (this is something almost ready for production, but likely needs some more testing).
It is also a common convention to set the major version to 0 in order to identify the first project draft (such as a prototype not intended to be stable).
In this section, we have learned some interesting concepts. Starting with Git, which is the de facto standard, and SCM, we learned about a couple of different branching strategies, and we had a look at a standard way for versioning releases. Now, our next step is to make some considerations about testing.
Testing
In Chapter 4, Best Practices for Design and Development, we had a look at Test-Driven Development (TDD), quickly touching on the concept of unit testing. Now is the right time to make some deeper considerations around the concept of testing and return to some topics that we have taken for granted so far.
Unit testing
Unit testing is the most basic technique for software quality assurance and, as we have seen, the tool behind TDD.
Unit testing aims to provide testing (usually automated) for the smallest unit of identifiable software. In the Java world, this means testing at a class and method level. The tests involve calling the method with a defined set of inputs and checking (with assertions) that the output complies with the expectation (including expected failures).
The reasoning behind it is that each method is tested individually, so the tests can be simple and pervasive. This also allows bugs to be identified early and in the exact spot where they are introduced (at least in the exact method). The limitation of this approach is that it doesn't easily detect bugs caused by corner cases or interaction between complex systems, or with external systems.
In the Java world, unit testing means JUnit, which is a very famous library widely used for implementing unit tests and more. Let's learn more about it.
JUnit
JUnit is the de facto standard for unit testing in Java. The current version at the time of writing is version 5. JUnit provides some standards and facilities for defining unit tests and integrating them into common toolchains, such as Maven and Gradle. JUnit is also easy to run from a common IDE, such as IntelliJ.
The Maven standard defines that the test classes must be placed in the src/test/java folder, whereas the application code is supposed to stay in the src/main/java folder.
In this way, the test classes can mirror the same package structure as the application files, and in the release phase, the test classes can then be discarded and not be part of the release artifacts.
JUnit automatically considers (and runs) tests contained in classes whose name starts or ends with Test.
Each test method is identified by the @Test annotation. It's possible to annotate some method for setting up resources before tests, with annotations such as @BeforeAll and @BeforeEach. At the same time, it's possible to clean up things after tests, using @AfterAll and @AfterEach. Test execution can be controlled by using @Order.
Moreover, JUnit provides a set of facility methods, such as AssertEquals, AssertTrue, and AssertFalse, which can be used to check for the expected results.
JUnit execution is commonly integrated as a step into a build chain (acting as a part of a Maven build or of a more complex pipeline). You can constantly have a view of what is working and what is failing, often with a visual representation with green and red lights for building reports.
Now, we have a simple class such as the following:
package it.test;
public class HelloWorld {
private String who;
public HelloWorld() {
this.who="default";
}
public String getWho() {
return who;
}
public void setWho(String who) {
this.who = who;
}
public String doIt()
{
return "Hello "+ this.who;
}
}
The preceding class basically has a field with a getter and setter, and a method to do the classic hello world (with a string concatenation). The unit test class associated with the preceding class is as follows:
package it.test;
import org.junit.jupiter.api.Assertions;
import org.junit.jupiter.api.BeforeEach;
import org.junit.jupiter.api.Test;
import io.quarkus.test.junit.QuarkusTest;
public class HelloWorldTest {
HelloWorld hello;
@BeforeEach
public void buildHello()
{
this.hello= new HelloWorld();
}
...
A few considerations about the preceding test are as follows:
- The it.test package, where the test resides, is the same as the package where the implementation is. As said, this is possible because the implementations stay in the src/main/java folder, while the tests stay in the src/test/java folder. During the testing phase, you can consider the preceding two folders as the source folders, while, when building the artifact, you can ditch the test folder. This allows us to access protected fields and methods on the class to be tested.
- The class name ends with Test. This will suggest to the JUnit framework that the class includes some tests.
- The buildHello method is annotated with @BeforeEach, hence it's executed before each test method. In this case, of course, the implementation is straightforward for the example purpose, but in the real world, there are a lot of meaningful things to be done there, such as initializing fake data and connecting to external systems.
You can also use @BeforeAll, which is executed once before all tests. Also, it's worth noticing that @AfterEach and @AfterAll are available for the teardown of resources that need to be safely closed (such as database connections) or for cleaning up the necessary data IDs.
- Each test method is annotated with @Test and does some assertions on expected output by using the Assertions.assertEquals utility method. Other methods, such as assertTrue and assertFalse, are available as well. As it's easy to spot, simple things such as setters are tested here, which are usually probably not so vulnerable to bugs:
...
@Test
public void testConstructor()
{
Assertions.assertEquals(this.hello.getWho(),
"default");
}
@Test
public void testGetterSetter()
{
String name="Giuseppe";
this.hello.setWho(name);
Assertions.assertEquals(this.hello.getWho(),
name);
}
@Test
public void testDoIt()
{
String name="Giuseppe";
String expected="Hello "+name;
this.hello.setWho(name);
Assertions.assertEquals(this.hello.doIt(),
expected);
}
}
The previous code can be made more readable by using a static import on Assertions, and then directly using the methods provided by the class.
When running these tests, you can easily see a recap of test execution. By way of an example, by running the mvn clean test command, you should see something similar to this screenshot:

Figure 13.4 – Test execution in the command line
As you can see, the build succeeds, and there is a recap of the executed tests (that were successful). If a test fails, by default, the build fails. If we know that there is a test intentionally failing (because, as an example, the method is not yet implemented, as it happens in the TDD methodology), we can skip that particular test (by annotating it with @Disable) or skip the testing phase completely (which is usually not advised).
In the case of a big project, usually, the testing results are then saved and archived as part of a build process. This may simply mean saving the console output of the build with the test recap (as seen in the preceding screenshot) or using more sophisticated techniques. By using a widespread Maven plugin (Surefire), it's easy to save test results as .xml or .html files, although more complete commercial test suites are able to do similar things.
But this was just about unit testing. To complete our view, it's useful to understand that more ways of testing are possible (and advised). Let's have a look at them in the following sections.
Beyond unit testing
Unit testing, indeed, can be seen as the (basic and essential) lowest step in the testing world. Indeed, as we have already said, unit testing is unable to catch some bugs that depend on more complex interactions between classes. To do so, more testing techniques are usually implemented, such as integration, end-to-end, performance, and User Acceptance Testing (UAT).
Integration testing
Integration testing is the immediate next step after unit testing. While unit testing tests the most atomic modules of software, such as methods and classes, integration testing focuses on the interaction of such modules with each other (but not on the entire system). So, the classes are put together and call each other to check (and realize) more complex testing scenarios. Each test involves more than one method call, usually from different classes.
There is no fixed rule for defining the granularity of each integration test, even if someone completely ditches this testing technique in favor of end-to-end testing (more on this in the next section). My personal suggestion is to at least add integration testing for the more complex functionalities by trying to involve at least two or three classes simulating the core features or at least the ones most impacted by changes (and by issues).
While there are libraries that can be implemented specifically for integration testing (arquillian comes to mind), JUnit is perfectly usable (and widely used) for integration testing, too, by using the same facility (such as assertion and setup methods) as seen in the previous section. Of course, instead of building tests for testing each method and class, more complex interactions are supposed to be implemented by chaining method calls and plugging different classes together.
End-to-end testing
End-to-end testing, also known as system testing, takes the integration testing ideas a bit further. End-to-end testing involves the testing of each functionality as a whole, including external systems (such as databases), which are commonly dedicated and maintained as part of the testing efforts. The functionality can be defined at many different times, but nowadays usually overlaps with the concept of an API.
End-to-end testing includes calling an API (or triggering a functionality differently) by passing a known set of inputs and then checking the expected outputs. This will include, alongside the API response, also checking the status of external systems that are supposed to be changed (such as things edited in databases or external systems that are supposed to be contacted, such as sending emails).
It is implied that the system is then tested from the outside, as opposed to the other testing techniques seen so far, which are more focused on the source code (and then more looking at the project from the inside).
End-to-end testing provides a good idea of system behavior as a whole, and it's usually less stable than unit and integration testing because a small change in any of the methods can cause failures in many end-to-end tests depending on that specific method (and go undetected or have a smaller impact on unit and integration tests). However, it is also coarser-grained, so it can be a bit more difficult to understand where and why things are breaking.
There are a lot of tools for end-to-end testing, both free and commercial. Such tools are usually more of a kind of standalone platform, as opposed to the tools seen so far (such as JUnit), which are more libraries and frameworks. Moreover, end-to-end testing is basically language-independent, hence, Java projects don't usually need any specific testing tool, as the entry points for testing are APIs or user interfaces. So, any tool capable of interacting at that level can be used.
Commonly used solutions include LoadRunner, a commercial solution originally built by HP and now part of Micro Focus, which is the standard in some projects. Other alternatives are the SmartBear testing suite and other free testing suites, such as JMeter, Cypress, Karate, Gatling, and Selenium. The last two tools are more focused on automating the user interface interactions, which means that there are basic ways to automate the programmatic use of web browsers, simulating a real user accessing a web application, checking all the expected behavior.
Performance testing
Performance testing is a special case of end-to-end testing. Instead of being exclusively focused on the correct implementation of each API (or feature) tested (which is basically taken for granted), performance tests focus on system capacity and the response time under different loads. While the tools can be (and often are) similar to end-to-end testing, the final goal is different. The metrics measured when doing performance testing are the ones described in Chapter 6, Exploring Essential Java Architectural Patterns, in the Designing for large-scale adoption section, and include throughput, response time, and elapsed time.
Performance testing can include the following scenarios:
- Load testing, which is measuring the performance of the system against a defined load, is usually similar to the one expected in production (or an exaggerated case of it, such as doubling the expected number of concurrent users).
- Spike testing, which is similar to the previous one (and indeed they are often run together), basically involves sudden changes in the load of traffic to simulate spikes. This test aims to check the scalability of the system and the time needed for recovery following a sudden traffic increase. In other words, it's often allowed to have a slight slowdown after an unexpected increase in traffic (because the system is expected to adapt to such traffic, such as using an autoscaling technique), but it's worth measuring how long it takes for the system to recover following such a slowdown.
- Stress testing, which takes the previous test types to the extreme, aims to benchmark the system by measuring the maximum traffic that can be correctly handled by the system.
During a performance test, regardless of the tools and objectives, it's strongly advised to observe the system as a whole, including OS parameters (such as memory, CPU, and network) and external systems, such as databases, in order to check for bottlenecks and understand how the system can be fine-tuned to perform better.
User acceptance testing
UAT is a crucial step of the testing process, and I'd say of the whole software development process. Technically speaking, it is quite similar to end-to-end testing, by focusing on testing functionalities as a whole. There are, however, some crucial differences. The first one is that the test is supposed to be governed by a functional analyst, business people, or the project sponsor.
This, of course, doesn't mean that these people should be running the tests themselves, but that the test structure (including the acceptance criteria and the priority of the features tested) should be set by those teams, and this is usually done by focusing on the point of view of the end user (hence the name of this phase).
It's accepted that part of this test is done manually, with users directly navigating the application feature as a final user is supposed to. A more deterministic approach is to also run the UAT using automated tools, similar to the ones used in end-to-end testing. Even in this case, it's common to still perform a small part of this phase manually, by doing what is called a smoke test, which is less structured and aimed at giving a general idea of how the application behaves.
Whether being done manually or automated, there is a core difference between UAT and the other tests seen so far, and this difference is that the tests need to be designed around business capabilities. Indeed, each test case is supposed to be related to a specific requirement in order to prove that this requirement is currently implemented in that particular software release. We already discussed this in Chapter 2, Software Requirements – Collecting, Documenting, Managing, where we saw how each software requirement is supposed to be testable.
This is where that loop closes. The successful execution of UAT is the gateway for the production release (hence the word acceptance); if all the tests succeed, it is, of course, safe and accepted to release in production. In case of any failure, a choice needs to be made (usually discussed with an extended team).
If minor issues occur, this may mean that the release will go into production anyway, with several known issues. Of course, if this is not the case and the issues are too many (or related to critical features), then the issues need to be fixed and the production release may be canceled or delayed. UAT is basically the higher rank of tests, but it's important to understand that it's crucial to have a strategy around every other testing technique seen so far; otherwise, it's likely to have software that is not completely tested and prone to errors. However, some other considerations around testing are worth noticing.
Further testing considerations
In the previous sections, we saw quite a few interesting things on testing, including the different testing phases and techniques. However, there are a number of other considerations that are worth a few words.
Interacting with external systems
As we have seen, in most of the phases of testing (sometimes even in unit testing), external systems may be involved. Databases, mail servers, and web services are common examples.
There are a number of different techniques for dealing with such external systems in a testing phase. The easiest one, better suited for some specific testing phases, such as unit tests, is to simply mock such systems. This means implementing special custom classes that simply simulate the interaction with such systems, instead of just providing fake values.
A very widespread library for mocking in Java is Mockito, which offers a simple but very complete setup to implement methods that react to the requests in a programmable way, simulating the behavior of external systems.
Mocking is handy to use because it's mostly driven by code and requires minimal maintenance. However, as it's easy to understand, it provides limited effectiveness in tests because it tests just a small part of the interaction, often neglecting some aspects such as the connection to the external system (and things that may go bad there), and in general, doesn't test against real (or close to real) systems.
A step further is to effectively use an external system in tests, but a simplified one. The most common example is using H2 (the embeddable database we saw in Chapter 7, Exploring Middleware and Frameworks) in place of a full-fledged database system. The reason behind it is that it may be harder (and more expensive) to use compared to the real system, while such simplified tools are usually easier to automate and use in a testing environment.
However, as we discussed in Chapter 9, Designing Cloud-Native Architectures, when talking about 12-factor applications, using external services (backing services, as defined in that context) different from the production ones should be considered a source of potential instability as, of course, the behavior may be different from real systems. So, especially in phases such as end-to-end testing and UAT, it's strongly advised to use external systems that are as close as possible to the production ones. This leads us to the next consideration on ephemeral testing.
Ephemeral testing
Ephemeral testing is a technique for creating complete test environments when needed. This basically means that the set of components needed for testing, including the application and the external systems, is created on-demand before each test runs, populated with the data and the configuration needed for the test execution.
Such environments can then be disposed of after each test runs, avoiding wasting computational resources when not needed. This paradigm is particularly suited for IaaS and PaaS environments (as seen in Chapter 9, Designing Cloud-Native Architectures) because such infrastructures will facilitate the scripting and automation around environment creation and disposal. IaaS and PaaS are also suited to recreating not only the application components themselves but also the external services (such as databases), and so are a good way to overcome the limitations that we have described in the previous section, and in particular with mocks.
Testcontainers (www.testcontainers.org) is an open source framework very well suited for this kind of scenario. It supports JUnit (as well as other testing frameworks) and provides throwaway containerized instances of testing utilities (such as common databases, Selenium browsers, and more).
But having all the right components is not the only consideration to be made in order to have a meaningful and complete testing strategy.
Code coverage, test coverage, and maintenance
A crucial topic of testing is coverage. Code coverage basically implies that every line of code, including the ones reached after if conditions, loops, and so on, is hit by at least a test case.
These kinds of metrics are not easy to measure manually and indeed are commonly calculated by relying on external tools. The most commonly used technique by such tools is bytecode instrumentation, which uses special features of the JVM to check code execution per line, as a result of tests running. Common libraries used for calculating code coverage, such as Cobertura and JaCoCo, use a similar approach.
Code coverage is the baseline of test completeness: a certain threshold must be defined, and a lower coverage should be considered as incomplete testing, especially when creating new functions and modules. But code coverage doesn't ensure that all the features are tested, nor that the data used for tests is complete and variable enough. Hence, a further concept—test coverage—must be introduced.
Test coverage is, in my opinion, a bit less scientific to calculate. Whether code coverage is exactly measurable (even if it requires tools) as the percentage of lines of code executed during tests versus the total lines of code, test coverage revolves around many different points of view. Some common ones are as follows:
- Features coverage, as in the number of features tested versus the total features of the application.
- Requirements coverage, as in the number of requirements effectively tested versus the total requirements that the software implements.
- Device coverage, particularly meaningful in web and mobile applications, is related to the number of different configurations (different mobile devices, multiple OS versions, multiple browsers versions, and so on) that our application is tested against.
- Data coverage, related to the different inputs and configuration that our application is tested against. This is, of course, very difficult to test against, as the combination can really be limitless. On the other hand, having a good variety of inputs to test ensures better protection against unexpected behaviors.
Both code coverage and test coverage should be constantly measured and possibly improved. That implies covering the code added with new features (if any), and checking against the bugs found in the current software releases in order to understand whether there is a way to improve test coverage to check for such bugs in the future. Customer reports are particularly useful in this sense.
Most of us are familiar with issues in the applications we use (especially in mobile applications) when, following an error message, there is the opportunity to send details of the error to the application team. By doing so, the application team has the opportunity to check for the particular conditions (inputs used, device used, and software version) at the time of that particular error, and can potentially extend the test suite (and, hence, the test coverage) to check for similar situations and avoid this family of errors in the future.
Last but not least, it's important to understand when to run what kind of tests.
Since running a whole test suite (including acceptance tests run by human operators) could be expensive and time-intensive, it's a common choice to have different test suites run in different situations. If we are fixing a minor bug or adding a small functionality, then we can probably take the risk of not testing the whole application, but just a subset.
However, with test automation becoming more and more pervasive and disposable test environments made possible by the cloud, the advice is to test as much as possible, especially for performance. In this way, it will become easier to understand whether the release we are testing introduces any performance issues. This concept, taken to the extreme, is called continuous testing, and basically implies running the complete suite of tests, in an automated way, after every code or configuration change (even the smallest one).
In this section, we have seen a complete overview of the different testing techniques and phases. Starting with unit testing, we also explored integration, end-to-end, and performance tests.
In the next section, we are going to talk about a step that is contiguous to (and mutually dependent on) testing: deployment.
Deploying
Software deployment is a very broad term, and can extensively be used to refer to the whole software life cycle, from development to release into production. However, in this particular context, I am referring to the deployment phase as the one in which the software is compiled and opportunely packaged, and the right configurations are applied. The software is then supposedly run and made ready for users to access (which is part of the process of releasing; more on this in a couple of sections). While we already mentioned some of these topics in this book, I would like to highlight a couple of them, useful for the purpose of this chapter.
Building the code
The phase of building the code, intended as compilation and packaging into a deployable artifact (.jar, .war, and .ear in the case of Java), is done by utilities shipped with the JDK (in particular, the javac tool).
However, this process often includes at the very least the management of dependencies, but in the real world, many other steps can be involved, such as code formatting, the parsing of resources or configuration files, and the execution of unit tests (as seen before).
A widely used technology to perform all of those steps, mentioned and used many times in this book, is Apache Maven.
While I assume that most of you already know and have used Maven, I think it is relevant to highlight some features that are useful to consider from an architect's perspective:
- Maven uses a standard way (the pom.xml file) to define instructions about building the software. Indeed, the pom file collects the list of dependencies (including the one needed just for testing purposes and the one needed just at development time). It can also specify the steps needed for the compilation and packaging of the software and provide some configurations for each step.
- It provides an extensible system, based on plugins. Hence, you can find (or implement) different plugins, to run tests, create documentation, generate code, and other steps that could be useful at deployment time.
- It can define a hierarchy between different projects and provide a unique way to identify each software artifact (also called a Maven artifact) by setting what is called the Group, Artifact, Version (GAV) coordinate standard, a triplet made by GroupId (basically a namespace or package for the project), ArtifactId (the identifying name of the project), and the version.
As said, Maven is basically a standard technology for building in the Java world, though it's not the only one. Ant is another option that used to be widely used some years ago and is more similar to scripting and less flexible. It has been progressively abandoned for its verbosity and a number of shortcomings in dependency management.
Gradle is a modern alternative to Maven, mostly widespread in the context of Android application development. However, the concept of code building raises the need of archiving and managing the dependencies, in the form of built artifacts (which, as we have seen, are referenced uniquely into the pom.xml configuration files). Let's have a quick overview of this concept.
Managing artifacts
Software artifacts are essential, both as part of the building process of bigger components (as dependencies) and to be directly deployed (as an example, to production environments). While it's possible to directly manage such contents (which, in the Java world, are basically .jar, .ear, and .war files) in filesystem folders, it's way better to do so in optimized systems. Such systems are called artifact repositories.
An artifact repository often provides many advanced features, including the following:
- Web interfaces, to simplify the search of the artifacts and the management of them.
- Role-based access control and authenticated access, providing differentiated access to different artifacts. A common example is that some artifacts can be changed only by certain groups, while others can be accessed in read-only mode, and maybe others have no access at all.
- Other security features, such as inspecting the code for known vulnerabilities (as we have seen in Chapter 12, Cross-Cutting Concerns, when talking about security).
- Versioning of the dependencies, including the cleanup of older versions under configurable policies.
- Mirroring and hierarchy, by providing the possibility of querying other artifact repositories over the internet to look up dependencies not available locally, and then mirroring it in order to avoid downloads when not necessary. A very famous repository available over the internet is Maven Central.
Two very famous implementations of Maven artifact repositories are JFrog Artifactory and Sonatype Nexus.
It's worth noting that the container technology (as discussed in Chapter 9, Designing Cloud-Native Architectures) is often seen as an extension (but not a replacement) of Java artifacts. Indeed, a container image contains a complete application component, including dependencies at an OS level, where JVM and other middleware are needed. Moreover, a container image is immutable and can be uniquely identified (by using a version and a signature), so it is really similar to a Java artifact and raises similar needs in terms of management.
For this reason, the ideas exposed about Java artifact repositories can be extended to container repositories. It's not incidental that both the mentioned technologies (Artifactory and Nexus) have extensions used for handling containers.
Popular container repositories available online include Docker Hub and Quay.io.
Completing the deployment
As we have looked at code compiling and the management of artifacts, it is now time to complete the deployment. This may include different steps, which ultimately aim to install the artifacts in the right places, perform some configurations, and execute the software. The details of these steps may vary heavily depending on the technology used:
- In the traditional Java world, there are custom ways to use Java application servers (such as WildFly, as seen in Chapter 7, Exploring Middleware and Frameworks) depending on the application server used. Common ones are copying the application artifact in a specific folder or invoking a command-line utility that triggers the deployment process. More steps for configuring things (such as a connection to databases) may be needed and usually involve changes in configuration files or commands issued.
- When using fat .jar applications (such as Spring Boot or Quarkus) in a non-containerized environment, the deployment process usually involves just copying the fat .jar in a specified location and running it using a command. This may be done with shell scripts, which can then address other steps (where relevant), such as the cleanup of the previous versions and the changes in configuration files.
- In containerized environments, deployment basically involves copying the container (Kubernetes and Docker are usually configured to access remote container repositories) and executing a number of commands to make it run. In Kubernetes, this is almost entirely done by using kubectl.
As we have seen, different technologies require slightly different ways to complete deployment and effectively distribute and run the software packages. If you consider that more steps can be required, including the configuration of external systems such as databases and IaaS or PaaS systems, it's often a good idea to orchestrate those steps in a unified way. This is one of the characteristics of CI/CD.
Continuous integration/continuous delivery (and deployment)
CI/CD is the process of automating most of the steps seen so far (and sometimes some more) in order to straighten the process and have a complete overview of it. Since the process includes many steps executed in a mostly sequential way, the tool providing it is commonly called a pipeline.
A typical CI pipeline includes these steps, usually executed sequentially:
- Building the code (as seen in previous sections).
- Testing, usually limited to static code testing, unit testing, and some limited integration testing. Since deployment has not occurred yet, end-to-end testing is not possible in this phase.
CD includes a few further steps, focused on deployment (also, in this case, usually executed in a sequence):
- Versioning of software artifacts in repositories.
- Deployment of artifacts from repositories to testing environments, including all the configuration needed. This may be done in ephemeral environments (as seen in previous sections).
- End-to-end testing in such environments.
- Deployment in other non-production environments, with the goal of user acceptance and/or performance testing.
Here is a simplified sample pipeline:

Figure 13.5 – A sample pipeline
In the preceding diagram, you can see a simplified pipeline example. There are a few steps (Automated tests and Artifact archiving) that are performed in parallel. Moreover, between Staging Deployment and Prod Deployment, some actions may happen, such as UAT and manual approval.
CD is considered a further extension of the pipeline, and basically includes the deployment of the environments in production environments. This may happen in a completely automated way (with no manual intervention), or it may require manual approval by a release manager (in more traditional environments).
It's of course intended that a failure in any step usually means that the pipeline stops and the release fails. It's also worth noticing that deployment in production does not necessarily mean that the software is released and available to users, as we will see soon. But first, it is worth having a look at widespread pipeline implementations.
Common CI/CD software implementations
It's almost impossible to talk about CI/CD without mentioning Jenkins.
Jenkins is a complete automation server, which is basically a synonym of CI/CD pipelines.
It's written in Java and deployed in a servlet container (usually Tomcat). It's possible to define pipelines in Jenkins, using a domain-specific language, which describes each step with the required parameters. Through a system of plugins, steps in Jenkins can do many different things, including compilation using Maven, performing SSH commands, and executing test suites.
Jenkins can then display the pipeline execution results, archive them, and optionally send notifications (as an example, in case of a build failure).
While still being widely used, Jenkins is nowadays famous for having a monolithic architecture (although some steps can be delegated to agents) and for being resource-intensive.
Attempts to create alternative pipeline software, with a more modern design and better performances in a cloud environment, are currently underway. The most famous ones are Jenkins X and Tekton.
Both of these software types, while created using different languages and frameworks, share the concept of implementing each step in a container, thereby improving horizontal scaling and reusability.
Other famous implementations of CI/CD capabilities include Travis, GitLab, and, more recently, some cloud alternatives such as GitHub Actions.
As we have said, regardless of the implementation, the CI/CD process can automate steps up to the production deployment. However, in order to make the software available to final users, the process requires some final steps.
Releasing
Releasing is usually the final step of a complete CI/CD pipeline. The process can be performed, in simple environments, together with deployment in production.
However, nowadays, it's common to split deployment and releasing into two different steps, and this allows more sophisticated (and often safer) ways of releasing software versions to end users. To do so, the most basic ingredient is to have different versions of the software available in production at the same time and to route users to each version by following different criteria (which is done by operating at a network level, routing each request to the desired target version). Let's look at some scenarios opened by this kind of technique:
- Blue-green deployment: Two versions of production environments (including database and other external systems) are released in production. This includes the version we want to release (identified as blue or green) and the previous version (identified by the color left, so either green or blue). The candidate release can then be tested in a real environment. If everything works as expected, the network traffic is then routed to the new version. A rollback can be easily performed at any time. In the next release, the same is done, replacing the previous version with the next one and changing the color-coding. The following diagram illustrates this:

Figure 13.6 – Blue-green deployment
- Rolling releases: This implies that our application components are provided on a set of identical instances (hosted on VMs or containers). When a release occurs, the New version is installed on a new instance and traffic starts to be sent to such new instances, too. Then, an Old instance is shut down (optionally draining all the pending connections). This process keeps going until all the instances are running on the new version, as shown here:

Figure 13.7 – Rolling releases
In the preceding diagram, each circle represents an instance (such as a VM or an application instance). The two steps are represented as a sample, but you can imagine that the New version starts from an instance, goes to two, and so on, and the Old version is progressively shut down, one instance at a time.
While this can be a subtle difference, compared to the blue-green deployment, a rolling release can be seen as a kind of technical trick aiming to reduce downtime in releases, but it provides fewer guarantees if a rollback is needed. Moreover, since old and new instances coexist for a certain amount of time, issues may occur, both on the application and on the external systems (such as databases).
- Canary releases: Basically, this is a variant of blue-green deployment. The new release is still provided alongside the previous version, but instead of switching traffic as a whole, this is done progressively, such as routing 1% of the users, then 2%, and so on, until all the users are running on the new release. This technique allows smoother releases and makes it easier to identify issues, if present (and optionally roll back), without impacting the whole customer base, as illustrated here:

Figure 13.8 – Canary releases
In the preceding diagram, we can see just two sample phases, where we start routing 90% of the traffic toward the Old version, and 10% to the New version, and another one representing 1% toward the Old version and 99% toward the New version. Of course, in a real situation, you can imagine a constant flow going from 1% to 100% and vice versa. The name canary refers to the canary used by miners to identify gas leakages. In a similar way, bugs are identified sooner, by a small percentage of users, and it's possible to stop the release before impacting more users.
- A/B testing: Technically, this is identical to the blue-green deployment. The most important difference is that, in this case, we are evaluating two alternative versions. The two versions should not be considered as a previous one and a next one, but instead two slightly different variants of the same software that the business wants to test against real users. The following diagram shows this:
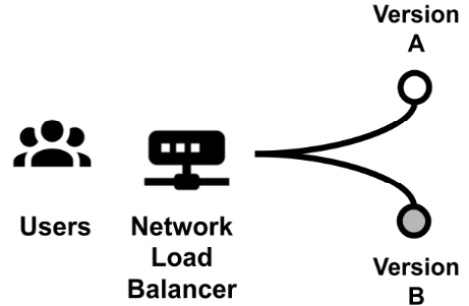
Figure 13.9 – A/B testing
Such variants are usually small changes in the user interface or other features, and the business aims to measure how those changes perform in the real world. The most common example is with online shops, where the business is willing to check whether changes in the purchase process (colors, position of the buttons, and the number of steps) enhance commercial performance.
In A/B testing, the less performant version is usually discarded. It's also worth noticing that the users routed to each version can be chosen randomly, split by percentage (such as 50% for each version), or even selected by specific criteria (where available), such as the geographical location or the age of the user.
- Traffic shadowing: This is a bit less common than the other alternatives. It implies that a new release of the software is released in production, where users keep using the older version while the new version gets a copy of all the production traffic:

Figure 13.10 – Traffic shadowing
It can be really useful for load testing in the case of major releases, but it may not work in some specific scenarios, and it's necessary to understand the impacts in any specific use case. As an example, if notifications (such as via email) are sent, we should ensure that they are not sent by both the old and the new systems, to minimize the impact on users.
It's worth noticing that these kinds of release techniques (especially the simpler ones) are nothing new, and were also possible before modern cloud and microservice architectures. However, to use them in traditional environments, you may need to coordinate with external teams (such as the ones administering the network), while modern architectures (such as the ones based on public clouds, IaaS or PaaS) provide way more flexibility, allowing the creation of new instances on the fly, and changing network configurations favored by software-defined networking. In the next section, we are going to complete our view of the software life cycle by looking at some considerations regarding software maintenance.
Maintenance
Software maintenance is usually a great part of software life. In my professional experience, it's not uncommon for a project to be fully active (with a lot of new features and developments happening) for a couple of years, followed by many years of maintenance, which is focused on fixing bugs and keeping the product alive (without releasing any new features).
It goes without saying that the maintenance period can become more expensive than the building of the project. Moreover, but this is a consideration purely from an economic perspective, enterprises often find it easier to access the budget for building new applications (which is seen as money generating, or at least associated with business initiatives) than for maintaining and modernizing older ones (which is seen as IT for IT, which means that this is a project with no business impact, hence, purely a cost).
With that said, maintenance activities on existing applications can be roughly categorized into one of the following buckets:
- Bug fixes address defects in the software, which may be an existing issue in code or code behaving badly due to an external unforeseeable situation.
- Requests For Enhancement (RFEs), which are targeted around covering new use cases that were not originally planned.
Of course, both of these types of activities can then have an impact and an effort associated, which may help prioritize the implementation.
The software maintenance process is then further categorized into four types, independent of the previous two categories:
- Corrective maintenance, which must be done as a reaction to issues occurring and problems being reported. Think about a classic bug fixing activity as a consequence of the application behaving incorrectly.
- Adapting maintenance, which aims at keeping the software correctly working in changing environments. Think about the application needing to be adapted to a newer version of the JVM, or to the release of a new browser.
- Perfecting maintenance, which aims at making our application just better, in terms of performance, resource usage, maintainability, or other enhancements (such as a better user experience). This is often neglected, as it's a proactive activity and nothing in the short term usually happens if it's not done. However, it may have a big positive impact (also in terms of savings) because it can, of course, prevent issues in the future. Moreover, avoiding perfecting maintenance may mean growing the so-called technical debt, which means that more and more tasks (such as fine-tuning, refactoring, and enhancing test coverage) will pile up, becoming less and less manageable (and more expensive to tackle).
- Preventive maintenance, which is really similar to the previous one, but revolves around fixing issues that have been identified (such as known bugs) before they become actual problems. As per the previous point, it risks being neglected and can cause technical debt if not handled properly.
Other than having a direct cost (because somebody needs to do it), all the maintenance categories may have several impacts. Indeed, such activities often involve software releases or configuration changes, and this may impact the application availability (and have a negative influence on the Service Level Agreement (SLA) established). There may even be legal agreements relegating maintenance activities to well-defined timeframes or allowing it only to solve high-severity issues.
Moreover, software maintenance can have an indirect impact because the activities (both enhancements and bug fixing) can change the application behavior and, in some cases, even leave the API exposed, hence, forcing the users to adapt to such changes or the developers to plan for implementing the retro compatibility.
With that said, application maintenance should never be neglected. Instead, it should be planned (and financed) from the very beginning of the project and be constantly adjusted over time. Indeed, a project that is not correctly maintained can incur security issues or customer dissatisfaction, or also simply lose attractivity on the market. This will risk nullifying all the efforts made to design and implement the project.
This was the last topic of this chapter. Let's now have a look at a summary of what we have learned.
Summary
In this chapter, we have had an overview of many crucial phases of the software life cycle.
Starting with SCM, we had a quick discussion of Git, which is the de facto standard over SCM. This allowed us to understand development models, with a focus on trunk-based development, which is common in CI/CD and DevOps-based projects.
We also briefly discussed semantic versioning, which is a way to identify what changes to expect based on the release version numbering.
We then entered the testing phase, starting with unit testing (and the inevitable description of JUnit, a standard for testing in Java). From unit testing, we moved on to other testing techniques, including integration, end-to-end, and UAT.
Deploying was the next step. We discussed the steps needed to compile software and run it, including an overview of Apache Maven and artifact management. The next topic was CI/CD and pipelines with some consideration around automating most of the steps seen in this chapter.
Then, we focused on releasing, which is the process of making the deployed software available to final users, and we saw many different options to do so, including blue-green and canary releases. Last but not least, we had an overview of maintenance activities (both bug fixes and enhancements) and why they are crucial for the overall success of our project.
In the next chapter, we are going to discuss monitoring and tracing, which are some core concepts for ensuring that our software is performing well in production, and for constantly understanding and governing what's happening.
Further reading
- Richard E. Silverman: Git Pocket Guide
- Konrad Gadzinowski: Trunk-based Development vs. Git Flow (https://www.toptal.com/software/trunk-based-development-git-flow)
- Hardik Shah: Why Test Coverage is an Important Part of Software Testing? (https://www.simform.com/blog/test-coverage/)
- Himanshu Sheth: Code Coverage vs Test Coverage – Which Is Better? (https://dzone.com/articles/code-coverage-vs-test-coverage-which-is-better)
- Sten Pittet: Continuous integration vs. continuous delivery vs. continuous deployment (https://www.atlassian.com/continuous-delivery/principles/continuous-integration-vs-delivery-vs-deployment)
- Michael T. Nygard: Release It!: Design and Deploy Production-Ready Software
- Martin Fowler: BlueGreenDeployment (https://martinfowler.com/bliki/BlueGreenDeployment.html)