Chapter 4. Norwegian Blue parrot game: adding logic to programs
In this chapter, you’ll learn how to create Python programs that
- Display an introduction
- Collect input from the user
- Use if statements to respond to users in different ways
- Use while loops to repeat things over and over
- Use Python code libraries to generate random numbers
Open a popular game, such as Minecraft, or think about a robot, like the Mars rover. Both are computer programs. What do they have in common? They both have the ability to take input and do something with it. What they do depends on the input they’re given. In a game, if you press Forward and fall off a ledge, your character falls and dies. If it’s your only life, then you’re taken to the Game Over screen. Similarly, the Mars rover might be instructed to go to a certain location, but if it detects a large rock in its way, it will stop or attempt to drive around the obstacle.
The logic of how games work or how the rover moves is programmed into them. But how do you create that logic in your programs? You’ll learn how by making a simple guessing game about a special parrot, the Norwegian Blue.
Displaying the game introduction
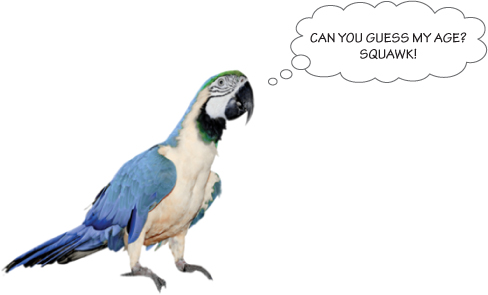
The Norwegian Blue parrot is a fictitious parrot that is the subject of one of the most famous comedy sketches from Monty Python.[1] Your game is about pretending you’re visiting a pet shop that has a Norwegian Blue parrot for sale. The shop owner challenges you to guess the age of the parrot (see figure 4.1). If you guess correctly, then you get to take home the parrot for free.
If you haven’t seen it, check out this Wikipedia page, which has an audio recording of the comedy sketch: http://en.wikipedia.org/wiki/Dead_Parrot_sketch.
Figure 4.1. The Norwegian Blue parrot has beautiful plumage and makes a great subject for a guessing game.
Each time the game is played, the program selects a different random number between 1 and 20 as the age of the parrot. The game player gets five chances to guess the parrot’s age. If the player guesses correctly, the game displays a funny message congratulating them on winning their new parrot. If the player makes a wrong guess, then the program displays a good-hearted insult, as if it were offended by the player’s guess. If the player doesn’t guess within five tries, they lose, and the pet shop owner lets them know the parrot’s true age (see figure 4.2).
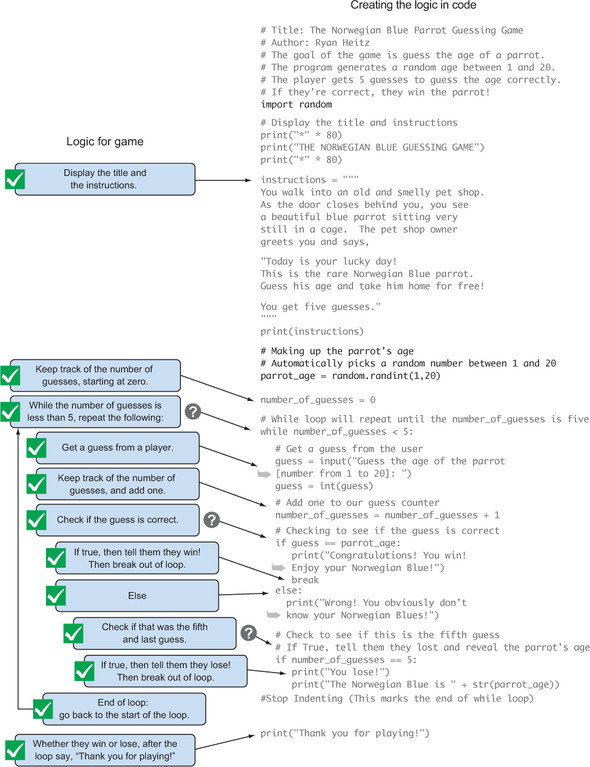
Figure 4.2. The game logic can be expressed in words. The question marks symbolize when the game needs logic to make a decision. This diagram also shows what code needs to be repeated because the player gets five guesses. Each decision has a simple True/False or Yes/No answer.

When this game is completed, you’ll be able to play it. The output will look like figure 4.3. In the example, the player guessed four times incorrectly; but on their fifth try, they guessed correctly. They won, and the shop owner gave them the parrot.
Figure 4.3. The Norwegian Blue Guessing Game is about trying to guess the age of a bird in a pet shop.

Creating the game welcome message and instructions
Let’s start by opening IDLE for Python 3 and creating a new program. Open IDLE by clicking the Python 3 icon under Menu > Programming on your Raspberry Pi desktop (see figure 4.4).
Figure 4.4. Click the Python 3 icon to open IDLE’s Python 3 Shell on your Raspberry Pi.

Give your Raspberry Pi a few seconds to open IDLE. You’ll see the Python Shell. Press Ctrl-N or File > New Window to open the IDLE text editor. You’ll see a blank window, ready for you to start typing in the program.
Let’s type in a few comments at the top of the program in the text editor. Start each line with a hash tag (#) and a space.
Listing 4.1. Creating comments at the top of your new program
# Title: The Norwegian Blue Parrot Guessing Game
# Author: Ryan Heitz
# The goal of the game is guess the age of a parrot.
# The program generates a random age between 1 and 20.
# The player gets 5 guesses to guess the age correctly.
# If they're correct, they win the parrot!
Change the words to whatever you’d like. Comments are notes for you and whoever you might share your program with, so make them read the way you want. Remember to avoid going off the screen with your comments—keep each line pretty short. No more than 79 characters per line is good style; this ensures that your beautiful Python programs fit in the window and don’t require the user to scroll or resize the window.
Tip
You can keep track of which line and column your cursor is on by using the cursor-location information (see figure 4.5). It’s displayed in the bottom-right corner of the text editor. The letters Col stand for column: this shows the number of characters your cursor is from the left side of the screen. The left side is 0, the middle is 40, the right side is 80, and so forth.
Figure 4.5. Once you’ve saved the file, the top of the window displays the filename and the location where the file is stored on your Raspberry Pi (/home/pi/NorwegianBlue.py). The cursor location is always shown at the bottom right of the window.

The program in the IDLE text editor now contains several lines of comments. Before you go further, save your work: press Ctrl-S to save the program. A window will pop up in which you can name and choose a location in which to save the file. In the File Name text box, type in the name of the file: name it NorwegianBlue. When you click the Save button, the file will be saved as NorwegianBlue.py (the .py extension is automatically added by IDLE), and it will be stored on your Pi’s SD memory card in the /home/pi folder.[2] Once the program is saved, the text editor displays the location of the file and the filename along the top of the window (see figure 4.5).
You can create a new folder in which to store your Python program. You create a folder by opening the Raspbian File Manager application and selecting File > Create New > Folder. Like your shoes, you’ll want to remember where you stored your programs so you don’t have to spend a lot of time looking for them.
Next you need to let the user know the name of your game and the instructions for playing it. Use Python’s built-in print function to write a few lines of code that display a title on the screen.
Listing 4.2. Making the title display on the screen

After they see the title, your game players need to know what to do. You should set the scene for the game and give them instructions. Let’s create a variable called instructions and store in it the sentences describing how to play the game. As in Silly Sentence Generator 3000 from chapter 3, this variable will contain a string of characters a few sentences long.
Rather than enter a super-long string all on one line, you want to use a neater way to keep the string on the screen and limit it to not more than 79 characters across (remember, good Python style is to keep text on the screen). In Python, you can use string literals to do this.
Definition
String literals are strings that can hold multiple lines of text and that appear exactly as you typed them in the text editor when they’re displayed on the screen. String literals keep the spaces between lines and characters. To make one, start and end a string with triple double quotes (""") or triple single quotes (''').
Let’s add instructions to your program after the program’s comments. You’ll use a string literal for the instructions and then print it to the display.
Listing 4.3. String literals that hold multiple lines of text
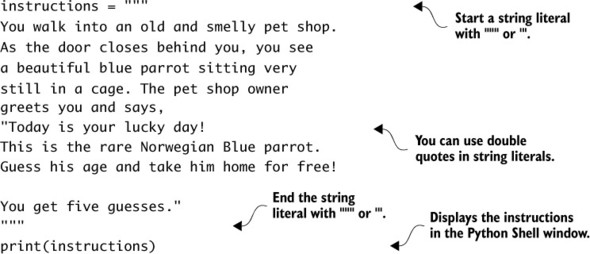
String literals give you the ability to display a string exactly as you type it in the text editor. Think of it as a “what you see is what you get” way of creating strings.
Before desktop operating systems (OSs) and games had high-end graphics, computers had limited display capabilities. Computer users and programmers invented a new type of art called ASCII art that uses text characters to make images.
ASCII is a way of storing characters as binary numbers. For example, the letter A is represented as 1000001. Later encodings had many more characters to support more languages, but the name ASCII art stuck. ASCII art uses the set of 95 ASCII characters (letters, numbers, and symbols) in cleverly designed patterns to represent images.
Here is an example of ASCII art for your game title that is made by creating a string literal and printing it to the screen. Craft your own ASCII art using a bit of imagination and trial and error:
bird_art = """

#########################################################################
                        ____
                       /  0          NORWEGIAN
                      |      >
                      |UUU) |         BLUE
                      |UUU) |
                     //UUU) |         GUESSING
                    //UUU)  /
                   //UU)   /          GAME
                  //U)    /
                 // -|--|/
              ==// ==W==W====
               //
              /
#########################################################################
"""
print(bird_art)
Sometimes it helps to blur your eyes a bit to see if the image looks like what you want. Get creative, and think how you can use uppercase and lowercase letters to create effects, like using a U to represent feathers on the parrot’s wing or W for the parrot’s claws.
Try these ASCII art sites for fun:
- www.chris.com/ascii —A huge collection of ASCII art, sorted by topics
- http://patorjk.com/software/taag —A text-to-ASCII art generator (TAAG). You type in words, and it automatically creates ASCII art for you.
- http://picascii.com —A tool that converts pictures to ASCII art
See if you can make some ASCII art for the title screen of your game that’s even better than this. Have fun with it!
It’s always a good idea to test your programs often to catch any mistakes. Test your program now, and see what you get. The title and instructions should display nicely on the screen.
A common mistake you might make when typing in this code would be to forget some of the quotation marks at the beginning or end of the strings. If you do, figure 4.6 shows an example of the error you’ll receive in Python.
Figure 4.6. Python will display an error if you forget starting or ending quotation marks. The line with the error will be highlighted in your program. Fix the program by adding the missing quotation marks, and then save and run the program.

A similar mistake you might make is forgetting to start your string literals with a triple quotation mark. In this case, Python will give you a syntax error message (see figure 4.7).
Figure 4.7. A string literal must start and end with a set of triple quotation marks. If you forget, Python will tell you that you have a syntax error. Add the missing triple quotes to fix the error.

It’s easy to fix this error by making sure there are triple quotation marks at the beginning and end of the string literal. Use the highlighting shown in the IDLE text editor to figure out which line is causing the problem.
Collecting input from the player
Your game has a proper introduction; now let’s start interacting with the player. Games, websites, and apps are all about causing interactions, whether it’s to create some fun or help you buy something online. Contrast that with the last movie you watched. Movies don’t have any interaction—they’re always the same.
A computer program’s ability to accept input and respond to that input is special. In text-based games like the one you’re creating, this interaction occurs through the keyboard. Players type in answers or make choices, and the game responds.
For this game, you want to ask the game player to guess the age of the parrot. The program knows the parrot’s age and checks whether each of the player’s guesses matches it. To make this work, you have to give the program the age of the parrot (it’s stored in a variable). This gives you something akin to god-like powers as the programmer—as the game’s maker, you can decide what the value is. Let’s create a variable and set it to a value that you pick. One great thing about being a computer programmer is that only you know the parrot’s true age.[3]
And anyone else who is reading this book! Later you’ll make the game use a random number so even you don’t know the parrot’s age.
Let’s make the parrot old. Create a variable named parrot_age, and assign it a value of 19.
Listing 4.4. Creating an age for the parrot

Notice that in the comments you include a TODO note: this tells you that you have an item to do later.
Tip
Use TODOs in your comments as reminders of areas of your program that are left unfinished or need further improvement. Comments are your friend, and they’re there to help you. Use them however you need them!
Next let’s get the user’s first guess. Use Python’s input function (like you did in chapter 2) to collect input from the user and store it in a variable named guess. Give the input function a message that clearly prompts the game player to enter an appropriate value. You don’t want them typing in 50 when you’re expecting a number between 1 and 20. In this case, you want them to guess a number from 1 to 20.
Listing 4.5. Getting a guess and storing it in a variable

After gathering input from the user, you need to convert the value from a string (for example, “5”) into an integer (simply the integer 5). By default, anything input by the game player is stored as a string (even if what they type in is a number). Figure 4.8 shows this graphically: you’re gathering input from the user and then converting it to an integer. The int function takes the value in the guess variable, converts it to an integer, and then stores it back in the guess variable.
Figure 4.8. The input function gathers text typed in by the user; then the text is stored in a variable as a string data type. You take the value of the variable (“5”), convert it to an integer (5), and store it as the variable.

One of the perils of working with people is they can type in whatever they want. If someone typed in “one” instead of “1”, you’d see an error like this:
Traceback (most recent call last):
  File "<pyshell#C>", line 1, in <module>
    int(guess)
ValueError: invalid literal for int() with base 10: 'one'
This error is saying you haven’t given the int function a valid string that is a number it can convert to an integer.
If you compare the logic you want to create in your code with the program so far, you can see that you’ve checked off a couple of parts (see figure 4.9).
Figure 4.9. On the left is the logic you want to create. On the right is your code. So far, you’ve welcomed the user and given them the game instructions. You’ve also added code to collect their guess.

Fabulous! Test the program again to make sure it’s working. It’ll now ask you to enter a guess. In the next section, you’ll see how to test whether the guess is correct.
Using if statements to respond to users in different ways
When you wake up for breakfast, you might walk into the kitchen and look around to see what there is to eat. You use logic to pick your breakfast. If your favorite food is in the kitchen, you’ll eat it. For example, if your favorite food is chocolate chip muffins, and there are some in the kitchen, then you’ll eat them. If there aren’t, you might have a bowl of cereal. In this example, you apply simple logic—you use reasoning to make a decision.
Computer programs use similar logic to interact with users and the world around them. The interactions are based on a set of rules that you (the programmer) write. One of the ways we as programmers can create this logic is with something called the if statement.
In your game, you want to test whether the player’s guess matches (is equal to) the parrot’s age. The logic you want to create in your code is as follows:
- If the player’s guess is equal to the parrot’s age, congratulate them and give them the Norwegian Blue to take home. End the game.
- Else (if the player’s guess isn’t equal to the parrot’s age) display a mildly insulting message that they’re wrong. If it’s not their last guess, let them guess again. If it’s their last guess, end the game.
Let’s use an if statement in the program to create the logic you need.
Listing 4.6. Adding logic to the game with an if statement
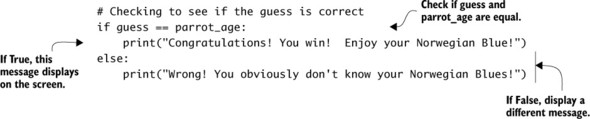
Let’s take a close look at how the if statement works and how it gives you a way to create logic in your programs (see figure 4.10).
Figure 4.10. The if statement can control the flow of your programs. This example shows how an if statement can be used to display one message if guess is equal to the parrot’s age or a different message if they aren’t equal.

The keyword if is followed by guess == parrot_age, and the line ends with a colon (:). guess == parrot_age is the condition that is being tested. The double equals sign (==) is a special operator that checks the equality of guess and parrot_age.
Tip
Make sure you don’t use a single equals sign when testing equality. Single equals signs are used to assign (or store) values into variables.
If they’re equals, the if condition is evaluated as True, and Python will execute the indented commands after it. In this case, you’re printing a message:
Congratulations! You win! Enjoy your Norwegian Blue!
If the guess is wrong (guess == parrot_age is False), then Python will do the else part. The statements to be executed for the else part are indented four spaces. In this case, if the guess is wrong, the program displays this on the screen:
Wrong! You obviously don't know your Norwegian Blues!
If you examine the code and think back to the logic you want to create, you can see how the if statement lets you check whether the guess is correct (see figure 4.11).
Figure 4.11. The logic you want to create is shown in the code. You use the if statement to check whether the player’s guess is correct.

You’ve seen how the if statement can make a program make a decision. It’s an easy way to control programs by checking whether something is True or False.
The if statement uses something called Boolean logic. In Boolean logic, the answer must always be True or False. There is no “Ummmm... maybe.” It’s always either True or False.
Boolean logic has its own set of operations for comparisons. These comparisons should be familiar from math class, such as less than (<) and greater than (>). Here is a table of some of the common comparisons you may need to use with your if statements:
|
Comparison operation |
Definition |
|---|---|
| == | Equal |
| != | Not equal |
| < | Less than |
| <= | Less than or equal |
| > | Greater than |
| >= | Greater than or equal |
For this game, you’re using the equality comparison to check whether two values are equal to each other.
If you need to reverse the logic in a comparison, you can use the not operator. The not operator changes a True to False or a False to True. If x is True, then not x is False.
Keep these comparison operators in mind. No matter which one you use, Python analyzes the comparison and returns either a True or False answer.
Practicing if statements
Trying more examples of if statements will help you get used to the logic and how to write them. Let’s do an example that checks to see whether a secret password is correct. If it is, the code should grant the person access; otherwise it should deny them access.
Listing 4.7. Using an if statement to check a password

Python’s if statements are a powerful tool for creating programs that respond the way you want them to. You now have the ability to make logic so your programs react and respond based on interacting with a user. This is the first step in adding a bit of artificial intelligence to your programs. Fabulous job!
One of the most common mistakes when working with if statements is forgetting to put the colon (:) at the end. Figure 4.12 is an example of an if statement missing the colon.
Figure 4.12. A missing colon at the end of an if statement will create a syntax error. Python highlights where the error is located. Add a colon at the end of the line to fix the problem.
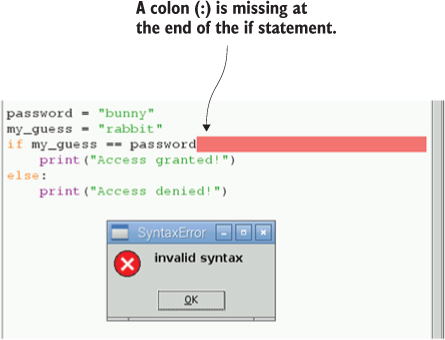
Errors are common when writing programs. Try to remember to add a colon at the end of your if statements. If Python throws a syntax error box and highlights a space at the end of an if statement, you know what you’ve done.
Using while loops to repeat things
You have input from the user, but you need a way to let the user repeatedly guess the parrot’s age. You might get bored repeating something over and over again, but computers will happily repeat something as many times as you want. The repeating parts of programs are called loops.
In the case of your guessing game, you’re giving the game player five tries to guess the parrot’s age. Python has several types of loops: you’ll use the while loop. A while loop repeats over and over until a certain condition or circumstance is no longer true. What it repeats is for you to decide. Each time through the loop, before the program repeats the instructions you gave it, it checks that condition.
Let’s look at how you can use a while loop with your if statement to give the user only five guesses. To help, you’ll create a variable named number_of_guesses to keep track of the guesses.
Listing 4.8. Using a while loop to repeat instructions


Notice how you have to rearrange the code in the program a bit. First you start the while loop, and then you ask the user to input their guess. Also notice that the code to repeat in the while loop is indented (shifted over four spaces). Let’s take a closer look at the key elements of the while loop (see figure 4.13).
Figure 4.13. Think of the logic you’re trying to create, and then translate it into your code. When you need to repeat something, you can use a while loop. When you need to check whether something is True or False, you can use an if statement.
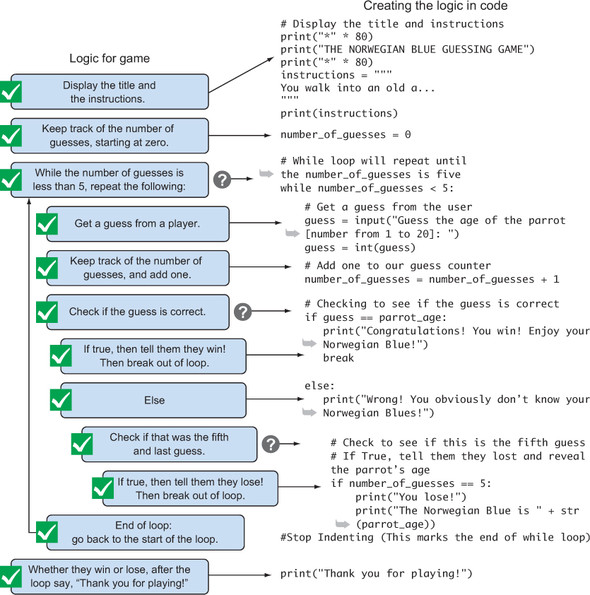
There is a special thing about a while loop: you must indent all the code that you want the loop to repeat (like you did for if statements). Each line should be indented four spaces from the left (you measure this from where you type the w in while). Similarly, you stop indenting code when you want the while loop to end. Code that isn’t indented is outside the while loop and is only run after the while loop finishes.
Tip
The IDLE text editor automatically indents the loop text for you. Indentation is used in Python to group code together.
Notice that you create a variable named number_of_guesses that helps keep track of how many guesses have been made. It starts with a value of 0; after each guess, the value increases by one. When it reaches a value of 5, if the last guess is incorrect, the game should end. As long as the number of guesses is less than five, the program will check the guess entered by the player to see if it’s correct. If a guess is correct, the game should congratulate the player, break out of the loop, and end.
A closer look at while loops
while loops run a set of instructions or code repeatedly, but only while the condition of the while loop is True. This is useful when you want to have something repeat but need a switch that signifies when it should stop. A very common use of while loops is in games. A loop makes it so the user can play the game again and again until they say they don’t want to play anymore.
The while loop in figure 4.14 counts from 0 to 99. Let’s look more closely at its parts.
Figure 4.14. You can use a while loop to repeatedly perform a task. Code that is part of the loop is indented four spaces. In this case, this while loop displays the numbers from 0 to 99; when completed, it prints the message, “I finished counting!” Typically, the condition should be such that code in the loop can make it False and thus end the loop.
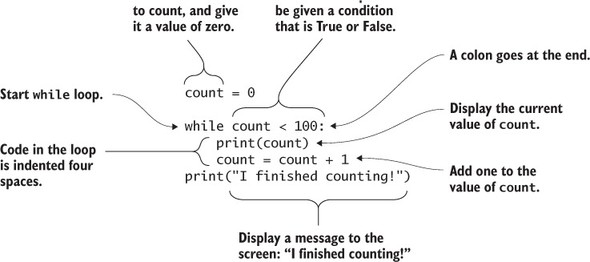
Like an if statement, a while loop has an expression that must be either True or False. The example in figure 4.14 uses count < 100. The line ends with a colon (:), and subsequent lines that belong with the loop should be indented four spaces. In a while loop, you can use any other commands you would normally use in Python. To signify the end of the loop, stop indenting statements. Notice that the print("I finished counting!") isn’t indented, so it’s only printed once, after the counting is complete. Python reads the indentation to know when you want your loop to start and end.
Tip
You can use if statements in while loops. In your game, you use an if statement in a while loop. Sounds fancy, but you want to check whether the player’s guess is correct, and you need to do this repeatedly to give them their five guesses.
Using loops can save you from writing a lot of code. They let you order a computer to repeat a series of commands many times. The commands only need to be written once in the loop.
Breaking out of a while loop
Sometimes you need to take a break to eat some food or grab a drink. Python has a break command that lets you break out of a while loop early. In this example, you want your loop to repeat if the player’s last guess was incorrect. If the player guesses the parrot’s age correctly, then you want to break out of the loop—even though you haven’t reached the fifth guess, you want to stop looping because the player got the answer right.
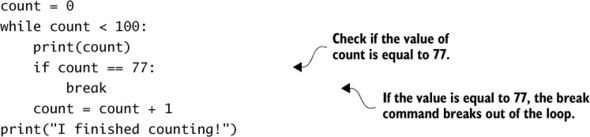
Let’s modify the previous example of counting to 99 so it breaks out of the loop when it reaches the number 77. You’ll use an if statement to do this.
Listing 4.9. Breaking out of a loop
Practicing while loops
Let’s try another example of using a while loop to get the hang of how to write them: a while loop that asks your favorite color. See if you can figure out what this program does.
Listing 4.10. Favorite colors
favorite_color = input("What is your favorite color? ")

while favorite_color != "blue":
    print("Nope, you got it wrong!")
    favorite_color = input("Try again: What is your favorite color? ")

print("Me too! What a coincidence!")
This example asks you for your favorite color; if you type in blue, it says, “Me too! What a coincidence!” and ends. If you don’t input blue, the program will keep asking you for your favorite color over and over again (until you say it’s blue).
Suppose your loop doesn’t produce the output you expect. Maybe the guessing game gives you six guesses instead of five. This is when you try to find the problem and fix it—a process also called troubleshooting. Fixing errors in while loops can be tricky because there may be many commands in the loop. The commands execute quickly, so it can be hard to see what is happening. One troubleshooting technique you can use is to add a print function in the loop and use it to print out the value of a variable such as the counter each time through the loop.
In this example, you might add this line in your loop:
print(number_of_guesses)
This prints out the value stored in the number_of_guesses variable each time the code goes through the loop. You can see whether the counter is incrementing as you expect and whether it’s starting with the right number.
Using Python code libraries to generate random numbers
You program should be working great. The player gets five guesses, and if they guess the age of the parrot correctly, they win! One exciting part about games is their unpredictability—you never know when you might win or lose. Your next task is to have the program pick a random number for the Norwegian Blue’s age. This will make it more thrilling because even you won’t know the answer!
If you’ve ever tried to fix a broken bike, toaster, or car, you probably needed some tools. Bare hands are good for many things, but they probably weren’t enough for the job. Similarly, in Python, the standard tools (your bare hands) aren’t enough. Sometimes you need to get a toolbox and take out a big hammer, soldering iron, or screwdriver.
Python has toolboxes as well. These toolboxes are also called modules. Each toolbox (module) contains different sets of tools (methods) that are useful for specific jobs. Here are some examples of common Python modules:
- datetime provides useful tools for getting the current time and date and formatting them nicely.
- random gives you the ability to create random numbers.
- math supports a larger set of mathematical functions.
- fileinput supports reading information from files.
Before you can use these toolboxes, you must first carry them into the room, like you might grab a toolbox of bike tools to fix a bike. To bring in a toolbox, you use the import command:
import random
You can add this line anywhere in a program before you need to use it to create a random number. Add it right after the comments at the beginning of your game program. This brings in the toolbox at the beginning of the program and makes it easier for other people who read your code to see what toolboxes (or modules) you’re using. What the line is actually doing is loading the toolbox into Python’s memory so you can use the tools in your program.
Now that you’ve added the toolbox, you can use a tool called randint to generate a random number between 1 and 20. This code replaces the line parrot_age = 19:
parrot_age = random.randint(1,20)
Notice that you enter the name of the toolbox, put a period or dot (.), and then put the name of the tool you want to use. This particular tool, randint, needs you to give it two numbers: the lower and upper numbers that the random integer should be between. If you wanted a number between 1 and 100, you’d write
parrot_age = random.randint(1,100)
With these two lines of code added, the complete code listing should match the code in figure 4.15.
Figure 4.15. To randomly select a number, you need to import the random library and use the randint function to select a random integer between 1 and 20.
Outstanding! You’ve made a Norwegian Blue Guessing Game and learned how to create logic in your programs using both if statements and while loops.
Fruit Picker Extra: Scratch
Have you been wondering why your Pi has an icon that is a picture of a cat head? That is the icon for Scratch. Developed by the Massachusetts Institute of Technology (MIT) to help teach programming, Scratch is a simple program you can use to create animations and games on your Raspberry Pi. Scratch is also its own easy-to-use programming language that is based on dragging and dropping program blocks.
Open Scratch by clicking Menu > Programming > Scratch on your Raspbian desktop. When Scratch opens, you’ll see a cat in a white square. Figure 4.16 shows an overview of the Scratch interface.
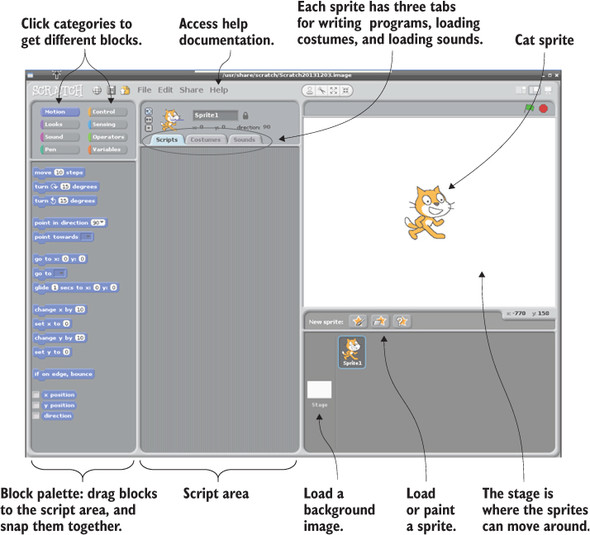
Figure 4.16. The Scratch interface is divided into an area for sprites to move around and a script area. You can create programs for your sprite by dragging blocks and connecting them in the script area.
Scratch can do many things, and we won’t explain them all. You can learn more about how to create projects with Scratch by clicking Help > Help Pages. The help tells you how to use each block and provides some tutorials.
Do you have an idea for a project? As in Python, you can make programs that ask for input, display messages, generate random numbers, and use if statements and loops. You might add a dog sprite and make it sing like a human when you click it. Or try creating a Scratch version of your favorite classic videogame.
![]()
Challenges
Let’s play Rock, Paper, Scissors! For this challenge, try to create the classic game.
Rock, Paper, Scissors is played with your hands. Each person simultaneously makes one of three shapes with their hand: the shape of a rock, a piece of paper, or a pair of scissors. If two people make the same shape, it’s a tie. The three game shapes interact with each other like this:
- Rock beats scissors.
- Paper beats rock.
- Scissors beats paper.
Let’s plan how to attack this challenge. Here are some of the key elements:
- Use a while loop to repeatedly ask the player to choose rock, paper, or scissors.
- Create a list of choices:
choices = ["Rock","Paper","Scissors"]
- Use the random library to have the computer randomly choose among the three choices (“Rock”, “Paper”, and “Scissors”).
- Remember, randint selects a random integer. You can select and store the random choice in a variable:
computer_choice = choices[random.randint(0,2)]
- You can select different items in the list by using a number representing where the item is in the list. This number is called a list index. In this case, there are three items in the list. The first item has an index of 0, the second item has an index of 1, and the third item has an index of 2. To display the second item in the list, you write print(choices[1]); the code displays “Paper” on the screen.
- Use an if statement to compare the player’s choice to the computer’s choice and let the player know who won.
- Ask the player if they want to play again. If so, the loop should repeat; if not, the game should end.
See if you can come up with a program! See appendix C for solutions.
Summary
In this chapter, you’ve learned some new techniques for working with text in Python and a few foundational elements for creating logic in your programs:
- You can make Python print things just how you want them. String literals allow you to create text that spans multiple lines. Use them to make text appear the same way you typed it in your programs.
- You can write intelligent code that can make decisions. if statements add logic to programs by responding only if a certain condition is True. You can combine if with else statements to make a program do something different if the condition is False.
- You don’t have to type things repeatedly—you can make Python repeat them for you. while loops can be used to repeat things over and over, as long as a certain condition is True. The break command lets you exit a while loop if you need to.
- You can use modules (toolboxes) to access more powerful tools to use in your programs. The random module has a tool that generates random integers.