Chapter 5. Raspi’s Cave Adventure
In this chapter, you’ll create a game to learn new programming techniques:
- Drawing flow diagrams to map out complex programs
- Using Boolean operators to check input from users
- Making code for multiple choices using if, elif, and else statements
- Creating and using your own functions to organize code and avoid repeating code
- Nesting if/else statements to create games with complex logic
Like a great book, a game can create an entire imaginary world in your mind. One of the most exciting aspects of games is when you feel like you’re inside the game. This doesn’t require virtual-reality goggles or high-definition graphics. You can create this immersive feeling even in a completely text-based game by connecting with the player’s imagination and creating a world where they can make decisions and determine their own fate. To create games with imaginary worlds, you often have to generate a sense of depth by having the user move from room to room or scene to scene. The game should allow the user to choose their own path and introduce elements of surprise. Finally, you should also have some great descriptions that make the player feel like they’re in the room.
In this chapter, you’ll create just such a game, based on exploring an underground cavern. Along the way, the player will have to make choices, and if they make a wrong decision, the game is over. If they make the right decision, they’ll find untold treasures of gold, rubies, and diamonds!
Project introduction: Raspi’s Cave Adventure
The game is set in medieval days: a time of stone castles, knights with swords, and (some say) mythical beasts that breathe fire. Your main character is a young boy named Raspi.[1] One day Raspi is out gathering firewood and gets lost in the forest. He stumbles upon the entrance to a cave. He peers in the entrance and finds that the cave splits into a left tunnel and a right tunnel. He remembers a folk tale his grandmother used to tell of a mysterious cave in this very forest that holds enormous treasures. It’s said the treasure is guarded by a ferocious fire-breathing dragon. Raspi can’t resist the temptation to explore the cave; although he knows he should turn back, he walks slowly into the dark cavern. This is the start of your next project: Raspi’s Cave Adventure.
Because this is your game, feel free to make Raspi a girl or a boy.
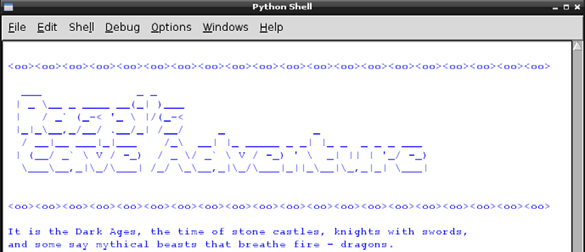
The game can have many different outcomes, depending on the path the player chooses for Raspi. A short sample of the program’s output is shown in figure 5.1.
Figure 5.1. Raspi’s Cave Adventure requires the player to make decisions about which way to go. Based on their choices, the player will meet different fates.
Let’s look at a map of the cave to see where the treasure is and also where the dragon lives! Because you’re the game designer and developer, you’ll use this as a guide to write the code creating the game logic (see figure 5.2).
Figure 5.2. This map of the cave system shows that Raspi will need to make many choices. If he makes the wrong ones, it’s game over! But if he makes the correct choices, he’ll find the legendary treasure!

Let’s examine the different paths and choices Raspi has in the cave and his possible fates. After Raspi enters the entrance to the cave, he can choose to go left or right.
Left cave
If Raspi goes into the left cave, he’ll find himself near an underground river. He’ll need to decide whether to take a boat down the river, swim down the river, or walk along the side of the river. If Raspi decides to take the boat, he’ll soon learn that it has a hole in it, and he’ll sink (game over). Should Raspi choose to avoid the river and walk along its edge, he’ll quickly become distracted by his thoughts, trip on a rock, and hit his head (game over). If Raspi is adventurous and decides to swim in the river, he’ll make it to the other side and find a hidden treasure room filled with riches!
Right cave
If Raspi decides to go into the right cave, he’ll need to decide whether to climb down into a hole using a rope or walk toward what appears to be a torch. After walking toward the torch, Raspi will enter a cave full of crystals. The crystal cave sounds promising, but unfortunately a crystal will fall from the ceiling, ending Raspi’s life (game over). Alternatively, if Raspi uses the rope and goes down the hole, he’ll find himself in the dragon’s lair with a final choice: whether to fight the dragon or go into a dark room. If Raspi fights the dragon, the dragon will eat him; but if Raspi heads toward the dark room, he’ll discover that it’s filled with thousands of gold coins, rubies, and diamonds. Raspi is rich and very much alive!
Hey wait, you need a plan (flow diagrams)
Your goal is to create a program that allows the player to make multiple decisions. You have a map of the cave; now you need to make that map into a diagram that can guide you as you write the code for the game. Much as you did in chapter 2, you’ll lay out the logic of the game and then write the code to create that logic.
You can make a map that also functions as a flow diagram. You can visualize the set of decisions and the outcome of each decision. Figure 5.3 shows the map of the cave as a flow diagram.
Figure 5.3. The flow diagram for Raspi’s Cave Adventure shows the various decisions the player can make and their outcomes. It’s a map of the logic of the game, and it can guide you as you program that logic.

Each decision in the diagram is represented by a diamond shape. Inside the diamond is the question at hand. Outside the diamond are arrows representing the possible choices available and the result of each choice. Sometimes choices lead to other choices (other diamonds). Other times, a choice leads to winning the game or game over!
Flow diagrams follow a few simple rules (see figure 5.4). You can construct one for any set of decisions, including those used by games, robots, and apps.
Figure 5.4. Flow diagrams are ways to visually show the logic of a program. They represent decisions, choices, and activities using diamonds, arrows, and boxes. This example shows a flow diagram for a program that turns on a light if a button is pressed.

A flow diagram is a great way to organize your thoughts and break down complex problems into a series of simple steps. Remember the Python way: simple is better than complex.
Which way should Raspi go? (checking input)
With your diagram in hand, the first bit of logic is the user choosing whether to go left or right. Let’s display text to tell the player what they see in the cave, and then prompt them to enter a choice. You prompt the user and collect information with the input function.
Listing 5.1. Choosing the left or right cave
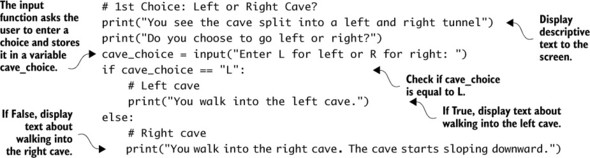
This example uses the input function and then an if/else statement to create the logic you want. The code asks the user to make a choice by typing L or R. The if statement checks whether the user’s choice equals “L”. If True, then the code displays a message that the player entered the left cave. If their choice isn’t equal to L (if that condition is False), then the program moves to the else statement and displays a message that the player entered the right cave.
Handling unexpected input
Users often do unexpected things. As a programmer, one thing you have to be thinking about is what happens if the user does something you don’t expect. The person playing your game can type in whatever they want. Let’s examine some different possibilities and see what would happen:
- What if the user types in l (lowercase L)? If the user types in l, the program checks (evaluates) whether “l” is equal to “L”. Because these two strings are different, this condition is False. The program will execute the else statement and display a message that the user entered the right cave.
- What if the user types in left? If the user types in left, the program evaluates whether “left” is equal to “L”. Because these two strings are different, this condition is False. The program will execute the else statement and display a message that the user entered the right cave.
- What if the user types in something like 44992 or banana just to be silly? The program checks whether “44992” or “banana” is equal to “L”. Because neither of these equals “L”, this condition is False. The program will execute the else statement and display a message that the user entered the right cave.
- What if the user enters anything except L? You guessed it; they will see a message that they entered the right cave.
This isn’t ideal. Let’s improve the code as follows:
1. Permit the user to enter L or l as well as Left or left to enter the left cave.
2. Permit the user to enter R or r as well as Right or right to enter the right cave.
3. Take care of anything else by having the game scold the user for entering the wrong thing and end the game in a humorous way. Maybe a stalactite could fall from the ceiling or a cave spider could bite them!
To create this behavior, you need to introduce the Boolean or operator. You also need to convert the input information to all uppercase letters using Python’s upper() method. Finally, to handle all three possible outcomes, you’ll use a new if/elif/else statement (see listing 5.2).
Methods are functions that only work on specific types of Python things, which programmers call objects. In this example, .upper() is only able to work on strings, so it’s called a string method. Methods are called differently than other functions. Methods use dot notation, which means you type the name of the thing (object) and then put a dot (.) and the method.
Here are some examples:
- "Left".upper() produces “LEFT”.
- "riGHt".lower() makes “right”.
Here’s the updated code to apply these new ways to avoid errors in user input.
Listing 5.2. Improving the code for the player’s choice

The upper() method converts the input text to all uppercase. If the user enters LEFT, LeFt, left, or Left, the string is converted to “LEFT”.
The Boolean or operator: checking whether either one is True
The or operator checks whether one condition or another condition is True. This gives your code more flexibility—it’s able to accept more than one input and still proceed. If either one is True, the if statement is True, and Python does whatever is indented under the if statement.
elif is short for else if
The elif statement is short for else if. It checks whether another condition is True. Think of it like a multiple-choice question. If the user doesn’t enter L or Left, the program moves on to the next option. If the user doesn’t enter R or r, the program moves to the else statement and drops a stalactite on their head. Game over! Take a closer look at the if/elif/else statement in figure 5.5 to see how to make one.
Figure 5.5. The if statement can come in many flavors. This is an if statement with two elifs and an else. It creates logic in the code that can do many different things depending on the user’s input. In this case, you’re having a player guess the age of a parrot. The program will tell them if their guess is too low, too high, correct, or invalid.

Notice that you can have more than one elif statement. In fact, you can have as many as you want. With the if/elif statement, you can create the logic needed for your cave.
Python has a complete set of Boolean operators that you can use to make expressions:
- or is used when you want the expression to be True if either of the operands is True.
- and is used when you want the expression to be True only if both operands are True.
- not is used to change an operand from True to False or False to True.
Let’s look at a few examples using these operators.
and OPERATOR
Pretend you want to create a program giving you access to the system only if your name and password are both correct. You could write this using the and operator:
if name == "Ryan" and password == "PiTaster":
    print("The name and password are correct!")
    print("Access granted! Welcome!")
else:
    print("Access denied!")
Only if both name and password are correct will the program grant you access. Try creating one yourself!
or OPERATOR
Next let’s imagine you want to create a program giving someone a free pizza if their age is under 20 or they have a coupon. Let’s assume you have a variable age that is the age of the person and another variable coupon that already holds a value of True or False. Using the or operator, you create this logic like so:
if age < 20 or coupon == True:
    print("You get 1 FREE PIZZA")
else:
    print("No free pizza for you!")
If either is True, the user gets a pizza. If both are True, they get a pizza. If neither is True, then no free pizza!
not OPERATOR
Finally, let’s say you have a variable is_absent that is equal to True or False. is_absent tells you whether a student is present or absent. To print a “Welcome to school!” message if a student is not absent, you can use the not operator:
if not is_absent:
    print("Welcome to school!")
else:
    print("Please return to school as soon as possible. School misses you!")
The not operator changes a variable or statement that is True to False and a False one to True. It helps you create conditional statements (if statements) that make more sense when you read the code. As you can see, the Boolean operators give you many different options for creating logical expressions.
Time to go spelunking (a fancy word for exploring caves) with your new knowledge of if/elif/else and Boolean operators!
Turning flow diagrams into code
For now, let’s concentrate on building a program for the left cave. The player has entered the left cave and needs to make their next choice. Looking at the map and the flow diagram, the next thing your player encounters is an underground stream. The player sees a boat and must choose among three options:
- Keep walking along the side of the river.
- Climb into the boat.
- Swim in the river.
Each of these will be an if or elif statement in your code. But wait! There’s a fourth possible outcome—that they don’t enter one of the three choices. You’ll make this the else statement. Figure 5.6 shows the left cave flow diagram and the code that creates the logic you need.
Figure 5.6. The left cave has a stream inside it, and the user has three choices of what to do next. In the code, you create an if statement followed by two elif statements to cover each of the options. The else statement is used to control what happens if the user inputs something other than one of the three choices.
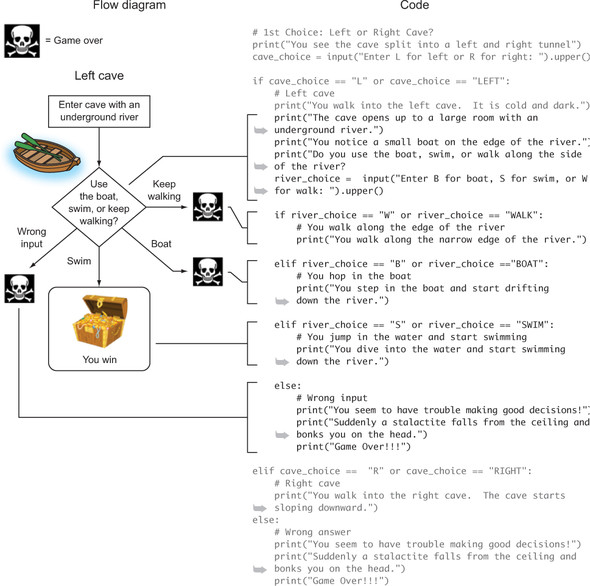
You display a few words about what Raspi sees inside the left cave. You ask the user to choose what to do next. Then, once you’ve gathered this input, you evaluate that information and respond accordingly. Notice that each of the possible choices appears in an if or elif statement and is indented under the left cave if statement. The user has to choose whether to keep walking (W), use the boat (B), or swim (S). For each case, the program should display information as you designed it in your flow diagram.
Boolean operators and if/elif/else statements are great for when your program needs multiple options or choices. Let’s see if you can create a program that has four possible options: A, B, C, and none of the above. The following snippet shows an example of using elif statements to create these four possible outcomes. In this example, you’re pretending that a person is on a game show and picking a door with a prize behind it:
print("Welcome to the Pi Game Show!")
print("There are three doors with prizes behind them: A, B, and C.")
door = input("Select a door by typing A, B, or C").upper()

#Logic for door selection
if door == "A":
    print("You've won a new car!")
elif door == "B":
    print("You've won a new boat!")
elif door == "C":
    print("You've won a trip around the world!")
else:
    print("Uh oh! You didn't follow directions!")
    print("Game Over!!!")

print("Thank you for playing.")
Creating programs with choices based on logic is a powerful programming skill. By combining simple choices, you can create complex programs.
Excellent work! You’ve created the left cave logic for Raspi’s Cave Adventure. Let’s add more decisions.
Simplify! Making your own functions
Yikes! The code for the left cave is starting to look long (and kind of ugly and hard to read), and you still have the right cave to go. How can you simplify your program?
The answer is functions. This time you aren’t going to call a built-in Python function—you’ll make your own!
Functions are like mini programs that you can create to organize or simplify your code. When you have long programs, you can take logical chunks of code (code that all goes together) and put them in a function. Once you’ve created (or defined) a function, you can call (or use) the function in your code.
Note
Functions should always be defined at the top of a program. The definition of a function must come before it’s called (or used).
Let’s see how this works by making (or defining) two functions for the left cave.
Listing 5.3. Creating functions for the left cave

Before moving on, let’s look more closely at how you can make your own functions (see figure 5.7). You’ve created two functions: left_cave and wrong_answer. Let’s rewrite the cave program to use (or call) those functions. Whenever you call a function, it’s as if the code is all in that spot, but you’ve hidden it.
Figure 5.7. Functions simplify your code and can reduce repetition. Use the def keyword to create a new function, and indent the function code under it. If you need a function to return a value, include a return statement in the function.
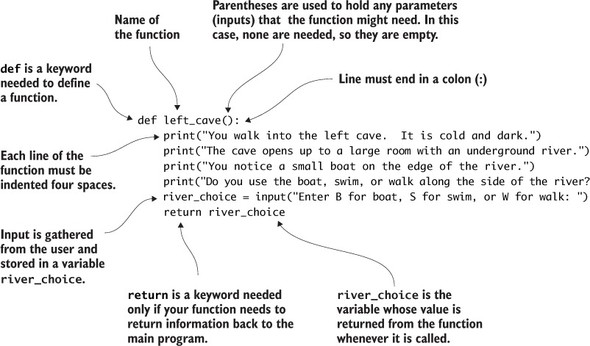
Some functions need to return something; others don’t. You might have a function that prints something to the screen or plays a sound; those types of functions don’t need to return anything. In the example code, the wrong_answer() function is a good example. You call the function like this:
wrong_answer()
Alternatively, when a function returns something and you want to store that information, you write it like this:
choice = left_cave()
This takes whatever information is returned by calling the left_cave() function and stores it in a variable named choice. Listing 5.4 shows how you can simplify the program by calling the left_cave() and wrong_answer() functions.
Listing 5.4. Using the new functions to simplify your code


Amazing! The resulting code is easier to read, and you avoid repeating code. Notice that you call the wrong_answer() function twice. This saves you from having to write those lines of code twice. Also, if you ever want to change the ending for a wrong answer, you only have to change it in one place (in the function). In addition to helping you organize your code, the ability to reuse functions is one of their key features. You haven’t changed the functionality of your program, but by using functions, you’ve made it easier to read and simplified it.
Definition
Refactoring is a programming technique that focuses on reorganizing and simplifying code in a program. Refactoring makes the code easier to read and less complex.
You’ve looked at two different functions so far: one that doesn’t return anything and one that does. Functions have another feature in addition to their ability to return something—they can also receive information. Think of it as input to a function. In programming speak, you say that the function has a parameter or parameters. Let’s see how this works with an example. Suppose you have a guessing game, and you want to create a function that prints a message to the screen telling the player if their guess is too high, too low, or spot on:
def check_guess(guess, answer):
    # Compare the guess to the answer
    if guess == answer:
        print("You're correct!")
        is_correct = True
    elif guess < answer:
        print("Too low!")
        is_correct = False
    elif guess > answer:
        print("Too high!")
        is_correct = False
    else:
        print("Invalid guess")
        is_correct = False
    # Return True or False depending upon if the guess is correct
    return is_correct
In this case, the def statement has the name of your function (check_guess). Inside the parentheses are two parameters separated by a comma: these are inputs to the function. The first input or parameter is guess. This is a guess the user has made. The second is answer, which is the number the user is trying to guess. The function then compares guess and answer and tells the user whether they were right or guessed too low or too high. The great thing about this function is that it can work with any numeric guess and answer (1 to 10, 1 to 1,000,000). By using parameters, you make the code more flexible.
The best way to learn about functions is by doing. Here are some functions dos:
- Use a simple name that describes the function.
- Put comments about your function inside the function.
- Return values when you want to use them in a program.
And here are some functions don’ts:
- Use complex names.
- Create functions with only one line of code.
- Forget to put a colon at the end of the def statement.
- Forget to call the function in your main program.
Fantastic programming! You’re achieving the Zen of Python by simplifying your code with functions.
Finishing the left cave
To complete the left cave, you need to add code for Raspi’s choices: walking along the river’s edge, taking the boat, or swimming (the winning ending). You’ll make each of these choices its own function to help organize your code and keep it uncluttered. You can call the functions in the main program, shown in the next listing.
Listing 5.5. Calling functions for each of the left cave choices


See the source code for chapter 5 for examples of each of these functions (walk(), boat(), and swim()). They follow a structure similar to the left_cave() and wrong_answer() functions. Feel free to make up your own descriptions of what happens to Raspi or change the outcomes to how you would like them.
Exploring the right cave
In this game, Raspi has two initial cave choices: left or right. Programming the right cave is similar to the left cave. Once again, you’ll use the map and flow diagram as your guides. Let’s add the logic for the right cave, which starts with the user finding a hole in the ground (see figure 5.8).
Figure 5.8. The right cave consists of a series of decisions. One wrong move, and certain death awaits Raspi. If the user makes the right choices, Raspi will find the treasure. The code uses if/elif/else statements and functions. See the code files for chapter 5 for examples of the functions.

The right cave uses logic similar to that of the left cave. You’ll use if, elif, and else statements to handle all the possible choices. As with the left cave, notice that you indent the if/elif/else statements under the other if statements to create the logic you desire. Nesting is the name given to indenting one set of if statements inside another. The technique of nesting if statements is useful when you have logic that you want executed only if a prior condition is True. In this case, you only want to give the user the choice of fighting the dragon if they have already decided to climb down into the hole using the rope. The logic now matches the flow diagram for the game.
Let’s take another look at nesting using a different example. Imagine that you want to write a program that displays a secret message after you enter the correct secret name (“Tim”) and correct secret password (“raspberrypi”). If the secret name is guessed correctly, then the user has to guess the secret password (see figure 5.9) to see the secret message.
Figure 5.9. if statements can be nested within other if statements. In this case, the user is only prompted to guess the password if they first guess the secret name correctly. Python uses indentation to figure out what statements belong together and which if statements are nested within other ones.

If the password is correct, the user has to enter their favorite color. If the color is red, the program will display the secret message (see figure 5.9).
Troubleshooting
A common error when creating if/elif/else statements is forgetting to include the colon at the end of the if statement. In this case, when you run the program, you’ll see a message pop up in IDLE saying “invalid syntax”, and the Python text editor will highlight the end of the line in red (see figure 5.10). You can fix this error by adding a colon at the end of the if statement.
Figure 5.10. Highlighting by IDLE when there is invalid syntax due to a missing colon (:) at the end of an if statement

Another error is forgetting to put a colon at the end of the def statement when creating your own function. In this case, you’ll see the same message (“invalid syntax”) and red highlighting at the end of the line missing the colon.
Finally, a third common error is using a single equals sign (=) when comparing two values in an if statement. Python will highlight the offending equals sign as shown in figure 5.11. Remember, you need to use a double equals sign (==) to test the equality of two values. This returns True (if the values are equal) or False (if they’re not). The single equals sign (=) is used to assign a value to a variable, like x = 7.
Figure 5.11. Highlighting by IDLE when there is only one equals sign

Fix this error by replacing the single equals sign (=) with double equals signs (==). As you can see, small problems can cause programs to have errors. If you get really stuck, ask a friend to look at your code, or post your code to a forum and ask for help. You’d be surprised by how helpful other programmers are!
Fruit Picker Extra: playing video
In addition to displaying text, as in the cave adventure game, the Raspberry Pi can output sound, show images, and play videos. Let’s see how you can play a video on your Raspberry Pi. See appendix A to learn how to set up your Raspberry Pi’s Wi-Fi adapter. There are many different video player apps you can use on your Pi, but a great one is OMXPlayer. It was created specifically for the Raspberry Pi and comes preinstalled with Raspbian. We’ll explore the audio (or sound) playback capabilities of OMXPlayer in chapter 8.
To show off your Pi’s capability, let’s play a high-definition demo video from a movie called Big Buck Bunny.[2] It’s about 10 seconds long and has no sound. Open LXTerminal, and at the prompt enter
This is a video developed to test video playback and display.
omxplayer /opt/vc/src/hello_pi/hello_video/test.h264
You should see a silent video play for about 10 seconds. Enjoy it! If you know of a video file on the web (.mp4 or H.264 format), OMXPlayer can play it as long as you have a good internet connection. For example, to watch the trailer for another video called Sintel, make sure you’re connected to the internet and type in
omxplayer https://download.blender.org/durian/trailer/sintel_trailer-720p.mp4
Why not open movies in a web browser? Because OMXPlayer can play them much more easily—it was designed to use the Pi’s graphics processing unit (GPU) for playing videos. This means most of your Pi’s resources are available to do other things.
Live streaming: exploring from your Pi
You’ve been pretending to explore a cave. Now let’s see if you can use your Pi to explore the ocean or space by live-streaming videos from web cameras. You can turn your Pi into a way to see the sharks and sea turtles by connecting to a live stream coming from the Monterey Bay Aquarium in California. Or maybe you want to see what the Earth looks like from the International Space Station right now.
With a few steps, you can configure your Pi to play live-streaming videos. First you need a small utility called Livestreamer that can take live video streams and output them for OMXPlayer to play, just like your test video. Let’s make sure you have the Python package installer. Make sure you have a working internet connection, and then open the Raspbian command line using the Linux Terminal (select Menu-->Accessories-->Terminal), and install the software:
sudo apt-get install python-pip
After it finishes, install Livestreamer:
sudo pip install livestreamer
Now you need a link to a live stream of video. Livestreamer will work with many of the most popular live-streaming sites. For this example, you’ll use Ustream, but you could also use YouTube Live and many others. If you go to the Ustream website,[3] you can find links to live-stream videos. Here are few different ones found on the site:
Explore the UStream live-streaming videos at www.ustream.tv/explore/all.
- Watch sharks and turtles at the Monterey Bay Aquarium: www.ustream.tv/channel/9600798.
- Check out the sea life living in the kelp beds at the Monterey Bay Aquarium: www.ustream.tv/channel/9948292.
- See the view from the International Space Station (it may appear dark if the Space Station is in the shadow of the Earth): www.ustream.tv/channel/9408562.
Note
These links may change over time. You can get the latest links by searching the Ustream website.
You’ll need an internet connection for the next couple steps. You need to figure out the video resolutions available. For the Monterey Bay Aquarium live stream, enter
livestreamer http://www.ustream.tv/channel/9600798
A few messages appear, and at the bottom are the supported stream resolution(s). For this live stream, you should see a response that says
Available streams: mobile_240p (worst, best)
This means mobile_240p is the only available resolution for the video stream. This is a low-resolution stream, but it’s still fun to watch. Tell Livestreamer to send the video to OMXPlayer with this command:
livestreamer http://www.ustream.tv/channel/9600798 mobile_240p --
Great! You should see a video open after a few seconds. It will be low resolution, but sit back and watch the amazing live view of fish, including sharks (see figure 5.12)!
Figure 5.12. The Pi’s monitor is a live stream from an aquarium. Check out that shark! By using Livestreamer and OMXPlayer, you can stream live video from exotic places, like water holes in Africa and the International Space Station.

Note
Notice that you have to type in mobile_240p. You’ll type in one of the supported resolutions from the previous step.
Press Ctrl-C to stop Livestreamer and OMXPlayer. Enjoy exploring the world from your Pi!
![]()
Challenges
These challenges focus on making improvements to the Raspi’s Cave Adventure game. If you get stuck, check appendix C for hints and solutions.
Introducing dramatic pauses
This first challenge is to include some drama in the game by adding two-second pauses between the print and input statements throughout Raspi’s Cave Adventure. This will create anticipation about what will happen next and give the player more time to read the messages before responding.
Here are some clues for how to accomplish this. First, Python has a built-in time module that provides some useful functions for working with time. At the top of the program, you need to add an import statement to use this built-in Python toolbox:
import time
Once you’ve imported the time module, you can call the sleep function in the program:
time.sleep(1)
This example code makes the program pause for 1 second. It takes the form time.sleep(seconds), where seconds is the number of seconds you want the program to pause. For example, if you wanted to display a message, wait 3 seconds, and then display another message, you’d write
print("It was a dark, dark cave...")
time.sleep(3)
print("Suddenly, a dragon appears out of the shadows.")
Go ahead and try to create some drama. If you get stuck, check appendix C or review the code files.
Random demise
Games are always more interesting when they have an element of unpredictability. Try to add some surprises to your game by improving the wrong_answer function to randomly display a message from a set of possible ways your player could meet their demise. Here are a couple of examples to get you started:
- Raspi sees a rock on the ground and picks it up. He feels a sharp pinch and drops the rock. He realizes it wasn’t a rock but a poisonous spider as he collapses to the ground.
- Standing in the cave, Raspi sees a small rabbit approach. Raspi gets a bad feeling about this rabbit. Suddenly the rabbit attacks him, biting his neck.
Hint: Create if/elif/else statements with different endings, and then use the random module to select from the possible endings.
Play again?
Modify the game so that no matter how it ends, the user is always given the option to play again. Hint: Create a variable play_again that is initially set to “Y”. You’ll also need to add a while loop to your game that will make the game repeat as long as play_again is equal to “Y”.
Scream!
If you have a set of headphones or your Pi is connected to a TV with built-in speakers via an HDMI cable, you should be able to play sounds and hear them. Let’s look at a simple program to play a sound on your Pi:
import os scream_file_path =
Test the program, and you should hear a scream. Now see how you can integrate the scream or other sounds into Raspi’s Cave Adventure. You can find more sounds on your Pi in the Scratch folder: /usr/share/scratch/Media/Sounds/.
Note
OMXPlayer works best with sound files ending in .mp3. Only some files ending in .wav will work. We’ll talk more about sound files and the OMXPlayer in chapter 8.
See appendix C if you need help solving these! Good luck!
Summary
You can create engaging programs by putting logic and instructions together into more complex programs:
- Use flow diagrams to map out complex programs before you begin.
- Create flexible programs that can handle unexpected input through the use of Boolean operators.
- Build programs with multiple choices and outcomes using if, elif, and else statements. Chain together multiple elif statements to create as many choices as you need.
- When you have logic embedded within logic, nest if statements to create decisions that depend on prior choices or conditions.
- Organize your code and cut down on repetition by defining your own functions and then calling them in your program.