Appendix C. Solutions to chapter challenges
In this appendix, you’ll find answers to the challenges presented at the end of each chapter. For challenges that require more lines of code than will fit on a page, I provide hints and snippets of code. The complete programs for the solutions are found in the code download that goes with this book. Comments are included in the code to help you understand the design and function of the programs. The solutions to the challenges are organized by chapter. Let’s begin!
Chapter 1
At the end of the first chapter, you go on a scavenger hunt:
- Squirrel —To find the squirrel game, choose Menu > Games > Python Games. After you select how you would like sound (audio) to be output, you’ll see a list of Python games. The squirrel game is near the middle of the list. Win the game, and achieve Omega Squirrel.
- Calculator —Select Menu > Accessories > Calculator. 89 × 34 is 3,026.
- Shutdown —Shut down or restart your Raspberry Pi by choosing Menu > Shutdown. The shutdown menu lets you choose to shut down, reboot, or log out.
- Black desktop —To change the desktop background to black, right-click anywhere on the desktop and select Desktop Preferences. In the Desktop Preferences window, look in the middle of the screen for a Background Color label. Click the white box to select a new background color. Click OK to select the color, and then click Close to close the Desktop Preferences window.
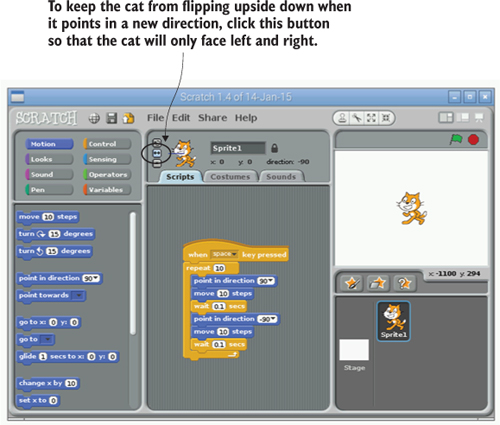
- Scratch bonus —To open Scratch, select Menu > Programming > Scratch. When Scratch opens, construct a program by dragging blocks into the
script area for your cat sprite. Figure C.1 shows an example of a dancing cat program that makes the cat dance back and forth 10 times when the space bar is pressed.
Figure C.1. Make the cat dance in Scratch by dragging program blocks into the script area.
Chapter 2
The challenges in this chapter are about displaying characters to the screen and doing some mathematics.
The Matrix
Create a screen full of 1s and 0s by using the print function and the multiplication operator like this:
matrix = "0100101101001100100110001011001011110000010101"
print(matrix * 100)
Building a brick wall
To solve this one, create a variable named brick and give it a string of characters like this:
brick = "|__"
print(brick * 1000)
To make the bricks look like raspberries, you could try
brick = "|_o88{_"
print(brick*300)
Use your imagination to visualize that this is a sideways raspberry brick. The bracket is the leaf on top of the raspberry.
Pi electrons
You’re trying to figure out how many electrons per second it takes to equal 1 amp flowing into your Raspberry Pi. The calculation using Python looks like this:
>>> electron_charge = 1.60 * 10**-19
>>> electrons_flowing = 1 / electron_charge
>>> print(electrons_flowing)
6.249999999999999e+18
The answer is 6,250,000,000,000,000,000. That’s a lot of electrons!
Chapter 3
These challenges are about gathering input, joining together strings, and displaying text to the screen.
Knight’s Tale Creator 3000
To make this program, you want to first print a title and then gather a series of words from the player:

Next, you join the input words with the story. You can do this sentence by sentence to make the code a bit easier to follow:
sentence1 = "There was a brave knight, " + player_name + ", who wassent on a quest to vanquish the " + adjective + " evildoer,
Finally, let’s join the sentences and display the tale to the screen:
tale = sentence1 + sentence2 + sentence3 + sentence4
print(tale)
Subliminal messages
You’re trying to create a message that’s hidden in a large display of characters. You start by asking for the person’s name and something they would like:

Next, create a pattern of letters, numbers, and symbols in which you’ll hide the message:
weird_characters = "*#ad@32*)23 )@*sad# 2&^ 32^423!"
Finally, you create the full message by making it read “You really want to buy [player_name] a [thing]”, but hide it by printing out on the screen the pattern of characters before and after the message:

Chapter 4
This chapter’s challenge is about using some of your new skills, like if/then (or conditional) statements, as well as toolboxes like the random module.
Rock, Paper, Scissors!
For this challenge, you start by importing the random module, creating a title, and defining any variables you’re going to need:
import random

play_again = "Yes"
choices = ["Rock","Paper","Scissors"]
Next, you want to display the title and then start a while loop that will gather the player’s choice and get a random computer choice:

You then want to display the two choices and use an if statement to test whether the player and computer choices are the same. If not, you want to check whether you have one of the following Player versus Computer combinations:
- Rock (Player) beats scissors (Computer)
- Scissors (Player) beats paper (Computer)
- Paper (Player) beats rock (Computer)
You program all this inside the while loop because you want it to be repeated as long as the player wants to play. At the end of the loop, the player is asked if they want to play again:
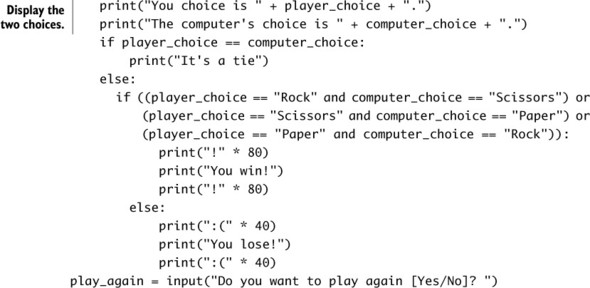
You create a large if statement that tests whether player_choice and computer_choice form one of the winning combinations. Each of the combinations is wrapped in parentheses, and you use or between them. This ensures that if any one of the combinations is correct, the winning message will be displayed.
Chapter 5
Introducing dramatic pauses
You were given some good hints about how to do this in chapter 5. Rather than display too much code here, I suggest that you head over to the code download to see what this looks like.
Random demise
In this challenge, you’re creating a more random and exciting end for your adventurer, Raspi. For this, you need to import the random module at the top of your program, define some new variables for the different endings, and create a list of the endings. This will allow you to have the computer pick a number:
import time import random demise1 = """Raspi sees a rock on the ground and picks it up. He feels a
You use triple quotation marks, called string literals, to make strings that span multiple lines. You also store the three different endings in a list called endings.
Finally, to solve this challenge, change the wrong_answer function to get a random number, select an ending, and then display it to the screen:
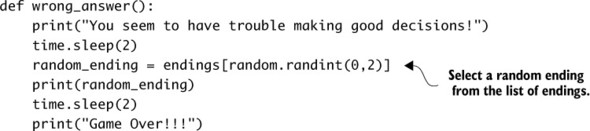
Check the code download to see how it all works together.
Play again?
To add a play-again option, add a new variable at the top of your program and set it equal to "Y" to start:
play_again = "Y"
Next, put all of your cave-selection logic in a while loop. The while loop will depend on the value of play_again, but you’ll use the string function upper() to make the play_again value all uppercase. This helps if the user accidentally enters y instead of Y:
while play_again.upper() == "Y":
At the end of the while loop, you also need to ask the user if they want to play again. Store their response in the play_again variable:
print("Do you want to play again?")
play_again = input("Enter Y for yes or N for no: ")
Another part of this challenge is adding a scream sound (or any other sound you want). First, make sure you import the os module and set up a variable with a sound file:
import os scream_file_path =
Add a new line to the wrong_answer function that calls OMXPlayer and tells it to play the scream sound:
os.system("omxplayer " + scream_file_path)
Run the program to test it out! Add it to all the other game-over endings in the game to make it even more fun!
Note
Make sure you have speakers or headphones connected, or you won’t hear anything.
Chapter 6
Wave pattern
Let’s turn on each LED one by one. Then, when they’re all on, you’ll turn them off one by one. Each light is turned on or off by setting its state to HIGH (on) or LOW (off). You create the sequence by adding a time delay between each command:

You can adjust the sleep time to get a faster or slower animation.
Simon says
In this challenge, you’re creating a program that blinks lights in a pattern like the classic game Simon. As before, the program requires that the GPIO and time modules be imported and the GPIO pins be set up properly. See the code download for the full code listing. Start by defining the simon_says function:
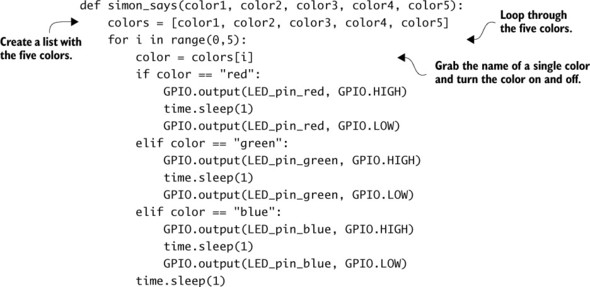
This creates a list with all the colors and loops through them one by one. For each one, the function checks its value and turns on and off the LED of that color. To use the function, you call it and give it the pattern you want to create, along with some helpful messages:
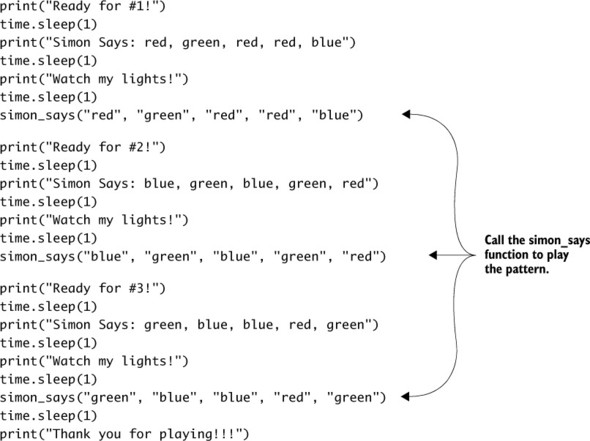
Go, Simon, go!
Random blinking
This challenge is about blinking LEDs on and off for random amounts of time between 0 and 3 seconds. Let’s see how to do it. I won’t show the top part of the program with the typical setup of the GPIO pins; refer to the code download for the full code listing. At the top of your program, don’t forget to import the random module so you can use it to generate random numbers:
import random
To accomplish this challenge, you need to create two variables and store in them a random number between 0 and 3. These variables are the amount of time the lights should stay on and off:
on_random_time = random.random() * 3
off_random_time = random.random() * 3
Next, you can use the random time with the sleep function to make the light blink. Put this inside a loop, making sure that each time through the loop, new random on and off times are created:

The off and on times change each time through the loop. Enjoy some fun blinking!
Chapter 7
The chapter challenges involve using your Guessing Game and controlling the RGB LED.
Game winner
Let’s write a function to quickly flash the RGB LED three different colors. Define a new function called winning_flash:

If you need help figuring out where to add this function and call it in your code, check the code download for more answers. You add it to the if statement when guess is equal to number_in_my_head so you get a wonderful flashing celebration when you win.
Easter egg
To make an Easter egg in your program, you need to have the code check to see whether the player entered a certain value instead of the usual number guess. Edit the main portion of the logic for the LED Guessing Game program to first check whether the secret word was entered. If it wasn’t, the program continues to convert the input text into an integer and check whether the guess was correct, too high, or too low. If the player enters the word Spam, you call an easter_egg function:

As a special bonus, you can create an easter_egg function that displays a Spam song or whatever message you’d like.

In the easter_egg function, you call a crazy_flash function. The one shown here makes the RGB LED quickly flash purple and green. It’s similar to how you created the winning_flash function:

Create your own easter_egg and crazy_flash functions, or see the code download for example ones that you can modify.
Warmer and colder
Let’s alter the guessing game to flash slower if you’re colder or further from the correct answer, and flash faster if you’re warmer or closer to the correct answer. Add some calculations so that blink_time is determined by the difference between the guess and the correct answer:

The abs function gets the absolute value—the distance a number is from zero. You need to do this because you can’t tell your Pi to sleep for a negative amount of time. That would be silly! You make this addition for both cases: when the player’s guess is higher and lower than the actual number. You divide the numbers by 10 to speed up blink_time and make sure your light isn’t blinking too slowly.
Finally, a nice touch is to add extra information to the game instructions so the player knows the blinking speed gives them a hint about how close or far they are. See the code download for an example.
Darth Vader surprise
Using what you learned in chapter 7 and a couple of new things, let’s see if you can make a Darth Vader image pop up on the screen when you lose the game. You’ll need an internet connection for the next few steps. Download a good Darth Vader image from the web, and make sure to save it to the homepi folder where your Python programs are located. Take special note of the filename.
After downloading the image, install the fim image-viewing software on your Raspberry Pi:
pi@raspberrypi ~ $ sudo apt-get -y install fim
Note
Make sure you include a line at the top of the program to import the os module.
When it’s done, test that fim works from Terminal:
pi@raspberrypi ~ $ fim Darth_Vader.jpg
Note
When fim is running, you need to press Esc (escape) to exit.
When you exit fim, the screen will display remnants of the image. It’s a funny issue, which you can fix by grabbing one of your windows by the title bar and swiping it around the screen to erase the image remnants and return it to the normal Raspbian desktop appearance.
In the Guessing Game, because you need to call fim from your Python program, add a line to import the os module at the top of the program:
import os
Next, edit the game_over function to display the image. The game_over function is called only when the player guesses incorrectly five times:
def game_over():
    print("You lost!")
    print("Better luck next time!")
    time.sleep(2)
    os.system("fim –a Darth_Vader.jpg")
Notice that you use fim with the –a option to display Darth Vader. This option automatically scales the image to fill the full screen. Here are some commands you can use to rotate or resize the image when it’s displayed on the screen:
|
Option |
Result |
|---|---|
| +/- | Zoom in/out |
| A | Automatically scale |
| F | Flip |
| M | Mirror |
| R/r | Rotate 10 degrees clockwise / counterclockwise |
| Esc/q | Quit |
Test it to see if it works!
Chapter 8
Let’s see what fun things you can do with buttons.
Double button press surprise
This challenge involves taking the project from the chapter and making something new and different happen when both buttons are pressed at the same time. In this case, you’ll make your Pi play a percussion sound to go with your vocals and music. You don’t need to change any of the wiring because you already have the two buttons.
First let’s add some code at the top of the program to create a path to where the sound effects are stored:
path_effects = "/usr/share/scratch/Media/Sounds/Effects/"
Next get a list of effects from the folder and store the list in a variable, sounds_effects. Put this next to where you load the other lists:
sounds_effects = get_MP3_sounds(path_effects)
Finally, you need to tell your program to check whether button 1 and button 2 are pressed. You’re going to modify the main game loop to first check if both are being pressed. You use the if/elif statement for this. Use the Boolean “and” operator—the ampersand (&)—to make this if statement true only if both button 1 and button 2 are pressed. If they aren’t, the statement will next check button 1, and finally it will check button 2:
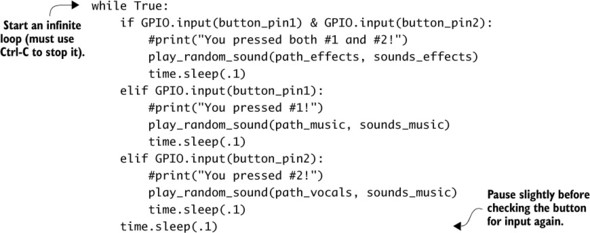
Let’s test to see if it works! Check out the code download if you need further details on the program.
Yoda Magic 8 Ball
Before you dive into the programming for this challenge, you need to work on the hardware. Because this challenge needs only one button, remove button 2 from the breadboard, along with its jumper wires and resistor. Your breadboard should have one button now, connected to GPIO 6.
Next, gather a set of Yoda sounds. You can download sounds from Soundboard once you create a free account. For this example solution, you’ll use five sound files, but feel free to use any ones you want. Make sure they’re MP3 sound files so they’ll work with OMXPlayer. The Yoda sound files in this example solution are as follows:
- Fear in You.mp3
- I am strong.mp3
- No.mp3
- Patience.mp3
- Use the Force.mp3
Much like the classic Magic 8 Ball game, the answers are sometimes clear and other times strange or unclear.
As in the DJ Raspi project, you need to import several modules for this project, set up your Pi’s GPIO pin for input (detecting electrical signals), and create some variables. Most notably, you need to create a variable for the folder with your Yoda sound files:

Use the same get_MP3_sounds and play_random_sound functions from your DJ Raspi project. One slight improvement you can make to the play_random_sound function is to hide the messages that OMXPlayer displays on the screen (they make it harder to read what the game is telling you to do). Change this one line to divert all the output messages to an empty or null location:
def play_random_sound(sound_path, sound_files):
    random_sound_index = random.randint(0,len(sound_files)-1)
    # print("Playing: " + sound_files[random_sound_index])
    os.system("omxplayer -o local '" + sound_path +
              "/" + sound_files[random_sound_index] + "' >/dev/null")
This is a great example of being able to reuse code! Next, you’ll gather the list of MP3 Yoda sounds from the folder.
sounds_yoda = get_MP3_sounds(path_yoda)
After printing out a nice title, you then show instructions to the player and enter the main loop that checks whether the button was pressed. In this loop, you call the play_random_sound function so the Raspberry Pi responds with an answer to the player’s question:

Enjoy making your future decisions with the help of Yoda!