Chapter 8. DJ Raspi
- Giving your Pi the ability to respond to input signals by making it interact with you in response to button presses
- Learning about electronic buttons and how to build circuits on a breadboard with them
- Running Raspbian operating system commands so your programs can play music, show videos, and more
- Using Python to store sets of information called lists
- Exploring how you can play sounds on your Pi and make your Pi into a music machine
We don’t think about our five senses (taste, smell, touch, hearing, and sight), but without them we wouldn’t be able to feel, know, and interact with the world around us. Think of your Pi as a person who, until now, has had a limited set of senses. So far, your Pi has only been able to respond to keyboard keys being pressed and mouse clicks.
Like a mad scientist bringing something to life, in this chapter you’re going to embark on a project to wire up a new sense of touch for your Pi. Okay, maybe it won’t be as crazy as creating a bionic creature, but a button gives your Pi a sense of touch. You’ll wire a couple buttons to the Pi’s GPIO pins (recall that GPIO stands for general-purpose input/output, so this is how your Pi can sense and affect the environment). Then you’ll program your Pi to react to button presses. Exciting times are ahead!
This project is a small glimpse of all the different senses you could possibly give your Pi. Electronic components that can detect the environment around them are called sensors. A button is one of the simplest sensors, because it can detect touch. What other sensors could you add? How about some of these ideas:
- A camera that can track a ball or face using special software called computer vision that can recognize objects (this is similar to how a Microsoft Kinect works)
- Super-human capabilities like a proximity sensor to detect when someone is walking nearby (like the ones used to trigger the doors to open at the grocery store)
- A microphone so it can hear
All this is possible with a Pi, some determination to figure it out, and a bit of fearlessness about trying new things.
Project overview
In this chapter, you’ll turn your Pi into DJ Raspi—a musical computer that plays different sounds when you press buttons. You’ll wire up two mini pushbuttons on your breadboard and figure out how to write the code to make the buttons play sounds. Later, if you want, you can add other sensors to your Pi and program them. This project will give you an example of how to work with input from sensors. Figure 8.1 shows the parts you’ll need.
Figure 8.1. The DJ Raspi project requires several different parts to turn your Pi into a music player. The length and color of the jumper wires don’t matter.

Gather the parts and get ready for some fun. You’ll notice that some of them are the same as in chapters 6 and 7, but you’ll also need a few new items. Most of these are included in Raspberry Pi starter kits, but you can find them at online electronics retailers as well. You’ll approach this project in two parts: building the circuit (the hardware) and writing the program (the software). Let’s go!
Setting up your Pi to play sounds
To start, let’s get your Pi ready to play sounds. A Pi can output sounds through the headphone jack (also called the 3.5 mm audio port) or through HDMI. Before you start, plug in your headphones, powered computer speakers, or, alternatively, a TV with built-in speakers connected via an HDMI cable.
If you wanted to leave a secret message for someone, you could choose several different ways to make the message into a secret code. You could use different symbols to represent words, or you might substitute letters or shift letters around. There are many different ways to encode something.
Similarly, people have come up with many different ways to store sounds (or audio files). These ways (called formats) are different ways of compressing or encoding the information in a sound to make it easy to store on a computer or music player. Sometimes sounds are encoded so they will only work on certain music players.
Here are some common formats:
- MP3 —The most common audio file format used in most audio players. The files end in .mp3.
- WAV or WAVE —Stands for Waveform Audio File Format. It’s used on many Windows computers. These files end in .wav.
- Ogg —An open format that was developed for streaming applications. The files end in .ogg.
Each format uses a different method to compress or shrink a sound and make it smaller to store. The Pi has many different software applications for playing audio. Each one can play different formats. Check the Raspberry Pi forums if you want to learn more about the different players and what they’re best for.
You’ll be focusing on playing MP3s from your Pi, because that is a common audio file format. What can you use to play them?
OMXPlayer and MP3s
When you watch movies or listen to music on a computer, you may use iTunes or Windows Media Player. Raspbian has its own equivalent called OMXPlayer that can play sounds or videos. Lucky for you, it’s capable of playing MP3 files (or MP3s)—one of the most common audio formats.
Definition
OMXPlayer is a video and audio player that was created for Raspberry Pi.
If you don’t have an MP3, you can test OMXPlayer using one of the sounds already on your Pi. There are quite a few MP3s in the folders included with the Scratch software. Open File Manager, and go to this folder to see some of them: /usr/share/scratch/Media/Sounds/Vocals/. In the folder, you’ll see both MP3 and WAV format files (see figure 8.2).
Figure 8.2. When you install Raspbian on your Pi, it comes with Scratch, which has a number of sound files including vocals, sound effects, animal sounds, and drum beats.

To play an MP3 using OMXPlayer, open Terminal, and enter
pi@raspberrypi ~ $ omxplayer /usr/share/scratch/Media/Sounds/Vocals/Oooo-badada.mp3
You should hear a short music clip of a woman singing. Enjoy the song!
Note
In Terminal, pressing the up and down arrows cycles through previous commands. Press the up arrow once and then press Enter to run the last command again.
Fantastic! Your Pi can speak to you now.
Troubleshooting
What if you have speakers or headphones plugged in but don’t hear anything? OMXPlayer should automatically detect whether to output the sound to the 3.5 mm audio output or HDMI. If it doesn’t, try this command for the headphone jack (3.5 mm audio output):
pi@raspberrypi ~ $ omxplayer –o local /usr/share/scratch/Media/Sounds/
–o is a special switch or flag that lets OMXPlayer know that you want to tell it something. In this case,–o stands for output, and it tells OMXPlayer where you want to output the sound. In this case, you set it to -o local, which outputs sound to the 3.5 mm (headphone jack) output.
Switches, such as–o for output, act like options or special controls for a program. They’re common when using the command-line interface. You can usually get a list of what switches a program has by making the command print out its help information. Most programs that you can run at the command line will give you a list of all switches or flags when you type the name of the program and then –h. The –h switch- stands for help. Try it with OMXPlayer:
pi@raspberrypi ~ $ omxplayer –h
You’ll see a long list of options you can use to control how video and audio files are played. Try -h with other command-line programs to see what results you get.
If you need to specify sending the sound to speakers in your monitor, then use the –o switch and specify hdmi for output to the HDMI port:
pi@raspberrypi ~ $ omxplayer –o hdmi /usr/share/scratch/Media/Sounds/
Now that you know you can play music, let’s build the circuit and write some code to create your DJ Raspi!
Hardware: building the circuit
Building time! You’re building a circuit on your breadboard to detect or listen to buttons. When a button is pressed, your circuit will send electricity flowing to a GPIO pin on your Pi. You’ll start by connecting the Pi’s GPIO pins to the breadboard using the ribbon cable and GPIO breakout board. Refer back to chapter 6 (section 6.1) if you need to recall how to set this up.
Like finding a seat in a stadium, we’ll refer to the holes on a breadboard using the prefix BB. So the hole located in row 25, column a, is BB25a. Similarly, we’ll refer to the Pi’s GPIO pins using the prefix GP and then the pin number. So GPIO pin 24 is called GP24 for short.
Wiring a button
Let’s get busy wiring the buttons. There are many different types of buttons, but you’ll be using a mini pushbutton (see figure 8.3). These buttons commonly come in Raspberry Pi kits along with jumper wires, resistors, and LEDs. If you need to purchase them, you can find them at many online electronics retailers in packs of 10 or 20 for less than the cost of a cheeseburger. With the parts gathered, let’s assemble the circuit.
Figure 8.3. The mini pushbutton makes a nice clicking sound when you press the black button in the middle. Pressing it acts like closing a switch to complete a circuit.

Circuit sketch
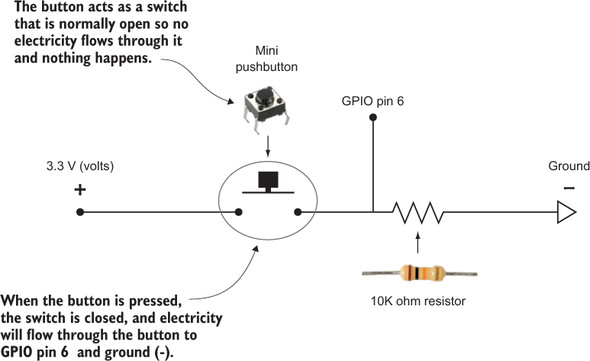
The circuit diagram for the DJ Raspi is shown in figure 8.4. To listen to whether a button is being pressed, you’ll have electricity (+3.3 V) flow from your Pi to the button. When the button is pressed, the electricity will flow through the button and then split. A small amount of electricity will flow to GPIO pin 6 (GP06) and the rest will flow through the 10K ohm resistor and then to ground (0 V). Let’s put it together on the breadboard.
Figure 8.4. The circuit diagram for the first button in the DJ Raspi project shows how electricity will flow through the circuit. The button is a switch that allows electricity to flow to GP06 and ground (-) when it’s pressed or closed.
Let’s build the button circuit on the breadboard and program your Pi to know when the button is being pressed. You’ll give your Pi the ability to feel the button being pressed, by wiring up the button in this order:
1. Add the mini pushbutton to the breadboard.
2. Connect a jumper wire from 3.3 volts to the button. You’ll use the positive power bus (+) that runs along the side of the breadboard.
3. Add the resistor from the button to the negative power bus (-), also called ground.
4. Connect the second jumper wire from the button to GP06 (GPIO pin 6).
The completed circuit for one button will look like what you see in figure 8.5.
Figure 8.5. The mini pushbutton will have 3.3 volts connected to it from the positive power rail. When the button is pressed, power flows through the button and splits. Some electrical current goes to GP06 (GPIO pin 6), and the rest goes through the resistor and then to the negative power bus (-).

Don’t forget, nothing will happen when you press the button. You have to program your Pi to react to this new-found sense of touch. Let’s go through the steps to build the circuit:
Step 1. Add the mini pushbutton
Let’s look at how pushbuttons work before we go on. If you had X-ray goggles, you would see that the left and right legs at the top of the button are connected. Similarly, the left and right legs along the bottom of the button are connected. The top and the bottom of the button aren’t connected.
But when you press the button, figure 8.6 shows what happens. Pressing the button pushes down a small metal bar so that the top and bottom are connected. We say the switch is closed. When you let go of the button, the spring in the button pushes the metal bar back up, and the switch is open again. Grab your mini pushbutton, and let’s insert it into the breadboard.
Figure 8.6. In a button, the legs are connected along the top and are separately connected along the bottom. When the button is pressed, the top and bottom are connected by a small metal bar.

Note
You’ll need to push the button into the breadboard very firmly. If the button legs aren’t lined up with the breadboard holes, you may accidentally bend some of the button legs. Don’t worry—you can bend them back and try again. If a leg breaks off, use a new button.
You’re going to put the button in rows 23 and 25 along columns d and g on the breadboard. Connect the legs:
- Top legs: BB23d and BB23g
- Bottom legs: BB25d and BB25g
When the button is inserted, it will look like figure 8.7. Double-check that it’s pushed down into the breadboard so that all the legs will make a good connection. Good job—you just completed the trickiest part!
Figure 8.7. Align the pushbutton with the breadboard holes, and then press it down into the breadboard. Make sure you press it so the button legs are down into the breadboard holes and make a good connection. If you accidentally bend the legs, don’t worry! Just bend them back and try again.

Step 2. Connect a jumper wire from 3.3 volts to the button.
You need to connect the button to a source of electrical current. You’ll use the positive power rail along the edge of the breadboard as the source of power (you could also directly connect the jumper to the 3V3 pin on the breakout board).
Connect the jumper wire from the positive power bus (+) to BB25a. Remember, you can connect the jumper to any hole along the power rail (it has a red line next to it). When you’ve added the wire, it will look like figure 8.8.
Figure 8.8. The jumper connects power (3.3 volts) to the bottom of the button.
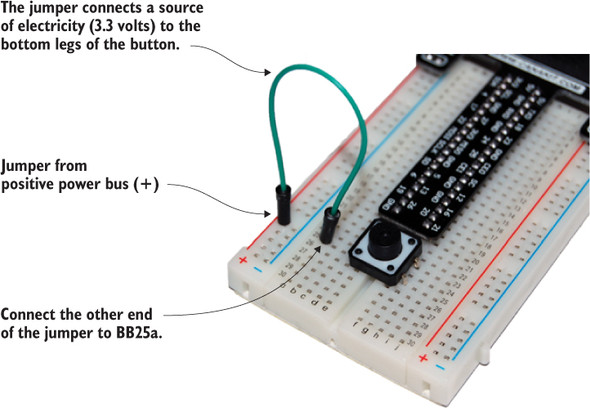
Fantastic! Now you have electricity reaching the bottom legs of the button.
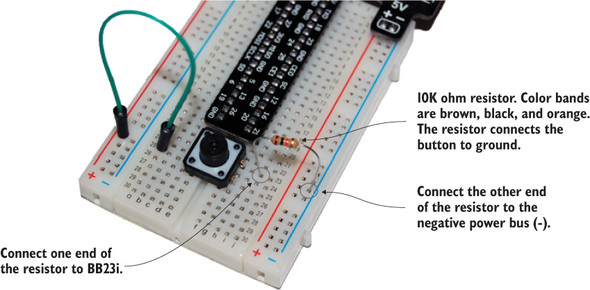
Step 3. Add the 10K ohm resistor
Time to connect your 10K ohm resistor. It has bands of brown, black, and orange followed by a fourth gold or silver band. Remember that electricity will flow either way through a resistor, so it doesn’t matter which way you place it.
You’re connecting the resistor from the top of the button to the negative power bus (-). This is the set of holes with a blue stripe next to it running along the edge of the breadboard.
Insert one end of the resistor into BB23i and the other end into the negative power bus (-). You can choose any hole along the blue line. Once the resistor is added, you’ll have something that looks like figure 8.9. Now you’re ready for the final step.
Figure 8.9. Add the resistor. Make sure its ends are pushed down into the breadboard holes.
Step 4. Add the jumper to a GPIO pin
A small amount of electricity needs to reach a GPIO pin (you’ll use GP06), so you need a jumper wire from the top of the button to a hole next to the GPIO pin. To make this connection, add a jumper from BB23a to BB16a. Figure 8.10 shows how it looks.
Figure 8.10. The jumper connects the top of the button to GP06. Later, you’ll set your Pi to listen for electrical input on this GPIO pin.

When the button is pressed, a small amount of electricity will flow to GP06 and through the resistor to ground. Nothing happens yet, but next you’ll write a Python program to detect that electricity and play some sounds.
Adding the second button
Let’s add a second button to the board. Figure 8.11 shows what it will look like when it’s done.
Figure 8.11. Add the second pushbutton just below the first one. The wiring is the same, but you’ll connect it to GP19 (GPIO pin 19). Any available GPIO pin will work, but remember that your code will have to reflect the GPIO pins you select.

To add another button, you’ll create the same circuit but place the button in rows 28 and 30 on your breadboards. You’ll wire the button to GP19.
Step 1. Add the mini pushbutton
Insert the button so that the top legs are in BB28d and BB28g and the bottom legs are in BB30d and BB30g.
Step 2. Connect a jumper wire from 3.3 volts to the button
You need to connect power from the positive power bus to the bottom of the button. The power rail is the line of holes with a red line running next to it. Insert a jumper from anywhere along the positive power bus (+) to BB30a.
Step 3. Add the 10K ohm resistor
To prevent too much electricity from flowing when the button is pressed, you need to add a resistor. As before, you’ll add a 10K ohm resistor (color bands are brown, black, and orange) to connect the top of the button to the negative power bus (-).
Insert one end of the resistor into BB28i and the other end into the negative power bus (-). Any hole along the blue line will work.
Step 4. Add the jumper to a GPIO pin
Finally, when the button is pressed, you need electricity to flow to a GPIO pin. For the second button, you’re using GP19. Connect a jumper wire from BB28a to BB18a (GP19).
Terrific! The second button is connected, and you’ve completed the button circuit. Let’s call the first button Button 1. It’s wired to GP06. The second button, Button 2, is wired to GP19. Now that everything is wired up, let’s write code for it!
Software: the DJ Raspi program
Your project is to turn your Pi into an awesome music player that is controlled by buttons. Here’s how it will work:
- Pressing Button 1 makes the Pi play random music clips.
- Pressing Button 2 makes the Pi play random vocal (singing) sounds.
You’ll need one of the following to hear the sounds:
- Headphones
- Powered computer speakers
- Your Pi connected via HDMI to a TV with built-in speakers
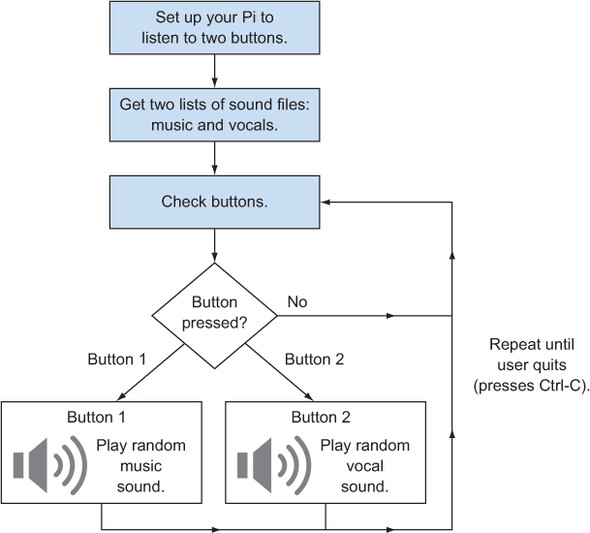
Let’s think through how this program will work. Figure 8.12 shows a quick diagram of the logic.
Figure 8.12. A flow diagram showing how the DJ Raspi program should work. The program must gather a list of sounds at the beginning and then check whether the buttons are pressed. The buttons will be checked over and over again.
Let’s write the code in this order:
1. Set up your Pi to listen to input coming from the buttons.
2. Gather a list of music and vocal sounds.
3. Program a loop to check the buttons. If they’re pressed, then play random sounds.
You’ll try to use functions along the way to simplify your code.
Let’s begin! Open IDLE by choosing Python 3 under Menu > Programming. In the Python Shell, start a new program by pressing Ctrl-N or selecting File > New Window.
Setting up the Pi: initializing the buttons
In the IDLE text editor, you’ll start by loading the Python libraries you’ll need to use. You’ll also set up a couple of the Pi’s GPIO ports to listen for electrical signals coming in from the buttons being pressed. In the flow diagram, this is the first step of initializing the buttons (see figure 8.13).
Figure 8.13. The first step is to set up the buttons as inputs. This will mean your Pi is ready to check whether it’s detecting any voltage coming in, which will happen when a button is pressed.

When you set up the GPIO ports, you use GPIO.IN to tell the Pi that you plan to use that port as an input. To prepare your Pi for input to the GPIO pins, you need to tell it which pins you plan to use. Based on the circuit, you’re using these pins as inputs:
- GP06 for Button 1
- GP19 for Button 2
The following listing shows how you can use the GPIO.setup command to set a GPIO pin to input.
Listing 8.1. Setting up GPIO pins for input

You may notice that you import a new os module. We’ll talk about why you need that in the next section when you gather your lists of sound files.
Getting a list of sounds
Lists are everywhere around you. You make lists of things you need to do, gifts to buy, places you want to visit, and favorite things, such as your top-10 movies or books.
Your DJ Raspi needs a list of sound files: one for music clips (or loops) and one for vocals. Based on the design, you need to get a list of files from a folder on your Pi, and then you need to select a random sound file from the list and play it (see figure 8.14).
Figure 8.14. The next step of the DJ Raspi program gets a list of sound files. Later, you’ll add the part that uses the button to trigger playing random sounds from the lists.

In Python, you can create lists or groups of things easily. Let’s look at some examples.
Let’s create a list of basketball player names. Open IDLE to the Python 3.x Shell by choosing Python 3 under Menu > Programming. In the Python Shell, make a list:
>>> basketball_players = ["Kevin Durant", "LeBron James", "Chris Paul",
Print out the list like this, and you’ll see what’s inside:
>>> print(basketball_players)
['Kevin Durant', 'LeBron James', 'Chris Paul', 'John Wall']
To make a list of the items, put them in a set of square brackets ([]) and separate each item with a comma (see figure 8.15). For lists of strings, each item in the list has to have quotation marks around it. Pretty simple! That’s the Python way.
Figure 8.15. You make lists by using square brackets to enclose a set of things. Each thing in the list should be separated with a comma. Python will even let you make lists that combine different types of data, like strings and integers.

Try creating a list called favorite_numbers, like so:
>>> favorite_numbers = [22, 27, 49, 121, 2, 25]
Display the contents of the list using print:
>>> print(favorite_numbers)
[22, 27, 49, 121, 2, 25]
Note
When making a list of numbers, you don’t use any quotation marks.
Enjoy making lists of some of your favorite things!
There are lots of things you can do with lists! Let’s try a few.
You make a list longer by adding more items to it. To do this, use the append method. Let’s add the name Stephen Curry to the list of basketball_players. Here is how you can use append to do that:
>>> basketball_players.append("Stephen Curry")
Use print to see the result:
>>> print(basketball_players)
['Kevin Durant', 'LeBron James', 'Chris Paul', 'John Wall', 'Stephen Curry']
Excellent! To remove an item from a list you can use the remove method. If you wanted to take John Wall out of the list, write
>>> basketball_players.remove("John Wall")
Print the list again to see if it worked:
>>> print(basketball_players)
['Kevin Durant', 'LeBron James', 'Chris Paul', 'Stephen Curry']
Wonderful! If you need to put a list in order alphabetically or from lowest to highest, you can use the sort method like so:
>>> favorite_numbers.sort()
Check that it worked by printing the list to the screen:
>>> print(favorite_numbers)
[2, 22, 25, 27, 49, 121]
The numbers are all sorted! This works on lists made of strings as well. If you sort the list of basketball_players, it puts them in alphabetical order based on the first letter of each string. Python has many built-in methods for lists.
Check the online Python documentation[a] for more things you can do with lists. Then sit back and enjoy thinking about all you can do with them in your future programs.
Go to the Python website for more information on things you can do with lists: https://docs.python.org/3.4/tutorial/datastructures.html.
For your DJ Raspi, let’s see how to
- Get the value of an item stored in a list.
- Get the length of a list.
Getting a value of an item stored in a list
Let’s start with a fresh list of basketball players:
basketball_players = ["Kevin Durant", "LeBron James", "Chris Paul",
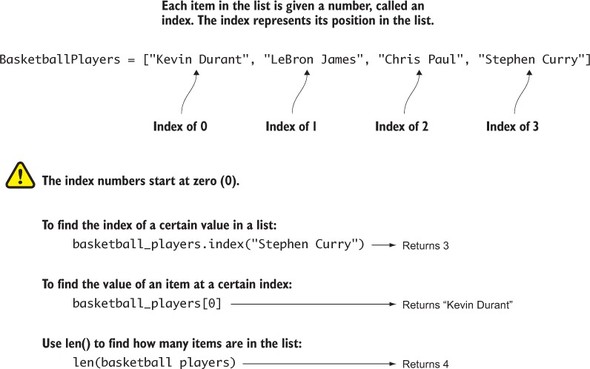
As you’ve seen, lists store information. What you might not know is that each spot in a list is given a number called the index. The index of the first item in the list is zero (0). The second item has an index of 1. The third item’s index is 2, and so on. To get the third item in the basketball_players list, you’d type
>>> print(basketball_players[2])
Chris Paul
If you want to search a list and have Python tell you the index of where an item first appears in the list, you use the index method:
>>> basketball_players.index("Kevin Durant")
0
>>> basketball_players.index("Stephen Curry")
3
If the item isn’t in the list, Python will give you an error saying so:
>>> basketball_players.index("Me")
Traceback (most recent call last):
  File "<pyshell#40>", line 1, in <module>
    basketball_players.index("Me")
ValueError: 'Me' is not in list
Note
Remember that the index for lists starts counting at 0, not 1! For example, basketball_players[1] gives you "Lebron James", the second item in the list.
Figure 8.16 shows examples of the indexes for a list and how you can get a specific item in a list.
Figure 8.16. Sets of things can be stored in lists. You can retrieve items from the list using the index, which represents the position of an item in the list. The index of a list starts at 0.
Getting the length of a list
Finally, there are times when you’ve loaded information into a list and you need a way to check how long the list is. Use the len() function to do that:
>>> yummy_snacks = ["chips", "popcorn", "donuts", "cheese",
   "pretzels", "spam"]
>>> print(len(yummy_snacks))
6
Great job—you know the basics of lists. Now let’s see how you can create lists of MP3s.
Building a list of sound files with the os library
To make the DJ Raspi project work, you need to
1. Grab two lists of sound files from folders on your Pi.
2. Make OMXPlayer play sound files from Python as part of the DJ Raspi program.
Let’s learn how.
The Pi has both these abilities through a Python module called the os module (OS stands for operating system). With it, you can run operating system commands (things you can type in the Terminal window) from your Python programs. This is fantastic, because it means you can get lists of files and also call OMXPlayer to play a certain file—exactly what you need!
Getting a list of files from a folder: using listdir()
Your Pi has some sound files on it already, as you saw in section 8.1. You’ll use the files in these two folders:
- /usr/share/scratch/Media/Sounds/Music Loops/
- /usr/share/scratch/Media/Sounds/Vocals/
The os library provides a built-in function, os.listdir(some_path), to get a list of files at some_path. To get a list of Scratch music loops and vocals, use these commands:
# Folders with sound files
path_music = "/usr/share/scratch/Media/Sounds/Music Loops/"
path_vocals = "/usr/share/scratch/Media/Sounds/Vocals/"

# Creating two lists with the files in the folders
sounds_music = os.listdir(path_music)
sounds_vocals = os.listdir(path_vocals)
If you print the lists, you’ll have something that looks like this:
print(sounds_music) ['Cave.mp3', 'Techno.mp3', 'HipHop.mp3', 'Triumph.mp3', 'Medieval2.mp3',
Wow—you have nice-looking lists! But wait: it looks like sounds_vocals has WAV (.wav) files and MP3s. Let’s filter out the WAVs so you only have MP3s.
Filtering for Only MP3s
To filter a list, you can use Python’s list-comprehension feature. List comprehension is a quick way of creating lists. When you use it, you can include certain conditions or operations that are applied to the items in the list, such as making sure all the files in the list end with .mp3. Let’s look at how you can use list comprehension to create a new list from your old list, but only keep the files in the list that end with .mp3:
sounds_music = [sound for sound in sounds_music if
  sound.endswith('.mp3')]
sounds_vocals = [sound for sound in sounds_vocals if sound.endswith
 ('.mp3')]
The list comprehension has a for loop inside it. In this case, Python is looping through the list of sound files in your original list of sounds. For each item in the list, Python only adds it to the new sounds list if it matches the condition of being a file ending with .mp3.
Playing a sound when a button is pressed
Next in your plan is to write the code that will play a random sound from your lists when a button is pressed. You’ll need this to be in a loop so the buttons are repeatedly checked to see whether they’re being pressed (see figure 8.17). Let’s start by creating the game’s title and creating the main game loop.
Figure 8.17. The main part of the DJ Raspi program is the loop to check the buttons. You’ll use a while loop to check the buttons over and over again. If one of them is pressed, you’ll tell Raspbian to play a random sound using OMXPlayer.
Loop to check the buttons
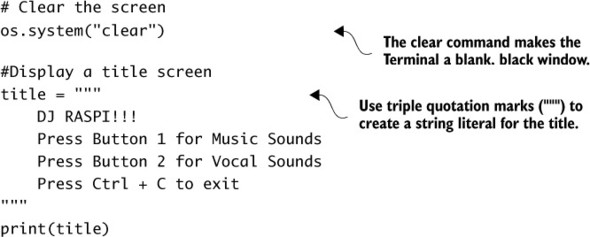
First let’s add some code to display a title screen and the DJ Raspi instructions. Feel free to make the title screen fancier!
Listing 8.2. DJ Raspi title screen
Now let’s write the code to loop over and over again to check whether either button is being pressed. When a button is pressed, the GPIO pin will give you a response of True, and you can then call a function to play a random MP3.
Listing 8.3. DJ Raspi game loop
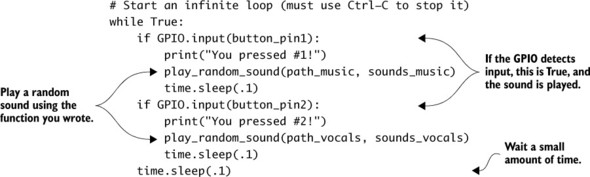
The code repeatedly checks whether Button 1 or Button 2 is pressed. If Button 1 is pressed, the code plays a random music sound. If Button 2 is pressed, the code plays a random vocals (singing) sound. If neither is pressed, the code loops around and checks them again. The loop never ends, so you’ll need to press Ctrl-C to exit the program.
Playing sounds: using operating system commands from Python
You’re ready to play your sounds! The os module will let you run operating system commands (ones you normally run using Terminal). To play the first sound in the sounds_music list, you could write
os.system("omxplayer -o local '" + path_music + sounds_music[0] + " &")
Later in this chapter, we’ll explain why the end of that command has an ampersand (&). The result of this command would be the same as typing this at the Raspbian command line:
omxplayer –o local "/usr/share/scratch/Media/Sounds/Music Loops/Cave.mp3"
Note
Remember, if you’re outputting the sound to HDMI (if your TV has speakers), you need to change –o local to –o hdmi.
Excellent! Let’s review what you’ve learned so far:
- Your Pi can play sounds that are in MP3 format using OMXPlayer.
- Python can store sets of things as lists.
- The Python os library has a function called listdir(path) that can give you a list of sounds in a folder.
- Python’s os library has an os.system(command) function that can run operating system commands from Python, such as playing sounds with OMXPlayer.
Functions!
Let’s think about how you can write the functions for DJ Raspi. You’ll want to create two functions:
- get_MP3_sounds —This function will get a list of sounds ending in .mp3 from a specified folder. You’ll tell the function (pass it a parameter) the name of the folder where you want to get the MP3 sound files. The function will return a list of sounds.
- play_random_sound —This function will take a list of sounds, pick a random number, and then use os.system to tell Raspbian to play the sound with OMXPlayer.
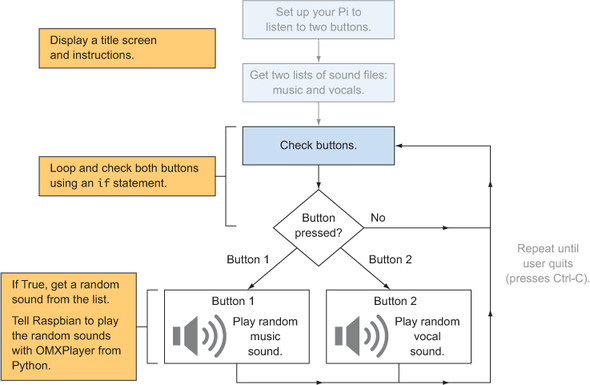
Figure 8.18 shows where these functions fit into the flow diagram.
Figure 8.18. There are two places where you can create functions so you can reuse code. One function creates a list of sound files, and the other function plays a random sound when a button is pressed.

Why not make this a single function? One reason is that you only need to load a list of sound files once, near the beginning of the program. You play the sound files every time a button is pressed. Listing 8.4 shows the code for the get_MP3_sounds and play_random_sound functions.
Note
Remember to put these functions near the beginning of the program. They must be added before they’re used for the first time.
At the end of this listing, you use (or call) get_MP3_sounds twice to get your lists of music and vocal sound files.
Listing 8.4. Functions for loading and playing sound files

You may have noticed that a few extra things are added to this line:
os.system("omxplayer -o local '" + sound_path +
          "/" + sound_filesound_files[random_sound_index] + "' &")
This line joins the command to run OMXPlayer with the path to your sound files (sound_path) and the random sound file you want to play (sound_filesound_files[random_sound_index]). At the end, you add an ampersand (&). The ampersand tells Raspbian to run the command in the background. This is so you can quickly press one button and then the other.
When you play sounds, you want to be able to press the buttons quickly, like a DJ, and have the sounds overlap to create interesting music. Normally, your Pi would play one sound, and, when it was finished playing, let you play another. Not what you want. Here is an example of playing two sounds. You can’t run the second command until the first one is finished:
omxplayer /usr/share/scratch/Media/Sounds/Vocals/Oooo-badada.mp3
omxplayer /usr/share/scratch/Media/Sounds/Vocals/Hey-yay-hey.mp3
Luckily, your Pi can do a few things at once. You might have several different windows open at the same time. Each window is connected to some underlying code or set of instructions running on your Pi. These underlying sets of code are called processes or threads. Raspbian, like other modern operating systems, manages these processes and assigns each one its own unique ID number. An ampersand (&) placed at the end of a command tells your Pi to run the command as another process in the background alongside any other processes.
Try these two commands again, but this time with ampersands:
omxplayer /usr/share/scratch/Media/Sounds/Vocals/Oooo-badada.mp3 &
omxplayer /usr/share/scratch/Media/Sounds/Vocals/Hey-yay-hey.mp3 &
Notice the ampersand (&) at the end of each command. In this way, the Pi will play your sound, but the code won’t make your Pi wait for the sound to finish before doing something else. Adding an ampersand at the end of the OMXPlayer command makes the button play each sound in the background. Remove the ampersand to play one sound at a time. Because this is a feature of the OS, the concept of using ampersands to execute commands as their own unique processes applies to other Linux commands that you know already or will learn.
Great! You’re ready to test your project!
Testing: your first gig as DJ Raspi
Save the code as DJRaspi.py, and try running it. Select Run > Run Module (or press F5) from the IDLE text editor to run your program. If you have an older version of Raspbian (prior to October 2015), programs that use the GPIO pins must be run from the Raspbian command prompt as the superuser (or root). Open Terminal, and enter the following command:
pi@raspberrypi ~ $ sudo python3 DJRaspi.py
You should see the title screen display. Test it by pressing the buttons to see if they work.
Note
Remember that any program that uses GPIO pins must be run from the Raspbian command prompt as the superuser (or root).
Believe it or not, it’s rare for a program to work perfectly the first time. If it doesn’t, read through the following “Troubleshooting” section and review your circuit and program to try to figure out how to get it working.
Troubleshooting
If sounds aren’t playing when you press the buttons, here are some things you can check:
- Check the circuit on the breadboard. Is the ribbon cable connected properly, with the first wire connected toward the edge of your Pi, away from the USB ports?
- Double-check that the jumpers, buttons, and resistors are in the right holes and pressed all the way into the breadboard.
- Does your program print “You pressed #1!” and “You pressed #2!”? If it does, you know your circuit is working, and either
it’s an issue with the code to load the sound files or your speakers or headphones aren’t working. Try running one of the
following commands from Terminal to check whether the speakers are working.
For headphones or speakers plugged into the 3.5 mm audio output:
omxplayer –o local /usr/share/scratch/Media/Sounds/Vocals/
For TV speakers connected by HDMI: Oooo-badada.mp3omxplayer –o hdmi /usr/share/scratch/Media/Sounds/Vocals/
Oooo-badada.mp3 - Look through your Python program for errors. Try adding some print statements to your functions to make sure they’re getting the list of MP3 files properly.
If you’ve enjoyed creating DJ Raspi, check out the button challenges.
![]()
Challenges
Try some of these button activities for extra fun!
Double button press surprise
Give your program a surprise button combination. See if you can make pressing both buttons at once play a new set of sound effects.
Hint: When you want something to happen only if both conditions are True, you can use the ampersand (&). The if statement will only be True if both the first and second conditions are True. It looks like this:
if GPIO.input(button_pin1) & GPIO.input(button_pin2):
    print("Both buttons are pressed!")
Here is the path to some Scratch sound effects on your Pi:
path_effects = "/usr/share/scratch/Media/Sounds/Effects/"
Yoda Magic 8 Ball
There is a great classic toy called the Magic 8 Ball. It’s a ball that displays an answer to a question when you shake it. Ask it a question, and you’ll get some truly magical advice. The Magic 8 Ball has 20 different answers, ranging from “It is certain” to “My sources say no.”
Note
I don’t recommend using the Magic 8 Ball to advise you on major life matters!
Your challenge is to make a Magic 8 Ball program:
- Ask a question aloud, and then press a button.
- Pressing the button makes your Pi select a random Yoda clip from a folder and play it.
To get started, find some short sound files of Yoda sayings. One place to find them is on soundboard.com. Search for “yoda” to see if you can locate some good clips (you’ll need to create an account to download them for your personal use).
Bonus: Try to give your Pi a handy button that plays Monty Python sound clips whenever you press it.
Continuing to explore
Now that you’ve given you Pi a new sense of touch, you’ll only need to change a few lines of code to make many other projects, such as these:
- An interactive display that shows different digital photographs each time a button is pressed
- Your own Raspberry Pi movie player that plays clips or movies at the press of a button
- An MP3 music player that shuffles through your favorite songs
You can also expand past buttons to sensors, such as passive infrared (PIR) sensors or cameras. For example, PIR sensors detect motion near the sensor. These are great for creating a Pi security system or something that scares people when they come to your door. Maybe you want to trigger a movie to make a frightening zombie head appear or generate a blood-curdling scream. Your only limit is your imagination and mischievous thoughts.
Summary
In this chapter, you learned that
- A Pi can sense the environment around it using the input capability of the GPIO pins. This creates incredible possibilities to make the Pi have human or even superhuman senses.
- Python lists make it easy to store and retrieve sets of things like numbers, sound files, images, and videos.
- Buttons act as simple switches that send a small amount of electricity to your Pi’s GPIO pins, which it can detect. You have nothing to fear in wiring up buttons or other sensors!
- Python programs can run Raspbian commands using the os library. This opens lots of possibilities for your programs, from playing music to showing or taking videos, displaying or taking pictures, and accessing information from websites.
You’ve completed a great adventure in learning Python programming and how to use your Raspberry Pi. But there is much more excitement ahead of you. Check out appendix D for even more ideas of projects you can do with your Pi. With your Raspberry Pi, knowledge of Python, and a bit of fearlessness, the possibilities are endless!