
CHAPTER 8

Mechanics for External Forces
The Force will be with you. Always.
Obi-Wan Kenobi
8.1 Introduction
Designing games is challenging now more than ever. In addition to high-end gaming consoles and high-powered desktop graphics cards, there are also low-powered mobile devices for which to cater. Of course, if you're designing a game for a mobile device it is not likely it will be released on a console. In addition to considering the different ways in which art assets are delivered, the designer also has the challenge of coming up with a really unique gaming experience.
The flood of mobile devices in the pockets of almost every consumer over 9 years of age has recently seen many small and independent game studios pop up—each battling for the casual gamer's attention.
Human-computer interaction (HCI) technology that once only existed in science fiction is now forefront in the designer's mind. Whether it be the tapping and dragging of a finger across a tablet screen or the tracking of waving arms and legs in front of a screen, the opportunity to create truly unique user experiences has never been more achievable.
Furthermore, if the challenge of designing for multiple platforms and a diversity of HCI methods weren't enough, multiplayer modes have almost become a necessity. Thanks to Twitter, Facebook, and others, today's players want to share their gaming experience with their friends, even if it is just to tell them they beat the other's high score.
This chapter examines the issue of new technologies with relation to game design and development. It examines how to integrate interactive devices, mobile devices, and social networking with your own games at the technical level. Workshops for integrating Unity with Twitter, Facebook, mobile devices, and more are featured throughout.
8.2 Up and Running on a Mobile Device
One of the best ways to investigate as many of the new HCI features used in games as possible is to deploy an application to a mobile device. Unity supports both Android and iOS development with the purchase of an extra plugin. If your version of Unity is still in its trial period you will have up to 30 days to explore these platforms.
The next workshop demonstrates deployment to the Android platform as the process is far simpler than for iOS.
![]() Unity Hands On
Unity Hands On
Your First Android Application
You will need Unity Android and an Android mobile device to create this project. A 30-day trial version comes with the Unity Indy download.
Step 1. Download and install the Android SDK from http://developer .android.com/sdk/index.html.
Step 2. Open Unity and create a new project.
Step 3. From the main menu select File > Build Settings.
Step 4. In the Platform box click on Android.
Step 5. At the bottom click the Switch Platform button.
Step 6. Plug in the Android device with the USB cable to the computer.
Step 7. Turn on the device.
Step 8. If it is the first time the device has been turned on, skip over all the tutorial and settings checks and setup (you can do this later).
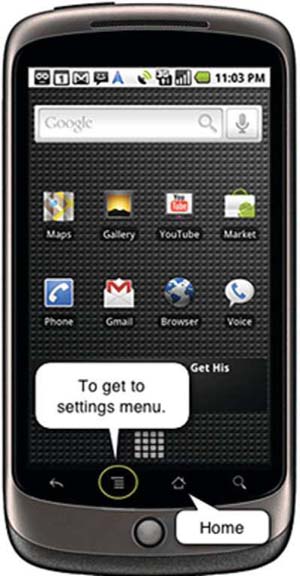
Step 9. The main screen will look something like that shown in Figure 8.1.
Step 10. Press on the menu settings icon on the device. This will bring up a menu.
FIG 8.1 The Android interface.
Step 12. Select Applications.
Step 13. Select Development.
Step 14. Check the USB debugging and Stay awake options.
Step 15. Press the little house button to go to the home screen.
Step 16. Return to Unity.
Step 17. Go back to the Build Settings window.
Step 18. Click on the Player Settings button.
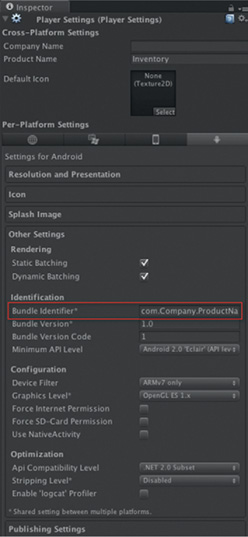
Step 19. In the Inspector, locate the Bundle Identifier field in the Other Settings area. Type a value in here of the format com.yourname.TestApplication as shown in Figure 8.2.
Step 20. At the top of the Inspector enter a Product Name. This will be the name under the icon for the game on the phone.
Step 21. Back in the Build Settings window click on the Build And Run button.
Step 22. Unity will want a name for the build file: “test” will do for now. If this is the first time you have created an Android build, Unity will also want to know the location of your Android SDK folder.
Step 23. The application will build and be pushed to the phone.
FIG 8.2 Essential settings for Unity Android deployment.
Step 24. It will run automatically and you will get the Unity splash screen followed by a blue screen. This is an empty game project. The one you just created and it is successfully running on the mobile device.
![]() Note
Note
If Unity returns the error “No Android Device” when trying to build, unplug the phone and plug in again. Windows may want you to install new software. Allow it to find the software and install it. It will require drivers for the “Android Composite ADB Interface.”
![]() On the Web
On the Web
For detailed instructions on setting up Unity and Android, watch the author's tutorial at http://vimeo.com/17919196.
Step 25. Return to Unity. In the Game, change the aspect to Nexus One Tall or another mobile resolution to suit your device as shown in Figure 8.3.
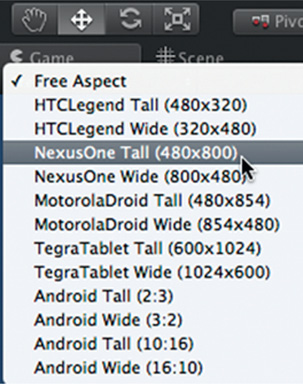
FIG 8.3 Selecting the screen display resolution of a mobile device in the Unity Editor.
Step 26. Download Chapter Eight/Google Android.3ds and add to the Project.
Step 27. Drag the Google Android from the Project into the Scene.
Step 28. Double-click on the Google Android in the Hierarchy. The Scene view will zoom in on it.
Step 29. If the axis gizmo in the top of the Scene is set to ISO, click on it to set it to Perspective.
Step 30. Select the Main Camera in the Hierarchy. From the main menu select GameObject > Align with View. This will match the camera to the Scene orientation. The 3D model will appear in the small camera preview window.
Step 31. Add a directional light.
Step 32. Select File > Build & Run to send the app to your mobile.
8.3 Integrating Haptics and External Motion into Games
The word haptic derives from the Greek meaning “a sense of touch.” In addition to touching a screen, keyboard, controller, or mouse, computer games suffer from a lack of touch. Console controllers introduced haptics to games through vibration. Today this is still the most commonly used touch feedback. Some of the first game-related peripherals to include vibration as a game feedback include the Nintendo 64 Rumble Pak and Sony PlayStation's Dual Shock analog controller.
![]() Unity Specifics
Unity Specifics
Vibration
You can make an iOS and Android device (with the required capability) vibrate by executing the code iPhoneUtils.Vibrate();
In 2003, Sony released the EyeToy for PlayStation 2. This is essentially a webcam that attaches to the gaming console. Through the processing of the image taken by the camera, computer vision and gesture recognition algorithms can estimate the movements of a player.
Although the Nintendo Wii took game haptics to a new level with its Wii Remote, it was Microsoft that broke new ground by releasing the Kinect in 2010. Although players are not feeling the game environment with a sense of touch, they are still interacting with it kinesthetically and therefore experiencing a level of immersion not before experienced in preceding games. The Kinect provides full-body 3D motion capture through the use of a continually projecting infrared laser out in front of the screen in a pixel grid. Depth data are gathered from a monochrome sensor gathering information about the reflections of the laser. Currently the Kinect is capable of tracking six people simultaneously. The Kinect is also able to perform facial and voice recognition tasks.
The Kinect differs from the PlayStation Move, a game controller wand with built-in accelerometers and light on top, by sensing actual 3D data. The Move released also in 2010 uses a combination of motion sensing with visual recognition from the PlayStation Eye (the successor of the EyeToy) to recognize player movements.
Numerous groups are attempting to make access to the Kinect open source and cross platform. These include OpenKinect (http://openkinect.org/wiki/Main_Page) and OpenNI (http://openni.org/).
OpenKinect is a community of developers bringing free programming interfaces for the Kinect to Windows, Linux, and Mac such that independent application developers and researchers can implement their own Kinect-based games and applications. Links to their source code and tutorials for installation and use can be found on their Web site.
OpenNI is a not-for-profit organization driven by industry to promote the use of natural HCI in applications and games. Their OpenNI framework is open source and helps developers to integrate low-level vision and audio sensors and high-level computer vision and tracking algorithms for use in products that deliver third-party middleware solutions to be used by others.
![]() Unity Specifics
Unity Specifics
At the time of writing, integration of the Kinect with Unity is in its infancy, although there are some compelling examples on the Unity forum. For the interested reader, the author recommends starting with the example Unity project available from https://github.com/tinkerer/UnityWrapper. You will also need to install OPENNI and drivers to get the Kinect to talk to your desktop computer.
Succeeding the technology of the Kinect are systems such as the Stage System by Organic Motion (http://organicmotion.com/). Currently used for real-time motion capture, this system has the potential to make games that are projected onto all the walls of a room where the player is positioned right in the center of the action. The Stage System has the ability to capture true full-body 3D-surround motion and structure with the use of its six cameras. It differs from the Kinect in that the Kinect only captures distances from the device itself to whatever is in front of it and tracks for key human features such as hands, feet, and head. Technologies such as these are driving games toward full-body immersive systems reminiscent of Star Trek's Holodeck.
8.4 Accessing Mobile Hardware Features
Believe it or not, mobile phones weren't originally designed for playing games. However, as games have become more popular on the platforms and their hardware and screens have advanced, games taking advantage of all the devices have to offer have grown in numbers. Primarily these include interacting with touch screens, inbuilt motion sensors, and location-based services.
This section explains these features and how to access them from within Unity.
8.4.1 Accelerometer
Accelerometers are electromechanical devices that measure acceleration forces. A circuit board, no bigger than a fingernail, can measure its angle of tilt by detecting the downward force of gravity and how fast it is traveling by sensing motion and vibration. Modern mobile devices have a microelectromechanical systems accelerometer integrated. These consist of a simple cantilever beam attached to a seismic mass sealed in a gas pocket. The beam acts as a bendable needle that moves under accelerative forces. Imagine the pendulum of a grandfather clock on the back of a truck and how it would move as the truck accelerates. The accelerometer is, in principle, the same. The movement of the beam is measured and reported as acceleration.
These same type of accelerometers are also found in the Nintendo Wii Remote and its Nunchuk and the PlayStation 3 Dual Shock 3 controller.
Data from accelerometers can be used in games to change the screen orientation, for example, turning a controller on its side, giving movement commands such as bowling or batting in Wii Sports games, or moving a character around in an environment, to name a few. The iPhone version of Spore Origins, for example, allows players to navigate their creature around in the primordial slime by tilting and rotating the device.
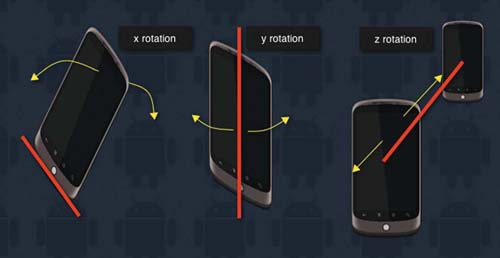
The accelerometer reports movement in 3D. In the case of Android, holding the device in an upright portrait with the screen facing you, an x acceleration will be registered if you tilt the phone forward and back, a y acceleration will be registered as the phone is swiveled around its vertical midpoint, and z acceleration is registered when the phone is brought toward and away from you. This is illustrated in Figure 8.4.
FIG 8.4 Acceleration axes of the Google Nexus One HTC mobile.
![]() Unity Specifics
Unity Specifics
Measuring Acceleration
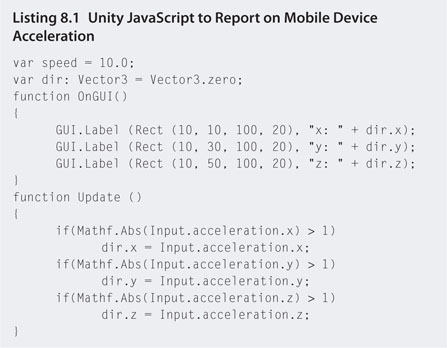
To access a device's acceleration data from within Unity, the Input class is used. When played on an iOS- or Android-enabled device (with an accelerometer), Input.acceleration will return the device's acceleration as a Vector3 value. The code in Listing 8.1 can be added to its own JavaScript, attached to the Main Camera, and deployed to a mobile device to display current acceleration values on the screen. The x, y, and z values obtained in this example could be used to change transform data of a game object and thus its position in the game world. Be careful though! The X, Y, and Z of the device do not automatically match the X, Y, and Z of your game world.
8.4.2 Orientation
As revealed previously, the accelerometer in a device also measures its orientation. As the accelerometer is fixed with respect to the device, it is assumed that its orientation is the same. A device can register one of six orientations: facing up, facing down, upright portrait, upright landscape, upside-down portrait, and upside-down landscape.
![]() Unity Specifics
Unity Specifics
Measuring Orientation
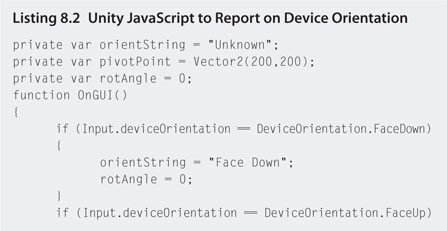
As in the previous section, device orientation can be gathered from the Input class. The orientation value is found in Input.deviceOrientation. Each of the six orientation positions is catered for with the values DeviceOrientation.FaceDown, DeviceOrientation.FaceUp, DeviceOrientation.PortraitUpsideDown, DeviceOrientation.LandscapeLeft, DeviceOrientation.LandscapeRight, and DeviceOrientation .Portrait. These orientations relate to the Google Nexus One HTC mobile as shown in Figure 8.5.
Adding the script in Listing 8.2 to a new JavaScript file, attaching it to the Main Camera, and deploying the application to a mobile device will illustrate the reporting of orientation from within Unity. The orientation can then be used to move characters and/or flip the player's view.
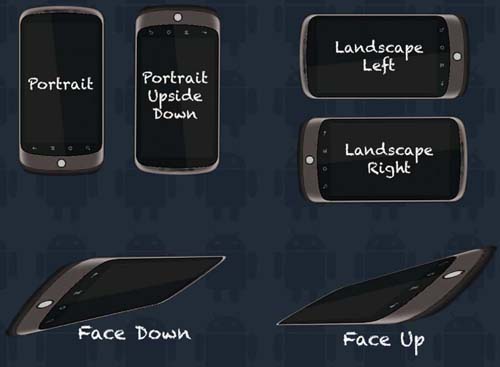
FIG 8.5 Orientations of a Google Nexus One HTC mobile phone.
8.4.3 Web Services
Access to the Internet is another feature integrated into mobile devices. People use them to surf the Web and send and receive email. This functionality can be exploited in games to send emails from within a game or obtain data from a Web site. For example, extra game information may be obtained from a Web site on an as needed basis. This occurs in Parallel Kingdom when the player wants to look up further information on a monster or item.
Calling and Retrieving URLs
Unity provides a WWW() function that can make a URL request retrieving data. As data can be sent and retrieved in any format, it makes it quite a powerful feature. For calls to Web sites, data are collected in raw HTML. You cannot display the webpage as it appears, but rather gather its HTML code. XML and HTML Unity parser packages can be purchased from the Unity Store should you wish to display a Web site inside a Unity application.
The following workshops demonstrate simple methods for sending emails. In the latter exercise where a Web server is employed, the code could be modified to support the sending of user data to a game server for a multiplayer game. However, WWW calls are notoriously slow with respect to a game server and this method would not be recommended for live-action games, such as real-time car racing.
![]() Unity Hands On
Unity Hands On
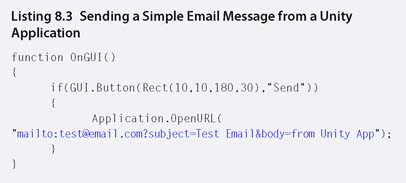
Sending Mail with Device Mail Client
Step 1. Create a JavaScript file named interface and add the code shown in Listing 8.3.
Step 2. Attach this code to the Main Camera.
Step 3. This code won't work in the Unity Editor. Build and push the app to a mobile phone.
Step 4. Run the app. When you push the Send button, the email client installed on the device will open with the subject and body lines already included.
Step 5. To send more information from the app to email client, modify interface.js to that in Listing 8.4.
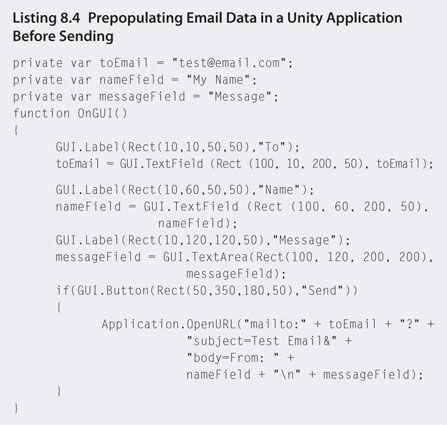
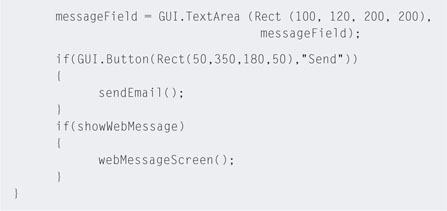
Step 6. Play. An email form will be created in the Unity app as shown in Figure 8.6. When send is pressed the information entered will be sent to the user's email client.
![]() Note
Note
The format for a mailto string should be mailto:email_address?email_information. The question mark always separates the email address of the recipient with extra data, which are divided into a number of headers separated by ampersands. Each header has a name and its own value set with an equals sign. The headers can include:
- subject—the text that will appear in the subject line
- body—the email message
- cc—the email address of others to send a copy of the message
- bcc—the email address of others who will receive the email but not appear in the send email message of the original
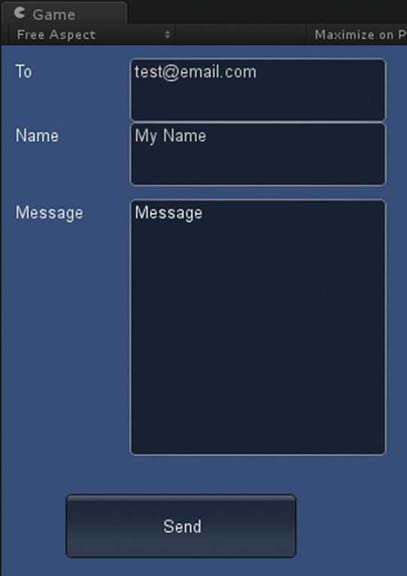
FIG 8.6 A simple email form screen in Unity.
Sending Mail via a Web Server
This method of sending an email from your app may be preferred as the application will not close to open the mail app. Data are sent straight from the app to the server. You can also use this method for passing other information to a Web server.
Step 1. Create a new Unity Project.
Step 2. Create a JavaScript file called emailViaServer and add the code shown in Listing 8.5. Note that the server URL is shown in bold in the code. This is where you put the URL of your own server.

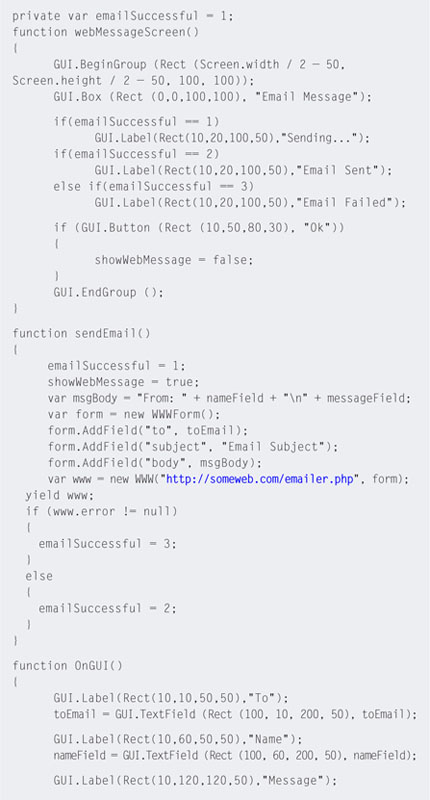
Step 3. Attach this code to the Main Camera. You can test this application in the Unity Editor as it does not require your mail program. It will send data to a server and the server will send the email. Remember to check your spam folder for the test email.
Step 4. The server code is written in php. The code is very simple. In this case, emailer.php is given in Listing 8.6.
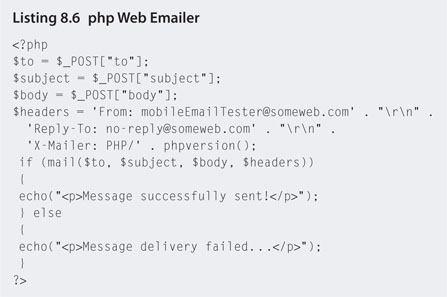
If you have access to a php-enabled Web server, try creating your own php server file with this code and redirect your mobile app to it. The full URL of emailer.php should appear in the sendEmail() function of Listing 8.5.
8.4.4 Global Positioning System (GPS)
Today's smart phones and tablets come with GPS receivers. These devices calculate their position on the earth by bouncing signals off the satellites of the global positioning system. The GPS was conceived by the American Department of Defense (DOD) in 1973 with the first satellites being launched in 1978. In 1993 the DOD decided to make it free for civilian use. The official name of the system is NAVSTAR (Navigation System for Timing and Ranging).
The GPS consists of 30 satellites orbiting the earth within a distance of 20,200 kilometers. The satellites are solar powered and circle the globe two times each day. The configuration of the satellites is such that at any location on the Earth's surface at least four are visible in the sky.
The GPS receiver in a mobile device calculates its position through analysis of the high-frequency, low-power radio signals emitted by the satellites. It determines its distance from any four of the satellites it is able to detect and works out its position. The process is called trilateration.
Trilateration finds the intersection of a number of circles or spheres. In the case of 3D space and the GPS system, for each detected satellite a sphere can be imagined around each with a radius equal to the distance to the satellite calculated by the GPS device. The location of each satellite is known, as the DOD monitors them constantly to ensure that they are aligned. With this information from four satellites and including the earth itself as another sphere in the equation, the location of the GPS device can be restricted to the area in which all spheres intersect. This process is illustrated in Figure 8.7 with just two spheres. The typical accuracy of GPS in mobile devices is around 10 meters.
Possibly the largest GPS-based game is Geocaching. It's a worldwide treasure hunt involving the hiding and locating of small boxes of items placed all around the globe. The GPS positions of geocaches are registered on the Web. Using a GPS navigation system, people scour the earth, arriving at the correct coordinates and then searching in the vicinity for a box, canister, or jar hidden cleverly under a pile of sticks, behind a brick, or even inside hollow fence poles. When found, the person records his or her presence on the log book inside and leaves a small token or gift. More details about the geocaching phenomenon can be found at http://geocaching.com.
The general genres of games that include geocaching are known as location-based games. Most are in the format of real-world scavenger hunts, such as visiting locations for points or virtual artifacts. Tourality (http://tourality.com/) is one such game; see Figure 8.8. The goal is to reach as many predefined GPS locations (stored in game sets) in the shortest amount of time. Tourality generates game sets based on the location of the player. It is possible to play in single player or multiplayer mode.
FIG 8.7 Satellite trilateration with two satellites.
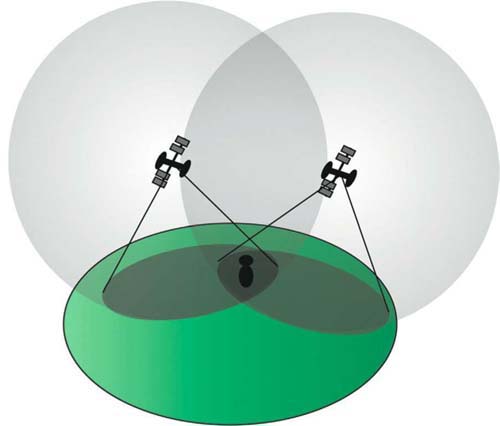
FIG 8.8 Tourality.

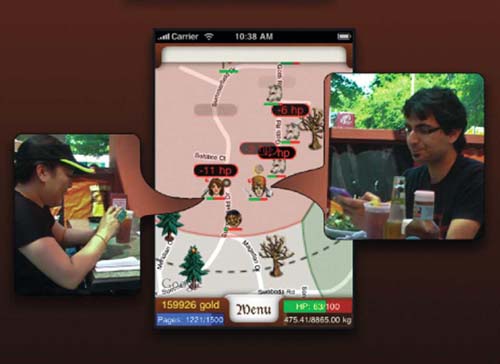
FIG 8.9 Parallel Kingdom.
Parallel Kingdom by PerBlue is the first location-based mobile massively multiplayer online role-playing game played in the real world (http://parallelkingdom.com/). It uses a player's GPS location to superimpose an imaginary fantasy world over the top of a Google Map as shown in Figure 8.9. The player can move around an approximate 1.3-mile radius on the map by tapping on the mobile screen. To move farther afield, the player has to physically go to another location in the real world. As with other role-playing games, players fight monsters and collect items while exploring their environment for experience points and leveling up their skills.
My Grove, by Kranky Panda (http://krankypanda.com/mygrove/), is another location-based multiplayer game that creates a virtual world over a map of the real world as shown in Figure 8.10. Players move from one geographical location to another with the goal being to plant and maintain virtual fruit trees to offset carbon emissions. Players compete against each other to be the top fruit producers in their area. They can also help other players tend to their trees or sabotage them!
You too can use GPS coordinates in your own games. The next workshop shows you how to obtain a player's location in Unity iOS and Android.
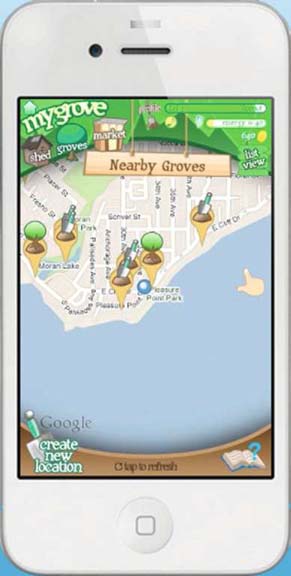
FIG 8.10 My Grove.
GPS
Step 1. Create a new Unity project. Set it to build for iPhone or Android depending on the device you have.
Step 2. Create a new JavaScript file called getGPS. Add the code shown in Listing 8.7.
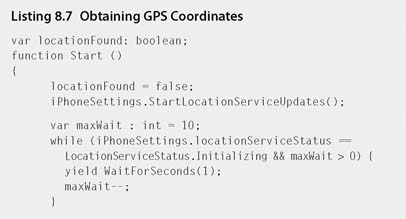
Step 3. Play. If your mobile device can access satellite data, the screen will contain details of your GPS location.
8.4.5 Augmented Reality (AR)
Although AR technology has been available since 1968, it has only been since 2006 or so that applications have become increasingly popular. This is due primarily to the availability of webcams with desktop and laptop computers and cameras, coupled with increased processing power in handheld devices and mobile phones. Technology from the domain of three-dimensional gaming is particularly key with respect to augmented reality as it allows efficient and seamless integration of high-quality animated virtual objects with AR applications.
In recent times, AR has slowly been creeping into the field of computer games. Some interactive applications of note include the Sony PlayStation Eye Toy and the EyePet and the Ninendo DS3D Nintendogs. In these games, players see their real world streamed via a camera onto the screen and superimposed with virtual game characters. The characters are positioned such that they appear to be existing in the real world. Players almost feel like they can reach out and touch them.
Augmented reality is a multidisciplinary field based in computer science with the goal of providing a viewer with an environment containing both real and virtual objects. With the use of mobile devices with cameras, computer-generated images are projected on top of the physical environment. To ensure correct positioning of virtual objects in the real world, hardware and software are required to determine accurately the viewer's location and orientation (point of view, POV). The POV can be matched with the location of a camera in a virtual model of the physical location and augmented objects and information projected onto the real-world image. Alternatively, a visual symbol in the real world known as a fiduciary marker can have its position relative to the POV determined and used as the location and orientation of a virtual object. This latter AR technique is examined in this section as such applications can be created easily for Android mobile devices with Unity and the Qualcomm Augmented Reality SDK.
![]() Unity Hands On
Unity Hands On
Augmented Reality in Unity on Android Device
Step 1. Visit https://ar.qualcomm.com/qdevnet/sdk and download the QualComm Unity Extension. Install on your computer as per the instructions on the Web site.
Step 2. Create a new Unity project and import the QCAR1.0.unitypackage. Set the project for the Android platform.
Step 3. In the Project open the Qualcomm Augmented Reality Prefabs folder and drag and drop the ARCamera into the Scene. Delete the original Main Camera.
Step 4. Download Chapter Eight/marker.unitypackage and import into the project. This package contains AR tracking marker data.
Step 5. Drag and drop Image Target prefab into the Scene from the Qualcomm Augmented Reality > Prefabs folder in the Project. Set the Image Target of this to tracker as shown in Figure 8.11.

FIG 8.11 Setting the AR marker.
Step 6. Add a cube to the Scene. Resize the cube and position it on top of the marker as shown in Figure 8.12. This will be the size and position of the cube relative to the marker in the AR application.
Step 7. Download the marker from Chapter Eight/marker.jpg and print out (if you are unable to print, you can also simply open the image and point your device at your screen).
Step 8. Select File > Build and Run from main menu. The camera will open on the Android device. Point it at the marker and the cube will appear as shown in Figure 8.13.
FIG 8.12 A cube positioned on the marker.


FIG 8.13 A simple AR application with Unity running on Android.
8.5 The Social Mechanic
Whether you are playing a game on a mobile device, desktop computer, or console, nowadays it is difficult to escape the social element. From creating personalized 3D avatars on Xbox live to inviting friends to farm virtual pastures on Facebook, the opportunity to boast about your fortunes (or misfortunes) in computer games now expands much farther than your immediate family and friends. Most computer games proudly display the Twitter, Facebook, MySpace, OpenFeint, and other icons on their menu screens—encouraging you to share your gaming experiences with the wider community.
As online social networks have been developed by other parties, it's not always an easy process to integrate your game with their system. Fortunately, many developers provide application programming interfaces (APIs) for you to use in your own code. These are plug-and-play functions that you can call in your script to access their system's functionality.
This section looks at two popular social network APIs and how they integrate with Unity.
8.5.1 Twitter
Twitter is a Web service allowing people to post a message 140 characters long to a Web site. The message isn't for anybody in particular, although Twitter allows other subscribers to follow the messages of another. In a way it is a method for posting your thoughts at any time into cyberspace for nobody or everybody to read about. The Twitter.com Web site was founded by Jack Dorsy and was launched in July 2006. Since then it has grown to over 200 million users posting around 200 million messages (called tweets) a day.
Twitter has its own API allowing other applications to retrieve twitter data. This API can be run as a URL typed into a Web site. For example, at the time of writing, typing http://twitter.com/statuses/user_timeline/aplusk.json?count=2 into a Web browser will return the text shown in Listing 8.8 —the last two tweets by Ashton Kutcher, supposedly the most followed person.

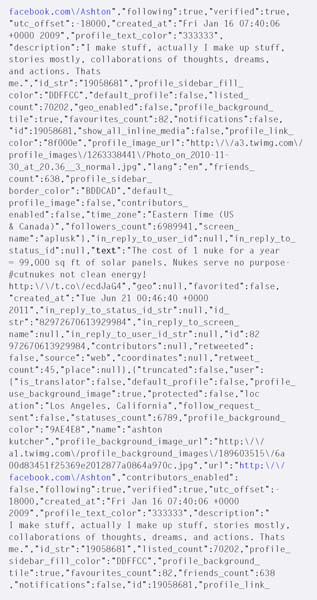
Data returned are in a format called JSON (JavaScript Object Notation). It was designed as a human-readable text data interchange standard. Although it's difficult to make immediate sense of it by just looking at Listing 8.8 (because it is standardized), computer algorithms can be written to extract data into a more meaningful format. Messages in JSON are in the format key : data. To find messages typed in by Ashton among the other text, the key “text” is searched for and the following text in double quotes is the actual message. For the reader's benefit, the key “text” has been typed in bold in Listing 8.8 after which you will find the message.
Posting messages to Twitter on behalf of a user is much more complex. There are three authentication steps to which you need to adhere. The first step is to send Twitter a message from your application asking for permission to access the user's account. The user's Web browser then opens, asking them if it is ok for the application they are using to access the Twitter account. If the user permits this access he or she receives a PIN number. The user enters this PIN number into the application. Following this, the application sends another message to Twitter telling it that it has the PIN. Once Twitter determines that this PIN is correct, it sends personalized authority tokens back to the application. These tokens can be stored inside the application so that the user doesn't have to go through the authorization process again. With the tokens, the application can post tweets to the user's Twitter account.
The authorization process and sending tweets from a Unity application are examined in the next workshop.
Tweeting Unity
Step 1. Go to https://dev.twitter.com/apps/new and register your application. This will give you a number of keys and authorization values for your application. You can do this even if your application is only for the personal testing purposes of this tutorial. After you submit the application you will receive personalized codes for your app. They will look something like this:
API key:
MpYzjvyhPZJe8Qyiitigfw
Consumer key:
SpMzjvyjKOJe5Xyiitigfw
Consumer secret:
LKJ5ddZzJOwaQghWRRmzR3YU4t0EypqASDf93Ge98
Keep these values handy as you will require them soon. Note that the ones listed here are not real and will not work in your application.
Step 2. Create a new Unity project with a new Scene called TwitterPosting.
Step 3. Download and add Chapter Eight/PostTweet.js to the Project.
Step 4. Create a new folder in the Project called Plugins. Download and add Chapter Eight/TwitterHelpers.js. The reason the .cs files go in the Plugins folder is that we want Unity to compile them first—that way the functions inside are ready for use by the PostTweet code.
Step 5. Attach PostTweet to the Main Camera.
Step 6. Modify the PostTweet code to include the OnGUI function given in Listing 8.9.
The code in Listing 8.9 displays the box for entering the user's PIN after they have received it from Twitter. If they are already connected with Twitter the text field for submitting tweets is displayed instead.
Step 7. Next you'll want to store the tokens once the user has been authenticated so that the next time they use your program they don't need to go through the authentication process again. To do this we will use the PlayerPrefs functions to set and get these values.
Step 8. Modify the Start() function of PostTweet to that shown in Listing 8.10.
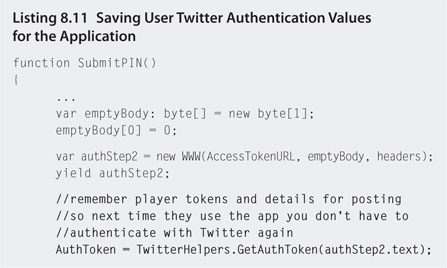
Step 9. After the user has submitted the PIN for the first time and has been authenticated successfully, you'll want to set the PlayerPrefs. To do this, modify the SubmitPIN() function of PostTweet to that in Listing 8.11.
Step 10. Take the keys obtained in Step 1 and add them into the strings at the top of PostTweet for the API_KEY, CONSUMER_KEY, and CONSUMER_SECRET.
Step 11. Play. As soon as the application starts running the Web browser will open and take you to your Twitter account. Log in if you aren't already. An authorization page will open asking to give the Unity application access to your Twitter account as shown in Figure 8.14.
Step 12. After pressing Authorize App, Twitter will present you with a PIN number as shown in Figure 8.15 Copy the PIN number and return to your Unity application.

FIG 8.14 Twitter's application access authorization form.
Authorizing the application to access your Twitter account is on a peruser basis. The instance of the app that you have is linked to your Twitter account. You cannot access other people's accounts and they cannot access yours.

FIG 8.15 Authorization PIN number from Twitter.
Step 13. The screen in Unity will now be waiting for the PIN number as shown in Figure 8.16. Type the Twitter PIN into the text field and press Submit.
Step 14. If all has gone to plan, the Unity application will display a window for you to enter tweets. This is illustrated in Figure 8.17. Type in a message and hit the Submit button. Tweets only allow a maximum of 140 characters. Therefore, when the text field is too large, the Submit button will disappear.
FIG 8.16 Unity awaiting Twitter PIN.
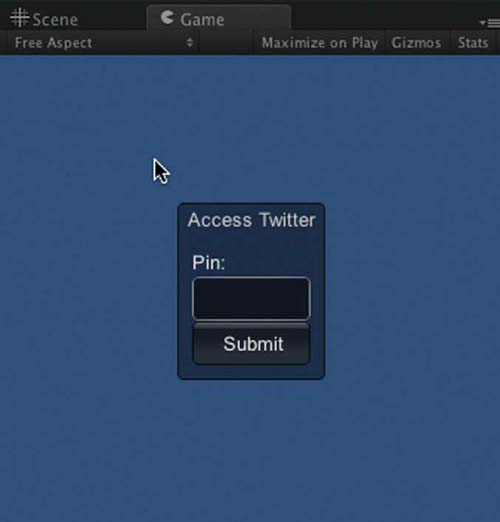
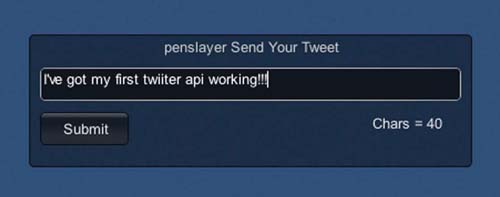
FIG 8.17 A simple Twitter posting form.
Step 15. Log into your Twitter account and check that your message has gone through.
Step 16. You can use this very method in your games to send automatic tweets on behalf of players about their status in the game, including current score, items they may have purchased, when their character has died, or when they unlock a level.
![]() Unity Hands On
Unity Hands On
Twitter Data in 3D
Performing a search on Twitter data is far easier than authenticating for a single user. You can use the Twitter API to search for any keywords. For example, http://search.twitter.com/search.json?q= Unity will return JSON data with tweets mentioning Unity. In this workshop you will use the Twitter API to get the last tweet posted by a specific user and display their tweet text and profile image in the Unity 3D environment.
Step 1. Download Chapter Eight/JSON.zip from the Web site. Open the 3DTweets scene.
Step 2. Play. A male character will be standing on a large plane with a rocky texture.
Step 3. The tweet and user profile is going to appear on a board above the character's head. This board is the prefab called Tweeter. Drag this object into the Scene and position near the character as shown in Figure 8.18.
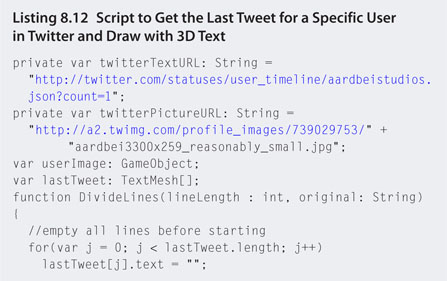
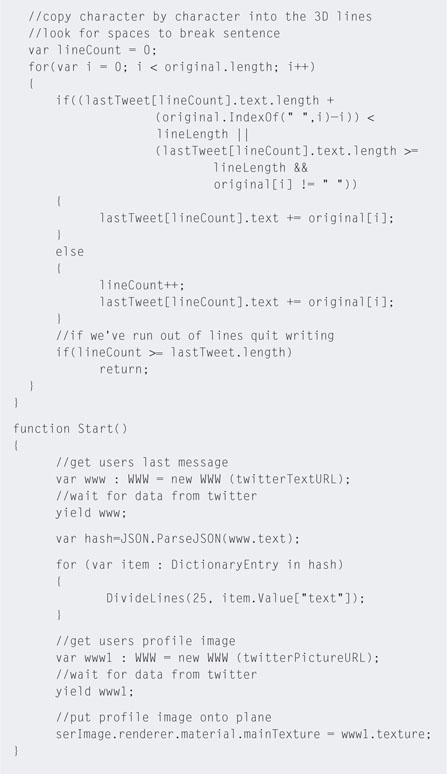
Step 4. Create a new JavaScript called UserTweets. Add the code from Listing 8.12.. The JSON parser referred to in the code is already in the project in the Plugins folder.
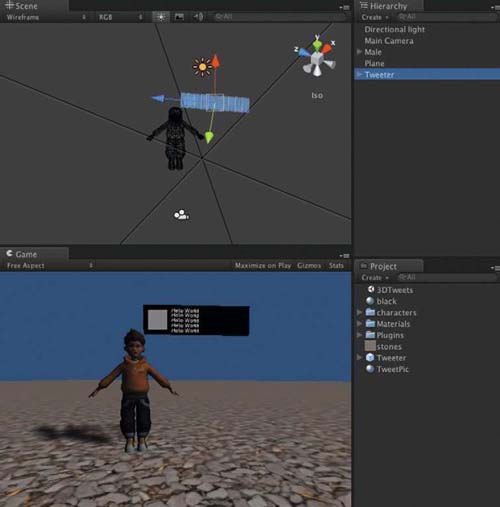
FIG 8.18 A 3D object to display Twitter data.
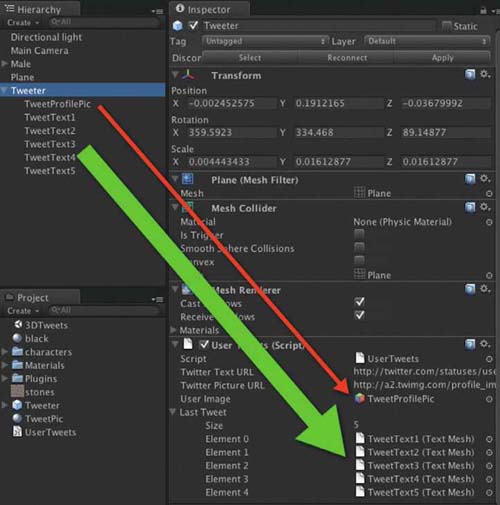
Step 5. Attach the UserTweets.js script to the Tweeter object in the Hierarchy. Expand the Tweeter object. Select it and locate the UserTweets component. Add the TweetProfilePic and the TweetText objects to the script as shown in Figure 8.19.
FIG 8.19 Adding UserTweets script to 3D object and display items.
Step 6. Play. The plane above the character's head will display the last tweet from, in this case, the user called aardbeistudios, and their profile image.
Step 7. To get others or your own tweets, simply replace the Twitter user name in the Twitter Text URL of the UserTweets script with another as shown in Figure 8.20
FIG 8.20 Adding UserTweets script to 3D object and display items.

Step 8. To change the profile image, modify the Twitter Picture URL. You can get this by browsing to the Twitter user of your choice, rightclicking on the profile picture, selecting Open Image In New Tab or the equivalent, and getting the image URL from the URL displayed in the new tab.
8.5.2 Facebook
The process of user authentication with Facebook is similar to that of Twitter. Facebook also supplies programming interfaces in C++ and C# for XCode and Visual Studio programming.
The process of authorizing the player's account is done through a series of Web-based calls as is the case with Twitter. Facebook, however, is a far bigger beast and the amount of data you can obtain is very large. These data are organized into the Facebook Graph. In brief, it is a data network that links your own profile with that of your friends and their friends and their friends.
Facebook, like Twitter, returns JSON-formatted data. The URLs to call to get access to these data are documented at http://developers.facebook.com/docs/reference/api/. We will take a look at some of these calls and data they return in the following workshop.
![]() Unity Hands On
Unity Hands On
Accessing Facebook
Accessing data in Facebook requires extra code to be created that returns an authorization number to you. This code needs to be hosted on a Web server and registered with Facebook as a Facebook app. As this is slightly out of the scope of this book, we will be using one already created by Unity developer Paul Price. The inspiration, Facebook API, and JSON code come from his Web site at http://ifc0nfig.com/accessing-facebook-within-unity/.
Note that this is but one way to get your Unity application to talk to Facebook.
Step 1. Download Chapter Eight/Facebook.zip. Open the project in Unity and select the ConnectToFacebook scene.
Step 2. Play. A small GUI box with a Connect to Facebook button will appear in the Game, as shown in Figure 8.21.
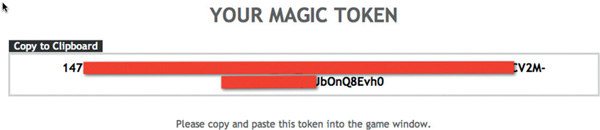
Step 3. Click on this button. Your browser will open. If you aren't logged into Facebook you will be asked to do so. In the end a window with your authentication token will appear. This is shown in Figure 8.22.
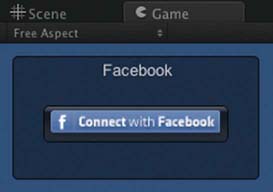
FIG 8.21 Connect to Facebook button in Unity.
FIG 8.22 The Magic Token needed by the Unity application to retrieve data from Facebook.
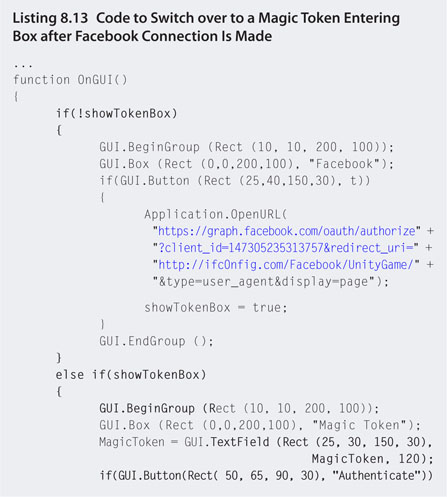
Step 4. This token is unique to you. You need to enter it into the Unity application so that Unity can communicate with your account. To do this, modify interface.js to the code shown in Listing 8.13.
Step 5. Play. After the Magic Token appears in your browser, copy and paste it into the Magic Token box, shown in Figure 8.23, which will appear in the Unity application after you hit the Connect button.
Step 6. Select Authenticate to Save. The code also saves the Magic Token in the player preferences for later use. This saves you typing it in every time the program runs.
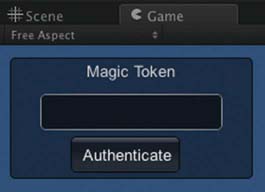
FIG 8.23 A GUI element to enter the Facebook Magic Token.

Step 7. To make use of this connection with your Facebook account, modify the interface.js code to return the details from your profile as given in Listing 8.14.
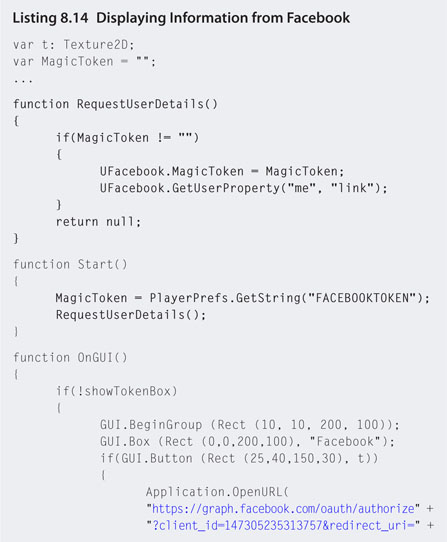
Step 8. Play. A scrollbox will now display with information obtained from your Facebook profile. The RequestUserDetails() function does all the work, calling functions in the existing C# code in the Project's Plugins direction. Using your Magic Token it calls one of the Facebook Graph API URLs. In this case, https://graph.facebook.com/me.
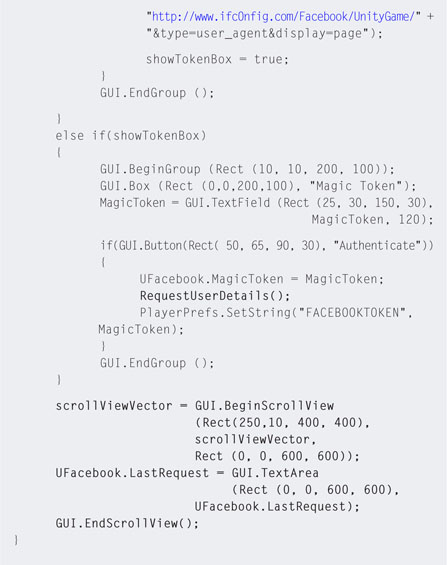
Step 9. Your profile picture is available by calling http://graph.facebook.com/YOUR_USERNAME/picture. The user name can be obtained from previous data and placed in the URL with code as shown in Listing 8.15. Note that the picture is downloaded in the same way as images in the Twitter workshop.
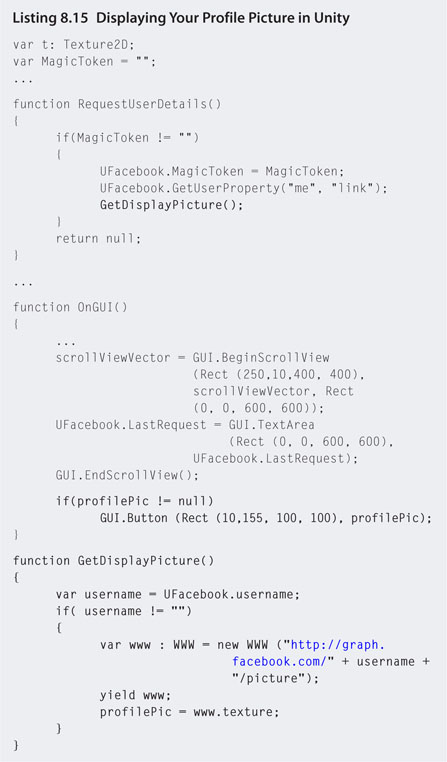
Step 10. To get data from other Facebook Graph APIs, more functions can be added into the Facebook UFacebook.cs file in Projects > Plugins. This file is in C# so unless you know what you are doing, it is recommended that you don't change this file.
However, for illustrative purposes, a function called GetUserFriends() has been added. This calls the Facebook Graph API that returns the current user's friends. The URL to achieve this is shown at http://developers.facebook.com/docs/reference/api/ and is https://graph.facebook.com/me/friends?access_token=…“friends” in this case is the keyword for data retrieval. Note that in the API documentation you can get data for anything from news feeds, likes, and photos. All you would need to do is copy the GetUserFriends() function in the C# file, give it another name, and change the word “friends” for something else such as “groups.” As an example, the C# function for GetUserGroups() would be
Step 11. To call the GetUserFriends() function and display the information in the text field, modify the interface.js code to reflect Listing 8.16.
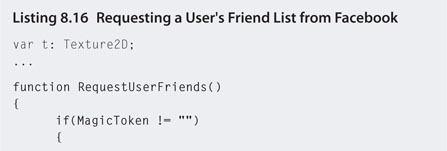
Step 12. Play. You will now be able to access a listing of your friends from inside Unity.
In addition to accessing Facebook data, you can also embed a Unity game into a Facebook page for others to play, like, and rate. For this you need to build a Web platform version of your game and have a Web server where you can host it.
![]() Unity Hands On
Unity Hands On
Embedding a Unity Game into Facebook
Step 1. Create a Unity game. In Build Settings, build it for the Web Player Platform. It will save into a folder with two files: HTML and Unity. Rename the HTML one to index.html.
Step 2. Upload these to a Web server. You should be able to browse to the game in a Web browser just by using the folder URL. For this example the game is in http://aardbeistudios.com/facebook/Asteroids/.
Step 3. Visit https://facebook.com/developers/. Login and press the “+Set Up New App” button in the top right corner of the page.
Step 4. Enter an App name, agree to the terms, and click Create App.
Step 5. On the next page enter some basic information—for now just type in an Application Name and Description.
Step 6. Select the Facebook Integration tab.
Step 7. Enter a name for your app in the Canvas Page settings. It must be unique and does not need to be the same as the name of your Unity project.
Step 8. Enter a Canvas URL. This is the location on the Web where you have uploaded your Unity Web project.
Step 9. Click on Save Changes.
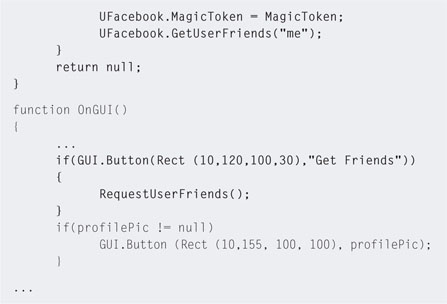
Step 10. You can now see your game embedded in Facebook using the Canvas Page, for example, http://apps.facebook.com/holistic_asteroids/ as shown in Figure 8.24.
FIG 8.24 A Unity game embedded in Facebook.
![]() Note
Note
Games embedded in Web pages will take a while to load. The larger the Unity file, the longer a player will have to wait for it. Casual gamers don't like to wait. Keep your game small and neat.
8.5.3 OpenFeint
OpenFeint is a social networking platform created especially for mobile games. It was launched in 2009 for iOS on the iPhone and iPad and is now available for Android-supporting devices. It provides a set of easy-to-use APIs that allow developers to integrate functionality such as leaderboards, forums, live chat, rewards, beat the highest score, and play with friends.
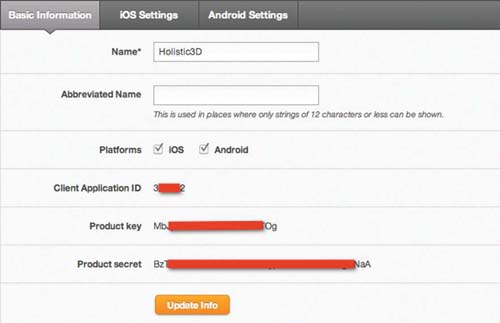
As with Twitter and Facebook, your game talks to OpenFeint with authorization tokens. To obtain these tokens, visit the OpenFeint developers' site at https://api.openfeint.com/dd. Here you create a login and then begin registering your game. On entering the Application Information tab you will be given a Client Application ID, Product Key, and Product Secret as shown in Figure 8.25. This information is entered into your programming code to provide your game with access to the OpenFeint features.
FIG 8.25 Obtaining authorization tokens for OpenFeint.
On the OpenFeint Web site you will find assistance for developers and downloads of APIs for iOS and Android. There is even a beta version of one for Unity.
Integrating OpenFeint with Your Unity Game
Step 1. Create a login at the OpenFeint developer site as discussed in the previous section (https://api.openfeint.com/dd).
Step 2. Login and Add a New Game. Give your game a name and select the Android development platform. Click on save.
Step 3. Select Application Information. Record the Client Application ID, Product Key, and Product Secret.
Step 4. Create a new Unity Android Project.
Step 5. Download Chapter Eight/OpenFeint-UnityAndroid .package.
Step 6. Import the package into your project.
Step 7. Download Chapter Eight/OpenFeintController.cs and add into the Project > Plugins folder.
Step 8. Select GameObject> Create Empty from the main menu. A new game object will be added to the Hierarchy. Rename it OFObject.
Step 9. Drag and drop the OpenFeintController script from Project> Plugins onto the OFObject.
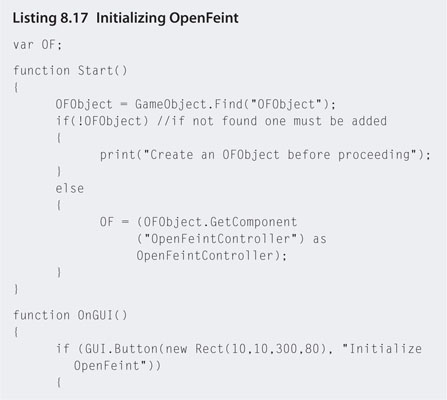
Step 10. Create a new JavaScript file in the root of the Project called OFInterface. Add the code shown in Listing 8.17.

Step 11. Attach OFInterface to the Main Camera.
Step 12. In OpenFeintController.cs insert your Application Name, Product Key, Product Secret, and Client Application ID in the corresponding empty quotes from the OpenFeint Web site, respectively.
Step 13. Play to see how your button is aligned on the screen in the Editor. Note that the button will not function in the Editor; you must build and deploy the app to an Android device.
Step 14. Build and Run to push the application to an attached Android device.
Step 15. Press the button and OpenFeint will open. Do not log into OpenFeint at this point.
Step 16. Return to Unity and select File > Build Settings. On the Build Settings pop up select Player Settings to bring up the Android configuration values in the Inspector. Give your application a name, icon, and bundle identifier.
Step 17. Open the AndroidManifest file in the Plugins > Android folder in the Project. Edit the package name string to match your bundle identifier as shown in Figure 8.26.
Step 18. Return to the OpenFeint developers' site and select the Application Information for your game title. On this page select Android Settings as shown in Figure 8.27.You will need to supply the package name created in the previous step, an icon, description, and at least two screen captures. Select Save.
Step 19. Before you can activate your game in OpenFeint it will require at least one leaderboard and one achievement. To add this, select the Features tab in the top right of the webpage. A leaderboard keeps track of players and high scores, and achievements reward players for reaching specific game play status such as bronze, silver, and gold medals or unlocking new levels. Achievements can be unlocked relative to in-game scores. The achievement scores obtained in OpenFeint set the players' overall level across all their playing of OpenFeint-enabled games. For a single game you can allocate up to 1000 bonus OpenFeint points with a maximum of 200 points per achievement.
Once you have added these items, return to the Overview page for your app and select the orange Enable Android button. This will place your OpenFeint game linkage Under Review.
FIG 8.26 Setting the Android bundle identifier and package.
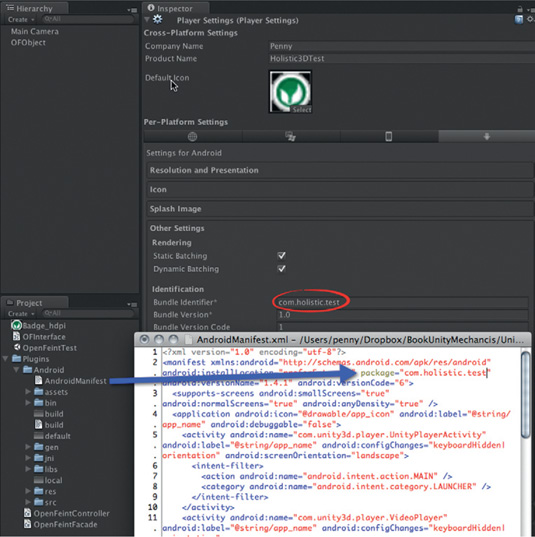
FIG 8.27 Completing the OpenFeint information for your app.

Note that you can still use and test your OpenFeint interface without its having completed the review process. As long as you have all the IDs and keys you are ready to go.
Ensure that you take note of the leaderboard and achievement IDs as you will need these in the code to send scores to the leaderboard and unlock achievements.
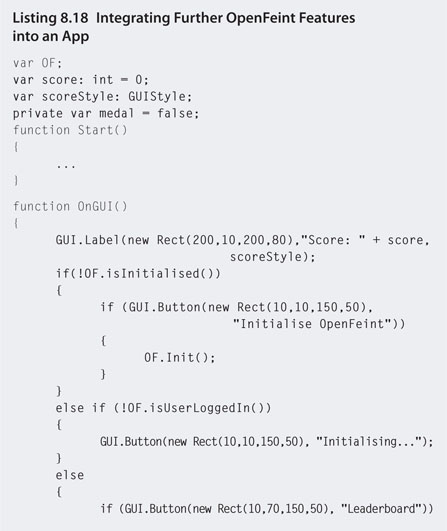
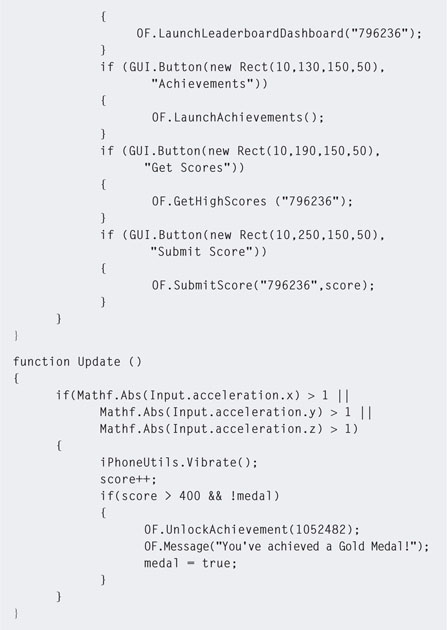
Step 20. To explore further the functionality of the OpenFeint interface, modify the OFInterface script to that in Listing 8.18. Remember to replace the three leaderboard IDs and achievement ID with your own.
Step 21. Build and Run. Screen displays are shown in Figure 8.28. When the application first opens it will display a score and Initialize OpenFeint button (Figure 8.28a). On pressing this, the OpenFeint linkage will log you in (Figure 8.28b). When logged in this button will disappear and the other buttons will be displayed (Figure 8.28c).
FIG 8.28 An OpenFeint integration within a Unity game playing in Android
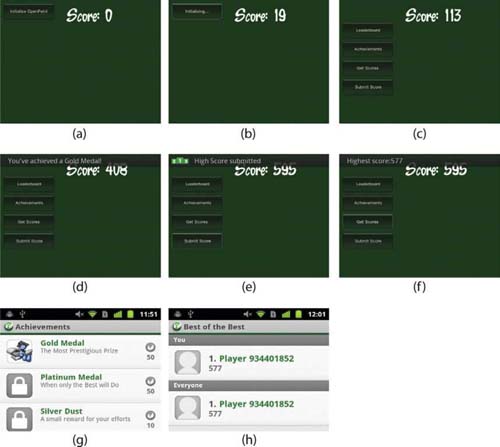
Shake the phone to increase your score. The script also unlocks an achievement when the score goes over 400. An achievement unlock message is sent to OpenFeint using achievement's ID and it is unlocked (Figure 8.28d).
At any time you may press the Submit Score button to register your score with OpenFeint (Figure 8.28e). You can review your highest score by pressing the Get Score button (Figure 8.28f).
Unlocked and locked achievements for the game can be viewed by pressing the Achievement's button (Figure 8.28g).
The Leaderboard button takes you to the OpenFeint leaderboard for the game (Figure 8.28h). The game can have numerous leaderboards. You must identify them with their ID.
This workshop has covered most of the OpenFeint functionality allowed by the Unity integration package. The package for this tutorial was taken from http://support.openfeint.com/dev/unity3d/. It is still in beta so expect it to have changed by the time this book is published. There is an iOS version available but it is still very buggy. The author recommends keeping an eye on this site for more details as they become available.
8.6 Platform Deployment: App Store, Android Market, and Consoless
In the past, publishing a game was an exercise in self-publicity and tenacity. Small independent developers would have to approach the big publishing houses with their dreams of grandeur, convince the publishers to invest in their game, and then stick to strict milestones and release deadlines for, in the end, what might amount to 7% royalties. While this situation is still possible nowadays and could lead a small development company to much fame and fortune via the publishers' vast network of marketing resources, small independent developers do have many more options available to them.
8.6.1 Publishing for the App Store and Android Market
The App Store delivers developers games directly to the consumer, cutting out the middleman. Applications for iOS and Mac OSX+ are listed in the store that buyers can purchase over the Internet and download directly to their desktop computer or mobile device.
Applications written for the AppStore must be developed with an XCode component. For example, Unity builds its code via XCode when pushing the application to the iPhone or iPad.
Developers wishing to put content in the AppStore or on iOS devices must register as an Apple Developer. At the time of writing, this costs $99 per year. For this, the developer gets access to the Apple Development Network, beta releases of Mac operating system updates, and authentication protocols to build and push applications for testing to their mobile devices.
Once a game is ready for deployment it is submitted to Apple for approval. This process can take up to 2 weeks. Apple has a checklist of the things it looks for when approving an application and it is prudent to check these off yourself before submitting. If there is something wrong with your application, you will have to fix it and resubmit for approval.
Apple has a fixed pricing scale for all apps. Fees taken by Apple are different in different countries, but equate to approximately 30%.
For the latest information on the exact procedures, visit http://developer.apple.com/.
The Android Market has a more relaxed approach to app publishing. It currently requires a Gmail account and a small once off fee of $25 to start selling apps. To get started, visit http://developer.android.com/index.html.
You will require the Android SDK to build applications. It is being updated constantly for new versions of Android; to ensure that your applications are compatible, it is best to update frequently.
To create an Android game, Unity functions in the same way as for the iOS. The game is created in the Unity editor and the final product is built via the Android SDK on its way to the mobile.
Android allows the developer to put any price on their app. A transaction fee of 30% is paid to Google for each app sold. This is detailed here at https://google.com/support/androidmarket/developer/bin/answer.py?&&answer=112622.
If you completed the workshop in Section 8.2, you're 95% on your way to placing an app in the Android Market.
8.6.2 Console Publishing
The different game console providers, including Microsoft, Nintendo, and Sony, have a variety of rules and regulations as to who can and can't publish on their platforms. In the case of Nintendo, a games studio must complete an application form to be authorized as an official developer (http://warioworld.com/).
Microsoft supplies the free XNA Game Studio development kit for the creation of Xbox and Windows 7 desktop and mobile games. Independent developers can submit their game to the AppHub (http://create.msdn.com/) for listing in the Xbox Live Marketplace. Access to the AppHub costs $99 per year. All games submitted are peer reviewed, and those listed and sold receive 70% of the revenue.
To become an official developer for PlayStation or Xbox (which means your titles get published on DVD and marketed by the respective publishers) is quite a big hurdle. The application process involves proving to the publishers that you have a quite experienced team and around five AAA published titles under your belt. The development kits start from around $10,000 each.
For the reader interested in pursuing console development, here are some URLs worth checking out:
- Microsoft: http://xbox.com/en-US/Developers/Home
- Sony Playstation: http://scedev.net/
- Nintendo: http://warioworld.com/apply/
8.6.3 Download Direct to Player
Last but not least there is the option to self-publish and make your desktop playable game available for download on your own Web site or via a download client such as Steam or Direct2Drive.
A download client allows players to search through a multitude of titles online and purchase, download, and install directly onto their computer, much in the same way the App Store and Android Market work.
Steam is a platform consisting of a software client that runs on desktop computers and manages distribution, management rights, and multiplayer functionality. It was developed by Valve Corporation (the famous developers of the Half-Life games series) and released in 2003. Steam currently manages 1250 titles and has over 30 million active users. It manages games for both large publishing houses and small independent developers. Information on Steam readying your game can be found at https://partner.steamgames.com/.
Direct2Drive is one of a number of online game stores with their own download clients. They are always looking to list and manage new game titles, even from small unknown developers. They provide a digital shop front in numerous countries and manage player purchases. Like Steam, they too retain purchase records so players can download their game at any time. This is a useful service that means the player isn't misplacing DVDs and jewel cases with serial numbers on them. It's all stored online and available as needed. Details of distributing with them are available from http://direct2drive.com/staticpage.aspx?topic=publisher_contact.
8.7 Summary
This chapter examined some of the external mechanics and forces that drive game development in certain directions. If you are an independent developer, there has never been a better time to get your game out into the world on a desktop computer, on a mobile device, or in the Xbox Live Marketplace. Relatively inexpensive high-quality tools, such as Unity, are bringing power to the people, allowing small inexperienced teams to take their first steps. And online stores are cutting out the publisher, allowing a more direct line to the consumer. While publishing someday with one of the big three might be your dream, there is no reason why your baby steps can't start now.
In addition, the availability of software development kits and game engines that access all the hardware functionality features of new mobile and peripheral devices means, as a game designer, that you can let your mind run wild. Finding clever new ways to interact kinesthetically with the virtual world could just give you the next big thing in computer games.
Whichever path you decide to take, know that the face of game design and development has taken the biggest turn in the past 5 years than it ever did in the previous 40, and you don't need to be a computer scientist anymore to work with the technology and create really amazing and visually exciting games.