
Solutions in this chapter:
Video, audio, instant messaging (IM), and Web conferencing have quickly become common terms in today’s workplace. Regional, national, and international companies use these forms of conferencing as a way to better collaborate with coworkers and customers who often reside in separate geographic locations. With the ability to more actively share slide presentations, whiteboards, and even applications, companies are rapidly deeming these forms of communication mission critical. Office Communications Server (OCS) 2007 delivers an easy-to-use video, audio, IM, and Web conferencing solution that offers rich integration with other Microsoft Office applications. OCS provides reliable conferencing with just a few clicks of the mouse from within applications with which most people are already familiar.
In addition to offering a full set of traditional conferencing features in OCS 2007, Microsoft has also announced a videoconferencing device named RoundTable. RoundTable brings Web conferencing to a new level by providing a 360-degree panoramic video experience to meeting participants.
After reading this chapter, you should have a clear understanding of the new conferencing features in OCS 2007 and be ready to configure and use those features in your organization.
Web conferencing is one of the fastest-growing collaboration applications available today. Web-based conferencing provides an easy-to-use interface that enables users to quickly learn how to use the application and begin to host meetings. Typically, Web conferencing is a hosted solution provided by a third party outside your company’s firewall. Microsoft began to offer its own Web conferencing solution, known as Live Meeting, just a few years ago. Live Meeting was instantly a success and is now the Web conferencing tool of choice for thousands of organizations. OCS 2007 delivers on-premises conferencing, giving your company the capabilities and features of a hosted conferencing solution, but allowing you to maintain the service within your corporate network.
OCS delivers three main conferencing solutions:
On-Premises Live Meeting Web conferencing. This service provides a more secure and possibly more cost-effective way to host Web conferences. Most of the features of the Hosted Live Meeting service are now available through OCS.
Audio and videoconferencing. By using the Microsoft Office Communicator (MOC) 2007 client, you can contact another OCS user(s) via an audio or video call. OCS even allows you to invite multiple parties to the audio/videoconference within MOC.
IM conferencing using MOC. OCS also provides an easy way to conduct IM conferences via MOC. With MOC 2007 you can now instantly start a group chat that includes other users inside your organization as well as users outside your company. You can even invite members from public IM networks such as AOL, MSN, and Yahoo! to the conference.
Both Live Meeting and IM conferencing using MOC include the ability to use audio and video within conferences. Because on-premises conferencing moves video, IM, and Web conferencing to your network, you need a good understanding of what it takes to support a conferencing infrastructure in-house.
Before you begin any implementation or proof of concept, you should plan to evaluate and review features and limitations of competing products. During your OCS evaluation, you may want to check out other Web conferencing solutions such as Adobe Acrobat Connect and IBM Lotus Sametime. Both products offer a version for on-premises meetings:
Adobe Acrobat Connect is a Web and videoconferencing solution built on Adobe’s Flash technology. Acrobat Connect provides good performance of both Web and video features due in part to the fact that Flash is an established platform that has proven itself reliable. Acrobat Connect provides integration features with Microsoft Outlook and other applications in the Microsoft Office suite; however, you may find that this integration is not as rich as OCS to Office integration. Acrobat Connect also offers a hosted conferencing option.
IBM Lotus Sametime provides an on-premises conferencing solution that integrates heavily with Lotus Domino and Lotus Sametime Instant Messaging. IBM’s conferencing solution provides a similar experience to an OCS Live Meeting. A key difference is that IBM relies on Java that is downloaded and run on the client when the user first enters the meeting, whereas OCS uses the installed Live Meeting client.
Before deploying the conferencing features in OCS 2007, it is important that you understand the differences between the traditional Hosted Live Meeting and the new On-Premises Live Meeting. Hosted Live Meeting is a service provided and managed by Microsoft, and On-Premises Live Meeting is a service supported by OCS. Sometimes you will need to use one instead of the other due to some distinct differences in security, features, and the number of conference attendees.
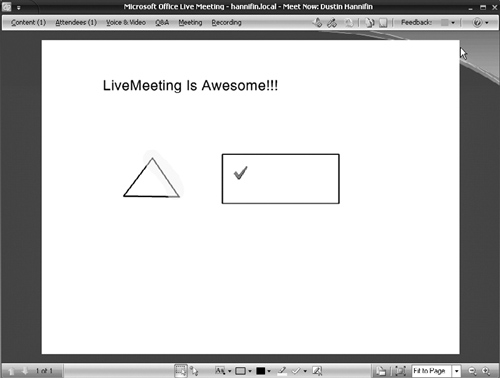
On-Premises Live Meeting uses OCS to provide a feature-rich Web conferencing solution that has a familiar look and feel to end users (see Figure 8.1). On-Premises Live Meeting uses the Live Meeting client that must be installed on all participants’ workstations. This lightweight application provides the interface in which attendees can start, interact with, and take part in a Web conference meeting. The client connects to the OCS conferencing server when a meeting is started or joined. The conference is then managed by services running on the OCS server. A few key features of On-Premises Live Meeting that the hosted solution does not provide are:
Active Directory integration. You can control security and admittance into conferences via Active Directory. You can set up conferences to allow only Active Directory users who receive the invitation, any Active Directory user, or anonymous users who have a meeting code. You can also use Active Directory to control who can initiate Web conference sessions via Live Meeting.
Federation. Using On-Premises Live Meeting, you can also take advantage of OCS federation features to allow federated partners to join and take part in the conference. If you want to enable federated users to join a Live Meeting, you will want to deploy an OCS edge server in your perimeter network.
Local storage of archived and recorded sessions. On-Premises Live Meeting also allows you to record and archive meetings on your servers instead of storing them on Hosted Live Meeting servers. This may be a requirement for regulatory and compliance purposes.
On-Premises Live Meeting requires that you set up and configure the supporting infrastructure during your OCS deployment. On-Premises Live Meeting also requires the initial cost of deployment of OCS, but there are no monthly or per-use fees for using the in-house conferencing service. You should also keep in mind that On-Premises Live Meeting supports a limit of 250 users per meeting.
Note
If you plan to deploy OCS Standard Edition, you should keep in mind that each Standard Edition server can support upward of 2,000–5,000 users, depending on hardware. If you plan to do a lot of Web conferencing with thousands of concurrent meeting attendees, you may want to consider deploying OCS Enterprise Edition, which can support upward of 50,000 users per pool. The maximum number of simultaneous Web conferences depends on the features used, the number of meetings using those features, and the number of users per meeting. A lot of small conferences that use audio and video in each will support a smaller number of total users than a few large conferences using the same features.
Hosted Live Meeting uses Microsoft’s servers for establishing and hosting conferences. This approach to Web conferencing has been around for a few years now and has become very popular in the corporate world. Microsoft itself uses the Hosted Live Meeting service to deliver Webcasts and presentations to thousands of customers on a daily basis. Hosted Live Meeting is a pay-per-use or per-month service. Hosted Live Meeting conferences provide the following benefits over On-Premises Live Meeting conferences:
Support for thousands of attendees. Hosted Live Meeting can support up to 2,500 attendees. This obviously allows you to provide conferences for target audiences much larger than the 250-attendee limit of OCS.
Web client option. If meeting attendees do not have the Live Meeting client installed or are unable to install the client, Hosted Live Meeting offers the choice to use a Web client to attend the meeting.
Breakout rooms. If you are hosting a large training event, you can set up breakout rooms for attendees to collaborate within smaller groups.
If you are a smaller business looking for a Web conferencing solution but you have limited resources, you may want to consider the Hosted Live Meeting offering from Microsoft. The initial cost of Hosted Live Meeting is very small because you are paying using a subscription model and there is no infrastructure to deploy. Most companies that plan to deploy OCS should probably consider a hybrid approach to Live Meeting. In this approach, you can use On-Premises Live Meeting for internal conferences and smaller conferences with customers and federated partners. Then, if you need to support a very large number of attendees, you can use the Hosted Live Meeting solution. You can use the same Live Meeting client in either situation. This provides end users with a common, easy-to-use interface for both services. Consider this scenario. Your company currently employees 2,000 people with offices located in six large cities throughout the United States. You have thousands of customers in five countries. Every Monday, sales teams have planning meetings for the coming week. Each sales team is composed of 10–20 members. During the meeting, the preceding week’s sales figures and goals for the coming week are presented. This situation is a perfect example of when you can use OCS to host On-Premises Live Meetings. By using OCS, the sales teams can conduct their weekly meetings without paying for a hosted solution. Using Hosted Live Meetings in this situation would prove to be very costly over time. Now consider this situation. Your company’s CEO is planning a corporate presentation that needs to be broadcast via a Web conference that every person in the company and several hundred external partners can view. Because this is a high-profile meeting that could have far more than 2,000 attendees, Hosted Live Meeting would be the better option.
You should now have a good understanding of the differences between Hosted Live Meeting and On-Premises Live Meeting. You can now determine in which situations you should use Hosted Live Meeting services and On-Premises Live Meeting provided by OCS. Table 8.1 provides a summary of key differences between the two Live Meeting options.
Table 8.1. On-Premises Live Meeting and Hosted Live Meeting Comparison
Features | On-Premises Live Meeting | Hosted Live Meeting |
|---|---|---|
Requires OCS 2007 | X | |
Requires Active Directory integrated security model[*] | X | |
Archived sessions stored on local network | X | |
Up to 250 conference attendees | X | X |
Up to 2,500 conference attendees | X | |
Optional Web client | X | |
[*] External users are not required to have an AD account. | ||
Now that you have a good understanding of what on-premises conferencing is, let’s jump right in and learn how to use the different conferencing features provided by OCS 2007. On-premises conferencing has traditionally been reserved for very large enterprises due to complexity and cost. OCS 2007 now makes it feasible for medium-size and even some smaller businesses to deploy on-premises Web and videoconferencing.
Chapter 4 provided you with details on setting up and configuring MOC 2007. This section focuses on using the videoconferencing features of MOC. Earlier in this chapter, you learned that OCS provides the ability to have videoconferences. Users can instantly start a MOC-based videoconference with any other MOC user.
Before you can start a videoconference with other MOC users, you need to set up the audio and video features in the MOC client. A simple wizard will guide you through this process, but there are a few requirements before running the Set Up Audio and Video Wizard.
Audio output device. If you plan to hear the person on the other end of the call you need a sound card and speakers or headphones. Just about any modern computer should come with a sound card and at least built-in speakers. It is highly recommended that you purchase a conferencing headset for better-quality audio.
Audio input device. Just as you need to hear audio, others need to hear you. As such, you need some sort of microphone to plug into your sound card to capture your voice. Again, it is highly recommended that you purchase a conferencing headset for a better-quality conferencing experience. These days, headsets are easy to find and are reasonably priced.
Videoconferencing camera. If you want others to see you in the videoconference, you obviously need a videoconferencing camera, also known as a Webcam. Microsoft recently released some very nice cameras in its LifeCam product line.
Let’s go ahead and set up the audio and video for MOC. Before you begin to set up audio and video, follow these steps to install the software and drivers for your audio and Webcam devices:
Make sure are you logged on to your MOC client and the contact list is open and visible.
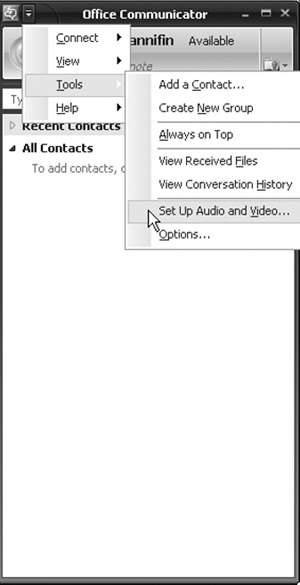
Select MOC menu | Tools | Set Up Audio and Video (see Figure 8.2). This will launch the Set Up Audio and Video Wizard (see Figure 8.3).
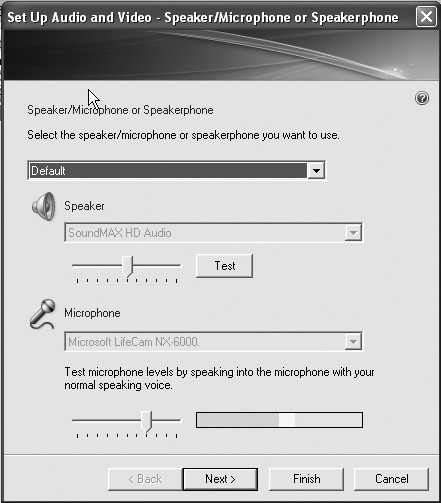
The default speaker and microphone for audio/videoconferencing should be selected. If you want to change these settings, select the Custom choice from the drop-down menu. You can then choose the speaker and microphone you want to use from each respective drop-down menu. After you have selected the speaker and microphone you want to use for audio and videoconferences, click Next.
Select the speaker you want to use for audio alerts such as new IM messages. In most cases, this will be the same speaker you selected in the preceding step. After you select the speaker you want to use for audio alerts, click Next.
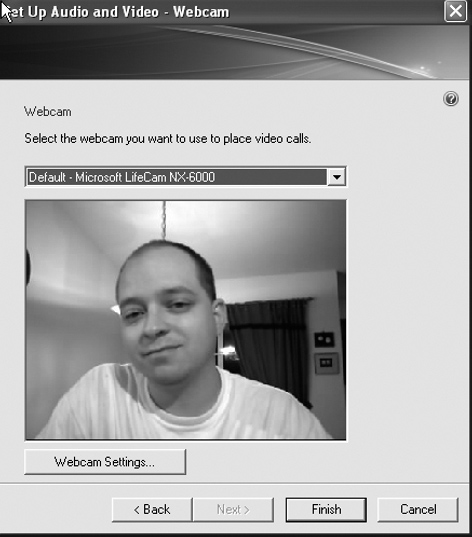
Select the Webcam of your choice. This is the camera you use for videoconferences in MOC. Your Webcam should turn on and display video in the wizard window (see Figure 8.4). If you need to make any Webcam adjustments such as color, contrast, or zoom, you can do so on this screen. After you have confirmed that your smile is well presented by the Webcam go ahead and click Finish. You have now successfully set up and configured your audio and video for MOC. Let’s start videoconferencing!
Some Independent Advice
Before deploying OCS video and audio conferencing features, be sure to plan for the added load on your network infrastructure. Microsoft recommends that network links support 45 Kbps per audio stream and 300 Kbps per video stream. If you plan to do a lot of videoconferencing you may need to plan for a network upgrade first. In most situations, it is not recommended that you to attempt audio and video over wireless networks.
You are now ready to start a videoconference. With any conference we need two things: a conferencing medium (we just configured that) and conference participants. It’s somewhat difficult to conference with just one person. The following steps guide you through starting a videoconference using MOC:
Open the Communicator main window.
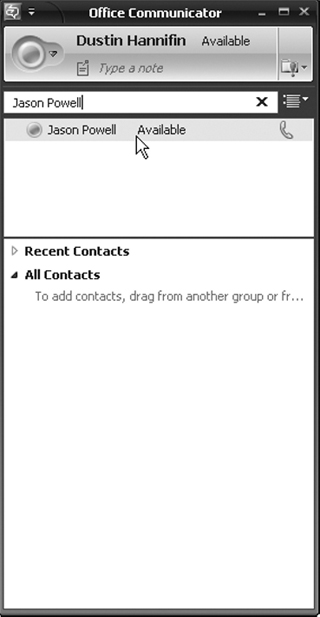
Locate someone in your contact list with whom you want to have a conference, or search for a contact using the search bar (see Figure 8.5).
Right-click the name of the person you want to invite to a videoconference and click Start a Video Call from the pop-up menu.
MOC will initiate a call to the other user. The other user will receive a pop-up window from the System Tray on his computer. From the pop-up, he can click Answer and the two of you will be instantly bridged into a videoconference. You should see the other person in the conversation window and yourself in the picture-in-picture window.
Now that you have started the videoconference you can see and talk to the person on the other end. You can also take advantage of the following options within the conversation window:
Use the Invite button to invite other attendees to the videoconference.
Click the Show instant message window button to display an IM window to chat with the other person.
Click the Pause picture-in-picture button to pause your Webcam.
Click the Switch Video button to make your video the main window and the other person the picture-in-picture window.
Click the End Call button to end the videoconference.
MOC and Live Meeting both provide integration with Microsoft Outlook. This integration enables you to easily interact with other MOC users and schedule Live Meetings within Outlook. To take advantage of all Outlook integration features you will need to install the Conferencing add-in for Microsoft Outlook.
The MOC integration with Outlook allows you to see presence information regarding other OCS users beside their names in e-mail messages. You can start an IM session simply by locating the person’s name in the e-mail message and right-clicking on the name of the user you want to IM. Then choose the Reply with Instant Message option. You can also schedule a MOC-based conference call from your Outlook Calendar.
Outlook’s integration with Live Meeting allows you to easily schedule a Web conference within the Outlook Calendar. To schedule a Live Meeting from Outlook follow these steps:
Open your Outlook Calendar.
Locate and click the date and time you want to schedule the Live Meeting.
Click the Schedule a Live Meeting button in the Live Meeting toolbar.
Add the requested attendees in the To: field.
Click the Presenters button if you want to add other presenters to the meeting.
Click the Audio button to customize the audio options for the meeting.
Click the Access button to set the access level for the meeting.
Confirm that the date and time are correct for the meeting and click the Send button.
The meeting request will be sent to all invited attendees via e-mail. By using the Access button in step 7 you can choose whether you want to limit the meeting to particular users. Selecting Open Authenticated will allow anyone with an account in your Active Directory domain. Open Authenticated also allows any federated user to join the Live Meeting. If you select Closed Authenticated, only those whom you have invited and who have Active Directory accounts will be allowed to join the meeting. Choosing Anonymous will allow anyone who receives the meeting invitation to join.
Live Meeting provides the ability to create a meeting on demand instantly, without prescheduling in Outlook. The Live Meeting client can connect to OCS or Hosted Live Meeting and can connect meeting users within seconds. The following section guides you through setting up the Live Meeting client for hosted or on-premises ad hoc Live Meetings as well as introduces you to some of the Live Meeting features.
Before you begin to use Live Meeting, you will want to configure the client. As mentioned earlier in this chapter, you can configure the Live Meeting client to use both Hosted and On-Premises Live Meeting sessions. The client can be configured for either service in just a few easy steps.
The Live Meeting client is easy to set up and configure; however, in most deployments you will want to preconfigure these settings via Group Policy or your software deployment system. Complete the following steps to set up the Live Meeting client:
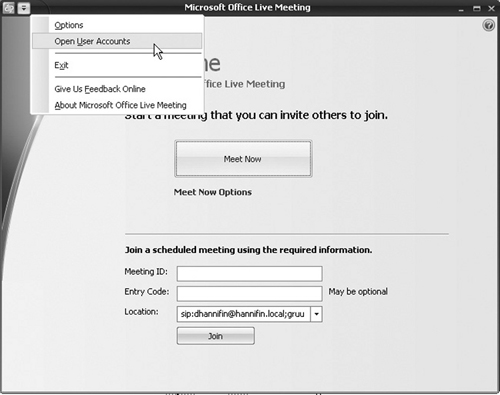
Select Start | All Programs | Microsoft Office Live Meeting 2007 | Microsoft Office Live Meeting 2007.
After the application launches and the main window is displayed, click Live Meeting menu | Open User Accounts (see Figure 8.6).
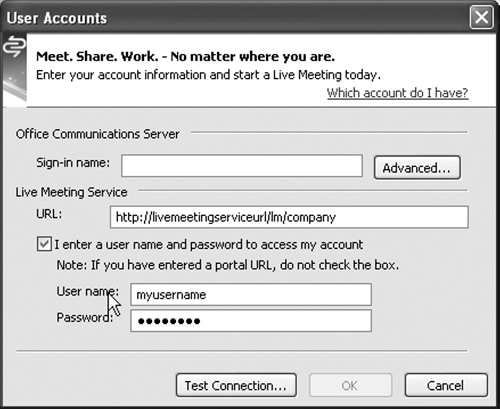
The User Accounts window will open. Locate the Live Meeting Service section.
Enter the Hosted Live Meeting Service URL, your Live Meeting username, and your password. Your Hosted Live Meeting administrator should have provided these to you when your Live Meeting account was created (see Figure 8.7).
Click Test Connection to ensure that the information you entered is correct. Then click OK.
Select Start | All Programs | Microsoft Office Live Meeting 2007 | Microsoft Office Live Meeting 2007.
After the application launches and the main window is displayed, click Live Meeting menu | Open User Accounts (see Figure 8.6).
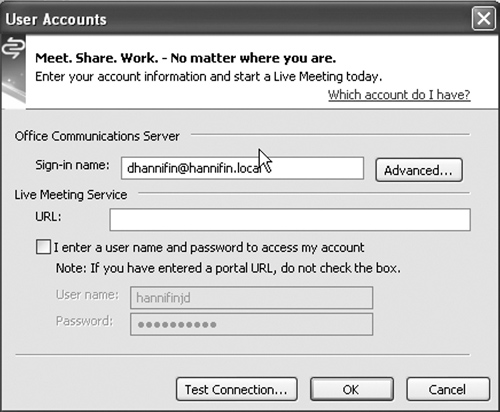
The User Accounts window will open. Locate the Office Communications Server section.
Enter your OCS sign-in name (see Figure 8.8).
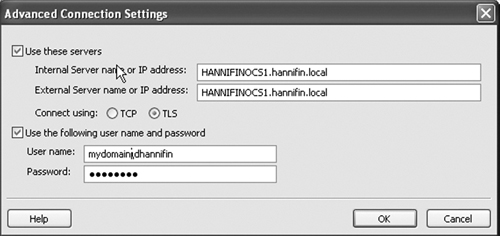
Click the Advanced button.
If you have not configured SIP Service records in the domain name system (DNS), you will need to enter the internal and external names of your OCS server in their respective text boxes. Note that these names must match the fully qualified domain name (FQDN) of the Secure Sockets Layer (SSL) certificate assigned to these servers (see Figure 8.9).
Select TLS as the connection protocol.
Optionally, you can check the Use the following user name and password checkbox. Enter your domain username and password in the corresponding text box and click the OK button. This option is useful if you are logged on to an untrusted domain or logged on to your computer with a different user account than the one you use for Live Meeting.
Click the Test Connection button to ensure that you have properly entered server names and logon information.
After a successful test, click the OK button.
You now have successfully configured the Live Meeting client for either hosted or on-premises Live Meetings. Next, you will use the Meet Now option to initiate an ad hoc Live Meeting.
The Live Meeting client offers an option which provides ad hoc escalation of Web conferences. When you open the client and click the Meet Now button, a Web conference is instantly established and you are placed in the meeting as the presenter. After being placed in the meeting, you can invite other attendees via e-mail or MOC. Ad hoc, or on-demand Live Meetings, can be particularly useful in situations when you are struggling to demonstrate something on a phone call. Using Live Meeting, you can instantly invite all members on the phone and demonstrate to them visually what you couldn’t describe in words. A great example of this would be in tech support situations. Let’s say Mary is receiving an error message while trying to save a document within her word processing application. Mary calls the help desk and requests assistance; however, she’s not sure how to describe the exact error she receives. The help desk technician can instantly initiate a Live Meeting session and ask Mary to share her screen. The technician can then see the error message for himself and more quickly resolve her problem.
Live Meeting offers a wide variety of features to enable people to better collaborate in real time. In this section, I will provide a partial list of these features and explain how to use them.
It is important to understand the different types of users within a meeting. The active presenter is the person currently in control of the Live Meeting. This person can perform all tasks within the meeting, including uploading content and conducting polls. Meeting attendees can also be inactive presenters. These attendees are presenters who currently do not control the presentation content but can perform tasks such as answer questions. The third attendee type is that of participant. These meeting attendees can only perform tasks such as viewing the content, participating in polls, and asking questions.
A presenter can invite other people to an active Live Meeting from within the Live Meeting client. To invite meeting participants you need an e-mail client installed and configured on the same computer as the Live Meeting client. To invite other participants from an active Live Meeting simply select Attendees menu | Invite | By Email. A preformatted e-mail is created within your default e-mail client. Simply type in the e-mail address of the person you want to invite and click the Send button.
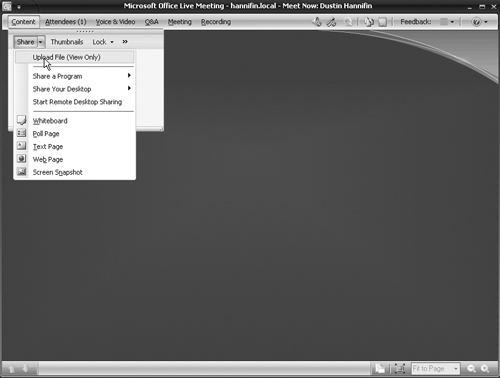
Live Meeting provides the ability to share content including documents, Web sites, and presentation slides. To share content within a Live Meeting first start a new Live Meeting session and then select Content menu | Share | Upload File (View Only), as shown in Figure 8.10. From within the open file window, browse to the file you want to share and click the Open button. The file uploads and is displayed within the Live Meeting window.
You can use Live Meeting to display to other participants applications running on your computer or your entire desktop. To share an application or your desktop select Content menu | Share | Share a program or Share your desktop. This displays the selected application or your entire desktop to other meeting participants.
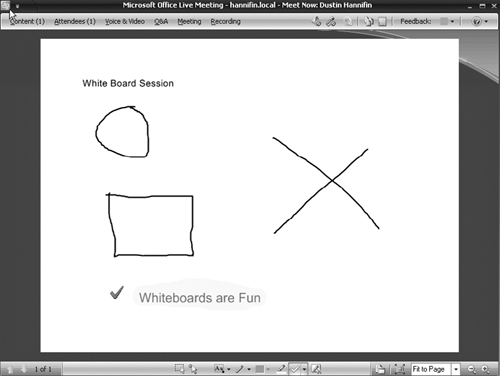
You can use Live Meeting to display a shared digital whiteboard. The whiteboard feature allows you to draw freeform shapes, include text, and embed other images. To use the whiteboard feature, you select Content menu | Whiteboard. This displays the digital whiteboard on the screen, as shown in Figure 8.11.
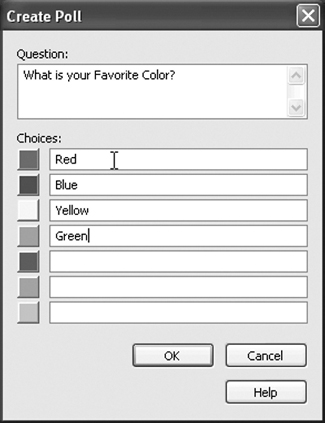
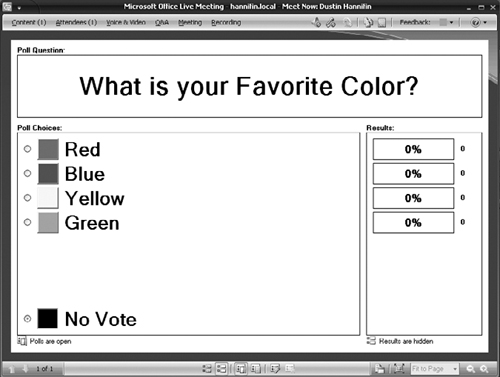
Live Meeting allows you poll all meeting participants and display the results in the session. This feature allows you to quickly get the opinions of all other meeting participants. To set up a poll, you simply select Content menu | Share | Poll Page. The Create Poll dialog box is displayed. Type your question and choices in the appropriate fields (see Figure 8.12) and click OK. Your poll is now displayed and is open for participants to respond (see Figure 8.13). The meeting presenter can, at any time, choose to close the poll, display results, or update the poll question and choices. After all participants have had an opportunity to vote, the presenter should click the Close Poll button and then click the Display Results button at the bottom of the poll page.
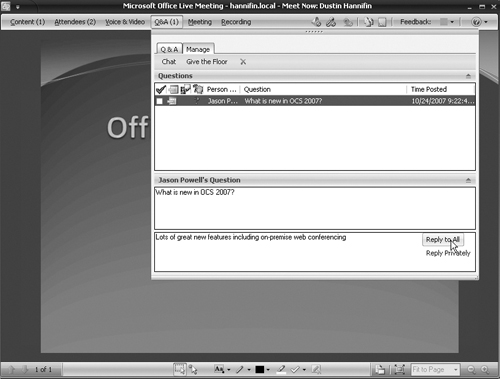
Throughout the meeting, participants can ask the presenter(s) questions. Participants can do this via the Q&A menu option. To ask a question select Q&A menu | Q&A tab. During the Live Meeting, the presenter(s) can answer questions at any time via the Q&A reply option. You access this by selecting Q&A menu | Manage tab (see Figure 8.14). The presenter can choose to answer the question publicly to all participants, or privately to the person that asked the question.
RoundTable is an exciting new product from Microsoft that offers advanced videoconferencing features typically available only in high-end videoconferencing systems. Some of those systems can cost hundreds of thousands of dollars to implement. Microsoft will initially offer RoundTable with a suggested retail price of around $3,000.
Microsoft RoundTable is a new hardware device that provides a rich videoconferencing experience by delivering a 360-degree view of the meeting. RoundTable takes a panoramic image of all attendees within a conference room and displays this image within Live Meeting. RoundTable then adjusts instantly to focus on the current speaker in the room. RoundTable is easy to set up and works with both Hosted and On-Premises Live Meeting.
It is important to understand how the RoundTable device works to be able to properly integrate it into your Live Meetings. First, you place the device in the center of a conference room table. It is important that RoundTable has a clear line of sight to each meeting participant. Next, you plug the device into a computer that will participate in or host a Live Meeting Web conference. After you turn on the RoundTable device, the embedded camera performs a 360-degree scan of the conference room and gathers an image of each participant. After performing the scan, RoundTable constructs a panoramic image of all meeting participants and displays this image within the Live Meeting client. Other users participating in the Live Meeting can see the panoramic display. As a participant in the conference room begins to speak, the RoundTable microphone detects that person’s voice and instantly displays live video of that person in a separate window within the Live Meeting. If another person in the conference room begins to speak, the camera jumps to that person and displays him or her in the main video window. This process continues throughout the meeting as different participants speak.
You may be asking yourself, “Why should I use RoundTable? It’s just another Webcam.” In a sense, this is true, but there are several compelling reasons why you may want to consider using RoundTable:
RoundTable costs about the same as today’s high-quality speaker phones. Most well-made, high-quality speaker phones that businesses use today can cost upward of $3,000. This price varies, of course, depending on features.
RoundTable provides a better experience than traditional videoconferencing systems in the same price range. RoundTable allows remote users to feel more engaged in the meeting by seeing all other users in the conference room.
RoundTable is easy to set up and integrates seamlessly with Live Meeting. Most modern-day videoconferencing systems require IT staff involvement to set up and configure, whereas typically any user who has basic knowledge of Live Meeting can set up RoundTable.
Conferencing capabilities are installed by default when you install OCS. However, you must perform several configurations post-setup. You can configure OCS Live Meeting features either globally or on a per-user basis. In this section, we will discuss how to set up these features.
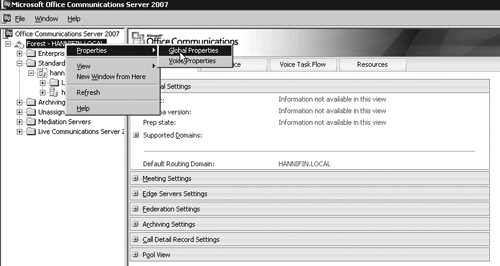
Global Live Meeting settings are set up at the forest level and impact all OCS users in that forest. To configure global settings perform the following:
Select Start | All Programs | Administrative Tools | Office Communications Server 2007.
Locate and right-click the Active Directory forest and choose Properties | Global Properties (see Figure 8.15).
Click the Meetings tab in the Office Communications Server Global Properties window.
You should now see several options on the Global Configurations tab. The following is a brief description of each:
Anonymous Participants. This allows you to decide whether you want to allow participants to join a Live Meeting via a meeting code. By allowing anonymous participants, you enable users without an Active Directory account in the OCS domain to join meetings via a passcode. You can also choose whether you want to Enforce this policy at the user level, which would allow you to set up different options for different user accounts.
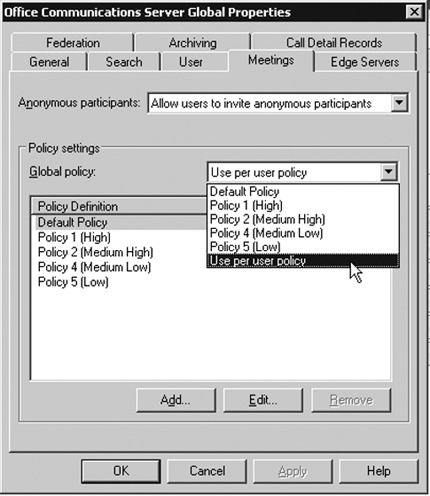
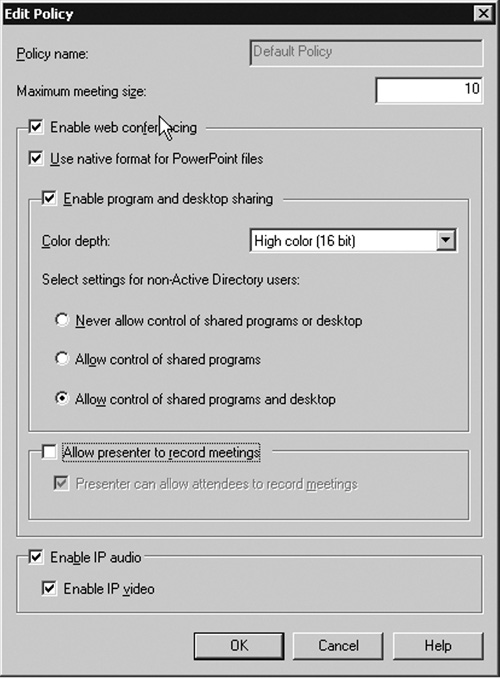
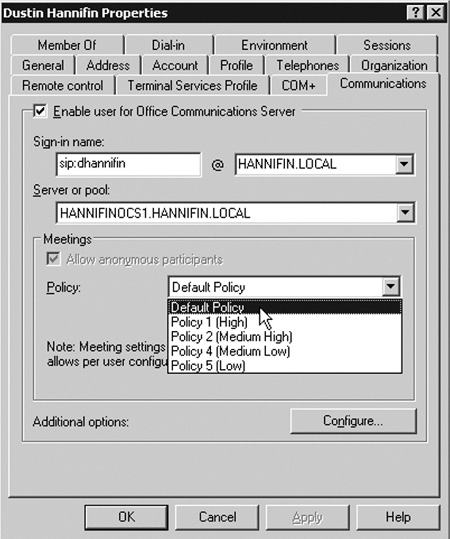
Global Policy. This option allows you to choose or customize several Live Meeting options, including the color depth of the meeting, permission to record meetings, and whether IP audio and video are enabled for users. You can also determine whether you want to force this same policy to all users or configure the policy on a per-user basis (see Figure 8.16). You can also edit existing and create new policy definitions in this window. Policy definitions define different sets of rules that can be applied globally or per user. For example, you can edit the default policy and disable the ability to record a Live Meeting session (see Figure 8.17). You can then edit Policy 1 (High) and allow recording of Live Meetings. After editing both policies, you can apply either one globally, or if you select Use per user policy you can assign the default policy to some users and Policy 1 (High) to others (see Figure 8.18). This gives you more granular control over who has what abilities within Live Meeting Web conferences.
After you configure the forest-level settings, you need to configure server settings. You must configure and set up these settings in each server in your OCS deployment. Let’s take a look at configuring server settings.
Open the OCS 2007 Microsoft Management Console (MMC).
Expand the Standard Edition Servers or Enterprise Pools folder, depending on which version of OCS you have deployed.
Find the name of the server you want to configure and right-click on that server. From the pop-up menu, choose Properties | Web Conferencing Properties. The Web Conferencing Properties window will be displayed.
The Meeting Compliance tab will be displayed. Meeting compliance allows you to archive all Live Meeting sessions. This feature is necessary for organizations that need to archive sessions for regulatory compliance. Check the box next to Enable Meeting Compliance if you want to archive Live Meeting Web conferences.
You can also optionally choose to shut down Live Meetings if they cannot be archived for some reason. Check the box Shutdown Meetings, if compliance fails to enable this option.
If you choose to Enable Meeting Compliance you must specify a folder location to store the Live Meeting archives. The Web conferencing service account must have write access to this folder.
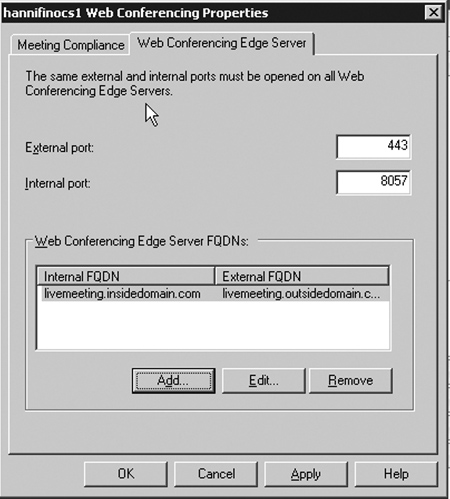
After configuring meeting compliance settings, click the Web Conferencing Edge Server tab. You will need to configure options on this tab only if you have an edge server in your OCS deployment.
Click the Add button and enter the internal and external FQDNs of the edge server (see Figure 8.19). Do not change the port numbers unless you changed them on your edge server. After entering the FQDNs of your edge server, click OK.
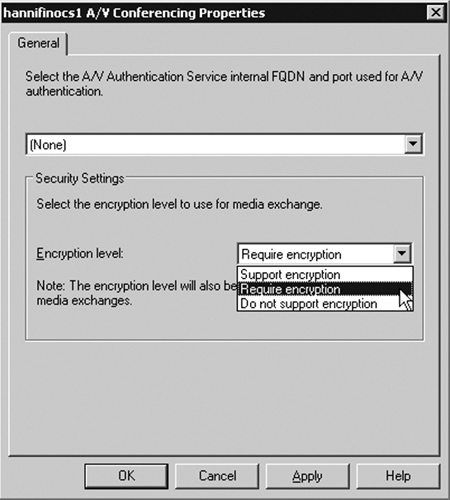
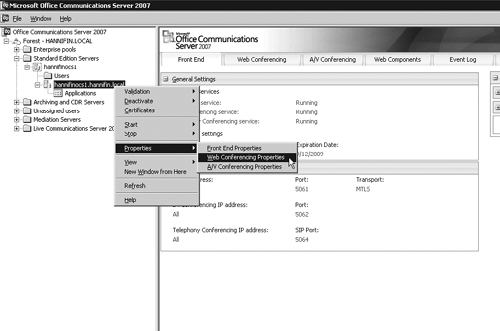
If you configured the edge server settings in the preceding step, you will need to configure the audio visual (A/V) conferencing settings for the same server. To configure these settings right-click on the same OCS server as you did in step 2. Select A/V Conferencing Properties from the pop-up menu.
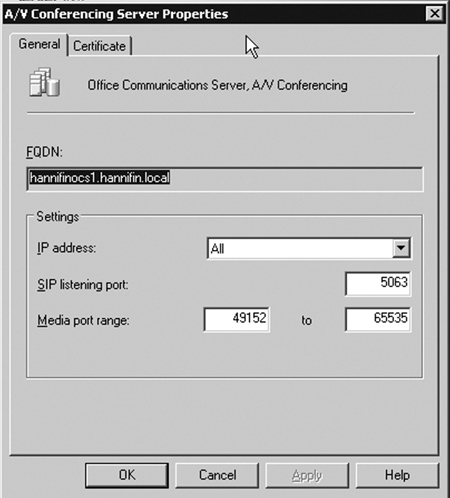
Choose the internal FQDN of your edge server from the drop-down menu. If you want to encrypt A/V traffic, ensure that the Require encryption option is selected, as seen in Figure 8.20, and then click OK.
Now let’s expand the server tree in the OCS MMC and locate the same server name displayed as the FQDN (see Figure 8.21). Right-click the server name and select Properties | Web Conferencing Properties from the pop-up menu.
In the Web Server Conferencing Properties window, ensure that the correct listening IP address and port are specified. In most cases, you can leave the default options of All IP addresses and a Media listening port of 8057 selected. Port 8057 is used for outgoing Live Meeting traffic being sent to the edge server.
Click the Certificate tab. Ensure that the certificate you selected in the initial setup of OCS is chosen. If that certificate is not shown, click the Select Certificate button to choose the certificate assigned to the OCS server. Then click OK.
Right-click the same FQDN server name in the OCS MMC and choose A/V Conferencing Properties from the pop-up menu.
The A/V Conferencing Server properties window will be displayed. Again you do not need to change any settings on this tab unless you have configured OCS to use different port numbers (see Figure 8.22). Click the Certificate tab. Ensure that the certificate assigned to this server during initial setup is selected, and then click OK.
This chapter provided you with an overview of the conferencing capabilities of Office Communications Server 2007. After reading this chapter, you should have a good understanding of IM, Web, and videoconference services offered by OCS and Microsoft’s Hosted Live Meeting solution. You should also now be ready to set up, configure, and host your own video and Web conferences via OCS. Happy conferencing!
Web, audio, video, and IM conferencing services are available in on-premises conferencing. | |
OCS provides on-premises conferencing services. | |
Microsoft offers hosted conferencing services on a subscription or per-use basis. |
You can use MOC to hold an IM, video, or audio conference with others. | |
The Outlook add-in allows you to schedule Live Meetings within Microsoft Outlook. | |
You can use the Live Meeting client to instantly start a Web conference in an ad hoc fashion. |
RoundTable is a new videoconferencing hardware device offered by Microsoft. | |
RoundTable provides a 360-degree view of the meeting room. | |
RoundTable pricing is reasonable enough for even smaller companies to take advantage of it. |
Most conferencing settings are installed and automatically configured during the initial OCS setup. | |
Conferencing settings are configured via policies which you can set up on a global or per-user basis. | |
You must configure each front-end server that will be used for Web conferencing to allow end users to access conferencing features on that server. |