
Solutions in this chapter:
Those of us who were early adapters as it were might remember that with the introduction of Live Communications Server (LCS) 2003, the default client was Windows Messenger 5.1. This client was sufficient for the first LCS release, and even for some users who needed no added functionality in LCS 2005. For those who wanted to be able to do more than send instant messages (IMs), share files, and use whiteboards, Microsoft released Office Communicator 2005 shortly after it released LCS 2005. With its enhancements to voice and video along with enrichments to the user interface, the roadmap for future clients was under way. This journey brings us to the newest client offering to go along with the newest LCS offering, Microsoft Office Communicator (MOC) 2007. So, it seems only right that we begin with an overview and discover just what has been added to this release.
With the advent of Office Communications Server (OCS) 2007 it would naturally make sense to introduce a new client as well. That is what Microsoft has done with the release of MOC 2007. Building on the already existing Office Communicator 2005, MOC 2007 takes greater advantage of the newest features of OCS 2007 and enhances the end-user experience. And building on the focus of unified communications along with a collaborative work environment, Microsoft has made those attributes the core of this newest client. As we review what’s new, we will break down the improvements to MOC 2007 into two categories: overall user experience and Enterprise Voice.
In MOC 2007, Microsoft has added features which are meant to enhance the overall user experience. These improvements build on the collaborative nature of MOC. Some have been in past clients, but we will focus here on what has been newly added. We’ll begin with presence, a familiar past feature which has been improved.
Since the release of LCS 2003, Microsoft has included the concept of a user having presence. Of course, in MOC 2007 Microsoft has found ways to both improve and integrate new features. The idea of knowing that the person is actually there and able to communicate is not in itself a new technology, and let’s face it, in all the major IM and communications software, the user’s presence is determined by the user. With either a setting or a click of the mouse, we can easily become unavailable or busy. However, for the most part, presence awareness does work. When a user is signed in, he is there and available. When we talk about presence in messaging software we talk about user “states.” This refers to the availability of the user you are trying to reach. We just need to believe that when a user’s profile shows “busy” it means busy with work, not busy with World of Warcraft.
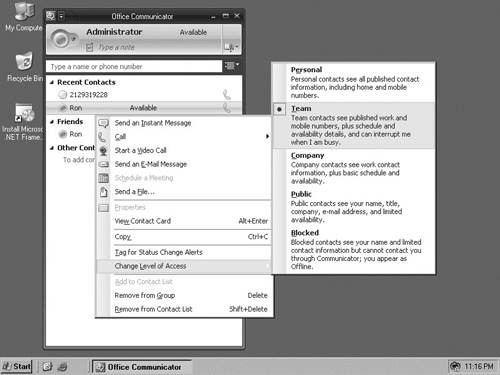
MOC 2007 offers users more granular control of their presence state. MOC 2007 uses a technology called access levels to determine who can view your presence state as well as how much of your personal information will be available to users. Access levels also grant users the ability to continue to send alerts to a user who is in a busy or away state. For instance, users assigned to a person’s Team access level would be able to interrupt the user and communicate with him even when a “do not disturb” state is displayed on his contact. Figure 4.1 shows a full list of access levels and the information available to users assigned to particular levels.
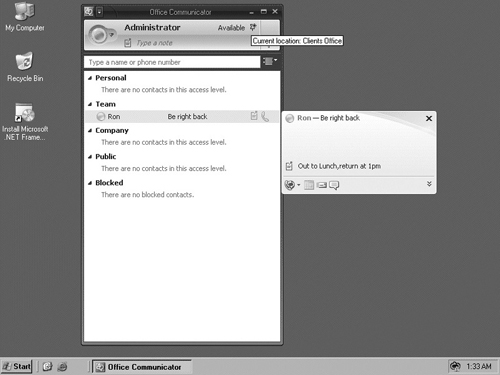
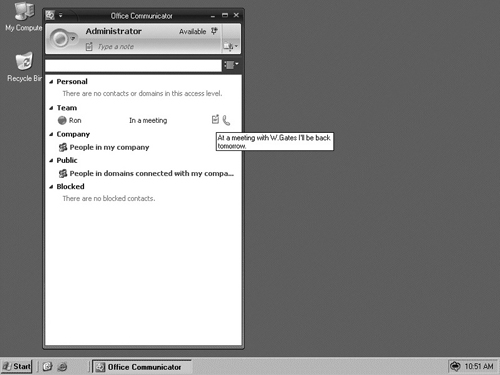
The newest area of presence in MOC 2007 is the new presence indicators. MOC users can manually change their presence state, choose from three preset locations or create custom locations, and even add a note that contacts can view. Figure 4.2 shows an example of user Ron’s state set to “Be right back”, with a note that he is out to lunch and will return at 1:00 P.M. In the right-hand corner, you can see that the Administrator’s current location is “Clients Office” (this is a customized location set by the user).
Note
Although being able to interrupt a team member has many upsides, this is not a license to disrupt team members. Users in a “do not disturb” state will only see alerts that are set to Urgent. And again, this ability to interrupt is granted only to the Team access level. So, if you abuse it, you may find yourself kicked off the “team”.
Along with states and access levels, you also have the ability to set your location. Several preset choices are available (as there were in MOC 2005), but MOC 2007 now offers the ability create custom locations. This is a tremendous advantage to those who are part of the mobile workforce and travel from office to office or from client to client.
New features for contact management include the ability to add Active Directory distribution lists to your contact list. You can then select a group for conversation, rather than just an individual. To further enhance contact management, you can now select multiple contacts and then choose to IM or conference them. Adding contacts is simpler than in past versions; just search for the user you want to add and drag and drop the user from the Search dialog into your contact list. This method works for users that are within your organization, federated users, and even users that are associated with public IM services. To further simplify you can now drag and drop contacts into the MOC 2007 contact list from the Outlook 2007 To: and CC: fields of an e-mail message. But perhaps the best drag-and-drop feature is the ability to add a contact into an active conversation window—in effect, dropping the contact into the conversation or conference instantly. In the reverse, you also have the option of taking a user from an active conversation and adding him to your contact list in MOC 2007 by simply dragging and dropping the user into your list of contacts. This level of simplicity makes it easier for users to find, add, and organize contacts in MOC 2007.
Note
Outlook 2007 also allows you to add a contact into MOC 2007, even without knowing the user’s IM address. Simply open the user’s contact information in Outlook and add an IM address (e.g., [email protected]). As a placeholder, add the contact into your MOC 2007 client. You can later edit the user’s IM address once you know the correct IM address for the contact.
IM has always been an important feature to Microsoft. In fact, with the release of Microsoft Exchange 2000, Microsoft released Exchange Instant Messenger Service. Microsoft removed this from Exchange 2003 and replaced it with LCS 2003. From the inception of LCS 2003, IM has been a core feature. Until the release of OCS 2007, Microsoft Messenger 5.1 was supported as an end-user client for LCS versions 2003 and 2005. So, it would make sense that we would continue to see new innovations in this aspect of the MOC client. In this newest client, users now have the ability to search for a contact by name and begin a conversation by simply choosing Enter after finding the person. Because MOC is enabled for rich text, you can now format IMs as well as copy and paste Word and Excel files into an IM.
With all these conversations going back and forth, it may become necessary to review past conversations, especially in this era of Sarbanes-Oxley and HIPAA. Integrating MOC with Outlook 2007, you now have the ability to right-click a contact(s) and check previous voice, conference, or IM conversations with the chosen contact(s). These are all logged in the Outlook Conversation History folder. Enabling the Conversation History folder is optional, and you set it in the MOC 2007 Options under the Personal tab. In the Personal Information Manager section, choose Microsoft Outlook from the drop-down menu and then check the following checkboxes:
“Save my instant messages conversations in the Outlook Conversation History folder”
“Save my call logs in the Outlook Conversation History folder”
The Conversation History folder keeps a history of all incoming and outgoing calls, as well as missed conversations. Links are used with the conversation history to rejoin conversations, embed notes taken with One Note, and view contextual information such as the e-mail or the calendar item that was used to start the conversation. Finally these items are archived by participants’ names and methods of conversation.
MOC 2007 comes with three types of alerts: actionable alerts, indicator alerts, and mini alerts. You use actionable alerts to reply to conversation alerts you’ve received. This allows you to respond to invitations via voice or IM, forward calls to another number, decline to join a conversation, or set a “do not disturb” for a set time. Indicator alerts display invitations to various types of conversations via visuals, to indicate the mode of communication and whether a user-to-user or conference invitation is being sent. You use mini alerts, which are expandable, to notify you of incoming calls or IMs.
MOC 2007 also includes some cool voice features. For instance, now you can choose how to handle incoming calls. MOC also offers several call forwarding features. You can forward a call to another phone, such as your home or mobile phone, forward a call to a user in your contact list, or have the phone call simultaneously ring your primary phone and a secondary phone. Of course, you need to configure the phone numbers in MOC (a process that we will review later in the chapter). Figure 4.3 shows the voice features in MOC 2007.

MOC has several other great features, including the ability to create rich text IMs. This means you can now treat an IM the same way you would a document you are writing. This is a great addition, because as humans we do not tend to communicate in a flat, monotone way. The ability to use features such as italics and bold text, as well as change the color of the text, better reflects the way we communicate with each other, and if we are going to collaborate with others in an IM environment, we should be able to express our thoughts and inflections completely. So, although it may seem to somewhat trivial, rich text IMs really do have a big impact on how we work.
Another new feature is the ability to escalate a conference into a Live Meeting. With the Live Meeting client installed on all participants’ machines, a user can simply right-click and choose Share Information using Live Meeting or click on the Live Meeting icon.
Note
The Live Meeting icon is available only when more than two people are in a conversation. To activate a Live Meeting with only two people, right-click a contact and choose Share Information using Live Meeting. It is also important to note that Live Meeting must be installed on all participants’ machines, and all clients must be on MOC 2007; this feature is not available to third-party public IM solutions or to earlier MOC clients (e.g., MOC 2005 and Messenger 5.1).
This concludes our overview of what’s new within MOC to improve the overall user experience. Next we’ll take a look at what has been added to enhance the use of Enterprise Voice.
The new Enterprise Voice features in MOC 2007 build on the unified communications infrastructure in OCS 2007. These newest components in MOC 2007 offer the ability to use the client as a full working telephone system.
The new items discussed in this section rely heavily on MOC’s Enterprise Voice feature. Microsoft has used the term enterprise voice to emphasize the fact that this is an enterprise-level solution, available to anyone, but without the enterprise-level price tag. This latest version of MOC is making a big play in the Voice over IP (VoIP) market. Combining software with telephony, and when used in conjunction with MOC’s Enterprise Voice feature, MOC 2007 is essentially an Internet Protocol (IP)-based softphone that doesn’t require a virtual private network (VPN) connection for remote users. We will cover how to set this up and administer it a little later in the book. For now, let’s look at what this means for the end-user.
Tip
Enterprise Voice is available to all users in the organization and works much the same way your regular phone does, with the obvious difference of not using a physical phone instrument, but rather a combination of software and hardware such as headsets or Universal Serial Bus (USB) phone devices. It is important to remember that users can take advantage of none of the features we’re discussing here unless they are enabled for either Enterprise Voice or Remote Call Control (RCC) within OCS first. Also note that with these integrations, you can interchangeably use a traditional PBX phone or your MOC client. You also can have PBX/PSTN phone users call and receive calls from your MOC users.
With MOC becoming your primary means of communication, you have the ability to manage multiple phone calls, using options such as the following:
Call forwarding. The ability to forward voice calls
Call hold. The ability to put a voice call on hold
Call transfer. The ability to transfer voice calls
Call resume. The ability to resume a call put on hold
All calls are converted to VoIP calls to allow for enhanced properties within the call, such as added contextual information including call subject and urgency level. Using the presence feature, a phone call made to a user who has enabled “do not disturb” will be routed directly to voice mail if the caller is not a member of the Team access level. Calls can also be forwarded to voice mail from within MOC by using the Communications Server Auto Attendant, which is part of the Unified Messaging (UM) integration with Exchange 2007 (we will discuss this later in the book). Another method of forwarding is to use the Actionable Alerts option. Answering an inbound call will also put other active conversations on hold.
MOC also offers a host of forwarding options in this new release, including the following:
Forward call. Calls can be forwarded to another work phone, mobile phone, or contact, or, as mentioned earlier, to voice mail. You can also use redirection rules to forward calls after a predetermined time (the default is 20 seconds).
Simultaneously ring additional number. This will allow you to have a secondary number ring simultaneously with your default number. This is good provision to ensure that calls will not be lost if you are experiencing trouble logging into MOC 2007 or, in the case of an IT administrator, if you have a call that you urgently need to take but you are all over the office that day. This feature allows the call to go to your mobile phone or, perhaps, to the receptionist, who can then locate you and forward the call to you.
These features are available for Enterprise Voice users as well as users who have Remote Call Control (RCC is the ability to manipulate conversations and session-oriented dialogs, using the Session Initiation Protocol [SIP]). This means you can use RCC to integrate voice, video, and text sessions (IM), and integrate legacy phone systems such as PBX/PSTN. With either option enabled, these features will work across both telephony topologies. Users also can select Active Directory distribution groups and add them to their contact list in MOC 2007, and then choose this distribution list to start a multiparty call. Users can create their own groups from within the list of contacts and choose that group to start a conference call, or they can simply choose multiple contacts from within the disparate groups and lists of users and start a multiparty conference call.
Note
For a user to take advantage of conference and multiparty calling, the conferencing option must be enabled for the user from the OCS management console. You can set this in the OCS Global Properties under the Meetings tab, or within Active Directory Users and Computers by choosing the option to configure Office Communications Server and selecting a meeting policy for the users in the wizard.
Calls to other users have been simplified, allowing you to place VoIP calls to other PCs running MOC. Conversation windows now appear when a call is placed, and they automatically close when either party ends the call. Calls can be transferred to another number, device, or contact, and with improvements in call transfers you can now check with your co-worker before transferring a call and then transfer the call right from within the IM conversation window. Other features include the ability to place a call by entering the telephone number into the search box in MOC, as well as better readability for phone numbers formatted within the United States.
We touched on conferencing when we discussed new calling features. To review, you can create conference calls in several ways. But you can also now move from a person-to-person conversation to a multiparty conference, and collaborate further thanks to such improvements as Web, videoconferencing, and audio conferencing server roles. You can securely initiate a Web conference to other MOC users or escalate a conference to a Live Meeting conference. With improvements to the escalation feature, you can escalate an IM, phone, or audio conference into a Live Meeting session. You can also share files or start a Live Meeting session. With an Outlook add-in you can schedule Live Meeting conferences to your calendar (we will cover this in greater depth in Chapter 8). Another improvement is the ability to “dial out” to a contact. With this feature, you can dial out to a PSTN/PBX or to a mobile phone. This ability to conference a traditional phone user into a VoIP-based communications system truly enables a new level of collaboration and is continuing to foster “anytime, anywhere” productivity.
In MOC 2007, users can now switch seamlessly from person-to-person conversations to multiparty conversations (the key word is seamless, as this is where the improvement lies). Likewise, an IM session can become an IM conference, phone calls can become phone conferences, and if you need to share applications during a conference you can move easily into a Live Meeting session. Another enhancement concerns conference calls. In the past, users have been unable to add and remove conference call participants dynamically. With MOC 2007, you can add members to a conference call and call out to a participant, effectively switching communication methods.
Setting up audio and video devices is even easier now with automatic setup. With MOC 2007, you can disconnect, change, and reconnect an audio or video device without the need for any manual setup. MOC supports automatic setup for headsets, microphones, Web cameras, and USB handsets. Optionally, you can choose to have a headset or USB handset use the computer’s speakers instead of the built-in earpieces for incoming audio.
MOC now supports USB headsets and handsets, as well as audio devices with telephony-grade options such as caller information, call timers, and call subjects. For example, imagine a typical collaboration scenario in which two co-workers are preparing a presentation and contract for a potential client. Alicia needs to call Rosa to discuss a contract negotiation, but she knows Rosa has been working on her presentation, so her MOC client is set to “do not disturb”. Being part of Rosa’s team and using the Subject and Importance features, Alicia can flag the call so that as MOC 2007 rings in Rosa’s office, Rosa can see by the Subject line that the call has to do with her presentation and she can see that the issue is urgent.
Rosa answers the call from Alicia, and as they discuss the contract issue, they realize that the legal department needs to be involved. They invite Jenny from legal into a conference. As they begin to talk, they realize they need to start a Live Meeting so that they can collaborate on rewording the contract. Alicia escalates the conference into a Live Meeting session. When they come across the page in question, they realize it was edited by Emma, one of the department managers. So, they try to reach Emma via MOC. Emma is not at her desk; she is headed to a client’s office. But she has turned on the “Simultaneously ring additional number” feature, so her mobile phone rings. Emma explains that the change was made per the prospective client’s requirements. Jenny from legal reviews company policy and legal procedure, and finds that the change doesn’t expose the company to any risk. So, with the problem corrected and the issue resolved, Rosa can make the necessary changes to her presentation so that the meeting will run smoothly.
This concludes our look at what is new in MOC 2007. Next, we will discuss how to install the client and ways to configure a single client and multiple clients, as well as how to use client templates for MOC 2007.
Before we install the MOC 2007 client, we will want to plan our deployment. Let’s consider several factors. First, the installation file for MOC 2007 is a Windows installer package (.msi); therefore, we have the option of using single-system installation methods, Group Policy software installation, or other third-party installation software deployment tools. Because software installation through Group Policy is free, we will discuss deployment via Group Policy and single-user installation techniques.
We will begin with a single-user install. To install MOC 2007 begin by clicking on the communicator.msi file and choosing Next; the license agreement screen will appear. Accept the licensing terms and click Next. On the next screen, you can choose the default install location or you can click the Browse radio button to change the location. Once you’ve decided where to install the client, click the Next button. On the final installation screen, click the checkbox to review the online notes for MOC 2007.
In this section, we’ll discuss how to install MOC 2007 using the Group Policy software installation feature. A Group Policy Object (GPO) is a virtual container for Group Policy settings. This container is attached or applied to objects within Active Directory, such as the Site, Domain, or Organizational Unit (OU). Using GPOs to install software affords some flexibility that you do not necessarily get with single-user installation. To set up the Group Policy installation open Active Directory Users and Computers, right-click the OU to which you want to apply the installation policy, and choose Properties. From the Properties page choose the Group Policy tab and click the Open radio button to launch the Group Policy Management Console (GPMC). Another way to launch the GPMC is to select Start | Run, type gpmc.msc, and click OK. Once you select where you want to place this policy, you can choose to create a new Group Policy or edit an existing Group Policy.
Tip
Because you are installing a software package, you can create a new Group Policy or perhaps edit an existing one. In most instances, depending on your organization’s size and complexity, you also want to try not to apply the Group Policy to the default domain policy. Rather, you should apply the Group Policy to an OU. The real trick is to balance not having too many Group Policies while trying to segregate domain activities at the same time. Some large organizations that use Group Policy installation will have an Installation Group Policy where they will create and manage all their installation packages. Ultimately, there is no wrong way, but managing these gets a bit hairy when there are too many of them. So, consider these factors when deciding to install the client via Group Policy.
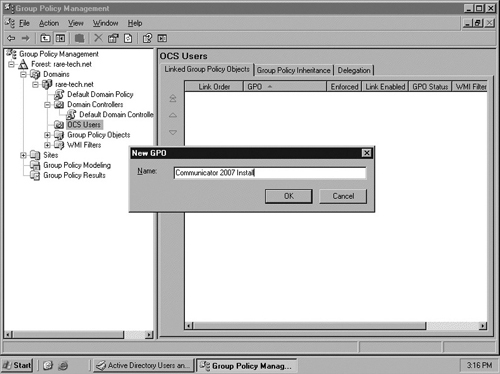
Figure 4.4 shows an OU named OCS Users; this is where we will create our new MOC 2007 installation GPO.
Once you have created your new Group Policy, you need to decide whether you will apply the GPO to the computer configuration or to the user configuration. Perhaps users do not always sit at the same system, or maybe temporary workers fill in at workstations where staff members are on vacation or are ill. In these cases, applying the GPO to the user is advantageous. Or maybe you have users who work from laptops out of the office and you do not use MOC outside the perimeter network; in this case, a computer-based installation might work better. For our example, we will use the user configuration. Click on the Software Settings folder and then on Software Installation. Right-click and choose New Package. From here, you need to navigate to where your installation (.msi) file is located.
Warning
You should place the installation package in a network share to ensure that users will have the proper permissions to install MOC 2007. GPMC will warn that installation may not be possible if you try to use an unshared folder location.
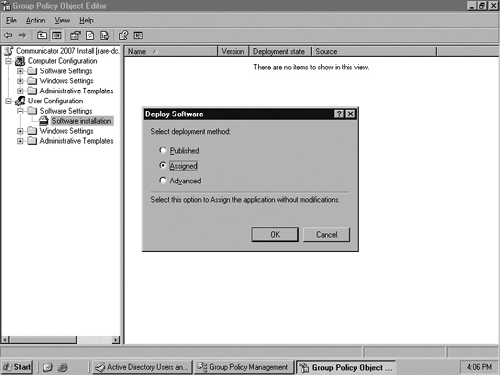
As shown in Figure 4.5, you now need to choose whether you want to publish, assign, or customize the package to be deployed. The publish and assign choices do not allow any modification to the package, and each installs differently. If you need to modify the installation package, you will need to choose Advanced. This will allow you to choose transform (.mst) files to customize the installation package. This would come in handy, for instance, when you want to redirect the installation to a drive other than the default, or when you want to make changes to a Registry setting for the package that cannot be defined through the Administrative template. Third-party packages exist to help you create transform files, but note that anytime you create such files you should do so with extreme care, as you are, in effect, changing the installation file directly. You are not able to modify the installation, or apply transform packages, at a later time after you’ve chosen the installation method.
For our deployment, we will use the Assigned deployment method. So, we will choose Assigned and click OK. After the screen refreshes, we will see that the deployment package is ready. Because we have chosen to assign the application, it will install automatically to the users in the OCS OU the next time they log in.
Now, let’s take a moment to discuss deploying MOC 2007 where a Group Policy installation for MOC 2005 is already implemented. Go to your GPO where MOC 2005 is set to be deployed and choose to Edit that policy. In the Software Installation section, create a new installation package in the GPO; however, after you choose your method of deployment, check the Properties to see that the settings are in place. Click the MOC 2007 installation package and the Properties screen will open. Click on the Upgrades tab and the screen in Figure 4.6 will appear.
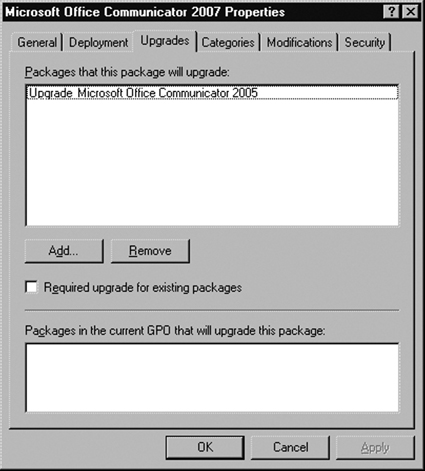
Checking the Required upgrade for existing packages checkbox will force the upgrade of the end-user client to MOC 2007, for all users linked to the GPO. You may not want to remove the old MOC 2005 client on certain end-users. But to make a correct assessment, you should consider the list of changes and differences between the 2005 and 2007 Group Policy deployments, which you can review in the Communicator 2007 Deployment Guide.
In addition to traditional and Group Policy installs, you have other options for installing the MOC client. For instance, you can install MOC using Windows login scripts (which you can do silently using command-line options to suppress user intervention). Or you can use software such as Systems Management Server (SMS) 2003 or System Center Configuration Manager 2007, which was in beta at the time of this writing. These programs are good for installations in which scheduling of network traffic or of wide area network (WAN) implementations is a consideration. These and other third-party programs are also effective when complex implementations are necessary.
Now that we have the client installed, we need to configure our end-users before they can sign in and use MOC.
Before your users can sign in and use MOC, you need to configure their accounts in Active Directory. You can do this in both Active Directory Users and Computers and the Communications Server Administrative Console. However, there is one step you must perform first by running the Communications Server Users Wizard from Active Directory Users and Computers. So, let’s take a look at what we need to do to enable users in Communications Server. Some user settings may not be available to configure at the user level if the Global and Voice Properties are not enabled or configured to allow for end-user configuration.
We will look at these properties in detail later in the chapter.
Note
Because we are talking about configuration, we should take a moment to talk about Microsoft PowerShell. At the time of this writing, OCS 2007 does not have built-in support for configuring properties in MOC using PowerShell. However, third-party tools are available for managing Group Policies in PowerShell.
Warning
Certain settings also require that you set up a server role for the settings to work. For example, you need to install archiving services to allow message archiving, and Access Edge Servers are required to allow public IM connectivity and federation.
Let’s walk through the steps of enabling and configuring user objects in Active Directory.
One of the great aspects of deploying MOC is that you can handle most of the user configuration in Active Directory Users and Computers. The Active Directory User Objects also use wizards to help guide you through the enabling and configuration of MOC users. Because configuring user properties in Active Directory Users and Computers is a familiar task, the process is much easier to master.
In this section, we will discuss how to enable and configure single users and multiple users for MOC access; we’ll begin with setting up a single user object in Active Directory Users and Computers. You can access this on a machine where the Active Directory Administration tools are installed. By default, these tools are installed on all domain controllers. However, you can use a Windows XP or Vista workstation with the Windows Administrative tools installed. So, browse to your Administrative tools, or launch it from Start | Run or the command line by typing dsa.msc:
Open Active Directory Users and Computers.
Go to the OU where the user is located.
Right-click the selected user and choose Enable users for Communications Server.
The Enable Office Communications Server Users Wizard launches. Click Next.
Choose a standard server or enterprise server pool in which to assign your user, and click Next.
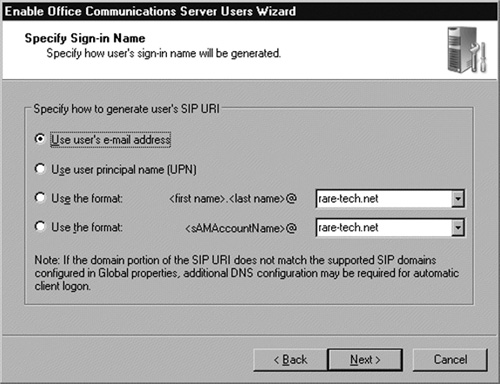
Choose a sign-in name for the user. You can use an e-mail address, a User Principal Name (UPN), a first name - last name @somedomain.com, or sAMAccoutName @somedomain.com. After you have chosen a sign-in name, click Next (see Figure 4.7).
After you complete step 6, an operation status screen will appear, telling you whether the operation succeeded or failed.
Now that you have enabled the user for MOC let’s look at the configuration. Again, from the user object within Active Directory Users and Computers, right-click and choose Configure Communications Server Users. Now you will see the Configure User Wizard; click Next, and then you will see a display of the user settings you can configure from this wizard. Table 4.1 shows which settings are available and what Global or Voice Properties are required to allow individual user configuration.
Table 4.1. User Configuration Wizard Settings
User Configuration | Available Settings | Tab | Global and Voice Properties |
|---|---|---|---|
Federation | Enabled/disabled | Federation | Fully qualified domain name (FQDN) of director or Access Edge Server for internal and external access |
Public IM connectivity | Enabled/disabled | Federation | FQDN of director or Access Edge Server for internal and external access |
Enhanced presence | Enabled/disabled | User | Enable to allow users to see presence information for noncontacts |
Archive internal messages | Enabled/disabled | Archiving | Set to Archiving according to user settings to override global settings |
Archive federated messages | Enabled/disabled | Archiving | Set to Archiving according to user settings to override global settings |
Organize meetings with anonymous participants | Allow/disallow | Meetings | Set to Enforce per user to override global settings |
Change meeting policy | Check whether to change meeting policies and choose a policy template | Meetings | Set to Use per user policy to set the features allowed in a Web conference |
Change Enterprise Voice settings | Check to allow changes, choose Enable Voice, and select a voice policy for the user | Policy tab in the Voice Properties | Set voice dialing properties for users. Set to Use per user policy to modify settings per user |
Using the Properties page in the Communications Server Administration Console, or the Communications tab in Active Directory Users and Computers, you can configure more user settings. So now, let’s look at the User Options page.
In the User Options page, you can change individual user properties. Many of these are options we considered before for forest, domain, and group-level configuration. The options we can set here are the username, the domain, which MOC server or pool to set for meetings (this is an option only when global settings allow for configuration), and additional options. Figure 4.8 shows the additional options.

In this page, you can configure IP/PSTN or RCC telephony options for the user. These include the following:
Enable PC-to-PC communication only. The user can make PC-to-PC voice calls only. There is no integration with phone systems.
Enable Remote call control. You can use your phone line to make PC-to-PC or PC-to-phone calls.
Enable Enterprise Voice. MOC is used to route all inbound and outbound calls for the user, and can be used to make these calls. Enterprise Voice also offers enhanced features not available in RCC.
Enable PBX integration. Users can receive calls from their legacy phone system or the MOC client.
Policy. This is where you can define what call privileges are available to the user.
Server URI. This is the Uniform Resource Identifier (URI) of the RCC server, and it is required to integrate RCC with PBX (it is not necessary to provide this to enable RCC; you need it for RCC to interact with a PBX system).
Line URI. This is the URI of the user’s telephone. RCC and Enterprise Voice use it for call routing.
You can also choose federation options for users with more granularity. In the Federation section of User Options you can change the options of a single user. For instance, your company policy may be that all departments by default have public IM connectivity and the ability to ederate with other organizations that use MOC with federation enabled. However, the marketing department may be employing several summer interns that need internal IM access, but that will not need to communicate outside the local office or with public IM clients. Here, you have the option to change that setting for a single user. The options are:
Enable federation
Enable remote user access
Enable public IM connectivity
Note
Public IM connectivity requires additional licensing, so you should use this sparingly as it can become an expensive addition if not moderated closely. These licenses are available from Microsoft through volume licensing programs, starting with Open Value for five or more licenses, Select for 25 or more licenses, and Enterprise agreements for 250 or more licenses. The public IM connectivity license is a per-user, per-month subscription, and this is in addition to the use CAL. The average retail price for the per-month subscription is about $1.49 per user.
Next, you can set up archiving options for the user. You can configure the available options only if the global properties are set to Archive according to user. The options are:
Archive internal IM conversations
Archive federated IM conversations
Using the Group Policy Administrative template for MOC, you can choose to have these conversations archived to the user’s Outlook mailbox.
The last option is the Enable enhanced presence option, which you cannot change once set. You can leave this configuration option alone when setting up the default configuration of users in Active Directory (which we will discuss shortly). You also can set it on an individual user basis.
We have considered how to configure individual user settings using the Active Directory user object. Now let’s look at what we can do to configure multiple users.
One of the most compelling reasons for multiuser configuration is the control of feature sets within MOC. Due to the costs associated with Live Meeting and public IM connectivity licensing, users within certain departments may not be configured for public IM connectivity or Live Meeting usage. Or perhaps corporate policy or standards such as HIPAA or Sarbanes-Oxley dictate that federation should not be allowed and that archiving is a must. So, let’s look at where we can configure user settings and what properties are affected. We will begin by discussing the forest-wide settings, which affect all users in the SIP domain.
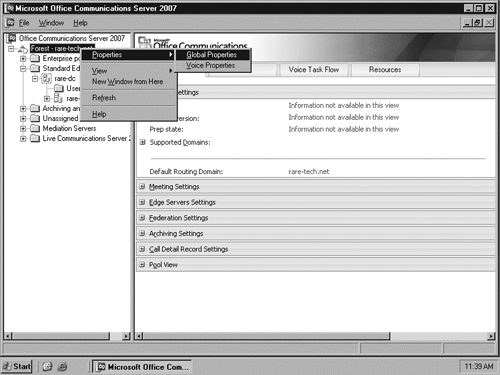
Both Global Properties and Voice Properties are available in multiuser configurations. To configure the Global and Voice Properties for your forest, open the Office Communicator Administration Console. Choose your forest, right-click, go to Properties, and choose Global Properties or Voice Properties, as seen in Figure 4.9.
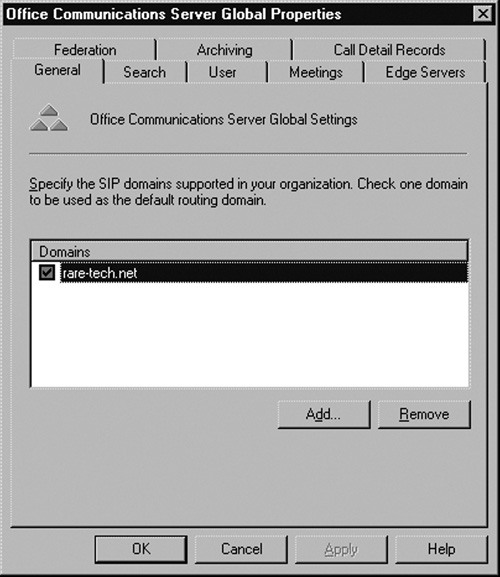
The Global Properties page includes eight tabs, listed here and shown in Figure 4.10:
General. Specifies the supported SIP domains in your organization
Search. Specifies how MOC handles search queries
User. Specifies the maximum subscribers and devices (points of presence) for each SIP domain
Meetings. Specifies the allowance of anonymous users and the meeting policy settings
Edge Servers. Specifies the internal FQDN of Access Edge Servers as well as Web conference and audio/video conference servers
Federation. Specifies the FQDN of the director or Access Edge Server that internal users will use to route outbound traffic
Archiving. Specifies the settings for archiving internal and federated communications
Call Detail Records. Specifies the use of call detail records (CDRs) for peer-to-peer, conferencing, or voice calls
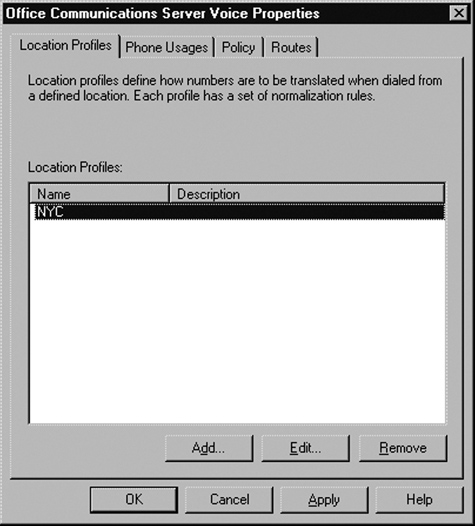
The Voice Properties page includes four tabs, listed here and shown in Figure 4.11:
Location Profiles. Defines how numbers are translated when dialed from a specific location
Phone Usages. Defines how to manage phone usage records
Policy. Specifies the Enterprise Voice policy for users
Routes. Defines the routing parameters for a voice call
Now that we’ve discussed the global settings, let’s discuss how to configure multiple users in a domain. To do so we will go back to Active Directory Users and Computers.
You can enable and configure multiple user settings in three ways: enable a group, enable an OU, or choose random users within Active Directory Users and Computers. Just as with individual users, to enable multiple users you right-click and choose Enable users for Communications Server. Then follow these steps:
Open Active Directory Users and Computers.
Go to the OU, group, or highlighted individual users to be enabled.
Right-click and choose Enable users for Communications Server.
The Enable Office Communications Server Users Wizard launches. Click Next.
Choose a standard server or enterprise server pool in which to assign your users, and click Next.
Choose a sign-in name for the users. You may choose an e-mail address, a User Principal Name (UPN), first name - last name @somedomain.com, or sAMAccoutName @somedomain.com. After you have chosen a sign-in name, click Next. Refer to Figure 4.6 for the sign-in naming conventions.
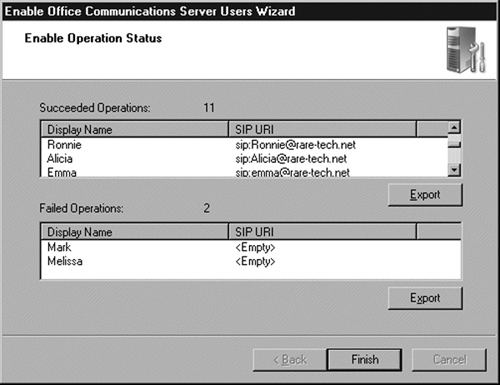
After you complete step 6, you will receive an operation status screen telling you whether the operation succeeded or failed, and letting you know which users have been enabled and which haven’t. Figure 4.12 shows both successful and failed operations.
Now let’s discuss how to configure multiple users. Open Active Directory Users and Computers, right-click, and choose Configure Communications Server Users. This launches the Configure User Wizard; click Next. As discussed earlier, here we can set up federation, public IM connectivity, enhanced presence, and archiving (both internal and federated messages); set meeting options (including policy settings); and set Enterprise Voice options.
Now we will look at the configuration options available in the MOC 2007 client. To configure the MOC client go to the Status button or menu button on the Communicator client and choose Options in the menu. Here you will see four tabs: Personal, Phones, Alerts, and General. We will discuss each tab in the sections that follow.
From the Personal tab, you can configure the following:
My Account. Here you can configure the sign-in address, choose to allow MOC to start when Windows starts, and choose to automatically open the contact list when MOC signs in. The Advanced option enables you to set automatic or manual configuration for the connection.
Status. Here you can set the time in minutes, to show an idle user as inactive and an inactive user as away.
Personal Information Manager. Here you can set up integration with Outlook or the Windows Address Book, or set it for no integration at all. You need Outlook 2007 for full integration with MOC 2007.
Note
You may need an update to Outlook 2007 to allow for integration with MOC 2007’s Personal Information Manager.
When choosing Outlook you have the option to check or uncheck the Display my Outlook out of office information to contacts in my Personal, Team, and Company access levels option. When Out of office is enabled, your status is updated and a note shows up in MOC displaying your out of office message. Figure 4.13 shows an example.
Additional options include the following:
Update my presence based on my Outlook calendar information
Show meeting subject and location to contacts in my Team access level
Save my instant message conversations in the Outlook Conversation History folder
Save my call logs in the Outlook Conversation History folder
From the Phones tab, you can configure the following:
My phone numbers. Here you can add phone numbers for Work, Mobile, Home, and Other, and you can choose which of these numbers to publish to your presence profile.
Phone integration. Here you can choose to integrate MOC with your phone system. The Advanced options let you configure the Remote Call Control and phone URI.
From the Alerts tab, you can configure the following:
General alerts. These notify you when someone adds you to their contact list, and they display the subject or message in conversation alerts.
When my status is set to Do Not Disturb. From here, you can choose one of the following:
Do not display alerts
Display only conversation alerts from people in my Team access level
Display all alerts, but only conversation alerts from people in my Team access level
Sounds This lets you play sounds in MOC. You can also configure the sounds that are used in MOC, and you can customize up to 17 different sound alerts. For example, you can suspend instant messaging sounds when the conversation window is in the foreground; suspend sounds when your status is busy; or suspend sounds when your status is do not disturb.
From the Options tab, you can configure the following:
Instant Message Settings. This lets you show emoticons in IM and change fonts.
File Transfer. From here, you can choose where to store received files. The default location is C:Documents and SettingsAll UsersWINDOWSDocumentsMy Received Files.
Windows Media Player. From here, you can pause Windows Media Player for calls, video calls, and conferences
Language. Here you can choose the communicator language (to switch languages you must have a Multilanguage User Interface [MUI] package installed).
Quality. This lets Microsoft collect information about how you use MOC.
Logging. From here, you can turn on logging as well as event logging for MOC.
MOC also allows more complex customization options for end-users. Here is a short list of some of the more common capabilities you have available:
With these options, you can really adjust MOC for your organization’s needs. However, many of the additional options available depend on a combination of XML files and Registry edits, and they are out of scope for our discussion. For more information, refer to Appendix B at the end of this book. There you will find examples of the XML files and Registry edits used to customize MOC 2007.
As IT professionals, we have control issues. We love to be able to keep a tight grip on things running in our environment, and MOC 2007 allows us to do that. We spoke earlier about pushing out an installation of MOC 2007 via Group Policy. To close out this chapter, let’s look at how to control what users can do and what is configured once MOC is installed.
We’ll begin with installing the MOC Administrative template, and we’ll look at what you can control once it is installed. The communicator.adm file should be located in the MOC 2007 installation folder. You can find the Administrative template at www.microsoft.com/downloads/details.aspx?familyid=DD3CAE08-3153-4C6A-A314-DAA79D616248&displaylang=en or you can search the Microsoft Web site for the “Office Communicator 2007: Communicator 2007 Policies” documentation. Installing the documentation will create an Excel spreadsheet and the communicator.adm file.
To install the Administrative templates, launch the GPMC by selecting Start | Run, typing gpmc.msc, and clicking OK. Browse to the GPO where you want to apply the Administrative template.
Tip
It is a best practice to apply the template to the GPO that was used for the MOC installation if you used the Group Policy installation method. If you used a single-user install, scripting, or third-party tools, you will want to apply the template at the OU level rather than at the domain policy level. This gives you the ability to customize MOC logically, by department, hierarchy, or geographical location.
Next, right-click and choose Edit; the Group Policy Object Editor will open. Choose whether to apply the template to the user or the computer, and then choose Administrative templates under that object (we will apply the templates to the user object in our example). From the Action menu choose Add/remove templates. The Current Policy Templates dialog box will appear. Click Add, choose the communicator.adm file, and click Open; you will now see MOC in the current policy templates. Choose Close on the dialog box and you will see a folder named Microsoft Office Communicator Policy Settings (see Figure 4.14).
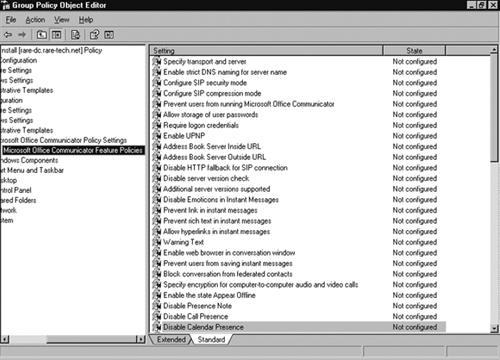
The template controls more than 60 different items (Appendix B lists all the available settings). Here is a broad overview of some of them:
Security. We can configure the SIP security level, storage of passwords, and the need for logon credentials. We can also configure whether users can even run MOC. For instance, interns or temporary employees in an office may not require MOC. It is easier to disable usage than to uninstall the client or to allow usage to a transient employee. Remember, every hole you open in your network puts you that much closer to risk.
User experience. We can control the use of emoticons, disable several presence features, and prevent the saving of IMs. But be prudent when considering use of this feature. In an organization of 1,500 employees, saving IMs in archives can be resource-intensive and may require the services of two or three extra admins, which in today’s business climate can be considered a luxury that is not easily afforded.
Bandwidth usage. We can configure SIP compression and control data as well as audio conferencing and videoconferencing. This could be useful for smaller offices, where Internet access may be less affordable, or in offices with many users where bandwidth is being sucked dry because employees are holding videoconferences to decide what to do about lunch.
Application integration. MOC allows integration with Outlook 2007 and One Note (there is limited support for integration with earlier versions of Outlook, such as Outlook 2003). Features such as enabling or disabling automatic archiving of IMs or calls to Outlook can be useful. Again, you need to determine what works for your organization.
As I said earlier, as IT professionals we want control, and specifically, we want control over the flow of information. We do not want to stop it; we just want to make sure it doesn’t come crumbling down around us. MOC gives you that control. This useful tool make your job easier, and can save you time that you no doubt will need for other IT issues.
In this chapter, we discussed MOC 2007 and its many new and exciting features which continue to build on the unified and collaborative framework that has become synonymous with many of Microsoft’s Office products. Enhancements to presence information, the ability to integrate MOC with your existing phone system, and the ability to integrate MOC with Office products allow you to be more productive. Easy installation and simplified control of feature sets via Group Policy mean you can control the user experience and limit unnecessary risk, while also customizing the MOC client for your organization. Adding to that the ability to interact with partners and clients to collaborate in real time and to escalate these real-time conferences into a Live Meeting makes MOC 2007 a no-brainer for any organization.
Enhanced presence provides the ability to create custom presence states and locations. | |
Contact management uses access levels to manage presence information available to users. Team options allow interruptions when a user state is set to “do not disturb”. | |
Enterprise Voice is a full-featured softphone that includes call forwarding, the ability to simultaneously ring an additional number, and conferencing capability. |
MOC 2007 installs easily with minimal upfront configuration, and auto-discovers audio, video, and USB telephony devices. | |
You can use Group Policy to deploy MOC 2007 to an organization and to control upgrades of previous versions of MOC. | |
You can choose from several methods of generating a user’s SIP URI. | |
MOC 2007 supports quiet install modes via logon scripts, and it uses the Windows Installer .msi extension. MOC can be packaged easily within third-party installers for more complex deployments. |
MOC 2007 supports Outlook 2007 out of office messages and publishing of free/busy calendar information. | |
You can easily configure most MOC user settings from within Active Directory Users and Computers. | |
MOC 2007 allows you to configure the client at the domain, server, and client levels; additional configuration is available via the Administrative template. |
You can install Administrative templates under the Computers or User object in the Group Policy Object Editor. | |
Templates allow enhanced administrative control that is not allowed in the standard installation. | |
Along with enabling and disabling features, the template allows further configuration for users, including specifying transport methods and internal and external SIP domains. |
Can Enterprise Voice integrate with all PSTN/PBX phone systems? | |
Yes. Several systems are directly supported by OCS. Those that do not support OCS directly can be configured to work with a mediation server and a PSTN/SIP gateway device. More information on mediation servers is available in Chapter 6. | |
Where can I get details regarding why a user fails to be enabled in MOC? | |
You can get this information from the Operations success/failure section of the Enable User Wizard. You can export this information to an XML file which will provide details about the failure. | |
Can I configure my MOC client’s audio and video devices manually? | |
Yes, although MOC installs and configures these automatically. Under the Tools menu item is the option to adjust and change audio and video settings for individual clients. Alternatively, you can disable them altogether. | |
After configuring an OU, a user is added and configured individually. Which setting will take priority? | |
As in Windows Server, the OU setting will take priority over the individual settings and the global properties settings will take priority over OU or group settings, unless the global properties are set to enforce the user settings. | |
Can I dial phone numbers of people not in my contact list? | |
Yes. You can directly enter a phone number in the Search box and press Enter or right-click and choose Call. | |
Can I create my own groups in MOC? | |
Yes. Go to Menu | Tools and choose Create groups. | |
Are these groups viewable when MOC is sorted by access level group? | |
No. Access level groups are predefined and cannot be viewed; however, contacts from the user-created group will be viewed in an access level group. | |
What does it mean to tag a contact for status change alerts? | |
This option exists to alert you when a contact that has presence set to Busy, Be Right Back, Do Not Disturb, or Away returns to an available state. | |
Can Communicator be configured to make a user appear to be offline rather than busy or away? | |
Yes. You can do this through the Administrative template. It appears as an option for users if this administrative policy is enabled. |