
Solutions in this chapter:
In the previous two chapters, we covered a variety of material to set the stage for implementing Microsoft Office Communications Server (OCS) 2007. Now, we will spend the next several chapters explaining a typical OCS implementation, and walking you through the installation process.
Many optional server roles can be put into action in an OCS 2007 implementation; however, one role in particular must exist to offer basic presence functionality within your environment: the front-end server. In this chapter, we will discuss the installation and configuration of not just the OCS bits, but also the prerequisite applications and services that must be in place. The key to a successful OCS implementation is to get the front-end server configuration right the first time, because this is where the user interaction with OCS takes place. Get this wrong, and the OCS implementation will always be suspect.
As mentioned, before you can begin to install OCS 2007, you first need to address some prerequisites. Before we get to the prerequisites, though, we need to discuss choosing the correct version of OCS for your environment. To that end, you have two options to choose from: Standard Edition and Enterprise Edition. Table 3.1 outlines the key differences between the two product versions.
Table 3.1. Comparison of Standard and Enterprise Editions
Feature | Standard | Enterprise |
|---|---|---|
Presence | X | X |
Instant messaging (including public IM and federation) | X | X |
Conferencing | X | X |
Voice | X | X |
Archiving (off-box) | X | X |
Load balancers | X | |
High availability | X | |
Multiple servers/pool | X | |
Sizing (estimated) | 2,000 users | 50,000 users |
Although we will be generalizing most of our discussion within this chapter to address both the Standard and Enterprise editions, we will actually be performing an Enterprise Edition installation. Now that licensing is squared away, the first thing you need to do is verify that you are at the proper Active Directory level.
As you are probably well aware, there are several functional levels of configuration for an Active Directory forest and domain. For forests, you can run in:
Windows 2000 (supports Windows NT, 2000, and 2003 domains and domain controllers)
Windows Server 2003 interim (supports Windows NT and 2003 domains and domain controllers)
Windows Server 2003 (supports Windows 2003 domains and domain controllers only)
Similarly, domains have multiple functional levels under which they can function:
Windows 2000 mixed (supports Windows NT, 2000, and 2003 domain controllers)
Windows 2000 native (supports Windows 2000 and 2003 domain controllers)
Windows 2003 interim (supports Windows NT and 2003 domain controllers)
Windows Server 2003 (supports Windows 2003 domain controllers only)
For OCS 2003 and the internal certificate authority (CA) services to work, you will need to ensure that both the forest functional level and the domain functional level of your environment are set to Windows 2003 mode. Let’s step through this process now.
Some Independent Advice
Before performing the following functional level changes, for your own sake make sure that your environment is ready to support a Native Windows 2003 environment. This is a nonreversible process. For more information on functional levels, visit www.petri.co.il/understanding_function_levels_in_windows_2003_ad.htm.
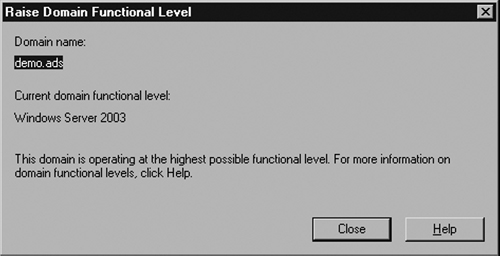
First, you need to raise the domain functional level. To do this, complete the following steps:
From a domain controller, click Start | Administrative Tools | Active Directory Users and Computers.
Right-click on the name of your domain, and select Raise Domain Functional Level from the drop-down menu.
Under Select an available domain functional level:, choose Windows Server 2003.
Click the Raise button (Figure 3.1).

Next, you need to raise the forest functional level. You need to perform this task on a domain controller at the root of the forest. This may or may not be the same as your production domain, depending on how your Active Directory deployment is configured. To raise the forest functional level, you will need to perform the following steps:
From the domain controller, click Start | Administrative Tools | Active Directory Domains and Trusts.
Right-click on Active Directory Domains and Trusts from the management window, and select Raise Forest Functional Level.
Under Select an available forest functional level:, choose Windows Server 2003.
Click the Raise button (Figure 3.2).
Now that your domain and forest levels are in their associated native modes, we can move on to the next step within the prerequisites: addressing the need for certificates within OCS 2007.
You need certificates with OCS 2003 for a number of reasons, which we will discuss later in this book. The important thing to understand is that this has everything to do with the need to properly secure your presence engine to prevent the potential leak of confidential company information.
Although it would certainly be easier to use public certificates from an authorized CA such as VeriSign, Thawte, or a similar provider, we will be using an internal CA during most of this book. It is important to note that for certain features to function, such as federation, you will be required to use a third-party CA server because other parties (outside your corporate environment) need to authenticate communications with your OCS servers. Using a private CA to perform this function is far more complicated and ultimately more expensive than simply buying a certificate. However, I digress. At this point, we will walk through the steps of configuring a CA in Windows 2003. You can use just about any server within your environment to run as a CA, but your best bet is to keep it off the OCS server itself. Let’s walk through the CA configuration process:
Click on Start | Control Panel | Add/Remove Programs.
When the Add/Remove Programs window opens, select Add/Remove Windows Components. Make sure you have either a Windows 2003 CD available, or the i386 directory copied to a local (or network) drive.
In the Components window, check the box next to Certificate Services.
If you are prompted with a warning window, read through the warning and click Yes.
In the Components window, click on the Application Server option, and then click on the Details button.
In the Application Server details window, check the box next to Internet Information Services and click OK (Figure 3.3).
Click Next to begin the installation.
In the CA Type window, you have a choice of multiple CA types. Click Enterprise root CA, and click Next.
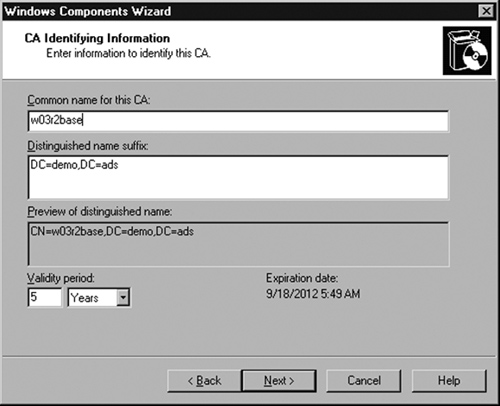
In the CA Identifying Information window, type the name of the server into the box titled Common name for this CA: and click Next (Figure 3.4).
Unless you want to move the CA configuration files to another drive, accept the defaults in the next window, and click Next.
When the installation completes, click Finish.

Now that the settings for the CA are ready, we can move on to installing our database which will be responsible for supporting the OCS front-end installation.
OCS 2005 Enterprise Edition can support either SQL Server 2004 (with Service Pack 4) or SQL Server 2005 (with Service Pack 1, 32-bit or 64-bit). Of note, OCS 2005 Standard Edition will run on SQL Server 2005 Express Edition. With Standard Edition, if you do not already have SQL Server 2005 Express Edition installed, the OCS installer will install and configure it for you.
Although we will be installing SQL Server 2005 Standard Edition for OCS 2007, we will not be tuning SQL or configuring SQL for best practices. If you want to know more about how to configure and tune SQL Server 2005, we recommend that you read Microsoft SQL Server 2005 Administrator’s Companion by Edward Whalen et al. (Microsoft Press). Let’s install SQL Server 2005:
First, we will create a user account for the SQL Service to use. From a domain controller, click on Start | Administrative Tools | Active Directory Users and Computers.
Right-click on the name of your domain. From the drop-down menu that appears, select New | User.
Type in a first name, last name, and user logon name for the account you will use. In this exercise, we will use OCS as the first name, Service as the last name, and OCSSQL as the user logon name. After you have entered the appropriate fields, click on the Next button to continue.
Enter a password that meets your minimum password requirements. In our example, we will use P@ssw0rd.
Remove the checkmark from User must change password at next logon. You can also select Password Never Expires if you do not want the password to change automatically, assuming that you have a password refresh policy. Click Next to continue.
Click on Finish.
Return to the OCS server where you will be installing SQL.
Insert the SQL Server 2005 CD into the drive.
When the SQL Server 2005 splash screen appears, click on Server components, tools Books Online, and samples under the Installs area.
When the End User License Agreement (EULA) appears, make sure to read through the license agreement, take copious notes, and then click Next.
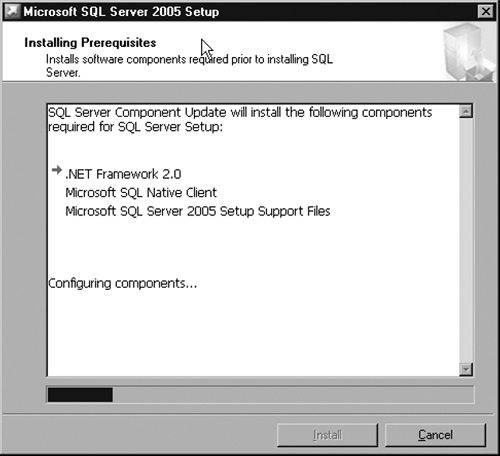
On the Installing Prerequisites page (Figure 3.5), SQL will now verify that the SQL prerequisites have been met. If they have, click Next. If they haven’t, click Install to begin installing the appropriate applications.
When you reach the Welcome screen, click Next.
On the System Configuration Check (SCC) page (Figure 3.5), SQL will now verify that the SQL prerequisites have been met. If they have, click Next. If they haven’t, go back and address the missing prerequisites, and then restart the SQL installation.
On the Registration Information page, enter your name and company information, and then click on Next.
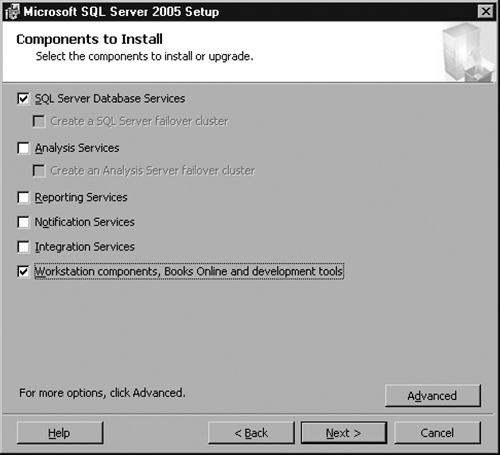
Select SQL Server Database Services and Workstation components, Books Online, and development tools from the Components to Install page, and click on Next (Figure 3.6).
On the Instance Name page, you have the option of choosing a name for the SQL Server instance, or simply selecting the default. For the purposes of this book, we will be choosing the default instance name.
On the Service Account page, enter the credentials for the account you created earlier in this section, and click Next.
Next, you need to choose the authentication mode for SQL. We will be using Windows Authentication. Once you have chosen the authentication mode, click Next.
Click Next on the Collation Settings page.
Click Next on the Reporting Settings page.
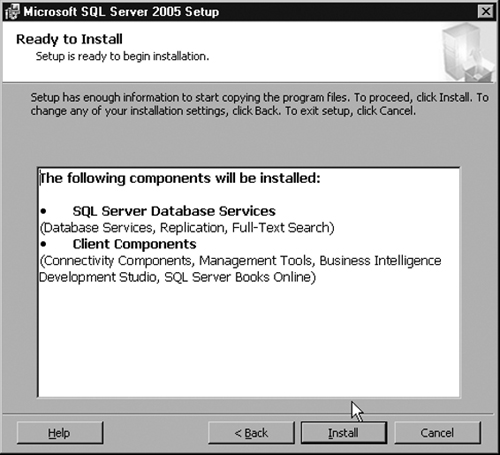
On the Ready to Install page, verify the information, and click Install (Figure 3.7).
Next, you will need to install Service Pack 1 or Service Pack 2 for SQL 2005. Depending on how and when you purchased SQL Server 2005, Service Pack 1 may have been bundled with the SQL Server DVD—this would likely be represented on the CD label. If not, you will need to download Service Pack 1 or Service Pack 2 (the latest SP as of the writing of this book). Service Pack 2 is available on the Microsoft Web site at http://technet.microsoft.com/en-us/sqlserver/bb426877.aspx. Because SP2 is the most recent update available, we will be using it for our configuration. The SQL Server 2005 Service Pack is fairly straightforward, so you can simply follow the defaults for upgrading. Please note that if the server you are using has other databases installed, upgrading to SP2 will stop any databases running on the server.
Now that your database server is humming along, you can begin to prepare Active Directory for the OCS attributes.
More and more applications from Microsoft are requiring that the Active Directory schema be modified to accept new attributes. Once upon a time, back in 2000, this was a pretty scary notion. The Active Directory schema was a new concept, and the general opinion of administrators was “don’t touch my schema.” However, as Active Directory and the applications requiring these types of changes have progressed, the chances of corruption or other issues have almost completely disappeared. With OCS 2007, you need to perform updates to the schema, forest, and domain for OCS to function within your environment. In the next few sections, we will walk you through this process.
First, you need to prepare the schema. To do this, you will need to perform the following actions from a domain controller at the root of the forest, and you will need Schema Admin rights to perform this function. Let’s walk through the process now:
From the domain controller, click Start | All Programs | Accessories | Windows Explorer.
If you are installing from a CD/DVD, navigate to the <drive>:Setupi386 directory.
Double-click on setup.exe.
On the Deployment Wizard page, click on Deploy Pools in an Expanded Topology.
On the Deploy Enterprise Edition Server page, click Prepare Active Directory.
When the Prepare Active Directory for Office Communications Server page appears, click the Run button next to Prep Schema (Figure 3.8).
On the Welcome page, click Next.
We will use the default location for our schema files, so on the Directory Location of Schema Files page, click Next.
The schema is now ready to be prepared, so click Next again.
When the installation is complete, click Finish.

Next, you need to prepare the forest for OCS. Let’s get right into the configuration steps:
From the domain controller, click Start | All Programs | Accessories | Windows Explorer.
If you are installing from a CD/DVD, navigate to the <drive>:Setupi386 directory.
Double-click on setup.exe.
On the Deployment Wizard page, click on Deploy Pools in an Expanded Topology.
On the Deploy Enterprise Edition Server page, click Prepare Active Directory.
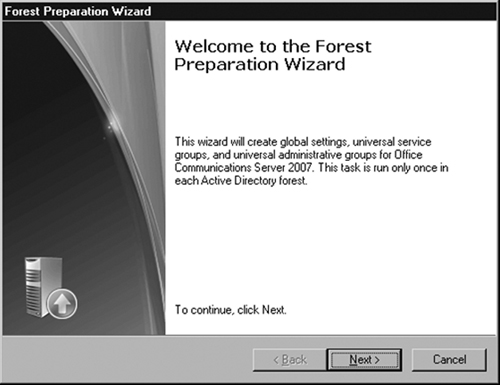
When the Prepare Active Directory for Office Communications Server page appears, click the Run button next to Prep Forest (Figure 3.9).
On the Welcome page, click Next.
We will use the default location for our Global setting, so on the Directory Location of Global Settings page, click Next.
On the Location of Universal Groups page, verify that the name of your domain is correct, and click Next.
On the Specify the SIP domain to be used for default routing page, verify the domain name again, and click Next.
Click Next to begin the process.
When the installation is complete, click Finish.
We’re almost at the end of the prerequisites for installing OCS 2007! The last step in the process is to prepare the production domain for OCS. Let’s begin that process now:
From the domain controller, click Start | All Programs | Accessories | Windows Explorer.
If you are installing from a CD/DVD, navigate to the <drive>:Setupi386 directory.
Double-click on setup.exe.
On the Deployment Wizard page, click on Deploy Pools in an Expanded Topology.
On the Deploy Enterprise Edition Server page, click Prepare Active Directory.
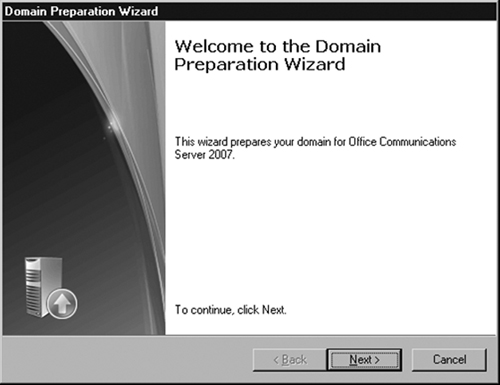
When the Prepare Active Directory for Office Communications Server page appears, click the Run button next to Prep Domain (Figure 3.10).
Click Next to accept the next few default settings.
Click Finish once the prep process is complete.
Click on the back arrow on the Prepare Active Directory page; step 1 is now complete!
The tension is building, excitement is in the air! You can cut the tension with a knife! Okay, maybe we’re overdoing it a bit, but this is, in fact, the moment we’ve all been waiting for. Now that all of the prerequisites are out of the way, we can move on to the actual installation of the OCS 2007 bits.
Microsoft has done a fantastic job of simplifying the installation process of its products over the past few years, and this still holds true with OCS 2007. At this stage, it’s time to get that front-end server up and running. Let’s begin. The following steps will take place on the server on which you have selected to run OCS 2007 as the front-end server.
First, you need to install IIS onto this machine. Click on Start | Control Panel | Add/Remove Programs.
When the Add/Remove Programs window opens, select Add/Remove Windows Components. Make sure you have either a Windows 2003 CD available, or the i386 directory copied to a local (or network) drive.
In the Components window, click on the Application Server option, and then click on the Details button.
In the Application Server details window, check the box next to Internet Information Services and click OK. When the installation completes, click Finish.
From the targeted OCS, click Start | All Programs | Accessories | Windows Explorer.
If you are installing from a CD/DVD, navigate to the <drive>:Setupi386 directory.
Double-click on setup.exe.
On the Deployment Wizard page, click on Deploy Pools in an Expanded Topology.
Next, select Step 2: Create Enterprise Pool and click Run.
Click Next to get past the Welcome page.
Accept the license agreement, and click Next.
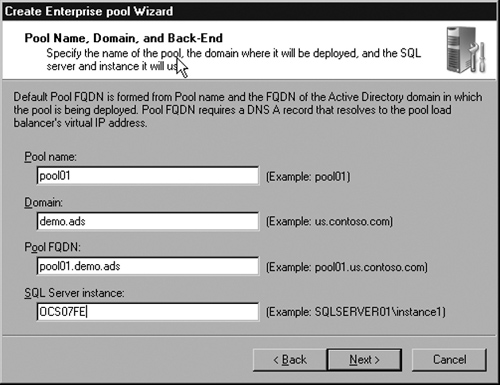
On the Create Enterprise Pool Wizard, enter a name for the pool, the pool’s fully qualified domain name (FQDN), and enter the name of the SQL Server and instance. If you are using the default instance on the SQL server, simply enter the server name (Figure 3.11).
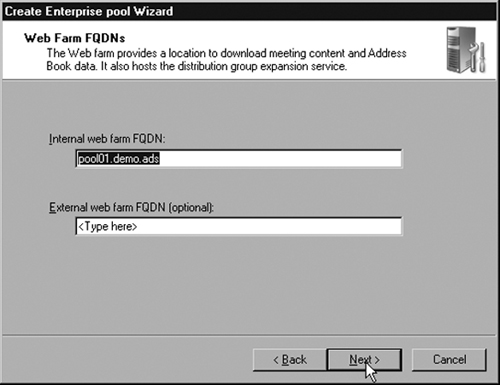
On the Web Farm FQDN screen, leave the field for External Web Farm FQDN blank (Figure 3.12), and click Next. This setting is used to allow external access to meetings hosted within the OCS infrastructure. You can change this feature post-installation.
Accept the defaults for the server files, and click Next.
On the Meeting Content and Archive Location screen, enter a UNC path on the server. For example, we will use \OCS07FEshare for the content and OCS07FEshare1 for the metadata. Create the corresponding shares on the server using Windows Explorer, and click Next.
Next, enter a UNC path for the Address Book. We will use OCS07AB. Create the corresponding share using Windows Explorer, and click Next.
For now, leave the archiving options blank, and click Next.
Click Next at the summary screen.
Click Finish after installation has completed.
The installation of the OCS bits is complete, but we are still a long way from being ready to install the Microsoft Office Communicator (MOC) client and begin using the presence engine. First, we have to complete the configuration of the OCS server:
If you are installing from a CD/DVD, navigate to the <drive>:Setupi386 directory.
Double-click on setup.exe.
On the Deployment Wizard page, click on Deploy Pools in an Expanded Topology.
Next, select Step 3: Configure Pool and click Run.
Click Next to get past the Welcome page.
On the Administrative Tools Required page, click Next to install the tools.
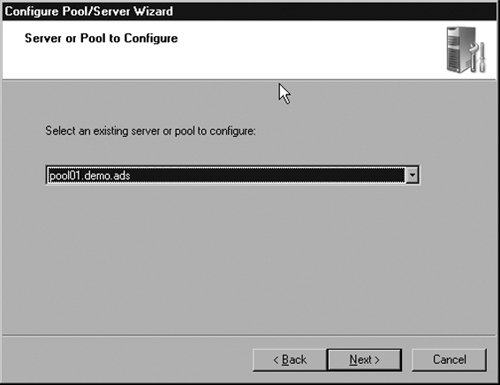
On the Server or Pool to Configure page (Figure 3.13), check to make sure that the name of the server is correct, and click Next.
On the Load Balancer Configuration Parameters page, click Next.
On the SIP domains page, make sure your domain name is selected, and click Next. Notice that we are using a nonstandard domain name system (DNS) suffix. You will want to use an Internet standard such as .com, .net, and so on as an alternative.
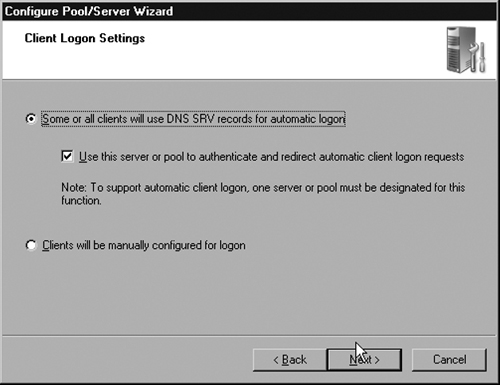
On the Client Logon Settings, accept the defaults that state Some or all clients will use a DNS SRV record for automatic logon and Use this server or pool as a Director for automatic logon (Figure 3.14). Once you’ve accepted those defaults, click Next.
Place a checkmark next to your domain name in the SIP Domains for Automatic Logon page, and click Next.
On the External User Access Configuration page, choose Do not configure for external user access now (we will address this with the Edge server install) and click Next twice.
When the configuration is complete, click Finish.
You have the base configuration completed, so now you need to install the front-end server role bits onto this server. To complete this portion of the installation, follow these steps:
If you are installing from a CD/DVD, navigate to the <drive>:Setupi386 directory.
Double-click on setup.exe.
On the Deployment Wizard page, click on Deploy Pools in an Expanded Topology.
Next, select Step 5: Add Front End Server.
From the Deploy Front End server screen, choose Step 1: Install files for Front End Server and click Install.
Click Next to get past the Welcome page.
Review and adjust the customer information as needed, and click Next.
Accept the defaults for file locations, and click Next.
Click Next to confirm the installation.
When the installation completes, click Close.
When you return to the Deploy Front End server screen, choose Step 2: Activate Pool Front End Server, and click Run.
Click Next to get past the Welcome page.
Verify the name of the domain, and click Next.
Under Select Service Account, enter and verify a password for the RTCService, and click Next.
Verify the settings you have chosen, and click Next.
When the installation completes, click Finish.
Now, you get to put your newly created certificate server to good use! You will be going back into the OCS Setup Wizard to initiate a certificate request so that you can use secure communications via the Transport Layer Security (TLS) protocol. Let’s begin:
If you are installing from a CD/DVD, navigate to the <drive>:Setupi386 directory.
Double-click on setup.exe.
On the Deployment Wizard page, click on Deploy Pools in an Expanded Topology.
Next, select Step 5: Add Front End Server.
From the Deploy Front End server screen, choose Step 3: Configure Certificate and click Run.
Click Next to get past the Welcome page.
Verify that Create a new certificate is checked, and then click Next.
Next, choose Send the request immediately to an online certificate authority, and click Next. You have the option of sending later, but because you already have your CA ready, there is no need to do this.
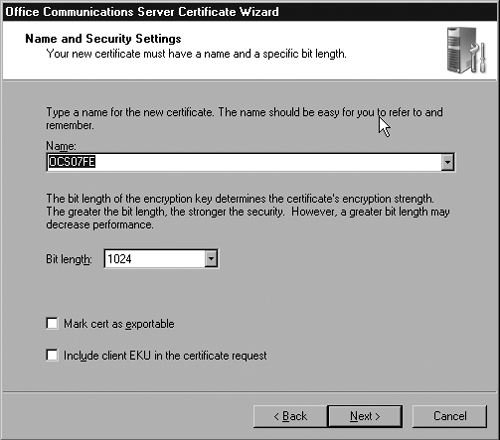
Next, verify that the name of your server is presented in the Name box of the Name and Security Settings page.
Remove the checkmark next to Mark certificate as exportable (Figure 3.15), and click Next.
Next, fill in the Organization and Organizational unit fields with the name of your company and department, respectively, and then click Next.
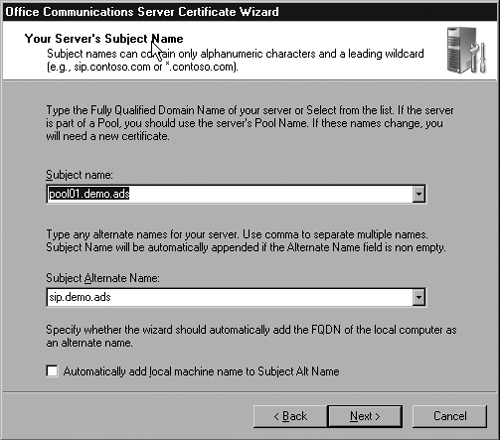
In the Subject name field, enter the FQDN of the OCS pool.
Make sure that the Subject Alternate Name appears as sip.<domain>.<com/net/etc> (Figure 3.16), and then click Next.
Now, enter the geographical information for the server (state/province and city/locality), and then click Next.
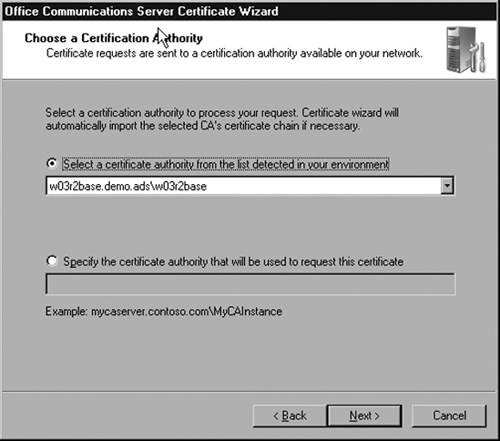
Verify that the name of your CA appears as in the Choose Certificate Authority page (Figure 3.17), and then click Next.
Click Next on the Summary page.
Click Assign on the Completion page.
Click OK on the Communications Certificate Wizard page.
Click Finish.
Note
If the certificate creation process fails, go back and make sure that the forest and domain levels are set for Windows Server 2003. This is a common issue.
Next, you need to go into the Internet Information Services Manager on the OCS server to begin to use the certificate that you just created:
Click Start | Administrative Tools | Internet Information Services (IIS) Manager.
Expand the server, expand the Web Sites settings, right-click on Default Web Site, and choose Properties.
Click on the Directory Security tab of the Default Website Properties.
Click on Server Certificate.
Click Next on the Welcome page.
Click Assign an existing certificate, and then click Next.
On the Available Certificates page (Figure 3.18), click the certificate that represents your server name, and click Next.
Click Next through the remaining screens, and then click Finish to complete the certificate configuration.
Close the IIS Management window.

As mentioned, OCS 2007 relies very heavily on DNS. For OCS to work as seamlessly as possible, especially for end-users, you need to make sure that you have the correct DNS records configured both internally and externally. The alternative to DNS records is that users would have to manually enter the name of their OCS server into the MOC client. Although this may not be a problem for users who will be using the product exclusively from inside the network, it is a major issue for people who will be travelling outside the network, as the Internet Protocol (IP) address (and FQDN, in some cases) will almost certainly be different from outside the network. In this section, we will walk you through the process of creating the proper DNS records for inside your network. Let’s create those records now.
A user with administrative rights to the DNS will need to make the following changes. Furthermore, the DNS servers will need to be able to support SRV records for this to work properly. Windows 2003 DNS supports these types of records. If you are using a third-party (or legacy Microsoft) DNS product, verify that these records can be created, or you may need to upgrade to a newer DNS service.
From your DNS server, click Start | Programs | Administrative Tools | DNS.
Expand the DNS console until you get to the appropriate domain name for your internal network (Figure 3.19).
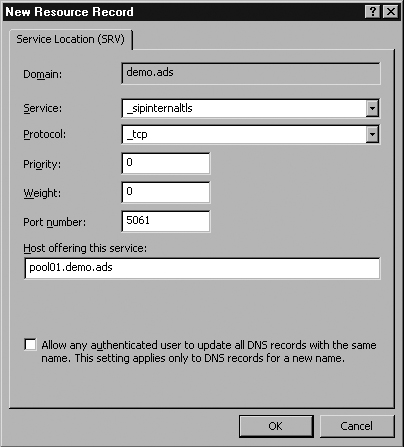
Under Select a Resource Type, click Service Location (SRV) and click Create Record. Type _sipinternaltls in the Service text field, _tcp in the Protocol field, and 5061 in the Port number field (Figure 3.20).
In the Host offering this service field, type the name of your OCS pool.
Click OK and close the DNS Management console.

We’re almost at the end of the front-end server installation process! Next, you need to start the OCS services and then validate your configuration. Let’s start the services now:
If you are installing from a CD/DVD, navigate to the <drive>:Setupi386 directory.
Double-click setup.exe.
On the Deployment Wizard page, click Deploy Pools in an Expanded Topology.
Next, select Step 5: Add Front End Server.
From the Deploy Front End server screen, choose Step 4: Start Services and click Run.
Click Next to get past the Welcome page.
Click Next again to start the services.
Once the services have started, click Finish.
When you return to the Deployment screen, click on Step 5: Validate Server Functionality and click on Run.
Click Next to get past the Welcome page.
Choose Validate Local Server Configuration and Validate Connectivity. Make sure all other boxes are unchecked, and click Next.
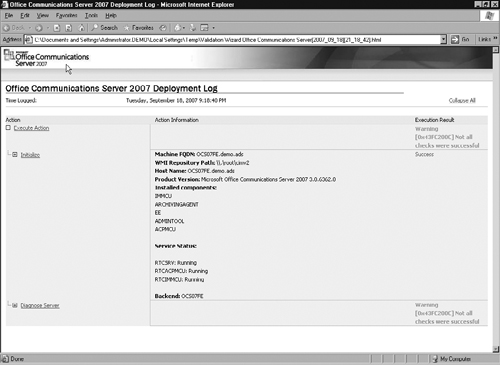
Review the validation information (Figure 3.21), and click Exit to close the window.
If you are prompted with a validation issue, click through the information tree to figure out how to resolve the issue.
That’s it for the server configuration! In the next chapter, we will discuss how the Communicator client is installed and configured, as well as how to set up a user to begin using OCS 2007.
Many optional server roles can be put into action in an OCS 2007 implementation; however, one role in particular must exist to offer basic presence functionality within your environment: the front-end server. The key to a successful OCS implementation is to get the front-end server configuration right the first time. After selecting the correct version of OCS for your environment (Standard or Enterprise Edition), you need to address the prerequisites and then prepare an Active Directory schema, forest, and domain. Once these steps have been completed, you can begin installing and configuring the software. Your final step involves starting the OCS services and validating your configuration.
Make sure that the forest and domain functional levels are set to Windows Server 2003. | |
For the Enterprise Edition of OCS, SQL Server 2000 SP4 or SQL Server 2005 SP1 is required. | |
For the Standard Edition, SQL Server 2005 Express Edition is installed if you do not have it configured already. | |
For internal security, you can use a Windows 2003 Enterprise Root CA. |
Active Directory must be prepared at three levels: schema, forest, and domain. | |
Schema Admin rights are needed to make the changes for OCS 2007. | |
During the Active Directory preparation phase, the SIP domain will be selected for use by OCS users. |
An external web farm FQDN is not needed; however, you can use it for external access to internal conference servers. | |
DNS records should be used for user connectivity to the DNS servers. | |
Certificates must be configured as part of the OCS server, but also must be configured in the IIS management console. |