
Solutions in this chapter:
The Mediation Server is an additional role in the Office Communications Server (OCS) 2007 deployment that allows connectivity to legacy private branch exchange (PBX) systems as well as Public Switched Telephone Network (PSTN). The Mediation Server provides media translation and signaling between a media gateway such as the Audiocodes MP-114 in the sample configuration in this chapter and your Enterprise Voice infrastructure. The Mediation Server is deployed inside your network, behind the firewall. The Mediation Server requires two network interface cards (NIC) because one listens on one NIC secured with mutual Transport Layer Security (TLS) that is connected to your OCS environment and a second NIC that is connected to your gateway over an unsecured connection. Both NICs require a separate IP (Internet Protocol) address. Because traffic from the Mediation Server to the gateway is unsecured, you may want to consider a VLAN or a separate network that provides more security on the unsecured connection.
The Mediation Server’s main functions are to translate SIP over the Transmission Control Protocol (TCP) on the gateway side, and over mutual TLS on the Enterprise Voice side. It also encrypts and decrypts the Secure Real-time Transport Protocol (SRTP) on the Communications Server side, translates media streams between the media gateway and the Communications Server, connects clients from outside the network to the internal Interactive Connectivity Establishment components which enable media traversal firewalls, and acts as a connector for calls from remote workers on the Enterprise Voice client.
OCS supports three different gateways: the Basic Gateway, which requires the use of a separate Mediation Server; and the Basic Hybrid Media Gateway and Advanced Media Gateway, which offer the Mediation Server built into a SIP-based Voice over IP (VoIP) gateway. This helps to provide a solution for interfacing your OCS environment with your legacy PBX system that doesn’t require another server to be deployed.
As you begin to think about deploying Enterprise Voice solutions with OCS, you need to consider the type of gateway you’ll be using, the number of gateways required, what configuration will be required for the gateways, and where you should place the gateways. Although the gateway deployment options you have may be vast, the option you choose can increase the required investment of your voice solution.
You can go with a distributed gateway solution, a data center deployment, or a hybrid distributed/data center deployment. Your answers to the following questions can help you to make the correct choice:
How many locations do you have to support?
What is the estimated traffic at each location?
In a distributed environment, such as that shown in Figure 6.1, you would place gateways in the outlying offices. Calls between users at each office and between the offices are routed over the company’s intranet. Calls made to people outside the company will be routed over the gateway that is closest to the location of the destination number. This configuration may be complex depending on the number of offices you have to support. In this situation, it might be best to have a few strategically located data centers.
In a data center configuration such as that shown in Figure 6.2, you would deploy several large gateways to support the traffic for each data center. Calls that are bound for the outside are routed over the data center gateways and calls that are bound for internal users are routed over the PSTN to the data center gateway. Call routing at the data center will determine how to route calls to the targeted users.
You can deploy gateways in a variety of ways, each with its advantages and disadvantages. You need to consider the goals of your deployment when choosing your locations.
Sizing for the gateways can vary based on traffic and location. You need to consider the number of phone calls you can expect and the types of users in each location where you are placing gateways. Microsoft offers the following guidelines:
A light telephone user (one PSTN call per hour) should allocate one port per 15 users.
A moderate telephone user (two or more PSTN calls per hour) should allocate one port per 10 users.
A heavy telephone user (three or more PSTN calls per hour) should allocate one port per five users.
You have a choice of deploying fewer large gateways or more small gateways for any number of users you have to support. It is a good idea to have at least two gateways to provide some level of fault tolerance.
Each basic media gateway you deploy needs to have one Mediation Server. You can point a single gateway at more than one Mediation Server but you can point only one Mediation Server at one gateway.
As a general rule, if you are deploying a hybrid gateway, the Mediation Server is collocated and should not be pointed at any other Mediation Server.
Hardware sizing for the Mediation Server will depend on the number of E1 or T1 cards that are in the media gateways you will support. A single-processor, dual-core 2 GHz machine with 2 GB of RAM and two 1 GB network interface cards (NICs) will support four T1 or three E1 interfaces. A single-processor, dual-core 3 GHz machine with 2 GB of RAM and two 1 GB NICs will support five T1 or four E1 interfaces. A dual-processor, dual-core 3 GHz machine with 2 GB of RAM and two 1 GB NICs will support 10 T1 or eight E1 interfaces. A dual-processor, quad-core 2.66 GHz machine with 2 GB of RAM and two 1 GB NICs will support 18 T1 or 14 E1 interfaces.
Note
E1 is a European equivalent of the North American T1. It differs slightly from T1, as it does not take bits, so all eight bits are used to code the signal on each channel. This enables the E1 (2.048 million bits per second) to carry more data than the T1 (1.544 million bits per second). You can interconnect the two for international use.
The Mediation Server we will configure in this chapter will use two NICs. One NIC will interface to the gateway and the other will interface to the OCS and will provide the internal next hop for the Mediation Server. The media gateway is creating a security loophole, as the gateway does not support master key identifiers (MKIs), TLS, or SRTP, so you should not trust it. The two NICs in the Mediation Server create a separation between the two networks, with one NIC accepting traffic from the internal network and the other accepting traffic from the media gateway. (In the exercises in this chapter, we will configure each card with a separate listening address so that there is a separation between trusted and untrusted network traffic). The internal edge port defaults to 5061 and the external edge port defaults to 5060.
When you install the Mediation Server role using the Deployment Wizard, it will detect both network cards and will write their addresses to the OCS listening IP addresses and to the gateway listening address. You will find both on the General tab of the Mediation Server properties.
The media bandwidth for the basic gateway is 64,000 bps for each concurrent call. If you multiply the number of ports by this number, you will get an estimate of the required bandwidth on the gateway side of the Mediation Server. The default port range is 60,000–64,000, which enables the server to handle up to 1,000 simultaneous voice calls.
Encryption is used for traffic flowing in both directions between the OCS and the Mediation Server. Traffic is encrypted using SRTP. You are encouraged to create an exception for the media port range if you have deployed IP Security (IPSec) for packet security, as it will slow down traffic.
In this chapter, we will be installing and activating the Mediation Server. We will use the Mediation Server role to connect our OCS environment with the existing PBX. Our Mediation Server name for this exercise will be NWN-OCS-MED.
Download the evaluation version of OCS and extract the files for installing onto the C: drive into a folder called Office Communications Server_Eval. You will need to navigate to the folder c:Office Communications Server_Evalse-evalsetupi386.
Double-click the setup.exe file. This will launch the Deployment Wizard (see Figure 6.3).
In the Deployment Wizard, click Deploy Other Server Roles. On the Deploy Other Server Roles screen, click Deploy Mediation Server. In the Deploy Mediation Server Deployment Wizard, next to Step 1: Install Files for Mediation Server, click Install.
On the Welcome page, click Next (see Figure 6.4).
On the License Agreement page, click I accept the terms in the licensing agreement if you agree to the terms.
On the Install Location page, select the location for installing OCS (see Figure 6.5).
On the Confirm Installation page, click Next.
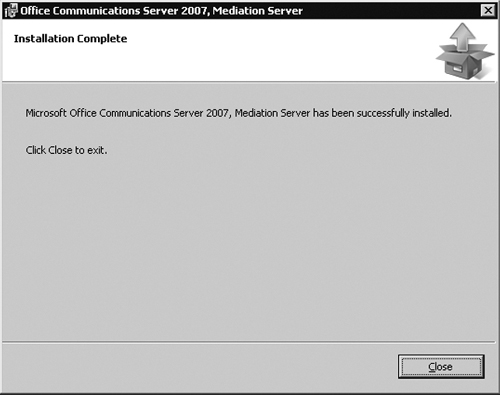
On the Installation Complete page, click Close (see Figure 6.6).

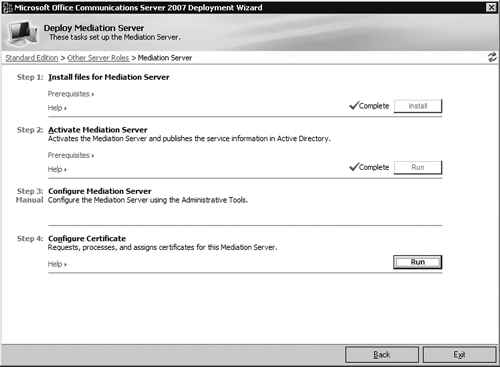
You have installed the files for the Mediation Server. Next, you need to activate the server. You will do this from the Deploy Mediation Server Deployment Wizard (see Figure 6.7).
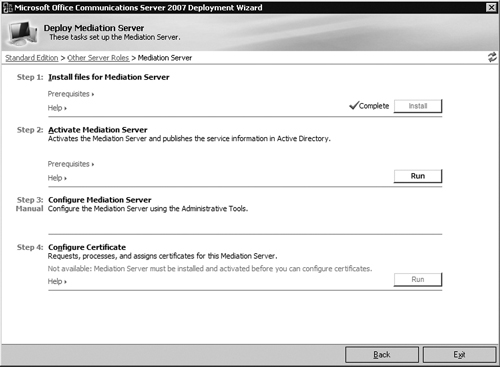
To activate the Mediation Server, click Run next to Step 2: Activate Mediation Server.
Click Next on the Welcome page of the Activation Wizard.
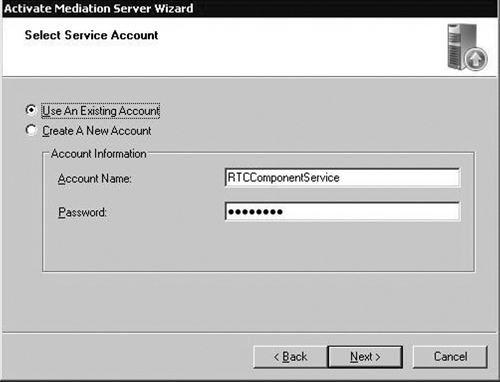
Type your password in the Password text box on the Service Account page, and then click Next (see Figure 6.8).
Click Finish on the Completion page.
Now you need to configure the Mediation Server and configure the certificates. You will be downloading the certificates from your internal certificate authority (CA), and requesting and assigning a certificate on the server to enable secure communication between the Mediation Server and your OCS 2007 server. The final step will be to start the services for the Mediation Server.
On NWN-OCS-MED, click Start | Administrative Tools | Office Communications Server 2007 to launch the Admin tool for OCS.
Expand Forest – domainname.com, expand Mediation servers, and then click on your Mediation Server (NWN-OCS-MED).
Right-click NWN-OCS-MED.domainname.com and click Properties.
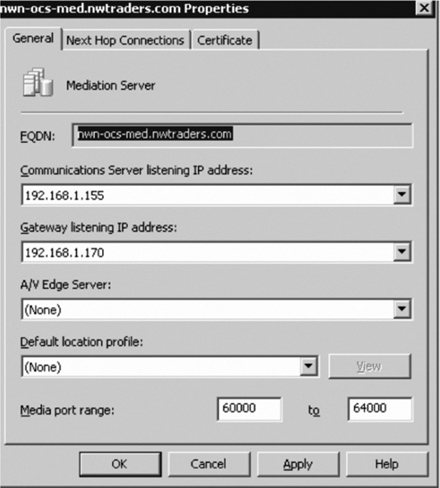
Click the General tab.
In the Communications Server listening IP address drop-down list, select the IP address on the Mediation Server that interfaces to the OCS server. This tells the server to listen on this IP for OCS communications.
In the Gateway listening IP address drop-down list, select the IP address on the Mediation Server that interfaces to the SIP-PSTN gateway device. This tells the server to listen on this interface for communication from the SIP-PSTN gateway.
Select the A/V Edge Server list, and verify that (None). See Figure 6.9.
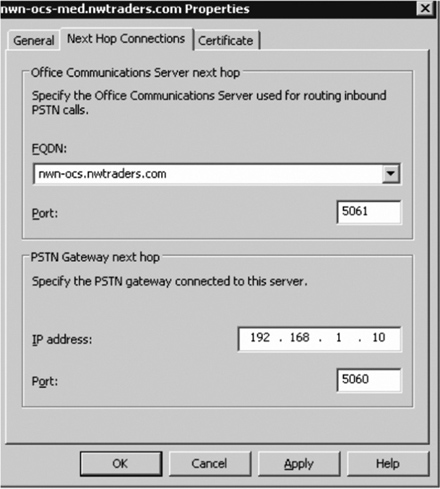
Click the Next Hop Connections tab.
Under the Office Communications Server next hop, in the FQDN drop-down list, select the OCS Server (NWN-OCS.domainname.com).
Under the PSTN Gateway next hop, in the IP address box, type the IP address of your gateway. Then in the Port box, accept the default of 5060 and click OK (see Figure 6.10).
Click OK for the A/V server and default location profile setting.
Click OK to the warning prompt for restarting the Mediation Server.
Close the OCS 2007 console.
This completes the Mediation Server configuration process. Now you need to download the certificate:
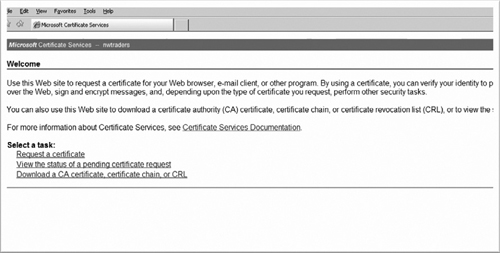
On the Mediation Server (NWN-OCS-MED), click Start, click Run, type http://servernameforCA/certsrv, and then click OK.
Microsoft Internet Explorer launches and displays the CA web page. Under Select a Task, click Download a CA certificate, certificate chain, or CRL (see Figure 6.11).
Under Download a CA certificate, certificate chain, or CRL, click Download CA certificate chain.
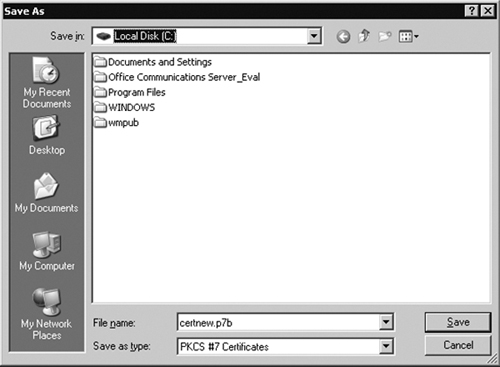
In the File Download box, click Save (see Figure 6.12).
Save the certnew.p7b file to the C: drive and click Close when the download is complete.
Close Internet Explorer.
Now that you have the certificate saved on the C: drive, you need to apply it to the Mediation Server.
Switch to the Deployment Wizard on the Mediation Server. If you closed the Deployment Wizard you can launch it again by going to the directory where you have the setup files for Microsoft OCS 2007 and clicking on setup.exe in the i386 directory.
On the Deployment Wizard page, click Run next to Step 4: Configure Certificate, to launch the Communications Certificate Wizard (see Figure 6.13).
Click Next on the Welcome page.
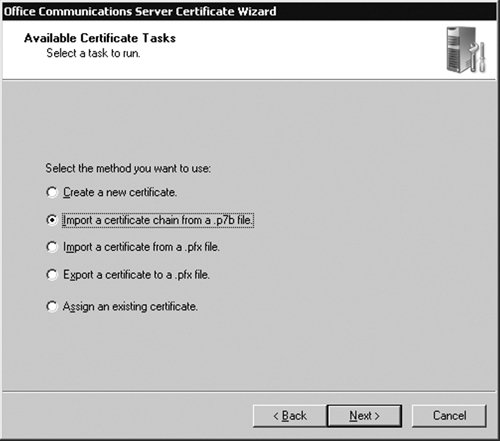
On the Available Certificate Task page, click Import a certificate chain from a .p7b file and then click Next (see Figure 6.14).
Navigate to the C: drive, click on the certnew.p7b file, and then click Open.
Click Next on the Import Certificate Chain page.
Click Finish.
Now it’s time to request a certificate for the Mediation Server. Switch to the Deployment Wizard on the Mediation Server. If you closed the Deployment Wizard, you can launch it again by going to the directory where you have the setup files for Microsoft OCS 2007 and clicking setup.exe in the i386 directory.
On the Deployment Wizard page, click Run next to Step 4: Configure Certificate, to launch the Communication Certificate Wizard.
Click Next on the Welcome page.
On the Available Certificate Task page, create a new certificate and then click Next.
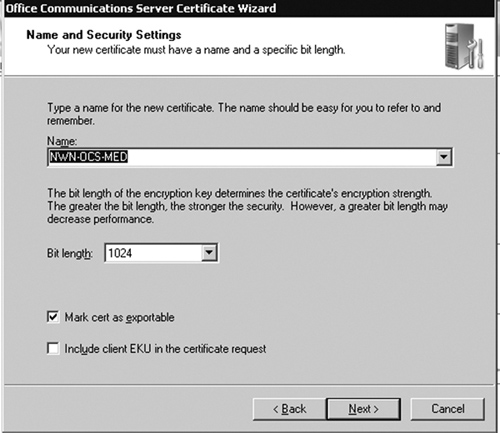
On the Name and Security page, type a friendly name for the certificate, verify that the Mark cert as exportable box is checked, and then click Next (see Figure 6.15).
On the Organization Information page, enter your organization name and your Organizational Unit name (OU), and then click Next.
On your server’s Subject Name page, in the Subject Name box, verify that your Mediation Server name is selected. The subject name should match the fully qualified domain name (FDQN) of the Mediation Server.
Click Next.
On the Geographical Information page, type in your city and state in the appropriate boxes, and then click Next.
On the Choose a Certificate Authority page, verify that your CA server is selected and then click Next.
Click Next on the Request Summary page.
Click Assign on the Certificate Wizard Complete page.
In the Communication Certificate Wizard prompt, click OK and then click Finish.
Click Exit to close the Deployment Wizard.
To start the Mediation Server services, follow these steps:
On the Mediation Server (NWN-OCS-MED), click Start | Administrative Tools | Services.
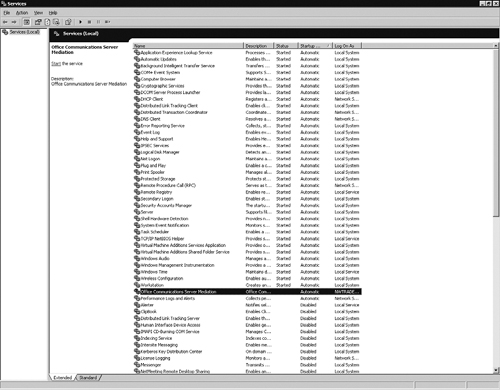
Make sure that “Office Communications Server Mediation” appears in the list of services.
Right-click Office Communication Server Mediation and then click Start (see Figure 6.16).
After the service starts, close Services.
In the configuration we are using in these exercises, we have an AudioCodes MP-114 gateway (www.audiocodes.com) which has two FXO ports and two FXS ports. We will plug an analog handset into FXO port 1, and we will configure the gateway for endpoint phone numbers, routing and manipulation tables, and hunt groups. When we finish with this setup our gateway will be ready to send calls from the analog handset to OCS and will be ready to receive calls from OCS. An optional connection to FXS port 3 will allow us to send calls to the PSTN.
Although we are using a gateway from AudioCodes, other companies also offer certified gateways for use with OCS. Among them are Dialogic (www.dialogic.com), Cisco (www.cisco.com), and Quintum (www.quintum.com). The gateways come with various port configurations and protocol support. Your configuration requirements will depend on which PBX you are interfacing with, the number of ports required, and the locations where you want to place your gateways.
Some PBX companies are building SIP functionality into their products. For instance, Cisco has built SIP functionality into its Call Manager product, as has Nortel with various models of its Communication Server line of products. It is important to remember that although the PBX you are using may support SIP natively, you must check the Microsoft Web site for a list of approved hardware if you expect to receive support from Microsoft should you have issues. You can check out the vendor list for Microsoft Unified Communications at www.microsoft.com/presspass/presskits/uc/partners.mspx#EOH to see what is available from different vendors.
Now let’s configure the gateway. On a computer with access to the network where you have your gateway connected, follow these steps:
Click Start | All Programs | Internet Explorer.
Type http://10.1.10.10 in the Internet Explorer Address field and click Enter.
In the Login text box, type Admin for the username and password. Both are case-sensitive, so make sure the A is uppercase.
You should now see the AudioCodes Channel Status page. Click on Status and Diagnostic on the left-hand side and then click on Device Information. This will display general information about the AudioCodes MP-114. You want to verify that you have a version of code that will support OCS. As of this writing, version ID 5.00A.033.001 was the minimum. If you don’t have the correct version, you will need to download the correct version and update the gateway. Please see the documentation for the MP-114 for instructions on updating the gateway.
Now that you have verified that you have the correct version, it’s time to configure the MP-114 to support your environment. If you had to update your gateway and reset the box, you’ll need to get back into the gateway as Admin.
We’ll start by defining the endpoints:
Click Protocol Management and then Endpoint Phone Numbers on the toolbar.
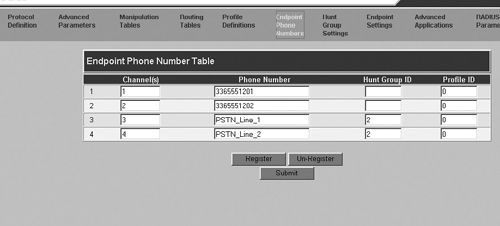
Configure endpoints 1 and 2 with phone numbers to ring the handset that is plugged into FXO ports 1 and 2. In Figure 6.17, we are using 3365551201 and 3365551202.
Once you have the endpoints configured, click Submit.
Now let’s configure the routing tables:
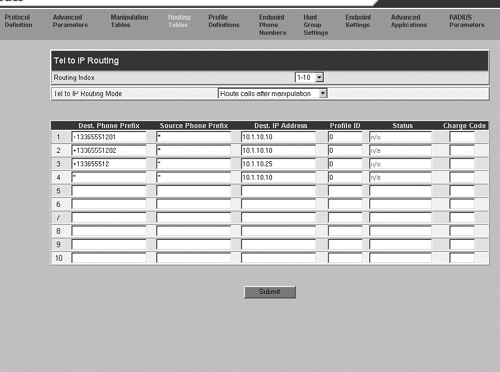
Click Routing Tables on the toolbar then click Tel to IP Routing.
Configure the routing tables to match your environment. In our example, we want to route calls for +13365551201 and +13365551202 to the MP-114 gateway address of 10.1.10.10. So, we will route calls for +133655512 to the OCS Mediation Server gateway address of 10.1.10.25, and we will route all other calls to the MP-114 address of 10.1.10.10. Also, make sure you have the Route calls after Manipulation set in the Tel to IP Routing mode. See Figure 6.18 for an example of the configuration.
Now we’ll configure the manipulation tables:
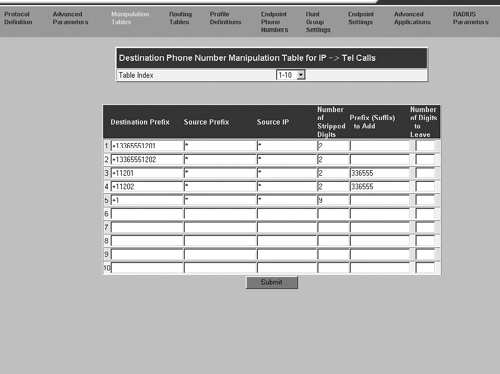
Click Manipulation Tables on the toolbar, and then click IP → Tel Destination Numbers.
Configure lines 1–5 to match the table shown in Figure 6.19. In this step, you are manipulating calls to match the number you need to successfully complete calls. Notice how, in the figure, we are stripping or adding digits based on what is dialed.
Click Submit.
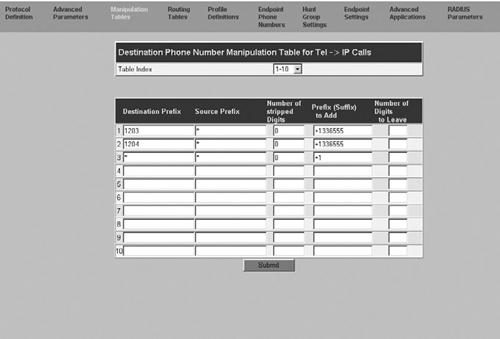
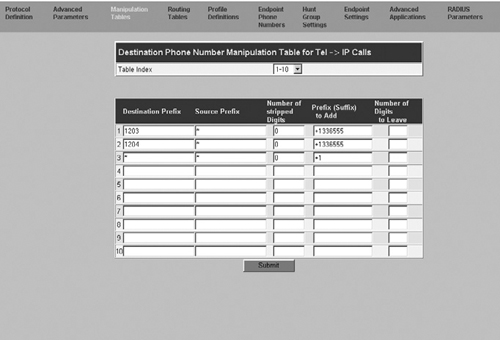
Click Manipulation Tables on the toolbar, and then click Tel → IP Destination Numbers.
Configure the Destination Phone Number Manipulation Table for Tel → IP Calls to match the table shown in Figure 6.20.
Click Submit.
Click Manipulation Tables on the toolbar, and then click Tel → IP Source Numbers.
Configure Tel → IP Source Numbers to match the table shown in Figure 6.21.
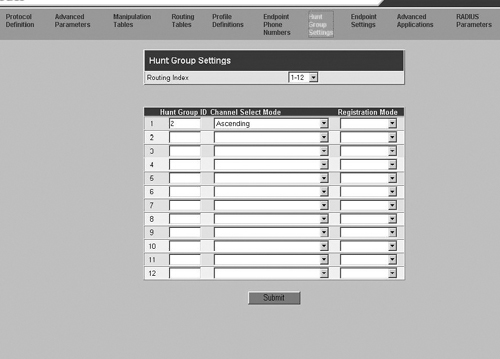
Now it’s time to configure the hunt groups:
Click Hunt Group Settings on the toolbar.
Configure the hunt groups to match the table shown in Figure 6.22.
Click Submit.
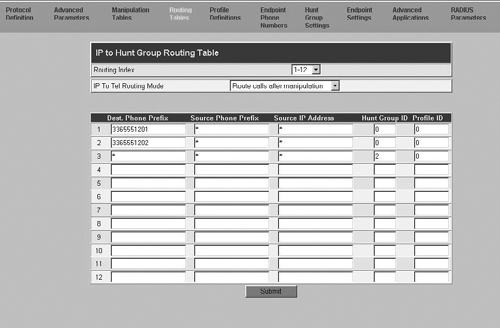
Click Routing Tables on the toolbar, and then click on IP to Trunk Group Routing.
In the drop-down list for IP to Tel Routing mode, make sure Route calls after Manipulation is set. If it isn’t, select it.
Configure the IP to Hunt Group Routing to match the table shown in Figure 6.23.
Click Submit.
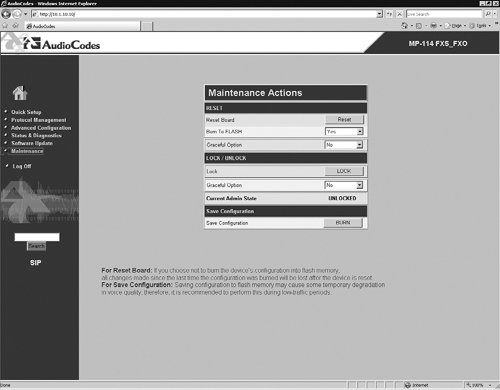
Now that you have done all this configuration work, you need to make sure you save it:
Click Maintenance on the left-hand side of the screen.
Click Burn under the Save Configuration section (see Figure 6.24).
Once the new configuration has been saved you can exit Internet Explorer.
OCS 2007 will normalize numbers prior to performing reverse lookups. If the normalized number matches the designated primary work number of a user in Active Directory, the call will be sent to the endpoints associated with that user’s SIP Uniform Resource Identifier (URI). If no match is found, that number will be considered outside the enterprise. The Outbound Routing component will check the caller’s phone usage policy to determine whether that caller is authorized to make the call. The call will then be directed to the media gateway, or the caller will be notified that the call was not authorized. This is a great way to deny long distance calls if you need to restrict users from making such calls.
As we’ve discussed thus far, you have some control over how calls are handled, so now you need to determine an outbound dialing plan. Your dialing plan will define how the server handles dialed digits. In the dialing plan we’ll be using in this exercise, we will look at how the server handles numbers that members of our Greensboro, North Carolina, team call. Common numbers that the Greensboro team calls are:
1234
93365551212
95551212
913365551212
We will create a plan to normalize the numbers in the preceding list to use the E.164 format for OCS dialing. Normalizing numbers is a process of converting numbers dialed into a standard E.164 pattern. Because users will enter phone numbers in various formats, normalizing the numbers enables call routing and authorization.
The normalization rules we use may need to account for the following fields: Dial Plan, Country Code, Area Code, Site Prefix, and Length of Extension.
You create normalization rules using .NET regular expressions. When creating normalization rules you may need to understand regular expressions. You can find a guide to regular expressions at www.amk.ca/python/howto/regex/ and a detailed guide to regular expression syntax at http://docs.python.org/lib/re-syntax.html.
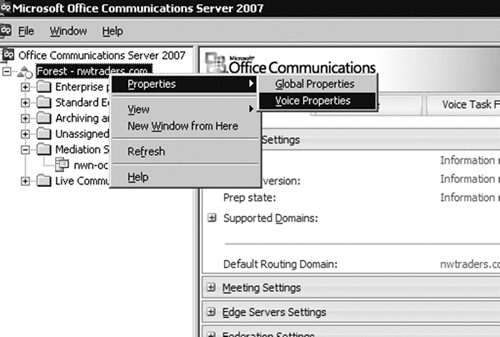
Let’s create a location profile and define phone number normalization rules for outbound calls:
On the OCS server, click Start | Administrative Tool | Office Communications Server 2007. On Forest – yourdomainname.com, right-click and point to Properties, and then click Voice Properties (see Figure 6.25).
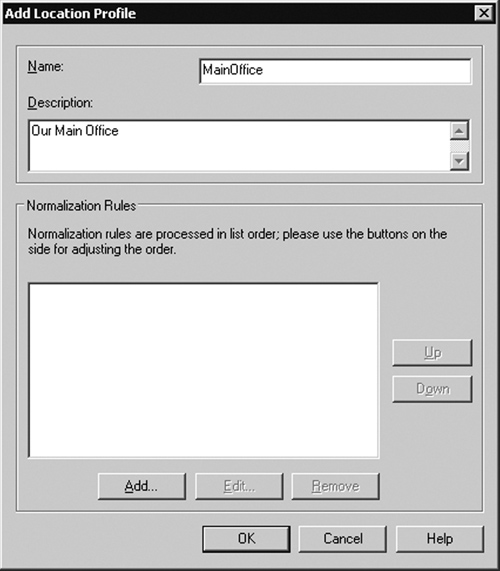
On the Location Profiles tab, click Add. In this step, you are creating a location profile for your office.
Type in a name for your profile in the Add Location Profile box, and then type in a description for your location profile, as shown in Figure 6.26.
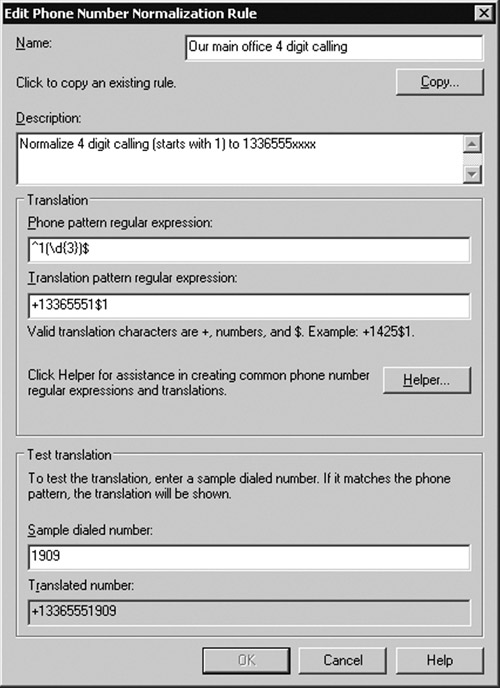
Click Add under Normalization Rules. Perform the following steps in the Add Phone Number Normalization Rule, as shown in Figure 6.27:
Type in a descriptive name for four-digit dialing in the Name box.
Type in a description for the rule.
Type in (don’t use spaces) ^1(d{3})$ in the Phone pattern regular expression box.
Type in +13365551$1 in the Translation pattern regular expression box and click OK.
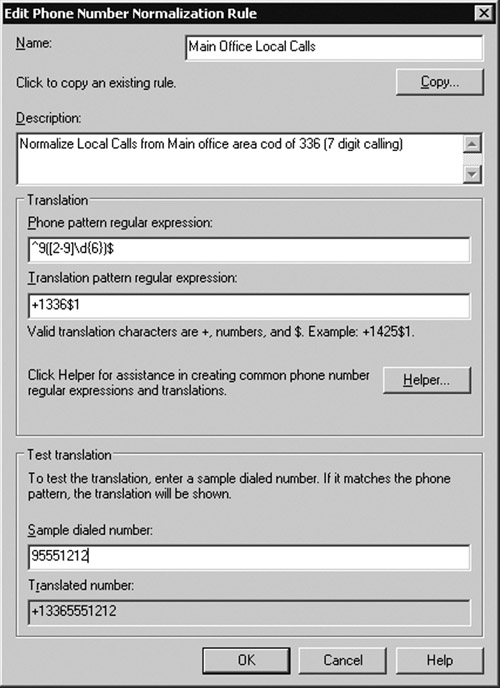
Click Add under Normalization Rules to add a second normalization rule. Perform the following steps in the Add Phone Number Normalization Rule, as shown in Figure 6.28:
Click Add under Normalization Rules to add a third normalization rule. Perform the following steps in the Add Phone Number Normalization Rule:
Type in a descriptive name for 1 + 10-digit dialing in the Name box.
Type in a description for the rule.
Type in (don’t use spaces) ^9(d{10})$ in the Phone pattern regular expression box.
Type in +1$1 in the Translation pattern regular expression box and click OK.
Click Add under Normalization Rules to add a fourth normalization rule. Perform the following steps in the Add Phone Number Normalization Rule:
Type in a descriptive name for 9, 1 + 10-digit dialing in the Name box.
Type in a description for the rule.
Type in (don’t use spaces) ^91(d{10})$ in the Phone pattern regular expression box.
Type in +1$1 in the Translation pattern regular expression box and click OK.
Now let’s create the phone usage record:
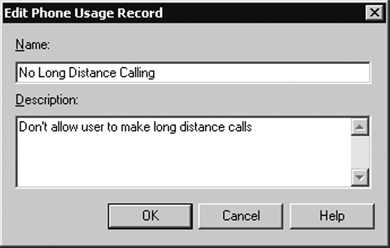
Click the Phone Usages tab and then click Add. Type a descriptive name for the phone usage record for local calling. Type a description for the record for local calling only (see Figure 6.29).
Click Add on the Phone Usages tab. Type a descriptive name for the phone usage record for allowing local and long distance calling. Type a description for the record for allowing local and long distance calling.
Now we need to define our policies:
Click the Policy tab and then click Add, as shown in Figure 6.30.
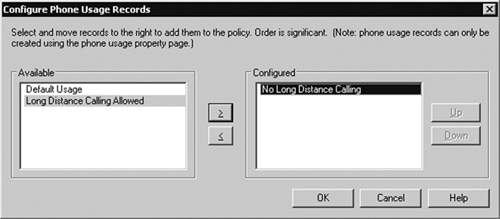
Type in a description for local-only calling. Make sure the Allow simultaneous ringing of phones box is checked, and click Configure.
In the Configure Phone Usage Records dialog box, in the Available phone usage records list, select your local calls only phone usage record and then click the Right Arrow button (>) to select this usage record, as shown in Figure 6.31.
Click OK two times. Click the Policy tab and then click Add.
Type in a description for local and long distance calling. Make sure the Allow simultaneous ringing of phones box is checked, and click Configure.
In the Configure Phone Usage Records dialog box, in the Available phone usage records list, select your local and long distance calls phone usage record and then click the Right Arrow button (>) to select this usage record.
Click OK two times. In the Global Policy drop-down list, select Use per user policy, click Apply, and then click OK.

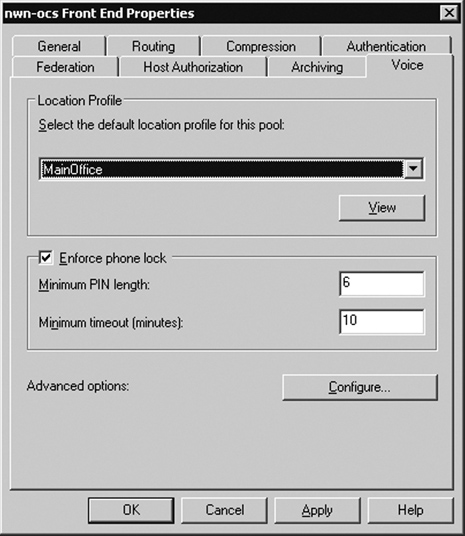
Now you can define the default location profile for the pool. Expand Standard Edition Servers and click your OCS standard server. Then, follow these steps:
Right-click the server, click Properties, and then click Front End Properties.
On the Voice tab, under Location Profile, select the location profile for the main office, as shown in Figure 6.32.
Click OK.
Now you can define the default location profile for the Mediation Server:
Expand Mediation Servers and click your Mediation Server.
Right-click the server and click Properties. On the General tab, under Default Location Profile, select your location profile for the main office.
Click OK to the warning prompts.
Now you will define the outbound call route. This will help OCS to determine the optimal gateway for calls that need to be routed to the PSTN.
Right-click Forest – yourdomainname.com, point to Properties, and then click Voice Properties.
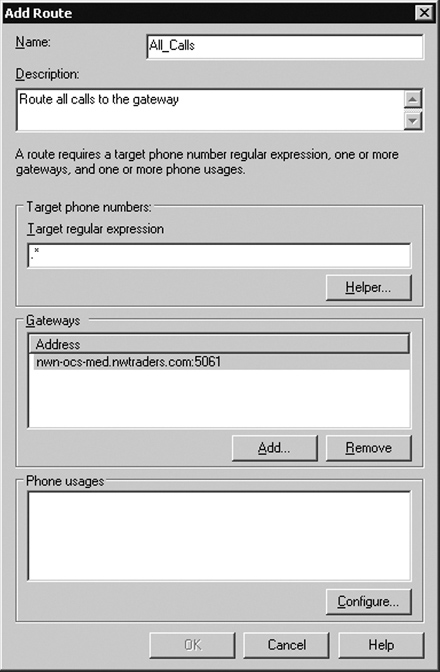
Click the Routes tab and then click Add. In the dialog box for Add Routes, type the following information:
Type in a description for the route for all calls.
Type in a description.
Type .* (a period followed by an asterisk). Make sure there are no spaces.
Under Gateways, click Add. Under Select the Gateway, select yourservername. yourdomainname.com:5061 and then click OK, as shown in Figure 6.33.
In the Configure Phone Usage Records dialog box, in the Available phone usage records list, select the policy you configured that allowed local and long distance calling, and then click the Right Arrow button (>).
Click OK two times.
Click the Routes tab and then click Add. In the dialog box for Add Routes, type the following information:
Type in a description for the route for local calls.
Type in a description.
Type ^(+1336).
Under Gateways, click Add.
Under Select the Gateway, select yourservername.yourdomainname. com:5061 and then click OK.
Under Phone usages, click Configure.
In the Configure Phone Usage Records dialog box, in the Available phone usage records list, select the policy you configured that allowed only local calling, and then click the Right Arrow button (>).
Click OK two times.
Microsoft provides a tool to help you verify that your call routes are working correctly. It is called the Enterprise Voice Route Helper and you can find it in the Resource Kit for OCS 2007. At the time of this writing, you could download the Resource Kit at www.microsoft.com/downloads/details.aspx?familyid=B9BF4F71-FB0B-4DE9-962F-C56B70A8AECD&displaylang=en. If the download is no longer there, you may want to use your favorite search site to look for it. We will be discussing the Route Helper tool, but you can find many other useful tools that may offer some assistance in deploying your next OCS installation.
In this exercise, you will install the Resource Kit on your OCS server. You will need to download the tool to the server. To start the installation process, launch the .msi file called OCSResKit.msi.
Click Next on the Welcome page.
On the License Agreement page, click Next if you agree to the licensing terms and conditions.
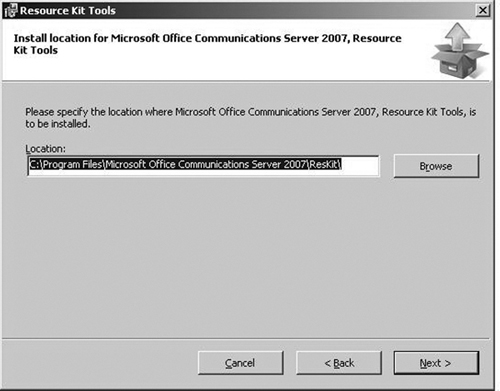
Select a location for the installation of the Resource Kit for OCS (see Figure 6.34).
Click Close.
Now that you have the Resource Kit installed, you can test your dial plans. In this exercise, we will test only four-digit dialing; however, you can test the remaining numbers and policies to verify that all is well.
On the OCS server where you installed the resource kit, click Start | Run | Office Communications Server 2007 | Resource Kit | Enterprise Voice Route Helper.
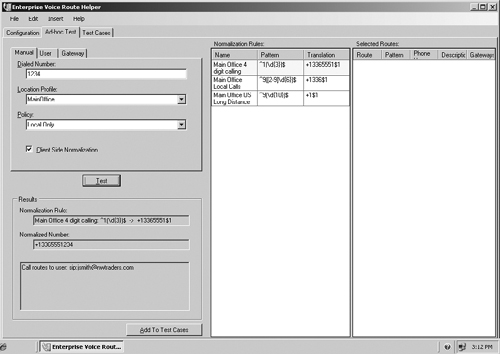
You should see your location profile and your normalization rules, which have been automatically imported. Click on the Ad-hoc Test tab.
Type in 1234 in the Dialed Number box, select the MainOffice location profile, and select the Local Only policy.
Click Test and you should see results similar to those shown in Figure 6.35. Notice how the corresponding normalization rule is highlighted in the center box and how the Results section shows the normalization rule along with the normalized number.
You can test additional numbers by repeating steps 3 and 4. In our example, we used the Ad-Hoc Test tab, but you can use the Test Cases tab to test numerous dial patterns to verify that the results you are getting are the results you expect. This is a great tool for testing prior to rolling out a dial plan for your Enterprise Voice solution.
In this section, we will configure users for voice. We will enable and update the voice information on a couple of users we have defined in Active Directory. We will use the OCS 2007 console to make these changes.
Expand Forest – Yourdomainname.com and then expand Standard Servers.
Expand your standard server name.
Right-click Users, and then click Configure Users. The Configure Users Wizard will launch.
On the Welcome page, click Next.
On the Configure User Setting bulk configuration page, click Next to leave the current settings in place. On the Configure User Setting organize meeting page, click Next to leave the current settings in place.
On the Configure User Setting specify meeting policy page, click Next to leave the current settings in place.
On the Configure User Setting enable users for VOIP page, click Enable Voice and then select a Voice Policy for the Users drop-down list. Select the Local Only Policy, and then click Next.
On the Configuration Operations Status page, click Finish.
In the User window, right-click on a user that you want to enable for local and long distance calls and click Configure User.
On the Welcome page, click Next.
On the Configure User Setting bulk configuration page, click Next to leave the current settings in place. On the Configure User Setting organize meeting page, click Next to leave the current settings in place. On the Configure User Setting specify meeting policy page, click Next to leave the current settings in place.
On the Configure User Setting enable users for VOIP page, click Enable Voice and then select a Voice Policy for the Users drop-down list. Select the Local and Long Distance calling policy, and then click Next.
On the Configuration Operations Status page, click Finish.
Now you need to define user extensions for your users. Here we will select only a couple of users on which to perform these tasks.
When testing voice it’s important to understand how OCS will process a call coming from a Communicator client to the PSTN. In Figure 6.36, you can see how the components connect and what protocols pass through the OCS environment to complete a call.
When you place a call from your voice client to the PSTN, the call will travel through the OCS environment as follows:
The user will place a call from the Communicator client.
The server will normalize the number and will check for routing rules based on the location profiles and the user policy, and then will send the call to the appropriate Mediation Server.
The Mediation Server will perform necessary media transcoding and will send the call to the PSTN gateway.
The gateway will apply any local dialing rules and will pass the call to the PSTN or the PBX.
In this final exercise, you will make a call from the Communicator to the analog phone you configured earlier. You will also make calls from the analog phone to the user you just set up. You will work from Microsoft Office Communicator (MOC) to make a call to the analog handset.
Launch your MOC.
Type in 3365551201.
Answer the analog phone.
Pick up the analog handset.
Dial 3365551234.
Answer the call on your Communicator client.
The Mediation Server enables voice connectivity between an existing PBX and an OCS solution. When you are designing your solution you have to choose between different types of gateways that may require a physical server to play the Mediation Server or role, or that may incorporate that role into the appliance. The Mediation Server will enable you to maintain a secure connection between your OCS environment and your PBX while providing SIP integration that is secured for OCS and SIP integration that is over basic TCP for your PBX connection.
The Mediation Server will provide:
Encryption/decryption for communication with OCS and the gateway
Media translation
A call flow that the gateway doesn’t support
Remote access for users outside the network to allow for firewall traversal
Use the Deployment Wizard to install the Mediation Server role. | |
Activate the Mediation Server. | |
Configure certificates. |
Create location profiles. Create rules for normalizing numbers to the E.164 standard based on numbers dialed. | |
Create phone usage records to configure calling permissions. Create routes to define optimal gateway usage. |
Enable users for voice using the Administration tool for OCS. | |
The policy for the user. | |
Add telephone information for the user. |