
In This Chapter
Discovering different methods of selection
Selecting objects, points, and groups
Adding to and taking away from selections
Using the Magic Wand tool
Selecting without tools
Understanding the Select menu
Fine-tuning points
To change — edit — a path in Illustrator, you have to first select it. In fact, 99 percent of the time, you can't make any changes at all to a path unless it's selected. Some exceptions are when you change Document Color Mode (see Chapter 1) and when you use the Pen tool to continue on an existing path (see Chapter 7). Every other action, though, requires that you make a selection first.
As I talk about earlier, making a selection in Illustrator says, "From this moment forward, I want to change this part of the artwork and nothing else." You're targeting a point, a path, an object, or objects for change. And with Illustrator's wide variety of selection tools and commands, you can target everything from a single point to your entire document. Changes you make — size, rotation, fill or stroke colors, and so on — simultaneously affect everything that you select. (If the term path makes you visualize a narrow walkway through a forest instead of a line with little dots and squares on it, head back to Chapter 2 for a quick refresher.)
This chapter tells you what you can do with those paths, as in how to select them and how to make changes to them.
Suppose you create a mondo-cool logo. With Illustrator, you can select
The entire logo
Any group of paths within the logo
Any single path within the logo
Any portion of any path or paths
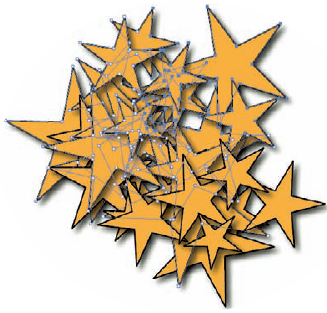
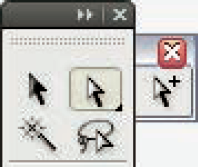
All these possibilities might make selecting in Illustrator seem rather daunting. As if that weren't enough, Illustrator gives you five different selection tools: namely, Selection, Direct Selection, Group Selection, Lasso, and Magic Wand. (I also talk about these a bit in Chapter 3.) See Figure 6-1.
Note
Compared with Selection, the names of the other selection tools aren't quite as accurate in describing their functions, but hey — Selection tool was already taken. To keep the confusion to a minimum, I call the tools by their Adobe-given names. That way, you know what the cute label refers to when you pause the cursor over a tool in the Tools panel and see the name in the ToolTip.
The following sections describe these tools and what happens when you use them.
Of the five selection tools in Illustrator, the Selection tool is (more or less) the main selection tool. It simply selects whatever you click.
You can select onscreen items with the Selection tool in two ways:
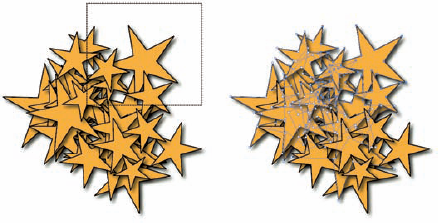
Click the object that you want to select. The object and any other object that's grouped with it are selected.
Click and drag with the Selection tool. As you do, a dotted rectangle — a marquee— appears. Anything inside or touching the marquee is selected, enabling you to select more than one object or group at a time, as shown in Figure 6-2. You'll notice that a lot of blue points are highlighted that were originally outside the marquee that was drawn; that's because at least a tiny bit of the objects with those highlighted points were touched by the edge of the marquee, and therefore the entire object was selected.

Tip
If you click another path when one path is already selected, the path that you click is selected, and the previously selected path is deselected. If you click an empty area, everything is deselected. If you press the Shift key when you click another path when one path is already selected, the new path is selected while the original one is still selected. In this way, the Shift key allows you to add to a selection (and if you Shift-click on a path that is already selected, you'll deselect just that path, letting you subtract from a selection as well). More details on adding and subtracting to selections below in the section "Selecting more or less of what you have."
Also, if you click inside a path that's filled with None, you can't select that path. To select a path that has no fill, click the path itself. Similarly, when you're in Outline view mode (a way of looking at your paths with all fill and stroke colors hidden, accessed by choosing View
Tip
With the Direct Selection tool, if you select the interior of a path (if it's filled) rather than the edge or actual line of the path, you select the entire path rather than just the individual anchor point and path segments.
A subgroup is a group within a group. Remember Statistics 101? (Don't make that face. What if it froze like that?) Suppose you want to create a graphic of a pencil. You start with the easy part — the lead. Then you go on to create something harder: that conical bit of wood that flares out around the lead and eventually becomes the rest of the pencil. After you get those two pieces positioned together the way you like, you want to keep them that way — so you group them together. (That way, you have to click only one of them with the Selection tool, and they move together.) Next, you create the rest of the pencil separately. After you bring all the pieces together, you want to keep them that way — so you group the lead and the cone with the rest of the pencil. All three objects are now a group, and the lead and the cone are a subgroup of that group.
You can continue grouping things, having as many subgroups as you want. Illustrator remembers the order in which you group things from the first subgroup to the last big group. When you click multiple times with the Group Selection tool, the first click selects the pencil lead, the second selects both the lead and the wood, and the third click selects the lead, the wood, and the rest of the pencil.
The Group Selection tool selects only one subgroup at a time, such as an object within a group, a single group within multiple groups, or a set of groups within the artwork. To find out how the Group Selection tool works, follow these steps:
Select the Group Selection tool from the Toolbox.
Click a path that's part of a group.
The path is selected entirely (all the points are solid; none are hollow), but the other objects in the group are not selected. (This result is an oddity of the tool. It first selects a single object, even though an object isn't really a group.)
Click the same path again.
The next higher level of grouped objects is selected, as well as anything that's already been selected. Each time you click, you select the next higher level of grouping, until finally the all-encompassing group-of-all-groups is selected.
If you continue this crazed clicking, you wind up with groups of groups. For example, if you make several on-screen drawings of pencils, you can group them so that you can move them all at once, draw a pencil box, and then group the pencils with the box. The Group Selection tool lets you select "up" from a single object to the group that the object belongs to, and so on. Figure 6-4 applies this principle to the objects that form a pencil when grouped together.

Suppose you want to select a path on the left side of your document, and you also want to select a placed image on the right side of your document, but lots of paths are in between. You can't drag a marquee because you get all those unwanted paths in the middle. So you select the path on the left and then click the object on the right — and the path on the left becomes deselected. Drat!
Use the Shift key to select more than one item at a time. If you hold down the Shift key and click a path with the Selection tool, you add that path to whatever is selected. If two paths are selected, pressing the Shift key and clicking another path results in all three paths being selected. You can also use the Shift key in conjunction with a selection marquee. The process is Shift-clicking, and you can also use it to select fewer paths. For example, if you Shift-click one of the three selected paths shown in Figure 6-5, you deselect that path, leaving only two selected paths.
Tip
Pressing the Shift key with the Lasso tool allows you to add selections to anything that's already selected . . . but you probably guessed that already. What you haven't guessed (unless you're a bona fide psychic) is that you use Option (Mac)/Alt (Windows) to subtract from a selection. If you accidentally select something, you don't need to reselect. Just press Option (Mac)/Alt (Windows) and drag around the points you don't want selected.
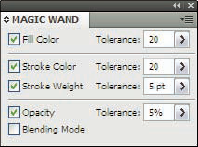
To use the tool, click the object, which can be either an open or a closed path (for example, a square or a line). Illustrator then goes out and selects all objects similar to the object you clicked. How similar do the objects have to be? Excellent question! Read on to get the scoop.
Choose Window
For example, if you select a stroke weight with a Tolerance setting of 2 points (pt) and click an object with a stroke weight of 5 pt, all objects with a stroke weight between 3 and 7 pt will be selected (5 pt – 2pt, and 5pt + 2 pt). Similarly, if you select the Opacity option and set the Tolerance setting to 10 percent, all objects with an opacity between 40 percent and 60 percent are selected when you click an object with an opacity of 50 percent.
The Tolerance settings for Fill Color and Stroke Color range from 0–255, which equates to the number of brightness levels. Rather than go into the techno-geek definition of brightness levels, a lower Tolerance setting selects only colors that are very similar to the object you click, whereas a higher Tolerance setting selects a wider range of colors. The only attribute that must be exactly the same is Blending Mode. (For more on blending modes, see Chapter 10.)
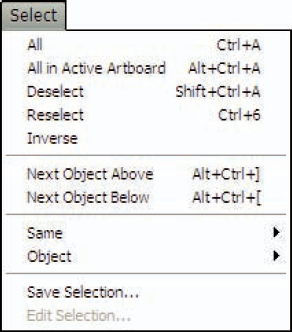
Sometimes selecting objects in Illustrator without using tools is easier or more convenient than selecting with tools. Because selecting is so important, Illustrator provides a menu entirely devoted to selection commands.
Here are the options you can find on the Select menu, as shown in Figure 6-7:
All: By far, the most common selection method in Illustrator is the keyboard command

All in Active Artboard: This command selects all the objects within whichever artboard is currently active. Objects that straddle multiple artboards will also be selected if a portion of that object is within the active artboard.
Deselect: The opposite of All is the Deselect command, which deselects anything selected in the document (but you knew that). You don't have to select everything to use the command. If you have just one thing selected from 100 objects, Deselect deselects it. The keyboard command is easy to remember:
Reselect: Using the Reselect command reselects whatever was last selected via the Selection menu. The keyboard command is
Inverse: Using the Inverse command selects the opposite of what's selected. In other words, everything that's selected becomes unselected, and everything else becomes selected. For example, if you select one of four squares, using the Inverse command selects the remaining three squares and deselects the original square. Hint: Inverse works only with entire paths. (The same goes for Reselect.) Using the same example, if you have only a single anchor point selected on the first square, using the Inverse command still selects the other three squares and ignores the unselected three anchor points on the first square.
Next Object Above and Next Object Below: Using these commands selects objects based on their stacking order— how objects are placed in front of other objects. For example, say you draw a square, a circle, and then a polygon. If you then select the square and choose Select

Same and Object: Using the Select
The Same and Object commands are described in more detail below.
Save Selection: Using the Save Selection command allows you to save selections. Select an object (or objects) and then choose Select
The Select menu contains a lot of other selection functions besides those mentioned in the preceding section. Located under the Same and Object submenus, these functions are designed to select objects that are similar in some way (such as style or fill color) to the object(s) already selected. Figure 6-8 shows what would happen if you went for the Same submenu.

These commands can be vastly helpful in streamlining the editing process. For instance, if your client loves everything about the image except for that certain shade of blue, you can select one object that has that blue color in it, and then choose Select
The four options that fall under the Object submenu are a bit less obvious:
Brush Strokes: Selects all paths in the document that have brush strokes assigned to them.
Clipping Masks: Selects paths used as masks in the document.
Direction Handles: Selects the direction handles of the Bézier curves of selected objects. (For more on direction handles, see the next section on editing and adjusting points.)
Stray Points: Selects paths in your document that contain only a single point.
After you go through the trouble of selecting specific points, what do you do with them? Well, you can move them and change the kinds of points they are. You can also adjust their handles to change the shape of a curve.
You can move any selected point to any location. Because points (and not entire paths) are what you're moving, use the Direct Selection tool. Click any point with the Direct Selection tool and then drag the point to move it. You can do this in one step (click and drag at once) or in two separate steps (click and release and then drag the point). Figure 6-9 shows a path with a point in its original location after it was moved with the Direct Selection tool.
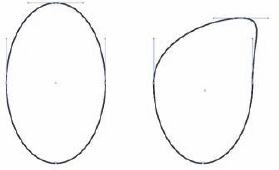
Figure 6-9. (Left) Original path. (Right) Path after you move the selected point with Direct Selection.
Tip
To move points just a tiny little bit at a time — yet with precision — use the arrow keys to nudge selected points in the direction of the arrow. One keystroke moves the point by an exact, smidgen-sized unit of measurement (1/72 of an inch, or .3528 millimeters) — a unit of measure known in the design and publishing trades as a point.
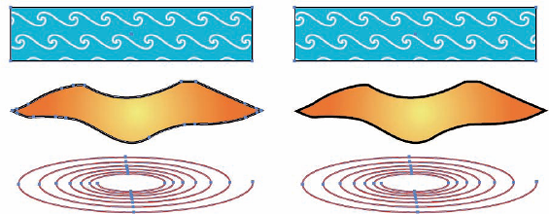
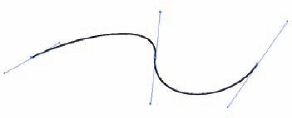
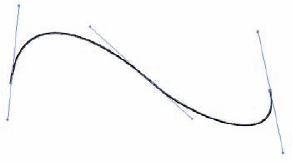
If a point has direction points (those little gearshift-like line segments) sticking out of it, you can use the Direct Selection tool to adjust the direction points, which adjusts the curves that shoot out from the points where the direction points connect to the curves.
Tip
Incidentally, the line that joins the direction point to the curve is called the direction line. Don't worry: Only you can see the direction lines. They don't print or show up in the graphic when it's on the Web. Their only purpose is to show which anchor point is currently under the control of the direction point. The combination of the direction line and direction point is also commonly referred to as direction handles or just plain handles.
You probably noticed already that sometimes you see those gearshift-like direction lines and direction points sticking out of points and sometimes you don't. When you click a point or a segment with the Direct Selection tool, you see the handles associated with that point or segment. However, if you Shift+click additional points, you lose those handles. Figure 6-10 shows what happens when you use the Direct Selection tool to click (or enclose in a marquee) a variety of different areas.
When you can see the handles that you want to move, click and drag them. Note that missing a handle is very easy if you aren't really careful. (And making crude remarks when you do miss them is still considered bad form, even if no one else is around.) Figure 6-11 shows the path from Figure 6-10 with the direction points moved to different positions.
Tip
You can change the size of those handles by choosing Edit
Illustrator has four types of anchor points: corner points; smooth points; and two types of direction-changing points. Every path has at least one of these types, and in many situations, you'll find that you need to change one type of anchor point into another, instead of going through the trouble of redrawing a path.
Straight-corner anchor points are in the corners of squares or triangles. Two path segments join in a corner point when neither of the connecting ends has a direction point associated with it.
Smooth anchor points are used when two path segments continue smoothly, as in a circle or in a curving path. Both path segments have direction points linked so that when you move one point, the other point moves in an equal and opposite direction, preserving the smooth curve.
A curved-corner anchor point has two direction points that move in different directions, enabling you to impose abrupt changes in direction.
A combination-corner anchor point has one direction point, allowing a straight line to join a curved line at an abrupt angle. (For more on anchor point types, see Chapter 7.)
Use the Illustrator Convert Anchor Point tool (which looks like an acute angle, and is located in the same slot as the Pen tool) to change a point from one type into another. (For more about the types of anchor points and their usual behaviors, see Chapters 2 and 7.) To use the Convert Anchor Point tool, put it on a point and click. What you do next determines the resulting point type:
To get a straight-corner anchor point: Click an anchor point and release to change it into a straight corner point with no direction points.
Tip
This is a quick-retract method of point conversion.
To get a smooth anchor point: Click an anchor point and drag it to change it into a smooth point with two linked direction points.
To get a curved-corner anchor point: Click a direction point and drag. It moves independently of the opposite direction point.
To create a combination-corner anchor point from a smooth point or a curved-corner anchor point: Click one of the direction points and drag it into the anchor point (leaving one direction point for the curved side of the point).
Tip
You can also quickly toggle back and forth between corner and smooth points by clicking the appropriate button in the upper left of the Control panel docked at the top of the work area. Click the corner-looking one to change the selected point(s) to a corner point, and click the curved-looking one to change the selected points(s) to a smooth point.
Illustrator has two tools that are used specifically for adding points to a path or for removing them. The Add Anchor Point tool adds points, and the Delete Anchor Point tool removes points. Both tools are located in the same slot as the Pen tool.
When you add an anchor point (or even several anchor points) with the Add Anchor Point tool, the path doesn't change shape (as shown in Figure 6-12), but you can then move the point or points with the Direct Selection tool or convert them to other types of points by using the Convert Anchor Point tool.
When you remove a point with the Delete Anchor Point tool, the path can change shape — slightly or dramatically, depending on the shape. Figure 6-13 shows what happens in two different circumstances.
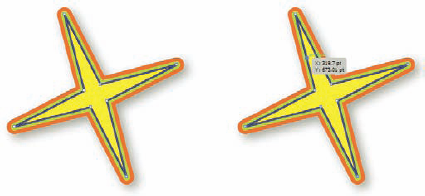
Figure 6-12. (Left) Original path. (Right) Unchanged shape with new anchor points added to three of the star's arms.
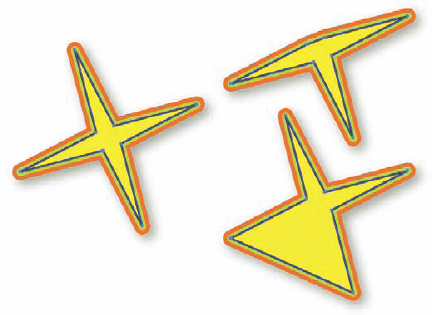
Figure 6-13. (Left) Original path. (Right) Removing two anchor points to create two different shapes.
Okay, have a squint at Figure 6-13 for a moment. (Ow, that's gotta hurt. Not that hard.) You can probably tell immediately which anchor points were zapped with the Delete Anchor Point tool to change the image on the left into the upperand lower-right images. In each case, only one point was removed. Powerful creatures, those anchor points.