
In This Chapter
Creating objects the easy way
Customizing basic objects
Combining objects to create other objects
Spewing objects onto a page with the Symbolism tools
A regrettably large number of people avoid using Illustrator because they find the whole point/path thing so intimidating. This situation is unfortunate but not surprising. When most people look at artwork, they see it as complete shapes, not as the lines that form the shapes. Working with points and paths, though, forces you to see your artwork in a way that many people have never thought of before, which creates enough of a hurdle to scare people away from Illustrator.
Fortunately, Illustrator offers shape-creation tools as a way to get a running start to clear that hurdle. With these six tools, you can create basic shapes, such as rectangles, ellipses, stars, and polygons. You can even create graphics without ever having to think about points and paths! (Don't be fooled — the points and paths are still there, but the tools create them all for you with just a single click-and-drag. Ah, progress.)
In this chapter, you discover how to use the shape-creation tools, giving you a good foundation for understanding and using the more complex features of Illustrator. You also find out how to combine simple shapes. Although you use the shape-creation tools to create basic elements, they are by no means limited, especially when used in conjunction with the Pathfinder panel — an Illustrator feature that allows you to combine multiple shapes in a whole array of interesting ways. Some people discover that they can create such an astonishing variety of graphics with the shape-creation tools that they can bypass more complex tools altogether, such as the Pen and Pencil tools!
Illustrator has six tools for creating shapes. Although you could create all those shapes with the Pen tool, you'd torment yourself if you did so. The specialized tools in Illustrator make creating shapes easy. The six tools are named for (and look like) the shapes they create, and are located in a single row that can be pulled from the Tools panel by dragging the Rectangle tool out to the side, as shown in Figure 4-1.
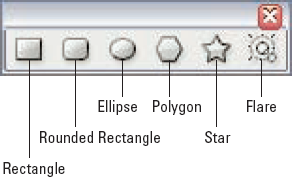
Rectangle: Use this tool to make rectangles and squares. Hold down the Shift key when using this tool to get a perfect square.
Rounded Rectangle: As you might expect, you get rounded corners on your rectangles and squares when you use this tool. Of course, if you recall high school geometry, you know that a round rectangle is a contradiction in terms. By definition, a rectangle is a four-sided polygon, with each corner forming a 90° angle. Oh, well. So much for Euclid.
Ellipse: Use this tool to make ellipses and circles. Hold down the Shift key when using this tool to get a perfect circle.
Polygon: Use this tool to make objects with any number of sides — from 3 to 1,000, to be precise — with each side the same length (equilateral). You can use this tool to create triangles, pentagons, hexagons, and so forth.
Star: Use this tool to make stars with any number of points between 3 and 1,000.
Flare: Use this tool to create lens flare and reflection effects that are photo realistic yet entirely vector-based. See Chapter 3 for the complete lowdown on this exciting tool.
Illustrator offers simple tools to choose from when drawing many types of rectangles and squares to draw. Just choose your shape, and use the best tool.
To draw a rectangle, select the Rectangle tool in the Tools panel, and then click and drag where you want the rectangle to go. After you release the mouse button, a rectangle appears.
To draw a square, you follow a slightly different procedure, as I describe in the following steps:
Choose the Rectangle tool from the Tools panel.
Click and drag with the tool. Don't release the mouse button yet.
This draws an initial rectangle.
Press the Shift key.
The rectangle snaps into a square.
Still holding the Shift key, release the mouse button.
Warning
Don't release the Shift key until after you release the mouse button. If you release the Shift key before you release the mouse button, the square snaps back into a rectangle.
A square appears.
Release the Shift key.
Draw a rounded-corner rectangle by choosing the Rounded Rectangle tool (hidden in the toolslot with the Rectangle tool) and drawing with that instead of the regular Rectangle tool. You can make a rounded corner square by keeping the Shift key pressed while drawing with the Rounded Rectangle tool.
Note
You can access any hidden tool by clicking and holding on the visible tool; after a second, the other tools in that toolslot appear.
To create a rectangle with exact dimensions (for example, 28 points × 42 points), select the Rectangle tool and click and release your mouse, but don't drag. A dialog box appears, as shown in Figure 4-2.
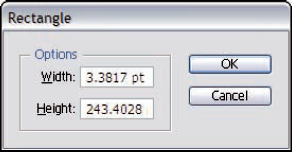
Type in height and width, and then click OK. Illustrator draws a rectangle to those exact specifications. To create a square, just make sure the width and height are the same.
Note that, for any shape that you create, you can always move that shape by clicking on it and dragging with the regular (black) Selection tool.
Tip
Illustrator places the rectangle's upper-left corner at the spot where you click with the Rectangle tool. If you hold down the Option key (Mac)/Alt (Windows) at the same time, Illustrator places the rectangle's center at the spot where you click with the Rectangle tool.
Drawing an ellipse or a circle in Illustrator is a snap.
Tip
If you hold down the Option key (Mac)/Alt (Windows) at the same time you click (but don't drag) with the Ellipse tool, Illustrator places the ellipse (or circle) from its center instead of from its upper-left edge relative to where you clicked.
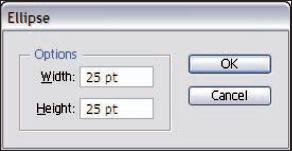
Like with the Rectangle tool, clicking (without dragging) causes the Ellipse dialog box to appear, as shown in Figure 4-3. Here you can type in an exact height and width for the ellipse. These values represent the distance across the ellipse at its widest and narrowest points. Typing in the same number for both values (as in Figure 4-3) results in creating a circle.
Illustrator has tools designed specifically for creating polygons and stars. Like rectangles and ovals, you could draw these shapes with the Pen tool, but having a tool for creating them makes the process easier, faster, and more accurate. Using these tools is fairly straightforward. Like with the Rectangle and Ellipse tools, just click and drag and then release the mouse button when the shape is the size you want. Also, like with the Rectangle and Ellipse tools, just clicking (without dragging) with the Polygon or Star tool opens their respective dialog box, which you use to specify the shape's exact size (and other attributes).
Tip
Need to create stars at various sizes with a certain number of points? Or different sized polygons with the same number of sides? The dialog boxes for the Polygon and Star tools remember the number of sides and points you enter and use those settings for each subsequent shape you draw, even if you click and drag.
To create a polygon, simply click and drag with the Polygon tool. When the polygon is the size you want, release the mouse button. The new polygon appears. Because polygons are more complex than ellipses or rectangles, you can get all sorts of special capabilities by pressing certain keys while you draw. To customize the polygon while you create it, hold down any of the following keys while you drag:
Shift: Constrains one side of the polygon so that it's parallel to the bottom of the page.
Up arrow/down arrow: Adds or deletes, respectively, sides of the polygon while you draw it.
Spacebar: Moves the polygon while you draw it (instead of changing the size of the polygon).
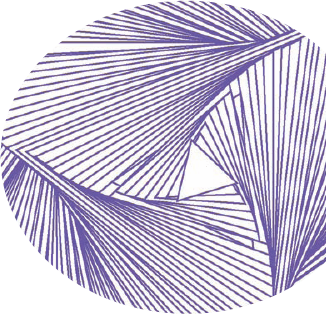
Tilde (~): Creates multiple polygons while you draw. At times, you can have so many polygons that they look like one solid figure, but each is a separate entity that you can separate and move wherever you want. This feature can create quite astounding effects, as shown in Figure 4-4.
Tip
To use this feature, you must release the mouse button before you release the key, or all the duplicates disappear. This works when you draw any of the other shapes, too!
By the way, to get the swirly effect, move your mouse clockwise or counterclockwise while you draw.
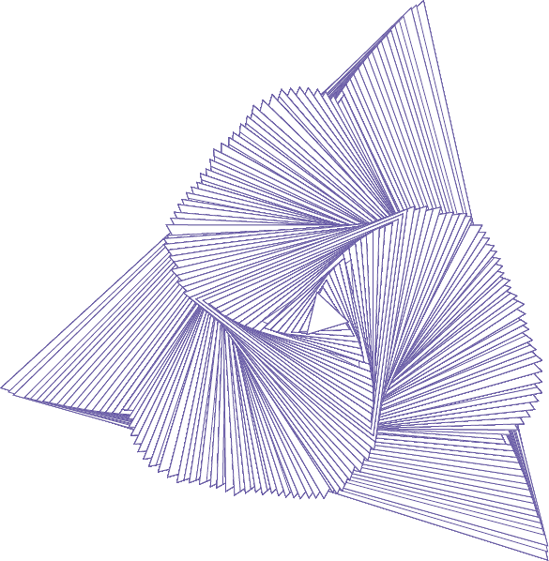
Figure 4-4. Press the tilde (~) key while you draw with the Polygon tool to produce a unique effect.
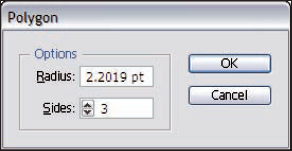
Clicking (without dragging) with the Polygon tool opens the Polygon dialog box, as shown in Figure 4-5. Polygons use a radius value instead of height and width. All sides of the polygon are the same distance from the center; this distance is the Radius value. To create a polygon of a specific width, type in half the width you want in the Radius field. You can type in any number of sides, from 3 to 1,000.
To create a star, click and drag with the Star tool. After you release the mouse button, a star is born. Stars are even more complex than polygons. Fortunately, you also have more keys for customizing options. To customize a star, use the following keys as you drag:
Shift: Constrains one side of the star so that the bottom two points of the star are parallel with the bottom of the page.
Up arrow/down arrow: Adds/deletes points of the star while you draw it.
Command key (

Spacebar: Moves the star while you draw it (instead of changing the size of the star).
Tilde (~): Creates multiple stars while you draw.
Clicking (without dragging) with the Star tool opens the Star dialog box, as shown in Figure 4-6. Stars have two radii that you can set here. The first radius determines how close the inner points of the star are to the center. The second radius determines how far the outer points are from the center. You can also set the number of points the star has. After you make your settings, click OK to create the star you specified.

After you create a star using the Star dialog box, each star you create by clicking and dragging uses the same specifications, more or less. Regardless of each star's size, it has the same number of points (unless you change them, using the up and down arrows), and the first and second radii maintain the same proportions, if not the same size. For example, if you enter 2 inches for the first radius and 1 inch for the second, the second radius is 50 percent smaller for every star you create after you establish the settings in the dialog box, regardless of the star's size.
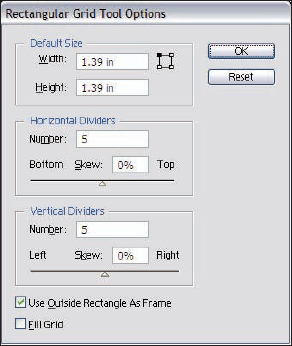
Enter values for the size of the grid and the number of columns (Horizontal Dividers) and rows (Vertical Dividers). You can also enter a skew value that progressively increases or decreases the size of the rows and columns. When left unchecked, the Fill Grid option creates a grid without a fill; enabling the Use Outside Rectangle as Frame option surrounds the grid lines with a rectangle.
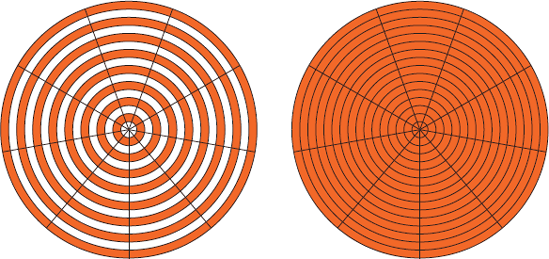
The Polar Grid tool, located in the Line toolslot next to the Rectangular Grid tool, operates in a similar manner as the Rectangular Grid tool. In the Polar Grid Tool Options dialog box, as shown in Figure 4-8, you find options for Size and the number of Concentric Dividers (smaller circles that appear within the largest outer circle) and Radial Dividers (the lines that radiate from the center of the smallest circle to the edge of the largest circle).
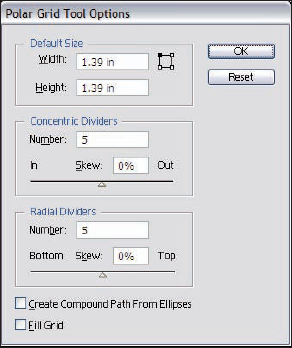
Using both radial and concentric dividers creates a spider web effect, as shown in Figure 4-9 (right). You also have the same Skew and Fill Grid options as for the Rectangular Grid tool. The Create Compound Paths from Ellipses option creates a polar grid where every other concentric circle is transparent. The effect creates a bull's-eye target, as shown in Figure 4-9 (left).
In addition to the grids created by the Rectangular Grid and Polar Grid tools, Illustrator can transform your background into electronic graph paper. Choose View
Figure 4-10 shows a document with a grid behind it.
To change the settings for the grid, choose Edit
The basic shape-creation tools are great starting points for creating more complex illustrations because most complex shapes are simply many basic shapes put together. You might be astonished at what you can create simply by combining one basic shape with another. One of the quickest and easiest ways to do so in Illustrator is by using the Pathfinder panel.
The Pathfinder panel has a misleading name. All it really does is combine or separate two or more shapes in a variety of ways. You can use the Pathfinder panel to join two or more objects into one object, remove the shape of one object from another, cut apart two shapes where they overlap, or combine objects in many other ways.
To access the Pathfinder panel, choose Window
Using the Pathfinder panel is simplicity itself: Just overlap two or more objects, select them all by clicking them with any selection tool (to select multiple objects, hold down the Shift key while clicking each additional object), and click the button in the Pathfinder panel that does the operation that you desire.
Note
Knowing which button to click isn't always obvious, but don't worry about that. Simply keep in mind that when you want to combine or separate two or more objects, you're likely to find a button to help you in the Pathfinder panel. Click a button; if it doesn't give you what you want, choose Edit
The results of the Pathfinder panel depend heavily on which object is in front and which object is behind. To change the stacking order of objects, select a single object with the Selection tool and choose Object

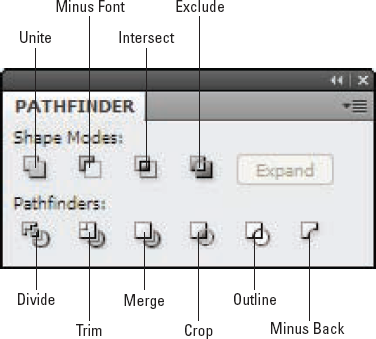
Not only does the Pathfinder panel enable you to create complex artwork from basic shapes, but all the artwork you create can remain fully editable if you press Option (Mac)/Alt (Windows) when you click the appropriate Pathfinder button. Overlap two or more objects by selecting one with the Selection tool and dragging it over another object, select them all, and click the button of the effect you want. The Shape Modes buttons along the top row of the Pathfinder panel consist of the following:
Unite: Groups multiple objects so they're selectable as a unit but can also be selected individually with the Direct Selection or Group Selection tools. The resulting objects use the fill and stroke of the object that was on top before the objects were added together. By pressing Option (Mac)/Alt (Windows) when clicking the button, the shapes are formed into a compound shape — meaning they are treated as a single shape by most operations in Illustrator, but still exist as two shapes that can be separated in the future.
Tip
In all Shape Modes, the Expand Compound Shape command "flattens" the compound shape into a single path which cannot then be separated back into the original shapes.

Tip
Minus Front: Cuts away all selected objects in front of the backmost object, leaving a hole in the backmost object in the shape of whatever was in front of it. In Figure 4-13, Minus Front cuts away the star in front of the circle, creating four separate curved sections.
Intersect: Cuts away all parts of the objects that don't overlap, as shown in Figure 4-14. The resulting object uses the fill and stroke color of the object that was on top before the objects were intersected. Here, Intersect joins the circle and star, using the fill and stroke color of the star (which was on top before the objects were intersected). Intersect also works on more than two objects.
Exclude: Removes all parts of the objects that overlap and unites what's left into a single object (the opposite of Intersect). The remaining object uses the fill and stroke of the object that was on top before the objects were united. In Figure 4-15, the Exclude command cuts away all parts of the circle and star that overlap, uniting what is left into a single object that uses the fill and stroke color of the star (which was on top before the objects were united).


All the Pathfinder effects I discuss here can be combined if applied as compound shapes, so knock yourself (and other paths) out. If you want to undo your compound shapes, choose the Release Compound Shape command from the Pathfinder panel pop-up menu. By clicking the Expand button (refer to Figure 4-11) or selecting the Expand command from the Pathfinder panel pop-up menu, you can further clean up or simplify your paths by eliminating unnecessary anchor points. The compound shapes are flattened and condensed into a new simplified shape. But be warned: After you use the Expand Compound Shape command, you can no longer release your compound shape by using the Release Compound Shapes command. The Expand feature permanently fuses your effect — just as if you had clicked without the Option (Mac)/Alt (Windows) pressed — so there's no going back.
The commands under the Pathfinders portion of the Pathfinder panel are a mixed bag of effects. The Divide and Minus Back commands achieve results by cutting away specific parts of the image. Figure 4-16 demonstrates the results of applying Minus Back, removing everything but the tips of the stars. (Now that's what I call minus!) The Trim, Merge, Crop, and Outline commands provide the means for tidying up your artwork before sending your creation out into the world. In Figure 4-17, this cleanup crew takes a bow.


Figure 4-17. Cleaning up and checking the circle and star, using (left to right) Trim, Merge, Crop, and Outline. In this case, Trim and Merge cause the same result.
Here's a quick rundown of the Pathfinder commands found under the Pathfinder panel:
Divide: Breaks two overlapping objects into separate objects. This operation might look as though it hasn't done anything after you first apply it. However, after you divide an object, you can move or color each piece individually.
Trim: Removes any parts of objects hidden by other objects and also removes any strokes. Like with Divide, this command might not produce visible results immediately: That is, you might not see anything until you start changing the position of the pie slices of the circle, where you'll suddenly notice that they can move as separate objects. (Refer to the first image in Figure 4-17.)
Merge: Removes any parts of objects hidden by other objects, removes strokes, and merges overlapping objects that have the same fill colors. This command functions almost the same way as the Trim command does, with the key difference being that this commands merges objects of the same color into a single object, but Trim leaves them as separate objects. In the second image in Figure 4-17, the Merge command removes any parts of the circle hidden by the star, removes strokes, and merges overlapping objects that have the same fill colors (which the star and the circle do not).
Crop: Divides two overlapping objects into separate objects where they overlap and then deletes everything outside the boundaries of the front most object. In the third image in Figure 4-17, the Crop command divides the star and circle into separate objects where they overlap and then deletes everything outside the boundaries of the star (the front most object).
Outline: Breaks objects into separate line segments with no fill colors. The last image in Figure 4-17 shows the visible effects of the command.
Minus Back: Cuts away from the front most object all selected objects that are behind the front most object. The remaining object uses the fill and stroke color of the front most object. Here, Minus Back cuts away the circle from the star and unites what's left (those four forlorn-looking points; refer to Figure 4-16) into a single object that uses the fill and stroke color of the star (which is the front most object).
Note
If you stumble upon the Pathfinder commands under the Effects menu, don't confuse them with those found under the Pathfinder panel. The commands under the Effects menu change the appearance of an object without changing the underlying object itself. The Pathfinder commands found under the Effects menu are designed to be applied to groups of objects, layers, and type objects. They usually have no effect on a few overlapping shapes. For more on appearances and effects, see Chapter 11.
By combining basic shapes, you can create just about anything you can imagine. So, how do you actually use the Shape Modes and Pathfinders commands to create such complex shapes? (Details, details.) Consider a couple of examples — a crescent moon and a sunrise.
A crescent moon seems fairly simple to draw, but trying to draw one accurately by hand is frustrating. The Pathfinder panel, however, makes drawing a crescent moon almost as easy as smiling and saying, "Green cheese." Just follow these steps:
Choose the Ellipse tool to draw a perfect circle (click and drag the Ellipse tool while holding down the Shift key).
Note
As I describe earlier in this chapter, let go of the mouse button before you let go of the Shift key.
Repeat Step 1, creating a second circle that's just slightly smaller than the first one.
Using the Selection tool, click on the second circle and then drag it over the first, as shown in Figure 4-18.
Select both circles.
Tip
Hold down the Shift key and click each circle with the Selection tool to select more than one object at a time.
Click the Minus Back button in the Shape Modes portion of the Pathfinder panel. Presto! A crescent moon appears!

What better way to follow a crescent moon than with a beautiful sunrise? Just follow these steps:
Click and drag with the Rectangle tool to create a box.
Click and drag with the Star tool to create a star. As you drag with the Star tool, repeatedly press the up-arrow (

A many-pointed star appears.
Choose the Selection tool and use it to position the star over the rectangle so the two objects overlap, as shown in Figure 4-19.
Select both the star and the rectangle.
Tip
Hold down the Shift key and click each object with the Selection tool so both objects are selected.
Click the Minus Back button in the Pathfinders portion of the Pathfinder panel.
Voilà! A beautiful sunrise! (Well, almost. Still needs colors and a caffeinated beverage.)

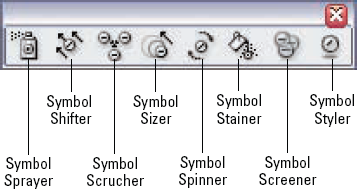
The Symbol Sprayer (which has the honor of being the preeminent tool in the Tool panel's Symbolism toolslot; see Figure 4-20) is how Adobe makes your job of producing repeating graphics easier and quicker. Feel like a kid (okay, a bad kid) and spray onscreen repeating graphics all over the place to your heart's content. No clogged spray nozzles, no paint drips, no fumes. Who could possibly resist that intriguing spray can sitting there in the Tools panel just begging to be picked up?
Note
Symbols are reusable and repeatable elements that are used in animation. Although they can be graphics, buttons, movie clips, sound files, and even fonts, in Illustrator, they can be composed of any Illustrator object — vectoror pixel-based images or text. Each individual symbol is an instance. The beauty of symbols is that although you might have multiple instances of a symbol in your file, each instance references a single symbol in the Symbols panel, thereby keeping the file size extremely small.
Symbols provide a quick and easy way to create a large group of similar objects and an easy means to collectively edit these objects. Symbols can be used for most anything, but are especially handy in creating navigation buttons; borders; map icons; and masses of graphics, such as foliage, snowflakes, and stars.
I like it when tools, such as the Symbol Sprayer, work the way I think they should (unlike the tedious Pen tool). Follow these steps to become the master of your personal digital spray can:
Select the Symbol Sprayer.
Note that the sprayer icon is surrounded by a circle, which represents the diameter of your sprayer. (Read the upcoming section, "Setting the Symbolism options," to discover how to change that size.)
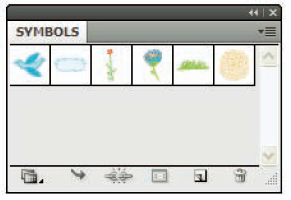
Choose Window

The Symbols panel, shown in Figure 4-21, appears with a default library of symbols to choose from.
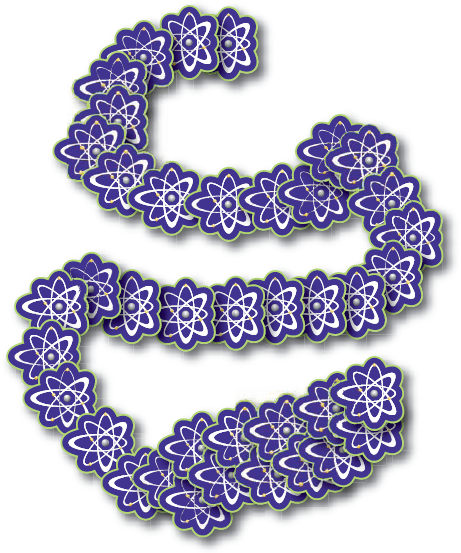
Select a symbol from the Symbols panel, click the Symbolism tool on the Artboard, and drag it around the page.
A trail of symbols (of the one you chose) appears, mirroring the movement of your cursor while you drag it across your Artboard. (Check it out in Figure 4-22.) Unless you feel the need to edit your symbols or create your own custom symbol, you're done!
If you're the creative type, create your own symbol. First create the artwork, which can include any Illustrator object — vectoror pixel-based images or text. You can even use a combination of objects, as shown in Figure 4-23. Next, select your artwork and do one of these three things:
Click the New Symbol button (the little piece of paper at the bottom of the Symbols panel).
Choose the New Symbol option from the Symbols panel pop-up menu (accessed from the little triangle at the upper right of the Symbols panel).
Drag and drop the art onto the Symbols panel.
Voilà! A symbol is born.

The other Symbolism tools hiding behind the Symbol Sprayer enable you to tweak your symbols to graphic perfection. To edit your symbols, first select the symbols with the Selection tool. Note how you select the bounding box (a temporary border surrounding objects) of the symbols and not the individual instances. That's because symbols are a unique breed of graphic that require a unique kind of editing.
Symbols used in a document are tied to the original symbol chosen in the Symbols panel. If that original symbol changes, all the associated symbols in your document change. This ability can allow you to quickly make dozens or hundreds of changes to a document. For instance, if you were using little stop signs based on a symbol throughout a map you've drawn, you could change all the stop signs to traffic lights simply by replacing the original symbol in the Symbols panel.
After you select the symbols, click and drag with the Symbolism tool of your choice. Depending on where you click and how you drag, you will get different results. Each of the tools is described in more detail below:
Symbol Shifter: Click and drag your mouse to shift the position of the symbols in relation to each other. The symbols move around the cursor while you drag, creating a sort of ripple effect.
Symbol Scruncher: Click and hold down your mouse to move the symbols closer. Hold down the Option (Mac)/Alt (Windows) key while clicking and holding down your mouse to move the symbols apart.
Symbol Sizer: Hold your mouse button down to size the symbols larger. Hold down the Option (Mac)/Alt (Windows) key while manipulating your mouse to reduce the size of the symbols.
Tip
You can also use the regular Rotate and Scale tools to rotate and size symbols.
Symbol Spinner: Click and drag your mouse in the desired direction to rotate the symbols.
Symbol Stainer: Hold your mouse down to tint the symbols by using the current Fill color.
Symbol Screener: Hold your mouse down to increase the transparency of the symbols.
Symbol Styler: Applies a style from the Graphic Styles panel (found by choosing View
Double-click any of the Symbolism tools to bring up the Symbolism Tools Options dialog box, as shown in Figure 4-24. Here you adjust the behavior of each tool.
Select your tool icon from the row and then adjust its Diameter (1–999 points), the Intensity (1–10), and the Symbol Set Density (1–10). Most of the tools provide shortcut keys with which you adjust settings while you draw. I recommend keeping the Show Brush Size and Intensity option selected (checked) so that you get a good idea of your tool coverage.
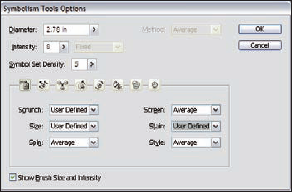
In the Symbolism Tools Options dialog box (refer to Figure 4-24), choose the User Defined setting to apply the settings within your Illustrator application to the Symbolism tools. For example, if you choose User Defined for your Stain setting for the Symbol Sprayer, the symbols appear with your current Fill color, regardless of the original color of the symbol.
Here are some other handy tips to keep in mind when working with symbols:
If you export your file as a Flash (SWF) file, your symbols are included in the symbol library of your Flash application. (See Bonus Chapter 1 on the Web site associated with this book for more info.)
To place a single instance of a symbol, choose the Place Instance of Symbol option from the Symbols panel pop-up menu, or click the Place Symbol Instance button at the bottom of the panel.
To convert a symbol into a regular, Illustrator editable graphic (to use either as regular artwork elsewhere or to add/replace a symbol using that symbol's artwork), select the symbol instance and click the Break Link to Symbol button at the bottom of the Symbols panel, or select the command from the Symbols panel pop-up menu. You can then modify the graphic, select it, and click the original symbol in the Symbols panel. Then, choose the Redefine Symbol option from the Symbols panel pop-up menu. Not only is the symbol revised, but any symbol instance on your Artboard is revised as well. Imagine having to change 1,000 little leaves on a tree if they were regular graphics and not symbols!
To take advantage of a pressure-sensitive tablet, select the Use Pressure Pen option (only available if a pressure-sensitive tablet is hooked up to your computer) in the Symbolism Tools Options dialog box.
To name or rename your symbol, double-click the symbol in the Symbols panel or choose Symbol Options from the Symbols panel pop-up menu.
To delete a symbol, select it in the Symbols panel and click the Delete Symbol at the bottom of the Symbols panel, or choose the command from the Symbols panel pop-up menu.
To duplicate a symbol, select it in the Symbols panel and choose Duplicate Symbol from the Symbols panel pop-up menu. Duplicating is handy for making variations of a symbol. (After duplicating, you can turn it into regular art on the artboard, modify that art and then replace the duplicated symbol with the modified artwork.)