
7. Freehand Drawing

In This Chapter
Drawing with the Paintbrush tool
Choosing options for the Pencil and Paintbrush tools
If you enjoy sketching in a loose, freehand manner, the Pencil, Paintbrush, and Blob Brush tools will be right up your alley. Each tool has its own special attributes, which we explore in this chapter. Paths drawn with these tools can be reshaped using any of the techniques described in Chapters 11 and 12. In fact, in addition to being used to create objects, the Pencil and Blob Brush tools also have a reshaping function.
A quick color primer
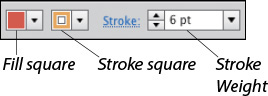
Before exploring the freehand drawing tools, learn how to quickly set the fill color, stroke color, and stroke weight. Do this via either the Control panel or the in-panel editing feature of the Appearance panel.
To choose a fill or stroke color:
1. Choose the Selection tool ![]() (V), then click an object or drag a marquee around multiple objects.
(V), then click an object or drag a marquee around multiple objects.
2. Do either of the following:
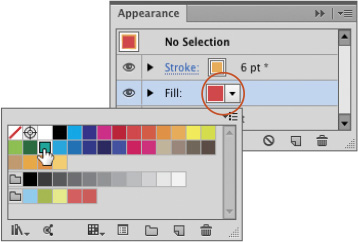
On the Control panel, click the Fill or Stroke square or arrowhead,A then on the temporary Swatches panel, click a swatch.
A To open a temporary Swatches panel, click the Fill or Stroke square on the Control panel...
On the Appearance panel,![]() click the square for the Fill or Stroke listing, click the color square or arrowhead, then on the temporary Swatches panel, click a swatch.B
click the square for the Fill or Stroke listing, click the color square or arrowhead, then on the temporary Swatches panel, click a swatch.B
B ...or on the Appearance panel.
Note: To choose a fill or stroke color of None, click the None button ![]() on the Swatches panel.
on the Swatches panel.
To choose a stroke weight:
Do either of the following:
On the Control panel, click the up or down Stroke Weight arrow.
On the Appearance ![]() panel, click the Stroke link, then click the up or down Stroke Weight arrow on the temporary Stroke panel.
panel, click the Stroke link, then click the up or down Stroke Weight arrow on the temporary Stroke panel.
Fill and Stroke Defined
![]() The fill displays inside a closed or open object or on a face within a Live Paint group. The stroke displays on the path of a closed or open object.
The fill displays inside a closed or open object or on a face within a Live Paint group. The stroke displays on the path of a closed or open object.
![]() The fill or stroke can be a solid color, a pattern, a gradient, or None (of the above).
The fill or stroke can be a solid color, a pattern, a gradient, or None (of the above).
![]() A stroke can be dashed or continuous. A Scatter, Calligraphic, Art, Bristle, or Pattern brush can also be applied to a stroke.
A stroke can be dashed or continuous. A Scatter, Calligraphic, Art, Bristle, or Pattern brush can also be applied to a stroke.
Note: To learn more about choosing and applying fill and stroke colors, see Chapter 10.
Note: For optimal results when using the Pencil, Paintbrush, or Blob Brush tool, draw with a pressure-sensitive tablet and a stylus. (Not to worry — although it’s recommended, it’s not mandatory.)
Drawing with the Pencil tool
The Pencil tool has three distinct functions: You can drag in a blank area of the artboard to create a new, open path (as described in the steps below); drag along the edge of an existing, selected path to reshape it (see page 165); or drag from an endpoint of an existing open path to add segments to it (see page 163).
Note: To choose options for the Pencil tool, see page 88.
To draw with the Pencil tool:
1. Choose the Pencil tool ![]() (N).
(N).
2. Choose a stroke color and weight, and a fill color of None.
3. Draw lines (a proxy line will appear while you draw). You can release the mouse between strokes. That’s all there is to it. (Well, except for the artistic part!)
4. Press Cmd-Y/Ctrl-Y to toggle the display of the artwork with its current color settings (Preview view) A and a wireframe representation (Outline view).
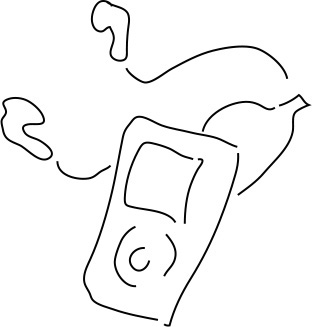
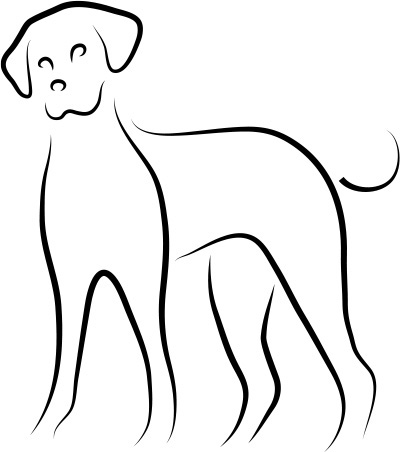
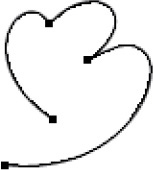
A An iPod is drawn with the Pencil tool. If you don’t know what subject matter to draw, observe the objects around you, and draw the contour of one that interests you.
5. Optional: To apply a brush to a selected path, keep the artwork selected, show the Brushes panel ![]() or click the Brush Definition menu
or click the Brush Definition menu ![]() on the Control panel, then click a brush. To learn about brushes, see Chapter 23.
on the Control panel, then click a brush. To learn about brushes, see Chapter 23.
6. Optional: To change the contour of a selected path, choose from the Variable Width Profile menu on the Control panel B–C (see page 166).
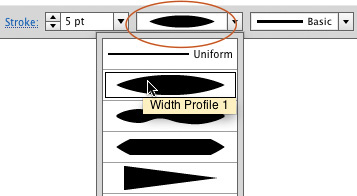
B You can choose a contour for a selected path from the Variable Width Profile menu.
C We applied Width Profile 1 to these paths.
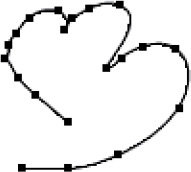
![]() To create a closed path with the Pencil tool, start drawing the path, then return to the start of the path and release the mouse button when you see the
To create a closed path with the Pencil tool, start drawing the path, then return to the start of the path and release the mouse button when you see the ![]() icon.
icon.![]()
![]() To close an existing path with a straight segment, select the path, then hold down the Option/Alt key and drag from one anchor point to the next with the Pencil tool. Alternatively, choose the Selection tool (V), click the line, then press Cmd-J/Ctrl-J.
To close an existing path with a straight segment, select the path, then hold down the Option/Alt key and drag from one anchor point to the next with the Pencil tool. Alternatively, choose the Selection tool (V), click the line, then press Cmd-J/Ctrl-J.![]()
![]() If you want to draw perfectly straight lines, hold down the Option/Alt key as you draw with the Pencil tool, release the Option/Alt key, and continue dragging to draw freehand again.
If you want to draw perfectly straight lines, hold down the Option/Alt key as you draw with the Pencil tool, release the Option/Alt key, and continue dragging to draw freehand again.![]()
![]() If you want to draw precision curves, your best bet is the Pen tool (see Chapter 21) instead.
If you want to draw precision curves, your best bet is the Pen tool (see Chapter 21) instead.
Drawing with the Paintbrush tool
If you use a stylus and a pressure-sensitive tablet, the Paintbrush tool will respond to pressure. The harder you press on the tablet, the wider the stroke.
Note: To choose options for the Paintbrush tool, see the following page.
To draw with the Paintbrush tool:
1. Choose the Paintbrush tool ![]() (B).
(B).
2. Choose a stroke color and weight, and a fill color of None.
3. Show the Brushes panel ![]() or click the Brush Definition menu
or click the Brush Definition menu ![]() on the Control panel, then click a brush. We recommend choosing a Bristle or Art brush (see Chapter 23).
on the Control panel, then click a brush. We recommend choosing a Bristle or Art brush (see Chapter 23).
4. Do either of the following:
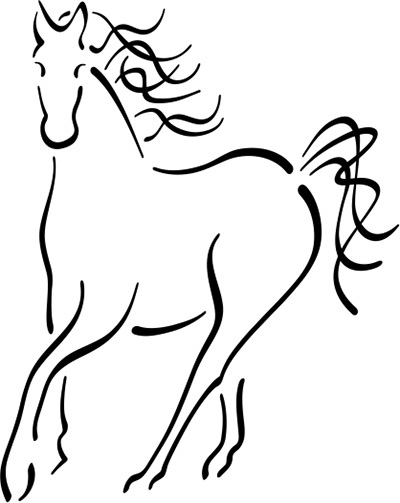
To draw open paths, draw separate lines.A–B

A These objects were drawn with an Art brush chosen for the Paintbrush tool.
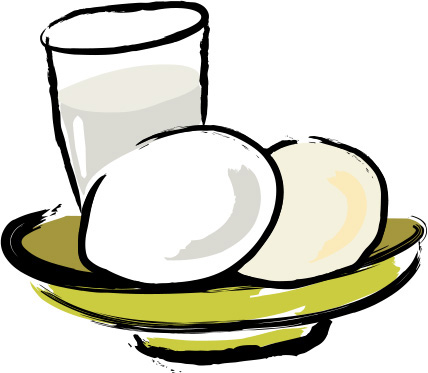
B We applied assorted fill colors to the objects.
To draw a closed path, drag to draw the path, then Option-drag/Alt-drag to close it (release Option/Alt last).
5. Optional: To change the contour of the stroke on a selected path, choose from the Variable Width Profile menu on the Control panel (see page 166).
![]() To change the width of a Bristle brush between strokes, press [ or ]. To change the brush opacity between strokes, press a number key (e.g., 5 for 50% opacity, 9 for 90% opacity, or 0 for 100% opacity).
To change the width of a Bristle brush between strokes, press [ or ]. To change the brush opacity between strokes, press a number key (e.g., 5 for 50% opacity, 9 for 90% opacity, or 0 for 100% opacity).
When you remove a brush stroke from a path, it is given a plain, basic shape. Similarly, if you remove a width profile from a path, it is given a uniform width.
To remove a brush stroke or width profile from a path:
1. Choose the Selection tool ![]() (V), then click a path.
(V), then click a path.
2. On the Control panel, do either or both of the following:
To restore the default width profile, on the Variable Width Profile menu, click Uniform.
To remove a brush, on the Brush Definition menu, click the Basic brush.
![]() When an object that contains a brush stroke is selected, you can click the Stroke listing on the Appearance panel to make a Brush Definition menu appear. And if you click the Stroke link on that panel, a variable width Profile menu displays on a temporary Stroke panel.
When an object that contains a brush stroke is selected, you can click the Stroke listing on the Appearance panel to make a Brush Definition menu appear. And if you click the Stroke link on that panel, a variable width Profile menu displays on a temporary Stroke panel.
A Checklist of Things to do Before you Begin Drawing (A Friendly Reminder)
![]() Display an artboard.
Display an artboard.
![]() Choose a drawing mode (usually Draw Normal
Choose a drawing mode (usually Draw Normal ![]() ) from the bottom of the Tools panel.
) from the bottom of the Tools panel.
![]() If your document contains multiple layers, click a layer.
If your document contains multiple layers, click a layer.
Choosing options for the Pencil and Paintbrush tools
The Pencil and Paintbrush tools can be customized in two ways: by choosing settings on the Control panel or via an options dialog. Changes to the tool options affect only lines you subsequently draw, not existing ones. The 2014 release of Illustrator CC provides significant improvements to how paths are generated when drawn with the Pencil, Paintbrush, Smooth, and Blob Brush tools.
To choose options for the Pencil or Paintbrush tool:
1. Do either of the following:
Double-click the Pencil tool ![]() (or press N to choose the tool, then press Return/Enter).
(or press N to choose the tool, then press Return/Enter).
Double-click the Paintbrush tool ![]() (or press B to choose the tool, then press Return/Enter).
(or press B to choose the tool, then press Return/Enter).
2. In the Fidelity area of the options dialog: A
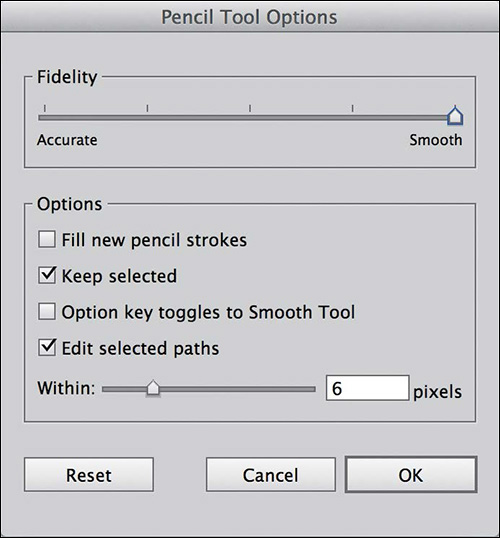
A The Pencil tool has its own options dialog ![]() .
.
Choose a Fidelity value.B–C An Accurate Fidelity setting produces many anchor points and paths that accurately follow the movement of your mouse, whereas a Smooth setting produces fewer anchor points and smoother paths.![]()
B This line was drawn with the Pencil tool at an Accurate Fidelity setting.
C This line was drawn with the Pencil tool at a Smooth Fidelity setting.
3. Check any of the following options:
Fill New Pencil Strokes or Fill New Brush Strokes to have new paths (whether they are open or closed) fill automatically with the current fill color. The default setting for this option is off.
Keep Selected to have the paths stay selected after they’re created. This saves you a step if you tend to edit your paths right after drawing them.
Option key toggles to Smooth Tool to provide a quick way to access the Smooth tool when the Option/Alt key is held down and the Pencil tool is active. With this option chosen, you can’t draw a straight line using the Pencil tool.
Edit Selected Paths to activate the reshaping function of the tool (see page 165). The Within: [ ] Pixels value is the minimum distance the pointer must be from a path for the tool to reshape it. Uncheck this option if you want to be able to draw multiple lines or brush strokes near one another without reshaping any existing selected paths.
4. Click OK.D
D Each stroke in this drawing is a separate path.
![]() Click Reset in the Pencil or Paintbrush Tool Options dialog to restore the default settings for the tool.
Click Reset in the Pencil or Paintbrush Tool Options dialog to restore the default settings for the tool.
Using the Blob Brush tool
The Blob Brush is a versatile, dual-purpose tool. It lets you draw closed paths in a loose, freehand style, and also lets you reshape existing closed paths, regardless of which tool they were created with. The tool is similar to a traditional felt-tip marker, with two advantages: It enables you to reshape your strokes after they’re drawn, and it’s odor-free! If you like to draw artwork “by hand,” you’ll probably take an instant liking to it. “Blob Brush tool” is a cumbersome name to say aloud, but it’s a fun tool to use.
On this page, you’ll learn how to create objects with the Blob Brush tool; on the next page, you’ll choose options for the tool; and on page 179, you’ll master its reshaping function.
To draw with the Blob Brush tool:
1. Choose the Blob Brush tool ![]() (Shift-B).
(Shift-B).
2. On the Control or Appearance panel, click the Stroke thumbnail or arrowhead ![]() to open a temporary Swatches panel, then click a solid-color swatch on the panel.
to open a temporary Swatches panel, then click a solid-color swatch on the panel.
3. Position the brush cursor over an artboard. Press [ to decrease the brush tip size or ] to increase it.
4. Draw lines, as you might with a traditional marking pen.A–B Let the lines crisscross or touch one another. When you release the mouse, a new closed path or compound path is created (unlike the stroked paths that are produced by the Paintbrush and other freehand drawing tools).
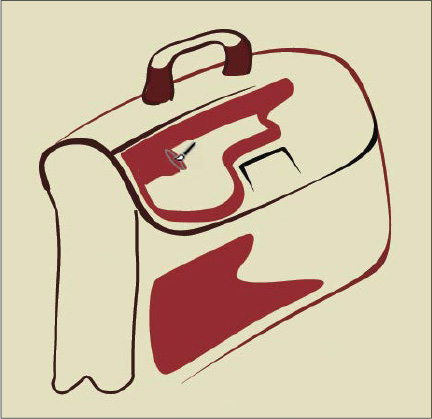
A A briefcase is drawn with the Blob Brush tool.

B Other areas of “shading” were drawn with the Blob Brush.
5. Optional: Without changing the stroke color, draw a connecting line from one end of a Blob Brush shape to the other end, to connect them.
6. Choose the Selection ![]() or Direct Selection
or Direct Selection ![]() tool, then click the new shape. Illustrator applies the current stroke color to the inside of the object and gives the object a stroke color of None.
tool, then click the new shape. Illustrator applies the current stroke color to the inside of the object and gives the object a stroke color of None.
7. Optional: For the selected Blob Brush path, via the Appearance or Control panel, change the Opacity percentage.
To choose options for the Blob Brush tool: ![]()
1. Double-click the Blob Brush tool.![]() The Blob Brush Tool Options dialog opens.A
The Blob Brush Tool Options dialog opens.A
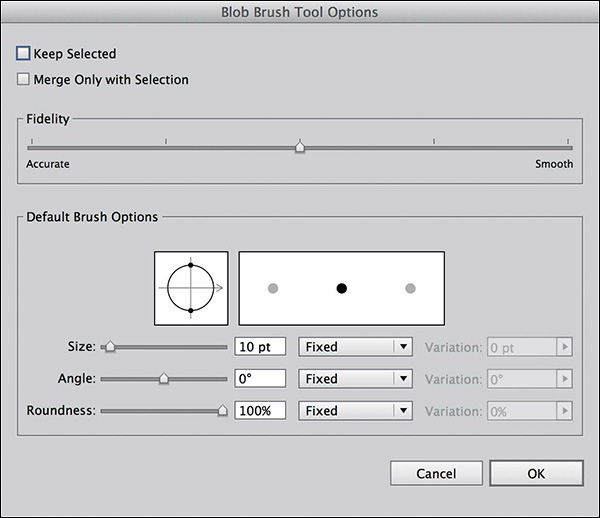
A You can customize the behavior of the Blob Brush tool via its options dialog.
2. Check Keep Selected to have the Blob Brush objects remain selected after they are created. We check this option so we can see more easily when our Blob Brush objects are being merged.
3. Check Merge Only with Selection to permit new Blob Brush strokes to merge only with selected unstroked objects, or uncheck this option to allow new strokes to merge with any unstroked objects that have the same fill color as the brush, whether they are selected or not. (To merge shapes with this tool, see page 170.)
4. Under Fidelity, choose an Accurate Fidelity setting to produce many anchor points and paths that follow your mouse movements more accurately, or a Smooth setting to produce fewer anchor points and smoother paths.![]()
5. For the brush Size, Angle, and Roundness options,B–C see steps 4–7 in the steps for editing a Calligraphic brush on pages 324–325.

B A Roundness setting of 100% for the Blob Brush tool produced the rounded ends on this object...

C ...whereas an Angle setting of –45° and a Roundness setting of 22% produced ends that look more calligraphic.
6. Click OK.