
27. Transparency

In This Chapter
Changing an object’s opacity or blending mode
Controlling which objects the transparency settings affect
Editing masked artwork or the masking object in an opacity mask
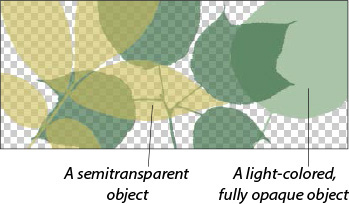
The objects in our environment have various densities depending on the type of material they’re made of, and may also look different depending on how much light is filtering through or reflecting off them. Take a minute to study the shade on a lamp. You might say “The shade is white” when you describe it simply, but upon closer inspection, you may notice that rather than being a dense, uniform color, it contains several permutations of white. And if the bulb is switched on, the shade will look semitransparent rather than opaque.
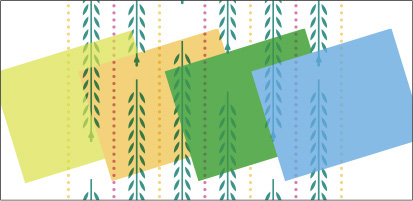
By using Illustrator’s transparency controls, you can add a touch of realism to your drawings. If you were to draw a window, for example, you could add a tinted, semisheer, diaphanous curtain on top of it. Draw some autumn leaves, and you could lower their opacity to make them look semitransparent. Abstract designs can be enhanced by opacity variations, too.
Changing an object’s opacity or blending mode
You can change the opacity of any kind of object, even editable type. You can also choose a blending mode for any object to control how its colors blend with the colors in the underlying objects. Objects that you add to a group or layer adopt the transparency settings of that group or layer. The opacity and blending mode controls in Illustrator are chosen from the Transparency panel.![]() A You can open this panel via the Window menu, or access it temporarily via the Opacity link on the Control panel or Appearance panel.
A You can open this panel via the Window menu, or access it temporarily via the Opacity link on the Control panel or Appearance panel.
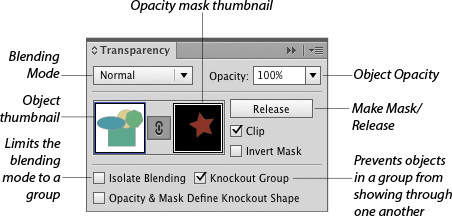
A The controls on the Transparency panel
To change the opacity or blending mode of an object, group, or layer:
1. Do one of the following:
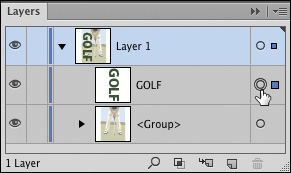
On the Layers panel,![]() click the selection area or the target circle for an object, type, or placed image for which you want to change the transparency settings.A–B To edit the attributes of all the objects in a group or layer, click the target circle for that entity.
click the selection area or the target circle for an object, type, or placed image for which you want to change the transparency settings.A–B To edit the attributes of all the objects in a group or layer, click the target circle for that entity.

A This is the original artwork.
B On the Layers panel, we are clicking the target circle for the type object.
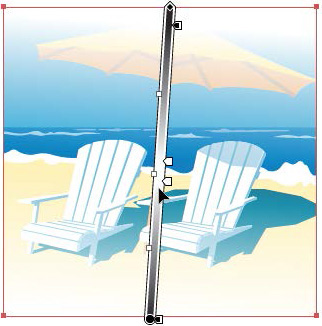
With the Selection tool,![]() select or isolate one or more objects in the document.
select or isolate one or more objects in the document.
Select some type characters with a type tool. (To change the opacity of just the fill or stroke of type, see the second task on the next page.)
2. Do either of the following:
To change the opacity, enter or choose an Opacity percentage on the Control panel.
To change the opacity and/or blending mode, either click the Opacity link on the Control or Appearance panel to open a temporary Transparency panel or display the Transparency panel.![]() The contents of the selected or targeted layer, group, or object display in the thumbnail on the panel. Choose from the Blending Mode menu and/or change the Opacity setting C–D (and A–B).
The contents of the selected or targeted layer, group, or object display in the thumbnail on the panel. Choose from the Blending Mode menu and/or change the Opacity setting C–D (and A–B).
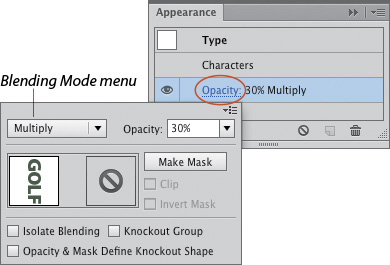
C We clicked the Opacity link on the Appearance panel to display a temporary Transparency panel, then chose Multiply as the blending mode and an opacity of 30%.

D This is the result.

A We selected an object.

B We lowered the opacity of the object’s fill.
![]() To adjust the opacity in the Transparency panel, do one of the following: type a value in the Opacity field, click the arrow to the right of the Opacity field and choose a value, or use a trackpad or the mouse.
To adjust the opacity in the Transparency panel, do one of the following: type a value in the Opacity field, click the arrow to the right of the Opacity field and choose a value, or use a trackpad or the mouse.![]()
To change the opacity or blending mode of an object’s fill or stroke:
1. On the Layers panel, click the target circle for an object.A (For a type object, follow the next set of instructions instead.)
2. On the Appearance panel,![]() expand the Fill or Stroke listing, then click Opacity to open a temporary Transparency panel. Change the Opacity B or Blending Mode setting.
expand the Fill or Stroke listing, then click Opacity to open a temporary Transparency panel. Change the Opacity B or Blending Mode setting.
If you want to change the opacity of the stroke on a type object separately from the fill, or vice versa (while keeping the type editable), follow these steps.
To change the opacity or blending mode of the fill or stroke in type:
1. Select an editable type object using the Selection tool or the Layers panel.C You’re going to add an extra fill and stroke attribute, so make sure the type is large enough for both of those attributes to be visible.

C All of the type objects in this artwork have an opacity of 100%.
2. At the bottom of the Appearance panel, click the Add New Fill button ![]() or press Cmd-/; Ctrl-/. A new fill attribute and stroke attribute are created.
or press Cmd-/; Ctrl-/. A new fill attribute and stroke attribute are created.
3. Click the Fill color square and choose a fill color. Double-click the Stroke color square and choose a stroke color; also use the controls on the panel to adjust the Stroke Weight.
4. Double-click Characters on the Appearance panel. All the characters in the object will become selected.
5. Click the Fill listing on the Appearance panel, then click the Delete Selected Item button ![]() ; do the same for the Stroke listing. Now the fill and stroke of the Characters have a setting of None.
; do the same for the Stroke listing. Now the fill and stroke of the Characters have a setting of None.
6. Click the Type listing at the top of the Appearance panel.
7. Expand the new Fill or Stroke listing, click the Opacity link, then change the Blending Mode menu and/or the Opacity setting.D

D We reduced the fill opacity of the “0” object to 30%, but kept the opacity of its stroke at 100%.
Controlling which objects the transparency settings affect
If you apply a blending mode to multiple selected objects, that mode becomes an appearance attribute for each object. In other words, the objects blend with one another and with any objects that are stacked below them. By applying the Isolate Blending option to a group, as in the instructions below, you can seal a collection of objects so they blend with one another but not with any underlying objects.
Note: The Isolate Blending option affects blending, not opacity. Whether this option is on or off, underlying objects will show through any objects in the artwork that aren’t fully opaque.
To restrict a blending mode to specific objects:
1. On the Layers panel,![]() expand the listing for a group of objects. Apply different blending modes (other than Normal) to all or some of the objects.A Click the target circle for the group. Note: To see the effect of this option, stack an object behind the group.
expand the listing for a group of objects. Apply different blending modes (other than Normal) to all or some of the objects.A Click the target circle for the group. Note: To see the effect of this option, stack an object behind the group.
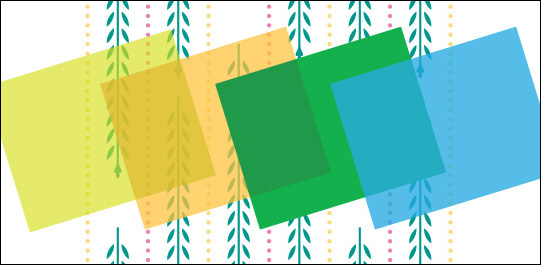
A The original objects consist of a pattern fill in a rectangle, which is stacked below a group of rectangles. The blending mode and opacity setting of each rectangle are interacting with all the underlying layers.
2. On the Transparency panel ![]() (with full options showing), check Isolate Blending.B (If this option isn’t visible, click the double arrowhead on the panel tab.) Nested objects within the targeted group will now blend with one another, but not with any objects below them.
(with full options showing), check Isolate Blending.B (If this option isn’t visible, click the double arrowhead on the panel tab.) Nested objects within the targeted group will now blend with one another, but not with any objects below them.
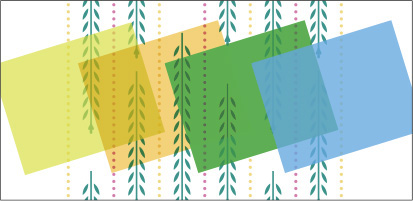
B We checked Isolate Blending for the group of rectangles. Now the blending modes are affecting only the objects within that group. (Note that where objects in the group don’t overlap one another, you can still see through them to the underlying pattern.)
Note: To reverse the effect, retarget the group, then uncheck Isolate Blending.
![]() This option can also be applied to an individual targeted layer.
This option can also be applied to an individual targeted layer.
Selecting Individual Objects Versus Targeting a Group or Layer
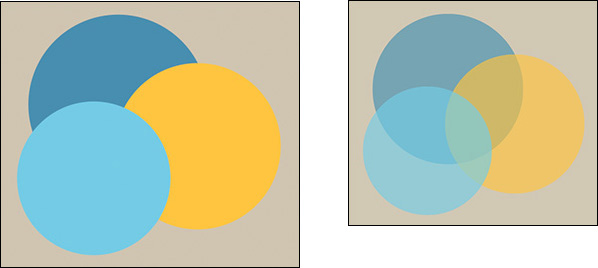
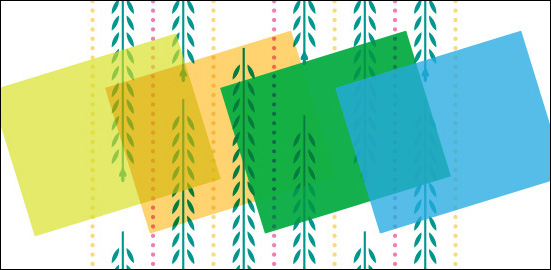
We selected multiple ungrouped objects in a layer (above left), then applied an opacity setting of 60% (above right).* The opacity levels are compounded in the areas where the objects overlap (it’s as though we piled up sheets of colored acetate). If we were to select any object individually, however, the Transparency and Appearance panels would list its opacity level as 60%.
*This information also applies to blending modes.
Above, we targeted a group, then chose an opacity setting of 60%.* The opacity levels aren’t compounded in the overlapping areas. If we were to target an individual object in the group, its opacity would be listed as 100%. (We would have gotten the same result had we targeted a layer.)
The Knockout Group option on the Transparency panel controls whether objects in a group or layer will show through (knock out) one another in the areas where they overlap. This option affects only objects within the same targeted group or layer.
To knock out objects:
1. Nest some objects within the same group or layer and arrange them so they partially overlap one another.
2. So you will be able to see how the Knockout Group option works, target some or all of the nested objects individually, then apply an opacity value below 100% and/or apply a blending mode other than Normal.
3. On the Layers panel,![]() target the group or layer that the objects are nested within.A
target the group or layer that the objects are nested within.A
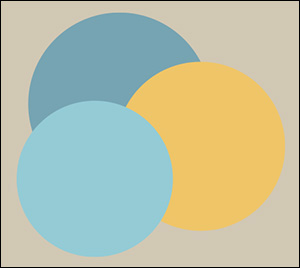
A The Knockout Group option is off for the group of rectangles (and Isolate Blending is also unchecked).
4. On the Transparency panel,![]() click the Knockout Group box once or twice, until a check mark displays.B With this option checked, objects nested in the group won’t show through one another, but you will still be able to see through any semitransparent objects in the group to underlying objects.
click the Knockout Group box once or twice, until a check mark displays.B With this option checked, objects nested in the group won’t show through one another, but you will still be able to see through any semitransparent objects in the group to underlying objects.
B We checked the Knockout Group option. The rectangles are no longer transparent or blend with one another (but they still blend with the underlying pattern).
Note: To turn off the Knockout Group option at any time, target the group or layer to which the option is applied, then click the Knockout Group box once or twice until the check mark disappears.
![]() ct all the objects in your artwork that have the same blending mode or opacity, select an object that contains the attribute you’re looking for, then choose Select > Same > Blending Mode or Opacity.
ct all the objects in your artwork that have the same blending mode or opacity, select an object that contains the attribute you’re looking for, then choose Select > Same > Blending Mode or Opacity.
Using the Transparency Grid
![]() Once you start changing the opacity settings for objects, you may find it hard to distinguish between those that have a light but solid tint and those that have an opacity below 100%. With the transparency grid on (View > Show Transparency Grid or press Cmd-Shift-D/Ctrl-Shift-D), you will be able to see a checkerboard pattern through semitransparent objects.
Once you start changing the opacity settings for objects, you may find it hard to distinguish between those that have a light but solid tint and those that have an opacity below 100%. With the transparency grid on (View > Show Transparency Grid or press Cmd-Shift-D/Ctrl-Shift-D), you will be able to see a checkerboard pattern through semitransparent objects.
![]() If you want to change the colors or size of the transparency grid to make it contrast better with the colors in your artwork, deselect, then click Document Setup on the Control panel. Under Transparency, choose a Grid Size of Small, Medium, or Large. From the Grid Colors menu, choose Light, Medium, or Dark for a grayscale grid, or choose a preset color. (You can also choose custom colors by clicking each color swatch, then choosing a color in the Colors dialog.)
If you want to change the colors or size of the transparency grid to make it contrast better with the colors in your artwork, deselect, then click Document Setup on the Control panel. Under Transparency, choose a Grid Size of Small, Medium, or Large. From the Grid Colors menu, choose Light, Medium, or Dark for a grayscale grid, or choose a preset color. (You can also choose custom colors by clicking each color swatch, then choosing a color in the Colors dialog.)
You can also check Simulate Colored Paper in the Document Setup dialog to have objects in your document look as though they’re printed on colored paper. The object color will blend with the “colored paper,” which will display as the background on all the artboards. The color in the top swatch is used as the paper color. To view the effect of this option, you must hide the transparency grid.
Creating an opacity mask
Via the Transparency panel, you can apply the grayscale equivalent of a solid color or gradient colors in an object as an opacity setting to underlying objects. Black applies 0% opacity; white applies 100% opacity.
To create an opacity mask:
1. On the Layers panel,![]() stack an object to be used as a mask above one or more other objects. To that object, apply solid gray, a solid color, a gradient, or pattern fill, and keep it selected. Note: If you want to have more control over the resulting opacity level, apply a fill of gray (try 20% to 50% gray).
stack an object to be used as a mask above one or more other objects. To that object, apply solid gray, a solid color, a gradient, or pattern fill, and keep it selected. Note: If you want to have more control over the resulting opacity level, apply a fill of gray (try 20% to 50% gray).
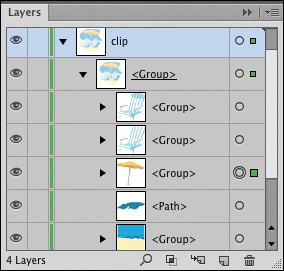
2. Via the Layers panel or the Selection tool, select the mask object and the objects to be masked.A
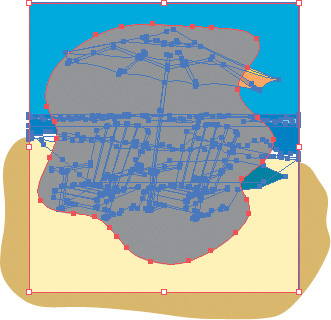
A We selected several objects, including an object containing 50% gray, which is on top, then clicked the Make Mask button. (The bottommost tan object wasn’t selected.)
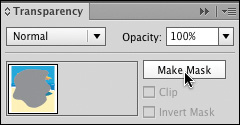
3. On the Transparency panel,![]() click Make Mask.B If you selected three or more objects, and they weren’t already in a group, Illustrator will put them into one. On the Layers panel, a dashed or solid underline will display below the Path or Group listing for the opacity mask.
click Make Mask.B If you selected three or more objects, and they weren’t already in a group, Illustrator will put them into one. On the Layers panel, a dashed or solid underline will display below the Path or Group listing for the opacity mask.


B Illustrator applied the grayscale value of the mask object (shown in the mask thumbnail) as an opacity value to the masked objects. (The underlying tan object remains visible because it isn’t in the mask.)
4. Optional: To stop the masking object from clipping the masked objects, uncheck Clip.C

C We unchecked the Clip option on the Transparency panel. The opacity mask is still in effect, except now areas of masked objects that extend beyond the mask are visible.
![]() To set a default so the Clip option is on for new opacity masks, check New Opacity Masks Are Clipping on the Transparency panel menu.
To set a default so the Clip option is on for new opacity masks, check New Opacity Masks Are Clipping on the Transparency panel menu.
Using a Gradient Fill as a Masking Object

A rectangle was drawn and filled with a gradient (Gradient panel, Type: Linear, Angle 86°). The objects were selected, then Make Mask was clicked on the Transparency panel.

The gradient is imposing a range of opacity values on the underlying objects, from the lightest opacity in the middle of the artwork through the darkest values at the top and bottom.
Editing masked artwork or the masking object in an opacity mask
To edit masked artwork in an opacity mask:
With the Selection tool,![]() click the masked artwork in the document. On the Transparency panel,
click the masked artwork in the document. On the Transparency panel,![]() click the left thumbnail,A then do either of the following:
click the left thumbnail,A then do either of the following:
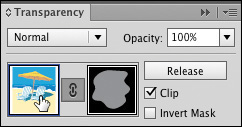
A To edit masked artwork, select it, then click the left thumbnail on the Transparency panel.
With the Selection tool,![]() double-click the masked artwork to put it into isolation mode. Edit any of the objects, then exit isolation mode. You can also add objects to the mask.
double-click the masked artwork to put it into isolation mode. Edit any of the objects, then exit isolation mode. You can also add objects to the mask.
On the Layers panel, click the selection square for one or more masked objects (or for the whole group, if any),B then apply edits.
B With the left thumbnail clicked on the Transparency panel, only the masked objects (not the masking object) are listed on the Layers panel.
![]() To disable a selected opacity mask temporarily, Shift-click the mask thumbnail on the Transparency panel (a red X appears on the thumbnail).C Repeat to re-enable the mask.
To disable a selected opacity mask temporarily, Shift-click the mask thumbnail on the Transparency panel (a red X appears on the thumbnail).C Repeat to re-enable the mask.
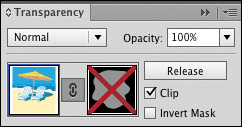
C This opacity mask is disabled.
To edit the masking object in an opacity mask:
1. With the Selection tool,![]() click the masked artwork in the document.
click the masked artwork in the document.
2. On the Transparency panel,![]() click the opacity mask thumbnail (on the right).
click the opacity mask thumbnail (on the right).
3. Select the masking object via the Selection tool or the Layers panel.A
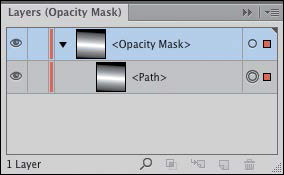
A When the mask thumbnail is clicked on the Transparency panel, only the masking object is listed on the Layers panel.
4. Edit any attribute of the object, such as its shape or fill, or for a gradient, edit its gradient settings.B Note that the actual fill of a masking object doesn’t display. You can also lower the opacity value of the masking object to alter the opacity of the masked artwork.
B If you select a masking object that contains a gradient, then click the Gradient tool, you can move or modify any of the stops on the annotator to control what opacity levels are applied to the masked artwork.
5. On the Transparency panel, click the left thumbnail.
![]() To display just the masking object in grayscale in the document, hold down Option/Alt and click the mask thumbnail on the Transparency panel. To redisplay the artwork in color, click the left thumbnail.
To display just the masking object in grayscale in the document, hold down Option/Alt and click the mask thumbnail on the Transparency panel. To redisplay the artwork in color, click the left thumbnail.
![]() To reposition one object in an opacity mask, drag it with the Direct Selection tool. To reposition all the masked objects separately from the masking object, click the artwork with the Selection tool, click the Link icon
To reposition one object in an opacity mask, drag it with the Direct Selection tool. To reposition all the masked objects separately from the masking object, click the artwork with the Selection tool, click the Link icon ![]() on the Transparency panel, then drag the artwork in the document. When you’re done, click the icon
on the Transparency panel, then drag the artwork in the document. When you’re done, click the icon ![]() to restore the link.
to restore the link.
To release an opacity mask:
1. Via the Selection tool or the Layers panel, select an opacity mask.
2. On the Transparency panel, click Release.
Using a Pattern Fill as a Masking Object
If you use an object that contains a pattern fill as a masking object, the artwork will be most visible below the lightest areas in the pattern. We recommend using a pattern that has strong light and dark color contrasts.

This is the original artwork.
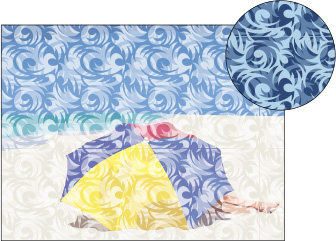
A rectangle containing a pattern was positioned over the artwork, then it was used as an opacity mask. (A sample of the pattern is shown in the upper right.)