
14. Appearances

In This Chapter
Applying appearance attributes
Hiding and deleting appearance attributes
Expanding appearance attributes
Appearance attributes consist of an object’s fill, stroke, effect, and transparency settings. In this chapter, you’ll learn how to use the Appearance panel ![]() to apply, edit, copy, and restack appearance attributes for a layer, sublayer, group, or object. You can create additional fill and stroke attributes to alter an object’s appearance, change its opacity or blending mode, or apply effects. When an object is selected, its attributes are listed on the panel.A–B
to apply, edit, copy, and restack appearance attributes for a layer, sublayer, group, or object. You can create additional fill and stroke attributes to alter an object’s appearance, change its opacity or blending mode, or apply effects. When an object is selected, its attributes are listed on the panel.A–B

A A circle is selected. Its attributes are listed on, and can be edited via, the Appearance panel (shown below).
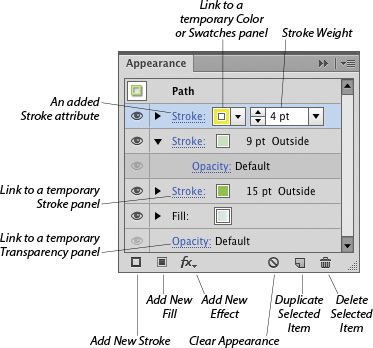
B This is the Appearance panel for the object shown in figure A.
Appearance attributes change how an object looks and prints, not its actual underlying path. You can save, close, and reopen a document, and the existing appearance attributes will remain editable and removable. Appearance attributes add speed and flexibility — but also some complexity — to object editing. When you’re finished with this chapter, be sure to continue with the next two chapters, which are closely related: Chapter 15 (Effects) and Chapter 16 (Graphic Styles).
Applying appearance attributes
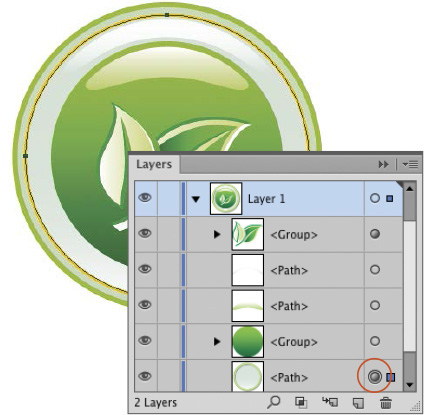
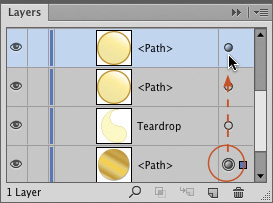
You can apply appearance attributes to individual objects one at a time, or you can target a whole top-level layer or group for appearance changes, in which case the attributes will apply to all the objects that are nested within the targeted layer or group. For example, if you target a layer and then change its opacity or blending mode, all the objects on that layer will adopt that opacity or blending mode. When an object has more than just the basic fill and stroke attributes, its listing on the Layers panel has a gray target circle.A
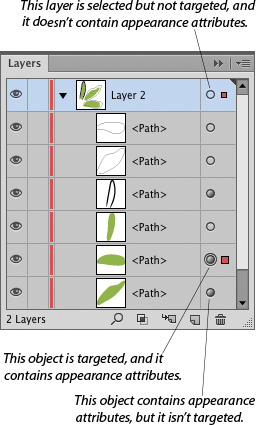
A Learn to “read” the three different states of the target circles on the Layers panel.
Appearance attributes can be modified or removed at any time, even after you save, close, and reopen your file. To edit an attribute, you simply retarget the object. Via convenient links and menus right on the Appearance panel, you can change an object’s fill color, stroke attributes, opacity, blending mode, or brush stroke, and apply effects.
To apply appearance attributes via in-panel links:
1. Do either of the following:
In the document window, select an object.B

B This is the original artwork.
On the Layers panel,![]() click the target circle
click the target circle ![]() for a layer, group, or object. A ring appears around the circle, signifying that it’s now an active target. If you click the target circle for a layer, all the objects on the layer will become selected, and the word “Layer” will appear at the top of the Appearance panel.
for a layer, group, or object. A ring appears around the circle, signifying that it’s now an active target. If you click the target circle for a layer, all the objects on the layer will become selected, and the word “Layer” will appear at the top of the Appearance panel.
2. Show the Appearance panel.![]()
3. For a targeted object, do any of the following:
Click the Stroke and/or Fill color listing, then click the color square to open a temporary Swatches panel or Shift-click the square to open a temporary Color panel (A). Choose a color.

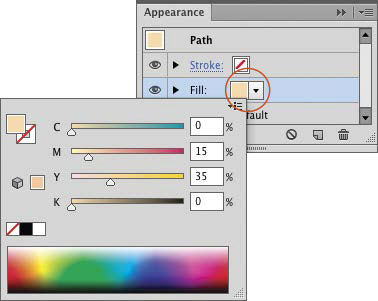
A We selected the root of the veggie, Shift-clicked the highlighted Fill color square on the Appearance panel, then chose a new fill color via the temporary Color panel (the carrot turned into a parsnip!).
To change other stroke attributes, click the underlined Stroke link, then choose a stroke weight, profile, or other settings on the temporary Stroke panel. To learn about the options on this panel, see pages 122–124 and page 166. Note: If the stroke has a variable width profile, an asterisk will display next to the stroke weight listing when that listing isn’t selected.
To apply a brush stroke, click a Stroke listing, then choose a brush from the Brushes panel or from the Brush Definition menu on the Control panel.
4. For a targeted object, group, or layer, do any of the following:
Click the Opacity link to open a temporary Transparency panel, then choose from the Blending Mode menu in the upper left corner and/or change the Opacity value.B (To learn about the Transparency panel, see Chapter 27.)

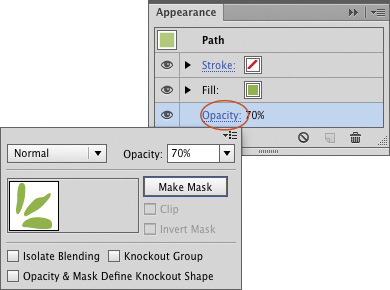
B We selected the three green objects, clicked the Opacity link on the Appearance panel, then lowered the opacity to 70%.
From the Add New Effect menu ![]() at the bottom of the panel, choose an Illustrator effect, such as one of the effects on the Distort & Transform or Stylize submenu. Choose settings in the dialog, then click OK. The chosen command will be listed on the Appearance panel. (To learn about effects, see the next chapter.)
at the bottom of the panel, choose an Illustrator effect, such as one of the effects on the Distort & Transform or Stylize submenu. Choose settings in the dialog, then click OK. The chosen command will be listed on the Appearance panel. (To learn about effects, see the next chapter.)
![]() To target multiple items, Cmd-click/Ctrl-click their target icons.
To target multiple items, Cmd-click/Ctrl-click their target icons.
To untarget an object, group, or layer:
Either Shift-click the gray target circle ![]() on the Layers panel or hold down Cmd/Ctrl and click a blank area of the artwork.
on the Layers panel or hold down Cmd/Ctrl and click a blank area of the artwork.
To choose default appearance settings for new objects:
If the New Art Has Basic Appearance command on the Appearance panel menu is on (has a check mark), subsequently created objects will have just one fill and one stroke, in the current colors. If this option is unchecked, the appearance attributes currently displaying on the panel will apply to any new objects you create.
Deciphering the Appearance panel
Depending on the entity (an object, group, or layer) that is currently targeted and the attributes it has, you may see one or more of these icons in the upper portion of the Appearance panel:
![]() For a layer or group (not an object), this icon
For a layer or group (not an object), this icon ![]() signifies that the item has an added stroke and/or fill attribute, and this icon
signifies that the item has an added stroke and/or fill attribute, and this icon ![]() signifies that it has transparency edits.
signifies that it has transparency edits.
![]() This icon
This icon ![]() indicates the entity contains effects.
indicates the entity contains effects.
The name for the currently targeted entity (e.g., Layer, Group,A Path B–C, Type, Symbol, Image) is listed in boldface at the top of the Appearance panel.

A When a group is targeted, the attributes that apply to the whole group are listed on the Appearance panel.
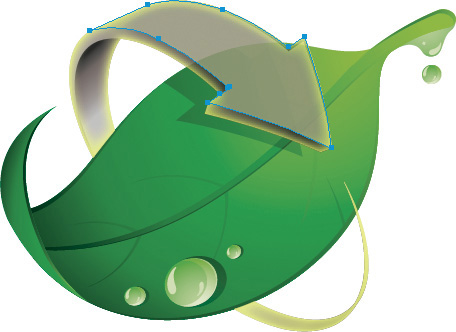
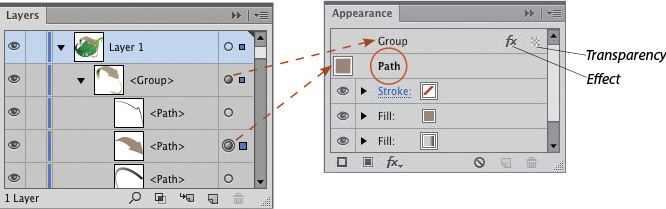
B The path we targeted is nested in a group, which has its own appearance attributes.
C The Appearance panel is listing the attributes for the path, and is also indicating that the group contains effects and nondefault transparency settings.
If you target an object that is nested within a layer and/or group to which appearance attributes have been applied, a “Layer” and/or “Group” listing will also appear above the individual entity (e.g., “Path”) listing on the Appearance panel.
If you target a layer or group, a “Contents” listing will also appear on the Appearance panel. Double-click the Contents listing to display Path attributes, click the Layer listing to display attributes that apply to the whole layer, or click the Group listing to display attributes that apply to the whole group. (Yup, this can be mighty confusing!)
Targeting Layers for Appearance Edits
Although both selecting and targeting cause objects to become selected in your document, they’re not interchangeable when it comes to whole layers:
![]() If you target a top-level layer by clicking its target circle and then apply appearance attributes (e.g., a fill color, an effect, or an opacity setting), those attributes will be applied to, and listed on, the Appearance panel for that layer, and the word “Layer” will appear at the top of the Appearance panel.
If you target a top-level layer by clicking its target circle and then apply appearance attributes (e.g., a fill color, an effect, or an opacity setting), those attributes will be applied to, and listed on, the Appearance panel for that layer, and the word “Layer” will appear at the top of the Appearance panel.
![]() If you click the selection area for a top-level layer instead of the target circle, then apply appearance attributes, those attributes will be applied separately to each object or group in that layer, not to the overall layer (they won’t be listed on the Appearance panel if you target the layer). To edit those attributes, you would need to target an object individually, not the top-level layer.
If you click the selection area for a top-level layer instead of the target circle, then apply appearance attributes, those attributes will be applied separately to each object or group in that layer, not to the overall layer (they won’t be listed on the Appearance panel if you target the layer). To edit those attributes, you would need to target an object individually, not the top-level layer.
Selecting and targeting do work interchangeably for objects and groups. If you click the selection area or target circle on the Layers panel for an object or group, that entity is both selected and targeted.
To apply multiple stroke or fill attributes:
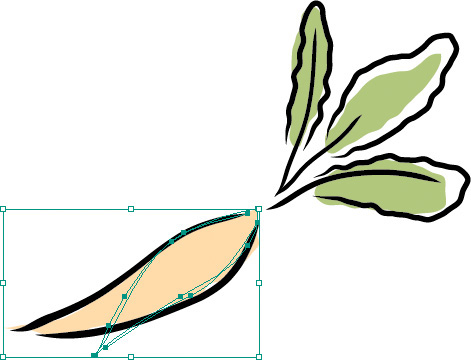
1. Target an object, group, or layer.A

A The targeted object (the outer circle) has a gray fill and a green stroke.
2. Do either of the following:
At the bottom of the Appearance panel, click the Add New Stroke button ![]() (Cmd-Option-/; Ctrl-Alt-/) B or the Add New Fill button
(Cmd-Option-/; Ctrl-Alt-/) B or the Add New Fill button ![]() (Cmd-/; Ctrl-/).
(Cmd-/; Ctrl-/).
B We clicked the Add New Stroke button.
Click a Stroke or Fill listing on the Appearance panel, then click the Duplicate Selected Item button ![]() at the bottom of the panel.
at the bottom of the panel.
3. A new Stroke or Fill listing appears on the panel. Click the new listing, then modify its attributes so it differs from the original one (or modify the original listing instead). Note: For multiple stroke attributes, make sure a narrower stroke is stacked above a wider one,C–D so the one on top doesn’t obscure those on the bottom. Similarly, for multiple Fill listings, lower the opacity (or change the blending mode) of the topmost one.
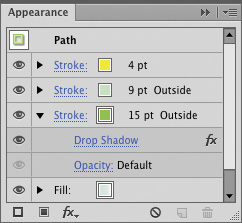
C We edited the attributes for all three of the Stroke listings. We made the bottommost stroke the widest of the three and applied a Drop Shadow effect to it.

D Our edits display in the object.
![]() You can drag a Stroke or Fill listing upward or downward on the panel. Be aware that this will change the object’s appearance in the document.
You can drag a Stroke or Fill listing upward or downward on the panel. Be aware that this will change the object’s appearance in the document.
![]() When you select an object that contains multiple stroke attributes, an alert icon
When you select an object that contains multiple stroke attributes, an alert icon ![]() may display next to its fill color on the Control panel. If you click the alert icon, the color for the topmost Stroke and/or Fill listing will display on the Control and Color panels.
may display next to its fill color on the Control panel. If you click the alert icon, the color for the topmost Stroke and/or Fill listing will display on the Control and Color panels.
Editing appearance attributes
You can use the same convenient in-panel links and menus on the Appearance panel to edit attributes that you used to apply them: the Stroke, Color, Swatches, and Transparency panels; the effect dialogs; and the Brush Definition menu.
To edit appearance attributes:
1. Do either of the following:
In the document, select an object that contains appearance attributes.
On the Layers panel,![]() click the target circle for a layer, group,A or object.
click the target circle for a layer, group,A or object.
A We targeted a path via the Layers panel.
2. On the Appearance panel,![]() click any existing appearance listing to open a related panel (or a dialog, in the case of an effect).B If there are multiple Fill or Stroke listings, be sure to click the one you want to modify.
click any existing appearance listing to open a related panel (or a dialog, in the case of an effect).B If there are multiple Fill or Stroke listings, be sure to click the one you want to modify.
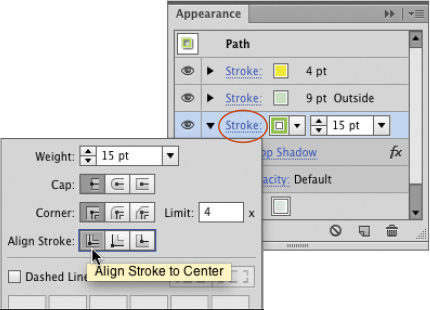
B We clicked the Stroke link on the Appearance panel, then clicked the Align Stroke to Center button.
3. Using links or menus on the Appearance panel, make the desired edits C (see steps 3–4 on pages 200–201). For example, to modify the setting for a stroke attribute, click the underlined Stroke link to open a temporary Stroke panel and choose options. If the object has a brush stroke, you can click a replacement brush on the Brush Definition menu or change the weight via the Stroke link.

C The new stroke alignment displays in the object.
![]() If you use the Brush Definition menu on the Appearance panel and then target or select a different object that doesn’t have a brush stroke, the Brush Definition menu will still display. To redisplay the stroke weight controls, deselect the Stroke listing, then reselect it. To learn more about brushes, see Chapter 23.
If you use the Brush Definition menu on the Appearance panel and then target or select a different object that doesn’t have a brush stroke, the Brush Definition menu will still display. To redisplay the stroke weight controls, deselect the Stroke listing, then reselect it. To learn more about brushes, see Chapter 23.
To add attributes to just an entity’s stroke or fill:
1. On the Layers panel,![]() click the target circle for a layer, group, or object.
click the target circle for a layer, group, or object.
2. On the Appearance panel,![]() click a Stroke or Fill listing, then click the expand arrow. Do any of the following:
click a Stroke or Fill listing, then click the expand arrow. Do any of the following:
Click the Opacity link to open a temporary Transparency panel, then change the opacity value and/or blending mode.
From the Add New Effect menu,![]() choose an effect, choose options, then click OK.
choose an effect, choose options, then click OK.
The newly applied attributes will be nested within the Stroke or Fill listing.
1. Target a layer, group,A or object.
A We targeted a group.
2. On the Appearance panel,![]() click in the visibility column to make the icon
click in the visibility column to make the icon ![]() and the targeted entity disappear B–C or reappear.
and the targeted entity disappear B–C or reappear.
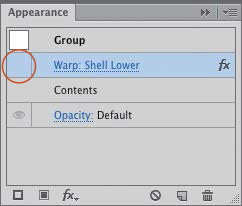
B On the Appearance panel, we clicked the visibility column for the Warp effect to hide that attribute.

C The Warp effect is now hidden, but we can redisplay it at any time.
To delete an appearance attribute:
1. Target a layer, group, or object.
2. On the Appearance panel,![]() click the attribute to be deleted, then click the Delete Selected Item button
click the attribute to be deleted, then click the Delete Selected Item button ![]() at the bottom of the panel.
at the bottom of the panel.
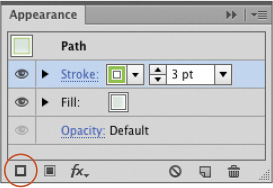
![]() The sole remaining fill and stroke appearance attributes can’t be removed. You can, however, click the Delete Selected Item button for either of those appearance attributes to apply a color of None.
The sole remaining fill and stroke appearance attributes can’t be removed. You can, however, click the Delete Selected Item button for either of those appearance attributes to apply a color of None.
![]() To remove a brush stroke from a stroke attribute, click the Stroke listing on the Appearance panel, then click the Basic brush on the Brush Definition menu.
To remove a brush stroke from a stroke attribute, click the Stroke listing on the Appearance panel, then click the Basic brush on the Brush Definition menu.
if you want to remove all but the basic appearance attributes from an individual object (using either of the commands discussed below), you need to target that object specifically. If you target a layer or group instead, the commands will remove only attributes that were applied to that layer or group, not attributes that were applied directly to objects nested within it.
To delete all the appearance attributes from an entity:
1. Target an object, layer, or group.
2. Do either of the following:
To remove all appearance attributes from the targeted entity and apply a stroke and fill of None, click the Clear Appearance button ![]() on the Appearance panel (for type, the fill color becomes black and any stroke color is removed).
on the Appearance panel (for type, the fill color becomes black and any stroke color is removed).
To remove all the appearance attributes except the entity’s original stroke and fill colors, choose Reduce to Basic Appearance from the Appearance panel menu.
Note: Regardless of which command you choose, all effects, brush strokes, and added fill and stroke attributes will be removed, and the transparency settings will be restored to a blending mode of Normal and an opacity setting of 100%.
Do either of the following:
On the Layers panel, Option-drag/Alt-drag the target circle from the item that contains the attributes you want to copy onto the target circle for another layer, group, or object.A
A To copy appearance attributes, either Option/Alt drag the target circle from one listing to another...
Choose the Selection tool (V), click an object that contains the attributes to be copied, then drag the square thumbnail from the upper left corner of the Appearance panel over an unselected object in the artwork.B–C (Note: If you don’t see the thumbnail, choose Show Thumbnail from the panel menu.)

B ...or drag the thumbnail from the Appearance panel over an object (note the plus sign in the pointer).

C The appearance attributes were copied to the object to which we dragged.
![]() To remove the appearance attributes from one item and apply them to another, drag a target circle from one layer, group, or object to another one without holding down any modifier keys.
To remove the appearance attributes from one item and apply them to another, drag a target circle from one layer, group, or object to another one without holding down any modifier keys.
![]() To select objects in a document based on their matching appearance attributes, select one of the objects, then choose Select > Same > Appearance.
To select objects in a document based on their matching appearance attributes, select one of the objects, then choose Select > Same > Appearance.
Expanding appearance attributes
When you expand an object’s appearance attributes, the paths that were used to create the attributes are converted into (dozens of!) separate objects, which can be edited individually. When exporting an Illustrator file to a non-Adobe application that can’t read appearance attributes, this command may be a necessity.
To expand an object’s appearance attributes:
1. Select an object that contains the appearance attributes to be expanded.
2. Choose Object > Expand Appearance. On the Layers panel, you will now see a new <Group> (or nested groups). The former effects or other attributes will become individual path and/or image listings. Even the former fill and stroke attributes will be listed as separate paths.