
CHAPTER THREE
Prepare to Conduct the Training
You have defined the need for training and have designed a training program to fit that need. Now, as you prepare to conduct the training, you face many new decisions, mostly about how you will present the material so as to achieve the success your program deserves. This chapter presents, first, the mechanics of preparation for conducting a training program, including consideration of the leadership role, establishing credibility, choosing the best teaching methods, and controlling for behavioral factors. Then, I follow up with pointed discussions of topics behind these matters of preparation, including some more sophisticated group techniques, how to make your lectures engrossing, and what best ways there are to sequence your presentation of ideas to the learners.
Be Prepared to Train Others
The term training is used when instructional experiences focus on individuals’ acquiring a skill. When training is to be designed and delivered, it requires leadership skills. Learners perceive at the start of a training program that the event is a structured setting, with an agenda and a set of learning objectives. The learners expect that the trainer will tell them when to begin, what to learn, how to proceed, and when the training session will end. The trainer automatically is identified as the group leader. However, if the trainer fails to fulfill the leadership role in the learners’ eyes, that trainer will be alienated from the group, leaving a vacuum for someone else to fill, presumably from the group. Therefore, it is important for the trainer to establish credibility within the first five minutes of the first session.
There are three basic trainer styles: authoritarian, laissez-faire, and democratic. Each style affects the learning process, encouraging some adult learners and discouraging others. At one extreme is the authoritarian style, whereby the trainer tends to dominate the learning process and the information flows in one direction, from the trainer to the learner. This style leaves little room for learners to interact with the trainer, and generally it limits learning.
At the other extreme is the laissez-faire style, whereby learners may feel that there is little direction to the training and that the learning experience is disorganized. The trainer might establish the focus for the conversation or topic, for example, and then allow the learners to control the direction, content, and flow of the exchange of information. The laissez-faire style of training may confuse learners and also inhibit the acquisition of skills and knowledge.
The democratic style offers a balanced approach. The trainer establishes a dialogue with the learners, and both trainer and learners have responsibility for exploring the topic. This approach allows for an interplay of personalities, and the instructional foundation is solid, with collaborative learning.
To assess your training style, take the quiz in Table 3-1.
Table 3-1. Self-assessment quiz of trainer style.
1. Consider a trainer you have observed or worked with: a. What were the trainer’s strengths? |
2. Consider the trainer interactions with the class: a. What did you learn from the trainer? |
3. Consider three trainings you have been involved in: a. For each one, consider the roles played by the trainer. |
The Leadership Role
There are a number of ways to assume leadership immediately when you open the beginning session:
1. Set the agenda, and stay on track.
2. Teach to the learning objectives.
3. Protect the rights of each learner.
4. Listen for understanding.
5. Summarize important topics and subtopics.
6. Review frequently to promote connections.
7. Focus the attention of the group on the subject at hand.
8. Manage any challenges to your authority.
9. Involve the silent members.
10. Provide opportunities for reflection.
11. Promote their asking questions.
12. Respect their silence.
13. Provide direction for the program.
14. Establish ground rules for the group meetings.
15. Develop a “parking lot” for handling off-the-topic questions.
There are numerous ways to assume the leadership role, but these 15 techniques are a good start. Let’s look at common elements among these techniques to be sure you include them in your training procedures.
The Agenda
The agenda is the contract you establish with your learners. That is, when learners come to the training, they want to know what they are going to learn, how they are going to learn it, and what requirements they need in order to complete the session. Your first responsibility as leader is to set the agenda and follow through on it. Specifically, you need to present the learning objectives and sequence of lessons as listed on the agenda. Remember, stick to the agenda. Learners will tolerate some deviations, but such changes from the stated course must be negotiated and agreed upon. As part of the agenda, you need to establish the administrative parameters: breaks, lunch, and beginning and ending times for the sessions.
The Learning Objectives
A credible trainer keeps the course on track, and that track leads to meeting the learning objectives. This task can be easy to do if you design the course to meet those learning objectives, you teach to the objectives, and you evaluate success by comparing achievement to the objectives.
Environmental Distractions
Always be on guard for both internal and external distractions. Outside distractions are the main reason new training facilities are designed windowless. If your training room has windows, arrange the learning space so that the learners can’t see anything going on outside, if possible. Internal discussions can be frustrating, too. Poor seating, inadequate lighting, uncomfortable room temperature, poor visibility of the media equipment, odd noises, and strong smells can contribute to learners’ being unhappy and distracted. Consider the following when evaluating your training environment:
![]() Seating—Are there adequate desks, tables, and comfortable chairs?
Seating—Are there adequate desks, tables, and comfortable chairs?
![]() Lighting—Is it too light or too dim?
Lighting—Is it too light or too dim?
![]() Temperature—Is it too hot or too cold (keep learners from changing the thermostat)?
Temperature—Is it too hot or too cold (keep learners from changing the thermostat)?
![]() Arrangement—Can everyone see, have a place to work, and have enough materials?
Arrangement—Can everyone see, have a place to work, and have enough materials?
![]() Schedule—Have you scheduled at least one break in the morning and one in the afternoon (ideal would be one break after every 90 minutes of training)?
Schedule—Have you scheduled at least one break in the morning and one in the afternoon (ideal would be one break after every 90 minutes of training)?
![]() Windows—Can you shut the windows and blinds to minimize glare and distractions?
Windows—Can you shut the windows and blinds to minimize glare and distractions?
The Trainer Role
The most important, most visible role of the trainer is to deliver the training. A trainer should be good at organizing and providing accurate information in a way that holds the attention of the audience.
Training is more than just standing up in front of people and presenting information. Individuals attend training sessions to acquire new job skills and knowledge. They want to learn about new resources and new technologies and to observe new ways of doing their job. They also want to network among fellow workers and meet new people. In all training situations, the facilitator has a diverse role that cuts across three distinct responsibilities: subject-matter expert, method expert, and group manager.
Subject-Matter Expert
The learners expect trainers to know something about the subject they are teaching, so the more you know and the better you communicate that knowledge, the greater your credibility increases. Keeping informed is an important part of your professional development, and being current in your training practice is essential.
Of course, nobody can be a complete book of knowledge. If you don’t know something, admit it. Be truthful. Recognize any expertise in the group, and call upon it when appropriate. Also, if you are teaching a specialized subject, consider bringing in an expert for a group chat; the expert can offer particular knowledge, and learners will appreciate a change in teaching style, which is often beneficial. One cautionary note, though: do not create such an aura of expertise that you become unapproachable. Credible experts with the human touch are far more respected than aloof ones. The best way to acquire the human touch is to be natural.
Method Expert
There are numerous instructional methods available, and trainers should be familiar with most, and feel comfortable and competent with a few. Part of your responsibility is to exercise sound judgment, choosing the best and most appropriate method for meeting your learners’ needs and accommodating the learning preferences of the group.
Becoming increasingly proficient with a variety of instructional methods should be a constant goal and part of your professional development. Watch other trainers, and learn from them. Take occasional risks, and be open to experimenting. As in all walks of life, it is only when we take a few risks that growth and development occur.
Group Manager
Facilitation skills are most obvious when the trainer is acting as group manager. Trainers require a high level of interpersonal skills to manage (not control) a group, for they are serving as motivators and counselors, according to the situation.
Be sensitive to the atmosphere in the group and people’s moods; notice the individuals, too. Part of your role is to analyze individuals as well as the group, so you’ll need some understanding of the concepts of group process and psychology.
The Trainer Characteristics
As a trainer, you need to have a sense of purpose and understanding of your role. As a facilitator, you realize you are not the center of the discussion; you manage the conversation, making sure that everyone stays on topic and that remains specific to the learning objectives. As a trainer, you are organized, know your material, and are respectful of time. You are fair, open-minded, and thoughtful, making sure that each learner has an opportunity to learn the material you provide. You listen, engage others, and ensure that the information is accurate, delivered in the most efficient and effective way for all the learners.
Being Fair
As leader, you treat all the learners equally, with respect. You establish yourself at the outset as honest, fair, and available to all. You don’t accept abusive language or tolerate disrespect of your role or of others in the group, and you don’t let one individual dominate. Finally, you do not let learners become scapegoats, for your own or others’ failings.
Listening Well
Active listening is a difficult skill to master; it takes practice. Remember, you cannot hear what someone is saying while you are speaking. Listen more, and you will learn more from others. Listen to what they say, and respect their input.
To become a better listener, practice these three active-listening skills:
1. Listen to summarize. When learners are speaking to you, focus on the content and context of their message—what they are saying and how they are saying it. For example, determine what their feelings or intentions are by bringing up the subject.
2. Check for understanding. When you lose track of the message, ask for clarification. For example, summarize what you have heard or share your reflections on what you thought you understood.
3. Offer feedback. When responding in turn, determine if the person has heard what you said by soliciting a response.
Practicing the art of active listening provides an opportunity for you to “listen to hear.” During every training session, focus on your communication pattern, be aware of the process, and use active-listening techniques to interact with the learners. Remember to mentally summarize what is being said, check for understanding, paraphrase to show your understanding, and provide appropriate feedback.
Answering Questions from Learners
Questions from learners can be used to facilitate learning, clarify points, and provide additional information. You can use these questions also to initiate a forum for discussion; and if you create a climate for the open exchange of ideas, you will be asked questions almost as often as you ask them of the learners. Here are five steps for handling questions from the learners.
1. Listen to the question being asked.
2. Acknowledge the question.
3. Ask for clarification, if necessary.
4. Answer the question.
5. Verify that your answer is acceptable.
When you follow this process for guiding the direction of learners’ questions, you stay focused on the topic at hand and answer the question directly. If someone asks a question that puts you on the spot, remain neutral and say something like, “That’s interesting.” This response conveys your interest, yet keeps you from talking aimlessly. Once you have listened and clarified the question, you can answer it and then verify that you have addressed the matter sufficiently.
Using Questions to Facilitate
The ability to design a question that facilitates the training process is a talent that takes time to develop. Good questions are an opportunity to get the group moving and involved. They also help you determine where the learners stand on an issue and how much they already know. You can use questions to draw out reticent learners, as well.
Well-phrased questions can clarify points, focus a training session, and move a discussion along. By asking questions, you provide an opportunity for learners to take responsibility for their learning and a chance for them to help others in mastering the new tasks.
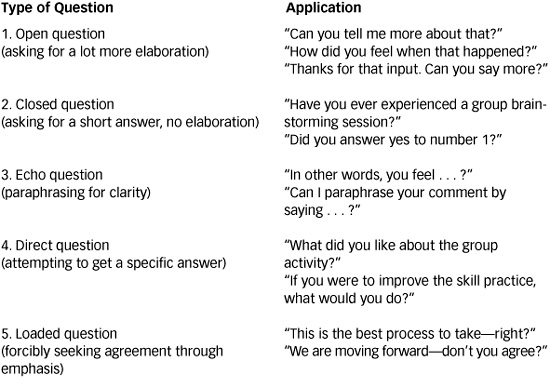
There are seven types of facilitation questions that you can use in your training. Table 3-2 shows each type and provides examples.
Table 3-2. Seven types of facilitation questions.
Responding Appropriately
A critical task for the trainer is getting individuals to participate in the training. The learners expect that you will keep them engaged and teach them something they can apply on the job. They look to you to teach, manage the classroom, and take care of the administrative matters with ease and efficiency. If they recognize your leadership, they will buy into the learning experience.
Nevertheless, there may be occasional challenges to your leadership. If you get challenged, guard against getting defensive. Here are some guidelines for handling a difficult situation.
![]() Greet the challenge openly, with a smile. Walk toward the challenger (never walk away or stand behind something, which would signal that you want to hide).
Greet the challenge openly, with a smile. Walk toward the challenger (never walk away or stand behind something, which would signal that you want to hide).
![]() Ask for clarification, or state your understanding of the matter.
Ask for clarification, or state your understanding of the matter.
![]() If the issue is a genuine one, allow the person to provide specifics.
If the issue is a genuine one, allow the person to provide specifics.
![]() Conclude with some resolution (even if it means that you say you will have an answer tomorrow, or when you check things out—just provide some deadline).
Conclude with some resolution (even if it means that you say you will have an answer tomorrow, or when you check things out—just provide some deadline).
![]() When the challenger and others are relaxed, move on to the next sequence of the training.
When the challenger and others are relaxed, move on to the next sequence of the training.
Five-Star Credibility
The initial question learners will ask about you is, “Who are you?” They have signed up for the training, and they need to trust you and identify with your knowledge. When you begin your session, think about the three questions that learners probably have on their minds during the first 10 minutes of any training program:
1. Can I identify with her/him?
2. Is he/she knowledgeable?
3. Can I trust him/her to be right?
Given these three questions, you need to settle just who you are in this relationship.
Here’s how to start. Use what they already know about you and the training from the brochure that describes the program and you. Acknowledge the value of what they will be learning and its importance to their professional and personal development. Ask them for their input about the learning objectives, and then conduct a brief, on-the-spot audience needs assessment. Write the responses on chart paper, identifying each topic with the learner’s name. Review the list, and respond by organizing the topics into major categories. Explain how the course will be conducted to meet some of these needs. If there are topics on the list that are not going to be covered, talk about why that is. Don’t ignore the issue.
Next, build a mental bridge for the learners by focusing on the topics that will be covered. Determine what is known and unknown among the group, and illustrate how the new information will fit with their existing knowledge.
Components of Credibility
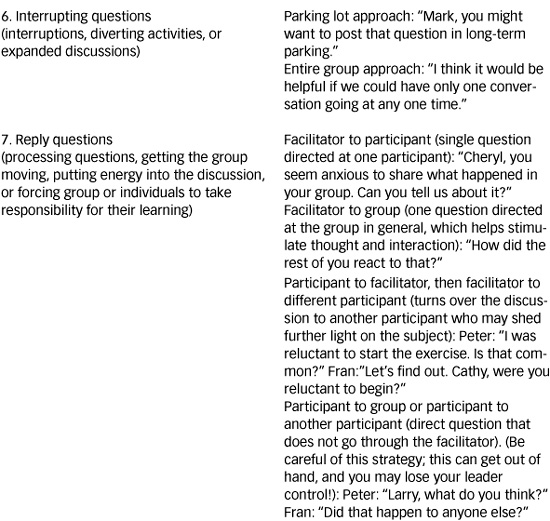
An important aspect of effective training is your personal style—the “This is me!” element. One of the best ways to establish your identity and your credibility is to present yourself in a frame of “Five-Star Personal Credibility.” This model (see Figure 3-1) consists of five points on a star, which represent parts of your persona that the learners will observe.
Below, I discuss each of these points and show their importance in establishing your credibility. It is important that you examine each and consider situations where you have successfully displayed all five at the same time. The model should become part of your natural human spirit, so that each time you conduct a training session, you convey this positive image.
Figure 3-1. Five-star credibility model.
1. Character. You act as a role model. You are ethical, and you have integrity. You set the good example by avoiding gossip and negative discussions about the organization, its executives, managers, or trainees.
2. Personality. You know yourself, laugh at yourself, maintain a positive attitude, and display empathy for others.
3. Competence. You have the knowledge, expertise, and experience to offer the training. You have good presentation and facilitation skills.
4. Intention. You display motivation and make it obvious to others why you want to be there.
5. Dynamism. You show and have self-confidence; your charisma attracts others.
Phases of Credibility
A training program has specific points at which different aspects of credibility will emerge. These points can be viewed as three distinct phases in the program. Although they appear to be simple to manage, remember that training is a partnership, a process, so you make conscious attempts at certain points, such as the words you choose to use and the way you explain things. Remember at all times, however, to appear natural, and the instruction will also flow naturally. The three phases of training credibility are:
1. Initial Credibility. This occurs even before the training begins, and is based on the organization’s reputation, the trainer’s reputation, and anything else that learners have heard about the course or about you.
2. Derived Credibility. This occurs during the training. The learners continually evaluate you and the information you are providing. Your credibility can either increase or decrease during this training.
3. Terminal Credibility. This occurs after the training is completed, and it is based on what the learners have seen, heard, experienced, and taken away from the session.
Folk Wisdoms and Credibility
Trainers often exchange tips and pass along what some term “folk wisdom.” The folk wisdom that I remember best is about credibility: learners evaluate their trainers in the first 60 seconds of the session.
So, how do you make a positive first impression? You provide a short welcome. In your welcome statement, you briefly state the topics to be covered, you explain why you are the trainer, and you offer something that might motivate them to learn from you—some “benefit” they may gain that suggests the journey you are taking together is worthwhile. One of my favorite opening statements is a guarantee statement. I say, “If you participate, you will be able to apply 80 percent of what you learn immediately.”
The Recipe for Trainer Success: Preparation
The secret for successful training is good preparation, including how you plan, conduct, and manage the sessions. You can apply this recipe to any length training or any topic. Preparation provides the basic ingredients for establishing a well-balanced event that will ensure success.
Taking our metaphor of a recipe further, let’s look at the ingredients list:
1 well-written program
2 parts subject-matter knowledge
3 parts program preparation
4 parts confidence
1 great opening
6 practice sessions with training aids
1 great summary and closing
Put all ingredients in a large bowl, and mix thoroughly. Repeat, practicing several times until the training begins. Review the recipe after the event, and make modifications, if necessary.
Preparing for your training is the best defense against the unmanageable. With careful preparation, you can reduce your down time and optimize the training time. There are four steps to organizing your training: plan the training, know the audience and venue, select the materials and format, and organize and present. Let’s consider each in turn.
Step 1: Plan the Training
The first step is the most essential and the most time-consuming. Planning requires establishing the topic and subtopic areas, understanding the audience’s needs, sequencing the topics for logical and easy learning, and building these into your training.
To begin, determine the purpose of the training. Trainers often confuse purpose with objective, so it is important to understand the difference. The purpose of the training is a single, broadly stated goal, the one result you want your delivery to achieve. In contrast, the objective is a description of specific steps you need to take or achieve in accomplishing a task.
Next, you think of your purpose in terms of the audience. Remember that your purpose is to effect a change; you want your audience to think and behave differently, or to have acquired new knowledge as a result of your training. So, you determine the purpose on the basis of your training needs assessment. The following are examples of training purposes:
![]() Teach newly promoted managers how to be effective in their new roles.
Teach newly promoted managers how to be effective in their new roles.
![]() Show technicians how to service the organization’s computers.
Show technicians how to service the organization’s computers.
![]() Illustrate how sales staff can improve customer relations.
Illustrate how sales staff can improve customer relations.
![]() Demonstrate the computerized reservation system to new travel agents.
Demonstrate the computerized reservation system to new travel agents.
The training event begins when the first individuals register for the program, so when planning and organizing, keep in mind the prospective learners. A majority of them will suffer some fear of the unknown; they may be concerned about what is expected of them during the training, worry whether there will be tests involved, or if they will like the other learners. Likewise, they will wonder if the training material will be easy to use, if they will have fun learning, and if they will learn something to take back to the job.
One of your first tasks in your introduction to the training is to speak to those fears. You’ll also keep these fears in mind when you plan the setup of the training room. You’ll arrange the room so that it appears to be a comfortable, organized space that will energize the learners. (There’s more about venue later in this chapter.)
There are instructional strategies and techniques that can make your training exciting, so don’t be afraid to use them, and don’t reserve them for a special day. (That opportunity to train on the topic might not come again, and you can always create new, exciting things if it does.) Your planning at this early stage should include fun for you and the learners. Get some props or wear a costume!
Delivery is important to successful training, so think about how you can show your “stuff.” Plan opportunities to make your training more interesting—and thereby make the information stick!
Step 2: Know the Audience and Venue
As part of your preparation, you need information about two essential elements: the audience and the physical setting.
The Audience Personality
Every audience, even a training group, has a single definite personality, even though the group is made up of individual personalities. You will need to sense both the individual and the group characteristics of your learners. Listed below are many questions you can ask to learn about your audience:
The Audience’s Makeup
![]() What are their job titles and functions?
What are their job titles and functions?
![]() Are they managers, teachers, or physicians?
Are they managers, teachers, or physicians?
![]() Are they parents, young adults, men, women, or older adults?
Are they parents, young adults, men, women, or older adults?
Their Knowledge of the Topic
![]() What do they know?
What do they know?
![]() Have they undergone similar trainings?
Have they undergone similar trainings?
![]() Is this topic new to them?
Is this topic new to them?
![]() What is important for them to learn?
What is important for them to learn?
![]() What do they need to know?
What do they need to know?
![]() Are they coming for general knowledge or for specific skills?
Are they coming for general knowledge or for specific skills?
![]() If they are coming to learn specific skills, what kind of skills (e.g., job, personal, career, coping)?
If they are coming to learn specific skills, what kind of skills (e.g., job, personal, career, coping)?
![]() What is not important for them to learn?
What is not important for them to learn?
![]() What do they not need to know?
What do they not need to know?
![]() How much do they already know about the subject?
How much do they already know about the subject?
![]() What will they consider superfluous or boring?
What will they consider superfluous or boring?
Their Sensitivities
![]() What should you risk talking about?
What should you risk talking about?
![]() What kinds of backgrounds do they have?
What kinds of backgrounds do they have?
![]() Is there anything in your background that you could share?
Is there anything in your background that you could share?
![]() What topics might insult their beliefs or their intelligence?
What topics might insult their beliefs or their intelligence?
![]() What are their feelings about coming to this training?
What are their feelings about coming to this training?
![]() How can you build credibility with them?
How can you build credibility with them?
External Issues
![]() Is the time of day convenient for them?
Is the time of day convenient for them?
![]() What kind of atmosphere are they used to?
What kind of atmosphere are they used to?
![]() Will the attendees be in a rush to leave at the end?
Will the attendees be in a rush to leave at the end?
![]() Will they be drifting in and out during the training?
Will they be drifting in and out during the training?
![]() Will they be eager to learn, or will they be skeptical about the training?
Will they be eager to learn, or will they be skeptical about the training?
![]() What will they be interested in learning?
What will they be interested in learning?
![]() Who is paying for them to attend, and how does that impact their motivation?
Who is paying for them to attend, and how does that impact their motivation?
As you take the steps of preparing the training, always keep your audience in mind. Primary, here, is determining the audience’s level of knowledge. Some learners may know more than you do about particular points, whereas others may not know enough to follow the training.
An audience’s knowledge falls into the following five categories:
1. No knowledge
2. Below average knowledge
3. Average knowledge
4. Above average knowledge
5. Expert
Once you have a grasp of the audience’s level of knowledge, you can make informed decisions about your delivery strategy. You have two choices: (1) For an informal or general presentation, you can aim for the average level of knowledge. (2) For specific skills training, you should ask the sponsor of the training, “In which of the five categories does the discerning mind sit?” If you miss by more than one category, you will not accomplish your training objectives.
If you are unsure about the audience’s level of knowledge, be careful not to underestimate the audience’s intelligence. Likewise, do not overestimate the audience’s knowledge and experience. Remember, part of knowing your audience is understanding that the audience members want you to succeed.
Gathering information about an audience is a critical step in the design and delivery of an effective training program. To determine how the audience will learn best, you should consider a broad range of factors when assessing the audience’s learning preferences. There is no one assessment of learning styles that all educators, researchers, or trainers agree is most effective; however, most agree that individuals learn differently. So, to create a training program that will appeal to all learners, consider how learning occurs.
Stated simply, learners initially observe that something is happening, then they reflect on what they have just observed, and they then apply their own meaning to that observation. Individual preferences come in when the learner tries to give that meaning to the observation. Expressed intellectually, we say that the learners are building a theory—their own theory of how this new information might work with something they already know, or fit what they perceive as new information with something that they already know. How well that application is made is determined largely by how easy people find the process. Learning differences owing to different learning styles and levels of learning maturity exist all of the time during training. Be sensitive to individual needs and aware of the audience’s various levels and abilities.
The Venue Challenges
The configuration of the room in which you will be training affects your training success. Therefore, part of your preparation is to see your classroom, its size, and its shape. This will allow you to determine how to arrange the room and set up the seating. If you fail to check the training room arrangements before starting the event, you will quickly learn that you have left yourself open for trouble. Ideally, you should check to see that everything is in place before the first participant arrives. It is always a little troubling when early arrivals find you rushing around to put things in order. Use a checklist to make sure that you have everything ready.
Step 3: Select Materials and Format
Once you know your audience and the physical surroundings, you are in a position to select the most appropriate materials and format for your training. Again, consider the participants in relation to the content.
Participant Overview
When determining the format for your training, you need to address the following four critical elements:
1. Learning is content based. One of the principles of adult learning theory is that adults learn nothing new. They merely sort and fit the concepts presented in the training into their existing knowledge base.
2. Motivation can be encouraged. You do not have the power to motivate anyone to learn. However, you can create environments and opportunities for people to learn by making the training immediately applicable to the job or by ensuring that the training contributes to their personal and professional growth.
3. Responsibility is shared. It is your job to help participants share the responsibility for what they are about to learn.
4. Learning needs structure. In general, people learn by seeing, listening, or doing. Regardless of your learners’ learning preferences, all of them learn best when there is a structured lesson plan.
Content Overview
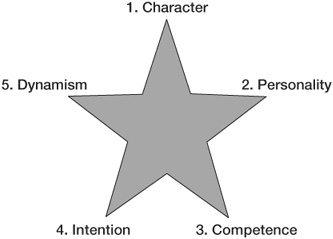
The content of your training program is the information, knowledge, or skills you will impart. When deciding how to develop that content, consider whether the presentation should focus on the trainer (known as a trainer-centered presentation) or on those being trained (trainee-centered presentation). In making this decision, consider the learning outcome, the simplicity or complexity of the content, your skill level as a trainer, and the participants’ level of learning.
Table 3-3 displays formats for trainings, according to the focus of the presentation. The left-hand column shows trainer-centered formats, in which the trainer is responsible for the presentation of information or is the lecturer. The right-hand column shows trainee-centered formats, which include contract learning, computer-based learning, and programmed instruction. These formats provide the opportunity for learners to assert their control over the content they are to master, and these formats let them decide the parameters for learning, including the time, place, and pace that suit their needs. The middle column shows formats that provide blended learning experiences, in which learners and trainer take equal roles and assume equal responsibility for the learning process.
Table 3-3. Training formats to match presentations.
How do you “collect” content? One easy way to begin is by jotting down ideas as soon as you know you are going to give a training program. To generate more ideas, use brainstorming techniques, in which you write down anything that comes to mind, regardless of its practicality. Remember that, at this point, you are simply collecting content; you will not need to use every note but merely the best of the ridiculous or possible you have generated.
Trust yourself to know what content is best. That way you’ll get out of your own way as you gather ideas by not judging those ideas prematurely. You are the authority on your subject, even if others don’t recognize you as such. By virtue of your own experience, you are qualified to speak about experiences and events in your personal and professional life. Weave these experiences and events into your delivery in order to make points, expand on issues, or use as examples. In doing so, you will put yourself and your audience at ease. In fact, as you collect and select ideas, remember that this is merely a conversation with your equals—which is what training is.
If, after reviewing your notes, you believe your idea generation is a bit weaker than you would like, you can gather additional ideas through literature searches, personal observations, experiments, surveys, and interviews. Unless your subject matter is scholarly or extremely technical, you can probably find all of the content you need in books, magazines, and technical manuals.
Step 4: Organize the Presentation
There are numerous ways to organize the content and ideas you have collected and selected. One of the easiest is to write the purpose of the training (see “Step 1: Plan the Presentation” at the beginning of this chapter) in large letters on a piece of paper and tape it to the wall in front of you. Then, you can create a mental picture of the audience you have identified. You proceed to select the type of training and the method of delivery.
Select the Training Type
Most training programs have one of two basic purposes: to present information or to develop a skill. Therefore, there are two types of training sessions: information oriented (theory) and skill related. The information-oriented presentation, or theory session, stresses ideas, whereas the skill-related presentation stresses mastery of a particular skill. Often, the training topic will dictate which model applies. However, sometimes the training topic is ambiguous, so the trainer needs to consider applying either or both models.
Assume that you were asked to train employees on how to fill out a new form. By reviewing the form, you can obtain a clearer understanding of which model to use. For instance, do the participants need to learn only how to complete the form? Or must the participants also understand the reason that the new form is required and how that form relates to work processes or communication? If the objective is for them to fill out the form correctly and understand the form’s role in the work processes, then you might need to combine a theory session, in which you explain the role of the form, with a skill session, in which you show how to complete the form.
Assume you will begin with a theory session, because trainers often precede a skill session with a theory session, during which they present background information about the skill. The theory session model, as Figure 3-2 shows, usually consists of three segments: introduction, body, and conclusion. First, divide your presentation into these segments, each of which may be relatively independent of one another or may build sequentially upon the others. Either way, each segment needs its own objective.
Figure 3-2. Theory session model.
![]()
If you are creating a skill session, it will consist of the same three segments as for the theory session. However, the body will not include theory (only activity and test) because it is more important for participants to understand how to perform an activity than to know the theory behind why it is done. (This will be discussed in more detail in Chapter 5.)
Select Method of Delivery
When thinking about how you will deliver your training, remember, again, that you are holding a conversation with your audience. Although at first you might think it would be easier—or at least less frightening— to read or memorize your presentation, if you do you will not be engaged in conversation. Imagine the times you have interrupted a direct telephone marketer to ask a question, and the person on the other end does not know what to do. Imagine yourself as that person in the audience if you were to deliver your training by reading or memorizing it.
Read or memorized presentations often sound artificial, and they create an unwanted distance between the presenter and the audience. Because you want to effect a change in behavior, you do not want to run the risk of losing your audience. Of course, it can be helpful to memorize certain sections—for example, the introduction and the conclusion. But remember that a read or memorized presentation leaves little room for spontaneity, or for responding to your audience. In fact, by reading or delivering a memorized presentation, you may be insulting your audience. If that weren’t enough to discourage you from reading or memorizing, then think about this: You need to practice long and hard to read well—much longer than practicing presenting material as a conversation.
If you are most comfortable reading a presentation, however, use colored pens to indicate some of the following in your script:
![]() Slash marks to represent places to pause
Slash marks to represent places to pause
![]() Underlined statements for emphasis
Underlined statements for emphasis
![]() Enlarged punctuation marks for exclamation or questions
Enlarged punctuation marks for exclamation or questions
Also, box in the passages that you plan to memorize, so that you can look up at your audience when you deliver them. In fact, think of memorization as another form of reading—reading from within. Rather than looking at notes, you search your brain for the content you have prepared. That’s why memorization suffers from the same disadvantages as reading, especially the inability to maintain eye contact with the participants—your eyes are looking inward, not out to the audience.
By far, extemporaneous delivery is best, with the following advantages:
![]() It allows you to adapt to a variety of circumstances.
It allows you to adapt to a variety of circumstances.
![]() It encourages audience involvement and interaction.
It encourages audience involvement and interaction.
![]() It projects spontaneity and enthusiasm, regardless of how often you have delivered the same training.
It projects spontaneity and enthusiasm, regardless of how often you have delivered the same training.
![]() It injects interest and enthusiasm into your presentation.
It injects interest and enthusiasm into your presentation.
For good extemporaneous delivery, you must plan and rehearse, as well as write the presentation. Though you do not bring your script, you do bring your notes to serve as a reminder of the introduction and conclusion, your key statistics, and any catch words and phrases that will help you make your points.
Use Visual Aids
Incorporate visual aids into your training. They have several benefits. They:
![]() Arouse interest
Arouse interest
![]() Encourage participation
Encourage participation
![]() Prevent misunderstanding
Prevent misunderstanding
![]() Persuade
Persuade
![]() Focus attention
Focus attention
![]() Save time
Save time
![]() Reinforce ideas
Reinforce ideas
![]() Add humor
Add humor
![]() Enhance credibility
Enhance credibility
![]() Explain the inaccessible
Explain the inaccessible
Visual materials supplement your presentation. Do not use visual materials as a script; rather, use them as a checklist of key ideas that you will explain, expand upon, and emphasize. The following are key types of visual aids:
Charts. Charts can be configured as words, as an organizational structure, as a pie, or as a series of sheets of paper. Word charts are lists and tables that you can prepare quickly. When creating word charts, use the seven-seven rule: limit lines of type to seven; limit words per line to seven. Organization charts are useful to explain processes and operations. Pie charts show percentage distribution, with the circle or pie presenting the whole and the segments. When using pie charts, make sure everyone in the audience can see the smallest part. Also, consider different colors for the segments you want to emphasize. Flip charts are large blank pads of paper, bound at the top. Use these charts with the adhesive on the back to stick to the wall—no more looking for tape to hang charts!
Cutaways. Cutaways are pictures that show the interior composition of an object, in three dimensions; these help clarify spatial relationships.
Maps. Maps should be simple enough to include only the specific features of land or sea that serve the purpose of the presentation.
Graphs. Several types of graphs are used commonly. Line graphs show how related sets of facts change according to a common measure of reference, usually time. Profile graphs present the same sort of information using shading or coloring. Bar graphs compare two facts, but do not show how they change over time.
Projected Visual Aids. Computer-generated slides projected from laptop computers are fast becoming the norm for presentations. Here are some rules to follow: Illustrate one idea only per slide, use only 15 words per slide, make sure the letters are legible, keep the content simple, use color whenever possible, and use several consecutive slides to explain complex information.
With regard to projected visual aids, you’ll find that most facilities have overhead projectors on hand. Consider using overhead projection when you want to show texts and photos (your daily newspaper often contains the very item that will enhance your presentation; also, check books and magazines) or cartoons (use cartoons carefully to make sure they do not offend any member of the audience; you can turn an ordinary photograph into a cartoon by adding an incongruous caption).
Models, Mockups, and Props. These types of visual aids have high-impact value, but often can be expensive and time-consuming to prepare. The biggest advantage to using models, mockups, and props is that they add realism to your presentation because of their three dimensions.
For the most effective use of any visual aid, keep in mind the following points:
![]() Size and Visibility. The visual aid must be large enough so everyone in the audience can see it clearly and read it easily. Audiences find visual aids that they cannot see annoying and distracting. Instead of paying attention to what the visual aid is communicating, audience members are desperately contorting themselves so as to see the image. To make your visual aids large enough so everyone can see them, you need to know the physical setting in which the training will take place. If you can, experiment with the visual aids in the actual room in which you will be delivering your presentation.
Size and Visibility. The visual aid must be large enough so everyone in the audience can see it clearly and read it easily. Audiences find visual aids that they cannot see annoying and distracting. Instead of paying attention to what the visual aid is communicating, audience members are desperately contorting themselves so as to see the image. To make your visual aids large enough so everyone can see them, you need to know the physical setting in which the training will take place. If you can, experiment with the visual aids in the actual room in which you will be delivering your presentation.
![]() Details. Details that are not essential to your point can detract from your presentation, cluttering the visual aid. Unless decoration is the point you are trying to make, do not be decorative.
Details. Details that are not essential to your point can detract from your presentation, cluttering the visual aid. Unless decoration is the point you are trying to make, do not be decorative.
![]() Precision. Make sure your visual aids are neat and precise. Sloppy or careless visual aids reflect poorly on you as a trainer.
Precision. Make sure your visual aids are neat and precise. Sloppy or careless visual aids reflect poorly on you as a trainer.
![]() Focus. Remember to keep your eyes on the audience, not on the visual aids, as you speak. The trainees’ eyes will be on the visual aids.
Focus. Remember to keep your eyes on the audience, not on the visual aids, as you speak. The trainees’ eyes will be on the visual aids.
![]() Introduction. Every visual aid needs to be put into context. First state what the visual aid is intended to show and then point out its main features.
Introduction. Every visual aid needs to be put into context. First state what the visual aid is intended to show and then point out its main features.
![]() Planning. Incorporate your visual aids into your script, and rehearse your discussion of them exactly as you plan to present them. Do not show a visual aid until you are ready to talk about it, and as soon as you are finished talking about it, remove it from sight.
Planning. Incorporate your visual aids into your script, and rehearse your discussion of them exactly as you plan to present them. Do not show a visual aid until you are ready to talk about it, and as soon as you are finished talking about it, remove it from sight.
Perhaps the most important reason to use visual materials is that people learn more easily through sight than through any other sense. Visual materials help people retain what they learn, as well. As Table 3-4 shows, people retain information longer when the presentation is both show and tell. You can help your audience retain what you present by adhering to the KISS and KILL principles:
![]() KISS: Keep It Simple and Succinct
KISS: Keep It Simple and Succinct
![]() KILL: Keep It Legible and Large
KILL: Keep It Legible and Large
Table 3-4. Information retention.

Use Quotations, Tell Unique Tales, and Incorporate Exciting Resources
Quotations from reliable sources can add credibility to your presentation. You can use business-related quotations, quote information from company publications, or incorporate statements from subject-matter experts. Likewise, telling some unique tales based on your own experience adds value—they say that you have “been there and done that!” Lastly, inserting some resources that learners will find exciting enhances your credibility, telling your audience that you are widely versed on the topic.
Below are some tips for using these presentation resources:
![]() Try to put yourself in your participants’ shoes. What do they know about you? What do they want to know? Incorporate resources that will make them admire your skill and abilities.
Try to put yourself in your participants’ shoes. What do they know about you? What do they want to know? Incorporate resources that will make them admire your skill and abilities.
![]() Remember that you know as much or more about the material than anyone else in the group, but if there are experts out there, make them your friends and include their expertise in your presentation.
Remember that you know as much or more about the material than anyone else in the group, but if there are experts out there, make them your friends and include their expertise in your presentation.
![]() Develop your own presentation style, using extra materials as you see them fitting in. Don’t try to copy another trainer’s style.
Develop your own presentation style, using extra materials as you see them fitting in. Don’t try to copy another trainer’s style.
Particularly when your presentation will be using visuals, you’ll need to double-check that the equipment you’ll need is on hand, in working condition, and ready for use. Table 3-5 is a checklist that you should review prior to beginning any sessions. In fact, bring the checklist with you on the first day of the event, and go down the list, checking off items as secured and ready. The more prepared you feel to use the auxiliary equipment, the more energy you’ll have for being a great trainer.
Table 3-5. Classroom preparation checklist.

Effective Management of the Training Process
So far, this chapter has offered preparation tips regarding your role as leader and trainer, tips for establishing your credibility, and four steps to trainer success. Now, let’s take a closer look.
Open with Energy
Opening exercises should accomplish three goals: (1) build teams— helping participants become acquainted with each other and creating a spirit of cooperation and interdependence; (2) provide on-the-spot assessment—learning about the attitudes, knowledge, and experiences of the participants; and (3) offer immediate learning involvement—creating initial interest in the training topic. According to Mel Silberman, author of Active Training, all three of these goals can be accomplished in combination or one at a time.
The opening of a training program is not a social event. It is a time to organize the participants, align their goals with the goals of the planned instruction, and provide an opportunity for participants to meet one another. The most popular opener strategy is the icebreaker, but there are many more creative ways to introduce the topics and the participants. Here are five ideas that are easy to design and fun to facilitate:
1. Opening activities. Design activities that build interest in the entire course and introduce some of the major ideas of the first part of the program. For example, bingo games, 30-second TV “self” commercials, go-arounds (group provides short responses to questions), self-assessments, and pop quizzes.
2. Headlines. Reduce the major points in the lecture to newspaper headlines that will then act as verbal cues to aid memory. For example, tell and sell, tell and listen, or listen and tell.
3. Use an active-listening mnemonic. Give your participants ways to remember key information. For example, the word trainer is a good device for you to remember the characteristics of a successful trainer:
T = trust
R = respect
A = authentic
I = informed
N = natural or neutral
E = enthusiastic
R = resourceful
4. Analogies. Create a comparison between your material and the knowledge and experience that trainees bring with them. For example, suppose a trainer is discussing adult learning needs. Using the computer as a metaphor for the brain, the trainer says the adult can (a) turn off the computer; (b) doesn’t have the right application on the desktop; (c) is not allowed to process the information; or (d) doesn’t have a chance to save the information.
5. Visual backup. Charts, brief handouts, and desktop presentation tools allow the learners to see as well as hear what you are saying.
Conducting a successful training requires organization, planning, and focus. If you know your material and have an appropriate portfolio of instructional methods and strategies, along with a good understanding of the audience, you are prepared and will do well. If you are in control, you can then focus your energy on providing a successful training. Here is a list of self-management techniques that you should think about to ensure a successful beginning of your training. It’s all about engaging your audience:
![]() Prepare yourself to train.
Prepare yourself to train.
![]() Arrange the physical environment.
Arrange the physical environment.
![]() Greet the participants and establish rapport.
Greet the participants and establish rapport.
![]() Get the best from the first 20 minutes.
Get the best from the first 20 minutes.
![]() Review the agenda.
Review the agenda.
![]() Invite feedback to the agenda.
Invite feedback to the agenda.
Vary the Instructional Methods
If you use the same method of instruction all the time, it can build a barrier to learning. For example, a trainer who uses role-plays all of the time might have little success with that method when instructing a group learning how to use the computer. Or, the trainer who uses the lecture method might find that it is an inappropriate learning method when hands-on practice would work better.
Following are several methods of instruction and a brief description of when or where they can be used effectively. It’s important to remember that these methods are not all limited to the classroom.
Traditional Methods
The most popular methods are usually the traditional ones. Most trainers know how to use these and do so most of the time. These standard methods are great, but they have their limitations. Make sure that your methods are best suited for the situation and the audience.
1. Lecture. The lecture is often referred to as “talking to” or “talking at” the group; it is simply addressing a passive audience. To be effective, lecturers need to be on top of things at all times and to be interesting or amusing to the audience. You also need to use an appropriate number of analogies, the correct level of language for the audience, and a logical sequence of ideas. For a lecture to be effective, the presenter needs to be aware of the participants at all times. The presenter’s voice is particularly important, in both level and tone. Also, the material must be made meaningful to the group so that the members will want to listen. It is also possible, and advisable, to use training aids in a lecture. Unfortunately, the lecture does not generally allow for any immediate evaluation or for two-way communication.
2. Modified Lecture. The modified lecture is similar to a lecture, except that the lecturer encourages some group participation. The modified lecture is now common in adult training; in fact, the lecturer often relies on the participants’ experiences to generate some discussion. However, the lecturer/presenter needs to make it clear from the beginning that the session is not a straight lecture and that group discussion or participation is welcome. Questions should be encouraged. This form of presentation should allow for some form of evaluation at the end, as well. The modified lecture is an extremely efficient method of instruction and is commonly used in private trainings. When preparing for this type of presentation, allow sufficient time for group participation.
3. Demonstration. The demonstration allows participants to observe what the presentation is about. Most demonstrations are limited to situations requiring motor skills, but this need not be the case. Demonstrations could also be used to show participants some of the interpersonal skills, such as interviewing and coaching. A demonstration should follow a planned sequence: a verbal explanation showing the item or skill, participant questions, and practice. Among the things to remember when using demonstrations is that you should break the task into bitesize pieces so that the learner can progress through mini-goals rather than trying to achieve everything at once. When demonstrating, ensure that all members of the group can see the demonstration. It is also a good idea to check ahead of time that all equipment is in working order. Above all, make sure that there is ample time for participants to practice the skill.
4. Learner Practice. The learner practice should occur after every type of instruction. It is pointless to teach a new skill and not encourage learners to use and perfect that skill. It is the trainer’s responsibility to encourage trainees to apply the skill. Under supervised practice, participants find out whether they can use the new skill effectively. The trainer also finds out whether the final objective has been reached whereby the participant is able to perform the skill away from the controlled atmosphere of the training room. Learner practice on the job occurs when trainers observe behavioral changes. This is the most effective form of practice and ultimately the most important evaluation of the training. Positive feedback to the participants is also likely to encourage them to want to know more, and may encourage them to undertake further instruction because they will have learned the effectiveness of training.
5. Learner Reading. Reading can be used effectively, or it may be a total waste of everyone’s time and effort. Learner reading before or during a course can be extremely relevant to group discussions and exercises; however, if there are one or two learners who do not do the reading, they won’t know what’s happening. Additionally, the group may have to mark time while the trainer brings these people up to speed with a quick overview. Therefore, learners must be given an incentive to spend their own time reading course material. The trainer could perhaps tell them that there will be a quiz. Also, they should know that if they don’t do the required reading they will be wasting not only their time but also the time of the group. A recent idea is to give the learners note pads that have structured exercises for them to perform while reading. An example of such exercises could be a series of statements with missing words or phrases that the participants must fill in. If the trainer uses a structured note pad, many other forms of assignment can be designed for the learners to undertake while reading.
6. Problem-Based Learning. Problem-based learning is an instructional method that challenges participants to learn by working together in groups to seek solutions to real-world problems. Use problem-based learning to prepare learners to think critically and analytically, and to find and use appropriate learning sources. When trainers use the problem-based learning strategy, they can transform a traditional lecture into a group-centered, problem-solving experience. To prepare for a problem-based learning session, pay close attention to detail, organization, and design of your program, and provide some built-in structure to introduce the problem, manage group dynamics, and provide a summary. Table 3-6 is a template for designing problem-based learning.
Table 3.6. Problem-based learning design template.
Introduction and Overview |
Each person will have an opportunity to describe a problem for the group to solve. The exercise provides an opportunity for learners to work together to solve a real workplace problem. |
1. Give the learners guidelines. |
2. Instruct each group to elect a group leader. The group leader then has the responsibility to collect the problem statements from each member and read each proposed problem scenario to the group; the group adopts one problem statement to use throughout the training problem exercise. |
3. Allow ample time each day for groups to work on the chosen cases and report progress to the group. |
4. Provide each participant with a sheet of printed questions to help the groups arrive at a problem solution. Typically questions can be: • What is the problem? • Who is involved? • What would you like to see happen? • What is the worst-case scenario if your desired solution doesn’t work? • What would the situation look like if the problem were resolved the way you consider appropriate? |
In-Session Check-In |
Assess the progress of group problem solving at regular intervals. If necessary, interrupt group work to correct misconceptions or to make sure that the groups are all in sync with respect to the task and time allotted. |
Discussion Time |
Allow time for combined group discussion of the problem at the end of the problem-based learning session or at the beginning of the next session of your training program. |
Experiential Methods
Experiential learning means an emphasis on active and participatory learning. You use the experiential learning approach to enhance the understanding of concepts as well as a gateway to skill development. Experiential learning means that the learners must do the tests themselves, thus promoting self-learning. The trainer helps participants become aware of their feelings and reactions to certain issues and new ideas. In addition, they allow participants to practice and refine new skills and procedures. The experiential learning approaches are particularly suited for affective and behavioral training goals.
1. Fishbowl. This method can be used for analysis of group process or as a monitor of the effectiveness of group discussion. The participants need to be seated in two concentric circles—a small inner circle with a larger circle around it. The trainer usually selects an important, or controversial, topic and formulates several discussion-provoking questions. These questions are given to one person in the inner circle. It is the responsibility of those in the inner circle to keep the discussion going on the set topic. A number of observers are appointed to sit in the outer circle, and they are asked to note things such as who is doing the talking, who is interrupting, whether the discussion gets sidetracked very often, whether there are many disagreements, whether there are any signs of nonverbal communication, and any other points the facilitator wants to include in the debriefing of the exercise. The group members should be shuffled around so that all have at least one turn in the inner circle as a participant and a turn in the outer circle as an observer. This is obviously a fairly complicated method, and it would be advisable for new trainers to avoid a fishbowl until they feel comfortable with simpler group work methods.
2. Role-Plays. Role-plays, or skill practices, are situational examples. A role-playing exercise normally involves the trainer, or someone in the group, in designing a simple script involving a situation the participant may be placed in. It is then a matter of getting some of the group members to act out the situation in identified positions, using previous experience, new knowledge or skills given to them, or other methods they would like to try under controlled conditions. Try to let the participants do most of the work because this will give them the commitment to follow the role-play through to the end. Don’t use too many props, as they may be distracting; let the group members use their imagination in setting the scene. Hold a debriefing as soon as the role-play is finished; this gives everyone feedback on the process and highlights the important points or issues raised by the group.
3. Simulations. A simulation is sometimes used for team-building exercises. It is not unlike role-plays or skills practice as we know them, but is more complex in structure and requires more participant input. For a simulation, the group has to act in a team role, such as a team of consultants or a board of directors. With large groups, it is advisable to break the group into smaller teams with different exercises so that all team members can have input. The groups are normally placed in a situation in which they must get together and solve problems or build empires. It is normally a very descriptive exercise and may run for months. When the simulations have been completed, the groups present their findings to all of the participants. Not only may someone pick up good ideas, but it is also a fitting conclusion to the exercise. In some simulations, a lot of team effort is used, and this presentation period is the group’s opportunity to show how successful it was. Simulations are also used for individual training, such as on flight simulators. Such exercises tend to be complex and generally expensive to set up, however.
4. Games. These can be simple (such as joining the dots in the shortest time) or very complex (such as who can show a million-dollar profit first). Games are normally competitive and usually related directly to the task involved. If games are made to be competitive, there should not be winners and losers, but should yield a variety of thoughts and ideas, and show how others may use them. When games are used to develop or improve skills, they can be offered at any stage during training. Experienced trainers tend to keep their games for use after breaks. If you find a lively game that gets everyone involved and moving around, it may be worth designing your session so that this game can be used immediately after lunch. There are many books now available that contain hundreds of proven games for different topics. If you design your own games and they are successful, share them with other trainers.
5. Observations. Observation is watching others without directly participating. This can be an effective way to experience learning. Although it is worthwhile for participants to practice something, observation by itself can play an important part in training. The key is for the observation experience to be active rather than passive. There are several ways to design observation activities so that participants are actively involved. Provide aids to help participants attend to and retain pertinent aspects of demonstrations. When participants are observing a role-play or group exercise, provide easy-to-use observation forms containing suggestions, questions, and checklists. Expect observers to give constructive feedback so as to challenge them to observe carefully and apply what they have learned. Finally, be aware that observers can have strong vicarious experiences if what they are observing has personal impact; use simple forms to record observations.
6. Mental Imagery. Mental imagery is the ability to visualize an object, person, place, or action that is not actually present. Trainers can design five kinds of imagery experiences: visual, tactile, olfactory, kinesthetic, and auditory. There are simple guidelines to use when conducting a mental imagery exercise:
![]() Help participants to clear their minds by encouraging them to relax.
Help participants to clear their minds by encouraging them to relax.
![]() Conduct warm-up exercises to open the mind’s eye.
Conduct warm-up exercises to open the mind’s eye.
![]() Assure participants that it’s okay if they experience difficulty visualizing what you describe.
Assure participants that it’s okay if they experience difficulty visualizing what you describe.
![]() Give imagery instructions slowly and with enough pauses to allow images to develop.
Give imagery instructions slowly and with enough pauses to allow images to develop.
![]() Invite participants to share their imagery.
Invite participants to share their imagery.
Methods for Groups
There are a number of group or meeting activities to consider. Here are several types most frequently used in training.
1. Group Discussions. Group discussions are normally held with groups of 5 to 20 people, with common interests in a subject area. It is a conversational style of discussion whereby all have equal rights and equal access to the subject. A group discussion must be under the control of a trained facilitator or group leader. This group leader remains impartial in the discussion but ensures that the group stays on the topic and that all participants do, in fact, have equal input. There are at least three types of discussions. The structured discussion is a conversation among the learners to meet set objectives. It is usually better for the group to have input on the topics to be covered to meet the objective, as this gives them more motivation. (The motivation comes from the fact that they were responsible for setting the agenda.) The open-form discussion is an unstructured conversation and is a free-for-all with the facilitator as a referee. This type can be used to voice opinions or vent frustrations. One problem here is that one or two dominant people may do all of the talking. The facilitator should set the ground rules before the discussion starts (or during it, if necessary). One solution is to nominate an object in the room as the “microphone”; only the person holding the microphone may speak, and when the microphone is passed to someone else, the new holder takes a turn. Panel discussions are almost like a lecture, in that they generally do not allow for a great deal of participant input. The panel is usually made up of topic experts, each with a subtopic. The facilitator starts at a logical point, and each expert builds on what the previous expert has said, with all of the topics related. To be effective, this instruction method needs to be mixed with a question-and-answer method, or perhaps the requirement for the participants to do some preliminary work on the subject matter.
2. Conferences. Conferences are usually larger groups. The numbers may vary from five to one hundred or more. The participants normally represent different departments or organizations, but all have a common interest or background. The activity of a conference is usually to look at problems within the specified subject area, and to endeavor to arrive at solutions by the end of the conference. Some conferences are simply venues for participants to exchange ideas or information or to find out about new technology in the industry.
3. Seminars. The seminar is a group of any size, from five to five hundred, conducted for a group of people who have a common need. Seminars are normally led by an expert in the topic area. A problem may be defined and then given to the participants to rectify under the supervision of the seminar leader. The seminar leader may also present relevant research findings so that the participants can discover the correct solutions based on those findings. Seminars usually follow more of a lecture format.
4. Workshops. The workshop may be a group of any size, but the members have a common interest or share a common background. A workshop is generally conducted so that the participants can improve their ability or understanding by combining study and discussion. Workshops tend to be user-driven; that is, the participants may influence the direction of the program from its very beginning.
5. Clinics. The clinic is a meeting at which a small group of people with common interests examine a real-life problem. The group members diagnose and analyze the problem and then offer solutions. Clinics may be used to establish procedures, as they are based on real-life situations, and the participants generally offer working solutions based on their past experiences.
Other Methods
Other methods have gained use with the advent of digital technology; likewise there are other teaching methods that tap participants’ creative expression.
1. Computer-Assisted Learning. This is largely a refinement of programmed learning, in which individuals work through written material that is organized in a static, sequential format. Learners proceed in a step-by-step fashion, only after they received feedback on their previous responses. Such programmed learning has become more sophisticated in recent years with the advantage of DVDs, learning video discs, and the Internet. One of the great advantages of such training is flexibility; the learners can progress at their own pace and wherever and whenever they want. The disadvantage is isolation, which can result in low motivation and reduced commitment.
2. Self-Discovery. Learners discover the content of the course on their own by using a variety of techniques, such as research and guided exercises.
3. Self-Paced/Programmed Instruction. Learners read or perform course-related activities, progressing through the program at their own pace.
4. Case Studies. Learners analyze situations and draw conclusions or recommend solutions on the basis of the content presented in the course.
5. Movies. Content comes primarily from movies. Develop a set of questions to use as a guide so that learners focus their attention on the content and the purpose of the media.
6. Individual Projects. Learners work individually to apply the concepts presented in the course.
7. Group Projects. Learners work in teams to apply the concepts presented in the course.
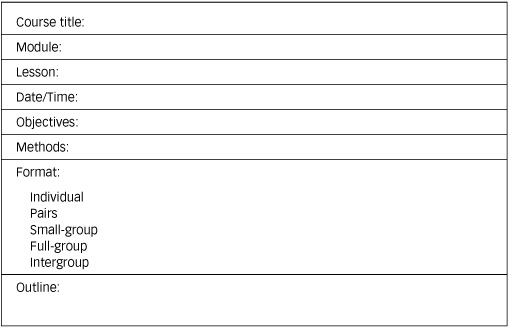
Many trainers wish they were more creative in their presentations. However, creative trainers are not a special breed. Creative trainers work at being creative and use several tricks to help them do their best work. Remember, one design can accomplish two things at once. The same design can often be used for different purposes. And published designs can often be modified to suit your own needs. You have learned the vital elements required to put a training activity together. Now, take those elements and organize them into a training activity worksheet, as shown in Figure 3-3. The worksheet is a way of organizing a picture of the training activity that becomes an important part of your module and lesson design.
Figure 3-3. Training activity worksheet.
Supporting Factors for Successful Training
Most training sessions occur inside a building. Buildings can be dark and confining. Be conscious that the environment set for your training does not negatively affect that training. However, there are other factors besides the physical environment that come into play—for example, the time of year or time of day. Consider both your own and your participants’ energy levels. Ask yourself: “Do I have more people registering for classes in the fall or during the summer months?” “Do I have more energy in the spring, feel more like getting things done, and being adventuresome?” “How happy are learners about coming to class first thing in the morning?” “Do they seem sharper later in the day?” and “What is too late in the day for them to concentrate?”
The learners coming to your training sessions have lives of their own, with individual daily rhythms. In short, some people are morning types and others can’t really get clicking until afternoon. Consider the easiest and most effective path to reaching your learners, and adjust your teaching behavior accordingly.
Time of Day
Do you ever think about the effect of time of day on your training? When are you most focused and energetic? Is your most productive period in the morning or in the afternoon? This factor is always a personal characteristic that learners will experience. Similarly, your learners will have individual reactions to the time of day. Consider some time frames that you can use as a guide for designing and delivering your training.
Early Morning (7:00 to 10:00 AM)
This is wake-up time for most people. You have the task during this period to alert the learners that they are requested to be physically and cognitively present! Try interesting and useful wake-up exercises. Here are some techniques that you can use:
![]() Include introductions that use not only the typical biographic questions but also an interesting question that will yield something about learners’ reasons for attending. For example, their wish for the training.
Include introductions that use not only the typical biographic questions but also an interesting question that will yield something about learners’ reasons for attending. For example, their wish for the training.
![]() Use team exercises before the introductions. Design this event as a 10-minute fun exercise that relates to the course content—discuss a case study that exemplifies the training goal. For example, learners assigned to a department in a hotel could design the façade of the hotel; they hang up the façade and tell the larger group how they developed it and a little about their department. Although drawing the façade is not a meaningful task, it does get people working together on a common goal and using their skill sets (or discovering new skills that they were not aware of). Also, the drawing becomes a team wall hanging that they can use when working on their assigned task. (This is a great time for you to assess how the groups work individually and collectively, which is invaluable information when you decide to have learners rotate to different groups or to have partners.)
Use team exercises before the introductions. Design this event as a 10-minute fun exercise that relates to the course content—discuss a case study that exemplifies the training goal. For example, learners assigned to a department in a hotel could design the façade of the hotel; they hang up the façade and tell the larger group how they developed it and a little about their department. Although drawing the façade is not a meaningful task, it does get people working together on a common goal and using their skill sets (or discovering new skills that they were not aware of). Also, the drawing becomes a team wall hanging that they can use when working on their assigned task. (This is a great time for you to assess how the groups work individually and collectively, which is invaluable information when you decide to have learners rotate to different groups or to have partners.)
![]() Write questions on chart paper for the groups to answer.
Write questions on chart paper for the groups to answer.
![]() Present the overview of the course—goals, objectives, and learning outcomes. By doing this exercise, you will invite more learners to interact and ask questions early in the training.
Present the overview of the course—goals, objectives, and learning outcomes. By doing this exercise, you will invite more learners to interact and ask questions early in the training.
![]() Review the most cognitively challenging information during the morning session.
Review the most cognitively challenging information during the morning session.
![]() Be more movement-oriented and energetic during the morning session.
Be more movement-oriented and energetic during the morning session.
![]() Review frequently using games and quizzes.
Review frequently using games and quizzes.
Late Morning (10:00 AM to noon)
This is usually people’s most highly interactive and energetic time of the day. It is a time when the learners are most physically and mentally ready to accept a challenge and usually absorb new ideas and techniques quickly. They have settled in, and they are no longer feeling the fear of the unknown. Things that you can do to keep the energy going are as follows:
![]() Deliver as much content and detail as possible during the session. Remain focused on your delivery. Wrap your content around models, outlines, and metaphors so that learners understand not only the content but also the task. You have explained the skeleton of the body during the early morning session. From now on, in each session you are going to put meat on the bones.
Deliver as much content and detail as possible during the session. Remain focused on your delivery. Wrap your content around models, outlines, and metaphors so that learners understand not only the content but also the task. You have explained the skeleton of the body during the early morning session. From now on, in each session you are going to put meat on the bones.
![]() Blast away on the content. The learners are eager to learn the new content, work on projects, meet other new participants, network, and share.
Blast away on the content. The learners are eager to learn the new content, work on projects, meet other new participants, network, and share.
![]() Conduct timed and focused discussions and interactive exercises or activities.
Conduct timed and focused discussions and interactive exercises or activities.
![]() Continually summarize the content that you have delivered and make the connections of where this information fits in and why and how this fit happens or should happen.
Continually summarize the content that you have delivered and make the connections of where this information fits in and why and how this fit happens or should happen.
Midday (noon to 1:00 PM)
This is when learners always think about lunch. Do not try to stretch this time to 12:45 PM. They will hate you. There is something different about 11:30 and 12:30 as lunch time. This is considered a time for a break.
Early Afternoon (1:00 to 3:00 PM)
This is when learners are digesting lunch and their energy is sapped. Many will feel tired and lazy. Use games, projects, small groups, and other activities to review the morning work, and then give them the opportunity to try out the new skills. Make sure the activities review and use the newly acquired information and that this information is added to the knowledge foundation they have built and continue to build with your training.
![]() Use break-outs, discussions, information exchanges, and clarifying points as re-energizers.
Use break-outs, discussions, information exchanges, and clarifying points as re-energizers.
![]() Try a small-group exercise after lunch instead of a lecture, and never show a video or movie.
Try a small-group exercise after lunch instead of a lecture, and never show a video or movie.
![]() Illustrate a quick physical activity that they can use back home as energizers, such as “We are now going to make like airplanes. Stand up, arms spread out wide like airplane wings. Turn left and turn right. Move circles with your arms.”
Illustrate a quick physical activity that they can use back home as energizers, such as “We are now going to make like airplanes. Stand up, arms spread out wide like airplane wings. Turn left and turn right. Move circles with your arms.”
![]() Develop an exercise whereby they have to talk with one another. Interactions and sharing will keep them awake; the more people they know in the event, the more interactive and personal exchanges that they foster can enrich their experience in class and when they go back home.
Develop an exercise whereby they have to talk with one another. Interactions and sharing will keep them awake; the more people they know in the event, the more interactive and personal exchanges that they foster can enrich their experience in class and when they go back home.
Late Afternoon (3:00 to 5:00 PM)
This is time for involvement, clarification, exchange, and application. The physical and cognitive energy is at the moderate level. Your task is to keep it consistent and engaged. The primary concern is the duration, especially if the learners have been involved in earlier sessions. You need to monitor carefully to determine when it is time to call it quits.
When learners are cycling down for the day, they become weary fast. You have to keep them engaged in discovery and group mode for just the right time. Then, start a quick shutdown exercise and invite discussion and sharing; don’t push them beyond their limit. If you do, they will gain nothing, and you will feel disappointed. Organize your material in well-designed chunks of time. Teaching less is sometimes more.
Evening (5:00 to 10:00 PM)
This time can be a mixed bag. You can develop an interactive lecture, a humorous talk, a self-help session, an exchange, or a retreat. To make this time successful, determine the need, the audience preferences and learning style, the time allotted, and the expected outcome. Call a few folks, and find out what they are expecting from the training. Physical and cognitive energy is not so high; however, learners are relaxed and not anxious. Here are some ways to capitalize on this relaxed energy:
![]() Use three to five teaching techniques to keep their attention and interest; assist in their learning by making sure you review many times; have them keep a journal of the evening outcomes.
Use three to five teaching techniques to keep their attention and interest; assist in their learning by making sure you review many times; have them keep a journal of the evening outcomes.
![]() Keep things interesting and focused on the topic. Bring in props. Have things for them to do; they learn best by doing. Have fun. Bring rewards. Have work groups that learners can hang out with each day or during the week of the training, for example, interest groups during lunch. Have the group report back some of the things they discussed, and make sure to have take-aways.
Keep things interesting and focused on the topic. Bring in props. Have things for them to do; they learn best by doing. Have fun. Bring rewards. Have work groups that learners can hang out with each day or during the week of the training, for example, interest groups during lunch. Have the group report back some of the things they discussed, and make sure to have take-aways.
Day of the Week
Unlike the time of the day, the day or night of the week does not directly influence a learner’s capacity to learn or retain the information. Most learners prefer day classes on Mondays, Tuesdays, or Wednesdays, never Fridays! For night classes, the preferred days are Tuesday, Wednesday, and Thursday. For the weekend, Saturday is fine, but Saturday night is terrible. Some of the best weekend time is Sunday afternoon. The preference of day really does make a difference with respect to participants’ learning.
SOME PRINCIPLES AND THEORIES THAT SUPPORT TRAINING
We conclude this chapter with a discussion of several disparate topics that both underlie the training approaches and techniques described so far and elaborate on those techniques in ways that can enhance learning, such as group involvement, reinforcement, and sequencing of information.
Additional Group Techniques
To supplement the suggestions for group activities given in this chapter, consider the following group activities, shown in Table 3-7.
Table 3-7. Advantages and disadvantages of group techniques.

1. The nominal group process is a decision-making method for use among groups of many sizes who want to make their decision quickly, as by a vote, but want everyone’s opinions taken into account (as opposed to traditional voting, where only the largest group is considered). The method of tallying is the difference. First, every member of the group gives their view of the solution with a short explanation. Then, duplicate solutions are eliminated from the list of all solutions, and the members proceed to rank the solutions. The numbers each solution receives are totaled, and the solution with the lowest (i.e., most favored) total ranking is selected as the final decision. There are variations on how this technique is used. For example, it can identify strengths versus areas in need of development, rather than be used as a decision-making voting alternative. Also, options do not always have to be ranked, but may be evaluated more subjectively. Though the goal is to break down a problem into manageable steps, the technique doesn’t draw completely on facts. This drawback may be offset, however, by the time efficiency in the whole process.
2. The Develop A Curriculum (DACUM) program, as shown in Figure 3-4, is a model normally used by training staff to build a curriculum by dissecting a position into its jobs and tasks. A group of 10 to 15 experts (usually supervisors or skilled workers) meets and conducts a performance analysis and then creates a topical outline according to the task analysis results or topics and subtopic. The DACUM is usually a competency-based instructional/training design model. The DACUM technique may also be used to establish varying levels of competency for certain positions (that is, basic, intermediate, and advanced levels of knowledge or skill proficiency).
3. Critical incident is a training technique by which individuals in a group identify the critical incidents that led to a problem. When all of the incidents have been collected, they are collated and then discussed by the group. Obviously, the individuals in this group must have a common interest or background in the subject at hand. This technique is sometimes used in management training to get participants to identify the critical incidents in their career.
4. Delphi is a training and problem-solving technique whereby the group members don’t get together; it could be called “the group you have when you’re not having a group.” A problem or situation is identified by management or a decision-making team. A group leader identifies the experts, then develops and distributes a questionnaire. When the responses have been collated, the group develops and distributes a second questionnaire, modified to suit the previous responses. Subsequent questionnaires ask respondents to reconsider their ideas, based on composite opinions. This process continues until the experts reach consensus. It is then up to the group leader to report the findings back to the management team. This technique may be modified for use with an assembled group as long as sufficient study is done.
Figure 3-4. Develop A Curriculum (DACUM) program.
DIRECTIONS: Break down each position that is the subject of a training program into its component jobs and tasks, filling in the boxes below. Then use these levels of specific work details to develop the curriculum for the training program.
All of the above group techniques (with the exception of nominal group technique) stipulate that the participants have a common interest or shared background in the subject matter. However, in the nominal group process it isn’t necessary for individuals to have that common interest or background because the aim is to find new ideas or solutions. Someone without that insider viewpoint may offer the best solution. Here are some tips for starting and maintaining group discussions:
![]() Select a topic that everyone can become involved in.
Select a topic that everyone can become involved in.
![]() Let the group set ground rules for everyone to follow.
Let the group set ground rules for everyone to follow.
![]() Acknowledge all input from the participants.
Acknowledge all input from the participants.
![]() Select as your first speaker the one who will give a model answer.
Select as your first speaker the one who will give a model answer.
![]() Go around the circle to begin with.
Go around the circle to begin with.
![]() Don’t leave the expected worst responses to last.
Don’t leave the expected worst responses to last.
![]() Ensure that everyone gets a chance to participate.
Ensure that everyone gets a chance to participate.
![]() Always get clarification if needed.
Always get clarification if needed.
![]() Look for nonverbal responses.
Look for nonverbal responses.
![]() Use first names, and direct eye contact with the group.
Use first names, and direct eye contact with the group.
![]() Don’t always give the answers; let the group do it.
Don’t always give the answers; let the group do it.
![]() Move from the foreground to the background as the discussion proceeds.
Move from the foreground to the background as the discussion proceeds.
![]() Intervene if necessary, and keep the group on track.
Intervene if necessary, and keep the group on track.
![]() Be aware of your nonverbal communication.
Be aware of your nonverbal communication.
![]() Be honest and enthusiastic with the group at all times. If you’re not, you can bet they won’t be.
Be honest and enthusiastic with the group at all times. If you’re not, you can bet they won’t be.
Brain-Friendly Lectures
Lectures are the most efficient and cost-effective way to communicate information in a classroom setting, and they are useful for reaching a large group, especially when you need to get across general knowledge.
If you are committed to using accelerated learning principles in training, lectures can hold an important place. Remember, involving the learner in the learning maximizes understanding and retention through participative techniques. Even in lectures you can get learners involved.
There are five ways to involve participants during a lecture:
1. Listening Role. Assign participants the responsibility to actively listen to the lecture. At the end of the lecture, they should produce a list of points they agree or disagree with and have questions to be answered. Provide a summary of the contents and quiz questions. Listening assignments can be given to individuals or to the group.
2. Guided Note Taking. Provide instructions or a form indicating how participants should take notes. Stop at intervals for the participants to write reactions or ideas that go beyond what you have presented.
3. Spot Challenge. Interrupt the lecture periodically, and challenge the participants to give examples of the concepts presented so far or to answer spot-quiz questions. For example, give a lecture on disability and stop at a reasonable interval to give a multiple-choice quiz testing participants’ understanding of the material.
4. Synergetic Learning. Provide different information to different participants. Allow them to compare notes and briefly teach each other.
5. Illuminating Exercise. During the presentation, intersperse a brief activity. This action calls notice and illuminates the information, ideas, and skills being presented.
Here are five ways to reinforce the learning that takes place in lectures:
1. Press Conference. Invite participants to prepare questions to be submitted to the trainer for response. Or provide a list of questions from which participants can select.
2. Participant Review. Ask participants to review the content of the lecture with each other (in any group configuration) and commit the major points to memory, or give them a self-scoring review test.
3. Group Processing. Ask participants to reflect on the lecture’s implications for them. Use any group format you feel will maximize the quality of the processing.
4. Post-Lecture Case Problem. Pose a case problem for participants to solve based on the information given in the lecture.
5. Experiential Activity. Design an activity that dramatically summarizes or illustrates the lecture you have given. Use any of the experiential learning approaches presented in this chapter—role-plays, games, simulations, observations, mental imagery, or writing tasks.
Holding the Audience’s Interest
To gain and hold the audience’s interest, start the program with an introductory game. Here are five suggested formats:
1. Scavenger Hunt. This is similar to bingo. Create a card with familiar facts either about the audience or the information that you will be teaching (e.g., terms and definitions).
2. Paper-Tearing Exercise. Ask the learners to fold sheets of paper in half, tear the upper right side, fold and tear upper left, fold and tear lower right. Open them up to reveal snowflakes—not one is alike.
3. Case Study. Use one of these scenarios, or make up your own: (a) Your boss just came in and asked for a training outline for a one-hour course in professional development. What do you do? (b) Sarah goes to the post office each morning and each afternoon. She has an accident one afternoon while leaving the post office. Is this compensable?
4. Test Questions. Introduce the presentation with true-or-false questions.
5. Leadoff Story. Tell a short story that makes the point that you will be presenting.
The Training Sequence
Sequencing your presentation of information is partly an art; some trainers just know where to place different pieces in the program and how to obtain a good mix and flow. Most trainers, however, learn to master sequencing through experience and trial and error. Here are six points that can guide your sequencing choices:
1. Build interest in new content before you delve more deeply. Set the stage for learning by using an activity that provides participants with the big picture of the training topic.
2. Place easy activities before demanding activities. Get participants settled in and warmed up before you put them through some hard work! Thinking takes energy.
3. Maintain a good mix of activities. Vary your training methods, the lengths of activities, intensity of activities, the physical setting, and the format.
4. Group together concepts and skills that build on each other. Generally, we learn more easily when one idea is an outgrowth of another.
5. Provide subskills before practicing complex skills. It’s better to learn parts before the whole.
6. Close training sequences with discussions of “so what” and “now what.”
Trainers have a number of sequence choices. Avoid always using the same sequences. You want to design action-oriented trainings that contain a variety of sequences designed to keep participants interested and also provide time for reflection.
![]() Go from the general to the specific.
Go from the general to the specific.
![]() When teaching procedures, start with the first step or the last step.
When teaching procedures, start with the first step or the last step.
![]() Place an experiential activity before a content presentation, or follow a content presentation with an experiential activity.
Place an experiential activity before a content presentation, or follow a content presentation with an experiential activity.
![]() Teach from theory to practice or from practice to theory.
Teach from theory to practice or from practice to theory.
The Zoom Principle
The success of a program, according to educator Ruth Clark, is all in the flow of events. She calls this process the Zoom Principle. It works like this. When you are introducing new information, provide an overview; this process is called an “advanced organizer.” The advanced organizer sets up “data files” in the minds of the learners for each of the topics you will cover. Then, when the topic is mentioned the learners can “file” the information in the appropriate mental organizer. Later, the trainer “zooms in” on the detail, returning to it periodically to show learners how each detail relates to the whole.
Clark also points out that the training sequence looks more like a spiral than a straight line. That is, you reintroduce skills and ideas taught earlier, but in greater detail each time. She cautions that trainers avoid the urge to plunge into an important element without providing that transition from old to new material. Consider adding a brief activity, short presentation, demonstration, or team project to get the group warmed up and focused on the topic.
She suggests that a training sequence be built around a critical incident, a problem to be solved, or a task to be accomplished, rather than a set of concepts or skills to use. Lastly, she says that closing a training sequence can be either climactic or reflective. Sometimes a sequence ends with a bang to emphasize the accomplishment; for example, a dramatic finish could be a scintillating lecture, an intergroup competition, a role-play that serves as a dress rehearsal for later application, or a challenging case study.