
CHAPTER FIVE
Implement the Training
Implementing the training program is, in its simplest term, training delivery. It’s the process of holding a conversation with your audience that is centered on specific topics. A successful conversation is one in which each participant hears the same message. And to be successful, that conversation must have audience interest, be well organized, and have a method for checking the listeners’ understanding. This chapter provides the tools for delivering a training program; these tools will become part of your skills portfolio.
We begin with an overview of training implementation, first examining the role and responsibilities of the program designer, who often turns to others for the delivery phase. We then focus the light on the facilitators and speakers who deliver the training to the learners. Of course, many times the program designer is also the presenter, so all will benefit from this discussion of delivery techniques. The chapter concludes with some special tips on presentation.
The Role of Designer: Managing the Implementation
With completion of the design phase (see Chapter 2) and its subsequent validation and revision, your work as course designer enters a new phase: turning over the training program to your implementation team. Sometimes these teams include curriculum planners, training administrators, instructors, and follow-up personnel; other times the teams consist of one person: the designer is also the instructor. Whether your implementation team is just you or includes others, there is much planning and preparation ahead.
Managing the implementation phase requires overseeing three basic areas, as shown in Table 5-1: instructors/facilitators, learners, and administration. These three areas represent the usual arena for training implementation. A fourth area, management, is often overlooked or left out of the process, however.
Only with management’s help can the training be transferred from the classroom to the job. Ultimately, the way management supports the learner and the instructor will affect the training. If management does not encourage course participation and follow-through, then the training effort will not succeed. On the other hand, if management acts as a visible and vocal sponsor for the course, the training that is offered will be practiced and in due time will be adopted on the job.
Check the Timing and Sequencing of the Presentation
Your design presents a coherent outline of the training program. It provides the basics: the necessary content, the sequence of subjects and activities, the instructional techniques to be used, and the length of the program and its subunits. As you well know, the program should be long enough time for participants to acquire the knowledge and skills, but within that time frame, the content should be sequenced in a logical manner. For example, a training program on presentation skills might begin by focusing on use of voice and gestures, proceed to a demonstration of how to organize a presentation, then focus on ways to be persuasive, ending with a discussion of the use of visual aids. Practice sessions might allow participants to try out these skills. The important point is to ensure that the design builds new skills upon a foundation of established skills. That’s why you would cover the more fundamental skills earlier in the program. However, with some programs, flexibility in sequencing may be more viable. Let’s review a hypothetical instance.
Table 5-1. Areas of training implementation.
Areas to Implement | What to Cover |
Instructors/facilitators | • Require a train-the-trainer program |
Learners | • Learner expectations |
Administration | • Pre-course materials —Practices —Test items —Evaluations —Hands-on materials —Hardware, software —Simulations, job-related materials —Post-course materials • Location/facilities —Training sites, rooms, break-out rooms —Technical/audiovisual needs —Hotel/restaurant facilities —Multisite locations —Course registration/confirmation procedures |
In a project-management training program, the designer might rightly decide to start with some exercises that demonstrate the benefits of teamwork over individual work. Then, the program would move to show the productive use of personality differences. The designer may decide that the program should end with developing action plans for how the teams could bring more products to market. In this instance, the designer may be correct, in that using a standard sequence is less important than building to a much-needed conclusion.
In another example, depending on the issues critical to a particular team, the designer may decide to conduct a module on conflict management before the module on typical problems with matrix management. At other times, the designer may feel it is better to do the opposite. Your experience with designing training programs and your sense of logic must work together to match the different training situations. Where you can, experiment with different sequences to uncover new approaches.
A sample training sequence is presented in Figure 5-1. At the top of the sequence are the program’s objectives. Then, the time is broken down into different training exercises, with the time frames for each.
Check the Program Using the Training Plan Matrix
Using a training plan matrix helps you to see at a glance the overall nature and structure of the course you have designed and the degree to which participative rather than one-way communication methods have been planned. A training plan matrix has the hours of instruction on the left side of the paper in a vertical column. The other related columns, also vertical, show objectives, content, instruction methods and materials, and post-session handouts.
As an example of how this works, use the training plan matrix shown in Figure 5-2, write a training plan to develop a lesson on workforce diversity. Remember to write a job breakdown and use your SMART (Specific, Measurable, Achievable, Relevant, and Time based) objectives. Figure 5-3 then shows a sample training plan.
Figure 5-1. Sample training sequence.
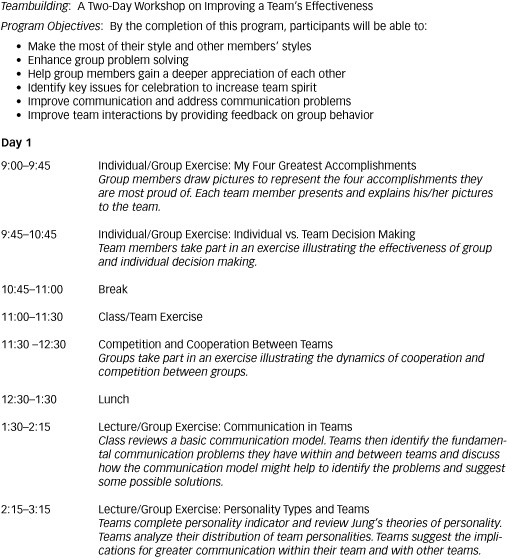
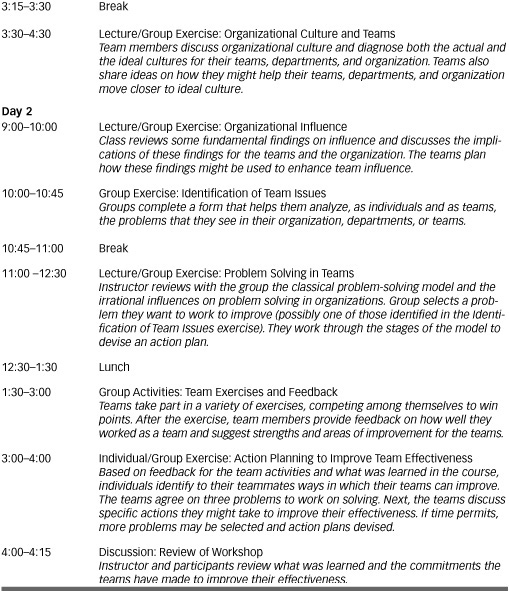
Figure 5-2. Training plan matrix.
The Role of Instructor or Facilitator
The role of a trainer is similar to a teacher—to deliver the training program. As stated above, sometimes the designer also is the instructor or facilitator; other times, a different individual or several individuals serve in this capacity. In either case, the principles of instruction and facilitation are the same.
Figure 5-3. Sample training plan on workforce diversity.

Facilitate, Don’t Just Teach
Adult learners are usually a diverse group of people. Each comes to the training session with individual life experiences and individual expectations about his or her work and career. These life experiences include previous learning opportunities that reflect the person’s age, gender, culture, values, and interests. The learning climate for your training should be sensitive to these differences, as reflected in the physical surroundings and intangible elements such as trust.
A relaxed, comfortable atmosphere permits learners to feel they have a degree of control over their learning, that they can ask questions freely, can influence the pace of the presentation, and can learn from others in the group. As the instructor, you will facilitate their learning, encouraging everyone to work together to solve problems and to share information. Especially, you will use good questioning techniques to explore the subject matter and you will encourage learners to ask questions to open up even more learning opportunities. Good questions stimulate insight and understanding, and encourage reflection. Also, remember that when learners ask questions, you can discover what points may be giving them difficulty.
Stay Within the Allotted Training Time
The time period designated for the training represents a contract between you and the learners. The two most important clauses of that contract are the starting time and the ending time. Pay attention to time. If, as instructor, you are establishing the times for each segment of the training, be realistic about how much you can accomplish in a set period. Break the session down into segments: five minutes for the learners to settle in, fifty minutes of instruction, five minutes to close, for example. During the delivery, if time is running out, make adjustments accordingly so you touch all the important points. Figure that eight hours designated means six hours of training, not eight. And there are breaks! Research on learning and the brain reveals that learners need to take mental breaks every twenty minutes and physical breaks every fifty minutes. Allocate your time accordingly.
Breaks are something you rarely get as a presenter, but don’t forget to give them to your learners. Define the official break time, and then get back to work. If you leave the room for your own break, be back on time. And when you are on your break, do not solve problems, give advice, or hang out with the group. This is your time. If you don’t take that break, you will never get an opportunity to rest.
Do Some Advance Preparation
A couple of days before the training begins, prepare your cheat notes and put them everywhere. Use the borders of your PowerPoint slides, add pencil comments on the newsprint, and use sticky notes. Also, make a list of where to go for technology help, and tape this list to something important so you don’t lose it. Place the agenda and outline in front of you so that you can keep yourself on track.
Next, set up your training room the day before the event. Practice several times with every piece of technology you are going to use. Check on the lighting, room temperature, and location of the break rooms and bathrooms. Make arrangements for the coffee breaks. Be sure that you have enough copies of materials for every learner. Also, check each package to make sure that no pages are missing. Finally, decorate the room and make everything ready for the big event.
Find a quiet place, and practice your narrative, using a natural, conversational style as if you were talking to a colleague. Give yourself more than one day to prepare, if possible. The longer the training session, the more time you need to practice delivering the message. And, remember that successful presentations are clear and concise. Although they are conversational in style, the language you use is more formal than casual conversation between friends. Choose your words carefully; don’t say anything that you wouldn’t want to read in the newspaper!
Prepare Your Notes
Even though you have prepared your presentation in every respect, you will probably want to use notes to keep you close to your planned delivery. Also, should something distract you, those notes can easily help you find your way back to the topic. But the notes won’t be helpful unless you can read them easily, under classroom conditions. You must be able to see your notes in bright or dim lights, and also when you change position to accommodate visual aids. The following is a checklist to make sure your presentation notes are ready:
![]() Use a large typeface.
Use a large typeface.
![]() Double- or triple-space between lines, and double-space between paragraphs.
Double- or triple-space between lines, and double-space between paragraphs.
![]() Use hanging indents for paragraphs so the first line will be easy to spot.
Use hanging indents for paragraphs so the first line will be easy to spot.
![]() Put several spaces at the end of each sentence, so you do not run them together accidentally.
Put several spaces at the end of each sentence, so you do not run them together accidentally.
![]() Type the words the way you will say them (for example, one-and-a-half million dollars, not $1,500,000).
Type the words the way you will say them (for example, one-and-a-half million dollars, not $1,500,000).
![]() Use only one side of the paper, and do not fasten the sheets in any way.
Use only one side of the paper, and do not fasten the sheets in any way.
![]() Number the sheets of paper.
Number the sheets of paper.
![]() Mark the page where visual aids should occur—put a symbol in the margin to indicate the aid.
Mark the page where visual aids should occur—put a symbol in the margin to indicate the aid.
Choose Your Attire and Prepare Psychologically
Getting yourself ready to make a presentation means choosing the most comfortable shoes and clothing that’s appropriate to make you look great. Lay out your clothes the night before. Go to bed early, and get as much rest as possible. Then, get up early, dress, and look your best. Your confidence is up when you look good.
Just before the training begins, do a morning stretch—a couple of times, if necessary—because you don’t want knots in your muscles. Talk to yourself to loosen up your throat. Remind yourself out loud that you are prepared. Next, double-check to see that nothing in the room was disturbed during the night. Stand up straight—it aids breathing and relaxation.
Try putting yourself in your learners’ shoes; consider how uncomfortable they may feel at the beginning of the training, not knowing what to expect. Be there to greet each of them as they arrive; it puts them at ease. Visualize the day ahead; close your eyes and see yourself being successful.
Check the Presenter Zone
Chapter 4 discussed the importance of establishing the “presenter zone.” This is the physical space between you and the learners. Table 4-2 listed ways to apply this principle in several different seating configurations. The presenter zone is all about how you handle your teaching space. In Western cultures, leaders assume and are awarded more space, both physical and psychological. But space is not important just to leaders. All people construct invisible boundaries around their bodies that become evident under certain circumstances. For instance, many people regard space, or “proximities,” of up to one-and-one-half feet as intimate, and in normal interactions they allow only the people they care about to come so close.
When this space is violated, as sometimes happens in a crowded situation, people feel intense discomfort. But the space from one-and-one-half feet to four feet around most people is regarded as casual space, the proximity they accord friends and acquaintances who want to talk. All cultures have unwritten rules of behavior, and the personal boundaries and responses therein to violations of those boundaries vary considerably.
The distance that concerns most trainers, however, is 12 feet. Generally speaking, this is the space allocated for formal interactions. Most important for us in the training context, this is this distance that trainers maintain between the nearest learners and themselves. When you are closer, learners feel discomfort; they interpret this as either an invitation for greater intimacy or an authoritative encroachment on their personal space. You must use your space wisely, depending on what you are hoping to achieve. Figure 5-4 shows the degrees of personal space, aligned with training techniques. As you can see, formal presentations fall in the outer circle; discussions and close interactions come within the center of the circle.
So, how is this system of zones realized? If you wish to give the impression of strong leadership, walk around the room, check among the learners how they are doing, sit with the work groups, and lend a hand. In essence, invade the 12 feet to get closer to your group. Most people are consciously aware of personal space, so use these rules to affect the training environment without creating friction or discomfort.

The Successful Delivery
If there is an opportunity before you begin your delivery, mingle with your audience, projecting a friendly, confident attitude. If there is no such opportunity, see if you can rework the schedule ever so slightly so as to create an opportunity to gather with the audience first. Once you are introduced as the presenter, walk briskly with purpose and confidence to the speaking position. Immediately connect with your audience, glancing at people with whom you have just mingled. Smile and limit your movements and gestures during the first few minutes of your presentation.
Begin speaking at a low volume, yet loud enough so as to be heard. Stand about six to eight inches away from the microphone, if you are using one. Even if you are shaking in your shoes and your hands are trembling, keep going and do not pay attention to your feet or your hands. After a few minutes, you will relax and be on your way to a successful delivery.
Watch Your Words
Simple words are the direct route to good communication. Use specific words to help your audience see, hear, feel, smell, or taste what you mean. Avoid words that are overly complex and that have more than one meaning or are misleading, or are only an approximation of what you want to say. The following tips may help you choose your words more carefully:
![]() Use familiar words. In general, familiar words are easier to understand than fancy words. Familiar words tend to be shorter, specific, and vivid.
Use familiar words. In general, familiar words are easier to understand than fancy words. Familiar words tend to be shorter, specific, and vivid.
![]() Avoid technical terms and business jargon. Stick with words that match your audience’s level. Even if you believe your audience will understand esoteric words, do not use them (it is best not to assume anything). Use technical terms and business jargon only when you know every person in the audience will understand them.
Avoid technical terms and business jargon. Stick with words that match your audience’s level. Even if you believe your audience will understand esoteric words, do not use them (it is best not to assume anything). Use technical terms and business jargon only when you know every person in the audience will understand them.
![]() Use concrete, specific words. Pick up on the words that listeners say, rather than the canned speech you fall back on.
Use concrete, specific words. Pick up on the words that listeners say, rather than the canned speech you fall back on.
![]() Use action words. Incorporate words that suggest movement or meaning by how they sound or the images they convey. Consider dynamic words such as slash rather than cut, and shred rather than crumble.
Use action words. Incorporate words that suggest movement or meaning by how they sound or the images they convey. Consider dynamic words such as slash rather than cut, and shred rather than crumble.
![]() Use figures of speech, such as similes and metaphors. Similes are introduced by the words as or like, as in “My love is like a red, red rose.” A metaphor is a direct comparison, without like or as, as in “business is war.”
Use figures of speech, such as similes and metaphors. Similes are introduced by the words as or like, as in “My love is like a red, red rose.” A metaphor is a direct comparison, without like or as, as in “business is war.”
Use Dynamic Entrances and Openings
You have probably heard that you get only one chance to make a first impression. This adage holds for your training sessions, too. With your first few sentences, you will win or lose your audience. The purpose of your introduction, therefore, is to open up the participants’ minds so they will be receptive to your delivery. You want to get them involved immediately.
To begin, tell the audience what the training is about and explain the overall purpose. You can use one or more of the following methods:
![]() Ask a question.
Ask a question.
![]() Make a dramatic statement.
Make a dramatic statement.
![]() Appeal to a special interest of your audience.
Appeal to a special interest of your audience.
![]() Use visual aids.
Use visual aids.
![]() Tell a story, anecdote, or personal experience.
Tell a story, anecdote, or personal experience.
![]() Use a quotation.
Use a quotation.
Another way to begin your session is to introduce a team project that can serve as a “mixer.” Use a puzzle, game, question-and-answer sheet, or a quick quiz. The key to success here is to use a theme and a prop that is coordinated with your topics.
The introduction is an essential step in setting the tone and direction of the training program. Although this is the first part of your session, prepare it last. Remember, you must accomplish the following in the introduction:
![]() Gain trainees’ interest.
Gain trainees’ interest.
![]() Check the trainees’ current knowledge.
Check the trainees’ current knowledge.
![]() Orient the participants.
Orient the participants.
![]() Preview your material.
Preview your material.
![]() Offer motivation.
Offer motivation.
Immediately, you must build respect and rapport. You do this by what you say, but also by how you act. Below are some techniques:
![]() Walk to the front of the room with poise, confidence, and authority.
Walk to the front of the room with poise, confidence, and authority.
![]() Take a deep breath.
Take a deep breath.
![]() Step in front of any barriers.
Step in front of any barriers.
![]() Think about the fun that you’re going to have.
Think about the fun that you’re going to have.
![]() Begin by greeting participants enthusiastically!
Begin by greeting participants enthusiastically!
Then, go on to accomplish these tasks:
![]() Introduce the seminar.
Introduce the seminar.
![]() Introduce yourself, and let the participants know something about you. Tell them about yourself and your experience (and that experience should relate to your credibility of why you are presenting this class—keep it short).
Introduce yourself, and let the participants know something about you. Tell them about yourself and your experience (and that experience should relate to your credibility of why you are presenting this class—keep it short).
![]() Set up your expectations for the course.
Set up your expectations for the course.
![]() Establish how you will deal with issues that are relevant but not priorities.
Establish how you will deal with issues that are relevant but not priorities.
![]() Determine participants’ expectations for the course.
Determine participants’ expectations for the course.
![]() Use motivation and participation techniques.
Use motivation and participation techniques.
![]() Get participants working on a project or in groups.
Get participants working on a project or in groups.
Provide a Solid Presentation of Information
In the body of your lesson, you present the major points to the trainees, in logical order and supported by evidence and reinforced with practice. For each new piece of information, you build on prior experience, give examples to illustrate, provide practice, and judge the comprehension.
Keep in mind that the body of the presentation is the development of a statement, which represents the theory or skill you want to teach. A statement can express an idea, make a judgment, offer an opinion, provide a fact, or present a matter of inquiry. You can develop a statement in any of these forms through illustration, interpretation, or reinforcement. For example, you can use the following to support your development of each statement:
![]() Facts: Statistics, data, something that can be proved, such as a typical circumstance or characteristic case to make the statement clear, vivid, and credible.
Facts: Statistics, data, something that can be proved, such as a typical circumstance or characteristic case to make the statement clear, vivid, and credible.
![]() Comparison and Contrast: A likeness or difference that associates the new with the familiar.
Comparison and Contrast: A likeness or difference that associates the new with the familiar.
![]() Testimony: The say-so of someone other than you, preferably a well-known authority.
Testimony: The say-so of someone other than you, preferably a well-known authority.
![]() Quotation: An opinion that is short and to the point.
Quotation: An opinion that is short and to the point.
![]() Digression: Built-in element that allows you to act as if you were departing from your script to tell a secret or to relate something that just popped into your head.
Digression: Built-in element that allows you to act as if you were departing from your script to tell a secret or to relate something that just popped into your head.
![]() Demonstration: Something you show how to do while the audience watches.
Demonstration: Something you show how to do while the audience watches.
![]() Visual Aid: Laptop computer projected on a screen, wall charts, learning maps, 3-D models, or drawings add some pizzazz and interest to your presentation, make your point vivid, and help your audience remember the material.
Visual Aid: Laptop computer projected on a screen, wall charts, learning maps, 3-D models, or drawings add some pizzazz and interest to your presentation, make your point vivid, and help your audience remember the material.
Remember as you deliver the body of the lesson that each major point is a mini-presentation, with its own introduction, body, and conclusion.
Effective Use of Time
Total time allotment and schedule are important considerations, especially during the presentation. As discussed earlier in the chapter, you have a specific amount of time to present a specific amount of information. You must maximize learning per unit of time. Assume 60 minutes have been allocated for theory presentation. You don’t actually have 60 minutes because 5 minutes will be spent on your introduction. Then 5 minutes will be spent introducing and bridging your lesson, and 5 minutes will go to concluding and summarizing.
The remaining 45 minutes is usually broken up unequally between theory and activity. Usually you spend less time on theory and more on the activity. For example, in a 45-minute presentation in which you present two concepts, allocate 5 to 10 minutes to each theory segment and 10 to 15 minutes each to activity and testing.
Types of Sessions
As introduced in Chapter 3, three types of training formats are: theory, skills, and lectures (see Table 3-3). Unlike the theory session model (see Figure 3-1), in which you create an activity by observing whether participants have attained the training objective, in the skills session model (see Figure 5-5), you readily observe the trainees performing the task and directly applying the content you have provided. The skills session is all about physical activity (the behavioral component of the objective).
Figure 5-5. Skills session model.
![]()
The body of the skills session can be broken down into its three components as well. The introduction aims to gain participants’ interest, check their current knowledge, and orient them to the training. The body is for show, show-and-tell, and practice. The conclusion links material together and clarifies issues. Therefore, in organizing the skills session, you break the task down into a series of closely linked steps requiring physical activity. By having the participants repeatedly practice those steps, you give them the chance to perfect the task (measured in terms of time it takes and quality of output).
To help determine if you have explained the task successfully, figure that the trainees should be able to perform it in less than 10 percent of the total length of the session. Again, using the example of a 45-minute session, you would want the participants to learn a four-and-a-half-minute task.
Active Teaching Tools
If you remember only one thing about the conclusion, it is to make it memorable. Use body language to indicate that you have finished your presentation. Nod and step back briskly from your speaking position. You might say something like, “I enjoyed being with you. Thank you for your attention and your participation. Best of luck to all of you.”
But first, begin the conclusion by briefly reviewing your topic and the major points, and provide a summary of the training. Here is a list of techniques that assist in summarizing the learning content. You may do one or more of these steps, in sequence or simultaneously. Make your choice by considering the topic, the participants’ abilities and accomplishments, and the participants’ preferences:
![]() Appeal for action by stating what you want the participants to do.
Appeal for action by stating what you want the participants to do.
![]() State your conclusions.
State your conclusions.
![]() Relate the conclusion to the introduction.
Relate the conclusion to the introduction.
![]() Ask a question.
Ask a question.
![]() Use a dynamic quotation.
Use a dynamic quotation.
![]() Stress the relationship of your topic to the participants’ interests.
Stress the relationship of your topic to the participants’ interests.
![]() Pay your audience a compliment.
Pay your audience a compliment.
Review the course and participant objectives, pointing out accomplishments. Refer back to significant moments in the training. Take out the pretraining needs assessment, and review it. Go around the circle, and ask participants to identify a significant event for each day of the training. Discuss memorable learning.
Similarly, take care of remaining housekeeping issues. Make sure you have done all of your tasks, critiques, forms, and rosters. If you have promised to send materials, announce an arrival date. Mention how long you will remain in the room for help or questions. Summarize all of the learning that occurred in the training. Point out how much the participants have achieved using the topic name. Praise their perseverance, their effort, and their hard work. Then end with a story that motivates and encourages lifelong learning.
Be sure to give participants a reason to practice what they learned in the course. Make sure your conclusion is real. If it has a joke, be sure it’s an original. Don’t preach or significantly change your personal style. Your last words should be “thank you” to the participants, telling them how much you have enjoyed the experience. Don’t ruin the moment by adding anything more!
A power close includes everything: a summary of the content, an opportunity for a dialogue or exchange, and individual reflection and sharing. The final point should end with some type of graphic display. For example, a group picture, a review of the individual goals’ chart, or the circle of sharing. Using a strategy that collects all of the information together to develop a summary, invite reflections to ensure successful training transfer.
And when you are planning, organizing, and rehearsing your presentation, be sure to include how you will leave the speaking area, as well as what you will do immediately upon leaving. You have several options:
![]() To sit in the chair from which you were introduced
To sit in the chair from which you were introduced
![]() To stand on stage to greet people
To stand on stage to greet people
![]() To move around the room to greet people
To move around the room to greet people
![]() To go into the hall to greet people
To go into the hall to greet people
![]() To leave the area so that the group can proceed to another activity
To leave the area so that the group can proceed to another activity
Remember, the power close is a memorable time. All learners like to participate in something that brings the training to closure. For some, the training has been a wonderful experience; they have met a lot of great folks, and they have learned plenty. Even the “fence sitters” will participate during the closing because it’s a positive event. Participants start to mentally check out about 30 minutes before the announced ending, so about 30 minutes before the end, begin making it clear that it’s almost over. As for delivery, keep these tips in mind:
![]() There’s no way to fake a good closing!
There’s no way to fake a good closing!
![]() Don’t memorize it.
Don’t memorize it.
![]() Allow enough time at the end of the event to deliver it well.
Allow enough time at the end of the event to deliver it well.
![]() Stay on schedule.
Stay on schedule.
![]() If they ask, “Can we go now?” You can bet you didn’t close it well!
If they ask, “Can we go now?” You can bet you didn’t close it well!
Secrets for Presentation Success
Audience Management
What if your worst fears are realized and your audience is looking around the room, and not at you—or worse, they seem to be falling asleep? If you find yourself in this situation, risk more not less. Make your delivery more dramatic. Identify a few sympathetic-looking faces, and work with them. Communicate an increased level of caring about your audience. For example, ask the learners to share their concerns or discuss the situation with you. It’s best for everyone concerned that you know what’s going on—best for the learners to know that you know that they know and that you want to understand and solve the problem.
One method for managing the audience is to use the SEE factor:
![]() Spontaneity. Respond immediately when there are concerns or concepts that need clarification.
Spontaneity. Respond immediately when there are concerns or concepts that need clarification.
![]() Enthusiasm. Be genuinely glad to be facilitating the learning situation; welcome questions or comments. If the matter is not appropriate, agree on a time for discussion.
Enthusiasm. Be genuinely glad to be facilitating the learning situation; welcome questions or comments. If the matter is not appropriate, agree on a time for discussion.
![]() Eye Contact. Be an active listener by looking at the person talking, and be an active presenter by focusing on the audience. Don’t look over their heads or at your notes. Be engaging.
Eye Contact. Be an active listener by looking at the person talking, and be an active presenter by focusing on the audience. Don’t look over their heads or at your notes. Be engaging.
Teaching people is like holding a conversation with friends. Provide a structure for the conversation, and direct the dialogue so that it is open and satisfying for everyone involved. Most of the time, we have to make inferences about the participants, and your participants will make those inferences about you, too. The first 10 minutes are the most critical. In a friendly way, present the training according to its logical four parts: introduction, topic information, practice, and feedback.
1. Introduction. To engage learners at the outset of the training requires meticulous attention to the way you begin your event. Preview the training, and be specific as to what the participants are going to learn.
2. Topic Information. To keep on track, pay attention to sequencing; make sure that every detail is structured to achieve the overall objective. Make sure the training targets the learners’ reasons for being there. Also, think about the various learning styles and how to match up the style with the need. Note the three types of learners in the audience. The auditory learner will not take notes, just listen with a consistent stare; don’t be alarmed about this because these learners are concentrating on what is being said. Don’t ask if they are “with you.” They are with you—they are processing the information. The visual learner will furiously take notes, draw pictures, use colored pens, and ask you to describe or give examples that explain the concepts. These learners will also be engaged and active. The affective learner will be calm and comfortable unless confronted. If something does happen, the affective learner will act to make things okay for everyone else.
3. Practice. Create opportunities for the participants to try out the new concepts or skills. Actively involving them will hold their interest. Develop a demonstration, tell a story, or give an example of how the concept or skill works back on the job. Once the learners understand how to connect the concept and the example, the opportunity to practice will keep them interested in the training.
4. Feedback. Design feedback opportunity into your session. The more learner-centered your training is, the more your learners will be with you. Think of yourself as the coach, and establish learning contracts with your participants.
Handling Difficult Situations
Keeping the monkeys off your back is an important part of being in control and feeling calm during the training sessions. If you know the typical things that can go wrong, you are prepared if they do. There are three categories of difficult situations:
1. When things go wrong …
• Remain calm and think of something proactive you can do.
• Even if the best of techniques goes wrong, laugh at it.
• Keep your sense of humor. Your ability to laugh at yourself or the situation will increase the participants’ positive opinion of you and your expertise!
• Do not place blame. Focus on the solution, not the problem.
• Don’t spend time rehashing what’s happened. That’s reactive behavior!
2. If participants complain …
• Don’t automatically agree with the participant; remain neutral.
• Ask the other participants for solutions.
• If participants can solve the problem, and it’s okay, empower them!
• Find the appropriate person to solve the problem; you don’t have to handle all of the issues!
3. If the participant is right …
• Remain neutral.
• Find an immediate common ground.
• Look for a solution that helps the situation now!
Question-and-Answer Sessions
Most presentations build a question-and-answer session into the end. This session allows the conversation you are having with the participants to move in the direction trainees might want to go. Plan ahead for this by having answers to questions that you anticipate the audience will ask.
However, what do you do if the unthinkable happens and no one asks a question? You have several options:
![]() You can avoid the appearance of no questions by planting a colleague or two in the audience who will ask questions. Sometimes that one question will encourage other people to begin asking.
You can avoid the appearance of no questions by planting a colleague or two in the audience who will ask questions. Sometimes that one question will encourage other people to begin asking.
![]() You can ask a question yourself: “Someone once asked me….”
You can ask a question yourself: “Someone once asked me….”
![]() You can end the presentation gracefully, “Seeing that there are no questions, let’s end for today.”
You can end the presentation gracefully, “Seeing that there are no questions, let’s end for today.”
Additionally, audiences have a variety of reasons for asking questions. Don’t assume that all those who ask questions are seeking information. People may ask questions to test you, show their own knowledge, make points, or get your approval. Following are some tips for managing your audience during the question-and-answer sessions:
![]() Receive all questions in an open, friendly manner. Don’t react or be defensive, even if someone is trying to put you on the spot.
Receive all questions in an open, friendly manner. Don’t react or be defensive, even if someone is trying to put you on the spot.
![]() Listen carefully and restate the question to make sure you understand it and the entire audience hears it.
Listen carefully and restate the question to make sure you understand it and the entire audience hears it.
![]() Think before you answer. Consider the following processing points before providing a response: Why is someone asking this question? How does this question fit with my purpose? How can I answer as briefly and as well as possible?
Think before you answer. Consider the following processing points before providing a response: Why is someone asking this question? How does this question fit with my purpose? How can I answer as briefly and as well as possible?
![]() Use the KISS (Keep It Short and Simple) principle. However, do not answer simply yes or no; answer with a short, to-the-point statement, perhaps supported by a brief example.
Use the KISS (Keep It Short and Simple) principle. However, do not answer simply yes or no; answer with a short, to-the-point statement, perhaps supported by a brief example.
![]() Admit to not knowing an answer, and offer to find out the answer and then follow up with the answer.
Admit to not knowing an answer, and offer to find out the answer and then follow up with the answer.
Memorable and Motivational Training
There are three lesser known ways that really help you get the learners’ attention. These fun events are usually memorable and leave people talking about them long after the training is over.
1. Ring a bell. Agree at the beginning of the course that you will quietly ring a bell when it’s time to reconvene or end an activity. Or stop the music that you have been playing during the activity.
2. Use real-life examples. If you can relate your organization’s, or another company’s, situation or a well-publicized example to the training subject, do so. Also, customer or client stories work well.
3. Tell a story from your own experience. If you are trying to explain a complex theory, tell a success story from a previous training. Or give examples of what you have observed. Try to relate the training to problems learners have had when back on the job.
Additionally, there are two basic types of memorable training techniques that are free of cost and simple to use, as shown in Table 5-2. Environment techniques use the physical setting to catch learners’ attention. Get-to-know techniques help you bridge the distance and reach reluctant learners.
Ideas for Greater Retention
The successful transfer of training is not just the trainer’s job, it is also the learner’s responsibility. However, as the facilitator, you can help that transfer take place. Table 5-3 lists some retention strategies you can use during your sessions.
Table 5-2. Memorable training techniques.
Environment Techniques | • Put phrases on the back of the tent cards. • Hang quotes around the room • Ask participants to write motivating phrases on an index card. Pass the index cards around, and then hang them on the wall. |
Get-to-Know-Participant Techniques | • Seek out those who seem distant, and talk with them to make them feel welcome. • Help the shy learners get to know others in the classroom; arrange chairs so that they have someone to sit with. • Provide a “lunch chat” session for anyone who wants to eat with the trainer. |
Table 5-3. Retention techniques.
Technique | Characteristics |
Outline your course on the first day, immediately during the introduction. | Make sure the outline flows from one idea to another. Think about these points: • Daily outline defines what is to be covered during that day. Don’t skip anything, and don’t add anything on. • Post the outline on the wall; refer to it often. |
Look for sequence of process. | Teach in logical progression. For example, use steps, general to specific and specific to general. |
Use diagrams and flowcharts. | • Each chart should contain icons that represent the most important information sections of the course. • Repeat the course outline in the participant notebook. • Ask the participants to draw a flowchart that will represent the information being covered in class. |
Conduct daily review sessions. | Use session reviews to reacquaint participants with the items covered the previous day. |
Conclusion
Following are key points to remember when you prepare to implement your training:
![]() Training delivery is like holding a conversation with your audience.
Training delivery is like holding a conversation with your audience.
![]() The most important and time-consuming step of training implementation is planning the delivery.
The most important and time-consuming step of training implementation is planning the delivery.
![]() Understanding the relationship between content and training methods helps you select the correct materials and format for your delivery.
Understanding the relationship between content and training methods helps you select the correct materials and format for your delivery.
![]() How you organize your training determines whether you use theory or skills sessions.
How you organize your training determines whether you use theory or skills sessions.
![]() You successfully manage your audience by paying attention to the group, and by fulfilling your contract to deliver on time and in the allotted time.
You successfully manage your audience by paying attention to the group, and by fulfilling your contract to deliver on time and in the allotted time.
Use the presentation checklist in Table 5-4 to ensure you have prepared each stage of the presentation.
You can monitor the progress of your presentation by asking summarizing questions or using a checklist posted on a flipchart. If you use a wall chart or learning map, make sure you refer to each item on it. If you use a checklist, check off the items as you complete them.
In this chapter we discussed the implementation of the training design, the result of which is successful training, with the participants gaining new skills or greater information. Whether they take that information back with them to the job is best measured by feedback and evaluation—the topic of our final chapter.
Table 5-4. Presentation checklist.
Item | Date Completed |
Accept invitation to delivery training. | ________________ |
Write the title. | ________________ |
Determine the purpose. | ________________ |
Prepare the instructional objectives. | ________________ |
Identify your audience. |
|
Learn about the physical setting in which you will deliver training. | ________________ |
Research the content. | ________________ |
Organize your material and determine the exact content. | ________________ |
Plan the body. | ________________ |
Plan the conclusion. | ________________ |
Plan the introduction. | ________________ |
Plan the visual aids. | ________________ |
Engage a full-service shop to execute the visual aids. | ________________ |
Receive professionally prepared visual aids. | ________________ |
Type your notes. | ________________ |
Rehearse for yourself. | ________________ |
Rehearse for others. | ________________ |
Conduct a dress rehearsal. | ________________ |
Write an outline of the presentation each night. | ________________ |
Review the answers to any questions, quizzes, tests, instruments, or surveys. | ________________ |