
CHAPTER FOUR
Set the Scene for Learning
You have defined the training need, designed the program, and chosen your methods and approach. Now, creating an environment that will encourage learners to challenge, experiment, and have fun is your goal. If learners become truly engaged in the task, and you present the information using accelerated learning principles designed for adults, the learners will begin to use this new knowledge with ease. Learning principles help you make the content more three-dimensional and move the class from the theory behind the training to the information the class will use in practice.
To create the setting that will work best to make this transition, you need to consider meeting both the physical and the emotional needs of the learners. The physical considerations are easiest, so let’s begin with those.
The Physical Environment: Training Rooms
Unless you are an extremely lucky person, almost all of the rooms that you will use to conduct your training sessions were built for another purpose. The rooms you’ll be given will range from traditional classrooms to hotel meeting suites, to conference rooms, boardrooms, and cafeterias, to living rooms, workshop floors, ballrooms, and even rooms in casinos. Make the best of your situation, and turn the environment into your workspace. Use anything you can find—be creative.
To begin, you need to establish the right space between you and the learners so you can maintain eye contact and manage the learning discussions while also establishing rapport. Beyond that, you need to determine how to configure the seating (unless it is fixed). To help you decide which configuration to use, consider the following from both your perspective and that of the learners:
![]() Visibility. Can you see them, and can they see you?
Visibility. Can you see them, and can they see you?
![]() Volume. Can you hear them, and can they hear you?
Volume. Can you hear them, and can they hear you?
![]() Nature of the session. Is it formal or informal? This depends on the purpose, content, and audience.
Nature of the session. Is it formal or informal? This depends on the purpose, content, and audience.
![]() Degree of interaction. How much learner involvement will there be? Will there be discussion or just listening?
Degree of interaction. How much learner involvement will there be? Will there be discussion or just listening?
![]() Extent of audience relationship. How much rapport will there be between you and the learners?
Extent of audience relationship. How much rapport will there be between you and the learners?
![]() Potential for group dynamics. Does your program include audience/group participation?
Potential for group dynamics. Does your program include audience/group participation?
Room Styles and Arrangements
There are six well-known configurations for a training room: classroom u-shape, round-table conference, chairs in a circle, small group cluster, and theater. Knowing ahead of time the configuration of the room, especially if it is fixed, is important because you can use that information to tailor your presentation. The size and shape of the room, the seating arrangement, and your location relative to the audience are critical factors to consider in the preparation phase (Chapter 3).
The right room setup can contribute to the success of your training; likewise, a poor setup can lead to devastating results. Yet, all it might take to change a nonconductive training room into an inviting setting is your shifting things around. Table 4-1 lists four typical room designs and gives tips on improvements.
Each room design has its pluses and minuses. Here are the characteristics of each style, to help you choose the best room setup.
Table 4-1. Possible room designs.
Designs | Tips for Use |
Traditional classroom | Design a fun, safe, and inviting environment. Use props to shift the mind; the traditional classroom brings back experiences with formal schooling. Put up posters, use a welcome sign on the door, create a welcome letter with bright color on the table, or give them an interesting article (can also send this out via e-mail) to read before the learning event begins. Or, design a fun welcome note and place it on your chart paper with your name, date, and course number. Other: put candy out along with colorful supplies such as colored paper, sticky notes, or paper tabs for marking places in the participant notebook. The intent for the props is to communicate to the participants that this is a fun, safe, and engaging event. |
Corporate meeting room | Integrate the furniture that exists to create a multipurpose learning environment. Use the corporate round meeting table as the teaching section of the room. Use these four corners as the mini-event spaces; put up a welcome sign. Design a creative poster that promotes the topic of the course, and hang it on the door or strategically place on a wall that participants will see when they enter. Dress up in a costume, if appropriate; have a “learning stick” or a magic wand placed on the table to break the traditional feeling that this meeting room is noninviting. The intent of the props and shifting of the furniture is to establish the philosophy that the group is attending to learn, have fun, and transfer the learning back home. So, turn up the lights, if possible, take advantage of the high-tech equipment. |
Convert the image-neutral space into a learning activity. Set up a main event area; this is usually in the front of the room. Around the room, place learning spaces with wall charts, computers, and in out-box exercises—given the topic, this room could be transformed into a learning labor or a learning emporium. For example, write final exams on various posters and hang the posters around the room; place learners in learning groups, and each learning group is instructed to go around the room as a cooperative learning group (starting and ending in the order of the posters), recording their group answers for each of the posters. Once the group completes the task, their individual scores and the group score is used in the final group. The hotel space can serve as a serious learning environment, yet feel safe. The intent is to use what you have and think about how you, as a learner, would like to feel in this space. |
|
Multipurpose room | These rooms come in various sizes and shapes: churches, community centers, city halls, courthouses, hospitals, museums, art galleries, and public buildings. They are accessible and that’s good. So, here’s how to use the space. First, make the room fit the group. If it’s a large one, section the room and create event areas and bring things into the event area like tables and chairs. Add tablecloths, coffee urns, and theater scenery (if appropriate). Set up extra tables as a library, break table, and chat table; put up banners! The intent here is that one or two outside items can make a big difference. |
Traditional Classroom
The standard classroom arrangement provides a lot of chairs and tables, easy access to the seats. The learning environment is hardwired into us, designed to meet learning objectives and desired outcomes. The role of the trainer in this arrangement is as an instructor. Some points to consider about this arrangement:
![]() Takes up more space than theater style.
Takes up more space than theater style.
![]() Good for note taking.
Good for note taking.
![]() Fosters good presentations and delivery of information.
Fosters good presentations and delivery of information.
![]() Not conducive for discussions and group participation.
Not conducive for discussions and group participation.
![]() Has an academic atmosphere.
Has an academic atmosphere.
U-Shape Style
A less traditional seating arrangement, this works well when participants will get up and form small groups. The role of the trainer in this arrangement is as a coach. Some points to consider about this arrangement:
![]() Takes up more space than theater or classroom.
Takes up more space than theater or classroom.
![]() Good for groups of 10 to 30 people.
Good for groups of 10 to 30 people.
![]() Combines the ability to make presentations and hold discussions.
Combines the ability to make presentations and hold discussions.
![]() Good for note taking.
Good for note taking.
![]() Has a business atmosphere.
Has a business atmosphere.
Conference Style
This arrangement promotes interactive activities because participants can look and listen to each other while seated around a table. The role of the trainer in this arrangement is as a facilitator. Some points to consider about this arrangement:
![]() Good for groups of 4 to 20 people.
Good for groups of 4 to 20 people.
![]() Encourages discussion.
Encourages discussion.
![]() Good for note taking.
Good for note taking.
![]() Good for presentation.
Good for presentation.
![]() Has a business atmosphere.
Has a business atmosphere.
Chairs in a Circle
This arrangement promotes group work and interactions. The role of the trainer in this arrangement is as a consultant. Some points to consider about this arrangement:
![]() Best for informal and participatory groups.
Best for informal and participatory groups.
![]() Allows presenter to serve as group member and less of an authority figure.
Allows presenter to serve as group member and less of an authority figure.
![]() Good for groups of 4 to 30 people.
Good for groups of 4 to 30 people.
![]() Suitable for interactive group games.
Suitable for interactive group games.
![]() Not good for note taking.
Not good for note taking.
![]() Not good for presentations using notes or technical aids.
Not good for presentations using notes or technical aids.
Small Group Settings
Similar to the U-shaped arrangement, the small-group style enables the trainer to walk among the learners or for the group to break into smaller groups for discussion. A small-group arrangement is good for presentations, especially those using visual aids.
Theater Setting
This arrangement permits the greater number of seats in the smallest amount of space. Theater style is good, and often necessary, for groups of more than 50, especially if the room size is limited. Theater style limits discussion and requires a more formal presentation. Also, make sure that all members of the audience can see you and your visuals.
Comfort Factors
Similar to the series of questions you might ask to get to know your audience, you will want to ask some questions to get to know the conditions in the room.
![]() Is the room properly lighted?
Is the room properly lighted?
![]() Does the room have cool fresh air or sufficient heat? A room that is too warm and stale will put your audience to sleep, especially after a meal. A room that isn’t adequately heated when needed is likewise too uncomfortable for people to learn.
Does the room have cool fresh air or sufficient heat? A room that is too warm and stale will put your audience to sleep, especially after a meal. A room that isn’t adequately heated when needed is likewise too uncomfortable for people to learn.
![]() Can the lights be appropriately dimmed for the projection screen? A room that is too bright will make it difficult to see the image on the screen, but a room that is too dark will make it difficult to take notes.
Can the lights be appropriately dimmed for the projection screen? A room that is too bright will make it difficult to see the image on the screen, but a room that is too dark will make it difficult to take notes.
![]() Are there outlets where you need them for your projector or laptop? If not, remember to bring an extension cord and tape it down so no one falls over it.
Are there outlets where you need them for your projector or laptop? If not, remember to bring an extension cord and tape it down so no one falls over it.
Your Training Space
The room setup is not complete without thinking about your own training space. Is the area where you will speak neat and looking professional? The lectern or stage is your personal space, and your audience will judge your effectiveness by how comfortable you are in it.
It has been discovered that the distance between you and the learners affects the degree of warmth, sense of closeness, and interaction that will occur. For example, if you stand too far from your participants, your presentation will appear formal. If you stand too close, participants may feel uncomfortable. The usual suggestion is to choose a moderate position, a comfortable interaction parameter, which means you can walk around, displace the furniture and equipment serving as barriers, and keep the space open between you and the audience. (For more discussion on training space, see Chapter 5.)
William Draves, in his book Energizing the Learning Environment, recommends that trainers be mindful of the “presenter zone.” Table 4-2 presents some tips on managing that distance.
The Learning Environment
Not only will you be setting the physical scene for the training but you’ll also be establishing the emotional and intellectual atmosphere. The learning environment is just as important as the physical environment. Without them both, learners will not maximize their learning.
Tip | Application |
Line is drawn | Stand in front of the room; draw an imaginary line from the learner on your left to the learner on your right; you should be no more than three feet behind the line. |
Chair trick | Move all of the comfortable chairs to the front row, thus, a reward for sitting up front. |
Make chairs disappear | Take all chairs around the wall and in the back of the room, stack and ship them somewhere so that they cannot be used and distract from the room setup. |
Move toward learners | If learners have migrated to the back of the room, remove the chairs in the front row and go to them. (Maybe have the class move the chairs with you, and make it a game.) |
Learning Curves and Patterns of Instruction
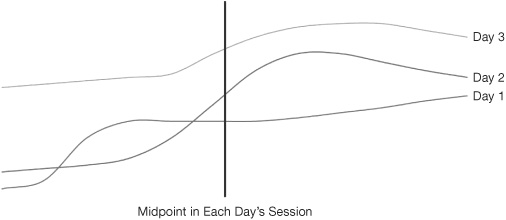
Every training event has a rhythm that reflects the content and instructional activities of the program. Figure 4-1 shows the learning curves for a three-day course. Notice that each day starts off slowly and builds. Gains are modest on Day 1; Day 2 shows a large increase in learning, as mastery of the subject is constructed atop a foundation of prior learning. By Day 3, the learning is fully integrated, and concludes with a higher level of topic mastery.
Encourage a Relaxed Atmosphere
Each person has a preferred way of learning. When people recognize which techniques match their preferred learning styles, they will view learning as natural and comfortable. Their relaxed state of mind will promote the most effective and efficient learning. There are six strategies to promote a comfortable and enjoyable learning environment:
Figure 4-1. The overlap of learning curves.
1. Create a low-stressed environment where it is safe to make mistakes, yet the expectation of success is high.
2. Ensure that the subject is relevant. Learners need to see the point of the training for them to learn.
3. Make sure that the learning is emotionally positive. Use humor and offer encouragement, provide regular breaks, and show enthusiastic support for their efforts.
4. Consciously involve all of the learners’ senses, as well as engaging their left- and right-brain thinking modes.
5. Challenge them to think through and explore what is being taught and to make personal sense of the subject matter.
6. Consolidate what is learned as you go along. Promote consistent review, and provide quiet periods of relaxed alertness.
Twelve Accelerated Learning Techniques
The accelerated learning method is based on research about ways of learning. Each person has a preferred learning style. If you know and use the techniques that match a person’s preferred way of learning, that individual will learn more naturally. And because it is more natural, the learning becomes easier. And because it is easier, it is quicker. By also incorporating well-researched memory techniques, you can use accelerated learning to make the training an enjoyable, successful, and satisfying experience that leads to behavior change and better performance. Static, one-way lectures are out; active, dynamic training is in. Accelerated learning, which recognizes the differences in how people absorb new information, is fast, effective, and efficient, but it only works when analytical skills are taught with a high level of participation.
Here are twelve accelerated learning strategies that you can use immediately in your training presentation:
1. Back-Home Exercise
2. Brainwriting and Brainstorming
3. Case Study
4. Collaborative Activity
5. Concert Review
6. Peripheral Materials
7. Demonstration in Class
8. Prework
9. Reading Assignment
10. Structured Note Taking
11. Skills and Knowledge Test
12. Self-Assessment
Such varied techniques provide opportunities to plan, organize, and create training sessions that are efficient because they make the training stick in a short amount of time. In essence, the content for your training program also is the process for instruction. Build into your training sessions the four basic steps for structuring the accelerated learning method:
1. Motivate the mind.
2. Acquire and absorb information.
3. Search out meaning (what is the implication and significance of the information?).
4. Trigger the memory by using accelerated learning techniques, including association, categorization, storytelling, acronyms, flash cards, learning maps, music, and review.
But let’s take a closer look at each of these techniques.
Back-Home Exercise
DEFINITION. Participants are given an in-class opportunity to practice what they have learned by applying the learned concepts to an existing back-home problem.
DIRECTIONS. Each participant writes a short synopsis of a back-home problem. Next, each participant presents the issue to the group. By group consensus, one problem is selected to be used as a model problem to apply the new techniques that were presented during the class. The group works as consultants to the participant who has the issue, thus helping that person apply the concepts and skills from the group to use back home.
Tools and Tips. Here are suggestions to consider when managing this learning process:
![]() Use the steps in sequence.
Use the steps in sequence.
![]() Use examples to reinforce learning with direct application to the learners’ situations.
Use examples to reinforce learning with direct application to the learners’ situations.
![]() Ask the class to share back-home plans.
Ask the class to share back-home plans.
![]() Make frequent referrals to back home during other activities.
Make frequent referrals to back home during other activities.
Brainwriting and Brainstorming
DEFINITION. Participants record ideas, advancing previous ideas (brain-writing) or listing ideas (brainstorming).
DIRECTIONS. For brainwriting, write two questions on chart paper. Each question should be put on a separate piece of chart paper and put on separate walls on opposite sides of the room so that participants can line up in two lines and then switch lines; the two lines save time. (Note: Have participants silently write their answers for each question; you can use more than two questions, just make sure that each question chart is located far away from each other.) Give a time limit. Participants are to work in silence. After the participants have recorded their answers, process the responses or have two participants process the questions and answers. An example of a question to construct is “Training is successful when …,” and the opposing question would be “Training is unsuccessful when….”
Use the mindmapping as a device for problem solving or decision making. The technique is based on the idea that many people find it helpful to dump a lot of ideas in a very short period of time and then organize the ideas. Have participants draw a circle in the middle of a paper. Put the key concept in the center, and branch out from the middle of the circle.
The brainstorming process allows participants to generate a list of responses to the question or activity in a given timeframe. This process gives the participants the opportunity to provide quick responses without being hindered by prejudgment. The point of brainstorming is to generate a lot of responses. Once the list of responses is produced, the participants review the list and delete responses that are not considered feasible.
Tools and Tips. Here are suggestions to consider when managing differences of opinion:
![]() Ensure that groups follow rules; monitor the groups closely; remember silence!
Ensure that groups follow rules; monitor the groups closely; remember silence!
![]() Don’t allow oral criticism (brainstorming).
Don’t allow oral criticism (brainstorming).
![]() Keep groups and papers moving. Keep them on track (brainwriting).
Keep groups and papers moving. Keep them on track (brainwriting).
![]() Point out that both brainwriting and brainstorming allow one person’s idea to trigger another person’s related idea.
Point out that both brainwriting and brainstorming allow one person’s idea to trigger another person’s related idea.
![]() Point out that brainwriting allows participants to build on ideas without the threat of criticism.
Point out that brainwriting allows participants to build on ideas without the threat of criticism.
![]() Use colored markers, and post charts.
Use colored markers, and post charts.
![]() Try using mindmapping in brainwriting as a recording or processing strategy.
Try using mindmapping in brainwriting as a recording or processing strategy.
Case Study
DEFINITION. Participants work to solve a problem similar to ones they face back home. A case study usually has multiple parts (plot, characters, issue, and setting) and various solutions and is processed as the parts are completed.
DIRECTIONS. Write a narrative—one or two paragraphs. Include detail about the situation, the characters involved, and the rationale for why this is an issue. Do not write suggested solutions; the point of the case study is to invite others to discuss the various options.
Tools and Tips. Here are suggestions to consider when completing case studies:
![]() Monitor groups, and answer questions.
Monitor groups, and answer questions.
![]() Don’t let the groups go too long without intervening.
Don’t let the groups go too long without intervening.
![]() Don’t use cases that are not related to the businesses of the participants.
Don’t use cases that are not related to the businesses of the participants.
![]() Point out that case studies encourage creative problem solving.
Point out that case studies encourage creative problem solving.
![]() Help participants learn from one another.
Help participants learn from one another.
![]() Post charts from all groups around the room so all groups can learn from one another.
Post charts from all groups around the room so all groups can learn from one another.
Collaborative Activity
DEFINITION. Participants work together to teach one another concepts, solve problems, or advance the learning objectives for the training.
DIRECTIONS. Create application exercises in the participant manual. The aim of the exercises is to invite learners to review the important points in the lesson. These exercises can include quizzes, scenarios, matching terms, or essays. The important point for this activity is that the group members can work independently and can then work together to pool their answers. This activity provides an opportunity for participants to ask for clarification and learn from others in the group; thus, each participant is becoming self-reliant while functioning as a team player.
Tools and Tips. This activity is a good way to review material and introduce the concept of the learning group, which means everyone helps one another. Here are some additional tips:
![]() Collaboration should pervade the entire training.
Collaboration should pervade the entire training.
![]() Learning is more effective in small groups with supportive and helpful members.
Learning is more effective in small groups with supportive and helpful members.
![]() Individual learning focuses on only the individual and does not provide for effective feedback.
Individual learning focuses on only the individual and does not provide for effective feedback.
![]() Individuals tend to emphasize their own mistakes, faults, and weaknesses, sometimes blowing them out of proportion because they have no comparisons.
Individuals tend to emphasize their own mistakes, faults, and weaknesses, sometimes blowing them out of proportion because they have no comparisons.
![]() Remember, there’s strength in numbers.
Remember, there’s strength in numbers.
Concert Review
DEFINITION. Trainers can review materials, periodically using music, presentations, wall charts, chart paper, movements, or oral reviews.
DIRECTIONS. This is a review activity. Tell participants that they are going to review the material covered thus far in the training and the number of concepts that have been presented. Have participants number their papers, assigning a number for each concept covered. Explain that the trainer is going to play music and at set intervals the trainer will put up an image that represents a concept that was presented during the training. Tell the participants that when they see the image, they are to write everything they know about the image until it disappears and another image appears.
After the presentation is complete, the learners should collaborate with their groups to clarify and check the entries on their recording sheets. This process is a great way to have the group work together, as well as to promote the collaborative learning processes.
Tools and Tips. The concert review approach to reviewing materials refers to the use of background music during review. The technique works for the three learning styles (visual, auditory, and kinesthetic) and the two ways people process information (linear and global). Some examples include the following:
![]() Visual. The facilitator silently goes through PowerPoint slides or wall charts. Background music is an enhancer.
Visual. The facilitator silently goes through PowerPoint slides or wall charts. Background music is an enhancer.
![]() Auditory. The facilitator reads specific review materials while background music plays.
Auditory. The facilitator reads specific review materials while background music plays.
![]() Kinesthetic. The group follows the facilitator around the room from item to item (wall charts, demonstration models, learning aids, or displays) while music plays.
Kinesthetic. The group follows the facilitator around the room from item to item (wall charts, demonstration models, learning aids, or displays) while music plays.
![]() Linear. The facilitator uses outlines of what’s first, second, third, and so on.
Linear. The facilitator uses outlines of what’s first, second, third, and so on.
![]() Global. The facilitator gives an overview.
Global. The facilitator gives an overview.
Peripheral Materials
DEFINITION. The term environing refers to treatment of the learning environment. Trainers can ease the anxiety of adult learners by using themes for training and decorating the training space according to the theme. Prewritten wall charts are an example of environing materials, also known as peripheral materials.
DIRECTIONS. Decorating the learning room with interesting posters or wall charts that depict the major concepts being presented in the training can be a bonus for the learners and the facilitator. The topic for each of the wall charts could contain icons or words, display a manufacturing process, or summarize an important topic. Trainers should dress their training rooms to invite learners to be creative, holistic, or interactive with one another and the training material. Using attention-grabbers is the key to making these concepts blend with the training process and content delivery.
Tools and Tips. Environing materials are materials that make the learning environment more conducive to learning the concepts of the course. They include the following:
![]() Wall charts and newsprint
Wall charts and newsprint
![]() Table decorations to fulfill a theme
Table decorations to fulfill a theme
![]() Mobiles and puzzles
Mobiles and puzzles
![]() Candles and scents
Candles and scents
![]() Anything that adds color, stimulation, and fun
Anything that adds color, stimulation, and fun
![]() Funny bags to hold all of the supplies for each table team
Funny bags to hold all of the supplies for each table team
![]() Basket for the trainer table with more supplies, candy, and surprises.
Basket for the trainer table with more supplies, candy, and surprises.
Demonstration in Class
DEFINITION. Participants observe or take part in a demonstration of the course concepts, techniques, skills, or tools.
DIRECTIONS. Adults learn best by doing. Therefore, an opportunity to demonstrate something involves the participants learning the concept and preparing to teach the concept. One suggestion for managing this concept is to take a section of the course material, form learning groups, and have each group prepare a 10-minute presentation. To accomplish this task economically, the instructor should pre-assign the material to be reviewed and prepare an instruction sheet for each group to follow to be ready to present the assignment to the large group.
Tools and Tips. The demonstration process serves as a teach-back tool and can serve as a mechanism to encourage collaborative group work. Here are some tips:
![]() Use actual equipment and resources as much as possible.
Use actual equipment and resources as much as possible.
![]() Make demonstrations easy for everyone to see, hear, observe, and practice.
Make demonstrations easy for everyone to see, hear, observe, and practice.
![]() Show trainees that you are an expert. This means that trainers may not be perfect at the skill, but, at the very least, they completely understand it.
Show trainees that you are an expert. This means that trainers may not be perfect at the skill, but, at the very least, they completely understand it.
![]() Don’t cut the process short. Teach all of the steps.
Don’t cut the process short. Teach all of the steps.
![]() Point out that demonstration allows hands-on learning.
Point out that demonstration allows hands-on learning.
![]() Show participants how this technique reinforces auditory and visual learning. If time and situation permit, let participants demonstrate.
Show participants how this technique reinforces auditory and visual learning. If time and situation permit, let participants demonstrate.
Prework
DEFINITION. Participants complete assignments prior to coming to the training session—it’s part of the prepare step in the accelerated learning process (prepare, present, practice, gain feedback).
DIRECTIONS. Learners really like to receive an agenda so that they can get a sense of what they are going to do, how to do it, and what the expected results are. The prework provides the opportunity for learners to prepare for the session. It serves as a map of the learning adventure they will experience when they arrive at the training.
Tools and Tips. Adult learners like to know where they are, where they are going, and how they will get there. The prework can serve as a mechanism to provide that direction. Here are some tips:
![]() Fun packages can include toys used in class, t-shirts, course logo stuff (pens, pencils, and notebooks), and video of skits or cartoons.
Fun packages can include toys used in class, t-shirts, course logo stuff (pens, pencils, and notebooks), and video of skits or cartoons.
![]() Serious work packages can include questionnaires, reassessment instruments, prereading material, audiotapes, or videotapes.
Serious work packages can include questionnaires, reassessment instruments, prereading material, audiotapes, or videotapes.
![]() Incentive-to-get-there packages can include course goals, course outline, testimonials from previous attendees, and statements of outcomes.
Incentive-to-get-there packages can include course goals, course outline, testimonials from previous attendees, and statements of outcomes.
![]() If the course has a theme, theme the prework!
If the course has a theme, theme the prework!
![]() Mix media and color, action, and fun.
Mix media and color, action, and fun.
Reading Assignment
DEFINITION. Participants are given evening or out-of-class assignments to supplement classroom materials and experiences.
DIRECTIONS. Reviewing and reflecting on the information gathered in class is something that you should encourage all participants to practice. Give them time to make connections between the new content and information that they already know. Look over the goals and objectives of the course, and develop summary handouts or search for expert sources of materials, articles, or case studies to expand the learners’ knowledge of the topics discussed.
Tools and Tips. The art of reading should be a skill that people continually practice. The reading assignments and report backs are vehicles to ensure that all of the participants have read required materials. Remember that participants have lives outside of the training. Try to keep the assignments quick (short reviews previewing the next day’s materials). Here are some additional tips:
![]() Make it memorable. Some people can learn a great deal by reading and homework; others hate it.
Make it memorable. Some people can learn a great deal by reading and homework; others hate it.
![]() Ask participants to record their learning creatively.
Ask participants to record their learning creatively.
![]() Try memory maps or mindmaps.
Try memory maps or mindmaps.
![]() Create a mobile or three-dimensional object.
Create a mobile or three-dimensional object.
![]() Ask participants to make videotapes.
Ask participants to make videotapes.
Structured Note Taking
DEFINITION. Text materials and rough outlines show participants what’s important and where to take notes. White space is provided for participants to add their own notes.
DIRECTIONS. Review the materials that you are to present in a lecture, and decide which sections are highlights of the training. Develop a note sheet for the participants to use to record the important points during your content delivery process. This teaching process can be a video, demonstration, discussion, or presentation.
Tools and Tips. The structured note process is something that people do all of the time in the form of recording thoughts or points in a meeting or developing a cheat sheet to remember points for a speech or presentation. The structured note process will assist the participants in remembering the important points of the presentation. Here are some tips:
![]() Design the courses to make everyone take notes once in a while.
Design the courses to make everyone take notes once in a while.
![]() Remember that it’s kinesthetic.
Remember that it’s kinesthetic.
![]() Go slowly enough so everyone can get something on paper.
Go slowly enough so everyone can get something on paper.
![]() Don’t put too much on the PowerPoint slides.
Don’t put too much on the PowerPoint slides.
![]() Don’t use jargon that learners don’t understand or can’t spell.
Don’t use jargon that learners don’t understand or can’t spell.
![]() Remember that note taking reinforces learning.
Remember that note taking reinforces learning.
![]() Have participants record in the participant guide, not on separate sheets of paper.
Have participants record in the participant guide, not on separate sheets of paper.
Skills and Knowledge Test
DEFINITION. Tests are used to determine how much participants have learned while they were attending the training.
DIRECTIONS. The importance of testing is to have participants reflect and recall information and to make the connections to their existing knowledge portfolio. The tests that trainers use should not be threatening but serve as a review. Prepare the tests, and put them in the participant manual in sections after the initial lesson or module. Trainers should use any test form they think appropriate. For example, fill in the blank, written response to a scenario or case study, or match the terms. Try to introduce the concept that tests can be fun and useful.
Tools and Tips. The tests are assessments, an opportunity to determine how well participants are grasping the information; therefore, make the tests collaborative and fun. Give prizes. Here are some suggestions:
![]() Daily review assessments work very well.
Daily review assessments work very well.
![]() Make sure all material is relevant, and use tests for different learning styles.
Make sure all material is relevant, and use tests for different learning styles.
![]() Allow learners to retake tests that are important to success.
Allow learners to retake tests that are important to success.
![]() Use testing creatively as a recall. For example, group quizzes with prizes.
Use testing creatively as a recall. For example, group quizzes with prizes.
![]() Don’t publish everyone’s score or make passing scores too high.
Don’t publish everyone’s score or make passing scores too high.
![]() If you have never written a test, get help!
If you have never written a test, get help!
![]() Participant-generated review questions add fun and show how much they are learning.
Participant-generated review questions add fun and show how much they are learning.
Self-Assessment
DEFINITION. Participants use profiles, tests, or inventories of their current skill levels to check their progress and learning during the class.
DIRECTIONS. Do not test for test’s sake. Participants love opportunities to find out more about what they are doing well and not so well. If trainers are going to use the assessment technique, they should make sure that it is valid and meaningful. Trainers can buy assessment instruments or develop their own, using the content that they are delivering in the session. For example, if trainers are teaching the learners the instructional system design model, they can write a scenario about a training department that receives a request for training and ask the learners to develop a response to the client that provides the steps they will take to fulfill the stated need. This scenario provides real-world experience and also serves to review the material.
Tools and Tips. Either purchase or develop assessment instruments that correspond to or highlight the concepts you are teaching. Here are some suggestions:
![]() Provide opportunities for learners to discover more about themselves.
Provide opportunities for learners to discover more about themselves.
![]() Suggest learners use similar assessments in their own classrooms.
Suggest learners use similar assessments in their own classrooms.
![]() Give learners fast and frequent successes.
Give learners fast and frequent successes.
![]() Try pre- and post-tests. This technique allows the learners to demonstrate to themselves what they have learned.
Try pre- and post-tests. This technique allows the learners to demonstrate to themselves what they have learned.
![]() Back-home quizzes let the learners know that there are some positive things going on they may not be aware of.
Back-home quizzes let the learners know that there are some positive things going on they may not be aware of.
Using the above 12 techniques, you will add energy and excitement to every training session and ensure faster, more effective, and greater efficient transfer of learner skills to the workplace.
Management of the Learning Process
Learning is not directly observable, yet it is something that almost everyone can experience. For example, learners will say, “I feel I know that now.” Or, “I saw how that formula works,” and “I know it now because I hear the different sounds and letter accents.” But what exactly is “learning”?
There are diverse definitions of learning. Most would agree that learning involves the process of change, and that learning is about acquiring new knowledge, skills, or attitude and comes from study or life experiences. Many popular definitions emphasize a change in behavior that lasts a relatively long time. When learning is defined this way, it is easy to measure. But what about new ways of thinking that open the possibility for new behaviors, but take a long time before they spark new ways of behaving? In such cases, learning is stymied, but can we really say that no learning has occurred? Learning is more than change in behavior. Learning involves three dynamic processes: thinking, feeling, and behaving.
When people learn, they respond differently to their situation by thinking differently, feeling differently, and acting differently. When trainers conduct trainings, they are interested in how learning to think differently and learning new ways of responding emotionally can support new behaviors that help individuals be more productive and feel more fulfillment from their work.
During the learning process, participants go through a number of intellectual and behavioral responses. This learning process takes place when learners begin to internalize the content and learning processes that are present during the training. Adult learners have the ability to be intellectually flexible, like learning while doing, can organize and synthesize pieces of data to create an understanding for themselves, and can make the information their own to use when they think best. Motivation to learn is a big factor of any learner, and you can’t motivate the learner—they motivate themselves to learn. What you can do is to establish the environment for the learner to feel motivated.
Motivate the Adult Learner
Participants attend trainings because they want to be there and to take away information and skills that will help them become more effective in their jobs. Providing opportunities for learners to interact with other participants during the classes is important. Developing opportunities for participants to share during group sessions is one way of providing the opportunity for sharing and exchanging. Sharing and interacting with and among groups during classes allows participants to hear and see a variety of ways to learn. Another way of providing sharing opportunities is to ask thought-provoking questions.
You’ve drawn up your plans and set the stage for training; in the next chapter, we discuss how you will implement the training program.