Adobe Photoshop is an image manipulation application developed by Adobe and is primarily designed for photo editing, retouching, image creation, and graphic design.
Photoshop is the industry standard and comes with a vast array of tools for manipulating digital images. It has become quite common to say that an image has been "photoshopped,” meaning that it's been airbrushed, edited, or manipulated in some way.
To make full use of Photoshop you’ll need a subscription to Adobe Creative Cloud. You’ll then be able to download Photoshop and install it on your computer.
Creative Cloud subscriptions can be quite pricey, but you can get a Photography Package for about $20 per month which includes the latest version of Photoshop.
It should be noted that the screenshots in subsequent chapters are correct at the time of writing; however, as Adobe releases updates to Photoshop, there may be slight differences in appearance.
Let’s get started.
Purchasing Photoshop
Select the “Individuals” tab, then scroll down and click “Buy now” under the “Photography (1TB)” plan.
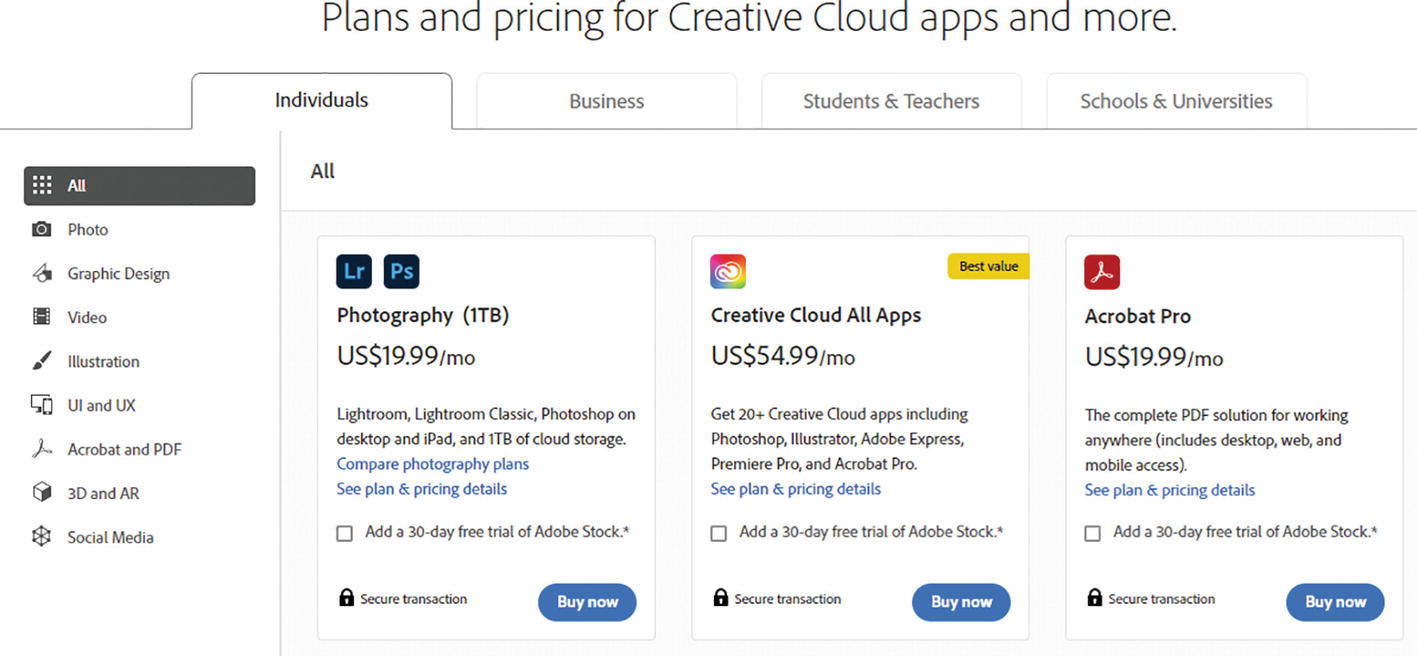
A page has the individuals tab selected on the menu bar. On the left is a selection panel and on the right are packages and plans for various apps.
Select “Annual paid monthly,” or if you want to purchase a full year, select “Annual, prepaid.” Click “Buy now.”

A window has a list of the apps included in the software package. On the right panel is an entry box for the payment plan selection, and a highlighted buy now button.
There is also a 30-day trial of Adobe Stock where you can find thousands of photos, images, and other illustrations you can use in your designs. Note that after the 30-day trial, you will be charged a fee. I usually leave this option unselected.
Enter your email address you want to use for your Adobe ID, then click “Continue” to run through the buying process.

A window has an entry box on the left panel for the email address, and a highlighted continue button below it. On the right is the purchase summary.
Select your payment method: either a credit card or PayPal, enter your details, then click “Continue” or “Agree and subscribe” at the bottom of the screen.

A window has an entry box on the left panel for the payment method and for other information pertinent to this, and a highlighted agree and subscribe button below it. On the right is the purchase summary.
Once you’ve subscribed, click “Get started” to download Photoshop.
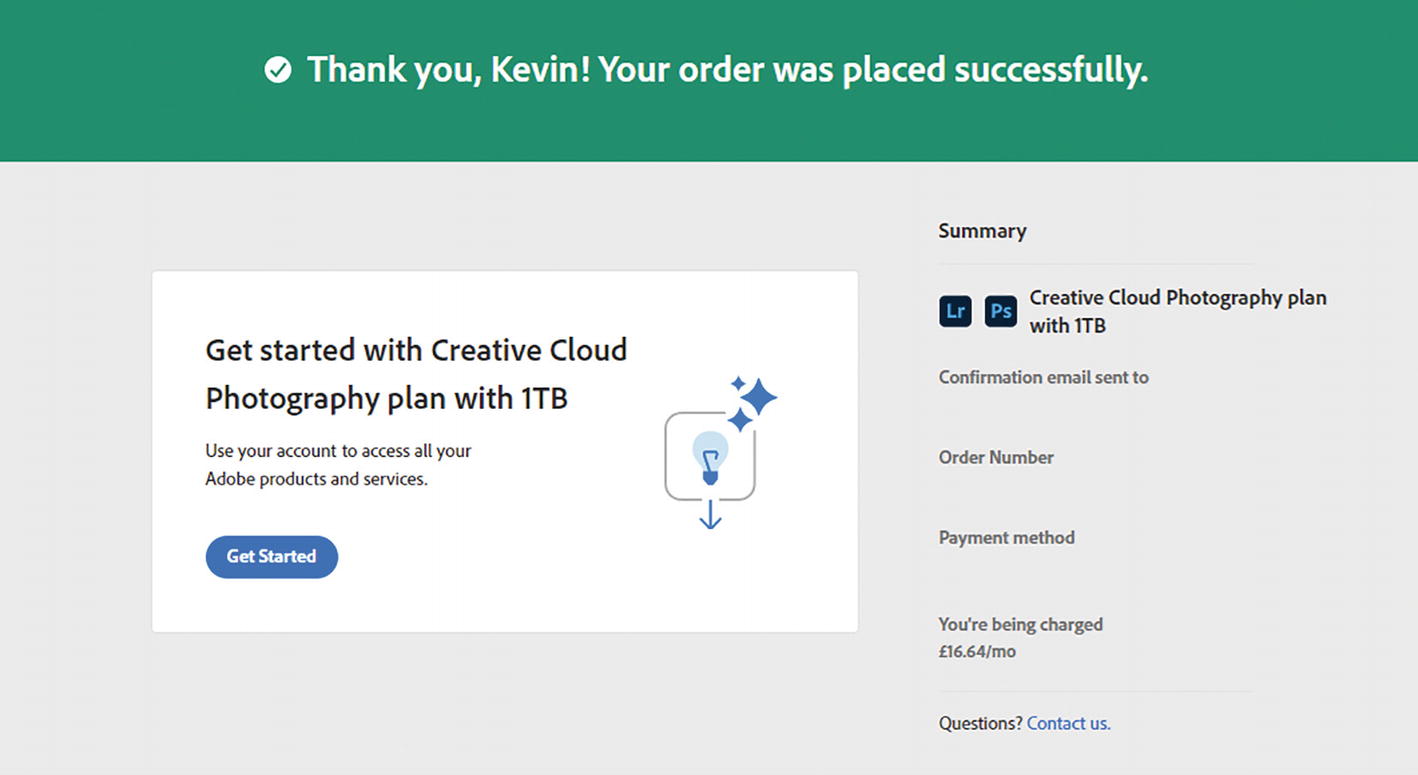
A window has the highlighted get started button on the left panel. On the right is the package summary. On the top reads, Thank you, Kevin! Your order was placed successfully.
See the next section for details on how to download and install Photoshop on your computer.
Downloading Photoshop
Sign in with your Adobe ID if you haven’t already done so. Select all apps on the left hand side, then click on the “Desktop” tab in the middle. Scroll down to “Photoshop,” then click on “Download.”

A window has arrows pointing at the all-apps option on the left pane and the desktop tab on the menu bar on the right. An arrow is pointed at the download button below.
Navigate to your downloads folder using File Explorer (or Finder on a mac). Double-click the file - which is usually “Photoshop_Set-Up.”

A window has an arrow pointed at the downloads folder on the left panel. On the right is the Photoshop set-up logo with an arrow pointed at it.
Once the installer program opens, click “Continue” on the title screen.

A window has a box labelled, Install Creative Cloud and Photoshop. Below is the highlighted continue button.
Sign in with your Adobe ID and password you created when you purchased Photoshop, click “Continue.”

A window has a sign-in panel requiring the email address. Below are the highlighted continue button, and other sign-in options like Facebook and Apple.
Click “Start installing” on the bottom right to run through the setup. This will take some time depending on how fast your computer is.

A window has a box labelled, Install Creative Cloud and Photoshop. Below is the highlighted start installing button.
Once Creative Cloud is installed, Photoshop will follow. Allow Photoshop to install on your computer. You’ll see the progress on the top right of the screen.

A window has the highlighted all apps option on the left pane. On the top right is a box informing that Photoshop is being installed, and below is a button labelled, next.
Again, this will take some time to complete.
Once installed, you’ll find Adobe Photoshop on your start menu in Windows. Click the icon to launch the application.

A desktop window has the start menu open on the lower left. An arrow is pointed at the Adobe Photoshop 2022 icon.
Or if you’re using a Mac, you’ll find Photoshop in Finder or on Launchpad. Click the icon to launch the application.

A Mac launchpad has the Photoshop icon boxed. On the finder menu at the bottom, an arrow is pointed at the launchpad icon.
Opening a Blank Project
Once Photoshop opens, you’ll see a thumbnail list of all your most recent projects in the middle. You can either open one of these or open a new blank project.

A window has the highlighted new file button on the left panel. On the right are thumbnails for the j p g and p s d files.
To open a new project, click “New file” on the left-hand side of your screen. You can also select “New” from the “File” menu on the top left. Here you’ll see some preset page sizes and templates.

A dialogue box has its various components boxed, with conversation bubbles next to each containing description. The main components are the menu bar, blank document templates, templates, and preset details.
New Document Dialog Box
For example, if you select the “Print” tab, you’ll see some familiar page sizes such as letter, legal, A4, and so on.
If we select A4, on the right-hand side you’ll see the preset sizes. You can change the height and width if you need to, set the orientation to landscape, or portrait, change the resolution (300 is usually the one to go for if you’re printing your work out and 72 is ideal for web). You can also set the background color (in our example, white).
Once all the settings are correct for your project, click “Create.”
Photoshop will open a blank canvas for you to start your design.
Opening a Saved File
When you start Photoshop, you’ll see a screen with a thumbnail view of all your most recently opened projects and images. If you see your project here, just click the thumbnail to open it up.

A window has the highlighted new file button on the left panel. On the right are thumbnails of j p g and p s d files.
If not click “Open” on the left-hand side of your screen and browse for the project. Photoshop files have the file extension “.psd”.

A window has a dialogue box with the documents folder highlighted on the left panel. On the right are folders, and various files with j p g and p s d extensions.
The project will open in the main window. Here you can edit and manipulate the image as you want using the various Photoshop tools

A window has several tool icons on the left pane, and a photo of a lake with a boat in the middle. On the right are the character and layers panels.
Saving a File
You should save your master file as a PSD – the master file is the version of your file that you want to be able to edit at the highest possible resolution/quality (usually 300dpi). This is the default and is the format that saves all the layers, effects, and edits you make to your files. To do this, use File ➤ Save As.
If you’re preparing your Photoshop file to send to a printing press, you’ll need to use Save As. In the Save As dialog box, you can select either a TIFF, EPS, or PDF file format, depending on what the printing press requires for their printers.
If you are saving the file to send to someone else, use in a word document, or on a website, you should export the file as a PNG or JPEG using the File ➤ Export Option, not Save As. This file doesn’t save any layers and the image isn’t as easily editable later on. These formats aren't as useful if you plan to edit the file as they don’t preserve layer information.
Save As
To save a file, click the file menu on the top left, then select “Save as.”
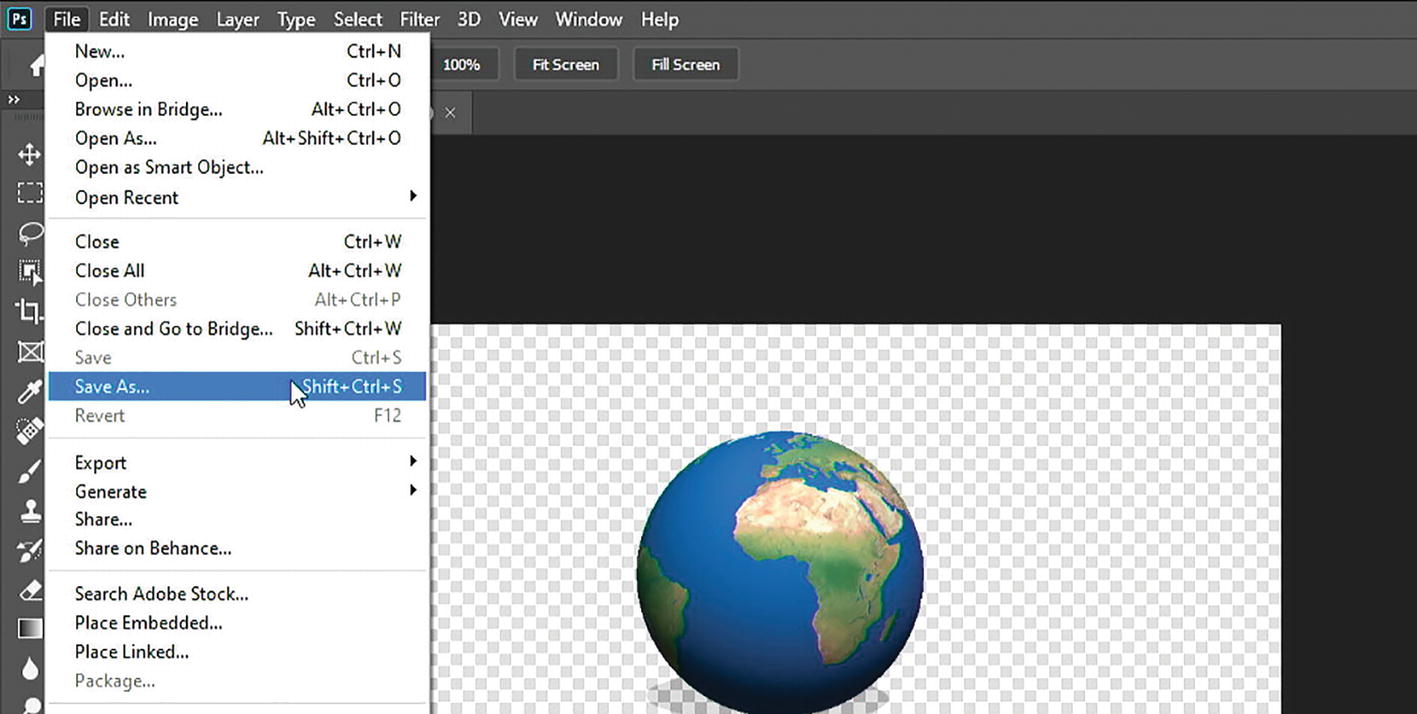
A window has the file tab selected from the menu bar on top. Below is a menu pane with the save as option highlighted. The picture of the globe without a background is in the middle.
In the save as dialog box, navigate to the folder where you want to save the file, for example, in the “Pictures” folder.

A dialogue box has the highlighted pictures folder on the left panel. On the right are entry boxes for the file name and save as type, and a highlighted save button.
Give the file a name.
In the format dialog box, select PSD for your master high quality file you want to be able to edit later. If you are sending to a printing press, select either .TIFF, .EPS, or .PDF
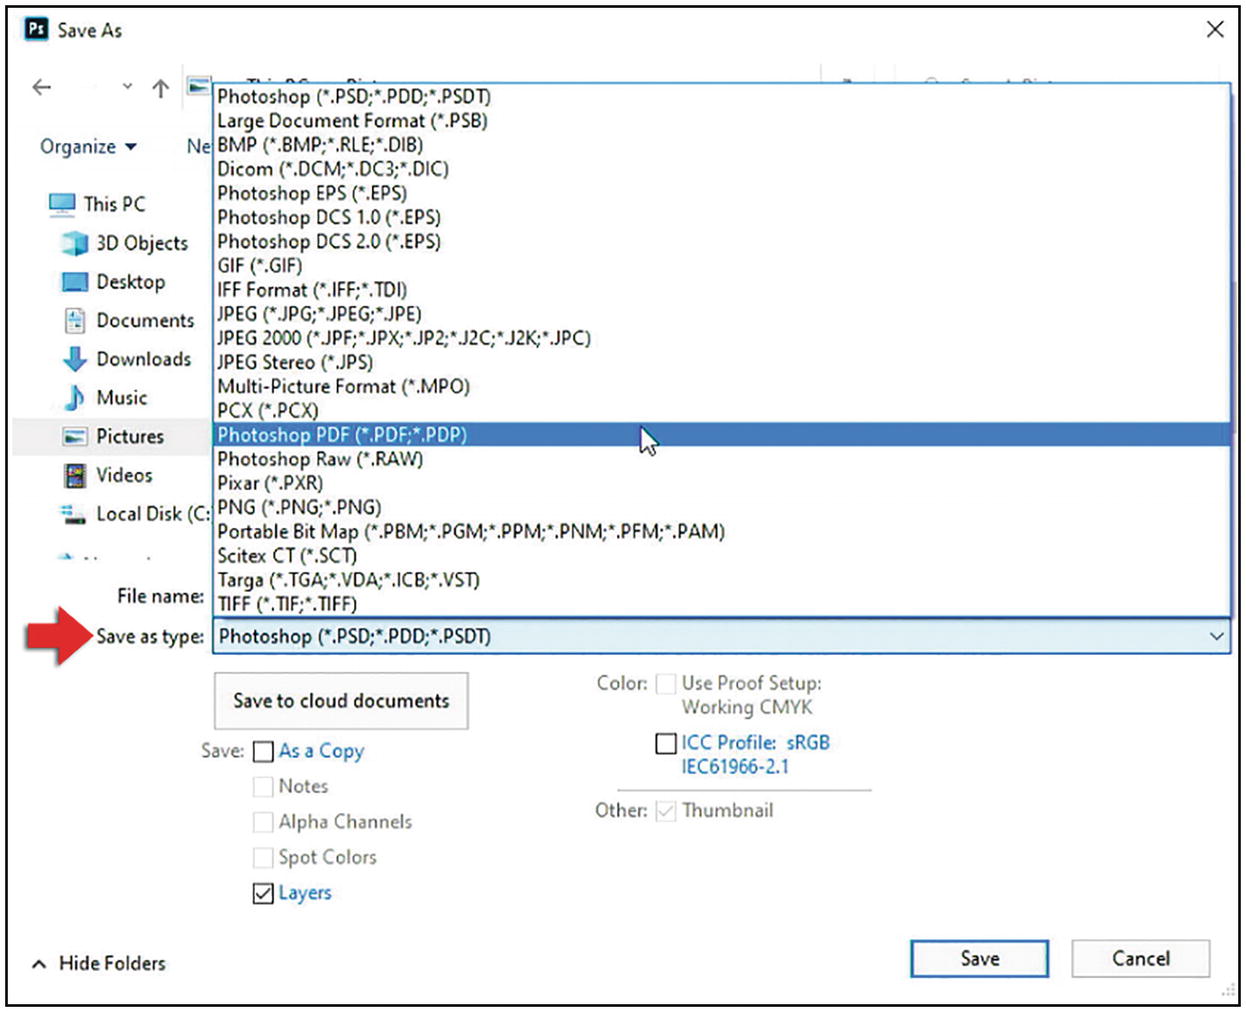
A dialogue box has the highlighted pictures folder on the left panel. On the right, an arrow is pointed at save as type with a p s d file selected on the entry box next to it.
Exporting
You should use “Export As” when saving final versions of your file as a PNG or JPEG for the web, or another application such as Microsoft Word.
To do this, click the “File” menu on the top left.

A window has the file tab selected from the menu bar on top. The menu panel below contains the options, save as, export, and generate, among others.
Go down to “Export.” Select “Export as” from the slideout menu.
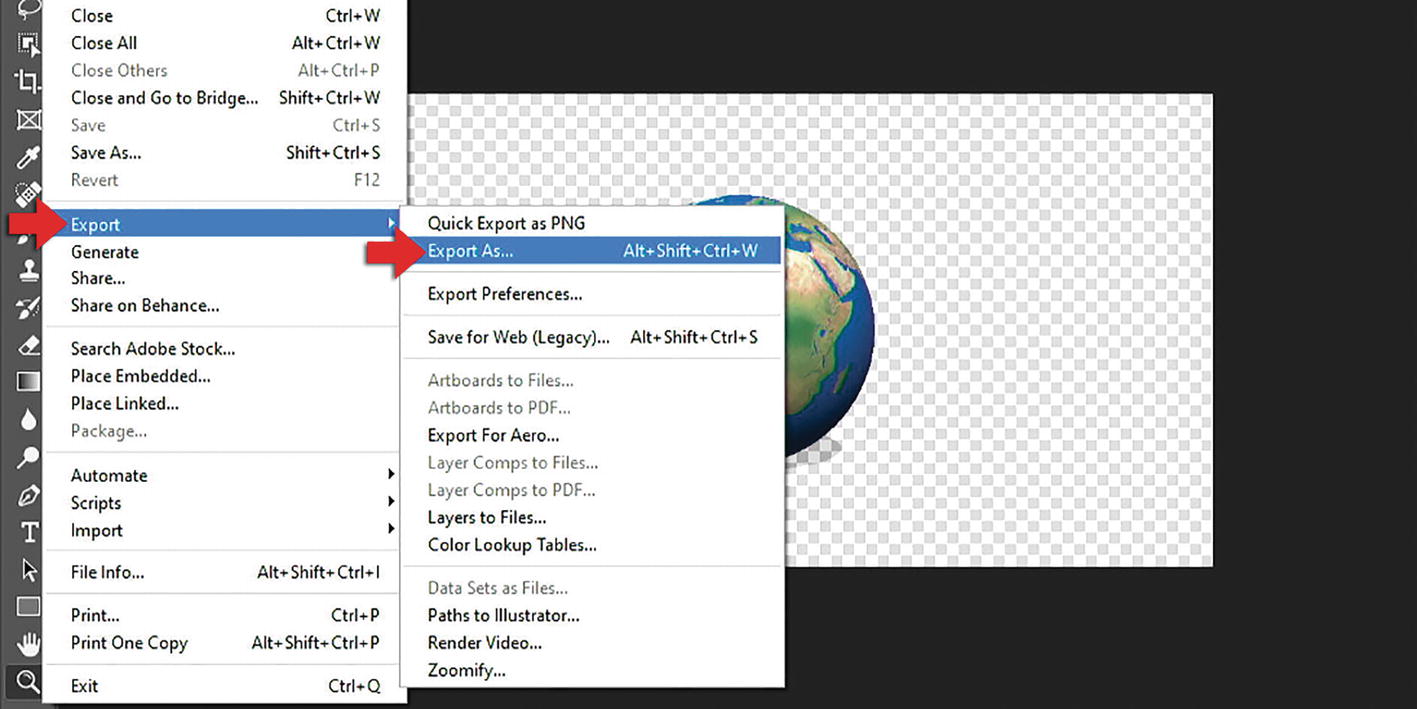
The menu pane on the left has the highlighted export option. On the submenu on the right, export as is highlighted.
In the export dialog box, set the format to PNG or JPEG, then set the size of the image.

A dialogue box has a p n g file selected on the left pane, and a preview pane is next to it. On the right is the file settings panel which includes the format, image size, and scale, among others, and below, the export button is selected.
For example, set the image size width to 1000px. The height should set automatically for you in order to prevent the image from being squashed.
Click “Export.”
In the “Save as” dialog box, navigate to the folder you want to export the file into. Enter a name for the file, then click “Save.”

A dialogue box has the highlighted pictures folder on the left panel. On the right are file thumbnails, entry boxes for the file name and save as type, and a highlighted save button.
Workspaces
A workspace is a preset screen layout that sets which panels and tools are displayed on your screen and how they are arranged. Workspaces are designed to help you customize Photoshop's interface for specific tasks, to give you the tools you need. For example, a photographer will use panels and tools for image editing or retouching. A graphic designer or artist would need brushes, pens, a type tool, and color. A workspace streamlines the interface for the task at hand, removing clutter and tools you don’t need to help you work more efficiently. This allows you to save the screen layout.
In this book we will be using the default workspace, but there are others such as web and graphics and photography, that reveal the panels and tools required to work on photographs and other graphics.
You can access and change the workspaces from the “Window” menu. Go down to “Workspace” and you’ll find them listed.

A window has an arrow pointed at the window tab on the menu bar on top. The menu panel below has the highlighted workspace option, and on the submenu next to it, essentials are selected.
If you have moved the panels or closed ones you don’t need, you can save the workspace. To do this, select “New workspace” from the slideout menu, then give it a name.
If you need to reset your workspace, perhaps some panels have vanished, you can do this using the “Reset workspace” option.
Cancelling a Subscription
Once you sign up with Adobe Creative Cloud to use Photoshop, you’ll be charged a monthly fee until cancelled, whether you use the application or not. So if you no longer want to use Photoshop, you’ll need to cancel the subscription.
Select “Manage plan” for the plan you want to cancel.

A page has plans selected on the left panel. On the right are the plans included in the package, billing and payment options, and the Manage plan button, among others.
Select Cancel your plan next to “End your service.”

A dialogue box has the following available actions, find a better plan, and end your service. On the right are buttons labelled, change your plan, and cancel your plan.
Indicate the reason for cancellation, and then select Continue.
Lab Exercises
- 1.
Download and install Photoshop on your machine if you haven’t already done so.
- 2.
Practice opening files from templates or files that have been previously saved.
- 3.
How do you save a file?
- 4.
When should you use “Save as”?
- 5.
When should you use “Export”?
- 6.
Name some image file formats.
Summary
Adobe Photoshop is an image manipulation application used for photo retouching, image creation, and graphic design and is developed by Adobe Inc. for Windows and macOS.
Available from Adobe.com
We learned how to open a new Photoshop file.
Use “Save as” to PSD for your master, high quality file you want to be able to edit later.
Use “Export as” to export files as PNG or JPEG for the web or other apps such as Word.
Use .PDF, .EPS, or .TIFF if saving files for commercial printing press.
A workspace is a preset screen layout that sets which panels and tools are displayed on your screen and how they are arranged.